
Chapter 8
Adding Media to Your Project
In This Chapter
![]() Importing audio and MIDI into your project
Importing audio and MIDI into your project
![]() Using Apple loops
Using Apple loops
![]() Navigating the Logic Pro browsers
Navigating the Logic Pro browsers
![]() Importing video to your project
Importing video to your project
What if you don’t play an instrument or sing? Are you destined to stare at an empty project? No way. Apple loops and prerecorded media come to the rescue.
Logic Pro X comes with an enormous amount of media that you can add to your project. You can build an entire song with nothing but this media. In this chapter, you learn how to use Apple loops, import audio and video files, and much more.
Adding Apple Loops to Your Project
Apple loops are audio and MIDI files that contain additional metadata, such as the key signature, time signature, and tempo. Logic Pro reads this metadata and adjusts the Apple loop to your project settings. For example, if you take an Apple loop in the key of G at 120 beats per minute and put it into a project in the key of E at 100 beats per minute, the Apple loop will automatically adjust to the project tempo and key. Apple loops are flexible. They do a lot of yoga when you’re not using them. It would be a shame for all that stretching to go to waste, so please use Apple loops.
Apple loops can be beats, instrument parts, sound effects, or anything that you want to repeat. You can build an entire project with only Apple loops, or you can use them as accents to live instruments. As limber as they are with time and key signatures, they’re equally able to fit into your project needs.
Navigating the loop browser
Logic Pro X gives you a special loop browser to search and find Apple loops, as shown in Figure 8-1. To open the loop browser, choose View⇒Show Apple Loops or press O. You can also open the loop browser by clicking the loop browser icon in the control bar. If you don’t see the loop browser icon, you can customize the control bar as described in Chapter 3.
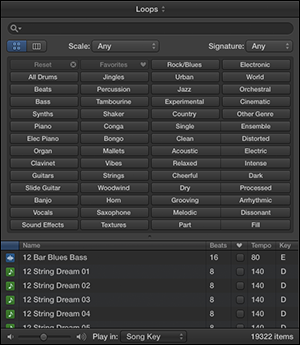
Figure 8-1: The Apple loop browser.
Here’s a description of the loop browser and its functions:
- Loops index drop-down menu: At the top of the loop browser is a drop-down menu where you can select different loop collections installed on your computer. To view only loops that you've created, choose the My Loops category. At the bottom of the menu, you can choose Reindex All Loops to rebuild the catalog. You may want to reindex your loops after you’ve added loops to your system.
- Search bar: You can search for loops by name with the search bar.
- View icons: Below the search bar are two view icons that let you switch between button view and column view. The button view is the default state that shows you clickable keyword buttons to refine your loop search. The column view lets you navigate through loops by category.
- Scale menu: You can filter your search by scale type, including Major, Minor, Neither, or Good for Both.
- Signature menu: You can filter your search by time signature.
- Keyword buttons: While in button view, you can click multiple keyword buttons to filter the search results. The top-left button is the Reset button, which clears all button choices. To the right of the Reset button is the Favorites button, which filters the search results to any loop that has been selected as a favorite.
- Category columns: While in column view, you filter the search results by navigating through categories of loops.
- Results list: This area displays the Apple loops. It has six columns: loop type, loop name, beats, favorites, tempo, and key. Loop types are divided into blue audio Apple loops and green MIDI Apple loops.
- Volume slider: Selecting a loop automatically plays it. The volume slider adjusts the loudness of the loop as you audition it.
- Play In menu: You can select the auditioned loop to play in the Song Key (the key of the current project), the Original Key (the key of the Apple loop), or a specific key.
- Count: The number of loops that fit your search criteria is displayed at the bottom right of the loop browser.
Adding audio loops
Audio loops are audio files and can be added to audio tracks. In the loop browser, you can spot an audio Apple loop by its blue icon containing a waveform. You can edit audio Apple loops just as you can a recorded audio region. To add an audio Apple loop to your project, do one of the following:
- Drag an audio Apple loop from the loop browser to an empty area of the tracks area or track list, as shown in Figure 8-2. An audio track will be created and the loop will be added to a region on the track.
- Drag an audio Apple loop from the loop browser to an existing audio track. The Apple loop will be added to the tracks area at the position where you drop the loop.
 You can’t drag an Apple loop to a software instrument track or an external MIDI track from the loop browser. Logic Pro is thoughtful enough to warn you if you try. After the loop is in the tracks area, however, you can drag an Apple loop region to a software instrument track or an external MIDI track but it will not play. So if you drag an Apple loop into your project and it’s not playing, make sure it’s on the right type of track.
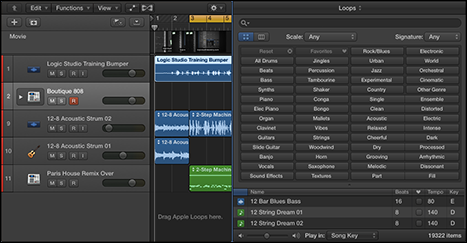
Figure 8-2: Drag Apple loops to the tracks area.
If you stretch an audio Apple Loop too far from its original key or tempo, your loop may end up with a pulled muscle. An audio Apple loop doesn’t always sound good when it's stretched too far, but it still makes a great placeholder until you can replace it.
Adding MIDI loops
MIDI loops can be added to software instrument tracks or external MIDI tracks. You can identify MIDI Apple loops by their green icon in the loop browser. To add MIDI Apple loops to your project, do one of the following:
- Drag a MIDI loop to an external MIDI track. A MIDI region is created on the track with the Apple loop contents.
- Drag a MIDI loop to a software instrument track or to an empty area of the tracks area or track list. A software instrument track is created, the corresponding software instrument is added to the track, and the loop is added to a MIDI region on the track.
 If you drag a MIDI Apple loop to an audio track, the loop will be converted to audio and added to the tracks area at the position where you drop the loop.
You can also create your own Apple loops from any audio or MIDI region in your project. To create your own Apple loops, Control-click any region and choose Export⇒Add to Loop Library (Shift-Control-O). The Add Region to Apple Loops Library window appears, as shown in Figure 8-3.
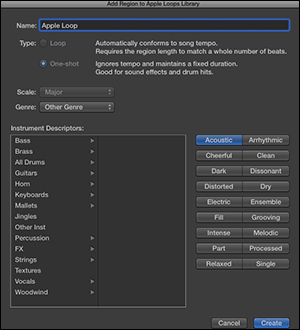
Figure 8-3: The Add Region to Apple Loops Library window.
You can create the following:
- Loop: A loop will follow the project tempo. Loops are great for regions you want to repeat again and again.
- One-shot: A one-shot will not follow the tempo and will play until the region completes. One-shots are great for sound effects or sounds that don’t have rhythmic content.
You can also choose the scale, genre, and instrument descriptors. Click the Create button and your Apple loop will be added to the loop browser.
Adding Prerecorded Audio to Your Project
If you have audio files on your hard drive that you want to bring into your project, Logic Pro makes the process a breeze. In most cases, adding audio files to your project is a simple drag-and-drop process from Finder or from one of the Logic Pro browsers to an empty audio track.
Using the browsers to find audio files
To open the Logic Pro browsers, choose View⇒Show Browsers or press F. The browsers open to the right of the tracks area, as shown in Figure 8-4.
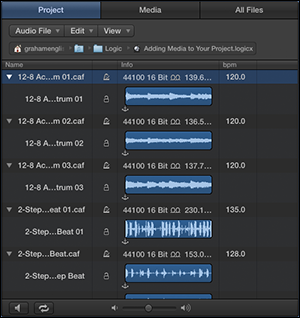
Figure 8-4: The project audio browser.
Logic Pro gives you three browsers for adding media to your project:
- Project audio browser: Add or remove files that are already in your project.
- Media browser: Import audio and video into your project from the system-wide media browser. You can also import GarageBand projects from the media browser.
- All files browser: Import files from anywhere on your hard drive as well as import settings from other Logic Pro projects. (For details, see Chapter 2.)
Show Advanced Tools must be enabled to view the project audio browser and all files browser. Choose Logic Pro X⇒Preferences⇒Advanced Tools, and select Show Advanced Tools.
Adding audio to your project
All the audio you record or import into your project will show up in the project audio browser. Click the Project tab in the browser window to see all the audio that’s been collected in your project (refer to Figure 8-4).
At the top of the project audio browser are three menus:
- Audio File: Add audio files from anywhere on your computer. You can delete, back up, and move files. You can also convert audio files to different formats or convert selected regions to independent audio files on this menu.
- Edit: Cut, copy, paste, and delete audio files. You can also select all, used, or unused files on this menu. The project browser has its own undo history, which you can access on this menu.
- View: Sort, show, hide, or group your audio files in the browser.
The file list has the following four columns:
- Name: Displays the file name with a disclosure triangle next to it. Click the disclosure triangle to display all the regions that use the audio file. Clicking a region will select the region in the tracks area. You can double-click the file and region name to rename them.
- Icon: Displays icons that tell you whether the file or region is time-stamped, follows the project tempo, contains tempo information, or is missing.
- Info: Displays sample rate, bit depth, input format, and file size. It also displays a waveform with an anchor icon. You can drag the icon to edit the absolute start time of the region. Click the center of the waveform to audition the audio file.
- bpm: Displays the tempo of the audio file if the file contains tempo information.
You can audition these files by clicking the play icon at the bottom left of the browser. Click the play icon again to stop. Click the loop icon to repeat the audio file after you click the play icon. A volume slider adjusts the volume of the audio file you’re auditioning.
You can drag the audio files and regions to existing audio tracks or to an empty area in the tracks area or track list, where a track will be created to contain the region.
Adding audio from the media browser
The second tab in the Browser window is the media browser. The media browser displays media created by other Mac applications such as iMovie, GarageBand, iTunes, or Logic Pro. If you want to import content from your iTunes library, which I do all the time to add reference tracks to my project, use the media browser.
At the top of the media browser are the following two tabs:
- Audio: Import songs from your iTunes library and GarageBand projects.
- Movies: Import movies from your Movies folder, iMovie projects, and Final Cut Pro projects.
Below the tabs are the media libraries available on your computer. Selecting a library updates the results list at the bottom of the browser, as shown in Figure 8-5. At the bottom of the window are a play icon and a search field to find and audition your media.
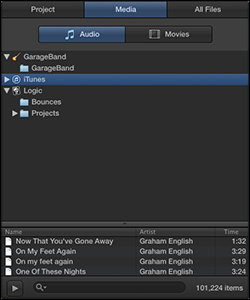
Figure 8-5: The media browser.
To add media from the media browser, drag the media to an existing audio track or to an empty area in the tracks area or track list, where a track will be created to contain the region.
Adding audio from the all files browser
The third tab in the browser window is the all files browser. If you want to add audio, MIDI, or movies from your computer, you would do it from this browser, as shown in Figure 8-6. The all files browser is like the Finder app.
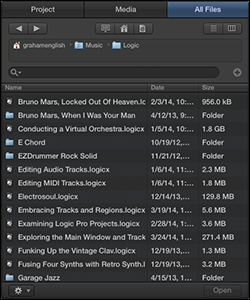
Figure 8-6: The all files browser.
Here’s a description of the elements in the all files browser:
- Back and forward icons: Use these icons to navigate backward or forward, respectively, in your browsing history.
- Computer, home, and projects icons: These three icons will take you to your Macintosh HD, user home directory, or Logic Pro projects directory, respectively.
- List and column view icons: These icons display your files in list view or column view, respectively.
- File path selector: The file path is displayed in this area and is clickable so that you can navigate up the file hierarchy.
- Search field: Use the search field to find files in your current folder. The plus icon to the right of the search field allows you to add up to 10 search filters.
- Results list: Your current search results are displayed in this area. You can sort the three columns — Name, Date, and Size — by clicking the column headers.
- Action menu: The gear icon has some actions that you can apply to the currently selected item in the results list. You can add audio files to the project audio browser, find the selected file in Finder, create new files, and convert ReCycle files to Apple loops. Depending on the file type selected, you can also audition the audio.
After you’ve located the file you want to add to your project, you can drag it into the project just like the other browsers. You can also import project settings from the all files browser, as described in Chapter 2.
Importing Video to Your Project
Logic Pro X isn’t just an audio/MIDI sequencer. You can also import video and add your own movie score. Film and TV scoring with Logic Pro X is intuitive, and you’ll find that adding movies to your project is simple.
Adding a movie to your project
As you discovered previously in the chapter, you can add QuickTime movies to your project by using any of the media browsers. You can also add a movie by choosing File⇒Movie⇒Open Movie (Option-![]() -O). Navigate to the movie file in the dialog that appears and click Open. The Open Movie dialog asks you to open the movie; if the movie contains an audio track, you can extract the audio track into your project, as shown in Figure 8-7. Click OK and the movie is added to your project and the audio is added to the track list.
-O). Navigate to the movie file in the dialog that appears and click Open. The Open Movie dialog asks you to open the movie; if the movie contains an audio track, you can extract the audio track into your project, as shown in Figure 8-7. Click OK and the movie is added to your project and the audio is added to the track list.
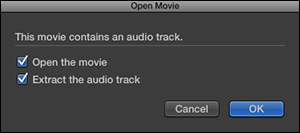
Figure 8-7: The Open Movie dialog.
Display the inspector, and the movie appears at the top of the inspector, as shown in Figure 8-8. You can double-click the movie to open the video in a separate window.
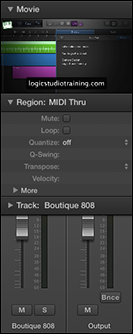
Figure 8-8: The movie inspector.
Exploring the movie track
After you add a movie to your project, you can display the movie track. Choose Track⇒Global Track⇒Show Global Tracks, and the global tracks open above the tracks area. (If the movie track isn’t visible, choose Track⇒Global Track⇒Configure Global Tracks, select the Movie check box, and click Done.) The movie track displays thumbnails of the video and is adjustable by dragging the bottom edge of the movie track, as shown in Figure 8-9.
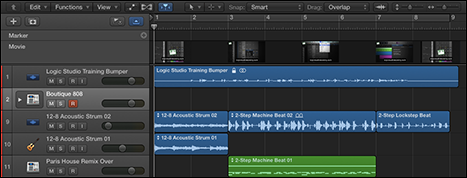
Figure 8-9: The global tracks movie track.
Creating movie scene markers
You can create movie scene markers that are locked to absolute time instead of relative time. This means they won’t move if you change the tempo of your project. Movie scene markers are great for timing your music to the rhythm of the scene. To create movie scene markers, choose Navigate⇒Other⇒Create Movie Scene Markers and select one of the following options:
- Auto Range: Create markers based on the marquee selection, project cycle, selected regions, or all three.
- Marquee Selection: Create markers based on the marquee selection.
- Cycle Area: Create markers based on the cycle area.
- Selected Regions: Create markers based on the selected regions.
- Entire Movie: Create markers based on the entire movie.
After you select the option for creating movie scene markers, the movie will be analyzed and markers will be created, as shown in Figure 8-10. Markers are created based on a fixed threshold for scene cuts and work well for most types of video.

Figure 8-10: Movie scene markers.
Importing audio from your movie
If you’ve already imported a movie but not the audio, or if you want to import audio from a movie without importing the movie, choose File⇒Movie⇒Import Audio from Movie. The audio will be added to a track in the track list. Importing audio is useful if you need to build a soundtrack around dialog or sound effects.
As you’ve learned in this chapter, you don’t need to play an instrument to benefit from Logic Pro. You discovered how to import movies so you can compose your own soundtracks. You also found out how to navigate the Logic Pro browsers so you can build a project from prerecorded media. As you can see, Logic Pro can support professional demands, which is why so many musicians rely on it to get great results.