
Chapter 18
Mastering Your Final Track
In This Chapter
![]() Enhancing the mix with EQ
Enhancing the mix with EQ
![]() Controlling dynamics with compression
Controlling dynamics with compression
![]() Reaching competitive loudness with limiting
Reaching competitive loudness with limiting
![]() Using audio references to improve your mix
Using audio references to improve your mix
After a track has been mixed, a mastering stage puts the final polish on the track. The level is matched to reference levels, and if needed, EQ and dynamics processing is applied. In the case of an album project, the mastering stage can include making global refinements and song sequencing and cataloging.
For professional situations, the best practice is to hire someone to master your track. Someone with a fresh set of ears and nothing but the best equipment can raise the level of your mix and turn it into a golden master. Sometimes, just sending a signal through a high-end compressor or EQ can improve the sound. Other times, a mastering engineer will need to adjust the sound to compensate for a poorly tuned room. If the project warrants it, let go and let your work be improved.
However, not all projects need outside mastering. Sometimes it’s not practical to pay for a mastering service. You might be under a deadline that forces you to do it yourself, or you might want to avoid extra expenses when the project budget is low. Logic Pro gives you the tools you need to master your own music. You can even be the fresh set of ears that masters someone else’s mix.
In this chapter, you discover how to enhance your mix, boost the volume to competitive levels, and support your mastering choices with reference audio.
Fine-Tuning EQ
Ask mastering engineers if they put EQ before or after compression and they’ll tell you that it depends, leaving you more confused than before. I think it’s safe to say that both alternatives can work just fine. If you’re making only subtle changes, the EQ and compressor shouldn’t affect each other too much. If your EQ is inserted before the compressor and you make extreme EQ changes, the compressor behavior can be affected. In that case, you might want to put the EQ after the compressor. Sometimes, cutting unwanted frequencies before the compressor can help you do a better job of compressing. Beginners should put the EQ before the compressor when they master their track, and keep the changes subtle.
 Your mastering effects chain is commonly used on the stereo output channel strip. That way, all the audio in your project will be affected by the plug-ins. If you’ve imported multiple audio tracks into your project for mastering, as in the case of an entire album, you may want separate control over each track’s mastering effects chain. In this case, you would put the effects on the individual track’s channel strip, not the stereo output. More details are given in the “Matching levels to other recorded material” section, later in the chapter.
Using Linear Phase EQ
Linear Phase EQ, shown in Figure 18-1, has the same controls as Channel EQ, which is described in Chapter 16. Linear Phase EQ works best in mastering situations because it keeps the stereo audio in phase even under extreme levels of gain, which requires more processing power. Linear Phase EQ doesn’t work well on single tracks because it introduces latency that can affect the timing of the signal relative to the other tracks. The higher processing and latency makes this EQ ideal for mastering single stereo tracks.
Linear Phase EQ shares settings with Channel EQ. You can switch between the two plug-ins and they will retain the current settings.
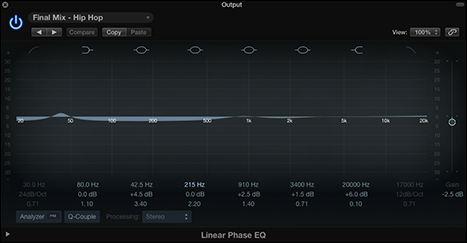
Figure 18-1: The Linear Phase EQ plug-in.
Matching a reference mix with Match EQ
Match EQ (described in Chapter 16) is a great tool to help you get a specific sound. You can manipulate your audio only so far after your mix is completed, but the mastering phase is a great time to analyze the frequency content of your mix and compare it to a reference mix. You can even adjust your mix to capture more frequencies similar to the reference mix. To analyze a reference audio file using Match EQ, follow these steps:
- Drag the reference audio file onto the Template Learn button.
The audio is analyzed and a frequency curve is added to the graphic display, as shown in Figure 18-2.
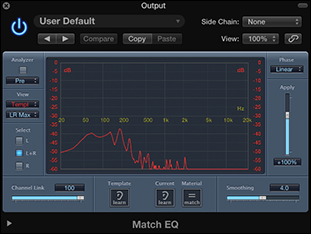
Figure 18-2: The Match EQ plug-in.
- Drag the current audio file that’s being mastered onto the Current Learn button.
The audio is analyzed, and a frequency curve is added to the graphic display.
- Click the Material Match button to apply a match EQ curve to the audio.
- Drag the Apply slider to adjust the level of the match EQ.
Don’t expect miracles with Match EQ. I’ve heard it produce amazing and horrible results. At the very least, the graphic display will enlighten you to the difference in EQ between the audio you’re mastering and the reference audio.
Adding Multiband Compression
Multiband compression allows you to separate frequency bands and compress them independently. (For the details on compression, see Chapter 16.) Logic Pro comes with a plug-in called Multipressor, shown in Figure 18-3, which can compress up to four different frequency bands.
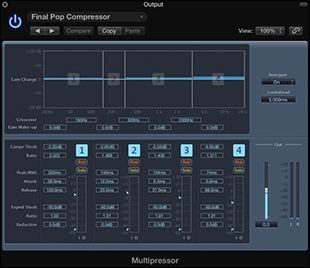
Figure 18-3: The Multipressor plug-in.
Multiband compression can produce subtle or extreme results. Your main goal is to raise the overall level without negatively affecting the balance of the mix. You also want the volume level to match the music in your marketplace. Multipressor has many presets that will help you achieve these goals.
Using Multipressor
You can insert Multipressor on a channel strip by clicking an effects slot and choosing Dynamics⇒Multipressor. Many of its parameters are similar to the Compressor plug-in described in Chapter 16. Here’s a description of the parameters that are unique to the Multipressor plug-in:
- Gain Change: Drag the horizontal bars in the graphic display up or down to raise or lower, respectively, the gain of that particular frequency band. You can adjust the gain also by using the Gain Make-Up fields. You raise the gain after a signal has been compressed because, as you reduce the level of the peaks via compression, you can raise the overall level to get the signal louder.
- Crossover: Drag the vertical lines in the graphic display left or right to lower or raise, respectively, the crossover frequency. You can also enter values directly in the crossover fields. It might be easier to start out with fewer bands in the beginning. You can add and remove frequency bands by clicking their number button above each level meter.
- Expand Threshold, Ratio, and Reduction: Multipressor has a built-in expander, which helps you keep some of the dynamics you may be losing due to compression. The gain of the signal below the expander threshold is reduced based on the ratio. The expander essentially takes the quiet signals and makes them quieter.
- Band Bypass and Solo: Click the bypass and solo buttons above each band’s level meter to hear exactly how the compressor is affecting the frequency band. These buttons are excellent ear-training tools. Soloing and bypassing bands helps you identify where instruments have the most and the least frequency energy.
Avoiding a squashed mix
Dynamic mixes need transients. The crack of a snare and the pluck of a string have sharp and fast attacks with fast decays. If you lower the attack and raise the decay, you’ve compressed the signal. Compressors have the potential to remove all the transients and squash the sound, making it weak and muffled. To preserve the transients, aim for subtle compression during mastering.
Turn It Up
It’s easy to get seduced into thinking that louder is better. But there’s clearly a limit to the loudness that digital audio can reproduce. So how loud is too loud? A trained ear listens for distortion, the loss of transients and dynamics, and unfavorable effects to the balance. Just remember that your goal isn’t to get your track louder than everyone else’s; it’s to get it within the competitive range of your marketplace.
The kind of audio material you’re mastering will dictate your loudness needs. A track that’s being delivered and sold on iTunes should match other tracks in the genre. A track that’s being delivered to a film or TV music supervisor for background purposes can withstand lower levels and less compression because its job is to not compete with the foreground audio. In this section, you discover how to maximize and match the level to an ideal reference source.
Using Adaptive Limiter for maximum loudness
The last effects plug-in to put in your mastering signal chain is Logic Pro’s Adaptive Limiter, shown in Figure 18-4. It can raise the overall level of a song and add an analog-sounding saturation to your mix. If your mix is already dirty with lots of distorted instruments, you might go easy on adding any more distortion. But if your mix is relatively clean, a little bit of distortion can excite the mix while smoothing the edges.
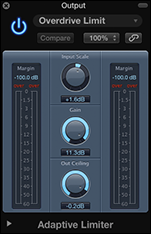
Figure 18-4: The Adaptive Limiter plug-in.
Adaptive Limiter is located on the Compressor menu of the effects slot. Here’s a description of the Adaptive Limiter controls:
- Margin: The Margin field above the meters shows you the highest peaks of the signal.
- Input Scale: Rotate the Input Scale knob to scale the input signal. You can raise the level of quiet signals or lower the level of loud signals with this knob. Higher levels can add an analog-sounding distortion that often sounds pleasing to the ear. But be careful not to clip the input because digital distortion, unlike analog distortion, isn’t a pleasing sound.
- Gain: Use the Gain knob to get your signal the rest of the way to your target level.
- Out Ceiling: Set your target level with the Out Ceiling knob. For popular music, this level is often just below 0 dBFS, for example, -0.02 dBFS.
Matching levels to other recorded material
To gauge whether you’re getting the final level in the same ballpark as your marketplace, it’s a good idea to import a reference mix into your project and compare it with your mastered track. (You learn how to import media into your project in Chapter 8.) It’s a good idea to keep a playlist of mixes that you know and love for reference as you work. If you’re working for a client, ask them to provide reference tracks so you can do a better job of achieving the client’s vision for the project.
If you’ve been putting your mastering effects on the stereo output, all the audio you import will be affected by the plug-ins. You can solve this in the following ways:
- Move the plug-ins on your output to the channel strip of the track you’re mastering.
- Move the plug-ins on your output to an auxiliary channel strip, and then route the output of your track to the auxiliary channel strip, as you learn in Chapter 16.
After you’ve moved your mastering plug-ins from the output, here’s how to A/B between your track and the reference track:
- Mute the reference track.
You only hear your mastered track while the reference track is muted.
- Option-click either track’s solo icon to A/B between the two tracks.
Option-clicking the solo icon turns solo off on all other tracks, allowing you to hear only one track at a time.
You can use your ears to judge whether the volume levels of your track and the reference track match, or you can measure with an SPL meter. If you’ve calibrated your listening position with an SPL meter, as you learn in Chapter 16, your ear should be a good judge of the levels between the two tracks. Having a meter on hand will help you build confidence in your ability to judge volume.