
Chapter 16
Mixing Your Project
In This Chapter
![]() Understanding the fundamentals of mixing
Understanding the fundamentals of mixing
![]() Setting levels and measuring volume
Setting levels and measuring volume
![]() Using channel strips in the mixer
Using channel strips in the mixer
![]() Applying effects and elevating your sound
Applying effects and elevating your sound
Mixing is so much fun that a lot of Logic Pro users begin mixing before they begin writing a song. So many cool effects and faders and knobs are available to entertain us. The excitement keeps Logic Pro users hooked and coming back for more. Mixing is taking all your parts, blending them, and delivering the result to your audience in a cohesive whole. Ultimately, mixing is all about controlling and directing the experience of the music.
In this chapter, you discover the fundamental concepts of mixing audio to create an experience. You learn the best practices for setting levels and measuring volume, taking guesswork out of balancing your tracks. You find out how to overcome the most common challenges of mixing and how to produce professional sounding audio.
 If you’re a laptop artist and you write, arrange, edit, and mix your project as you go, hold your mix loosely until you’ve settled on the rest. You’re going to discover cool sounds by design and by accident, and you should save them as patches so you can come back to them later. However, you might want to start mixing from scratch after you’ve settled on all your parts. Sometimes a clean slate is faster to mix than a full plate.
Understanding Important Mixing Concepts
Audio engineering confuses a lot of beginners. It’s part art and part science. When you understand the core concepts, you can get good mixing results without years of trial and error. In this section, I show you the nine fundamentals of mixing audio. If you visit http://logicstudiotraining.com/lpxfordummies, you can download a video guide in which I demonstrate these core concepts visually.
Mindset
The mixing head game can keep beginners from producing quality mixes. What should you focus on? How can you take all your tracks and make them sound good? I believe that if you focus your mind in the right direction, your mix will come together and satisfy your artistic needs and the needs of your listener.
When you’re mixing a project, the first thing to consider is your audience. Decide the people for whom you’re producing this project as well as the final listeners. Music is a subjective art, and many beginners make the mistake of trying to please the wrong people. If you’re working for a client, please the client and the client’s audience. Here are some questions to ask yourself and your client:
- What other music does the audience listen to? If you know the musical interests of your listeners, you’ll have a target sound that you can emulate or complement. Gather a reference list of music that engages your listeners and make notes on how you can achieve a similar or complementary sound.
- Does the project have a specific concept? Many music projects need to achieve a specific vibe or concept. If you need to go after an emotion or a distinct sound, knowing the concept will help you set the criteria for success. If more than one person is working on the project, having a specific concept also helps you work together and avoid disagreements.
- Does the project have boundaries or limitations? For example, a commercial jingle might require exactly 30 seconds of music. A band might have only four pieces with one singer. The project could have a solid deadline. These boundaries keep you from experimenting too far and help you to sharpen your focus.
Your first goal is to take the raw tracks and make them sound adequate. After you’ve achieved a tolerable mix, you can work on elevating it until it sounds really good. Your final step is to stabilize the mix until it sounds polished and professional. But remember that you will never think it’s perfect, and that’s okay!
Acoustics
The biggest challenge to achieving a stable and professional mix is the acoustics of your listening environment, including the gear you use and the room where you listen. A pair of quality monitors with an even frequency response is important. The room that you listen in can potentially add or subtract frequencies and give you an inaccurate picture of the sound. Here are some suggestions for making the most of your gear and listening environment:
- Measure your room and calculate the room modes. Search online for a room mode calculator to do the math for you. You’re looking for areas in the frequency spectrum where your room creates buildups of frequencies or gaps in frequencies. This knowledge can help you adjust for the room’s limitations.
- Position your speakers and listening position in an equilateral triangle. Find the sweet spot where your ears are equally distant between the two speakers, as shown in Figure 16-1. Also consider placing your speakers away from walls. Having speakers too close to the back wall of your room can create a boomy sound.
- Consider treating your room with absorptive and diffusive material. Acoustic foam placed strategically throughout your room can help absorb and diffuse reflections of sound against the walls and give you a much clearer picture of what you’re hearing. Furniture and heavy curtains also help break up audio reflections.
- Listen in multiple locations through multiple audio systems. If you want to get a clear picture of what other listeners will hear, play your mix through common consumer systems in addition to your optimized system and location. iPod earbuds, laptop speakers, and car stereos are some of the most common audio systems that listeners use. Michael Brauer, the engineer for artists such as Coldplay and John Mayer, is famous for doing a big chunk of his mixing on a 90s Sony boombox.

Figure 16-1: Ideal speaker placement and listening position.
You don’t have to spend thousands of dollars or hire acoustic specialists to significantly improve your acoustics. Spending an hour or two optimizing your room and listening position and calculating room modes will give you a practical advantage as you mix your music.
Balance
With your new mixing mindset and optimized acoustics, you’re ready to begin the technical part of mixing. The first step is to adjust the relative levels of your tracks to get an appropriate balance. Different genres of music have different approaches to balance, and it helps to study the genre of music you’re mixing to get a feel for the approach. But a general rule is that one track should have the ultimate focus at a time. Soloists and lead vocals are generally more prominent than the rest of the tracks.
A critical component to balance is loudness. Here’s what you need to remember about loudness: The human ear doesn’t hear all frequencies equally. The ear is more sensitive to frequencies centered around the human voice and less sensitive to lower and higher frequencies. That means if you’re listening to music quietly, the vocals are going to stick out more than the bass guitar or high strings. To compensate for the loudness contour of the human ear, you have to monitor music at a level where the frequencies become more equal.
The film industry has been calibrating the monitoring level to 83 dB SPL for decades because it produces a consistent product and allows audio engineers to create balances that account for the loudness contour of the human ear. Best of all, with today’s technology, it’s easy to calibrate your own monitoring level and make mixing even easier. Here’s how to calibrate your monitoring level:
- Get a sound-level meter.
You can find inexpensive sound-level meters online or at electronics stores. If you have an iPhone or iPad, you can find many free or paid sound-level meters in the app store.
- Set your sound-level meter to a C-weighted, slow response.
I use my iPhone and the AudioTools app by Studio Six Digital.
- Hold or place your sound-level meter where your head would be at your listening position.
I like to use a music stand to hold my iPhone while I do the next step.
- Play a reference CD or your Logic Pro project, and adjust the monitor gain until the sound level meter reads 83 dB.
To adjust your monitor gain, use the master volume knob on your audio interface or amplifier, not the volume of the playback application.
- Mark your monitor gain so you can recall this position.
After you’ve calibrated the monitoring level of your listening position to 83 dB, you’ll have a much easier time getting balances. You don’t have to always listen at this level, but whenever you are adjusting the volume of individual tracks, set your monitor gain to the calibrated position.
Panning
Everyone in the music business knows that, for better or worse, the world revolves around lead singers. But in the mix, the world revolves around drummers. The drums and drum machines are giant instruments that take up the low end, the high end, and all the other ends. When it comes to the stereo spectrum, the drums also take up the left side, right side, and center. One of the first questions you ask yourself regarding the panning of your mix is, are the drums in drummer perspective or audience perspective?
Putting your drums in audience perspective is the most common technique. You, as the mixer, take the perspective of the audience and pan the drums as you would see them on stage. Kick and snare go in the center, hi-hat goes a little to the right, toms are panned right to left from hi to low, and cymbals are spread just as you see them in the Drum Kit instrument, shown in Figure 16-2. Drummer perspective is the reverse of audience perspective and a valid option. You can spread the drums wide or keep them closer to mono. What you do with drums often helps you with the rest of the mix.
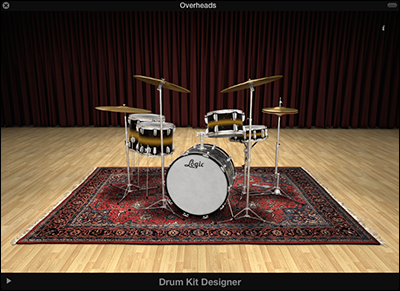
Figure 16-2: Drum Kit in audience perspective.
What if you don’t have drums in your mix? Panning is still often associated with the natural acoustic setup of the instruments. An orchestra is panned as you see it on the stage. Electronic dance music treats panning similarly to other pop music, except without extreme panning, which doesn’t translate well in a club.
After you’ve decided on the mix perspective, create clarity and balance from left to right with an equal distribution of rhythmic and frequency activity. Aim for no gaping holes between nine and three o’clock on your pan knobs. You learn exactly how to adjust the pan balance later in the chapter.
Frequency
Panning covers left and right, balance covers front to back, and frequency covers the high and low dimensions of the mix. You don’t need to balance each frequency range by making sure they’re all equally as loud. Instead, you need to make them present in a way that best represents your vision and the marketplace. Hip-hop must have low end. Pop needs to translate to average systems. Jazz must sound natural, and classical must sound transparent.
If you record your project well, you might not need to use a lot of EQ. Extreme EQ can disturb your balance because you’re raising or lowering the volume level of frequencies. It’s probably best for beginning mixers to go easy on the EQ and stay subtle. But you will need to use some EQ, and these frequency ranges are generally accepted:
- Low end: 20–250 Hz
- Lower midrange: 250–1000 Hz
- Upper midrange: 1–8 kHz
- High end: 8–20 kHz
The biggest challenge for beginning mixers is getting the low end right. Boosting anything between 20–60 Hz can easily overpower a mix. The low end workflow I’m about to give you has saved my bass from trouble on many occasions. If the low end is too thick or unclear, mute things that should be in the low end (kick drum, bass guitar, low strings, and so on) and listen for what’s left in the mix. If you still hear bass, EQ it out, as you’ll learn later in this chapter. Some big culprits to listen for are acoustic guitar, piano, synths, low percussion, and electric guitar.
Depth
Another dimension you can add to your mix is depth, near and far. The difference between balance and depth is that while a lead vocal can be up front in the mix (balance) it can include an element of depth through the use of reverb or echo, making it also seem far away. If you want sounds to be intimate, leave them dry (without effects). If you want sounds to seem larger than life, add depth.
Your main tools for creating depth in the mix are reverb and delay. Reverb is an effect that simulates the reflections of sound bouncing in an enclosed space. Delay is an effect that takes the original signal and delays it before playing it back again. Sometimes, delay is used in place of reverb because it gives the impression of space without taking up as much space as reverb. Both effects are commonly used together in a mix.
The brain can perceive approximately two or three levels of depth at a time. That means you need only a couple of reverbs or delays in your mix.
Effects
Playing with effects is a lot of fun. Just ask a guitar player to use only one effects pedal, and you’ll get a look that wonders why you’re such a buzz kill. Effects add character to your sound and help instruments create their own sonic space. You’ll consistently use the following three major families of effects in your mixing:
- Modulation effects: Chorus uses multiple delays for thickness and richness. Phasers use a narrow-band EQ cut that’s swept back and forth through the frequency spectrum. Flangers create washy phase cancellations throughout the frequency spectrum. Tremolo and vibrato vary volume and pitch, respectively.
- Distortion: Distortion effects include tube distortion, tape distortion, distortion effect pedals, hard clipping, soft clipping, transformer clipping, noise, record pops and scratches, and speaker distortion.
- Filters: Filtering effects include band-pass filters, filter sweeps, envelope filters, and wah wahs.
Dynamics
How would you like it if everyone yelled at you all the time? Or what if they constantly whispered? We need contrast to feel the effect of loudness and softness. Dynamics are integral to keeping your listener interested and engaged.
Changes in volume are the key to dynamics. Here are three ways you can provide dynamics in your mix:
- Peaks and valleys: Your overall mix should have changes in volume. Some genres of music, such as classical and jazz, tolerate more dynamics than others, such as pop or rock. Popular music is often listened to in settings where the need for dynamics is lower, such as in the background of clubs and parties, while classical and jazz are listened to in more intimate settings where music is the focus. At the very least, identify the climaxes of the music, and design those areas to be the loudest part of your mix, regardless of the genre.
- Compression: Compressor effects are used for effect or to control the dynamics of instruments, groups of instruments, or the entire mix. You discover many types of dynamic control later in this chapter.
- Envelopes: You find out about ADSR envelopes (attack, decay, sustain, and release) in Chapter 11. Envelopes, like compressors, control the dynamics of individual sounds. They’re useful at bringing out dynamics at a micro level. Synths and samplers have built-in envelopes, but you can also add envelope effects to other instruments, as you learn later in this chapter in the “Using other dynamics tools” section.
Interest
The final mixing fundamental is interest. All these fundamentals work together, but you could define a workflow around the order in which I’ve presented them. Set your mindset before you do anything. Set up your acoustics before you set your balances, and so on. Some fundamentals blend together more than the others. For example, adjusting your panning helps to set your balances, and your effects and dynamics help your mix sound interesting.
I leave this discussion with three final elements to elevate your mix into something that sounds interesting and keeps your listener’s attention:
- Focus: Find the main point of interest and focus on it. It could be a lead vocal, a solo, or a riff. Give the listener something interesting to focus on at all times.
- Uniqueness: Find a unique element and make it stand out. If you can’t find a unique element, find a way to make an ordinary element sound unique.
- Automation: Use automation to add dynamics, mutes, panning, and effects, all which lead to creating interest. You learn about automation in Chapter 17.
Knowing Your Channel Strip Types
You use channel strips to shape your sound and control the signal flow. You have control over the volume, pan, effects, and where the sound is coming from and where it’s going. Similar to track types, which you learn about in Chapter 4, different channel strips do different things. Some channel strip types are automatically added to your project while others you can add for specific purposes.
In this section, you learn about the five different channel strips, which are shown in Figure 16-3, and what they do.
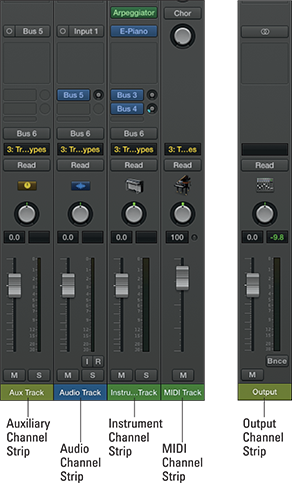
Figure 16-3: The channel strips in Logic Pro.
 Show Advanced Tools must be selected in the Advanced Preferences pane to take full advantage of the mixer and all the information in this chapter. Choose Logic Pro X⇒Preferences⇒Advanced Tools, and then select Show Advanced Tools.
Audio channel strips
You use audio channel strips (refer to Figure 16-3) for audio tracks. When you create an audio track, an audio channel strip is automatically added to the mixer in your project. Everything you record live, such as guitars or vocals, uses an audio channel strip. Imported and bounced audio also use an audio channel strip.
Instrument channel strips
Software instrument tracks use instrument channel strips (refer to Figure 16-3). Instrument channel strips are similar to audio channel strips except that they use MIDI as the source material instead of audio. Instrument channel strips also allow you to add MIDI effects, which you learn about in the “Adding Effects to Tracks” section.
MIDI channel strips
MIDI channel strips (refer to Figure 16-3) are used to control your external MIDI gear. You can’t add audio or MIDI effects to these channel strips, and you can’t route audio or save channel strip settings. You can, however, control track automation, mute the track, and send general MIDI settings to the connected instrument, such as volume, pan, and other controller data.
Auxiliary channel strips
Auxiliary channel strips (labeled in Figure 16-3) are used mainly for routing the audio of other track types. You can use auxiliary channel strips as submixes and add effects as a whole. For example, all the tracks in a summing track stack (described in Chapter 4) send their audio outputs to a collective auxiliary channel strip. You can also send a portion of a track’s signal to an auxiliary channel strip via an effects send to blend reverbs, delays, or other effects with the track’s signal.
Output channel strips
All audio is routed through a default output channel strip (refer to the rightmost strip in Figure 16-3) before it goes to your master output. You can add effects to the output channel strip that will affect the entire mix, such as dynamics compression and EQ. If your hardware supports it, you can add additional outputs and assign tracks or submixes to them for outboard processing or additional monitor mixes.
The inspector has two channel strips, as shown in Figure 16-4. The channel strip on the left shows the selected track’s channel strip. The channel strip on the right is dynamic and, by default, shows the output of the channel strip on the left. If the selected track has a send effect, you can click the send slot and the second channel strip is updated to show the auxiliary channel strip being used to host the send effects. This feature is useful if you’re mixing a track and you also want to adjust the sound of the send effects it’s using.
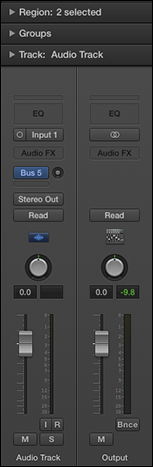
Figure 16-4: The inspector channel strips.
Using Meters to Visualize Volume and Levels
Loudness. We’re kidding ourselves that we can perceive it objectively. Music often sounds instantly better when it gets louder. But you can only turn it up so much before you see diminishing returns (or blow up your speakers). If you don’t stage your volume levels with the big picture in mind, you can easily run into a situation where you’re constantly seeing red lights at the top of your meters and pulling down faders and readjusting the balance of your mix. In this section, you discover how to use your meters so you don’t trick yourself into thinking that louder is better.
If you calibrate your monitoring level as I described previously, in the “Frequency” section, you’ll have a much easier time perceiving loudness and you won’t need to rely on your meters to tell you how loud the music is.
Your ears are the number-one meter of quality. A little bit of ear training can go a long way in polishing your perception of sound. A close second to your ears are the meters on your channel strips. I’d like to give you one rule for setting the levels on your meters: Peak no higher than between –12 and –6 dBFS on your output channel strip. All the tracks that sum together will need to be even lower, probably between –18 and –12 dBFS. You will have plenty of opportunity to get your overall mix louder as you go through the mastering process in Chapter 18.
I have an hour-long video about ear training with Logic Pro X that I am happy to share with you. Just visit http://logicstudiotraining.com/lpxfordummies.
Understanding clipping
The meters in Logic Pro are measured in dBFS, which stands for decibel full scale. 0 dBFS is the top limit and anything above that is digital clipping. Digital clipping means that the signal has gone beyond maximum capacity. The result is distortion in the audio, and not the good kind of distortion that rock guitar players know and love. Digital distortion is an unpleasant sound that you should avoid.
When digital audio came along, 16 bits was the maximum resolution. 16-bit audio accounted for about 96 dB of recordable space, and it was deemed important to record and mix as close to 0 dBFS as possible to keep noise low and use the full digital resolution. Logic Pro is capable of 24-bit recording, so you can record better signals at much lower levels and regain the headroom that was a major benefit of analog mixes. In fact, you’d have to lower your mix by 48 dB to equal a 16-bit recording.
Lowering your mixing levels gives you more headroom and makes mixing easier because you’re not always fighting red lights (digital clipping) and having to readjust your balances. Lower mixing levels also makes it easier to work with third-party effects plug-ins or outboard analog gear and to raise the final level at the mastering stage.
Choosing pre-fader or post-fader metering
Audio professionals have a common complaint with Logic Pro’s meters: They default to post-fader. In post-fader metering, the position of the fader affects the level of the meters. With post-fader metering enabled, the meters will show no level if your channel strip fader is all the way down. Post-fader metering offers visual assistance when you’re using a “mix with your eyes” approach. You can see the track level with your eyes on the meter based on the location of your fader. That’s not a bad thing, but it’s definitely not the whole picture.
Switching to pre-fader metering shows you the level of the signal regardless of the fader’s location. Pre-fader metering allows you to see whether a track is clipping, even when your fader has pulled the level all the way down. You’d be surprised how many software instrument presets clip right from the start. You need to know exactly what signal level is hitting the channel so you can make the appropriate decisions when it comes to adding effects such as compression or EQ.
On analog mixing consoles, many engineers will set the faders to unity gain (the default position) and quickly get track levels stable by using a trim control. You can do something similar by putting Logic Pro’s Gain plug-in in the first insert effects slot, setting the basic rough level with the plug-in, and using the channel strip fader to fine-tune the level. You probably won’t need to add the Gain plug-in to every track, but it can help if a recorded track is too loud. You learn how to add insert effects later, in the “Adding audio and MIDI insert effects” section.
Another complaint is that peak level meters, the type Logic Pro and most digital audio workstations use, have almost nothing to do with loudness. For example, two takes from a drummer can sound equally as loud, but one take can peak 4–10 dB higher on a single snare hit. If you raise the other take so that they both peak at the same level, one will sound much louder, maybe even twice as loud. To judge loudness, the ear responds to average levels and not peak levels. Peak meters are great when you need to be concerned with clipping (well, you’re always concerned with that), but they don’t help you perceive loudness very well. For that reason, professionals often work with VU (volume units) meters, which more closely respond like an ear.
Logic Pro doesn’t come with VU metering, so learning to use pre-fader metering will help. Consider searching for a free VU meter plug-in or purchasing one. You can mix without VU meters, but the job is easier with them. To switch to pre-fader metering, follow these steps:
- Control-click an empty area of the control bar, and then choose Customize Control Bar and Display.
The customization dialog opens.
- In the Modes and Functions column, select Pre Fader Metering.
- Click OK.
 The pre-fader metering icon (shown in the margin) is added to the control bar.
 - Click the pre-fader metering icon to turn it on.
If you want to quickly switch between pre-fader and post-fader metering, set the Toggle Pre-Fader Metering key command. For details, see Chapter 3.
Changing the level-meter scale
Take a look at your level meters, shown in Figure 16-5. The lower they are, the coarser they are. They go from increments of 1 dB at the top to 10 dB at the bottom. Trying to make subtle changes when your fader is near the bottom becomes more difficult than it needs to be. You can adjust the scale of your level meters to suit your needs.
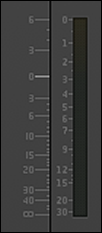
Figure 16-5: The channel strip level meter set to exponential scale.
Follow these steps to change the scale of your channel strip level meters:
- Choose Logic Pro X⇒Preferences⇒Display.
The Display Preferences window opens.
- Click the Mixer tab.
- On the Scale drop-down menu, choose one of the following:
- Exponential: This scale has a higher resolution in the upper range of the meter. Use this scale if you want finer control at the top of the meter.
- Section dB-linear: This scale has a near-even resolution throughout the meter. Use this scale if you want an even control over the entire level.
If you think you might want to change the level-meter scale frequency, you can assign a Toggle Level Meter Scale key command. For details on creating key commands, see Chapter 3.
Adjusting Channel Strip Controls
The channel strip is where you adjust the volume and sound of a track. You can view a selected track’s channel strips in the following ways:
- Choose View⇒Show Inspector or press I. The channel strip is shown on the inspector. You may have to close the region and track inspector to view all channel strip controls.
- Choose View⇒Show Mixer or press X. The selected channel strip appears light gray in the mixer. You may need to adjust the size of the mixer to view all channel strip controls.
- Choose Window⇒Open Mixer or press
 -2 to open the mixer in a new window.
You can adjust multiple selected channel strips simultaneously. To select multiple channel strips, Shift-click the channel strips or make a choice on the Edit⇒Select menu in the mixer. You can select multiple tracks in the mixer also by dragging along the channel strip names of the channel strips you want to select.
By default, not all channel strip controls are shown. To show or hide channel strip components, Control-click any track in the mixer or inspector and choose the components you want to show on the Channel Strip Components menu. You can also show and hide channel strip components by using the View menu in the mixer.
Adjusting volume and toggling between levels
Adjust the volume of your tracks by raising or lowering the fader on each channel strip. The default fader state (no boost or cut) is called unity gain. You can quickly restore your fader to unity gain by Option-clicking the channel strip.
Your faders are capable of .01 dB changes. Don’t drive yourself crazy with these tiny increments. At least 1 dB of change is required before you reach a just noticeable difference, so moving your fader less than 1 dB isn’t worth the effort. Depending on the frequency and complexity of a sound, even a 3 dB change in level is barely noticeable. Save time by moving your faders in increments of 1 dB or more.
Adjusting the pan balance
The pan balance knob is located above the fader and dB readout. Rotate the knob to find the ideal position in the stereo spectrum and Control-click it to reset it to center. Use pan to balance tracks from left to right and to find clarity on individual instruments. You can achieve balance by positioning tracks evenly throughout the stereo field. If the arrangement is balanced, it can dictate the panning. For example, a call and response between two groups of instruments can be panned on opposite sides of the stereo spectrum.
Your three most sacred positions are center, hard left, and hard right. Vocals, bass, kick drum, and snare are almost always panned center. What you put in the left and right positions will depend on the mixing concept, as described previously in the “Understanding Important Mixing Concepts” section. If two guitar tracks are playing at the same time, they are often panned hard left and hard right with other instruments filling in between.
Muting and soloing tracks
At the bottom of the channel strips are two buttons labeled M (mute) and S (solo). Mute a track to disable it from the mix. Solo a track, and all the other tracks’ mute buttons blink to indicate they are muted. Sometimes, you can’t find a track that was originally soloed because it’s hidden or among many other tracks. In that case, press Control-Option-![]() -S to engage the Solo Off for All key command. You can also Option-click a solo button to unsolo all the other tracks.
-S to engage the Solo Off for All key command. You can also Option-click a solo button to unsolo all the other tracks.
You can put a track into solo-safe mode so it won’t mute even if you solo another track. Control-click the solo button of a track to toggle solo-safe mode. A red slash will cross the solo button. Solo-safe mode is useful when you want to hear more than one track at a time when you use solo mode.
Grouping tracks
After you get the balance of a group of instruments, such as drums, just right, you can adjust their volumes together as a group. Good candidates for channel groups are drums, background vocals, doubled lead vocals, and anything that goes together and should be adjusted together. To group tracks and choose group settings, follow these steps:
- Click the channel strip’s Group slot and choose Open Group Settings, or press Shift-Option-G.
The Group Inspector opens, as shown in Figure 16-6.
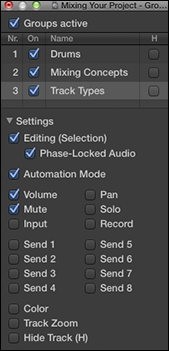
Figure 16-6: The group inspector.
- Select the Groups Active check box.
When you want to edit a track individually, deselect the Groups Active check box.
- Select the track group check box in the list.
A track can be in more than one group at a time. You can also rename the group by double-clicking in the name field and entering the new group name.
- Select the track settings you want to adjust as a group.
If you don’t see the group settings, click the Settings disclosure triangle.
Note that you can also edit tracks as a group by selecting the Editing (selection) check box. This option is useful when you want to edit drum tracks or background vocal tracks as a group. If the grouped tracks are audio tracks and were recorded together, such as drum tracks, select the Phase-Locked Audio check box to ensure that your edits don’t adjust the phase of the tracks, which can produce unwanted cancellations of frequencies between the tracks.
After you add a track to a group, the group inspector pane is added to the inspector between the region and track inspectors. From the group inspector, you can quickly deselect the Groups Active check box to allow individual track adjustments or make other group adjustments without opening the group inspector window.
Choosing input and output settings
The input and output settings you have available are determined in part by your hardware. During the mixing of your project, you rarely need to change input settings because you’re not recording audio sources. You might want to change your output settings, however. In particular, you can do some creative audio routing by choosing a bus as an output.
Buses are used to route audio to and from auxiliary tracks. To route the output of a track to an auxiliary track, click-hold the output slot and choose a bus on the menu. If a bus is already being used to route audio to an auxiliary track, it will have the name of the auxiliary track in parenthesis. Because you can route many tracks to the same auxiliary track, you can process them as a group. You learn more about auxiliary tracks later, in the “Using auxiliary channel strips” section.
You can route the output of a track to an output other than the main stereo output if your audio hardware supports it. You can use your additional outputs to route audio to external hardware or additional monitors. You can also choose No Output if you don’t want the track to sound at all, or you can select the Surround output if your hardware supports it. You can even select the Binaural output setting, which allows you to pan the track as if it were coming from behind your head. (Wear headphones for this type of panning.)
Selecting channel strip settings
When you set up a channel strip the way you like it, you can save the settings for recall. Click the Setting button at the top of the channel strip and choose Save Channel Strip Setting As. A dialog opens where you can name and save the setting. You can load your saved channel strip settings with the same menu as well as copy, paste, and reset the channel strip.
You can change channel strip settings by sending MIDI program changes from your MIDI controller. Click the Setting button and choose Save as Performance. Have your MIDI controller send a program change message to change the channel strip setting on the selected track. Only 127 performances can be saved. The MIDI program change value is listed next to the performance name on the Performance menu.
Adding Effects to Tracks
I don’t know many Logic Pro users who get excited about setting track volumes or panning, but they can’t seem to get enough of plug-ins and effects. And for good reason, too, because using effects is where a lot of the fun, experimentation, and magic come into the mix. Logic Pro comes with some of the most amazing sound effects on the market and includes everything you need to make great sounding music.
Adding audio and MIDI insert effects
Audio insert effects can be added to audio, instrument, auxiliary, and output channel strips. You add effects plug-ins via the channel strip Audio FX slot. Click an empty effects slot and, on the menu that appears, choose the plug-in you want to add. Insert effects have three clickable areas, as shown in Figure 16-7. You open the plug-in interface by clicking the center of the plug-in slot. You can choose a different plug-in by clicking the right side of the plug-in to open the plug-in menu. You can turn plug-ins on and off by clicking the left side of the plug-in.

Figure 16-7: An insert effect slot.
Insert effects are added to the channel strip in series, which means that the audio signal goes through each effect in the order in which it is inserted. You can reorder effects by click-dragging the center of the plug-in to the new location. You can also drag plug-ins to other channel strips. You can copy an effect by Option-dragging the plug-in to a new location.
MIDI effects, which are new to Logic Pro X, sound and look gorgeous, as shown in Figure 16-8. MIDI effects can be added only to instrument channel strips. You add MIDI effects plug-ins via the channel strip MIDI FX slot. You can replace, move, and copy MIDI effects plug-ins just like audio effects plug-ins.
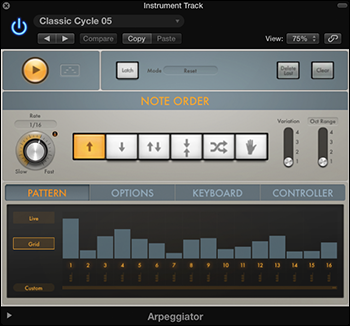
Figure 16-8: The MIDI Arpeggiator plug-in.
Choose Help⇒Logic Pro Effects to open the online effects manual. Logic Pro X comes with 58 audio effects plug-ins and 9 MIDI effects plug-ins. The Pedalboard plug-in includes an additional 35 cool-looking stompboxes — and they’re not just for guitar players. Logic Pro has plenty of built-in tone-shaping capabilities.
Adding send effects
While insert effects are serial in the signal flow (one goes through the next), send effects are parallel in signal flow (one goes beside the other). Send effects are useful when you want to send a portion of the signal through an effect, but you want the original sound to remain untouched. For example, you can send a portion of a snare or vocal through a reverb and mix the reverb with the original sound. Reverbs, delays, and compressors are commonly used as send effects. The auxiliary channel that hosts the effects will often have other insert effects on it, such as EQ, compression, or dynamics.
To add a send effect to a channel strip, follow these steps:
- Click the channel strip send slot, and choose a bus on the menu.
The send slot routes the signal through a bus to an auxiliary channel strip. If the bus is empty, an auxiliary channel strip is created and added to the mixer.
- Drag up or down on the send level knob to change the level sent to the auxiliary channel strip.
You can also double-click the send knob and enter the value directly.
- Add the insert effects you want to the auxiliary track.
The effects on the auxiliary track process the signal you route through the send.
Similar to insert effects, you can click the left side of the send slot to turn it on and off. Click-hold the right side of the slot to choose a different bus and the way the fader and pan controls affect the send. Select pre-fader when you want the send effect level to remain unchanged as you lower or raise the fader of the channel strip. Select post-fader when you want the send effect level to remain relative to the fader level. Select post-pan (the default) to allow both the fader and the pan knob to determine how the signal is sent to the auxiliary channel strip.
Controlling Signal Flow
After your tour of channel strips and insert and send effects, you understand that signal flow is flexible in Logic Pro. You can route audio in many ways for both practical and creative purposes. In this section, you find more ways to control signal flow.
Understanding how insert and send effects work
As you learned previously, insert effects are inserted in a series. The order in which you insert the effects can have a big effect on your sound. However, many Logic Pro plug-ins, such as Compressor and Space, have a mix control, so you can adjust the level of dry and wet signal, effectively turning it into a parallel effect.
Send effects are always parallel to the source that’s sending the signal. But on the auxiliary channel that’s hosting the effects, the plug-ins are inserted in series. You can also use effects sends on auxiliary channel strips. For example, you can add a distortion or overdrive plug-in to an auxiliary track and send a small amount of your lead vocal to it so it’s in the background, adding a little color. Then you can send the distorted auxiliary track to a delay or reverb so that the distorted vocal is adding a bit of depth and interest to your mix.
Make your mix as complicated or as simple as you want, but don’t lose sight of your mixing goal and concept. What are you trying to do to the audio? Is it necessary? Is it enhancing your audio? Experiments are great, but give yourself a time limit. Otherwise, you’ll easily spend your creative time tweaking instead of finishing your project. You’ll have plenty of opportunities to try out new ideas on your next project.
Using auxiliary channel strips
You just discovered some ways to use auxiliary channel strips creatively. You can also use auxiliary channel as submixes, without any effects, by selecting an auxiliary track as the output on a group of tracks. To create submixes. follow these steps:
- Select the tracks you want to group.
Drum tracks or background vocal tracks are great examples of tracks you would group in a submix.
- Click-hold the output slot on one of the selected tracks and choose an empty bus.
An auxiliary channel strip is added to the mixer, and you can control the sound and level of all the tracks as a group from the auxiliary track.
Another important use of auxiliary channel strips is for efficient use of effects on multiple tracks. There’s no need to create a separate reverb effects send on every track that needs reverb, especially because reverbs such as Space Designer are processor intensive. Create one reverb effects send and add multiple tracks to the same reverb. This technique also gives your mix a cohesive sound.
Another popular use of an auxiliary channel strip is for parallel compression. Create an effects send on the lead vocal or a group of drums. Add the Compressor plug-in to the auxiliary channel strip and compress it heavily, as described later, in the “Using the Compressor” section. Then mix the compressed sound with the dry sound, and you’ll get more presence and loudness without raising the level of the dry tracks.
After you have your effects sends set up the way you like, you can add them to a track stack and save them as a patch for later recall. For details, see Chapter 4.
Using multi-output instruments
Multi-output capabilities are built into some Logic Pro software instruments, such as Drum Kit Designer, EXS24, and Ultrabeat. Multi-output instruments enable you to route audio within the instrument to its own channel strip. This gives you individual control over sounds and enables you to route sounds to separate outputs. To use a multi-output instrument:
- Click the right side of the instrument slot on the channel strip, and choose the Multi Output option of the instrument on the menu.
The mixer channel strip is updated with a plus icon and a minus icon above the mute icon, as shown in Figure 16-9.
- Click the plus icon to add instrument outputs to the mixer.
New channel strips are added to the right of the first instrument channel strip. The number of outputs you have available depends on the software instrument.
- Click the center of the instrument slot to open the instrument interface.
- In the instrument interface, route the sounds to the outputs in the mixer.
Each instrument handles routing differently. Some instruments, such as Drum Kit Designer, have sounds hard-wired to specific outputs. Others, such as Ultrabeat, are more flexible and allow you to choose how sounds are routed. Consult the instruments’ manual (Help⇒Logic Pro Instruments) for specific instrument instructions.
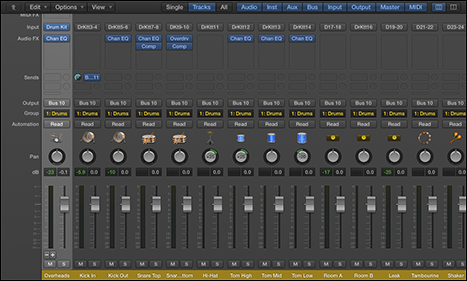
Figure 16-9: A multi-output instrument.
Because setting up multi-output instruments can be time consuming, save your multi-output instrument setups as patches for later recall. For instructions on saving patches, see Chapter 4.
Using the output and master channel strips
Unless you have a channel strip’s output set to No Output or an additional output that doesn’t return into Logic Pro, all channel strips are summed to your stereo output channel strip and finally to your master output. Here’s a description of your output and master channel strips:
- Output: Your stereo output behaves similarly to other channel strips, except you can’t add send effects to it. You can use this channel strip to adjust the final level of your mix, as described in Chapter 18. The output channel strip has a bounce icon below the meter to export your project to a single file or burn it to CD or DVD. For details on bouncing your project, see Chapter 19.
- Master: Your master output is stripped to the basics. Many professionals never touch the master fader during a project and instead use the output for overall volume control. You can adjust the fader level and even automate the fader, as described in Chapter 17. In addition to the mute icon, you have a dim icon, which allows you to adjust the playback volume according to the dim level. To set the dim level, choose Logic Pro X⇒Preferences⇒Audio, click the General tab, and adjust the Dim Level slider.
Adjusting the EQ of Your Tracks
EQs (equalizers) are used to adjust the frequencies of your tracks. You might need to correct audio sources, such as microphones, recording environments, or instrument sounds. You can use EQ also to enhance the tone of a track and make it fit in the context of the entire mix. Several types of EQs are available, such as graphic EQ, parametric EQ, and low- or high-shelf EQ. In this section, you will learn how to use EQ to adjust the sound of your mix.
There’s no right way to EQ your tracks. Different genres of music handle frequencies differently, and a wide range of acceptable EQ exists even within a genre. Because there’s no perfect amount of bass or treble, if it sounds good to you and your listeners, it’s good.
Adding Channel EQ
Logic Pro Channel EQ is a plug-in that also has a special place on the channel strip to display the EQ curve and quickly access the EQ controls. You can add the Channel EQ plug-in to a track in the following ways:
- Double-click the EQ display on the channel strip. The Channel EQ plug-in is added to the first available insert effects slot, and the plug-in interface opens, as shown in Figure 16-10.
- Choose EQ⇒Channel EQ from the channel strips effects slot, just as you would add any other insert effect.
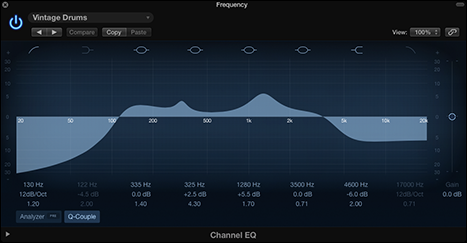
Figure 16-10: The Channel EQ plug-in.
Channel EQ is capable of adjusting eight frequency bands simultaneously. You can turn any of the bands on or off by clicking the colored buttons at the top of the interface. Bands 1 and 8 are low-pass and high-pass filters, respectively. Bands 2 and 7 are low-shelving and high-shelving filters, respectively. Bands 3 through 6 are parametric bell filters. You can adjust the boost or cut of each band by dragging the frequency handle in the graphic display, dragging the values of the fields below the graphic display, or double-clicking the fields and entering the value directly. Here’s a description of the values:
- Frequency: The top value adjusts the center frequency of the band.
- Gain/Slope: The center value adjusts the level of boost or cut of the frequency band. In the case of the low-pass and high-pass filters, the value adjusts the slope of the filter.
- Q factor: The bottom value adjusts the frequency range that’s affected, known as resonance or Q factor. Higher values lead to narrower frequency ranges.
You can adjust the gain of the entire track with the Gain slider on the right side of the interface. Click the Analyzer button below the frequency display to turn the Channel EQ analyzer on or off. Inside the Analyzer button is a Pre/Post button that toggles the analyzer display of the frequency curve before and after the EQ. This feature is useful when you want to see both the frequency content of the track (pre) and how the EQ is affecting the track (post). The Q-Couple button connects the frequency gain with the Q factor so that the resonance band narrows as you increase the boost or cut of the frequency.
Using match EQ
Logic Pro comes with several EQ plug-ins, and one of the more magical EQs is Match EQ, shown in Figure 16-11. It allows you to grab the frequency spectrum of one audio track and apply it to another. You can use it on individual tracks, groups of tracks, or even your stereo output. It can’t take a folk song and make it sound like a heavy metal song, but it has many practical uses, especially for beginners.
To match the EQ of one track to another, follow these steps:
- Add the Match EQ plug-in on the track to which the EQ is to be applied.
The track with the Match EQ plug-in is the track that will be modified by the frequency curve of a different track.
- On the Side Chain menu in the plug-in header, select the track to use as a template.
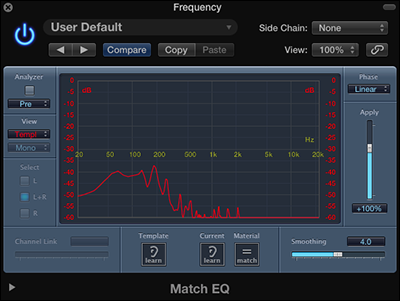
Figure 16-11: The match EQ.
- Click the Template Learn icon at the bottom of the plug-in interface.
Learn mode turns on so you can create a template from the track selected on the Side Chain menu.
- Play the project until the frequency curve stabilizes in the graphic display.
- Click the Template Learn icon to turn off learn mode.
- Click the Material Match icon.
The new match EQ curve is added to the graphic display and applied to the current track.
You can adjust the frequency curve by dragging the curve in the graphic display. You can also adjust how much of the curve is applied to the track with the Apply slider on the right side of the interface. Drag the Smoothing slider to smooth the filter curve. Here are a couple more uses for Match EQ:
- Match the EQ of vocals recorded on a different day: The voice is a dynamic instrument and often changes from day to day, causing issues if you track a vocal on different days. You can use Match EQ to remove the differences and create a consistent vocal sound.
- Reverse-match conflicting tracks: If you have a track that’s conflicting with another, drag the Apply slider to a negative value, which will invert the frequency curve and remove the conflicting frequencies. This trick is especially useful on bass guitar and kick drum, which frequently fight for space in the low end.
Adding Depth with Reverb and Delay
You accomplish the illusion of depth in your mix through the use of reverb and delay. Reverbs are designed to simulate acoustic spaces. Aside from using actual acoustic spaces, many different techniques have been used to create reverb effects. Logic Pro can re-create them all.
Mechanical and digital reverbs have distinct sounds and have become classic studio accessories. Plates and spring reverbs are classic mechanical reverbs. A plate reverb is a metal plate that vibrates when audio signals are sent into it. A pickup on the plate records the signal to get a shimmery reverb. Spring reverbs are common in guitar amps and have a spring that bounces and gets picked up and mixed into the output. An impulse response is a digital algorithm that’s created by sending a sound into the space, recording what comes back, and analyzing the difference to replicate it. Impulse responses are realistic and more adjustable than an acoustic space.
If you want an intimate sound, it should be dry and up close, with less chance to bounce around. But if it’s a huge sound you want, you might want it to bounce through an arena or echo across mountaintops.
Delays are reproductions of the original signal that are delayed. A tape delay uses actual electromagnetic tape to record the signal and play it back, which adds its own character. Digital delays provide exact copies of the original sound. The delayed signal can also be altered with filters or other processing to add interest.
You can use short delays to create a double-tracking effect, as if you had recorded the signal twice. Delays set to around 50 milliseconds can also simulate a small space. Sometimes, delays are preferable to reverbs for simulating acoustic spaces because they take up less room in the mix. You can get the famous slapback echo of Elvis and others with delays between 65 and 150 milliseconds. You can also tempo match multiple delays (multitap) at different parts of the beat for interesting rhythmic effects.
The Haas effect, also known as the precedence effect, is a binaural psychoacoustic effect that makes your audio signal sound as if it’s coming from outside the speakers. Add a 30-millisecond delay panned opposite to the original signal for ultra-wide stereo signals. This technique is useful when you’re running out of room in the stereo spectrum of your mix.
Using Space Designer
The Space Designer plug-in, shown in Figure 16-12, is a convolution reverb. It convolves, or combines, the audio signal with an impulse response to simulate acoustic environments. Space Designer can create any space, such as inside a cabinet, a plastic or cardboard box, or an opera house. Space Designer also has a synthetic impulse response to create unique effects.
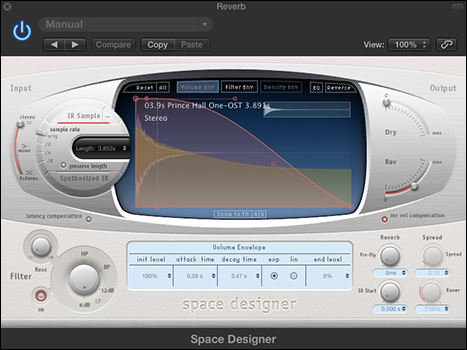
Figure 16-12: Space Designer.
Space Designer is most often used on auxiliary tracks and used as an effects send because it is processor intensive. That way, you can send several instrument tracks to the same Space Designer plug-in on the auxiliary track.
Space Designer comes with many presets that you can access on the preset menu at the top of the plug-in. You can adjust the presets within the plug-in interface. Here’s a description of the Space Designer interface:
- Impulse response parameters: The round area on the left side of the interface is where you adjust the impulse response parameters. Click the IR Sample button or Synthesized IR button to switch between the impulse response samples and synthesized impulse response. Drag the Sample Rate slider to adjust the sample rate. Drag or enter a value in the Length field to determine the length of the impulse response. The Preserve Length button locks the length as you change the sample rate.
- Main display with button bar: The center display and button bar is where you edit the envelope or EQ curve. You change the view mode of the main display in the button bar at the top of the display.
- Envelope and EQ parameters: You can edit the envelope and EQ in the main display or numerically in the parameter bar below the display. The parameters you can adjust depend on the view mode of the main display.
- Global parameters: On the right side of the interface is the output section. Drag the slider to adjust the output levels. The input slider to the left of the impulse response parameters sets how to process stereo or surround signals. Below the main display are two buttons that turn on or off the latency compensation and reverb volume compensation features. The knobs at the bottom right of the interface adjust the reverb pre-delay and start point of all impulse response types, and the stereo spread and crossover frequency of the synthesized impulse responses.
- Filter parameters: The knobs at the bottom left of the interface adjust the filter type and resonance.
Use less reverb, if at all, on tracks with a lot of low end, such as bass guitar and kick drum tracks. Adding a lot of low end to your reverb can muddy your mix and leave less room for the instruments themselves. Stick to using reverb on instruments that benefit from depth, such as vocals and snare. Not every track in your mix needs to have reverb. And because your listeners can perceive only two or three levels of depth at a time, you can create distinct groups of depth: close (dry), near (a little reverb), and far (the most reverb).
Using Delay Designer
Delay Designer, shown in Figure 16-13, is a multitap delay that can have up to 26 individual taps (delays). Each tap can have a distinct sound, such as changes in the volume level, pan, filter, and even the pitch of the delay. It’s the most advanced delay that comes installed in Logic Pro X.

Figure 16-13: Delay Designer.
If you need a simple delay, try one of the many other delays in Logic Pro, such as the Stereo Delay or Tape Delay, which are simple to use and sound great. Delay Designer is a processor-intensive delay and unnecessary for most basic delay needs.
Delay Designer comes with presets that include everything from basic to warped delays. The presets are great starting places for designing your own delays. Here’s a description of the Delay Designer interface:
- Sync section and tap pads: On the left side of the interface, you can create taps in real time with the tap pads. Click the Start button to begin. The Start button changes to the Tap button, which you click every time you want to record a tap. Click the Last Tap button to end. Click the Sync button to sync Delay Designer to the project tempo. Adjust the sync settings with the Grid resolution and Swing fields.
- Main display: In middle of the interface is the main display, where you adjust the taps. Click the view mode buttons at the top of the display to change the displayed parameters. Click the toggle buttons at the top of each tap to turn tap parameters on or off. Each tap has a bright bar or dot that you can drag to change the level of the selected parameter. At the bottom of each tap is an identification letter that you can drag back and forth through time. You can copy taps by Option-dragging them.
- Master section: On the right side of the interface is the master section. The Feedback field sends the output of a single tap back through the effects to make the rhythm continuous. The Mix sliders set the wet/dry mix so you can use the effect as an insert effect as well as a send effect and still control the balance of the wet/dry signal.
- Tap parameters: The wide bar at the bottom of the interface controls the selected tap. You can turn the filter on or off, and set the frequency cutoff, resonance, and filter slope. To the right of the Tap Delay circle, you can turn the Pitch parameter on or off and set the transpose level. The Flip parameter sets the pan to its opposite. You can also set the stereo spread, mute, and output level for the selected tap.
Get the classic delay made famous by The Edge of U2 by using a dotted eighth-note delay. An eighth-note or a quarter-note delay can get lost behind all the other instruments playing on the beat, but a dotted eight note allows the delay to peek out in the space between the other instruments.
Adding or Removing Dynamics with Compression
Controlling the dynamics of the overall mix as well as individual instruments is a crucial fundamental of mixing. A compressor is your main tool for controlling dynamics as well as for effect. Compressors work well on individual sounds, groups of instruments or sounds, and even the entire mix. There are many types of dynamic control, include limiting, multiband compression, de-essing, gating, envelope shaping, side chaining, and parallel compression. In this section, you learn how to use the dynamics tools of Logic Pro to create powerful and interesting mixes.
Using Compressor
The Logic Pro Compressor plug-in, shown in Figure 16-14, can emulate a wide variety of hardware compressors. Many compressors have become classics in the recording and mixing world, and there’s a giant market for software emulations of these compressors. Logic Pro doesn’t advertise its own compressor emulations, but savvy users know what they are, and you will too after you read this section.
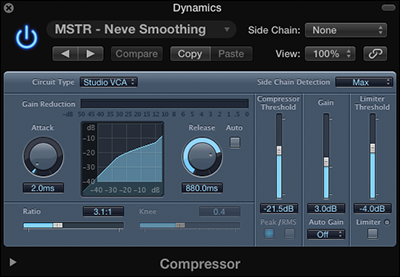
Figure 16-14: The Compressor plug-in.
Like Channel EQ, Compressor has its own meter in the channel strip, right below the EQ display. The meter shows you the amount of gain reduction. You can double-click the meter to open Compressor. If it’s not currently inserted on the channel strip, it’s added to an open slot. Here’s a description of Compressor parameters:
- Circuit Type: The Circuit Type menu is where you choose a compressor emulation:
- Platinum: This compressor is Logic Pro’s original compressor. It’s a transparent compressor you can use on any audio source to control dynamics.
- Studio VCA: The studio VCA is similar to the SSL bus compressor. This compressor is clean, with low distortion, and has a faster attack than FETs. Use it when you want to protect a track from clipping and on instruments with complex harmonics, such as pianos, harpsichords, or 12-string guitars. The studio VCA is great for providing “glue” on groups of tracks or the entire mix.
- Studio FET: The studio FET is new to Logic Pro X. FET-style compression is warm with a fast attack time. It’s often used on individual tracks and groups of tracks for both compression and color.
- Vintage VCA: The vintage VCA is similar to a dbx 160. This compressor has a fast response and a distinct sound, and is useful for protecting tracks from clipping. It’s often used on bass, kick, and snare.
- Vintage FET: The vintage FET is similar to the UREI 1176. This compressor can provide a lot of aggressive color to groups of instruments, such as drums, and individual instruments, such as bass and lead vocals.
- Vintage opto: The vintage opto is similar to a Teletronix LA-2A. Electro-optical tube compression is smooth and rich, with a warm tone. It’s often used on piano, bass, and vocals.
- Compressor Threshold: Drag the Compressor Threshold slider to adjust the level at which compression starts.
- Attack: The Attack time knob sets the reaction speed of the compressor.
- Release: The Release time knob sets the speed it takes for the compressor to release after the signal falls below the threshold. Click the Auto button to let the compressor choose the release time.
- Ratio: The Ratio slider sets the ratio of gain reduction when the threshold is reached.
- Knee: The Knee slider adjusts how extreme the compression begins as the signal reaches the threshold. Low values compress harder, and higher values compress softer.
- Gain: Use the Fain slider to raise or lower the gain after the signal has been compressed. You can choose to automatically raise the gain to –12 dB or 0 dB on the Auto Gain menu.
- Limiter Threshold and button: Click the Limiter button to turn the limiter on, which limits the signal from going beyond the level set by the limiter threshold.
- Extended Parameters: Click the disclosure triangle at the bottom of the Compressor interface to choose advanced settings. You can choose the type of output distortion, which adds color to the compressor in varying degrees. You can adjust the output mix to blend the compressed signal with the original signal for parallel compression. You can also add a side-chain filter.
You can set Compressor to react to the dynamics in another track in the project. Choose the track that will trigger Compressor on the Side Chain menu at the top of the plug-in interface. Now Compressor will compress the audio only when the track chosen on the Side Chain menu reaches the threshold. This feature is useful when you want to make room for a track in the mix by automatically lowering any track that’s competing with it.
Using Limiter
The Limiter plug-in, shown in Figure 16-15, is used when you need to restrict the level from going any higher. Limiters differ from compressors in that they have a strict threshold, whereas compressors only reduce the level above the threshold. You might put a limiter on a single track to guarantee that it doesn’t clip or on a group of tracks to raise the volume as high as possible before it distorts. Limiters can have a big effect on the sound, so a little goes a long way.
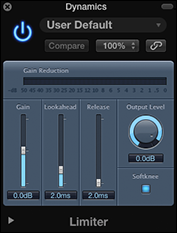
Figure 16-15: The Limiter plug-in.
Limiters are often added as the last insert effect in the chain. But sometimes you can add a limiter before a compressor that’s set to a slow attack time to catch any large peaks and avoid the pumping and breathing effect that can come from too much compression. A description of the Limiter parameters follows:
- Gain: Drag the Gain slider to adjust the level of the input.
- Lookahead: Drag the Lookahead slider to adjust how far in advance the limiter will analyze the signal. Higher levels cause latency, so it’s best not to use this setting on instrument or group tracks because it will change the timing. Higher lookahead times work better when the Limiter is on the main output.
- Release: Drag the release slider to set the time it takes for the compressor to release after the signal falls below the threshold. Click the Auto button to let the compressor choose the release time.
- Output Level: Rotate the output level knob to adjust the overall output level.
- Softknee: Click the Softknee button to soften the compression curve as the signal reaches the threshold.
Using other dynamics tools
Logic Pro comes with many dynamics tools that can make your time mixing easier. Dynamics tools can help you solve problems and be creative at the same time. As a beginner, it’s a good idea to use the presets that come with these plug-ins. The preset names are educational, and you’ll often find a preset that describes exactly what you want to do. Following are other dynamics tools you can use:
- De-esser: Remove hiss from vocal sibilance. This frequency-dependent compressor can lower specific frequency ranges, such as those that cluster around sibilant sounds.
- Expander: Expand the dynamic range. For example, you can use an expander to reduce the amount of hi-hat leakage in a snare track by expanding the distance between the main snare sound and the background hi-hat.
- Noise gate: Lower the level of sounds below the threshold. The noise gate enables you to remove unwanted room noise, such as amp hump.
- Enveloper: Adjust the attack and release of a sound’s transients. An enveloper is a tone-shaping tool that works well with instruments having sharp transients, such as drums, picked and plucked sounds, and pianos.
Taking Track Notes
As you mix your project, you make countless changes to each track and its parameters. Mixes can go from stable to unstable quickly, without a clear path back to stability. Keeping project and track notes can help you catalog your big milestones and store important reference material. Choose View⇒Show Note Pads or press Option-![]() -P to display the note pad, shown in Figure 16-16.
-P to display the note pad, shown in Figure 16-16.
Figure 16-16: Track notes.
Project notes are a good place to store information about the song arrangement and overall project direction. Track notes are excellent for EQ settings, plug-in settings, and preset names. You can also show track notes at the bottom of every channel strip in the mixer. Control-click a channel strip in the mixer and choose Channel Strip Components⇒Track Notes. The project and track notes are great scratch pads.
Adding effects and buses to tracks creates auxiliary tracks in the mixer. You can add those auxiliary tracks to the track list in the tracks area for organization and track automation. (For details, see Chapter 17.) Select the channel strips and choose Options⇒Create Tracks for Selected Channel Strips, or Control-click the channel strips and choose Create Track (Control-T). The selected tracks are added to the tracks area where you can edit them.