
Chapter 6
Recording Audio
In This Chapter
![]() Setting up Logic Pro for recording audio
Setting up Logic Pro for recording audio
![]() Recording audio tracks and multiple takes
Recording audio tracks and multiple takes
![]() Overdubbing and punch recording audio
Overdubbing and punch recording audio
![]() Setting up separate monitor mixes
Setting up separate monitor mixes
Audio recording was introduced to the original Notator Logic in 1994, about 20 years before the introduction of Logic Pro X. “The Sign” by Ace of Bass was the number-one song that year. While I can't confirm that the song was referring to the emergence of computer audio recording, I can confirm that it was a breakthrough year for Logic.
Fast forward 20 years and you have a powerful and an affordable digital audio workstation that scores of major artists are using to create chart-topping hits. In this chapter, you discover how to record audio, build the perfect track from multiple recordings, and much more.
Preparing to Record Audio
In Chapter 5, you connect your audio hardware, set the project sample rate, and select the recording file type. You should confirm that the incoming signal from your audio source (microphone or instrument) is being received by your audio interface by checking the levels of your hardware inputs. (Check your audio interface documentation for details.)
Before you can begin recording, you need to create an audio track by choosing Track⇒New Audio Track. The new audio track is added to the track list and selected automatically.
 Name your new track something descriptive because the audio files generated from recording will use the track name in the file name. To name your track, double-click the track header or press Shift-Enter and type your track name.
On your new track, select the correct input as follows:
- Select the track.
- Open the track inspector by pressing I or by choosing View⇒Show Inspector.
- Click the Input slot, as shown in Figure 6-1, and choose the correct input.
- Click the input format icon to toggle between stereo and mono input.
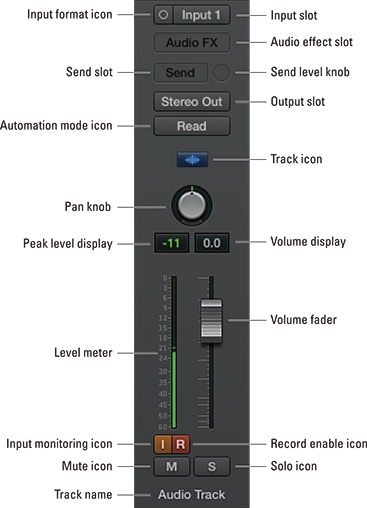
Figure 6-1: The Audio Track channel strip.
Test your recording levels
To test the volume level at which you’ll record, enable the track for recording by clicking the record enable icon on the track header (refer to Figure 6-1) or by pressing Control-R. The record enable icon will blink red to let you know that the track is enabled for recording. Play your instrument or speak into your microphone to test the recording level. If your signal is too high or low, adjust the instrument volume or the input level on your audio interface.
 Don’t clip the audio signal! When a signal is too loud and exceeds the limit that digital audio can reproduce, the signal is said to be clipping. You can see when your signal is clipping by the peak level display at the top of your track’s level meter, as shown in Figure 6-2. When the number above the level meter is positive, the peak level display will become red, indicating that the track is clipping. During the recording phase, the best way to remedy signal clipping is to lower the volume on your instrument or audio interface. (Be sure to check for clipping on your audio interface as well.)
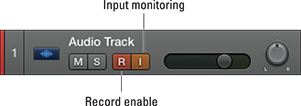
Figure 6-2: The track header.
 You must have Show Advanced Tools selected in the Logic Pro X Advanced Tools Preferences pane. Choose Logic Pro X⇒Preferences⇒Advanced Tools and select Show Advanced Tools.
Pre-fader metering, which is used to test recording levels, means the level meter shows you the level of the signal before the fader. You can turn on pre-fader metering by customizing your control bar, as described in Chapter 3, and selecting Pre Fader Metering in the Modes and Functions column. An icon is added to your control bar, as shown in Figure 6-3, to allow you to toggle pre-fader metering. You want your meters to show you the signal pre-fader so that you can be aware of what’s being recorded, even if you lower the fader to blend better with the other tracks. If you use post-fader metering, the meter will show you the level of the track after it has been raised or lowered, and you won’t know whether it’s clipping.
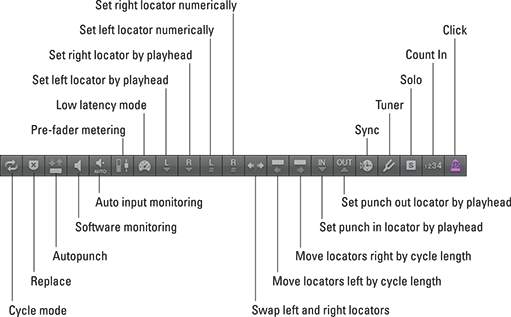
Figure 6-3: The control bar modes and functions.
Enable software and input monitoring
If you’re not going to monitor your signal through your hardware, you’ll need to turn on software monitoring. Follow these steps:
- Choose Logic Pro X⇒Preferences⇒Audio.
The Audio Preferences window opens.
- Click the Devices tab.
- Select the Software Monitoring check box.
You can now use the Logic Pro software to monitor your audio. If you plan on monitoring the signal through your hardware, deselect Software Monitoring.
When a track is record enabled, you'll be able to hear it. If a track isn’t record enabled, you won’t hear it unless you've turned on input monitoring.
If you’re monitoring from hardware and not software, you should turn off input monitoring. Turn it off and on by clicking the input monitoring icon on the track header (refer to Figure 6-2) or on the channel strip.
Setting up the metronome
By default, Logic Pro will play a metronome as you record. To turn off the metronome while recording, choose File⇒Project Settings⇒Metronome and select the Click While Recording check box, as shown in Figure 6-4. If you want to hear the metronome while you play the track, press K to toggle the metronome on and off.
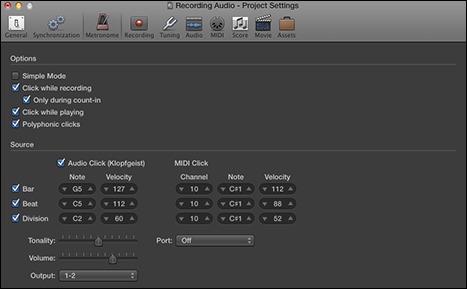
Figure 6-4: The metronome Project Settings.
The audio click you hear in the metronome is generated by the Klopfgeist software instrument. You can play it as instrument (though I don't know why you’d want to). You can also set up an external sound source as your metronome. In Figure 6-4, MIDI channel 10 is set to transmit a MIDI click. MIDI channel 10 is often reserved for drum sounds, so if you have a multi-timbral keyboard workstation, you can set a drum sound to MIDI channel 10 to receive the MIDI click.
If you have a drumbeat that grooves a little differently than the metronome, you may want it to hear the click only during the count-in and not while recording. To do so, select the Only During Count-In check box.
Be careful of metronome blindness, a condition where you don’t even realize that the metronome is playing because your brain has tuned it out. It’s happened to me and to others. The click can be heard over the entire mix but you forget that it’s on as you’re playing the track.
If you want to adjust the number of bars that the metronome counts in before recording, choose File⇒Project Settings⇒Recording and select the number of bars or beats you want on the drop-down menu, as shown in Figure 6-5.
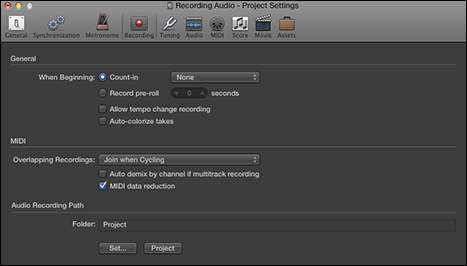
Figure 6-5: The recording Project Settings.
If you’re recording a slower song, select the Division check box to give yourself more clicks to reference the time. And if you’re recording a drummer, you’ll be a recording session hero.
Recording Your First Audio Take
In the recording world, a single recording is called a take. Recording a good take is like capturing something special and elusive. Logic Pro helps you capture the moment quickly and easily.
With your track selected and record enabled, you can begin recording as follows:
- Place the playhead where you want to begin recording.
- Press R or click the record icon in the control bar transport, as shown in Figure 6-6.
- Wait for the count-in and then start playing.
- When you’re finished, click the stop icon on the transport or press the spacebar.
A new audio region will fill the area where you began and stopped recording, as shown in Figure 6-7.
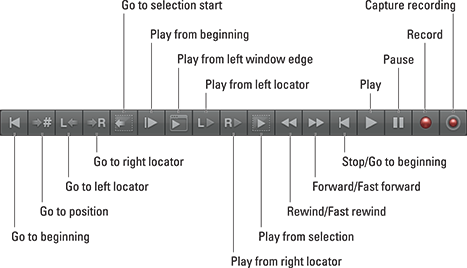
Figure 6-6: The control bar transport.

Figure 6-7: A recoded audio region.
To play back what you just recorded, place the playhead at the beginning of your newly recorded region and then click the play icon on the transport or press the spacebar. When you’re finished listening to your new recording, press the spacebar again and the project will stop playing.
Recording Multiple Takes in Cycle Mode
You can record additional recordings, or takes, on a track that already contains audio regions. A take folder is created to contain the original and new takes. In cycle mode, new lanes are created each time the cycle passes.
When cycle mode is enabled, playback or recording begins at the left locator and repeats when it reaches the right locator. To set up cycle mode, set the left and right locators by dragging from left to right in the upper half of the ruler in the tracks area. The cycle area will be displayed as a yellow strip in the upper half of the ruler, as shown in Figure 6-8. You can turn cycle mode on and off by pressing C or clicking the cycle icon in the control bar (refer to Figure 6-6).

Figure 6-8: Cycle mode.
To record in cycle mode, turn on cycle mode and begin recording as you did previously. After the second take is recorded, a take folder is created in the cycle area, as shown in Figure 6-9, and new lanes are added with each pass through the cycle. This is a great way to get several takes that you can edit into a perfect (or close to perfect) take. You learn how to edit your takes in Chapter 14.
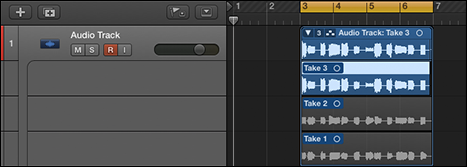
Figure 6-9: An audio take folder.
A key to using cycle mode is setting locators. You can set locators in many ways. Here are a few useful locator commands:
- Choose Navigate⇒Set Locators by Selection (
 -U) to set the locators according to the regions you've selected.
 - Choose Navigate⇒Auto Set Locators⇒Enable Auto Set Locators to automatically follow your region selection or marquee tool selections.
- Set the locators manually in the control bar LCD if you have Locators (Left/Right) selected in the Customize Control Bar and Display options (see Chapter 3 for details).
Open the Key Commands window (Option-K) and type locators in the search bar. You’ll find dozens of key commands. After you browse the available locator key commands, you’ll have an idea of what you can do and how important locators are to a speedy workflow.
Recording Multiple Inputs
You aren’t limited to recording one track at a time. You can record multiple tracks by record-enabling several tracks at once and following the same steps as recording a single take. You can also create multiple takes on multiple tracks at once. Say that three times fast.
To record multiple tracks at once, set each track to the correct input, as you did previously. When all track inputs are set correctly, you can begin recording. You can even record multiple takes on multiple inputs at the same time. The number of tracks you can record at one time depends on your hardware and computer power.
Punching In and Punching Out
Replacing just a portion of a track is called punch recording. You play the track, punch in and record the new part, and then punch out when you’re done. It’s like punching the work clock for a bar or two. Play, punch in, punch out, and play again.
The first way to set up punch recording is to do it on-the-fly, as the track is playing, as follows:
- Choose Record⇒Allow Quick Punch-In.
This is the default setting.
- Choose Record⇒Record Button Options⇒Record/Record Toggle.
The settings of both the record icon and the record key command are updated so that clicking the record icon or using the key command toggles the record state on or off, while continuing to play.
- Press the spacebar to play your project.
- At the point where you want to begin recording (punch in), press R.
- At the point where you want to stop recording (punch out), press R again.
Your project continues playing but no longer records.
While your project is playing, you won’t be able to hear the input of the selected track until you begin recording. This setting is the default and is useful if you need to hear the recorded track to time the punch in. After you begin recording, you’ll be able to hear the input. But if you want to listen to the input during playback as well as during recording, turn off Auto Input Monitoring on the Record menu.
If you want to listen to the input of tracks that are not record-enabled, click the track's input monitoring icon (refer to Figure 6-2).
When you need more precision in your punch recording, you can preprogram the punch in and punch out points. This technique is called autopunch recording. To begin autopunch recording, follow these steps:
- Click the autopunch icon in the control bar (refer to Figure 6-3).
If you don't see the icon, customize the control bar. A second ruler is shown at the top of the tracks area, as shown in Figure 6-10.
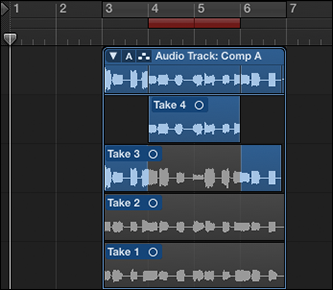
Figure 6-10: Autopunch mode.
- Set the autopunch locators by dragging from left to right in the autopunch area of the ruler.
The autopunch area will be displayed by a red stripe (refer to Figure 6-10).
- Start recording before the punch-in point.
Recording begins automatically when the playhead reaches the left autopunch locator and ends when it reaches the right autopunch locator.
- Stop recording after the punch-in point.
A take folder is created, and a new lane is added that includes your autopunch recording.
Setting Up Multiple Monitor Mixes
In the recording world, the monitor mix is what the engineer hears from the speakers. It’s possible to create multiple monitor mixes if your hardware supports multiple outputs. Small nearfield monitors are the standard choice for getting a good sound. Sometimes, a large set of speakers is used to get a full giant sound that impresses the clients and, well, everyone else. A third set of small speakers or even a single mono speaker may be used to imitate cheaper sound systems, though you can use your built-in computer speakers for this job.
To set up additional monitor mixes, follow these steps:
- Choose Logic Pro⇒Preferences⇒Audio.
- Click the I/O Assignments tab and then click the Output tab.
- On the Output menu, choose the output pair you want to set up, as shown in Figure 6-11.
The outputs you have available depend on your hardware.
- Select Mirroring to mirror the stereo output to the selected output.
Your mix will now be played through the additional output pairs.
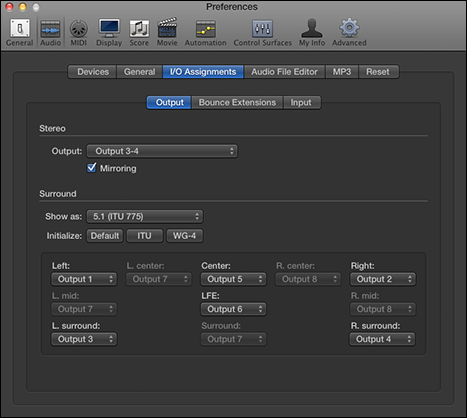
Figure 6-11: The I/O Assignments Output tab.
Giving your singer a separate vocal cue mix
If you’re recording by yourself and using a microphone, you need headphones so that any audio played back won’t leak into your recording. But as you add other people to the recording process, you might need to set up different headphone submixes for each person you record.
Giving a performer a separate headphone mix, known as a cue mix, can improve the precision and emotion of a performance. Vocalists need to hear different things than drummers need to hear. And if you want to get the best performance out of a performer, you need his or her recording process to be smooth and productive. That’s why you need to give performers their own mix, the way they want it.
Your hardware must have multiple outputs to route the submix to the correct output.
The process of setting up different submixes involves splitting the audio signal of a track and routing the parallel signal to an auxiliary track via the Send slot. (Refer to Figure 6-1 for the location of the Send slot.) To set up a submix:
- Click the Send slot on each track you want to send to the submix.
- On the Bus drop-down menu, choose an unused bus.
An auxiliary track is automatically added to the mixer. A bus is used to route audio to auxiliary tracks. To open the mixer and view the auxiliary track, press X.
- Click the Send slot again, and choose Pre Fader.
Setting the send to pre-fader allows you to adjust the volume of the track in the monitor mix using the track fader without changing the volume of the signal sent to the auxiliary track. If the send is set to post-fader, any adjustments you make to the volume of the track are also sent to the submix.
- Adjust the volume of the track in the submix by using the Send Level knob.
- Click the Output slot on the auxiliary track, and set it to the correct hardware output.
You can adjust the overall level of the submix by using the auxiliary track’s volume fader in the mixer.
Eight sends are available per channel strip, so you can send the track’s signal to eight different parallel submixes.
The recording techniques you discover in this chapter will put you well on your way to bringing your musical visions into reality. Recording in Logic Pro is straightforward but flexible enough to meet your needs. You have a powerful tool that will capture your music so you can share it with the world.