Chapter 3
Configuring Storage and Replication
THE FOLLOWING 70-740 EXAM OBJECTIVES ARE COVERED IN THIS CHAPTER:
 Configure disks and volumes
- This objective may include but is not limited to: Configure sector sizes appropriate for various workloads; configure GUID partition table (GPT) disks; create VHD and VHDX files using Server Manager or Windows PowerShell Storage module cmdlets; mount virtual hard disks; determine when to use NTFS and ReFS file systems; configure NFS and SMB shares using Server Manager; configure SMB share and session settings using Windows PowerShell; configure SMB server and SMB client configuration settings using Windows PowerShell; configure file and folder permissions.
- Implement server storage
- This objective may include but is not limited to: Configure storage pools; implement simple, mirror, and parity storage layout options for disks or enclosures; expand storage pools; configure Tiered Storage; configure iSCSI target and initiator; configure iSNS; configure Datacenter Bridging (DCB); configure Multi-Path IO (MPIO).
- Implement data deduplication
- This objective may include but is not limited to: Implement and configure deduplication; determine appropriate usage scenarios for deduplication; monitor deduplication; implement a backup and restore solution with deduplication.
 This chapter explains how to set up your servers so that your network users have something to access. Before you can set up a server, you have to determine the purpose of it. Is it going to be a print server, a file storage server, a remote access server, or a domain controller?
After you have decided how the machine is going to help your network, you must implement your decision. In this chapter, I’ll show you how to set up a print server and a file server. In addition, I will discuss how to set up permissions and security for these servers and how you can limit the amount of space your users can have on a server.
Finally in the chapter, I will show you how to setup and use data duplication. I will explain the benefits of duplication and how to use data duplication for backups. I will also show you how to monitor the data that is being duplicated.
But I am going to start the chapter by introducing you to the different Windows File Systems. So let’s begin.
Understanding File Systems
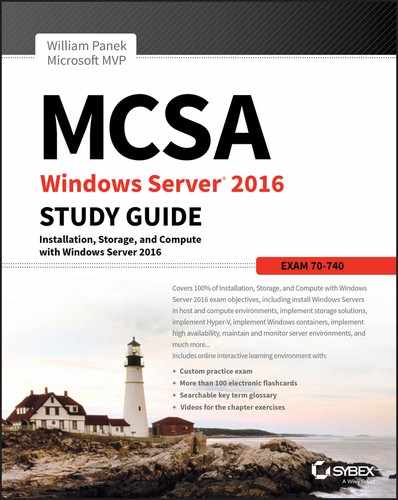
When we start the discussion about understanding Windows files systems, we have to first think about how the Windows Server 2016 machine will be used. There are four (4) supported file systems: FAT, FAT32, NTFS, and ReFS. FAT and FAT32 partitions may not always be an available option. As you can see in Figure 3.1, all 4 file systems are available because the partition is under 4 GB.
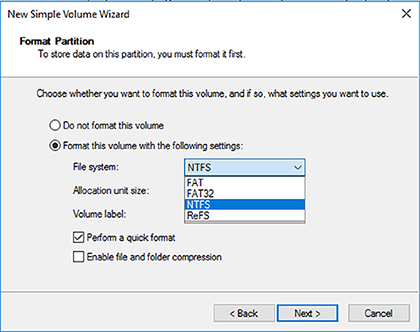
FIGURE 3.1 Format options on Windows Server 2016
FAT has a max partition size of 4GB and FAT32 has a max partition size of 32 GB. In Figure 3.1, since it’s a 3 GB partition, all four options are available. But since most drives today are much larger than 32 GB, we will continue our focus on just NTFS and ReFS.
When you’re planning your Active Directory deployment, the file system that the operating system uses is an important concern for two reasons. First, the file system can provide the ultimate level of security for all the information stored on the server itself. Second, it is responsible for managing and tracking all of this data. The Windows Server 2016 platform supports two main file systems:
- Windows NT File System (NTFS)
- Resilient File System (ReFS)
Although ReFS was new to Windows Server 2012, NTFS has been around for many years, and NTFS in Windows Server 2016 has been improved for better performance.
Resilient File System (ReFS)
Windows Server 2016 includes a file system called Resilient File System (ReFS). ReFS was created to help Windows Server 2016 maximize the availability of data and online operation. ReFS allows the Windows Server 2016 system to continue to function despite some errors that would normally cause data to be lost or the system to go down. ReFS uses data integrity to protect your data from errors and also to make sure that all of your important data is online when that data is needed.
One of the issues that IT members have had to face over the years is the problem of rapidly growing data sizes. As we continue to rely more and more on computers, our data continues to get larger and larger. This is where ReFS can help an IT department. ReFS was designed specifically with the issues of scalability and performance in mind, which resulted in some of the following ReFS features:
Availability If your hard disk becomes corrupt, ReFS has the ability to implement a salvage strategy that removes the data that has been corrupted. This feature allows the healthy data to continue to be available while the unhealthy data is removed. All of this can be done without taking the hard disk offline.
Scalability One of the main advantages of ReFS is the ability to support volume sizes up to 2^78 bytes using 16 KB cluster sizes, while Windows stack addressing allows 2^64 bytes. ReFS also supports file sizes of 2^64-1 bytes, 2^64 files in a directory, and the same number of directories in a volume.
Robust Disk Updating ReFS uses a disk updating system referred to as an allocate-on-write transactional model (also known as copy on write). This model helps to avoid many hard disk issues while data is written to the disk because ReFS updates data using disk writes to multiple locations in an atomic manner instead of updating data in place.
Data Integrity ReFS uses a check-summed system to verify that all data that is being written and stored is accurate and reliable. ReFS always uses allocate-on-write for updates to the data, and it uses checksums to detect disk corruption.
Application Compatibility ReFS allows for most NTFS features and also supports the Win32 API. Because of this, ReFS is compatible with most Windows applications.
NTFS
Let’s start with some of the features of NTFS. There are many benefits to using NTFS, including support for the following:
Disk Quotas To restrict the amount of disk space used by users on the network, system administrators can establish disk quotas. By default, Windows Server 2016 supports disk quota restrictions at the volume level. That is, you can restrict the amount of storage space that a specific user uses on a single disk volume. Third-party solutions that allow more granular quota settings are also available.
File System Encryption One of the fundamental problems with network operating systems (NOSs) is that system administrators are often given full permission to view all files and data stored on hard disks, which can be a security and privacy concern. In some cases, this is necessary. For example, to perform backup, recovery, and disk management functions, at least one user must have all permissions. Windows Server 2016 and NTFS address these issues by allowing for file system encryption. Encryption essentially scrambles all of the data stored within files before they are written to the disk. When an authorized user requests the files, they are transparently decrypted and provided. By using encryption, you can prevent the data from being used in case it is stolen or intercepted by an unauthorized user—even a system administrator.
Dynamic Volumes Protecting against disk failures is an important concern for production servers. Although earlier versions of Windows NT supported various levels of Redundant Array of Independent Disks (RAID) technology, software-based solutions had some shortcomings. Perhaps the most significant was that administrators needed to perform server reboots to change RAID configurations. Also, you could not make some configuration changes without completely reinstalling the operating system. With Windows Server 2016 support for dynamic volumes, system administrators can change RAID and other disk configuration settings without needing to reboot or reinstall the server. The result is greater data protection, increased scalability, and increased uptime. Dynamic volumes are also included with ReFS.
Mounted Drives By using mounted drives, system administrators can map a local disk drive to an NTFS directory name. This helps them organize disk space on servers and increase manageability. By using mounted drives, you can mount the C:Users directory to an actual physical disk. If that disk becomes full, you can copy all of the files to another, larger drive without changing the directory path name or reconfiguring applications.
Remote Storage System administrators often notice that as soon as they add more space, they must plan the next upgrade. One way to recover disk space is to move infrequently used files to external hard drives. However, backing up and restoring these files can be quite difficult and time-consuming. System administrators can use the remote storage features supported by NTFS to off-load seldom-used data automatically to a backup system or other devices. The files, however, remain available to users. If a user requests an archived file, Windows Server 2016 can automatically restore the file from a remote storage device and make it available. Using remote storage like this frees up system administrators’ time and allows them to focus on tasks other than micromanaging disk space.
Self-healing NTFS In previous versions of the Windows Server operating system, if you had to fix a corrupted NTFS volume, you used a tool called Chkdsk.exe. The disadvantage of this tool is that the Windows Server’s availability was disrupted. If this server was your domain controller, that could stop domain logon authentication.
To help protect the Windows Server 2016 NTFS file system, Microsoft now uses a feature called self-healing NTFS. Self-healing NTFS attempts to fix corrupted NTFS file systems without taking them offline. Self-healing NTFS allows an NTFS file system to be corrected without running the Chkdsk.exe utility. New features added to the NTFS kernel code allow disk inconsistencies to be corrected without system downtime.
Security NTFS allows you to configure not only folder-level security but also file-level security. NTFS security is one of the biggest reasons most companies use NTFS. ReFS also allows folder- and file-level security.
Setting Up the NTFS Partition
Although the features mentioned in the previous section likely compel most system administrators to use NTFS, additional reasons make using it mandatory. The most important reason is that the Active Directory data store must reside on an NTFS partition. Therefore, before you begin installing Active Directory, make sure you have at least one NTFS partition available. Also, be sure you have a reasonable amount of disk space available (at least 4 GB). Because the size of the Active Directory data store will grow as you add objects to it, also be sure that you have adequate space for the future.
Exercise 3.1 shows you how to use the administrative tools to view and modify disk configuration.
If you want to convert an existing partition from FAT or FAT32 to NTFS, you need to use the CONVERT command-line utility. For example, the following command converts the C: partition from FAT to NTFS:
CONVERT c: /fs:ntfsStorage in Windows Server 2016
As an IT administrator, you’ll need to ask many questions before you start setting up a server. What type of disks should be used? What type of RAID sets should be made? What type of hardware platform should be purchased? These are all questions you must ask when planning for storage in a Windows Server 2016 server. In the following sections, I will answer these questions so that you can make the best decisions for storage in your network’s environment.
Initializing Disks
To begin, I must first discuss how to add disk drives to a server. Once a disk drive has been physically installed, it must be initialized by selecting the type of partition. Different types of partition styles are used to initialize disks: Master Boot Record (MBR) and GUID Partition Table (GPT).
MBR has a partition table that indicates where the partitions are located on the disk drive, and with this particular partition style, only volumes up to 2 TB (2,048 GB) are supported. An MBR drive can have up to four primary partitions or can have three primary partitions and one extended partition that can be divided into unlimited logical drives.
Windows Server 2016 can only boot off an MBR disk unless it is based on the Extensible Firmware Interface (EFI); then it can boot from GPT. An Itanium server is an example of an EFI-based system. GPT is not constrained by the same limitations as MBR. In fact, a GPT disk drive can support volumes of up to 18EB (18,874,368 million terabytes) and 128 partitions. As a result, GPT is recommended for disks larger than 2TB or disks used on Itanium-based computers. Exercise 3.2 demonstrates the process of initializing additional disk drives to an active computer running Windows Server 2016. If you’re not adding a new drive, then stop after step 4. I am completing this exercise using Computer Management, but you also can do this exercise using Server Manager.
Configuring Basic and Dynamic Disks
Windows Server 2016 supports two types of disk configurations: basic and dynamic. Basic disks are divided into partitions and can be used with previous versions of Windows. Dynamic disks are divided into volumes and can be used with Windows 2000 Server and newer releases.
When a disk is initialized, it is automatically created as a basic disk, but when a new fault-tolerant (RAID) volume set is created, the disks in the set are converted to dynamic disks. Fault-tolerance features and the ability to modify disks without having to reboot the server are what distinguish dynamic disks from basic disks.
A basic disk can simply be converted to a dynamic disk without loss of data. When a basic disk is converted, the partitions are automatically changed to the appropriate volumes. However, converting a dynamic disk back to a basic disk is not as simple. First, all the data on the dynamic disk must be backed up or moved. Then, all the volumes on the dynamic disk have to be deleted. The dynamic disk can then be converted to a basic disk. Partitions and logical drives can be created, and the data can be restored.
The following are actions that can be performed on basic disks:
- Formatting partitions
- Marking partitions as active
- Creating and deleting primary and extended partitions
- Creating and deleting logical drives
- Converting from a basic disk to a dynamic disk
The following are actions that can be performed on dynamic disks:
- Creating and deleting simple, striped, spanned, mirrored, or RAID-5 volumes
- Removing or breaking a mirrored volume
- Extending simple or spanned volumes
- Repairing mirrored or RAID-5 volumes
- Converting from a dynamic disk to a basic disk after deleting all volumes
In Exercise 3.3, you’ll convert a basic disk to a dynamic disk.
Managing Volumes
A volume set is created from volumes that span multiple drives by using the free space from those drives to construct what will appear to be a single drive. The following list includes the various types of volume sets and their definitions:
- Simple volume uses only one disk or a portion of a disk.
- Spanned volume is a simple volume that spans multiple disks, with a maximum of 32. Use a spanned volume if the volume needs are too great for a single disk.
- Striped volume stores data in stripes across two or more disks. A striped volume gives you fast access to data but is not fault tolerant, nor can it be extended or mirrored. If one disk in the striped set fails, the entire volume fails.
- Mirrored volume duplicates data across two disks. This type of volume is fault tolerant because if one drive fails, the data on the other disk is unaffected.
- RAID-5 volume stores data in stripes across three or more disks. This type of volume is fault tolerant because if a drive fails, the data can be re-created from the parity off of the remaining disk drives. Operating system files and boot files cannot reside on the RAID-5 disks.
Exercise 3.4 illustrates the procedure for creating a volume set.
Storage Spaces in Windows Server 2016
Windows Server 2016 includes a technology called Storage Spaces. Windows Server 2016 allows an administrator to virtualize storage by grouping disks into storage pools. These storage pools can then be turned into virtual disks called storage spaces.
The Storage Spaces technology allows an administrator to have a highly available, scalable, low-cost, and flexible solution for both physical and virtual installations. Storage Spaces allows you to set up this advantage on either a single server or in scalable multinode mode. So, before going any further, let’s look at these two terms that you must understand.
Storage Pools Storage pools are a group of physical disks that allows an administrator to delegate administration, expand disk sizes, and group disks together.
Storage Spaces Storage spaces allow an administrator to take free space from storage pools and create virtual disks called storage spaces. Storage spaces give administrators the ability to have precise control, resiliency, and storage tiers.
Storage spaces and storage pools can be managed by an administrator through the use of the Windows Storage Management API, Server Manager, or Windows PowerShell.
One of the advantages of using the Storage Spaces technology is the ability to set up resiliency. There are three types of Storage Space resiliency: mirror, parity, and simple (no resiliency).
Now that you understand what storage spaces and storage pools do, let’s take a look at some of the other advantages of using these features in Windows Server 2016.
Availability One advantage to the Storage Spaces technology is the ability to fully integrate the storage space with failover clustering. This advantage allows administrators to achieve service deployments that are continuously available. Administrators have the ability to set up storage pools to be clustered across multiple nodes within a single cluster.
Tiered Storage The Storage Spaces technology allows virtual disks to be created with a two-tier storage setup. For data that is used often, you have an SSD tier; for data that is not used often, you use an HDD tier. The Storage Spaces technology will automatically transfer data at a subfile level between the two different tiers based on how often the data is used. Because of tiered storage, performance is greatly increased for data that is used most often, and data that is not used often still gets the advantage of being stored on a low-cost storage option.
Delegation One advantage of using storage pools is that administrators have the ability to control access by using access control lists (ACLs). What is nice about this advantage is that each storage pool can have its own unique access control lists. Storage pools are fully integrated with Active Directory Domain Services.
Redundant Array of Independent Disks
The ability to support drive sets and arrays using Redundant Array of Independent Disks (RAID) technology is built into Windows Server 2016. RAID can be used to enhance data performance, or it can be used to provide fault tolerance to maintain data integrity in case of a hard disk failure. Windows Server 2016 supports three types of RAID technologies: RAID-0, RAID-1, and RAID-5.
RAID-0 (Disk Striping) Disk striping is using two or more volumes on independent disks created as a single striped set. There can be a maximum of 32 disks. In a striped set, data is divided into blocks that are distributed sequentially across all of the drives in the set. With RAID-0 disk striping, you get very fast read and write performance because multiple blocks of data can be accessed from multiple drives simultaneously. However, RAID-0 does not offer the ability to maintain data integrity during a single disk failure. In other words, RAID-0 is not fault tolerant; a single disk event will cause the entire striped set to be lost, and it will have to be re-created through some type of recovery process, such as a tape backup.
RAID-1 (Disk Mirroring) Disk mirroring is two logical volumes on two separate identical disks created as a duplicate disk set. Data is written on two disks at the same time; that way, in the event of a disk failure, data integrity is maintained and available. Although this fault tolerance gives administrators data redundancy, it comes with a price because it diminishes the amount of available storage space by half. For example, if an administrator wants to create a 300GB mirrored set, they would have to install two 300GB hard drives into the server, thus doubling the cost for the same available space.
RAID-5 Volume (Disk Striping with Parity) With a RAID-5 volume, you have the ability to use a minimum of three disks and a maximum of 32 disks. RAID-5 volumes allow data to be striped across all of the disks with an additional block of error-correction called parity. Parity is used to reconstruct the data in the event of a disk failure. RAID-5 has slower write performance than the other RAID types because the OS must calculate the parity information for each stripe that is written, but the read performance is equivalent to a stripe set, RAID-0, because the parity information is not read. Like RAID-1, RAID-5 comes with additional cost considerations. For every RAID-5 set, roughly an entire hard disk is consumed for storing the parity information. For example, a minimum RAID-5 set requires three hard disks, and if those disks are 300GB each, approximately 600GB of disk space is available to the OS and 300GB is consumed by parity information, which equates to 33.3 percent of the available space. Similarly, in a five-disk RAID-5 set of 300GB disks, approximately 1,200GB of disk space is available to the OS, which means that 20 percent of the total available space is consumed by the parity information. The words roughly and approximately are used when calculating disk space because a 300GB disk will really be only about 279GB of space. This is because vendors define a gigabyte as 1 billion bytes, but the OS defines it as 230 (1,073,741,824) bytes. Also, remember that file systems and volume managers have overhead as well.
Table 3.1 breaks down the various aspects of the supported RAID types in Windows Server 2016.
TABLE 3.1 Supported RAID-level properties in Windows Server 2016
| RAID Level | RAID Type | Fault Tolerant | Advantages | Minimum Number of Disks | Maximum Number of Disks |
| 0 | Disk striping | No | Fast reads and writes | 2 | 32 |
| 1 | Disk mirroring | Yes | Data redundancy and faster writes than RAID-5 | 2 | 2 |
| 5 | Disk striping with parity | Yes | Data redundancy with less overhead and faster reads than RAID-1 | 3 | 32 |
Creating RAID Sets
Now that you understand the concepts of RAID and how to use it, you can look at the creation of RAID sets in Windows Server 2016. The process of creating a RAID set is the same as the process for creating a simple or spanned volume set, except for the minimum disk requirements associated with each RAID type.
Creating a mirrored volume set is basically the same as creating a volume set except that you will select New Mirrored Volume. It is after the disk select wizard appears that you’ll begin to see the difference. Since a new mirrored volume is being created, the volume requires two disks.
During the disk select process, if only one disk is selected, the Next button will be unavailable because the disk minimum has not been met. Refer to Figure 3.4 to view the Select Disks page of the New Mirrored Volume Wizard during the creation of a new mirrored volume, and notice that the Next button is not available.

FIGURE 3.4 Select Disks page of the New Mirrored Volume Wizard
To complete the process, you must select a second disk by highlighting the appropriate disk and adding it to the volume set. Once the second disk has been added, the Next button is available to complete the mirrored volume set creation.
A drive letter will have to be assigned, and the volume will need to be formatted. The new mirrored volume set will appear in Disk Management. In Figure 3.5, notice that the capacity of the volume equals one disk even though two disks have been selected.
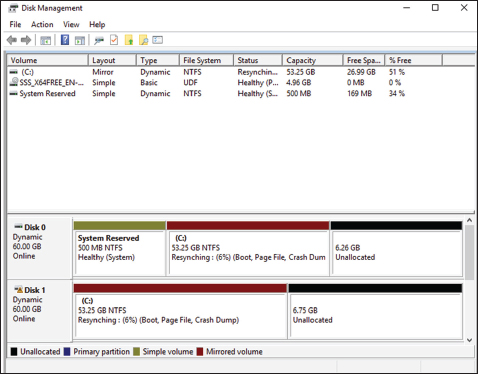
FIGURE 3.5 Newly created mirrored volume set
To create a RAID-5 volume set, you use the same process that you use to create a mirrored volume set. The only difference is that a RAID-5 volume set requires that a minimum of three disks be selected to complete the volume creation. The process is simple: Select New RAID-5 Volume, select the three disks that will be used in the volume set, assign a drive letter, and format the volume.
Mount Points
With the ever-increasing demands of storage, mount points are used to surpass the limitation of 26 drive letters and to join two volumes into a folder on a separate physical disk drive. A mount point allows you to configure a volume to be accessed from a folder on another existing disk.
Through Disk Management, a mount point folder can be assigned to a drive instead of using a drive letter, and it can be used on basic or dynamic volumes that are formatted with NTFS. However, mount point folders can be created only on empty folders within a volume. Additionally, mount point folder paths cannot be modified; they can be removed only once they have been created. Exercise 3.5 shows the steps to create a mount point.
Microsoft MPIO
Multipath I/O (MPIO) is associated with high availability because a computer will be able to use a solution with redundant physical paths connected to a storage device. Thus, if one path fails, an application will continue to run because it can access the data across the other path.
The MPIO software provides the functionality needed for the computer to take advantage of the redundant storage paths. MPIO solutions can also load-balance data traffic across both paths to the storage device, virtually eliminating bandwidth bottlenecks to the computer. What allows MPIO to provide this functionality is the new native Microsoft Device Specific Module (Microsoft DSM). The Microsoft DSM is a driver that communicates with storage devices—iSCSI, Fibre Channel, or SAS—and it provides the chosen load-balancing policies. Windows Server 2016 supports the following load-balancing policies:
Failover In a failover configuration, there is no load balancing. There is a primary path that is established for all requests and subsequent standby paths. If the primary path fails, one of the standby paths will be used.
Failback This is similar to failover in that it has primary and standby paths. However, with failback you designate a preferred path that will handle all process requests until it fails, after which the standby path will become active until the primary reestablishes a connection and automatically regains control.
Round Robin In a round-robin configuration, all available paths will be active and will be used to distribute I/O in a balanced round-robin fashion.
Round Robin with a Subset of Paths In this configuration, a specific set of paths will be designated as a primary set and another as standby paths. All I/O will use the primary set of paths in a round-robin fashion until all of the sets fail. Only at this time will the standby paths become active.
Dynamic Least Queue Depth In a dynamic least queue depth configuration, I/O will route to the path with the least number of outstanding requests.
Weighted Path In a weighted path configuration, paths are assigned a numbered weight. I/O requests will use the path with the least weight—the higher the number, the lower the priority.
Exercise 3.6 demonstrates the process of installing the Microsoft MPIO feature for Windows Server 2016.
Typically, most storage arrays work with the Microsoft DSM. However, some hardware vendors require DSM software that is specific to their products. Third-party DSM software is installed through the MPIO utility as follows:
- Open Administrative Tools ➢ MPIO.
- Select the DSM Install tab.
- Add the path of the INF file and click Install.
Configuring iSCSI Target
Internet Small Computer System Interface (iSCSI) is an interconnect protocol used to establish and manage a connection between a computer (initiator) and a storage device (target). It does this by using a connection through TCP port 3260, which allows it to be used over a LAN, a WAN, or the Internet. Each initiator is identified by its iSCSI Qualified Name (iqn), and it is used to establish its connection to an iSCSI target.
iSCSI was developed to allow block-level access to a storage device over a network. This is different from using a network attached storage (NAS) device that connects through the use of Common Internet File System (CIFS) or Network File System (NFS).
Block-level access is important to many applications that require direct access to storage. Microsoft Exchange and Microsoft SQL are examples of applications that require direct access to storage.
By being able to leverage the existing network infrastructure, iSCSI was also developed as an alternative to Fibre Channel storage by alleviating the additional hardware costs associated with a Fibre Channel storage solution.
iSCSI also has another advantage over Fibre Channel in that it can provide security for the storage devices. iSCSI can use Challenge Handshake Authentication Protocol (CHAP or MS-CHAP) for authentication and Internet Protocol Security (IPsec) for encryption. Windows Server 2016 is able to connect an iSCSI storage device out of the box with no additional software needing to be installed. This is because the Microsoft iSCSI initiator is built into the operating system.
Windows Server 2016 supports two different ways to initiate an iSCSI session.
- Through the native Microsoft iSCSI software initiator that resides on Windows Server 2016
- Using a hardware iSCSI host bus adapter (HBA) that is installed in the computer
Both the Microsoft iSCSI software initiator and iSCSI HBA present an iSCSI qualified name that identifies the host initiator. When the Microsoft iSCSI software initiator is used, the CPU utilization may be as much as 30 percent higher than on a computer with a hardware iSCSI HBA. This is because all of the iSCSI process requests are handled within the operating system. Using a hardware iSCSI HBA, process requests can be offloaded to the adapter, thus freeing the CPU overhead associated with the Microsoft iSCSI software initiator. However, iSCSI HBAs can be expensive, whereas the Microsoft iSCSI software initiator is free.
It is worthwhile to install the Microsoft iSCSI software initiator and perform load testing to see how much overhead the computer will have prior to purchasing an iSCSI HBA or HBAs, depending on the redundancy level. Exercise 3.7 explains how to install and configure an iSCSI connection.
Internet Storage Name Service
Internet Storage Name Service (iSNS) allows for central registration of an iSCSI environment because it automatically discovers available targets on the network. The purpose of iSNS is to help find available targets on a large iSCSI network.
The Microsoft iSCSI initiator includes an iSNS client that is used to register with the iSNS. The iSNS feature maintains a database of clients that it has registered either through DCHP discovery or through manual registration. iSNS DHCP is available after the installation of the service, and it is used to allow iSNS clients to discover the location of the iSNS. However, if iSNS DHCP is not configured, iSNS clients must be registered manually with the iscsicli command.
To execute the command, launch a command prompt on a computer hosting the Microsoft iSCSI and type iscsicli addisnsserver server_name, where server_name is the name of the computer hosting iSNS. Exercise 3.8 walks you through the steps required to install the iSNS feature on Windows Server 2016, and then it explains the different tabs in iSNS.
Implement Thin Provisioning and Trim
Thin provisioning and trim can be useful features that allow organizations to get the most out of their storage arrays. These solutions apply directly to a virtualized environment using virtual disks that are thin provisioned.
Thin provisioning is a way of providing what is known as just-in-time allocations. Blocks of data are written to disk only as they are used instead of zeroing out all of the blocks of data that have been allocated to the virtual disk configuration. Thin provisioning is tricky to manage properly because you could easily find yourself in a position where you have an over-provisioned environment because of over-allocation.
For example, you have 100 VMs that are all provisioned with 40GB thin-provisioned virtual disks. Each VM is currently utilizing only 20GB of the total 40GB that has been allocated. The problem is that you have only 2TB worth of storage. Without realizing it, you’ve over-provisioned your environment by 200 percent because of thin provisioning.
This is where trim comes in to help us manage thin provisioning. Trim automatically reclaims free space that is not being used. In addition to trim, Windows Server 2016 provides standardized notifications that will alert administrators when certain storage thresholds are crossed.
Fibre Channel
Fibre Channel storage devices are similar to iSCSI storage devices in that they both allow block-level access to their data sets and can provide MPIO policies with the proper hardware configurations. However, Fibre Channel requires a Fibre Channel HBA, fiber-optic cables, and Fibre Channel switches to connect to a storage device.
A World Wide Name (WWN) from the Fibre Channel HBA is used from the host and device so that they can communicate directly with each other, similar to using a NIC’s MAC address. In other words, a logical unit number (LUN) is presented from a Fibre Channel storage device to the WWN of the host’s HBA. Fibre Channel has been the preferred method of storage because of the available connection bandwidth between the storage and the host.
Fibre Channel devices support 1Gb/s, 2Gb/s, and 4Gb/s connections, and they soon will support 8Gb/s connections, but now that 10Gb/s Ethernet networks are becoming more prevalent in many datacenters, iSCSI can be a suitable alternative. It is important to consider that 10Gb/s network switches can be more expensive than comparable Fibre Channel switches.
N-Port Identification Virtualization (NPIV) is a Fibre Channel facility allowing multiple N-port IDs to share a single physical N-Port. This allows multiple Fibre Channel initiators to occupy a single physical port. By using a single port, this eases hardware requirements in storage area network (SAN) design.
Network Attached Storage
The concept of a network attached storage (NAS) solution is that it is a low-cost device for storing data and serving files through the use of an Ethernet LAN connection. A NAS device accesses data at the file level via a communication protocol such as NFS, CIFS, or even HTTP, which is different from iSCSI or FC Fibre Channel storage devices that access the data at the block level. NAS devices are best used in file-storing applications, and they do not require a storage expert to install and maintain the device. In most cases, the only setup that is required is an IP address and an Ethernet connection.
Virtual Disk Service
Virtual Disk Service (VDS) was created to ease the administrative efforts involved in managing all of the various types of storage devices. Many storage hardware providers used their own applications for installation and management, and this made administering all of these various devices very cumbersome.
VDS is a set of application programming interfaces (APIs) that provides a centralized interface for managing all of the various storage devices. The native VDS API enables the management of disks and volumes at an OS level, and hardware-vendor-supplied APIs manage the storage devices at a RAID level. These are known as software and hardware providers.
A software provider is host based, and it interacts with Plug and Play Manager because each disk is discovered and operates on volumes, disks, and disk partitions. VDS includes two software providers: basic and dynamic. The basic software provider manages basic disks with no fault tolerance, whereas the dynamic software providers manage dynamic disks with fault management. A hardware provider translates the VDS APIs into instructions specific to the storage hardware. This is how storage management applications are able to communicate with the storage hardware to create LUNs or Fibre Channel HBAs to view the WWN. The following are Windows Server 2016 storage management applications that use VDS:
- The Disk Management snap-in is an application that allows you to configure and manage the disk drives on the host computer. You have already seen this application in use when you initialized disks and created volume sets.
- DiskPart is a command-line utility that configures and manages disks, volumes, and partitions on the host computer. It can also be used to script many of the storage management commands. DiskPart is a robust tool that you should study on your own because it is beyond the scope of this book. Figure 3.8 shows the various commands and their function in the DiskPart utility.

FIGURE 3.8 DiskPart commands
- DiskRAID is also a scriptable command-line utility that configures and manages hardware RAID storage systems. However, at least one VDS hardware provider must be installed for DiskRAID to be functional. DiskRAID is another useful utility that you should study on your own because it’s beyond the scope of this book.
Understanding Data Center Bridging
I think the easiest way to understanding Data Center Bridging (DCB) is to understand NIC bridging. Many of us who have used laptops have used both the Wireless and Wired networks at the same time. This is bridging network adapter cards to work as one. Well, Data Center Bridging is the same thing but just done on a larger scale.
The Institute of Electrical and Electronic Engineers (IEEE) created a suite of standards called Data Center Bridging. DCB allows the same ethernet infrastructure to work throughout the datacenter. This means that all of the network servers, clusters, and datacenter will share the same ethernet infrastructure. DCB works through the use of hardware based bandwidth allocation. This means that the hardware controls the flow of data through DCB.
DCB is nice because when you setup the hardware based flow control, you can determine which type of traffic gets a higher priority to the allocated bandwidth. This can be very useful for data that bypasses the operating system and accesses the network adapters directly (like virtualization can). DCB can work with different types of network adapters including Remote Direct Memory Access (RDMA) over Converged Ethernet, Internet Small Computer System Interface (iSCSI), or Fiber Channel over Ethernet (FCoE).
The reason that the IEEE has developed the DCB standard is because many third party and hardware manufacturers do not work together well. By having an industry standard of hardware based flow control protocol, many IT datacenters can use DCB to make different vendors work together. Also, Windows Server 2016 makes it very easy to deploy and manage DCB. There are a couple of requirements that are needed when deploying DCB through Windows Server 2016:
- The Ethernet adapters installed into the Windows Server 2016 systems must be DCB compatible.
- The Hardware switches that are deployed to your infrastructure must also be DCB compatible.
DCB can be installed onto a Windows Server two ways: through Server Manager or through PowerShell. Here are the steps for both ways.
Installing DCB Using PowerShell
If you would like to install and use DCB through PowerShell, you need to complete the following steps:
- Click the Start button, then right-click Windows PowerShell ➢ More ➢ Run As Administrator.
-
In the Windows PowerShell console, enter the following command followed by the Enter key:
Install-WindowsFeature “data-center-bridging”
Installing DCB Using Server Manager
If you would like to install and use DCB through Server Manager, you need to complete the following steps:
- On the Windows Server 2016 system, open Server Manager.
- Click the Add Roles And Features link.
- At the Before You Begin screen, click Next.
- At the Select Installation Type screen, choose Role-based or feature-based installation and then click Next.
- The Select Destination Server screen will be next. Make sure the server that you want to install DCB on is selected and then click Next.
- On the Select Server Roles screen, just click Next.
- On the Select Features screen, check the box for Data Center Bridging. If a dialog box appears asking to install additional features, click the Add Feature button. Then click Next.
- At the Confirmation screen, verify that everything is OK and then click the Install button.
Configuring Permissions
Before I can dive into how permissions work, let’s first talk about how clients and servers talk to each other. In the Microsoft Windows world, clients and servers talk to each other using the Server Message Block (SMB) protocol. So let’s start our discussion there.
Understanding SMB
Server Message Block (SMB) is a network-sharing protocol that allows Windows machines (either client- or server-based operating systems) that are running applications to read and write data to files. SMB also allows systems to request services or resources that are running on remote servers. The one advantage to SMB is that it doesn’t matter what network protocol you are using (TCP/IP, etc.), SMB runs on top of the network protocol that is being used on your corporate infrastructure.
It’s important to understand what protocols work with client- and server-based systems because it can affect your network’s performance. For example, when Microsoft released Windows Server 2012, it released SMB 3.0. The issue that many users had was that SMB 3.0 was not compatible with Macintosh-based systems. So if you were running Apple Macintosh on your network and upgraded to Windows Server 2012, your Apple-based systems would not communicate properly. This issue was eventually resolved, but this is why it’s important to understand that SMB file sharing is used between Windows client and server systems.
Now that you understand how Windows clients and servers communicate with each other, let’s look at how we can protect the files and folders that clients access. You can add security to a folder in two ways: NTFS security or shared permissions. But when it comes to securing files, you can secure files in only one way: NTFS Security. So let’s take a look at these methods and how they work independently and then together.
Understanding NTFS
NTFS is an option that you have when you are formatting a hard drive. You can format a hard drive for a Microsoft operating system in three ways:
- File Allocation Table (FAT) is supported on older operating systems only (Server 2003, Server 2000, XP, and so on).
- FAT32 is supported in Windows Server 2016.
- NTFS is supported in Windows Server 2016.
NTFS has many advantages over FAT and FAT32. They include the following:
Compression Compression helps compact files or folders to allow for more efficient use of hard drive space. For example, a file that usually takes up 20 MB of space might use only 13 MB after compression. To enable compression, just open the Advanced Attributes dialog box for a folder and check the Compress Contents To Save Disk Space box (see Figure 3.9).

FIGURE 3.9 Setting up compression on a folder
Quotas Quotas allow you to limit how much hard drive space users can have on a server. Quotas are discussed in greater detail in the section “Configuring Disk Quotas.”
Encryption Encrypting File System (EFS) allows a user or administrator to secure files or folders by using encryption. Encryption employs the user’s security identification (SID) number to secure the file or folder. To implement encryption, open the Advanced Attributes dialog box for a folder and check the Encrypt Contents To Secure Data box (see Figure 3.10).
FIGURE 3.10 Setting up encryption on a folder
If files are encrypted using EFS and an administrator has to unencrypt the files, there are two ways to do this. First, you can log in using the user’s account (the account that encrypted the files) and unencrypt the files. Second, you can become a recovery agent and manually unencrypt the files.
Security One of the biggest advantages of NTFS is security. Security is one of the most important aspects of an IT administrator’s job. An advantage of NTFS security is that the security can be placed on individual files and folders. It does not matter whether you are local to the share (in front of the machine where the data is stored) or remote to the share (coming across the network to access the data); the security is always in place with NTFS.
- The default security permission is Users = Read on new folders or shares.
- NTFS security is additive. In other words, if you are a member of three groups (Marketing, Sales, and R&D) and these three groups have different security settings, you get the highest level of permissions. For example, let’s say you have a user by the name of wpanek who belongs to all three groups (Marketing, Sales, and R&D). Figure 3.11 shows this user’s permissions. The Marketing group has Read and Execute permissions to the StormWind Documents folder. The Sales group has Read and Write, and the R&D group has Full Control. Since wpanek is a member of all three groups, wpanek would get Full Control (the highest level).

FIGURE 3.11 Security settings on the StormWind Documents folder
The only time this does not apply is with the Deny permission. Deny overrides any other group setting. Taking the same example, if Sales has Deny permission for the StormWind Documents folder, the user wpanek would be denied access to that folder. The only way around this Deny is if you added wpanek directly to the folder and gave him individual permissions (see Figure 3.12). Individual permissions override a group Deny. In this example, the individual right of wpanek would override the Sales group’s Deny. The user’s security permission for the StormWind Documents folder would be Full Control.
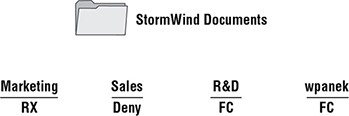
FIGURE 3.12 Individual permissions
Understanding Shared Permissions
When you set up a folder to be shared, you have the ability to assign that folder’s permissions. Shared permissions can be placed only on the folder and not on individual files. Files have the ability to inherit their permissions from the parent folder.
Shared folder permissions are in effect only when users are remote to the shared data. In other words, if computer A shares a folder called Test Share and assigns that folder shared permissions, those permissions would apply only if you connected to that share from a machine other than computer A. If you were sitting in front of computer A, the shared permissions would not apply.
Like NTFS permissions (discussed in the previous section), shared permissions are additive, so users receive the highest level of permissions granted by the groups of which they are members.
Also, as with NTFS permissions, the Deny permission (see Figure 3.13) overrides any group permission, and an individual permission overrides a group Deny.
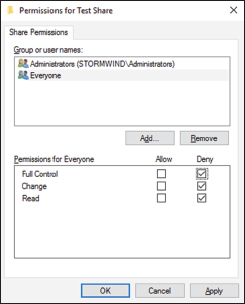
FIGURE 3.13 Setting up permissions on a shared folder
The default shared permission is Administrators = Full Control. The shared permissions going from lowest to highest are Read, Change, Full Control, and Deny. Table 3.2 compares the two different types of permissions and security.
TABLE 3.2 NTFS security vs. shared permissions
| Description | NTFS | Shared |
| Folder-level security. | Yes | Yes |
| File-level security. | Yes | No |
| In effect when local to the data. | Yes | No |
| In effect when remote to the data. | Yes | Yes |
| Permissions are additive. | Yes | Yes |
| Group Deny overrides all other group settings. | Yes | Yes |
| Individual settings override group settings. | Yes | Yes |
How NTFS Security and Shared Permissions Work Together
When you set up a shared folder, you need to set up shared permissions on that folder. If you’re using NTFS, you will also need to set up NTFS security on the folder. Since both shared permissions and NTFS security are in effect when the user is remote, what happens when the two conflict?
These are the two basic rules of thumb:
- The local permission is the NTFS permission.
- The remote permission is the more restrictive set of permissions between NTFS and shared.
This is easy to do as long as you do it in steps. Let’s look at Figure 3.14 and walk through the process of figuring out what wpanek has for rights.
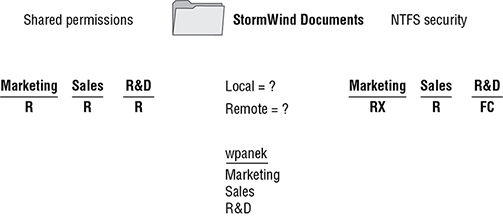
FIGURE 3.14 NTFS security and shared permissions example
As you can see, wpanek belongs to three groups (Marketing, Sales, and R&D), and all three groups have settings for the StormWind Documents folder. In the figure, you will notice that there are two questions: Remote = ? and Local = ? That’s what you need to figure out—what are wpanek’s effective permissions when he is sitting at the computer that shares the folder, and what are his effective permissions when he connects to the folder from another computer (remotely)? To figure this out, follow these steps:
- Add up the permissions on each side separately.
Remember, permissions and security are additive. You get the highest permission. So, if you look at each side, the highest shared permission is the Read permission. The NTFS security side should add up to equal Full Control. Thus, now you have Read permission on shared and Full Control on NTFS.
- Determine the local permissions.
Shared permissions do not apply when you are local to the data. Only NTFS would apply. Thus, the local permission would be Full Control.
- Determine the remote permissions.
Remember, the remote permission is the most restrictive set of permissions between NTFS and shared. Since Read is more restrictive than Full Control, the remote permission would be Read.
Let’s try another. Look at Figure 3.15, and see whether you can come up with wpanek’s local and remote permissions.

FIGURE 3.15 NTFS security and shared permissions
Your answer should match the following:
- Local = Read
- Remote = Read
Remember, first you add up each side to get the highest level of rights. NTFS would be Read, and shared would be Full Control. The local permission is always just NTFS (shared does not apply to local permissions), and remote permission is whichever permission (NTFS or shared) is the most restrictive (which would be Read on the NTFS side).
Exercise 3.9 walks you through the process of setting both NTFS and shared permissions. This exercise assumes that you have Active Directory installed on the server and you have some groups created. If you do not, go to Computer Management (right-click Start ➢ Computer Management) and under Local Users and Groups, create a new group that can be used in this exercise.
Understanding NFS Shares
The NFS role service and feature set gives IT administrators the ability to integrate a Windows Server–based environment with Unix-based operating systems. Most corporate environments today consist of a mixed operating system infrastructure to some extent. Using a Windows NFS file server, you can configure file shares for use by multiple operating systems throughout the environment.
Windows Server 2016 takes those capabilities even further by enabling you to integrate with platforms such as ESXi. ESXi is VMware’s exclusive operating system–independent hypervisor. ESXi is referred to as a bare-metal operating system because once it is installed on server virtualization hardware, guest virtual machines can be installed without requiring the use of any other underlying operating system. With Windows Server 2016, you can use an NFS share efficiently as an ESXi data store to house all of your guest virtual machines. Let’s take a look at configuring an NFS data store in Exercise 3.10.
For this exercise, you will need the following:
- A Windows Server 2016 server
- A VMware ESXi 5 server
The previous exercise shows how versatile Windows Server 2016 shares can be. The same principles can be applied to making Windows Server shares available to other Unix-based operating systems such as ESXi.
Configuring Disk Quotas
In this chapter so far, you have learned how to set up permissions and security and how NTFS and shared permissions work with each other. It’s time to learn how to limit users’ hard drive space on the servers.
Disk quotas give administrators the ability to limit how much storage space a user can have on a hard drive. As mentioned earlier in this chapter, disk quotas are an advantage of using NTFS over FAT32. If you decide to use FAT32 on a volume or partition, quotas will not be available.
You have a few options available to you when you set up disk quotas. You can set up disk quotas based on volume or on users.
Setting Quotas by Volume One way to set up disk quotas is by setting the quota by volume, on a per-volume basis. This means that if you have a hard drive with C:, D:, and E: volumes, you would have to set up three individual quotas—one for each volume. This is your umbrella. This is where you set up an entire disk quota based on the volume for all users.
Setting Quotas by User You have the ability to set up quotas on volumes by user. Here is where you would individually let users have independent quotas that exceed your umbrella quota.
Specifying Quota Entries You use quota entries to configure the volume and user quotas. You do this on the Quotas tab of the volume’s Properties dialog box. (See Exercise 3.11.)
Creating Quota Templates Quota templates are predefined ways to set up quotas. Templates allow you to set up disk quotas without needing to create a disk quota from scratch. One advantage of using a template is that when you want to set up disk quotas on multiple volumes (C:, D:, and E:) on the same hard drive, you do not need to re-create the quota on each volume.
Exercise 3.11 will show you how to set up an umbrella quota for all users and then have an individual account in your Active Directory exceed this quota.
Windows PowerShell
Windows PowerShell is a task-based, command-line scripting utility that allows you to execute commands locally or remotely on a Windows Server 2016 machine. It was specifically designed for system administrators to allow for local or remote administration.
Most operating system shells, including Cmd.exe and the SH, KSH, CSH, and BASH Unix shells, work by running a command or utility in a new process and then presenting the results to the user as text. These system shells also have commands that are built into the shell and execute in the shell process. In most system shells, because there are only a few built-in commands, many utilities have been created over the years to complete tasks.
Windows PowerShell contains an interactive prompt and a scripting environment that can be used independently or in combination. Unlike the previously mentioned system shells, which accept and return text, Windows PowerShell is built using the .NET Framework common language runtime (CLR) and the .NET Framework. Because of this, Windows PowerShell accepts and returns .NET Framework objects. This important change in the shell allows you to use entirely new tools and methods to manage and configure Windows.
Windows PowerShell introduced the concept of using cmdlets (pronounced “command-lets”). Cmdlets are simple, single-function command-line tools built into the shell. Administrators can use the cmdlets independently, or they can combine these tools to execute complex tasks and harness the true power of PowerShell. Windows PowerShell includes more than a hundred core cmdlets, but the true advantage of PowerShell is that anyone can write their own cmdlets and share them with other users.
Administrators often automate the management of their multicomputer environments by running sequences of long-running tasks, or workflows, which can affect multiple managed computers or devices at the same time. Windows PowerShell can help administrators accomplish workflows in a more effective way. Windows PowerShell includes some of the following advantages:
Windows PowerShell Scripting Syntax Administrators can use Windows PowerShell scripting expertise to create script-based tasks by using the extensible Windows PowerShell language. Windows PowerShell script-based tasks are easy to create, and IT members can share them easily by entering them into an email or publishing them on a web page.
Day-to-Day Management Tasks Windows PowerShell allows administrators to configure and maintain servers. PowerShell allows you to pre-create scripts or use ready-to-use scripts to handle day-to-day tasks. This way, an administrator can just run a script to complete server configurations or management.
Multiserver Management Administrators can concurrently apply workflow tasks to hundreds of managed servers and computers. Windows PowerShell includes common parameters to set workflows automatically, such as PSComputerName, to enable multicomputer administrative scenarios. You can also use PowerShell to help you create new servers by creating new virtual hard drive (.vhd) files.
Single Task to Manage Complex, End-to-End Processes Administrators can combine related scripts or commands that act upon an entire scenario into a single workflow. The status of activities within the workflow can be viewed at any time.
Automated Failure Recovery Using Windows PowerShell allows workflows to survive both planned and unplanned interruptions, such as computer restarts. Administrators have the ability to suspend workflow operations and then restart or resume the workflow from the exact point at which it was suspended. Administrators can then create checkpoints as part of their workflow process so that they can resume the workflow from the last persisted task (or checkpoint) instead of restarting the workflow from the beginning.
Activity Retries Administrators can create workflows that also specify activities that must rerun if the activity does not get completed on one or more managed computers (for example, if a target node was not online at the time the activity was running).
Connect and Disconnect Administrators can connect and disconnect from the node that is executing the workflow, but the workflow will continue to run.
Configuring Non-Domain Servers Another advantage of PowerShell is the ability to configure non-domain servers from a Windows Server 2016 server (domain member). When you are running commands on the non-domain machine, you must have access to the non-domain machine’s system administrator account. Another way to configure a non-domain server is to connect through remote desktop into the non-domain server and then configure the machine or run PowerShell commands while connected through remote desktop.
Task Scheduling Workflow tasks have the ability to be scheduled and started when specific conditions are met. This is also true for any other Windows PowerShell cmdlet or script.
Table 3.3 defines a few of the cmdlets available in Windows PowerShell. Again, there are hundreds of cmdlets, and the ones listed in the table are just some of the more common ones. You can retrieve a list of all the cmdlets starting here:
http://technet.microsoft.com/en-us/scriptcenter/dd772285.aspx
TABLE 3.3 Windows PowerShell cmdlets
| Cmdlet | Definition |
| Add-VMHardDiskDrive | Allows you to add a .vhd file to a virtual machine. |
| Block-SmbShareAccess | This cmdlet allows an administrator to add a deny access control entry (ACE) to the security descriptor for the Server Message Block (SMB) share. |
| Clear-History | Deletes entries from the command history. |
| Close-SmbOpenFile | This allows an administrator to forcibly close an open file by one of the clients of the Server Message Block (SMB) server. |
| Close-SmbSession | This allows an administrator to forcibly kill a Server Message Block (SMB) session. |
| Format-table | Shows the results in a table format. |
| Get-Date | Shows the date and time. |
| Get-event | Shows an event in the event queue. |
| Get-Help Install-WindowsFeature | Shows the syntax and accepted parameters for the Install-WindowsFeature cmdlet. |
| Get-NetIPAddress | Shows information about IP address configuration. |
| Get-NfsClientConfiguration | Shows configuration settings for an NFS client. |
| Get-NfsMappedIdentity | Shows an NFS mapped identity. |
| Get-NfsMappingStore | Shows the configuration settings for the identity mapping store. |
| Get-NfsNetgroup | Shows the netgroup. |
| Get-NfsSession | Shows the information about client systems that are currently connected to a shares on an NFS server. |
| Get-NfsShare | Shows an NFS share on the NFS server. |
| Get-NfsSharePermission | Shows you the NFS shares permissions that are on a NFS server. |
| Get-Package | This command allows an administrator to view a list of all software packages that have been installed by using Package Management. |
| Get-ShieldedVMProvisioningStatus | This command allows you to view the provisioning status of a shielded virtual machine. |
| Get-SmbOpenFile | Allows an admin to see basic information about the files that are open on the Server Message Block (SMB) server. |
| Get-SmbShare | Allows an administrator to see the Server Message Block (SMB) shares on the computer. |
| Get-WindowsFeature | Shows a list of available and installed roles and features on the local server. |
| Get-WindowsFeature -ServerName | Shows a list of available and installed roles and features on a remote server. |
| Import-Module | Adds modules to the current session. |
| Install-Windowsfeature | This command allows you to installs a role, role service, or feature on the local or a specified remote server that is running Windows Server 2016. |
| Invoke-command | Runs commands on local or remote computers. |
| New-NfsShare | Allows you to create an NFS file share. |
| New-event | Creates a new event. |
| New-SmbShare | Allows an admin to create a new SMB share. |
| New-VHD | Allows you to create a new .vhd file. |
| Optimize-VHD | This command allows an administrator to optimize the allocation of space in virtual hard disk files, except for fixed virtual hard disks. |
| Out-file | Sends the job results to a file. |
| Receive-job | Gets the results of a Windows PowerShell background job. |
| Remove-job | Deletes a Windows PowerShell background job. |
| Remove-NfsShare | Allows you to delete an NFS file share. |
| Remove-SmbShare | Allows an admin to delete an SMB share. |
| Set-Date | Sets the system time and date on a computer. |
| Set-NetIPAddress | Modifies IP address configuration properties of an existing IP address. |
| Set-NetIPv4Protocol | Modifies information about the IPv4 protocol configuration. |
| Set-SmbShare | Allows an administrator to modify the properties of the Server Message Block (SMB) share. |
| Set-VM | This command allows you to configure some virtual machine settings, like configuring the locations for snap shot storage and smart paging. |
| Set-VMDvdDrive | Allows you to set a virtual machine to use a DVD or .ISO file. |
| Set-VMHost | This command allows an administrator to configure a Hyper-V host. |
| Set-VMMemory | This command allows you to set the RAM for a virtual machine. |
| Set-VMNetworkAdapter | This command allows an administrator to configure features of the virtual network adapter in a virtual machine or the management operating system. |
| Set-VMProcessor | This command allows an admin to configure the processors of a virtual machine. This command is also used for nested virtualization. While the virtual machine is OFF, run the Set-VMProcessor command on the physical Hyper-V host to enable nested virtualization for the virtual machine. |
| Set-VMSwitch | This command allows an administrator to configure a virtual switch. |
| Start-job | Starts a Windows PowerShell background job. |
| Stop-job | Stops a Windows PowerShell background job. |
| Trace-command | Configures and starts a trace of a command on a machine. |
| Uninstall-WindowsFeature | Removes a role or feature. |
Another advantage of Windows PowerShell is that it allows you to gain access to a file system on a computer and to access the Registry, digital certificate stores, and other data stores.
Complete Exercise 3.12 to start the Windows PowerShell utility in the Windows Server 2016 Server Core machine.
Using Server Manager
Server Manager is a very powerful MMC snap-in. If you want to install any features using a GUI interface, you will be using Server Manager. But what a lot of users don’t know is that you can use Server Manager to configure and manage the features that are installed on a server.
This also includes configuring disks. The one advantage of using Server Manager is that it is included with every GUI version of Windows Server 2016. When it comes to hard disks, Server Manager allows you to manage and create disks from within the Server Manager program (see Figure 3.17).
FIGURE 3.17 Using Server Manager
Once you are in the Server Manager application, click the File and Storage Services link on the left side. Once you are in the File and Storage Services section, you can create volumes, .vhd files, storage pools, shares, iSCSI targets, and work folders. You can also manage disk quotas from Server Manager.
One of the nice advantages of Server Manager is that you can configure and manage other Windows Servers from Server Manager. You need to add the server to Server Manager but once this is done, you can configure those servers. This is very helpful for machines that are running Server Core. If you need to install a Windows Serve without the GUI installed, you can still configure that server by using Server Manager.
Booting from a VHD
Now that I have shown you how to create a .VHD file by using PowerShell or by using Server Manager (Disk Administrator), I need to show you how to boot a machine up using that .VHD. To do this, we will work with the Boot Configuration Data store.
The Boot Configuration Data (BCD) store contains boot information parameters that were previously found in boot.ini in older versions of Windows (Windows Server 2003 and previous). To edit the boot options in the BCD store, use the bcdedit utility, which can be launched only from a command prompt. To open a command prompt window, do the following:
- Launch Windowssystem32cmd.exe.
- Open the Run command by pressing the Windows key plus the R key and then entering cmd.
- Type cmd.exe in the Search Programs And Files box and press Enter.
After the command prompt window is open, type bcdedit to launch the bcdedit utility. You can also type bcdedit /? to see all of the different bcdedit commands. To boot from a VHD file, you can use the following command:
bcdedit /set {GUID} description="Windows 2016 VHD"You can also use the bcdboot command to change how the Boot Configuration Data store boots from another Windows directory or VHD. So, for example, let’s say that you copied the bootable VHD drive to the V: drive. You would then use the following command to boot from the VHD file:
bcdboot V:Windows.vhdUnderstanding Data Deduplication
Data deduplication involves finding and removing duplicate data within the company network without compromising its integrity. The object is to store more data in less space by segmenting files into small chunks, identifying duplicate chunks, and maintaining a single copy of each chunk.
Data deduplication allows redundant copies of data chunks and then it references those multiple copies into a single copy. The data is first compressed and then the data is configured into a file system container in the System Volume Information folder.
After the data deduplication is completed, the data files will no longer be stored as independent files. The data files are replaced with markers that direct the computer system to the data blocks within the data store. Because the duplicate files are now migrated into a single data point, the data is only stored once and thus saves space on the servers.
When the files are then accessed, the data blocks are transparently re-assembled to fulfill the data request. This is all done without the users or applications having any knowledge that the data has been transformed into a single spot. This is a nice advantage to administrators because they do not have to worry that the data will be impacted in any negative way by using data deduplication.
To enable data deduplication, you enable a volume for duplication and then the data is automatically optimized. After this happens, the volume will contain the following:
Optimized Files The volume will contain files that are optimized, and that means that these files will have pointers to map the data to its respective areas of the chunk store.
Unoptimized files Some files will not meet the standards for data deduplication. These files will remain as Unoptimized files. For example, encrypted files are not eligible to be optimized. So these encrypted files will remain Unoptimized on the volume.
Chunk Store This is the location that the data duplicated files will be stored and optimized.
Free Space Because data files are optimized and require less space, your volumes will have additional free space that the administrator can use for users or applications.
Backup and Restoring Deduplicated Volumes
One issue that every administrator has faced in their career has to do with how we are going to protect our data by using backups. Backups are a million dollar industry because every backup company knows the importance of protecting your data. Well the issue that we, as IT administrators, deal with is backup space.
This is where data deduplication can help us out. Because the files are optimized, the files will require less space used on backups. This doesn’t matter if its cloud-based or tape-based backups. The backups will use less space and this in turn will allow us to retain the data longer without requiring more space. Also, because the data is optimized (thus being smaller), the backups will be quicker, and if any restores are needed, they will also be faster.
Any backup system that uses block-based backup applications should work without any modifications to the backup systems. File-based backups may be an issue because file-based backups normally copy the files in their original data form. If you are using file-based backups, you must have enough backup space available to handle the files in their original form.
If your organization is using the Windows Server 2016 backup software, your backups will have the ability to back up the files as optimized files and no other changes will be needed. Since most of us don’t use Windows backup, make sure your backup can handle data deduplication if you are planning on using it.
If you decide to use Windows backup, the following steps will help you backup and restore data duplicated files.
-
You will need to install Windows Server Backup on the machines running data deduplication. This can be done through Server Manager or by running the following PowerShell command:
Add-WindowsFeature -name Windows-Server-Backup - Administrators can then run a backup by using the following PowerShell command (this command is backing up the E: volume to the F: drive):
wbadmin start backup –include:E: -backuptarget:F: -
You will then want to get the version ID of the backup you just created. You can do this by running the following command:
wbadmin get versions -
After you run the wbadmin get version command, you will be given the date and time of the backup. This will be needed if you are going to do a restore. The following is an example of the output: 04/24/2017-14:30. To restore the volume you would run the following command:
Wbadmin start recovery –version:04/24/2017-14:30 -itemtype: Volume -items:E: -recoveryTarget:E:To restore just a part of a volume or folder, you would run the following command (for example, the E:WPanek folder):
Wbadmin start recovery –version:04/24/2017-14:30 -itemtype: File -items:E:WPanek -recursive
Installing and Enabling Data Deduplication
To install data deduplication, there are two ways to do the install. You can install data deduplication through Server Manager or through PowerShell. Let’s take a look at each way.
To install data deduplication by using Server Manager:
- On the Windows Server 2016 system, open Server Manager.
- Click the Add Roles and Features link.
- At the Before You Begin screen, click Next.
- At the Select Installation Type screen, choose Role-based or feature-based installation and then click Next.
- Choose the server where you want to install Data Deduplication and click Next.
- On the Select Server Roles screen, select File And Storage Services ➢ File And iSCSI Services and then select the Data Deduplication check box (shown in Figure 3.18). Click Next.
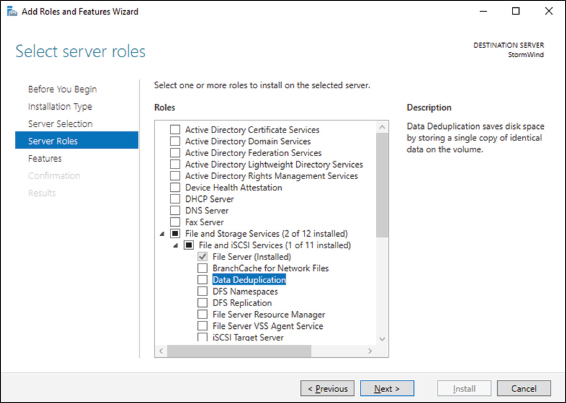
FIGURE 3.18 Selecting Data Deduplication
- Click Next on the Selected Features screen.
- Then click the Install button once you confirmed that all options are correct.
- Once completed, close Server Manager.
To install data deduplication by using PowerShell:
- Click the Start button, then right-click Windows PowerShell ➢ More ➢ Run As Administrator.
- In the Windows PowerShell console, enter the following commands (one at a time) followed by the Enter key:
- Import-Module ServerManager
- Add-WindowsFeature -name FS-Data-Deduplication
- Import-Module Deduplication
After you have installed data deduplication, you must then enable it on the servers. To enable data deduplication in Server Manager, you would need to complete the following steps:
- In Server Manager, click File And Storage Services.
- Click Volumes. On the right side, click the volume on which you want to set up Data Deduplication. Right-click the volume and choose Configure Data Deduplication (see Figure 3.19).

FIGURE 3.19 Enabling Data Deduplication
- The New Volume Deduplication Settings Wizard will start. Under the Data Deduplication pulldown, choose General Purpose File Server (shown in Figure 3.20). Enter the number of days that should elapse from the date of file creation until files are duplicated (I used 3 days), enter the extensions of any file types that should not be duplicated (I used .exe), and then click Add to browse to any folders with files that should not be duplicated (I included est share). Click OK once completed. You can also set a Deduplication Schedule by clicking the Set Deduplication Schedule button.
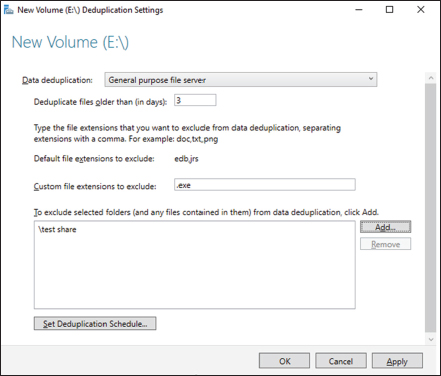
FIGURE 3.20 Data Deduplication setup
Monitoring Data Deduplicated
Finally, after data deduplication is installed and configured, an administrator will want to monitor the progress of the data deduplication jobs. To do this, you can run the following PowerShell commands (this command will show you the status of the deduplication process):
Get-DedupStatusGet-DedupVolume
Summary
In this chapter, I discussed file servers and how they can be effective on your network. I also discussed sharing folders for users to access, and then I discussed how to publish those shared folders to Active Directory.
You learned about NTFS security versus shared folder permissions and how to limit users’ hard drive space by setting up disk quotas. The chapter also covered the Encrypting File System (EFS) and how users can encrypt and compress files.
I also discussed how configuring file and storage solutions can be highly effective within your organization. You now have a better understanding of how Windows Server 2016 can provide you with extended functionality for effectively controlling corporate data.
Finally, I finished the chapter by talking about data deduplication and how data deduplication can help protect your corporate data and also provide a company with a backup solution.
Video Resources
There are videos available for the following exercises:
- 3.3
- 3.6
- 3.12
You can access the videos at http://sybextestbanks.wiley.com on the Other Study Tools tab.
Exam Essentials
Know storage technologies. Understand how to use the Fibre Channel, iSCSI, and NAS storage technologies. Know how to configure an iSCSI initiator and how to establish a connection to a target. Practice configuring tiered storage and using thin provisioning and trim.
Know how to configure NTFS security. One of the major advantages of using NTFS over FAT32 is access to additional security features. NTFS allows you to put security at the file and folder layers. NTFS security is in effect whether the user is remote or local to the computer with the data.
Know how to configure shared permissions. Shared permissions allow you to determine the access a user will receive when connecting to a shared folder. Shared permissions are allowed only at the folder layer and are in effect only when the user is remote to the computer with the shared data.
Understand how NTFS and shared permissions work together. NTFS and shared permissions are individually additive—you get the highest level of security and permissions within each type. NTFS is always in effect, and it is the only security available locally. Shared permissions are in effect only when connecting remotely to access the shared data. When the two types of permissions meet, the most restrictive set of permissions applies.
Know how to configure disk quotas. Disk quotas allow an organization to determine the amount of disk space that users can have on a volume of a server. An administrator can set up disk quotas based on volumes or by users. Each volume must have its own separate set of disk quotas.
Understand Windows PowerShell. Understanding Windows PowerShell is not only important for the exam, it will also allow you to configure Server Core more efficiently. Windows PowerShell is a command-line utility that allows you run single cmdlets as well as run complex tasks to exploit the full power from PowerShell.
Understand data deduplication. Understand that data deduplication involves finding and removing duplicate data within the company network without compromising its integrity. Understand that the goal is to store more data in less space by segmenting files into small chunks, identifying duplicate chunks, and maintaining a single copy of each chunk.
Review Questions
-
What is the default TCP port for iSCSI?
- 3260
- 1433
- 21
- 3389
-
You have a Windows Server 2016 Hyper-V host named Jupiter. You want to deploy several shielded virtual machines on Jupiter. You deploy a Host Guardian on a new server. You need to view the process of the shielded virtual machines installation. What should you run to see the progress of the shielded VM?
- Get-ShieldedVMProvisioningStatus cmdlet
- the Diskpart command
- the Set-VHD cmdlet
- the Set-VM cmdlet
-
You are the administrator of a mid-size network. You have a Hyper-V host that runs Windows Server 2016. The host contains a virtual machine named Virtual1. Virtual1 has resource metering enabled. You need to use resource metering to track the amount of network traffic that Virtual1 sends to the 10.10.16.0/20 network. Which command would you run?
- Add-VMNetworkAdapteiAd
- Set-VMNetworkAdapter
- New-VMResourcePool
- Set-VMNetworkAdapterRoutingDomamMapping
-
You are the administrator for an organization that has started using Hyper-V. You have a Hyper-V host named Server1 that runs Windows Server 2016. Server1 contains a virtual machine named Earth. You need to make sure that you can use nested virtualization on Earth. What should you run on Server1?
- The Mount-VHD cmdlet
- The DiskPart command
- The Set-VMProcessor cmdlet
- The Set-VM cmdlet
-
You need to ensure that VM1 and VM2 can communicate with each other only. The solution must prevent VM1 and VM2 from communicating with Server1. Which cmdlet should you use?
- Set-NetNeighbor
- Remove-VMSwitchTeamMember
- Set-VMSwitch
- Enable-VMSwitchExtension
-
You are the admin for a mid-size company. You have a Hyper-V host named Server1 that runs Windows Server 2016. Server1 has a dynamically expanding virtual hard disk (VHD) file that is 950 GB. The VHD currently contains around 450 GB of free space. You want to reduce the amount of disk space used by the VHD. What command should you run?
- The Mount-VHD cmdlet
- The DiskPart command
- The Set-VHD cmdlet
- The Optimize-VHD cmdlet
-
You have a Nano Server named Nano1. Which cmdlet should you use to identify whether the DNS Server role is installed on Nano1?
- Find-ServerPackage
- Get-Package
- Find-Package
- Get-WindowsOptionalFeature
-
You are working on a Windows Server 2016 Datacenter Server system. You need to view which roles and services are installed on the machine. Which PowerShell cmdlet can you use to see this?
- Get-event
- New-event
- Trace-command
- Get-WindowsFeature
-
What command would be used to register an iSCSI initiator manually to an iSNS server?
- iscsicli refreshisnsserver server_name
- iscsicli listisnsservers server_name
- iscsicli removeisnsserver server_name
- iscsicli addisnsserver server_name
-
You are an administrator who has set up two Hyper-V servers named Server1 (Windows Server 2016) and Server2 (Windows Server 2012 R2). Each Hyper-V server has multiple network cards. Each network card is connected to a different TCP/IP subnet. Server1 contains a dedicated migration network. Server2 contains a virtual machine named VM1. You plan to perform a live migration of VM1 to Server1. You need to ensure that Server1 uses all of the available networks to perform the live migration of VM1. What should you run to complete this task?
- The Mount-VHD cmdlet
- The DiskPart command
- The Set-VHD cmdlet
- The Set-VMHost cmdlet