Chapter 7
Configuring Windows Containers
THE FOLLOWING 70-740 EXAM OBJECTIVES ARE COVERED IN THIS CHAPTER:
 Deploy Windows containers
- This objective may include but is not limited to: Determine installation requirements and appropriate scenarios for Windows Containers; install and configure Windows Server container host in physical or virtualized environments; install and configure Windows Server container host to Windows Server Core or Nano Server in a physical or virtualized environment; install Docker on Windows Server and Nano Server; configure Docker daemon start-up options; configure Windows PowerShell for use with containers; install a base operating system; tag an image; uninstall an operating system image; create Windows Server containers; create Hyper-V containers.
- Manage Windows containers
- This objective may include but is not limited to: Manage Windows or Linux containers using the Docker daemon; manage Windows or Linux containers using Windows PowerShell; manage container networking; manage container data volumes; manage Resource Control; create new container images using Dockerfile; manage container images using DockerHub repository for public and private scenarios; manage container images using Microsoft Azure.
 When reading a Windows Server book, there will always be things in that book that you will already know because previous versions of Windows had the same type of functionality. This chapter is not going to be like that.
In this chapter, I will introduce you to Windows Containers. Windows Containers are brand new to Windows Server 2016 or some versions of Windows 10.
I will teach you how to install, configure, and maintain your Windows Containers. I will also show you all of the components needed to work with containers. Unless you have already started to learn about containers, this entire chapter will be brand new material. So let’s start learning about Windows Containers.
Understanding Windows Containers
Windows Containers are independent and isolated environments that run an operating system. These isolated environments allow an administrator to place an application into its own container thus not affecting any other applications or containers.
Think of containers as virtual environments that are used to run independent applications. They load much faster than virtual machines and you can run as many containers as needed for all of the different applications that you run.
One of the nice advantages of using Windows Containers is that the containers can be managed the same way an administrator can manage an operating system. A container works the same way as a newly installed physical or virtual machine. So once you know how to configure these containers, management is much easier than configuring a physical machine.
There are two different types of containers that the Windows Container can use.
Windows Server Containers This container allows an administrator to isolate applications so applications can run in their own space and not affect other applications. The question that you may be asking is why not use a virtual machine? Well the advantage of Windows Server Containers is that they are already pre-built and you don’t need all of the other services that a virtual machine would need to run. So Windows Containers are smaller, faster, and more efficient when isolating applications. In a Windows Server Container, the kernel is shared between all of the different Windows Containers.
Hyper-V Containers Hyper-V Containers and Windows Containers work the same way. The difference between the two is that Hyper-V Containers run within a virtual machine and the Windows Containers don’t need to run in a Hyper-V environment. In a Hyper-V Container the container host’s kernel is not shared between the other Hyper-V Containers.
Container Terminology
As with any new technology, it is important to understand the terminology that goes along with that new technology. The first thing that you may have noticed is that a container works a lot like a virtual machine. Just like a virtual machine, the container has a running operating system within the container.
The container has a file system and the container can also be accessed through the network the same way a virtual machine does. The advantage is that a container is a more efficient operating system. But to truly understand how containers work, you need to understand all of the different components that allow containers to function properly.
Container Host This component can be on a physical or virtual machine and it’s the component that is configured with the Windows Container feature. So the Windows Container sits on top of the Container Host.
Container OS Image This component provides the operating system to the container. Containers are made up from multiple images that are stacked on top of each other within the container.
Container Image This is the component that contains all of the layers of the container. So the Container Image contains the operating system, the application, and all of the services required to make that application function properly.
Container Registry This component is the heart and brain of the container. The container images are kept within the container’s registry. The advantage of doing containers this way is that you can download other registries to automatically add other applications or services quickly.
Docker Daemon This is the component that runs the docker application. The docker daemon is automatically installed after you complete the installation of the docker application. If you need to configure the docker daemon, you would use the docker daemon file. This file is in a JSON format.
Dockerfile This component is used to create the container images. The advantage of using the Dockerfile is that you can automate how containers are created. Dockerfiles are batches of instructions (within a txt file) and commands that are called on when an image is assembled.
Docker Hub Repositories This component is a location where all of your images are stored. By having a central location for stored images, the images can be used among co-workers, customers, or the for the entire IT community. There are docker hub repositories on the internet and these locations allow you to grab and use images for your organization.
Install and Configure Server Containers
So now that we have talked about what the different components are of a container, it’s time that we look at installing containers on our Windows Server 2016 system. When it comes to Microsoft, it really doesn’t matter if we are installing containers on a GUI based system or non-GUI based system. We are going to install the components needed by using Windows PowerShell.
But before we can look at installing and using containers, I need to show you what is required on the Windows Server 2016 system. So the first step in using containers is looking at what we need on our network and computers for containers to run properly.
Requirements
Now that you have decided to work with containers, you need to make sure that your network meets the minimum requirements to install and work with Windows Containers. The following are the requirements for installing and working with containers:
- Computer systems (physical or virtual machines) running Windows Server 2016 (Core and with Desktop Experience), Nano Server, or Windows 10 Professional and Enterprise (Anniversary Edition).
- The boot partition must be on the C: drive (this does not apply if only Hyper-V Containers will be deployed).
- All critical updates must be installed on the system running the Windows Container feature.
- Docker application needs to be installed.
The following are the requirements needed if you are going to be running virtualization with containers.
- For systems running the Hyper-V containers, the Hyper-V role must be installed on the system.
- If you are going to run a Windows Container host from a Hyper-V virtual machine (also you will be hosting Hyper-V Containers), you will need to enable nested virtualization. Nested virtualization also has some requirements:
- Operating system that allows nested virtualization (Windows Server 2016).
- Minimum of 4 GB RAM available to the virtualized Hyper-V host.
- The processor needs to use Intel VT-x (this is only available for Intel processors).
- 2 virtual processors for the container host VM.
Supported Images for Windows Containers
When I talk about setting up containers and you are getting ready to start using containers, there is one major requirement that we need to consider. The operating system on the host machine needs to be the same operating system that is used in the Windows Container. If you install a different operating system in the Windows Container, the container may load but you will most likely start to see errors and there is no guarantee that all of the container’s functionality will work.
So it is very important to make sure that the version of Windows Server 2016 that you install onto the host system is the same version as you run in the Windows Container. One nice advantage to using Microsoft Windows is that you can check what version of Windows you are using.
To see what Windows version you have installed, enter into the system’s Registry (Regedit.exe) and search the following Registry key (see Figure 7.1):
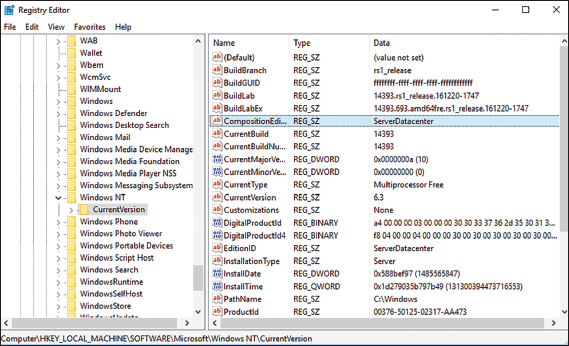
FIGURE 7.1 Regedit version
HKEY_LOCAL_MACHINESoftwareMicrosoftWindows NTCurrentVersionDepending on which host operating system that you are going to run will determine what operating systems you can run in the Windows Server Container or Hyper-V container. Not all operating systems are available depending on the host OS image. Table 7.1 shows you all of the supported configurations for each host operating system.
TABLE 7.1 Supported Base Images
| Host Operating System | Windows Server Container | Hyper-V Container |
| Windows Server 2016 with Desktop | Server Core / Nano Server | Server Core / Nano Server |
| Windows Server 2016 Core | Server Core / Nano Server | Server Core / Nano Server |
| Nano Server | Nano Server | Server Core / Nano Server |
| Windows 10 Pro / Enterprise | Not Available | Server Core / Nano Server |
Installing Docker
So the first step in setting up our Windows Containers is to install Docker. Docker is the software package that allows you to create and manipulate containers and images.
Docker is the software package that you install and the docker daemon is the application that you use to do your configuration and management. After you install docker, the docker daemon is automatically installed and configured with default settings.
Docker is a third party application that Microsoft has started using for containers. The docker application consists of a docker engine and a docker client (docker daemon). So the first thing that we need to do is install docker. To do this, you need to first download and install the docker application. Another item that needs to be completed when installing and using docker, is the Microsoft updates. You need to make sure that all of the current updates have been installed.
In Exercise 7.1, I will show you how to download and install docker. I will also show you how to get your Windows updates. In this exercise, I will install docker to a Windows Server 2016 (with GUI) Datacenter operating system. But this installation can be done on a Nano Server or a Server with no GUI.
Docker is now downloaded and installed onto the Windows Server 2016 machine. The next step is to work with docker to install and configure containers.
When using Docker, there are some switches that you can use to work with Docker. Table 7.2 shows some of the Docker switches and what each switch does. These commands are what is needed if you want to manage Windows or Linux containers using the docker daemon. These commands can be run in PowerShell or at an elevated command prompt.
TABLE 7.2 Docker PowerShell and command-line commands
| Command | Description |
| docker attach | This command allows an administrator to attach to a running container. |
| docker build | Using this command allows you to build an image from a Docker file. |
| docker checkpoint | Administrators can use this command to manage a Docker checkpoint. |
| docker commit | This command allows an administrator to debug and build a new image. |
| docker container | This command allows you to manage containers. |
| docker cp | Using this command allows an administrator to copy files and folders between the container and the local computer system. |
| docker create | This command gives you the ability to create a new container. |
| docker deploy | Administrators can use this command to create and modify a stack. |
| docker diff | This command allows an administrator to view changes to files or directories in the container’s filesystem. |
| docker events | This command allows an administrator to see a server’s events in real time. |
| docker exec | Administrators can use this command to run a new command in an existing container. |
| docker image | This command (along with its options) allows you to manage your images. |
| docker info | Using this command allows an administrator to view system information of the Docker installation. |
| docker kill | This command allows you to terminate running containers. |
| docker login | Administrators can use this command to log in to the docker registry of a server. |
| docker pause | This command allows an administrator to pause all processes within a container. |
| docker port | Use this command to view the port mappings for a container. |
| docker ps | This command allows you to view all of the containers. |
| docker pull | Administrators can use this command to pull an image from a registry. |
| docker push | This command allows you to push an image to a registry. |
| docker rename | This command allows you to rename a container. |
| docker restart | Using this command allows you to restart a container. |
| docker rm | Administrators can use this command to remove a container. |
| docker run | Using this command (along with the Options), an administrator can add to or override the image settings set by a developer. |
| docker save | This command allows an administrator to save images to an archive. |
| docker search | This command allows you to search the Docker Hub for images. |
| docker start | This command allows an administrator to start a stopped container. |
| docker stop | This command allows an administrator to stop a running container. |
| docker update | Administrators can use this command to update the configuration of a container. |
| docker version | This command allows an administrator to view the Docker version information. |
After docker is installed, you may want to configure the docker daemon for how docker will start and stop after a system restart or when the system needs to reboot. If you want to set a restart policy, you will want to use the -restart flag on the Docker run command.
Table 7.3 shows you all of the different startup policies that you can set on a container.
TABLE 7.3 Docker Restart Policy
| Policy | Result |
| no | This setting will not automatically restart the container. This is the default setting for a container. |
| on-failure[:max-retries] | This setting will restart the container only if the container has a non-zero exit status. Also you have the ability to limit the number of restart retries that the docker daemon will attempt. |
| always | This setting will always restart the container. When the setting is set to always, docker will try to restart the container indefinitely. The container will also always start on daemon startup. |
| unless-stopped | This setting will always restart the container unless the container was stopped before the restart. |
Install and Configure Windows Containers
So now that you have installed docker on your Windows Server 2016 system, let’s take a look at how you install and configure containers.
In Exercise 7.2, I will show you how to make sure your Docker service is started. I will then show you how to install a base operating system image onto your host. I will also show you how to create Windows Server Containers.
Now that you have seen how to download an image to the systems repository, you need to see how you can turn an image into a container. To do this, you need to just use the docker run command to get the image into a container. Also there may be a time when you need to remove an image from a container. This is done using the docker rm command.
But first you need to know which image that you want to put into a container. Exercise 7.3 will show you how to see your images and then how to add an image into a container. To complete Exercise 7.3, you must have completed Exercise 7.2.
Tagging an Image
Administrators have the ability to change the tags associated with the images. Many administrators use tag names as version names so that they can keep track of the different images on their machine.
By having tags that you create, it allows you to easily access the images later by its tag name. To tag an image, you use the -t parameter. So the following is tagging an image as WillPanekImage.
docker build -t WillPanekImageUninstall an Operating System Image
One of the maintenance issues that many IT administrators must deal with is hard drive space. As you are downloading and using images, there may be a time when you need to remove images from our server that are no longer being used.
If you continue to download and use multiple images files, you will need to make sure that every once in a while that you look at all of your images and delete any images that are no longer valid or no longer in use.
Exercise 7.4 will show you how to remove an image file from your host system. To complete this exercise, make sure that you have completed the earlier exercises in this chapter.
Creating New Images Using Dockerfile
One nice advantage of using docker is that you can go out to Docker’s website and look at the different images that are available. There are images for operating systems, applications, and software.
But what if you can’t find an image that you need? Well, then you can build your own images using Dockerfiles. When an administrator installs docker, the docker engine includes tools that the IT department can use to create these Dockerfiles. Dockerfiles are just text files that are manually created and they are compiled and turned into an image file.
If your organization decides that they want to build their own Dockerfiles, then they will get some benefits while doing just that. Some of the advantages of building your own Dockerfiles are as follows:
- Administrators can store images as code.
- Your organization can have rapid recreation of images. These images can then be used for maintenance and upgrade cycles.
- Customization for exactly what your organization wants.
So once you have installed docker, there will be some components that are included so that you can create your own Dockerfiles. These two docker components include the docker engine and the compiler (docker build command).
So if you have ever built .ini files or even a host file, then you understand how building a file can work. Same as many programming codes or .ini files, you can use the pound (#) to show comments in the file. This is very useful.
Many years ago, before I got into networking, I was a programmer. One thing that most programmers hate is when you look at someone else’s coding and you have no idea what they were doing. When a coder takes the time to put in comments so that anyone can follow them and work on the code, it makes following that coder a thousand times easier. This is what the comments in the Dockerfile do. Using the pound (#) for making comments and stating exactly why each line is included, helps someone following you or if someone is trying to learn what you do.
So let’s take a look at an example of a Dockerfile:
# Sample Dockerfile for WillPanek# We will be using Windows Server Core as our base image.FROM microsoft/windowsservercore# Uses dism.exe to install the DNS role.RUN dism.exe /online /enable-feature /all /featurename: : DNS-Server-Full-Role /NoRestart# Sets a command or process that will run each time a container is run from the new image.CMD [ "cmd" ]
So now that we can see a Dockerfile, lets break down some of the different sections that you can configure. Table 7.4 will show you some of the configuration settings that you can use.
TABLE 7.4 Dockerfile Commands
| Command | Description |
| Add | This setting will copy new files, directories, or remote file URLs from a source (<src>) location to the filesystem of the image destination <dest>. |
| CMD | This setting sets the default commands that will be executed when deploying the container image. |
| Copy | This setting will copy new files or directories from a source (<src>) location to the filesystem of the image destination <dest>. |
| Escape | This setting is used to escape characters in a line and to escape a newline. Normally, the escape command is followed by the character that will represent a new line. For example: escape=. This means that when a (backslash) is in the file, it will represent a new line. |
| ENV | This setting allows you to add an environmental variable. |
| Expose | This setting tells Docker that the container is listening on the specified network ports during runtime. |
| From | This setting shows the location of the container image that will be used during the image creation process. |
| Label | This setting adds metadata to an image. |
| Onbuild | This setting allows you to set a trigger that gets executed when the image is used as the base for another build. |
| Run | This setting will specify what commands are to be run in the Dockerfile process. These commands can include software installation and file, directory, and environment creation. |
| User | This setting allows you to set up a user’s account that will be used during the runtime. |
| Volume | This setting allows an administrator to create a mount point and externally mounted volumes from host systems or other containers. |
| Workdir | This setting allows you to set the working directory that will be used during the runtime. |
Understanding Hyper-V Containers
So far in this chapter we have discussed Windows Containers, but now we are going to look at Hyper-V Containers. As I stated earlier, Windows Containers share the system’s kernel between all containers and the host. Hyper-V Containers are different because each Hyper-V Containers utilizes their own instance of the Windows kernel.
Since Hyper-V containers utilizing their own instance of the Windows kernel, administrators can use different versions of Windows between the host system and the image version.
Also the Windows host system needs to have the Microsoft Hyper-V role installed onto the host system. Windows Server 2016 and Windows 10 Professional and Enterprise (Anniversary Editions) both allow you to create containers and Hyper-V.
The one nice feature is that both container types, Windows Containers and Hyper-V Containers, are created, managed, and function the exact same way. The only difference is how the Hyper-V Containers have better isolation to the kernel.
When you are working with Hyper-V containers in Docker, the settings are identical to managing Windows Server containers. The one difference that you want to include in the Hyper-V Container is using the ––isolation=hyperv parameter. The following is an example of the docker command with the Hyper-V parameters:
docker run -it ––isolation=hyperv microsoft/nanoserver cmdManaging Container Networking
One of the features included with building containers is the ability to access the servers and data within the container the same way you would on a normal network server or Hyper-V server.
Once you have installed Docker, there will be three networks that are created automatically. You can see these networks by typing docker network ls in PowerShell (see Figure 7.13) or at an elevated command prompt.

FIGURE 7.13 Docker Network Info
If you would like to get even more details about a specific network (see Figure 7.14), after you run the docker network ls command, you will need to grab the Network ID number. Then type the following PowerShell command followed by the Network ID number (my Network ID is 3cb894810795):
FIGURE 7.14 Docker Network Info
Docker network inspect 3cb894810795One nice thing about working with networks within containers is that these three networks are always available to you even when you choose only one to be part of your container. You can specify which network you want your container to run on by using the ––Network flag setting.
When you create a container, the host network adds the container onto the host’s network stack. When you are dealing with the containers network, there are very few reasons why you would even need to manage or manipulate the container’s network. The only network that you may need to work with is the bridge network. The docker default bridge is created as soon as you install the Docker Engine. It creates your bridge network and its name is bridge.
Using Docker Hub Repository
One really nice advantage of using containers is that there are hundreds of images that you can use. Docker has a public database of images that you can access.
The DockerHub repository has images for Microsoft, UNIX, Linux, and hundreds more. If you want to see what a vendor has out on the repository, just type in docker search vendorname. So let us take a look at what Microsoft has for you in the repository. Type docker search Microsoft (see Figure 7.15).

FIGURE 7.15 Docker Search Microsoft
Administrators have the ability to setup a private repository so that co-workers can share and use the images that you create. After you create your images using the Docker Daemon, you can then push those images to your corporate Docker Hub repository. Administrators can add users and accounts to the Docker Hub to verify that only the organization’s users are accessing the images.
If you are building images and placing those images on GitHub or Bitbucket, you can then use the Automatic build repository that is included with the Docker Hub service.
So when you are ready to start uploading corporate images to the Docker Hub, you will first need to create a Docker Hub user account (https://cloud.docker.com/). After you have created your account, click the Create ↓ and choose “Create Repository.”
You will then be asked to put in a Docker ID namespace for your organization. The repository name needs to be unique and it can be up to 255 characters. The namespace will only allow letters, numbers, or the dash (-) and underscore (_). You are then allowed to put in a Short Description (100 characters or less) and a Full Description. Then you click the Create button and you are finished.
After your repository is created, you can push images to the repository by putting in the name of your image, your Docker Hub username, the repository name that you created earlier, and the image tag. The following is an example of the docker push command:
docker push <hub-user>/<repo-name>:<tag>
Using Microsoft Azure for Images
If you decide to run container applications within a cluster of virtual machines, you can use the Azure Container Service. The Azure Container Service allows you to easily create, configure, and manage your virtual machine cluster of containers. The Azure Container Service uses open-source scheduling and management tools.
By using open-source tools, the Azure Container Service connects you with thousands of other users who are also designing, building, and maintaining container images.
The Azure Container Service uses the Docker format but it is also compatible with Marathon, DC/OS, Kubernetes, or Docker Swarm. Because the Azure Container Service works with all of these different formats, you have the ability to work with thousands of applications and images. But since this is Microsoft’s Azure platform, you get all of the security benefits and features that Azure has to offer.
To setup the Azure Container Service, you must first setup an Azure Container Service cluster through the Microsoft portal. Once you have entered the portal, you would need to use the Azure Resource Manager template for Docker Swarm, DC/OS, and Kubernetes, or you would need to use the Azure Command Line Interface.
Using PowerShell for Containers
The following table (Table 7.5) will show you just some of the available PowerShell commands that are available for using containers and Docker.
TABLE 7.5 PowerShell Commands
| PowerShell Command | Description |
| Add- ContainerNetworkAdapter | This command allows an administrator to add a virtual network adapter to a container. |
| Connect- ContainerNetworkAdapter | Administrators can use this command to connect a virtual network adapter to a virtual switch. |
| Disconnect- ContainerNetworkAdapter | This command allows an administrator to disconnect a virtual network adapter from a virtual switch. |
| Export-ContainerImage | Administrators can use this command to export a container image to a file. |
| Get-Container | This command allows an administrator to view information about containers. |
| Get-ContainerHost | This command allows an administrator to view information about the host. |
| Get-ContainerImage | Administrators can use this command to view local container images. |
| Get- ContainerNetworkAdapter | Administrators can use this command to view the virtual network adapter of a container. |
| Import-ContainerImage | Administrators can use this command to import a container image from a file. |
| Install-ContainerOSImage | This command allows an administrator to install the operating system image to a base container. |
| Install-Module | Administrators can use this command to download a module from an online gallery. This module can then be installed on the local computer. |
| Install-Package | Administrators can use this command to install a software package on a computer. |
| Install-PackageProvider | This command allows an administrator to install a Package Management package providers. |
| Move- ContainerImageRepository | Administrators can use this command to move the local container image repository. |
| New-Container | This command allows an administrator to create a container image from an existing container. |
| Remove-Container | Administrators can use this command to delete a container. |
| Remove-ContainerImage | This command allows an administrator to remove a container image. |
| Remove- ContainerNetworkAdapter | This command allows an administrator to remove a virtual network adapter from a container. |
| Restart-Computer | Administrators can use this command to restart a local and remote computer. |
| Set- ContainerNetworkAdapter | Administrators can use this command to configure the features of the virtual network adapter within a container. |
| Start-Container | Administrators can use this command to start a container. |
| Stop-Container | Administrators can use this command to stop a container. |
| Test-ContainerImage | This command allows an administrator to test for issues with a container image. |
| Uninstall- ContainerOSImage | Administrators can use this command to uninstall the container operating system image. |
Summary
In this chapter, I started introducing you to Windows Containers. Windows Containers are a brand-new technology to Windows Server 2016 or some versions of Windows 10.
I also showed you how to install, configure, and maintain your Windows Containers. And I talked to you about the components that are needed to work with containers.
I then showed you some exercises for configuring Windows Server 2016 containers and also how to download and work with image files. These image files can be used to create Windows and Hyper-V containers.
In addition, I showed you how to install and work with Docker. Docker is the technology used to manage and maintain Windows Containers. I showed you how to work with Docker PowerShell and command-line switches and also how to use PowerShell to work with Windows Containers.
Video Resources
There are videos available for the following exercises:
- 7.1
- 7.2
You can access the videos at http://sybextestbanks.wiley.com on the Other Study Tools tab.
Exam Essentials
Understand Windows Containers. Windows Containers work a lot like virtual machines except that when you build a virtual machine, you need all of the services that make that VM run properly. Windows Containers are fast operating system builds that allow you to run applications in their own environment.
Know the requirements for Windows Containers. Understand that you have to have Windows Server 2016 with Docker installed. You must also make sure that all updates are current on the system. You can install containers on Windows 10 Professional and Enterprise (Anniversary Edition).
Know the PowerShell commands used for Containers. The Microsoft exams are going to focus on PowerShell commands. Make sure you know the PowerShell commands that are used for Docker and containers.
Understand Docker technology. Understand that Docker is the technology that is used to manage and maintain Windows Containers. There are preset images on Docker that you can pull down and run. Microsoft has preset Docker images that you can use and manipulate.
Know the different Docker switches. Understand how docker switches are used and know the main docker switches. Understand that docker switches can be run in PowerShell or at an elevated command prompt.
Review Questions
-
You have a Windows Server 2016 server named Server. You install the Docker daemon on Server1. You need to configure the Docker daemon to accept connections only on TCP port 64500. What should you do?
- Use the New-NetFirewallRulecmdlet.
- Use the View-ServiceWindows PowerShell cmdlet.
- Edit the daemon.json file.
- Create a new configuration file.
-
You are the network administrator for a company that has decided to start using Windows Containers. You want to create a new container. What command allows you to create a container?
- docker create
- docker build container
- docker new
- docker build
-
You are the network administrator for a company that has decided to start using Windows Containers. You have built a bunch of containers. What PowerShell command allows you to view the containers?
- docker view
- docker see
- View-Container
- Get-Container
-
You have a Nano Server named Nano1. You deploy several containers to Nano1 that use an image named Image1. You need to deploy a new container to Nano1 that uses Image1. What should you run?
- Install-NanoServerPackage cmdlet
- Install-WindowsFeaturecmdlet cmdlet
- docker load
- docker run
-
You are the network administrator for a company that has decided to start using Windows Containers. You have created some images. What command allows you to see your images?
- docker images
- docker info
- docker view
- docker see
-
You are the administrator for your organization, which has started using containers. You need to build and use a Dockerfile. You need to compile and create an image using the Dockerfile. What command would you use?
- Docker run
- Docker rm
- Docker build
- Docker compile
-
You are the administrator for your organization, which has started using containers. You need to build and use a Dockerfile. You need to execute commands within the Dockerfile. What command would you use?
- Docker run
- Docker rm
- Docker build
- Docker compile
-
You are the network administrator for a company that has decided to start using Windows Containers. You want to delete a container. What PowerShell command allows you to delete a container?
- docker delete
- docker kill container
- Remove-Container
- Delete-docker-Container
-
You are the administrator for your organization, which has started using containers. You need to build a new image using Windows Server Core. What command would you use to get a Windows Server Core image?
- Docker run microsoft/windowsservercore
- docker pull microsoft/windowsservercore
- Docker build microsoft/windowsservercore
- Docker get microsoft/windowsservercore
-
You have been asked to start using Windows containers in your organization. Your manager wants to know what client operating systems can host containers. Which of the following client operating systems will allow for containers?
- Windows 10 Home
- Windows 7 Professional
- Windows 10 Enterprise (Anniversary Edition)
- Windows 8.1 Enterprise