Chapter 5
Configuring High Availability
THE FOLLOWING 70-740 EXAM OBJECTIVES ARE COVERED IN THIS CHAPTER:
 Implement high availability and disaster recovery options in Hyper-V
- This objective may include, but is not limited to: Implement Hyper-V Replica; implement Live Migration; implement Shared Nothing Live Migration; configure CredSSP or Kerberos authentication protocol for Live Migration; implement storage migration.
- Implement Network Load Balancing (NLB)
- This objective may include, but is not limited to: Install NLB nodes; configure NLB prerequisites; configure affinity; configure port rules; configure cluster operation mode; upgrade an NLB cluster.
- Manage VM movement in clustered nodes
- This objective may include but is not limited to: Perform a live migration; perform a quick migration; perform a storage migration; import, export, and copy VMs; configure VM network health protection; configure drain on shutdown.
 It is now time to start talking about keeping our servers up and running as much as possible. So with this in mind, this chapter and Chapter 6, “Understanding Clustering,” work hand in hand together.
In this chapter, I will start introducing you to some of the techniques and components of high availability. I will explain how to set up high availability using Network Load Balancing. I will talk about some of the reasons why you would choose to use Network Load Balancing over using a failover cluster and which applications or servers work better with Network Load Balancing. I will also show you how to use PowerShell for NLB.
I will continue the chapter by explaining how to keep your Hyper-V servers up and running by implementing high availability and disaster recovery options in Hyper-V. Finally, I will show you the PowerShell commands for Hyper-V high availability.
Components of High Availability
High availability is a buzzword that many application and hardware vendors like to throw around to get you to purchase their products. Many different options are available to achieve high availability, and there also seem to be a number of definitions and variations that help vendors sell their products as high-availability solutions.
When it comes right down to it, however, high availability simply means providing services with maximum uptime by avoiding unplanned downtime. Often, disaster recovery (DR) is also closely lumped into discussions of high availability, but DR encompasses the business and technical processes that are used to recover once a disaster has happened.
Defining a high availability plan usually starts with a service level agreement (SLA). At its most basic, an SLA defines the services and metrics that must be met for the availability and performance of an application or service. Often, an SLA is created for an IT department or service provider to deliver a specific level of service. An example of this might be an SLA for a Microsoft Exchange server. The SLA for an Exchange server might have uptime metrics on how much time during the month the mailboxes need to be available to end users, or it might define performance metrics for the amount of time it takes for email messages to be delivered.
When determining what goes into an SLA, two other factors need to be considered. However, you will often see them discussed only in the context of disaster recovery, even though they are important for designing a highly available solution. These factors are the recovery point objective (RPO) and the recovery time objective (RTO).
An RTO is the length of time an application can be unavailable before service must be restored to meet the SLA. For example, a single component failure would have an RTO of less than five minutes, and a full-site failure might have an RTO of three hours. An RPO is essentially the amount of data that must be restored in the event of a failure. For example, in a single server or component failure, the RPO would be 0, but in a site failure, the RPO might allow for up to 20 minutes of lost data.
SLAs, on the other hand, are usually expressed in percentages of the time the application is available. These percentages are also often referred to by the number of nines the percentage includes. So if someone told you that you need to make sure that the router has a rating of Five 9s, that would mean that the router could only be down for 5.26 minutes a year. Table 5.1 shows you some of the different nines rating and what each rating allows for downtime.
TABLE 5.1 Availability percentages
| Availability Rating | Allowed Unplanned Downtime/Year |
| 99 (two nines) percent | 3.65 days |
| 99.9 (three nines) percent | 8.76 hours |
| 99.99 (four nines) percent | 52.56 minutes |
| 99.999 (five nines) percent | 5.26 minutes |
| 99.9999 (six nines) percent | 31.5 seconds |
| 99.99999 (seven nines) percent | 3.15 seconds |
Two important factors that affect an SLA are the mean time between failure (MTBF) and the mean time to recovery (MTTR). To be able to reduce the amount of unplanned downtime, the time between failures must be increased, and the time it takes to recover must be reduced. Modifying these two factors will be addressed in the next several sections of this chapter.
Achieving High Availability
Windows Server 2016 is the most secure and reliable Windows version to date. It also is the most stable, mature, and capable of any version of Windows. Although similar claims have been made for previous versions of Windows Server, you can rest assured that Windows Server 2016 is much better than previous versions for a variety of reasons.
An honest look at the feature set and real-world use should prove that this latest version of Windows provides the most suitable foundation for creating a highly available solution. However, more than just good software is needed to be able to offer high availability for applications.
High Availability Foundation
Just as a house needs a good foundation, a highly available Windows server needs a stable and reliable hardware platform on which to run. Although Windows Server 2016 will technically run on desktop-class hardware, high availability is more easily achieved with server-class hardware. What differentiates desktop-class from server-class hardware? Server-class hardware has more management and monitoring features built into it so that the health of the hardware is capable of being monitored and maintained.
Another large difference is that server-class hardware has redundancy options. Server-class hardware often has options to protect from drive failures, such as RAID controllers, and to protect against power supply failures, such as multiple power supplies. Enterprise-class servers have even more protection.
More needs to be done than just installing Windows Server 2016 to ensure that the applications remain running with the best availability possible. Just as a house needs maintenance and upkeep to keep the structure in proper repair, so too does a server. In the case of a highly available server, this means patch management.
Installing Patches
Microsoft releases monthly updates to fix security problems with its software, both for operating system fixes and for applications. To ensure that your highly available applications are immune to known vulnerabilities, these patches need to be applied in a timely manner during a scheduled maintenance window. Also, to address stability and performance issues, updates and service packs are released regularly for many applications, such as Microsoft SQL Server, Exchange Server, and SharePoint Portal Server. Many companies have a set schedule—daily, weekly, or monthly—to apply these patches and updates after they are tested and approved.
Desired Configuration Manager (DCM), an option in Microsoft System Center Configuration Manager, is a great tool for helping to validate that your cluster nodes are patched. It can leverage the SCCM client to collect installed patches and help reporting within the enterprise on compliancy with desired system states based on the software installed.
To continue with the house analogy, if you were planning to have the master bath remodeled, would you rather hire a college student on spring break looking to make some extra money to do the job or a seasoned artisan? Of course, you would want someone with experience and a proven record of accomplishment to remodel your master bath.
Likewise, with any work that needs to be done on your highly available applications, it’s best to hire only decidedly qualified individuals. This is why obtaining a Microsoft certification is definitely an excellent start to becoming qualified to configure a highly available server properly. There is no substitute for real-life and hands-on experience. Working with highly available configurations in a lab and in production will help you know not only what configurations are available but also how the changes should be made.
For example, it may be possible to use Failover Clustering for a DNS server, but in practice DNS replication may be easier to support and require less expensive hardware in order to provide high availability. This is something you would know only if you had enough experience to make this decision.
As with your house, once you have a firm and stable foundation built by skilled artisans and a maintenance plan has been put into place, you need to ascertain what more is needed. If you can’t achieve enough uptime with proper server configuration and mature operational processes, a cluster may be needed.
Windows Server 2016 provides two types of high availability: Failover Clustering and Network Load Balancing (NLB). Failover clustering is used for applications and services such as SQL Server and Exchange Server. Network Load Balancing is used for network-based services such as web and FTP servers. The remaining sections of this chapter will cover NLB and Hyper-V high availability in depth. Chapter 6 “Understanding Clustering” will cover all of the clustering aspects.
Understanding Network Load Balancing
So the first thing we have to discuss is why an administrator would choose to use NLB. NLB allows an administrator to configure two or more servers as a single virtual cluster. NLB is designed for high availability and scalability of Internet server applications. So this means that Windows Server 2016 NLB is designed to work with web servers, FTP servers, firewalls, proxy servers, and virtual private networks (VPNs).
Administrators can use NLB for other mission-critical servers, but you can also use failover clusters on many of these servers. So after these two chapters are done, hopefully you will be able to choose the appropriate high availability server setup for your network and applications.
Network Load Balancing is a form of clustering where the nodes are highly available for a network-based service. This is typically a port listener configuration where a farm of, say, Microsoft Internet Information Services servers all listen on ports 80 and 443 for incoming web traffic from client endpoints. These nodes, while not fully clustered in a technical sense, are load balanced, where each node handles some of the distributed network traffic.
The NLB feature uses the TCP/IP networking protocol to distribute traffic. For web servers and other necessary servers, NLB can provide performance and consistency when two or more computers are combined into a single virtual cluster.
Hosts are servers that make up an NLB cluster. Each host runs their own individual copy of the server applications. The incoming client requests are distributed by NLB to each of the hosts in the cluster. The administrator can configure the load so that it is handled by each host. Hosts can be added to the cluster to increase the load. If NLB has all traffic directed to a specific single host, then it is called a default host.
With the use of NLB, all the computers in a cluster can use the same set of IP addresses while each host maintains its own exclusive IP address. When a host fails for load-balanced applications, the computers still in operation will receive the workload automatically. When the down computer is ready to rejoin the cluster, it comes back online and will regain its share of the workload. This allows the rest of the computers in the cluster to handle less traffic.
NLB is beneficial in that stateless applications (for example, web servers) are available with little downtime and it allows for scalability.
Scalability is the capability of a system, network, or process to handle a growing amount of work, or its potential to be enlarged in order to accommodate growth. Scalability, when used for NLB clusters, is the ability to add one or more systems to an existing cluster when the need arises. An administrator can do the following with NLB to support scalability:
- A single cluster can support up to 32 computers.
- Handle multiple server load requests from across multiple hosts in a cluster.
- For single TCP/IP services, balance load requests across the NLB cluster.
- As the workload grows, be able to add hosts to the NLB cluster without failure.
- When the workload declines, be able to remove hosts from the cluster.
- Allow higher performance and lower overhead by utilizing a pipelined implementation. Pipelining allows requests to be sent to the NLB cluster without waiting for a response.
- Use NLB Manager or Windows PowerShell cmdlets to manage and configure NLB clusters and hosts from a single computer.
- Determine port rules for each website. Port rules allow you to configure which ports are going to be enabled or disabled. Ports are doorways that applications can use to access resources. For example, DNS traffic uses port 53 for all DNS traffic. Here are some of the more common port numbers:
- FTP uses ports 20/21.
- Secure Shell uses port 22.
- SMTP (mail) uses port 25.
- DNS uses port 53.
- HTTP uses port 80.
- POPv3 uses port 110.
- HTTPS uses port 443.
- Determine load-balancing behavior using port management rules for an IP port or group of ports.
- Use an optional, single-host rule that will direct all client requests to a single host. NLB will route client requests to a specific host that is running particular applications.
- Allow certain IP ports to block unwanted network access.
- When operating in multicast mode, enable Internet Group Management Protocol (IGMP) support on the cluster host. This will control switch port flooding (when all incoming network packets are sent to all ports on the switch).
- Use Windows PowerShell to start, stop, and control NLB actions remotely.
- Check NLB events using Windows Event Log. All NLB actions and cluster changes are logged in the Event Log.
NLB Requirements
The NLB cluster hardware requirements are as follows:
- All hosts must be on the same subnet.
- For each host, there is no limitation to the number of network adapters.
- All network adapters must be multicast or unicast within the cluster. Mixed environments, within a single cluster, are NOT supported.
- If using unicast mode, the network adapter used to handle client-to-cluster traffic must support media access control (MAC) address changing.
NLB cluster software requirements:
- The adapter on which NLB is enabled can only support TCP/IP.
- Must have a static IP address on the servers in the cluster.
Installing NLB Nodes
You can install NLB nodes like any other server build. Administrators can install NLB by using either Server Manager or the Windows PowerShell commands for NLB.
Administrators should first make sure that all NLB servers have the most current updates, provisioned with appropriate resources (typically with multiple network interface cards for capacity and responsiveness), and monitored for health and reliability. In Exercise 5.1, I will walk you through the installation of your NLB nodes.
If you decide that you want to install NLB using Windows PowerShell commands, you would open an elevated Windows PowerShell prompt and type in the following command:
Install-WindowsFeature NLB -IncludeManagementTools
Upgrading an NLB Cluster
Upgrading an NLB cluster is a fairly straightforward process. The first thing that you have to do is stop the NLB cluster. There are two ways to stop a NLB cluster: stop or drainstop.
If an administrator decides to use the stop command, the cluster stops immediately. This also means that any current connections to the NLB cluster are killed.
If an administrator decides to use the drainstop command, the cluster stops after answering all of the current NLB connections. So the current NLB connections are finished but no new connections to that node are accepted.
So to do your upgrade, you should execute a stop or drainstop on the NLB cluster node that you want to upgrade or remove existing connections to the application on the local host. After the NLB cluster is stopped you then perform an in-place upgrade in a rolling manner.
If you want to stop the entire cluster from running, while in the NLB manager (type NLBmgr in Run command), you would right click on the cluster, point to Control Hosts, and then choose Stop.
If you want to stop a single node in the cluster from running, while in the NLB manager (type NLBmgr in Run command), you would right click on the node, point to Control Hosts, and then choose Stop.
PowerShell Commands for a NLB Cluster
In Table 5.2, I will show you some of the different PowerShell commands that you can use to manage the NLB cluster.
TABLE 5.2 PowerShell Commands for NLB
| PowerShell Command | Description |
| Add-NlbClusterNode | This command adds a new node to the NLB cluster. |
| Add-NlbClusterNodeDip | This command will add a dedicated IP address to a cluster. |
| Add-NlbClusterPortRule | This command adds a new port rule to a cluster. |
| Add-NlbClusterVip | This command adds a virtual IP address to a cluster. |
| Disable-NlbClusterPortRule | This command disables a port rule on a Network Load Balancing (NLB) cluster. |
| Enable-NlbClusterPortRule | This command enables a port rule on a cluster. |
| Get-NlbCluster | This command allows you to view information about the Network Load Balancing (NLB) cluster. |
| Get-NlbClusterDriverInfo | This command allows you to see information about the NLB drivers on a machine. |
| Get-NlbClusterNode | This command gets the information about the cluster object. |
| Get-NlbClusterPortRule | This command gets the port rule objects. |
| New-NlbCluster | This command creates a cluster on the specified interface. |
| New-NlbClusterIpv6Address | This command generates IPv6 addresses to create cluster virtual IP addresses. |
| Remove-NlbCluster | This command deletes a cluster. |
| Remove-NlbClusterNode | This command removes a node from a cluster. |
| Remove-NlbClusterPortRule | This command deletes a port rule from a cluster. |
| Resume-NlbCluster | This command resumes all nodes in the cluster. |
| Set-NlbCluster | This command allows you to edit the configuration of an NLB cluster. |
| Set-NlbClusterNode | This command allows an administrator to edit the NLB cluster node settings. |
| Set-NlbClusterPortRule | This command allows you to edit the NLB port rules. |
| Start-NlbCluster | This command will start all of the nodes in a cluster. |
| Start-NlbClusterNode | This command will start one of the nodes in a cluster. |
| Stop-NlbCluster | This command stops all nodes in the cluster. |
| Stop-NlbClusterNode | This command will stop one of the nodes in a cluster. |
Achieving High Availability with Hyper-V
One of the nice advantages of using Hyper-V is the ability to run an operating server within another server. Virtualization allows you to run multiple servers on top of a single Hyper-V server. But we need to make sure that these servers stay up and running.
That is where Hyper-V high availability comes into play. Having the ability to ensure that your Hyper-V servers are going to continue to run even if there is a hardware issue is an important step in guaranteeing the success of your network.
There are many ways that you can ensure that your virtual machines will continue to operate. One is to set up clustering (discussed in Chapter 6) and another is to set up Hyper-V high availability without clustering.
To set up reliability without clustering requires that your Hyper-V servers have replica copies that can automatically start up if the virtual machine errors out. This is referred to as Live Migration and replica servers.
Implementing a Hyper-V Replica
Hyper-V Replica is an important part of the Hyper-V role. It replicates the Hyper-V virtual machines from the primary site to the replica secondary sites simultaneously.
Once an administrator enables Hyper-V Replica for a particular virtual machine on the primary Hyper-V host server, the Hyper-V Replica will begin to create an exact copy of the virtual machine for the secondary site. After this replication, Hyper-V Replica creates a log file for the virtual machine VHDs. This log file is rerun in reverse order to the replica VHD. This is done using replication frequency. The log files and reverse order helps ensure that the latest changes are stored and copied asynchronously. If there is an issue with the replication frequency then the administrator will receive an alert.
On the virtual machine, an administrator can establish resynchronization settings. This can be setup to be done manually, automatically or automatically on an explicit schedule. To fix constant synchronization issues an administrator may choose to set up automatic resynchronization.
Hyper-V Replica will aid in a disaster recovery strategy by replicating virtual machines from one host to other while keeping workloads accessible. Hyper-V Replica can create a copy of a running virtual machine to a replica offline virtual machine.
Hyper-V Hosts
With replication over a WAN link the primary and secondary host servers can be located in the same physical location or at different geographical locations. Hyper-V hosts can be standalone, clustered or a combination of both. Hyper-V hosts are not dependent upon Active Directory and there is no need to be domain members.
Replication and Change Tracking
When an administrator enables Hyper-V Replica on a particular virtual machine an identical copy of the virtual machine is created on a secondary host server. Once this happens, the Hyper-V Replica will create a log file that will track changes made on a virtual machine VHD. The log file is rerun in reverse order to the replica VHD. This is based on the replication frequency settings. This ensures that the latest changes are created and replicated asynchronously. This can be done over HTTP or HTTPS.
Extended (Chained) Replication
Extended (chained) Replication allows an administrator to replicate a virtual machine from a primary host to a secondary host and then replicate the secondary host to a third host. It is not possible to replicate from the primary host directly to the second and third hosts.
Extended (Chained) Replication aids in disaster recovery in that an administrator can recover from both the primary and extended replica. Extended Replication will also aid if the primary and secondary locations go offline. It must be noted that the extended replica does not support application-consistent replication and it must use the same VHD that the secondary replica uses.
Setting the Affinity
NLB allows an administrator to configure three types of affinity settings to help response times between NLB clients. Each affinity setting determines a method of distributing NLB client requests. There are three different affinity settings: None, Single, and Class C. The New Cluster Wizard sets the default affinity to Single.
No Affinity (None) When setting the affinity to No Affinity (None), NLB will not assign a NLB client with any specific member. When a request is sent to the NLB, the requests are balanced among all of the nodes. The No Affinity provides greater performance but there may be issues with clients establishing sessions. This happens because the request may be load balanced between NLB nodes and session information may not be present.
Single Affinity Setting the cluster affinity to Single will send all traffic from a specific IP address to a single cluster node. This will keep a client on a specific node where the client should not have to authenticate again. Setting the affinity mode to Single would remove the authentication problem but would not distribute the load to other servers unless the initial server was down. Setting the affinity to Single allows a client’s IP address to always connect to the same NLB node. This setting allows clients using an intranet to get the best performance.
Class C Affinity When setting the affinity to Class C, NLB links clients with a specific member based on the Class C part of the client’s IP address. This allows an administrator to setup NLB so that clients from the same Class C address range can access the same NLB member. This affinity is best for NLB clusters using the internet.
Failover
If the primary or the secondary (extended) host server locations goes offline an administrator can manually initiate failover. Failover is not automatic. There are several different types of manually initiating failover:
Test Failover Use Test Failover to verify that the replica virtual machine can successfully start in the secondary site. It will create a copy test virtual machine during failover and does not affect standard replication. After the test failover, if the administrator selects Failover on the replica test virtual machine the test failover will be deleted.
Planned Failover Use Planned Failover during scheduled downtime. The administrator will have to turn off the primary machine before performing a planned failover. Once the machine fails over the Hyper-V Replica will start replicating changes back to the primary server. The changes are tracked and sent to ensure that there is no data lost. Once the planned failover is complete, the reverse replication begins so that the primary virtual machine become the secondary and vice versa. This ensures that the hosts are synchronized.
Unplanned Failover Use Unplanned Failover during unforeseen outages. Unplanned failover is started on the replica virtual machine. This should only be used if the primary machine goes offline. A check will confirm whether the primary machine is running. If the administrator has recovery history enabled then it is possible to recover to an earlier point in time. During failover an administrator should ensure that the recovery point is acceptable and then finish the failover to ensure that recovery points are combined.
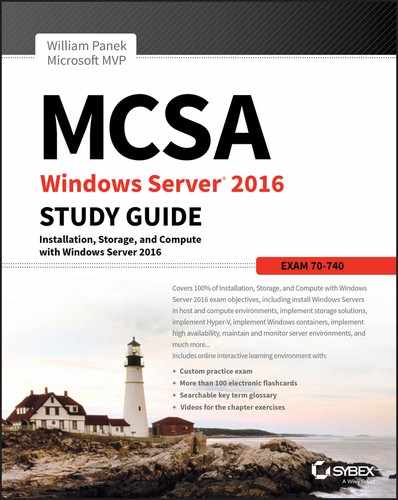
Virtual Machine Advanced Features
One nice feature of virtual machines is the ability to setup advanced features. In the Advanced Features section (see Figure 5.7), there are multiple settings that you can configure.
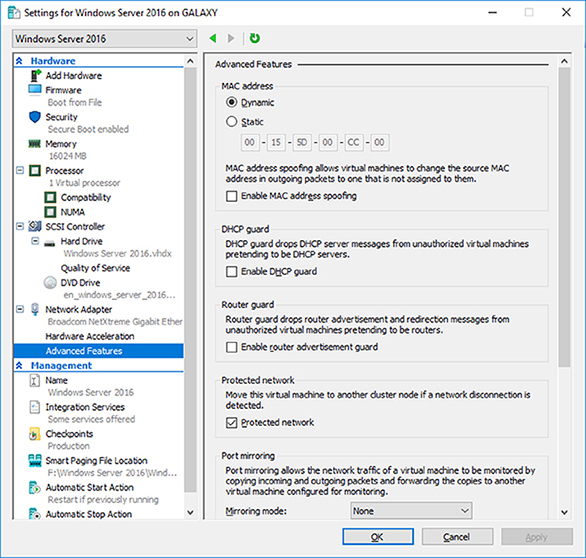
FIGURE 5.7 VM Advanced Features
MAC Addressing
The first thing that you can configure in the Advanced Features section is setting a MAC address. The MAC address is a physical address that is associated to the NIC adapter. Administrators have the ability to set the MAC address to Dynamic (creates its own MAC addresses) or Static (this is where you can set a MAC address).
You also have the ability to do MAC spoofing. This is where a VM can change the source MAC address in outgoing packets to one that is not assigned to the NIC adapters.
DHCP Guard
DHCP guard drops DHCP server messages from unauthorized virtual machines pretending to be a DHCP server. So what does this mean to you? If a server tries to pretend to be a DHCP server, your virtual machine will drop any messages that are sent by that DHCP server.
Router Guard
Router guard drops router advertisement and redirection messages from unauthorized virtual machines pretending to be routers. It almost works the same way DHCP guard works. If an unauthorized router tries to send messages to a virtual machine, that VM will not accept those messages.
Protected Network
Administrators have the ability to set Network Health Detection at the virtual machine level for a Hyper-V host cluster. This is configured as a Protected Network. By setting the Protected Network check box, the virtual machine will be moved to another cluster node if a network disconnection is detected. If the health of a network connection is showing as disconnected, the VM will be automatically moved.
Port Mirroring
Port mirroring allows the network traffic of a virtual machine to be monitored by copying incoming and outgoing packets and forwarding the copies to another virtual machine configured for monitoring.
NIC Teaming
NIC Teaming gives an administrator the ability to allow multiple network adapters on a system to be placed into a team. You can establish NIC Teaming in the guest operating system to aggregate bandwidth and provide redundancy. This is useful if teaming is not configured in the management operating system.
Device Naming
Device naming causes the name of the network adapter to be propagated into supported guest operating systems.
VM Checkpoints
One thing that you may want to setup on your Hyper-V server is recovery points or checkpoints. A checkpoint is a snapshot in time from when an administrator can recover a virtual machine. It’s like taking a picture of the virtual machine and using that picture to recover the VM. Administrators can create multiple checkpoints of a VM and then recover back to any of those checkpoints if there is an issue. Using a more recent recovery point will result in less data lost. Checkpoints can be accessed from up to 24 hours ago.
If you want to enable these checkpoints in time for Hyper-V, you just need to follow the steps below:
- In Hyper-V Manager, right-click on the virtual machine and then click Settings.
- Under the Management section, choose Checkpoints.
- To enable checkpoints for a VM, check the box Enable checkpoints. If you want to disable checkpoints, just clear box.
- Once finished, Click Apply. Once you are finished, click OK and close the Hyper-V Manager.
Software Load Balancing
Windows Server 2016 Hyper-V also allows an administrator to distribute virtual network traffic using Software Load Balancing (SLB). Software Load Balancing allows administrators to have multiple servers hosting the same virtual networking workload in a multitenant environment. This allows an administrator to setup high availability.
Using SLB allows an organization to load balance virtual machines on the same Hyper-V server. So let’s take a look at how SLB works. SLB is possible because it sets up a virtual IP address (VIP) that is automatically mapped to the dynamic IP addresses (DIP) of the virtual machines. The DIP addresses are the IP addresses of the virtual machines that are part of the load balancing setup.
So when someone tries to access the resources in the load balancing setup, they access it by using the VIP address. The VIP request then gets sent to the DIP address of the virtual machines. So users use the single VIP address and that address gets sent to the load balancing virtual machines.
Understanding Live Migration
Before we can implement Live Migration, first you need to understand what Live Migration does for Hyper-V. Hyper-V live migration transfers a running virtual machine from one physical server to another. The real nice advantage of Live Migration is that during the move of the virtual machine, there is no impact on the network’s users. The virtual machine will continue to operate even during the move. This is different from using Quick Migrations. Quick Migrations require a pause in the Hyper-V VM while it’s being moved.
Live Migrations allow administrators to move virtual machines between servers. This is very useful when a Hyper-V server starts having issues. For example, if a Hyper-V machine is starting to have hardware issues, you can move the virtual machines from that Hyper-V server to another server that is running properly.
When setting up VM migrations, you have a few options. You can Live Migrate a VM, Quick Migrate a VM, or just move a VM. As stated before, Live Migration requires no interruption of the VM. Quick Migration requires that you first pause the VM, then save the VM, then move the VM and finally re-start the VM. Moving a virtual machine means that you are going to copy a VM from one Hyper-V server to another while the virtual machine is turned off.
So if you decide to setup and use Live Migrations, there are a few things that you should understand before setting it up. So let’s take a look at some of the configuration settings that you can configure.
Configure CredSSP or Kerberos authentication
When choosing to setup Live Migrations, one of the settings that you get to manipulate is the type of authentication you can use. Choosing the authentication type is a feature listed under the Advanced Features of Live Migration. Administrators can choose two types of authentication (as shown in Figure 5.8): Kerberos or Credential Security Support Provider (CredSSP).
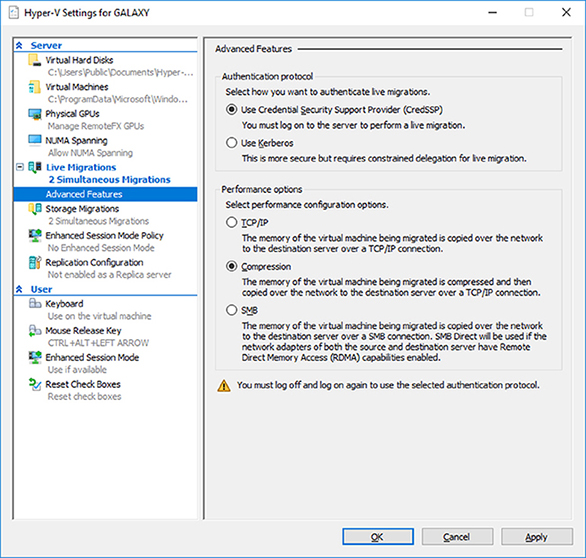
FIGURE 5.8 Live Migration Advanced Features
Authentication is choosing which protocol you will use to guarantee that live migration traffic between the source and destination servers are verified. Let’s take a look at both options.
- Use Credential Security Support Provider (CredSSP)
- This option allows an administrator to setup better security but requires constrained delegation for Live Migration. Administrators have the ability to sign in to the source server. Administrators can sign in to the source server by using a local console session, a Remote Desktop session, or a remote Windows PowerShell session.
- Use Kerberos
- This option allows an administrator to avoid having to sign in to the server, but requires constrained delegation to be set up.
Another section that you setup in the Advanced Features of Live Migrations is the Performance options. This section allows you to choose how the network traffic for Live Migrations will be configured. There are three options that you can choose from:
TCP/IP The memory of the virtual machine being migrated is copied over the network to the destination server over a TCP/IP connection.
Compression The memory of the virtual machine being migrated is compressed and then copied over the network to the destination server over a TCP/IP connection.
SMB The memory of the virtual machine is copied over the network to the destination server over a SMB (Server Message Block) connection. SMB Direct will be used if the network adapters of both the source and destination server have Remote Direct Memory Access (RDMA) capabilities enabled.
Implementing Live Migration
You will need the following to set up non-clustered hosts for live migration:
- A user account in the local Hyper-V Administrators group or the Administrators group on both the source and destination computers. Membership in the Domain Administrators group.
- The Hyper-V role in Windows Server 2016 or Windows Server 2012 R2 installed on both the source and destination servers. Live migration can be done if the virtual machine is at least version 5.
- The source and destination computers must belong to the same Active Directory domain or belong to trusted domains.
- The Hyper-V management tools installed on the server. Computer must be running Windows Server 2016 or Windows 10.
If an administrator wants to setup the source and destination of the live migration, they would need to use the following steps in Hyper-V Manager:
- Open Hyper-V Manager. (click Start ➢ Administrative Tools ➢ Hyper-V Manager.)
- In the navigation pane, click on one of the servers. Right click on the server ➢ Hyper-V Settings ➢ Live Migrations.
- Click on the Live Migrations pane. Check the box Enable incoming and outgoing live migrations.
- Under the section Simultaneous live migrations, specify the number of Simultaneous live migrations (the default is 2).
- Under Incoming live migrations, administrators can choose to accept any network for live migrations or specify the IP address you want to use for live migration. If you want to use an IP address, click the Add button and type in the IP address information. Click OK once you’re finished.
- For Kerberos and performance options, expand Live Migrations (click the plus sign next to Live Migrations) and then select Advanced Features.
- Under Authentication protocol, select either Use CredSSP or Use Kerberos.
- Under Performance options, Select performance configuration options (either TCP/IP, Compression, or SMB).
- Click OK.
- If you have any other servers that you want to setup for Live Migrations, select the server and repeat the steps.
Implement Shared Nothing Live Migration
Administrators can now Live Migrate virtual machines even if the Hyper-V host is not part of a cluster. Before using Live Migrate without a Windows Cluster an administrator will need to configure the servers. Either choose Kerberos or Credential Security Support Provider (CredSSP) to authenticate the Live Migration.
To trigger a Shared Nothing Live Migration remotely, the administrator will need to enable Kerberos constrained delegation.
Constrained delegation is configured through Active Directory Users and Computers in the Delegation tab for each computer taking part in the Shared Nothing Live Migration.
Implementing Storage Migration
Hyper-V supports moving virtual machine storage without downtime by allowing the administrator to move storage while the virtual machine is running. This can be performed by using Hyper-V Manager or Windows PowerShell.
An administrator can add storage to a Hyper-V cluster or a stand-alone computer, and then move virtual machines to the new storage while the virtual machines continue to run.
An administrator can move virtual machine storage between physical storage devices to respond to a decrease in performance that results from bottlenecks.
Storage Migration Requirements
The following will be needed to utilize Hyper-V functionality of moving virtual machine storage:
- One or more installations of Windows Server 2016 with the Hyper-V role installed.
- A server that is capable of running Hyper-V.
- Virtual machines that are configured to use only virtual hard disks for storage.
Storage Migration allows administrators to move the virtual hard disks of a virtual machine while the virtual hard disks are still able to be used by the running virtual machine (see Figure 5.9). When an administrator moves a running virtual machine’s virtual hard disks, Hyper-V performs the following steps:
FIGURE 5.9 Storage Migration Settings
- Disk reads and writes utilize the source virtual hard disk.
- When reads and writes occur on the source virtual hard disk, the disk data is copied to the new destination virtual hard disk.
- Once the initial disk copy is complete, the disk writes are mirrored to both the source and destination virtual hard disks while outstanding disk changes are replicated.
- After the source and destination virtual hard disks are entirely synchronized, the virtual machine changes over to using the destination virtual hard disk.
- The source virtual hard disk is deleted.
PowerShell Commands for Hyper-V High Availability
When configuring Hyper-V high availability, you may want to setup some of the components using PowerShell. Table 5.3 shows you some of the available PowerShell commands available for setting up Hyper-V high availability.
TABLE 5.3 PowerShell Commands for High Availability
| PowerShell Command | Description |
| Complete-VMFailover | This command helps finish a virtual machine’s failover process on the Replica server. |
| Disable-VMMigration | This command allows an administrator to disable virtual machine migration on a virtual machine host. |
| Enable-VMMigration | This command allows an administrator to enable virtual machine migration on a virtual machine host. |
| Enable-VMReplication | This command allows an administrator to enable replication of a virtual machine. |
| Get-VMMigrationNetwork | This command shows you the virtual machine networks used for migration. |
| Get-VMReplication | This command shows an administrator the replication settings for a virtual machine. |
| Get-VMReplicationAuthorizationEntry | This command shows an administrator the authorization entries of a Replica server. |
| Get-VMReplicationServer | This command shows an administrator the replication and authentication settings of a Replica server. |
| Import-VMInitialReplication | This command imports initial replication files for a Replica virtual machine when using external media. |
| Measure-VMReplication | This command shows an administrator the replication statistics and information associated with a virtual machine. |
| New-VMReplicationAuthorizationEntry | This command allows you to create an authorization entry to replicate data to a specified Replica server. |
| Remove-VMMigrationNetwork | This command allows an administrator to remove a network from use in migration. |
| Remove-VMReplication | This command removes the replication from a specific virtual machine. |
| Reset-VMReplicationStatistics | This command allows an administrator to reset the replication statistics of a virtual machine. |
| Resume-VMReplication | This command allows an administrator to resume virtual machine replication after an error, a pause, a suspension, or a resynchronization is required. |
| Set-VMProcessor | This command allows an administrator to configure which processors are used for a virtual machine. |
| Set-VMReplication | This command allows an administrator to modify the replication settings of a virtual machine. |
| Set-VMReplicationServer | This command allows an admin to configure a host as a Replica server. |
| Start-VMInitialReplication | This command starts replication of a virtual machine. |
| Stop-VMReplication | This command stops replication of a virtual machine. |
| Suspend-VMReplication | This command suspends replication of a virtual machine. |
| Test-VMReplicationConnection | This command allows an administrator to test the connection of a primary server and a Replica server. |
Summary
High availability is more than just clustering. It is achieved through improved hardware, software, and processes. This chapter focused on how to configure Failover Clustering and Network Load Balancing in order to achieve high availability and scalability.
High availability should be approached through proper hardware configuration, training, and operational discipline. Failover Clustering provides a highly available base for many applications, such as databases and mail servers.
Network load-balanced clusters are used to provide high availability and scalability for network-based applications, such as VPNs and web servers. Network load-balanced clusters can be configured with any edition of Windows Server 2016 except for the Windows Server 2016 Hyper-V Edition.
Windows Server 2016 Hyper-V can also have high availability set up on it without using clustering. Administrators have the ability to set up Live Migrations on Hyper-V virtual machines.
Live Migration allows you to move a virtual machine from one server to another without any impact on the users. This can be very useful if you have a Hyper-V server that is starting to show hardware issues. Administrators can move the virtual machine from the server with issues to a server without any issues.
Video Resources
There are no videos available for this chapter.
Exam Essentials
Know the hardware requirements for Network Load Balancing. Network Load Balancing has distinct hardware requirements. Know the requirements for NLB.
Know the PowerShell commands for NLB. Make sure you know the different PowerShell commands for Network Load Balancing. Understand which command is used to create, manage, and stop NLB clusters.
Understanding Live Migration. Understand how Live Migrations work and why we use them. Understand that Live Migrations allow an administrator to move a virtual machine from one server to another without any impact on the users.
Know PowerShell for VM Replication Make sure you know the different PowerShell commands for Virtual Machine Replication. Understand which commands are used to create, manage, and stop VM Replication.
Review Questions
-
You are the administrator for a mid-size organization. You have been asked by the owner to set up a NLB cluster. You want to use PowerShell to set up the cluster. What command would you use?
- New-NlbCluster
- Create-NlbCluster
- Setup-NlbCluster
- Set-NlbCluster
-
You are the administrator for your company. You have an application named AppA. AppA is distributed in a multitenant setup across multiple Hyper-V virtual machines. You need to ensure that the traffic is distributed evenly among the virtual machines that host AppA. What should you include in the environment?
- Router and Windows Server Network Load Balancing (NLB) nodes
- Router and Windows Server Software Load Balancing (SLB) nodes
- RAS Gateway and Windows Server Network Load Balancing (NLB) nodes
- RAS Gateway and Windows Server Software Load Balancing (SLB) nodes
-
What is the maximum number of nodes that can participate in a Windows Server 2016 NLB single cluster?
- 32
- 4
- 16
- 64
-
Which of the following actions should be performed against an NLB cluster node if maintenance needs to be performed while not terminating current connections?
- Evict
- Drainstop
- Pause
- Stop
-
Which of the following actions should be performed against an NLB cluster node if maintenance needs to be performed and all connections must be terminated immediately?
- Evict
- Drainstop
- Pause
- Stop
-
You are the network administrator for your organization and you want to stop virtual machine replication. What PowerShell command would you use?
- Stop-VMReplication
- Terminate-VMReplication
- Kill-VMReplication
- Drainstop-VMReplication
-
You are the network administrator for a company that has a Windows Server 2016 Hyper-V failover cluster. This cluster contains two nodes named ServerA and ServerB. On ServerA, you create a virtual machine named VirtualMachineA by using Hyper-V Manager. You need to configure VirtualMachineA to move to ServerB automatically if ServerA becomes unavailable. What should you do?
- In the Failover Cluster manager, run the configure Role actions.
- In the Hyper-V Manager, click VirtualMachineA and click Enable Replication.
- In the Hyper-V Manager, click ServerA and modify the hyper-V settings.
- Using Windows PowerShell, run the Enable-VMReplication cmdlet.
-
To configure an NLB cluster with unicast, what is the minimum number of network adapters required in each node?
- One
- Two
- Three
- Six
-
Users who are connecting to an NLB cluster have been complaining that after using the site for a few minutes they are prompted to log in using their username. What should you do to fix the problem and retain scalability?
- Create a port rule to allow only ports 80 and 443.
- Set the cluster affinity to None.
- Set the filtering mode to Single Host.
- Set the cluster affinity to Single.
-
Users who are connecting to an NLB cluster through the Internet are complaining that they keep connecting to different NLB nodes in different locations. You want to keep Internet users connecting to the same NLB members each time they connect. What should you do to fix the problem?
- Create a port rule to allow only ports 80 and 443.
- Set the cluster affinity to None.
- Set the cluster affinity to Class C.
- Set the cluster affinity to Single.