Chapter 4
Understanding Hyper-V
THE FOLLOWING 70-740 EXAM OBJECTIVES ARE COVERED IN THIS CHAPTER:
 Install and configure Hyper-V
- This objective may include but is not limited to: Determine hardware and compatibility requirements for installing Hyper-V; install Hyper-V; install management tools; upgrade from existing versions of Hyper-V; delegate virtual machine management; perform remote management of Hyper-V hosts; configure virtual machines using Windows PowerShell Direct; implement nested virtualization.
- Configure virtual machine (VM) settings
- This objective may include but is not limited to: Add or remove memory in running a VM; configure dynamic memory; configure Non-Uniform Memory Access (NUMA) support; configure smart paging; configure Resource Metering; manage Integration Services; create and configure Generation 1 and 2 VMs and determine appropriate usage scenarios; implement enhanced session mode; create Linux and FreeBSD VMs; install and configure Linux Integration Services (LIS); install and configure FreeBSD Integration Services (BIS); implement Secure Boot for Windows and Linux environments; move and convert VMs from previous versions of Hyper-V to Windows Server 2016 Hyper-V; export and import VMs; implement Discrete Device Assignment (DDA).
- Configure Hyper-V storage
- This objective may include but is not limited to: Create VHDs and VHDX files using Hyper-V Manager; create shared VHDX files; configure differencing disks; modify virtual hard disks; configure pass-through disks; resize a virtual hard disk; manage checkpoints; implement production checkpoints; implement a virtual Fibre Channel adapter; configure storage Quality of Service (QoS).
- Configure Hyper-V networking
- This objective may include but is not limited to: Add and remove virtual network interface cards (vNICs); configure Hyper-V virtual switches; optimize network performance; configure MAC addresses; configure network isolation; configure synthetic and legacy virtual network adapters; configure NIC teaming in VMs; configure virtual machine queue (VMQ); enable Remote Direct Memory Access (RDMA) on network adapters bound to a Hyper-V virtual switch using Switch Embedded Teaming (SET); configure Bandwidth Management.
 One of the greatest improvements to Microsoft’s servers over the past few versions is its implementation of their Virtual Server called Hyper-V.
Hyper-V is a server role in Windows Server 2016 that allows you to virtualize your environment and therefore run multiple virtual operating system instances simultaneously on a physical server. This not only helps you to improve server utilization but also helps you to create a more cost-effective and dynamic system.
Hyper-V allows an organization of any size to act and compete with other organizations of any size. A small company can buy a single server and then virtualize that server into multiple servers. Hyper-V gives a small company the ability to run multiple servers on a single box and compete with a company of any size.
For the large organizations, an administrator can consolidate multiple servers onto Hyper-V servers thus saving an organization time and money by using less physical boxes but still having all the servers needed to run the business.
In this chapter, you will learn the basic concepts and features of Hyper-V that a Windows Server 2016 technical specialist must know. You will also get a solid understanding of what is important in virtualization and in what areas of your work life you can use it.
Hyper-V Overview
In the following sections, I’ll introduce you to Hyper-V. To begin, you’ll take a look at virtualization and what types of virtualization exist. I will then discuss Hyper-V features and the Hyper-V architecture before finishing up with the Hyper-V requirements for software and hardware.
What Is Virtualization?
Virtualization is a method for abstracting physical resources from the way that they interact with other resources. For example, if you abstract the physical hardware from the operating system, you get the benefit of being able to move the operating system between different physical systems.
This is called server virtualization. But there are also other forms of virtualization available, such as presentation virtualization, desktop virtualization, and application virtualization. I will now briefly explain the differences between these forms of virtualization:
Server Virtualization This basically enables multiple servers to run on the same physical server. Hyper-V is a server virtualization tool that allows you to move physical machines to virtual machines and manage them on a few physical servers. Thus, you will be able to consolidate physical servers.
Presentation Virtualization When you use presentation virtualization, your applications run on a different computer, and only the screen information is transferred to your computer. An example of presentation virtualization is Microsoft Remote Desktop Services in Windows Server 2016.
Desktop Virtualization Desktop virtualization provides you with a virtual machine on your desktop, comparable to server virtualization. You run your complete operating system and applications in a virtual machine so that your local physical machine just needs to run a very basic operating system. An example of this form of virtualization is Microsoft Virtual PC.
Application Virtualization Application virtualization helps prevent conflicts between applications on the same PC. Thus, it helps you to isolate the application running environment from the operating system installation requirements by creating application-specific copies of all shared resources. It also helps reduce application-to-application incompatibility and testing needs. An example of an application virtualization tool is Microsoft Application Virtualization (App-V).
Hyper-V Features
As a lead-in to the virtualization topic and Hyper-V, I will start with a list of key features, followed by a list of supported guest operating systems. This should provide you with a quick, high-level view of this feature before you dig deeper into the technology.
Key Features of Hyper-V
The following are just some of the key features of Hyper-V:
Architecture The hypervisor-based architecture, which has a 64-bit micro-kernel, provides a new array of device support as well as performance and security improvements.
Operating System Support Both 32-bit and 64-bit operating systems can run simultaneously in Hyper-V. Also, different platforms like Windows, Linux, and others are supported.
Support for Symmetric Multiprocessors Support for up to 64 processors in a virtual machine environment provides you with the ability to run applications as well as multiple virtual machines faster.
Compatible with Connected Standby If an administrator installs the Hyper-V role on a computer that has the Always On/Always Connected (AOAC) power model configured, the Connected Standby power state is now available. The Connected Standby power state is a low-power state that allows Windows to function more like a tablet than a PC.
Encryption Support for Generation 1 VMs Administrators now have the ability to encrypt the operating system disk in generation 1 virtual machines by using BitLocker drive encryption. This is possible because of a new Hyper-V feature called key storage. Key storage creates a small, dedicated drive to store the system drive’s BitLocker key. When you want to decrypt the disk and start the virtual machine, the Hyper-V host will need to be either a part of an authorized guarded fabric or use a private key from one of the virtual machine’s guardians. Version 8 virtual machines must be used for key storage to function properly.
Host Resource Protection Administrators can enable this feature to ensure that a virtual machine does not use more than its share of the host machine’s system resources. Enabling this feature ensures that no one virtual machine can cause a performance issue on the host or on any other virtual machines. This feature is off by default. To enable this feature, an administrator will need to run the following Windows PowerShell command:
Set-VMProcessor -EnableHostResourceProtection $trueNetwork Load Balancing Hyper-V provides support for Windows Network Load Balancing (NLB) to balance the network load across virtual machines on different servers.
Hardware Architecture Hyper-V’s architecture provides improved utilization of resources such as networking, memory, and disks.
Quick Migration Hyper-V’s quick migration feature provides you with the functionality to run virtual machines in a clustered environment with switchover capabilities when there is a failure. Thus, you can reduce downtime and achieve higher availability of your virtual machines.
Virtual Machine Checkpoint You can take checkpoints of running virtual machines, which provides you with the capability to recover to any previous virtual machine checkpoint state quickly and easily.
Resource Metering Hyper-V resource metering allows an organization to track usage within the businesses departments. It allows an organization to create a usage-based billing solution that adjusts to the provider’s business model and strategy.
Scripting Using the Windows Management Instrumentation (WMI) interfaces and APIs, you can easily build custom scripts to automate processes in your virtual machines.
RemoteFX Windows Server 2016 Hyper-V RemoteFX allows for an enhanced user experience for RemoteFX desktops by providing a 3D virtual adapter, intelligent codecs, and the ability to redirect USB devices in virtual machines.
Fibre Channel The virtual Fibre Channel feature allows you to connect to the Fibre Channel storage unit from within the virtual machine. Virtual Fibre Channel allows an administrator to use their existing Fibre Channel to support virtualized workloads. Hyper-V users have the ability to use Fibre Channel storage area networks (SANs) to virtualize the workloads that require direct access to SAN logical unit numbers (LUNs).
Enhanced Session Mode Enhanced Session Mode enhances the interactive session of the Virtual Machine Connection for Hyper-V administrators who want to connect to their virtual machines. It gives administrators the same functionality as a remote desktop connection when the administrator is interacting with a virtual machine.
In previous versions of Hyper-V, the virtual machine connection gave you limited functionality while you connected to the virtual machine screen, keyboard, and mouse. An administrator could use an RDP connection to get full redirection abilities, but that would require a network connection to the virtual machine host.
Enhanced Session Mode gives administrators the following benefits for local resource redirection:
- Display configuration
- Audio
- Printers
- Clipboard
- Smart cards
- Drives
- USB devices
- Supported Plug and Play devices
Shared Virtual Hard Disk Windows Server 2016 Hyper-V has a feature called Shared Virtual Hard Disk. Shared Virtual Hard Disk allows an administrator to cluster virtual machines by using Shared Virtual Hard Disk (VHDX) files.
Shared virtual hard disks allow an administrator to build a high availability infrastructure, which is important if you are setting up either a private cloud deployment or a cloud-hosted environment for managing large workloads. Shared virtual hard disks allow two or more virtual machines to access the same virtual hard disk (VHDX) file.
Automatic Virtual Machine Activation (AVMA) Automatic Virtual Machine Activation (AVMA) is a feature that allows administrators to install virtual machines on a properly activated Windows Server 2016 system without the need to manage individual product keys for each virtual machine. When using AVMA, virtual machines get bound to the licensed Hyper-V server as soon as the virtual machine starts.
Network Isolation One nice feature of using Microsoft Hyper-V network virtualization is the ability of Hyper-V to keep virtual networks isolated from the physical network infrastructure of the hosted system. Because administrators can set up Hyper-V software–defined virtualization policies, you are no longer limited by the IP address assignment or VLAN isolation requirements of the physical network. Hyper-V allows for built-in network isolation to keep the virtual network separated from the virtual network.
Discrete Device Assignment One feature of Windows Server 2016 is the ability to use Discrete Device Assignment (DDA). DDA allows an administrator to take full advantage of performance and application compatibility improvements in the user experience by allowing the system’s graphic cards to be directly assigned to a virtual machine. This allows the graphic card processor to be fully available to the virtual desktops that are utilizing the native driver of the graphics card processor.
Non-Uniform Memory Access Non-Uniform Memory Access (NUMA) is a multiprocessor memory architecture that allows a processor to access its local memory quicker than memory located on another processor. NUMA allows a system to access memory quickly by providing separate memory on each processor. Processor can access their local assigned memory thus speeding the system performance. Normally a multi-processor system runs into performance issues when multiple processors access the same memory at the same time. NUMA helps prevent this by allowing processors to access their own memory. Memory that is dedicated to a processor is referred to as a NUMA node.
Dynamic Memory Dynamic Memory is a feature of Hyper-V that allows it to balance memory automatically among running virtual machines. Dynamic Memory allows Hyper-V to adjust the amount of memory available to the virtual machines in response to the needs of the virtual machines. It is currently available for Hyper-V in Windows Server 2016.
Virtual Machine Queue Windows Server 2016 Hyper-V includes a feature called Virtual machine queue (VMQ) as long as the hardware is VMQ compatible network hardware. VMQ uses packet filtering to provide data from an external virtual machine network directly to virtual machines. This helps reduce the overhead of routing packets from the management operating system to the virtual machine.
Once VMQ is enabled on Hyper-V, a dedicated queue is created on the physical network adapter for each virtual network adapter to use. When data arrives for the virtual network adapter, the physical network adapter places that data in a queue and once the system is available, all of the data in the queue is delivered to the virtual network adapter.
To enable the virtual machine queue on a specific virtual machine, enter the settings for the virtual machine and expand Network Adapter. Click Hardware Acceleration and on the right hand window, check the box for Enable virtual machine queue.
Hyper-V Nesting Windows Server 2016 has introduced a new feature of Hyper-V called Hyper-V nesting. Hyper-V nesting allows you to run a virtual machine in a virtual machine. So let’s say that you build a new 2016 Hyper-V server. You install Windows Server 2016 into a virtual machine. Then in that virtual machine, you can install Hyper-V and build other virtual machines within the first virtual machine. This is new to Windows Server 2016 and can be very useful in training situations. You can install a Windows Server 2016 virtual machine and still show others how to install and create virtual machines in the original virtual machine. To enable Hyper-V nesting, you would run the following PowerShell command on the Hyper-V Host. The virtual machines must be in the OFF State when this command is run (this means the virtual machines must be turned off):
Set-VMProcessor -VMName <VMName> ‐ExposeVirtualizationExtensions $trueSupported Guest Operating Systems
The following guest operating systems have been successfully tested on Hyper-V and are hypervisor-aware. Table 4.1 shows all of the guest server operating systems and the maximum number of virtual processors. Table 4.2 shows all of the guest client operating systems and the maximum number of virtual processors.
TABLE 4.1 Hyper-V guest server operating systems
| Guest Operating System (Server) | Maximum Number of Virtual Processors |
| Windows Server 2016 | 64 |
| Windows Server 2012 and Server 2012 R2 | 64 |
| Windows Server 2008 R2 with Service Pack 1 (SP1) | 64 |
| Windows Server 2008 R2 | 64 |
| Windows Server 2008 with Service Pack 2 (SP2) | 8 |
| Windows Home Server 2011 | 4 |
| Windows Small Business Server 2011 | Essentials edition: 2 Standard edition: 4 |
| Windows Server 2003 R2 with Service Pack 2 (SP2) | 2 |
| Windows Server 2003 with Service Pack 2 (SP2) | 2 |
| Red Hat Enterprise Linux 5.7 and 5.8 | 64 |
| Red Hat Enterprise Linux 6.0–6.3 | 64 |
| SUSE Linux Enterprise Server 11 SP2 | 64 |
| Open SUSE 12.1 | 64 |
| Ubuntu 12.04 | 64 |
TABLE 4.2 Hyper-V guest client operating systems
| Guest Operating System (Client) | Maximum Number of Virtual Processors |
| Windows 10 | 32 |
| Windows 8 / 8.1 | 32 |
| Windows 7 with Service Pack 1 (SP1) | 4 |
| Windows 7 | 4 |
| Windows Vista with Service Pack 2 (SP2) | 2 |
| Windows XP with Service Pack 3 (SP3) | 2 |
| Windows XP x64 Edition with Service Pack 2 (SP2) | 2 |
| CentOS 5.7 and 5.8 | 64 |
| CentOS 6.0–6.3 | 64 |
| Red Hat Enterprise Linux 5.7 and 5.8 | 64 |
| Red Hat Enterprise Linux 6.0–6.3 | 64 |
| SUSE Linux Enterprise Server 11 SP2 | 64 |
| Open SUSE 12.1 | 64 |
| Ubuntu 12.04 | 64 |
Hyper-V Architecture
This section will provide you with an overview of the Hyper-V architecture (see Figure 4.1). I’ll explain the differences between a hypervisor-aware and a non-hypervisor-aware child partition.
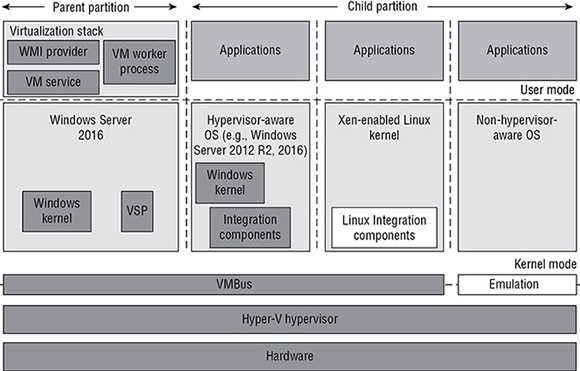
FIGURE 4.1 Hyper-V architecture
As you can see, Hyper-V is based on the microkernel architecture. Hyper-V provides a virtualization layer called a hypervisor that runs directly on the system hardware. You can see that the hypervisor is similar to what the kernel is to Windows. It is a software layer responsible for the interaction with the core hardware and works in conjunction with an optimized instance of Windows Server 2016 that allows running multiple operating systems on a physical server simultaneously. The Hyper-V architecture consists of the hypervisor and parent and child partitions.
The Windows Server 2016 operating system runs in the parent partition, and it delivers the WMI provider for scripting as well as the VM service.
Virtual machines each run in their own child partitions. Child partitions do not have direct access to hardware resources; instead, they have a virtual view of the resources, which are called virtual devices.
If you’re running a hypervisor-aware operating system like Windows Server 2003, Windows Server 2008, Windows Server 2008 R2, Windows Server 2012, or Windows Server 2016 in your virtual machine, any request to the virtual devices is redirected via the high-speed bus to the devices in the parent partition, which will manage the requests.
By default, only Windows Server 2008 R2, Server 2012, and Server 2012 R2 are hypervisor-aware operating systems. Once you install Hyper-V Integration Components on an operating system other than Windows Server 2008 R2 and newer, it will be hypervisor-aware. Microsoft provides a hypervisor adapter to make Linux hypervisor aware.
Non-hypervisor-aware operating systems (for example, Windows NT 4.0) use an emulator to communicate with the Windows hypervisor, which is slower than molasses in the winter.
Hyper-V Requirements
The following sections will describe the hardware and software requirements for installing the Hyper-V server role. It is important to understand these requirements for obtaining your software license as well as for planning for server hardware. When you understand the requirements, you can design and configure a Hyper-V solution that will meet the needs of your applications.
Hardware Requirements
In addition to the basic hardware requirements for Windows Server 2016, there are requirements for running the Hyper-V server role on your Windows server. They are listed in Table 4.3.
TABLE 4.3 Hardware requirements for Hyper-V
| Requirement Area | Definition |
| CPU | x64-compatible processor with Intel VT or AMD-V technology enabled. Hardware Data Execution Prevention (DEP), specifically Intel XD bit (execute disable bit) or AMD NX bit (no execute bit), must be available and enabled. Minimum: 1.4 GHz. Recommended: 2 GHz or faster. |
| Memory | Minimum: 1 GB RAM. Recommended: 2 GB RAM or greater. (Additional RAM is required for each running guest operating system.) Maximum: 1 TB. |
| Hard disk | Minimum: 8 GB. Recommended: 20 GB or greater. (Additional disk space needed for each guest operating system.) |
The Add Roles Wizard in Server Manager additionally verifies the hardware requirements. A good starting point is to check your hardware against the Microsoft hardware list to make sure that Windows Server 2016 supports your hardware. If you try to install the Hyper-V server role on a computer that does not meet the CPU requirements, you’ll get a warning window that looks like Figure 4.2.
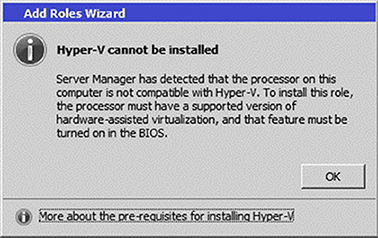
FIGURE 4.2 Warning window that Hyper-V cannot be installed
Software Requirements
To use virtualization in Windows Server 2016, you need to consider the basic software requirements for Hyper-V. Hyper-V runs only on the following editions of the Windows Server 2016 operating system:
- Windows Server 2016 Standard edition
- Windows Server 2016 Datacenter edition
- Microsoft Hyper-V Server 2012 R2 edition
- Windows Server 2016 Hyper-V edition
Hyper-V Installation and Configuration
The following sections explain how to install the Hyper-V role using Server Manager in Windows Server 2016 Full installation mode or the command-line mode in Windows Server 2016 Server Core. We will then take a look at Hyper-V as part of Server Manager before discussing how to use the Hyper-V Manager. Finally, we will look at the Hyper-V server settings and then cover two important areas for Hyper-V: virtual networks and virtual hard disks.
Install the Hyper-V Role
Now it’s time to see how to install the Hyper-V server role on the two installation options of Windows Server 2016, namely, a Full installation and a Server Core installation.
Installing Hyper-V in Full Installation Mode
You can install the Hyper-V server role on any Windows Server 2016 installation for which the Full option was chosen. In addition, the server must meet both the hardware and software requirements. The installation process is simple, as Exercise 4.1 demonstrates.
Installing Hyper-V in Server Core
The Server Core installation option is introduced in Windows Server 2008. It creates an operating system installation without a GUI shell. You can either manage the server remotely from another system or use the Server Core’s command-line interface.
This installation option provides the following benefits:
- Reduces attack surface (because fewer applications are running on the server)
- Reduces maintenance and management (because only the required options are installed)
- Requires less disk space and produces less processor utilization
- Provides a minimal parent partition
- Reduces system resources required by the operating system as well as the attack surface
By using Hyper-V on a Server Core installation, you can fundamentally improve availability because the attack surface is reduced and the downtime required for installing patches is optimized. It will thus be more secure and reliable with less management.
To install Hyper-V for a Windows Server 2016 installation, you must execute the following command in the command-line interface:
Dism /online /enable-feature /featurename:Microsoft-Hyper-VHyper-V in Server Manager
As with all of the other Windows Server 2016 roles, the Hyper-V role neatly integrates into Server Manager. Server Manager filters the information just for the specific role and thus displays only the required information. As you can see in Figure 4.5, the Hyper-V Summary page shows related event log entries, the state of the system services for Hyper-V, and useful resources and support.
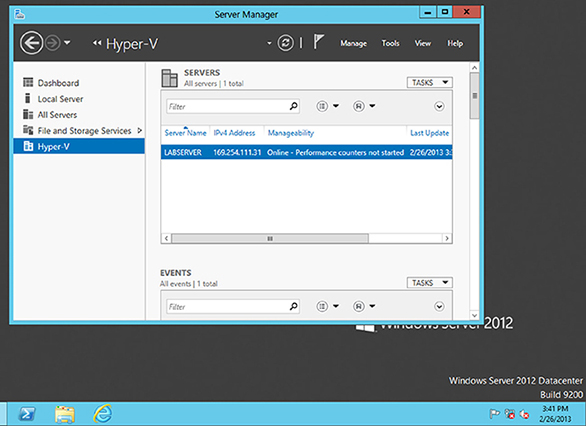
FIGURE 4.5 Hyper-V in Server Manager
Using Hyper-V Manager
Hyper-V Manager is the central management console to configure your server and create and manage your virtual machines, virtual networks, and virtual hard disks. Hyper-V Manager is managed through a Microsoft Management Console (MMC) snap-in. You can access it either in Server Manager or by using Administrative Tools ➢ Hyper-V Manager. Figure 4.6 shows how Hyper-V Manager looks once you start it.

FIGURE 4.6 Hyper-V Manager
Hyper-V Manager is available for the following operating systems:
- Windows Server 2016
- Windows Server 2012 R2
- Windows Server 2012
- Windows Server 2008 R2
- Windows Server 2008
- Windows 8
- Windows 10
- Windows 8.1
- Windows 7
- Windows Vista with Service Pack 1 (SP1)
Hyper-V Manager is installed on a Windows Server 2016 machine only when you install Hyper-V on it. On Windows Server 2012 R2/2012/2008/2008 R2/ 2003, Windows 10/8/7, or Windows Vista, you will need to install the Hyper-V Manager MMC using the Remote Server Administration Tools (RSAT).
You can use Hyper-V Manager to connect to any Full or Server Core installation remotely. Besides Hyper-V Manager, you can use the WMI interface for scripting Hyper-V.
Configure Hyper-V Settings
In this section, you will get an overview of the available Hyper-V settings for the server. You configure all server-side default configuration settings like default locations of your configuration files or the release key. You can open the Hyper-V Settings page (see Figure 4.7) in Hyper-V Manager by clicking Hyper-V Settings in the Actions pane.

FIGURE 4.7 Hyper-V Settings
The Hyper-V Settings page includes the following settings:
Virtual Hard Disks Specifies the default location of your virtual hard disk files (.vhd and .vhdx).
Virtual Machines Specifies the default location of your virtual machine configuration files. It includes the Virtual Machine XML configuration files (part of the Virtual Machines folder) as well as related checkpoints (part of the Checkpoints folder).
Physical GPUs This feature allows for graphical processing unit (GPU) accelerated video within a virtual machine. The GPU will allow you to support 3D GPU accelerated graphics.
NUMA Spanning An administrator can configure Hyper-V to allow virtual machines to span nonuniform memory architecture (NUMA) nodes. When the physical computer has NUMA nodes, this setting provides virtual machines with additional computing resources. Spanning NUMA nodes can help you run more virtual machines at the same time. However, using NUMA can decrease overall performance.
Live Migrations Live migration allows a Hyper-V administrator to relocate running virtual machines easily from one node of the failover cluster to another node in the same cluster.
Storage Migrations Storage Migration allows an administrator to move their virtual machine storage from one location to another. This setting allows you to specify how many storage migrations can be performed at the same time on this system.
Replication Configuration This setting allows you to configure this computer as a Replica Server to another Hyper-V server. Hyper-V Replica allows administrators to replicate their Hyper-V virtual machines from one Hyper-V host at a primary site to another Hyper-V host at the Replica site.
Each node of the failover cluster that is involved in Replica must have the Hyper-V server role installed. One of the servers in the Hyper-V replication needs to be set up as a Replica Broker to allow the replication to work properly.
Keyboard Defines how to use Windows key combinations. Options are Physical Computer, Virtual Machine, and Virtual Machine Only When Running Full Screen.
Mouse Release Key Specifies the key combination to release the mouse in your virtual machine. Options are Ctrl+Alt+left arrow, Ctrl+Alt+right arrow, Ctrl+Alt+space, and Ctrl+Alt+Shift.
Reset Check Boxes Resets any check boxes that hide pages and messages when checked. This will bring any window up again on which you checked the Do Not Show This Window Again check box.
Manage Virtual Switches
A virtual network provides the virtual links between nodes in either a virtual or physical network. Virtual networking in Hyper-V is provided in a secure and dynamic way because you can granularly define virtual network switches for their required usage. For example, you can define a private or internal virtual network if you don’t want to allow your virtual machines to send packages to the physical network.
To allow your virtual machines to communicate with each other, you need virtual networks. Just like normal networks, virtual networks exist only on the host computer and allow you to configure how virtual machines communicate with each other, with the host, and with the network or the Internet. You manage virtual networks in Hyper-V using Virtual Switch Manager, as shown in Figure 4.8.
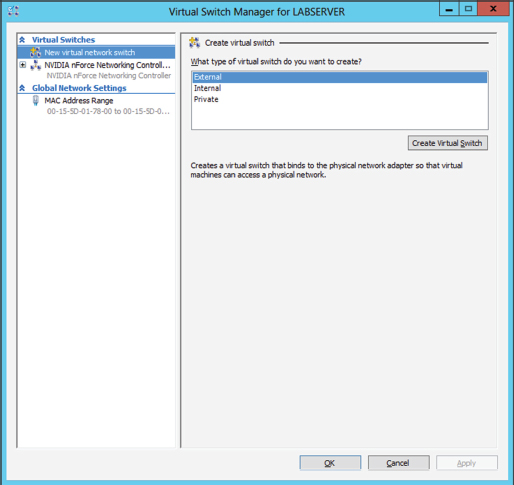
FIGURE 4.8 Virtual Network Manager
Using Virtual Switch Manager, you can create, manage, and delete virtual switches. You can define the network type as external, internal only, or private.
External Any virtual machine connected to this virtual switch can access the physical network. You would use this option if you want to allow your virtual machines to access, for example, other servers on the network or the Internet. This option is used in production environments where your clients connect directly to the virtual machines.
Internal This option allows virtual machines to communicate with each other as well as the host system but not with the physical network. When you create an internal network, it also creates a local area connection in Network Connections that allows the host machine to communicate with the virtual machines. You can use this if you want to separate your host’s network from your virtual networks.
Private When you use this option, virtual machines can communicate with each other but not with the host system or the physical network; thus, no network packets are hitting the wire. You can use this to define internal virtual networks for test environments or labs, for example.
On the external and internal-only virtual networks, you also can enable virtual LAN (VLAN) identification. You can use VLANs to partition your network into multiple subnets using a VLAN ID. When you enable virtual LAN identification, the NIC that is connected to the switch will never see packets tagged with VLAN IDs. Instead, all packets traveling from the NIC to the switch will be tagged with the access mode VLAN ID as they leave the switch port. All packets traveling from the switch port to the NIC will have their VLAN tags removed. You can use this if you are already logically segmenting your physical machines and also use it for your virtual ones.
Exercise 4.2 explains how to create an internal-only virtual switch.
When you create the internal virtual switch, a network device is created in Network Connections, as shown in Figure 4.9.
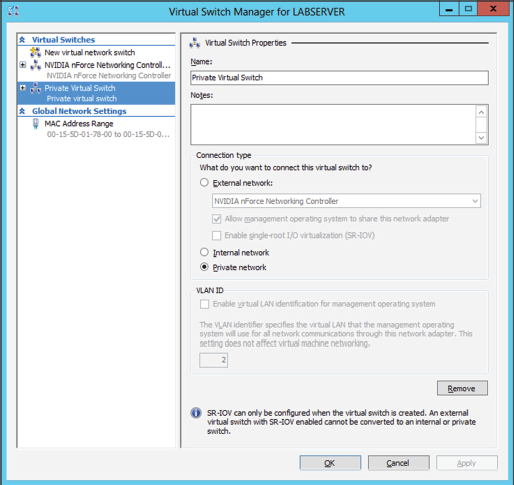
FIGURE 4.9 Virtual network card
This is also the case when you create an external virtual network because it will replace the physical network card of the host machine to give the parent partition a virtual network card that is also used in the child partitions.
Hyper-V binds the virtual network service to a physical network adapter only when an external virtual network is created. The benefit of this is that the performance is better if you do not use the external virtual network option. The downside, however, is that there will be a network disruption when you create or delete an external virtual network.
Managing Virtual Hard Disks
In addition to virtual networks, you need to manage virtual hard disks that you attach to your virtual machines. A virtual hard disk in Hyper-V, apart from a pass-through disk, is a VHD or VHDX file that basically simulates a hard drive on your virtual machine.
The following sections will first show you what types of virtual hard disks are available and then show you how to create them. You will also learn about what options are available to manage virtual hard disks.
Types of Hard Disks
Depending on how you want to use the disk, Hyper-V offers various types, as described in Table 4.4.
TABLE 4.4 Virtual hard disks in Hyper-V
| Type of Disk | Description | When to Use It |
| Dynamically expanding | This disk starts with a small VHD file and expands it on demand once an installation takes place. It can grow to the maximum size you defined during creation. You can use this type of disk to clone a local hard drive during creation. | This option is effective when you don’t know the exact space needed on the disk and when you want to preserve hard disk space on the host machine. Unfortunately, it is the slowest disk type. |
| Fixed size | The size of the VHD file is fixed to the size specified when the disk is created. This option is faster than a dynamically expanding disk. However, a fixed-size disk uses up the maximum defined space immediately. This type is ideal for cloning a local hard drive. | A fixed-size disk provides faster access than dynamically expanding or differencing disks, but it is slower than a physical disk. |
| Differencing | This type of disk is associated in a parent-child relationship with another disk. The differencing disk is the child, and the associated virtual disk is the parent. Differencing disks include only the differences to the parent disk. By using this type, you can save a lot of disk space in similar virtual machines. This option is suitable if you have multiple virtual machines with similar operating systems. | Differencing disks are most commonly found in test environments and should not be used in production environments. |
| Physical (or pass-through disk) | The virtual machine receives direct pass-through access to the physical disk for exclusive use. This type provides the highest performance of all disk types and thus should be used for production servers where performance is the top priority. The drive is not available for other guest systems. | This type is used in high-end datacenters to provide optimum performance for VMs. It’s also used in failover cluster environments. |
Creating Virtual Hard Disks
To help you gain practice in creating virtual hard disks, the following three exercises will teach you how to create a differencing hard disk, how to clone an existing disk by creating a new disk, and how to configure a physical or pass-through disk to your virtual machine. First, in Exercise 4.3, you will learn how to create a differencing virtual hard disk.
The process to add a physical or pass-through disk to a virtual machine is quite different. For this, first you need to create the virtual machine, and then you open the virtual machine settings to configure the physical disk. If you want to add a physical disk to a virtual machine, the physical disk must be set as Offline in Disk Management, as shown in Figure 4.10.
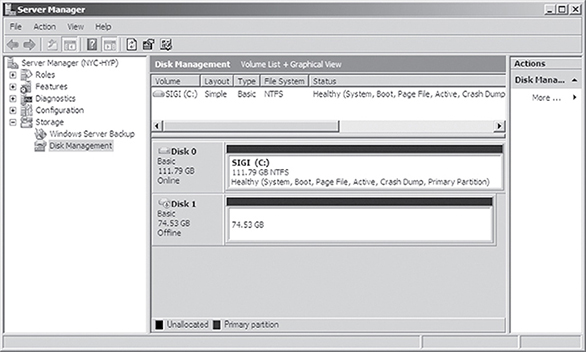
FIGURE 4.10 In Disk Management, you can set disks as Offline.
To access Disk Management, click the Windows key, choose Administrative Tools ➢ Computer Management, expand Storage in the left pane, and click Disk Management.
Physical or pass-through disks might not be that important if your use of virtualization is based on test environments, but they become crucial when you need to plan for highly available virtual datacenters. This is especially true if you consider using failover clusters to provide the Quick Migration feature, which is when you should consider matching one logical unit number (LUN) from your enterprise storage system or storage area network (SAN) as one physical disk. This provides you with the optimum performance you need in such an environment.
Managing Virtual Hard Disks
Hyper-V also provides two tools to manage virtual hard disks: Inspect Disk and Edit Disk. These tools are available on the Actions pane in Hyper-V Manager.
Inspect Disk This provides you with information about the virtual hard disk. It shows you not only the type of the disk but also information such as the maximum size for dynamically expanding disks and the parent VHD for differencing disks.
Edit Disk This provides you with the Edit Virtual Hard Disk Wizard, which you can use to compact, convert, expand, merge, or reconnect hard disks. Figure 4.11 shows you the wizard’s options when you select a dynamically expanding disk.

FIGURE 4.11 The Edit Virtual Hard Disk Wizard
Table 4.5 provides you with an overview of what you can do with the wizard.
TABLE 4.5 Edit Disk overview
| Action | Description |
| Compact | Reduces the size of a dynamically expanding or differencing disk by removing blank space from deleted files. |
| Convert | Converts a dynamically expanding disk to a fixed disk or vice versa. |
| Expand | Increases the storage capacity of a dynamically expanding disk or a fixed virtual hard disk. |
| Merge | Merges the changes from a differencing disk into either the parent disk or another disk (applies to differencing disks only!). |
| Reconnect | If a differencing disk no longer finds its referring parent disk, this option can reconnect the parent to the disk. |
Generation 1 vs. Generation 2 VHDs
Previous versions of Hyper-V had some pretty major drawbacks. One big drawback was that Hyper-V could not boot a virtual machine from a virtual hard drive that was SCSI. Believe it or not, SCSI controllers were not even recognized by Hyper-V unless you installed the Integration Services component.
Another issue that the previous versions of Hyper-V had was the inability to copy files from the Hyper-V host to the virtual machines without the use of a network connection in the virtual machine. The older versions of Hyper-V, prior to Windows Server 2016, are now considered generation 1 versions. Why is it so important to know which generations of Hyper-V you should use or need to use?
Hyper-V generations help determine what functionality and what virtual hardware you can use in your virtual machine. Windows Server 2016 Hyper-V now supports two different virtual machine generations: generation 1 and generation 2.
As already explained, previous versions of Hyper-V are considered generation 1, and this provides the same virtual hardware to the virtual machine as in previous versions of Hyper-V.
Generation 2 is included with Windows Server 2016, and it provides better functionality on the virtual machines including secure boot (which is enabled by default), the ability to boot from a SCSI virtual hard disk or boot from a SCSI virtual DVD, the ability to use a standard network adapter to PXE boot, and Unified Extensible Firmware Interface (UEFI) firmware support. Generation 2 now gives you the ability to support UEFI firmware instead of BIOS-based firmware. On a virtual machine that is Generation 2, you can configure Secure Boot, Enable TPM, and set security policies by clicking on the Security section of the virtual machines properties.
So when you create VHDs in Windows Server 2016, one of your choices will be the ability to create the VHDs as a generation 1 or generation 2 VHD. If you need the ability to have your VHDs run on older versions of Hyper-V, make them a generation 1 VHD. If they are going to run only on Windows Server 2016, make your VHDs generation 2 and take advantage of all the new features and functionality.
Configuring Virtual Machines
The following sections cover the topics of creating and managing virtual machines as well as how to back up and restore virtual machines using features such as Import and Export and Checkpoint. You’ll also briefly look at Hyper-V’s Live Migration feature.
Creating and Managing Virtual Machines
It is important to learn how to create a virtual machine, how to change its configuration, and how to delete it. You will take a look at the Virtual Machine Connection tool and install the Hyper-V Integration Components onto a virtual machine.
Virtual Machines
Virtual machines define the child partitions in which you run operating system instances. Each virtual machine is separate and can communicate with the others only by using a virtual network. You can assign hard drives, virtual networks, DVD drives, and other system components to it. A virtual machine is similar to an existing physical server, but it no longer runs on dedicated hardware—it shares the hardware of the host system with the other virtual machines that run on the host.
Exercise 4.4 shows you how to create a new virtual machine. Before completing this exercise, download an eval copy of Windows Server from Microsoft’s website (www.microsoft.com/downloads). Make sure the file downloaded is an image file (.iso). You will use this image to install the operating system into the virtual machine.
After completing Exercise 4.4, you will have a virtual machine available in Hyper-V Manager. Initially, the state of the virtual machine will be Off. Virtual machines can have the following states: Off, Starting, Running, Paused, and Saved. You can change the state of a virtual machine in the Virtual Machines pane by right-clicking the virtual machine’s name, as shown in Figure 4.19, or by using the Virtual Machine Connection window.

FIGURE 4.19 Options available when right-clicking a virtual machine
Here is a list of some of the state options (when the VM is running) available for a virtual machine:
Start Turn on the virtual machine. This is similar to pressing the power button when the machine is turned off. This option is available when your virtual machine is Off or in Saved state.
Turn Off Turn off the virtual machine. This is similar to pressing the power-off button on the computer. This option is available when your virtual machine is in Running, Saved, or Paused state.
Shut Down This option shuts down your operating system. You need to have the Hyper-V Integration Components installed on the operating system; otherwise, Hyper-V will not be able to shut down the system.
Save The virtual machine is saved to disk in its current state. This option is available when your virtual machine is in Running or Paused state.
Pause Pause the current virtual machine, but do not save the state to disk. You can use this option to release processor utilization quickly from this virtual machine to the host system.
Reset Reset the virtual machine. This is like pressing the reset button on your computer. You will lose the current state and any unsaved data in the virtual machine. This option is available when your virtual machine is in Running or Paused state.
Resume When your virtual machine is paused, you can resume it and bring it online again.
Changing Configuration on an Existing Virtual Machine
To change the configuration settings on an existing virtual machine, you right-click your virtual machine’s name in the Virtual Machines pane in Hyper-V Manager and choose Settings. You can change settings such as memory allocation and hard drive configuration. All items that you can configure are described in the following list:
Add Hardware Add devices to your virtual machine, namely, a SCSI controller, a network adapter, or a legacy network adapter. A legacy network adapter is required if you want to perform a network-based installation of an operating system.
Firmware This is the replacement of the virtual machine’s BIOS. Because you can no longer enter the BIOS during startup, you need to configure it with this setting. You can turn Num Lock on or off and change the basic startup order of the devices.
Security This setting allows an administrator to set up the Secure Boot option along with enabling the Trusted Platform Module (TPM). TPM is a special-purpose microprocessor which provides cryptographic services. You can also set virtual machine shielding in the security section.
Memory Change the amount of random access memory (RAM) allocated to the virtual machine.
Processor Change the number of logical processors this virtual machine can use and define resource control to balance resources among virtual machines by using a relative weight.
SCSI Controller Configure all hard drives that are connected to the SCSI controller. You can add up to 63 hard drives to each SCSI controller, and you can have multiple SCSI controllers available.
Hard Drive Select a controller to attach to this device as well as to specify the media to use with your virtual hard disk. The available options are Virtual Hard Disk File (with additional buttons labeled New, Edit, Inspect, and Browse that are explained in the virtual hard disk section) and Physical Hard Disk. You can also remove the device here.
DVD Drive Select a controller to attach to this device and specify the media to use with your virtual CD/DVD drive. The available options are None, Image File (ISO Image), and Physical CD/DVD Drive Connected To The Host Computer. You also can remove the device here.
Network Adapter Specify the configuration of the network adapter or remove it. You can also configure the virtual network and MAC address for each adapter and enable virtual LAN identification. The network adapter section also allows you to control Bandwidth Management.
Bandwidth Management allows an administrator to specify how the network adapter will utilize network bandwidth. Administrators have the ability to set a minimum network bandwidth that a network adapter can use and a maximum bandwidth. This gives administrators greater control over how much bandwidth a virtual network adapter can use.
Name Edit the name of the virtual machine and provide some notes about it.
Integration Services Define what integration services are available to your virtual machine. Options are Operating System Shutdown, Time Synchronization, Data Exchange, Heartbeat, and Backup (Volume Checkpoint).
Checkpoints Define the default file location of your checkpoint files. Virtual machine checkpoints allow an administrator to restore a virtual machine to a previous state. After checkpoints are created, an administrator would use the “Recover action” to restore a virtual machine back to the time the checkpoint was created.
Smart Paging File Location This area allows you to set up a paging file for your virtual machine. Windows Server 2016 has a Hyper-V feature called Smart Paging. If you have a virtual machine that has a smaller amount of memory than what it needs for startup memory, when the virtual machine gets restarted, Hyper-V then needs additional memory to restart the virtual machine. Smart Paging is used to bridge the memory gap between minimum memory and startup memory. This allows your virtual machines to restart properly.
Automatic Start Define what this virtual machine will do when the physical computer starts. Options are Nothing, Automatically Start If The Service Was Running, and Always Start This Virtual Machine. You also can define a start delay here.
Automatic Stop Define what this virtual machine will do when the physical computer shuts down. Options are Save State, Turn Off, and Shut Down.
Deleting Virtual Machines
You can also delete virtual machines using Hyper-V Manager. This deletes all of the configuration files, as shown in Figure 4.20.
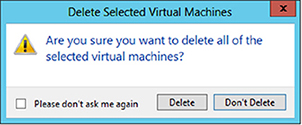
FIGURE 4.20 Delete Virtual Machine warning window
Make sure you manually delete any virtual disks that were part of the virtual machines to free up disk space. Virtual disks are not deleted when you delete a virtual machine.
Virtual Machine Connection
Hyper-V comes with Virtual Machine Connection to connect to virtual machines that run on a local or remote server. You can use it to log onto the virtual machine and use your computer’s mouse and keyboard to interact with the virtual machine. You can open Virtual Machine Connection in Hyper-V Manager by double-clicking a virtual machine or by right-clicking a virtual machine and selecting Connect. If your virtual machine is turned off, you might see a window similar to the one in Figure 4.21.

FIGURE 4.21 Virtual Machine Connection window when the machine is turned off
Virtual Machine Connection not only provides you with functionality similar to that of Hyper-V Manager, such as being able to change the state of a virtual machine, but it also provides you with additional features that are especially useful when you want to work with a virtual machine.
File Access Settings or Exit Virtual Machine Connection Change the state of a virtual machine and create or revert a checkpoint. Additionally, you have the options to send Ctrl+Alt+Delete to your virtual machine and Insert Integration Services Setup Disk.
Context-Sensitive Buttons Provide Quick Access to Key Features These buttons are available under the menu bar to provide you with fast access to the most important features, as you can see in Figure 4.22. It shows the connection of a running VM, but the VM has not had an operating system installed yet, so the figure shows the Windows Server 2016 Setup screen.
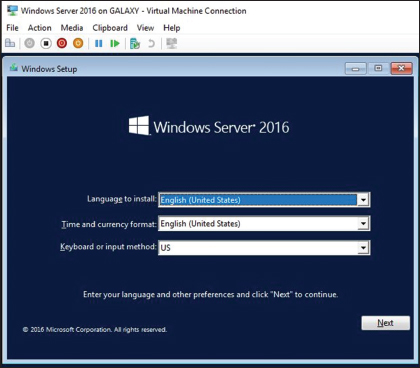
FIGURE 4.22 Virtual Machine Connection window showing a running Windows Server 2016 virtual machine
NIC Teaming
NIC Teaming, also known as load balancing and failover (LBFO), gives an administrator the ability to allow multiple network adapters on a system to be placed into a team. Independent hardware vendors (IHVs) have required NIC Teaming, but until Windows Server 2012, NIC Teaming was not part of the Windows Server operating system.
To be able to use NIC Teaming, the computer system must have at least one Ethernet adapter. If you want to provide fault protection, an administrator must have a minimum of two Ethernet adapters. One advantage of Windows Server 2016 is that an administrator can set up 32 network adapters in a NIC team.
NIC Teaming is a common practice when setting up virtualization. This is one way that you can have load balancing with Hyper-V.
NIC Teaming gives an administrator the ability to allow a virtual machine to use virtual network adapters in Hyper-V. The advantage of using NIC Teaming in Hyper-V is that the administrator can use NIC Teaming to connect to more than one Hyper-V switch. This allows Hyper-V still to have connectivity even if the network adapter under the Hyper-V switch gets disconnected.
An administrator can configure NIC Teaming in either Server Manager or PowerShell. NIC Teaming can be configured in different configuration models including Switch Independent or Switch Dependent. Switch Independent means that each NIC adapter is connected into a different switch. Switch Dependent means that all NIC adapters are connected into the same switch. If you use Switch Independent NIC Teaming then you must connect your NICs to different switches but both switches must be on the same subnet.
Remote Direct Memory Access
When most of us think of Hyper-V, we think of a group of virtual machines sharing access to a systems resource. With Windows Server 2016, Hyper-V includes Remote Direct Memory Access (RDMA).
RDMA allows one computer to directly access memory from the memory of another computer without the need of interfacing with either one’s operating system. This gives systems the ability to have high throughput and low-latency networking. This is very useful when it comes to clustering systems (including Hyper-V).
Windows Server 2012 R2 RDMA services couldn’t be bound to a Hyper-V Virtual Switch and because of this, Remote Direct Memory Access and Hyper-V had to be on the same computer as the network adapters. Because of this, there was a need for a higher number of physical network adapters that were required to be installed on the Hyper-V host.
Because of the improvements of RDMA on Windows Server 2016, administrators can use less network adapters while using RDMA.
Switch Embedded Teaming
Earlier we discussed NIC Teaming but we also have the ability to do Switch Embedded Teaming (SET). SET can be an alternative to using NIC Teaming in environments that include Hyper-V and the Software Defined Networking (SDN) stack in Windows Server 2016. SET is available in all versions of Windows Server 2016 that include Hyper-V and SDN stack.
SET does use some of the functionality of NIC Teaming into the Hyper-V Virtual Switch but SET allows an administrator to combine a group of physical adapters (minimum of 1 adapter and a maximum of 8 adapters) into software based virtual adapters.
By using virtual adapters, you get better performance and greater fault tolerance in the event of a network adapter going bad. For SET to be enabled, all of the physical network adapters must be installed on the same physical Hyper-V host.
One of the requirements of SET is that all network adapters that are members of the SET group be identical adapters. This means that they need to be the same adapter types from the same manufacturers.
One main difference between NIC Teaming and Set is that SET only supports Switch Independent mode setups. Again this means that the NIC adapters are connected to different switches.
Administrators need to create a SET team at the same time that they create the Hyper-V Virtual Switch. Administrators can do this by using the Windows PowerShell command New-VMSwitch.
At the time an administrator creates a Hyper-V Virtual Switch, the administrator needs to include the EnableEmbeddedTeaming parameter in their command syntax. The following example shows a Hyper-V switch named StormSwitch.
New-VMSwitch -Name StormSwitch -NetAdapterName "NIC 1","NIC 2" -EnableEmbeddedTeaming $trueAdministrators also have the ability to remove a SET team by using the following PowerShell command. This example removes a Virtual Switch named StormSwitch.
Remove-VMSwitch [StormSwitch]Storage Quality of Service
Windows Server 2016 Hyper-V includes a feature called Storage Quality of Service (QoS). Storage QoS allows a Hyper-V administrator to manage how virtual machines access storage throughput for virtual hard disks.
Storage QoS gives an administrator the ability to guarantee that the storage throughput of a single VHD cannot adversely affect the performance of another VHD on the same host. It does this by giving administrators the ability to specify the maximum and minimum I/O loads based on I/O operations per second (IOPS) for each virtual disk in your virtual machines.
To configure Storage QoS, you would set the maximum IOPS values (or limits) and set the minimum values (or reserves) on virtual hard disks for virtual machines.
Installing Hyper-V Integration Components
Hyper-V Integration Components, also called Integration Services, are required to make your guest operating system hypervisor-aware. These components improve the performance of the guest operating system once they are installed. From an architectural perspective, virtual devices are redirected directly via the VMBus; thus, quicker access to resources and devices is provided.
If you do not install the Hyper-V Integration Components, the guest operating system uses emulation to communicate with the host’s devices, which of course makes the guest operating system slower.
Exercise 4.5 shows you how to install Hyper-V Integration Components on one of your virtual machines running Windows Server 2016.
Linux and FreeBSD Image Deployments
One of the features of Windows 2016 is the ability for Hyper-V to support Linux and FreeBSD virtual machines. Hyper-V now can support these new virtual machines because Hyper-V has the ability to emulate Linux and FreeBSD devices. Because Hyper-V now has the ability to emulate these two devices, no additional software needs to be installed on Hyper-V.
Unfortunately, because Hyper-V has to emulate these devices, you lose some of the Hyper-V functionality like high performance and full management of the virtual machines. So it’s a tradeoff. You get to run Linux and FreeBSD type Hyper-V virtual machines but you lose some of the benefits of Hyper-V.
But wait; there is a way to get your Hyper-V functionality back. This issue can be resolved as long as you install Hyper-V on machines that can support Linux and FreeBSD operating systems. The drivers that are needed on Hyper-V are called Linux Integration Services (LIS) and FreeBSD Integrated Services (FIS). By putting these drivers on a device that can handle Linux and FreeBSD, you can then have Hyper-V with all of the features Microsoft offers.
To get these drivers and make Hyper-V work will all of its functionality, you must make sure that you install a newer release of Linux that includes LIS. To get the most out of FreeBSD you must get a version after 10.0. For FreeBSD versions that are older than 10.0, Microsoft offers ports that work with BIS drivers that need to be installed. Hyper-V will work with Linux and FreeBSD without the need of any additional drivers or equipment. By having drivers and equipment that supports Linux and FreeBSD, you just get all of the Hyper-V features that your organization may need.
In Exercise 4.6, I will show you how to install Linux into a virtual machine. I will then walk you through a full installation of a Linux Server. Before you complete this lab, you must download a copy of Linux. For this exercise, I downloaded a free copy of Linux Ubuntu Server as an image file (.iso). If you choose a different version of Linux, the installation screens during the exercise may be different.
Now that we have installed Linux (or FreeBSD), the next step is to help improve the Hyper-V performance. As I stated earlier, this issue will be resolved as long as we install the drivers that are needed on Hyper-V called Linux Integration Services (LIS) and FreeBSD Integrated Services (FIS). By putting these drivers on a device that can handle Linux and FreeBSD, you can then have Hyper-V with all of the features Microsoft offers.
In Exercise 4.7, I will show you how to install the additional updates needed for the Linux Ubuntu version (16.10) that I installed in Exercise 4.6.
Finally, if you want to setup the Linux or FreeBSD virtual machines to use the advantages of secure boot, you would need to run the following PowerShell command on the Hyper-V server:
Set-VMFirmware -VMName "VMname" -EnableSecureBoot OffPowerShell Commands
One of the things that Microsoft has stated is that the exams are going to be more PowerShell intensive. So, I wanted to add a PowerShell section showing the different PowerShell commands that you can use for Hyper-V. This table has been taken directly from Microsoft’s websites. Table 4.6 explains just some of the PowerShell commands that you can use with Hyper-V.
TABLE 4.6 Hyper-V PowerShell commands
| Command | Explanation |
| Add-VMDvdDrive | Adds a DVD drive to a virtual machine. |
| Add-VMHardDiskDrive | Adds a hard disk drive to a virtual machine. |
| Add-VMMigrationNetwork | Adds a network for virtual machine migration on one or more virtual machine hosts. |
| Add-VMNetworkAdapter | Adds a virtual network adapter to a virtual machine. |
| Add-VMSwitch | Adds a virtual switch to an Ethernet resource pool. |
| Checkpoint-VM | Creates a checkpoint of a virtual machine. |
| Convert-VHD | Converts the format, version type, and block size of a virtual hard disk file. |
| Copy-VMFile | Copies a file to a virtual machine. |
| Debug-VM | Debugs a virtual machine. |
| Disable-VMConsoleSupport | Disables keyboard, video, and mouse for virtual machines. |
| Disable-VMMigration | Disables migration on one or more virtual machine hosts. |
| Dismount-VHD | Dismounts a virtual hard disk. |
| Enable-VMConsoleSupport | Enables keyboard, video, and mouse for virtual machines. |
| Enable-VMMigration | Enables migration on one or more virtual machine hosts. |
| Enable-VMReplication | Enables replication of a virtual machine. |
| Enable-VMResourceMetering | Collects resource utilization data for a virtual machine or resource pool. |
| Export-VM | Exports a virtual machine to disk. |
| Export-VMSnapshot | Exports a virtual machine checkpoint to disk. |
| Get-VHD | Gets the virtual hard disk object associated with a virtual hard disk. |
| Get-VHDSet | Gets information about a VHD set. |
| Get-VHDSnapshot | Gets information about a checkpoint in a VHD set. |
| Get-VM | Gets the virtual machines from one or more Hyper-V hosts. |
| Get-VMDvdDrive | Gets the DVD drives attached to a virtual machine or checkpoint. |
| Get-VMHardDiskDrive | Gets the virtual hard disk drives attached to one or more virtual machines. |
| Get-VMMemory | Gets the memory of a virtual machine or checkpoint. |
| Get-VMNetworkAdapter | Gets the virtual network adapters of a virtual machine, checkpoint, or management operating system or of a virtual machine and management operating system. |
| Get-VMProcessor | Gets the processor of a virtual machine or checkpoint. |
| Get-VMReplication | Gets the replication settings for a virtual machine. |
| Get-VMSwitch | Gets virtual switches from one or more virtual Hyper-V hosts. |
| Merge-VHD | Merges virtual hard disks. |
| Mount-VHD | Mounts one or more virtual hard disks. |
| Move-VM | Moves a virtual machine to a new Hyper-V host. |
| New-VHD | Creates one or more new virtual hard disks. |
| New-VM | Creates a new virtual machine. |
| New-VMGroup | Creates a virtual machine group. |
| New-VMSwitch | Creates a new virtual switch on one or more virtual machine hosts. |
| Remove-VHDSnapshot | Removes a checkpoint from a VHD set file. |
| Remove-VM | Deletes a virtual machine. |
| Remove-VMHardDiskDrive | Deletes one or more virtual hard disks (VHDs) from a virtual machine (VM). |
| Remove-VMNetworkAdapter | Removes one or more virtual network adapters from a virtual machine. |
| Remove-VMReplication | Removes the replication relationship of a virtual machine. |
| Remove-VMSan | Removes a virtual storage area network (SAN) from a Hyper-V host. |
| Remove-VMSwitch | Deletes a virtual switch. |
| Rename-VM | Renames a virtual machine. |
| Rename-VMGroup | Renames virtual machine groups. |
| Resize-VHD | Resizes a virtual hard disk. |
| Restart-VM | Restarts a virtual machine. |
| Save-VM | Saves a virtual machine. |
| Set-VHD | Sets properties associated with a virtual hard disk. |
| Set-VM | Configures a virtual machine. |
| Set-VMBios | Configures the BIOS of a Generation 1 virtual machine. |
| Set-VMMemory | Configures the memory of a virtual machine. |
| Set-VMNetworkAdapter | Configures features of the virtual network adapter in a virtual machine or the management operating system. |
| Set-VMProcessor | Configures one or more processors of a virtual machine. The Set-VMProcessor command also allows an administrator to configure nested virtualization. While the virtual machine is in the OFF state, run the Set-VMProcessor command on the physical Hyper-V host. This will enable nested virtualization for the virtual machine. |
| Set-VMReplicationServer | Configures a host as a Replica server. |
| Set-VMSan | Configures a virtual storage area network (SAN) on one or more Hyper-V hosts. |
| Set-VMSwitch | Configures a virtual switch. |
| Stop-VM | Shuts down, turns off, or saves a virtual machine. |
| Suspend-VM | Suspends, or pauses, a virtual machine. |
Summary
Virtualization is quickly becoming a hot topic in information technology. The potential for consolidation is tremendous, and thus it will become more and more important.
After reading this chapter, you should have a good understanding of the Hyper-V architecture and what is required to install Hyper-V.
The section about installation and configuration covered various basic aspects of configuring the virtualization environment. You learned about the different types of virtual networks that are available, the options for installing the Hyper-V role, and the various types of virtual hard disks that you can use to optimize virtualization for your specific scenario.
You also learned how to configure virtual machines using the Hyper-V environment and how to create your own virtual datacenter on top of your Hyper-V machines. I showed you how to create and manage virtual machines, how to use Virtual Machine Connection to control a virtual machine remotely, and how to install Hyper-V Integration Components. You also learned how to export and import virtual machines as well as how to do checkpoints of your virtual machine.
If you have never worked with virtualization software before, the information in this chapter may have been completely new to you. You should now be well prepared to try Hyper-V in your own environment.
Video Resources
There are videos available for the following exercises:
- 4.1
- 4.4
You can access the videos at http://sybextestbanks.wiley.com on the Other Study Tools tab.
Exam Essentials
Understand Hyper-V’s architecture. When you have a good understanding of Hyper-V’s architecture, especially when an operating system in a virtual machine is hypervisor-aware versus non-hypervisor-aware, you have a solid understanding of what is important from an architectural perspective.
You should know about the Hyper-V Integration Components and how they change the behavior of a virtual machine. Also know for which operating systems the integration components are available.
Know Hyper-V’s requirements and how to install it. Know the hardware and software requirements as well as how to install Hyper-V. Hyper-V requires an x64-based processor and Data Execution Protection (DEP). Hardware-assisted virtualization must be enabled—don’t forget this! Also remember that you can install Hyper-V two ways: using Server Manager or using the command line in Server Core.
Understand virtual networks and virtual hard disks. Virtual networks and hard disks are the two most tested topics. You definitely should know the types of virtual networks available (that is, external, internal only, and private virtual network) as well as all types of virtual hard disks (namely, dynamically expanding, fixed size, differential, and physical or pass-through). You should be able to apply the correct one when needed. Don’t forget the Edit Virtual Hard Disk Wizard, which is also a good source for questions in the exam.
Know how to create and manage virtual machines. You should be able to explain how to create a virtual machine, what options are available to install an operating system in a virtual machine, and how to install the Hyper-V Integration Components on a virtual machine. Don’t forget about the virtual machine states and the virtual machine settings!
Understand how to back up and restore virtual machines. Have a good understanding of the concept of exporting and importing virtual machines, how checkpoints work, and what lies behind a quick migration. Understand how you can export a virtual machine, what you should consider when moving it to a new host machine, and what happens after importing it to the import folder. The same applies to checkpoints: You need to know what options you have available and what each option will do. Especially recognize the difference between applying and reverting a checkpoint.
Review Questions
-
On which of the following x64 editions of Windows Server 2016 does Hyper-V run? (Choose all that apply.)
- Windows Server 2016 Web Edition
- Windows Server 2016 Standard Edition
- Windows Server 2016 Itanium Edition
- Windows Server 2016 Datacenter Edition
-
You want to build a test environment based on virtual machines on a single Windows Server 2016 machine, but you also want to make sure the virtual machines communicate with only each other. What type of virtual network do you need to configure?
- External
- Internal only
- Private virtual machine network
- Public virtual machine network
-
Andy wants to change the memory of a virtual machine that is currently powered up. What does he need to do?
- Shut down the virtual machine, use the virtual machine’s settings to change the memory, and start it again.
- Use the virtual machine’s settings to change the memory.
- Pause the virtual machine, use the virtual machine’s settings to change the memory, and resume it.
- Save the virtual machine, use the virtual machine’s settings to change the memory, and resume it.
-
You want to make sure the hard disk space for your virtual machines is occupied only when needed. What type of virtual hard disk would you recommend?
- Dynamically expanding disk
- Fixed-size disk
- Differencing disk
- Physical or pass-through disk
-
How do you add a physical disk to a virtual machine?
- Use the Virtual Hard Disk Wizard.
- Use the Edit Virtual Hard Disk Wizard.
- Use the virtual machine’s settings.
- Use the New Virtual Machine Wizard.
-
Rich bought a new server with an Itanium IA-64 processor, 4 GB RAM, and a SAN that provides 1 TB hard disk space. After installing Windows Server 2016 for Itanium-based systems, he wants to install Hyper-V on this server. Can Hyper-V be installed on this system?
- Yes
- No
-
What are the minimum CPU requirements for running Hyper-V on a machine? (Choose all that apply.)
- An x64-based processor (Intel or AMD).
- Hardware Data Execution Protection (DEP) must be enabled.
- Hardware-assisted virtualization must be enabled.
- The processor must at least have a dual core.
-
What is the command to install Hyper-V on a Windows Server 2016 machine that was installed in Server Core?
- start /w ocsetup Hyper-V
- start /w ocsetup microsoft-hyper-v
- start /w ocsetup Microsoft-Hyper-V
- start /w ocsetup hyper-v
-
On what operating systems can you install the Hyper-V Manager MMC? (Choose all that apply.)
- Windows Server 2012 R2
- Windows Server 2003
- Windows 10
- Windows 7, Windows 8
-
What statement is correct for an external virtual network?
- The virtual machines can communicate with each other and with the host machine.
- The virtual machines can communicate with each other only.
- The virtual machines can communicate with each other, with the host machine, and with an external network.
- The virtual machines cannot communicate with each other.