
Chapter 7
Step III
The Mastering Game Plan
After heeding the information and impressions informed by objective and subjective assessments, Step III is creating and executing a game plan or approach for mastering the song or project. This includes selecting: the sampling frequency and bit depth for mastered audio in the RDAW, the mastering equipment and its sequence in the signal path to achieve the desired sonic result, and beginning with the best sounding mix for the project. Additionally, The Mastering Game Plan follows four sequential work priorities: 1) Gain Structure, 2) Compression/Limiting, 3) EQ, and 4) Capture. Once this approach is firmly grasped, advanced mastering techniques may be integrated into the sequence. Each mix in the project is approached via these priorities, and you will cascade through them until you are satisfied with the sonic result before moving on to the next mix. I will now explore this and other related aspects of The Mastering Game Plan.
Setup—The Mastering Game Plan ‘Flight Check’
Select Sampling Frequency (S) and Bit Depth (BD) of Mastered Audio
Decide on the sampling frequency and bit depth for the mastered audio. I prefer 96kHz and 32bit floating-point for the raw mastered file that will be used to render all subsequent formats. It is a great storage/archive resolution for audio, as 96kHz provides a Nyquist frequency of 48kHz, and 32bit is an effective storage format for 24bit audio, which allows for 144dB of dynamic range (6dB per bit).
Select Signal Path
At this juncture, the Mastering Engineer selects the equipment and fine-tunes or makes adjustments to the signal path. I list analog signal paths here that would be in zone 2 of the mastering system; however, these same signal paths could be created with plug-ins or digital hardware. There are many possibilities for a mastering signal path, but a handful of common ones exist that I will list here. These block diagrams begin with more simple setups, and increase in complexity. Equipment accessed by dashed lines may be present or not, depending on your sonic goals. At either end of each chain would be a DAW (PBDAW on the left or beginning, and RDAW on the right or end):
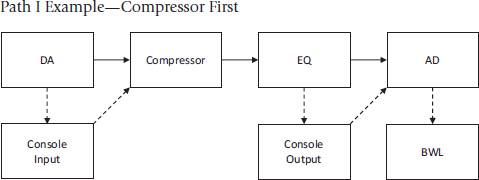
Figure 7.1Dashed lines show this chain with a mastering console and BWL options, and solid lines show a simpler point-to-point setup.
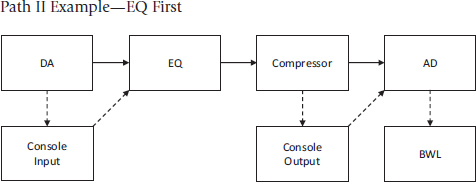

Figure 7.3Dashed lines again show mastering console and BWL options. Chain is more complex with addition of M/S encoder/decoder and EQ2 in M/S mode.

Figure 7.4This chain makes the mastering console obligatory and adds parallel compression to the chain in Figure 7.3. The BWL is still shown as an option with dashed line.
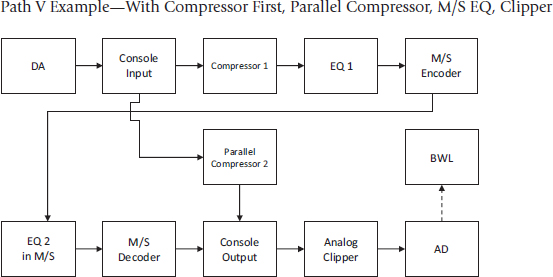
Figure 7.5This chain also has the mastering console as obligatory and places the compressor first, and also adds an analog clipper to the chain in Figure 7.4. The BWL is still shown as an option with dashed line.
Usually your analog path will include one or two compressors, and one or two equalizers with or without a mastering console. If necessary, this is accompanied by digital signal processing before your DA converter (zone 1), after your AD converter (zone 3), or both. The most common digital device in a mastering chain is a hardware digital BWL (i.e. Waves L2, t.c. electronic Finalizer, or t.c. electronic M6000) directly after the AD converter, or a plug-in BWL in the RDAW.
After You, Kind Sir: Compressor or Equalizer First in the Mastering Chain?
By compressing first then equalizing by adding high frequencies, more shimmer and high-frequency extension can be achieved. By adding low frequencies after compression, low-frequency transient instruments such as the kick drum will swing the VU meters further. More frequency extension is achievable, in other words. This is due to EQ being more apparent after compression. Standard compression will generally smooth out added mid- and high frequencies due to the gain reduction it performs on transients. Note that by adding output gain at the compressor, this darkening is less apparent even making the mix sound brighter (with less dynamic range). Always verify the result is desirable by bypassing then reinserting the compressor or EQ. Take time to experiment with each piece of equipment in order to learn its sonic characteristics. For instance, compressors often have a tonal component that is important to make mental note of; they can sometimes be used as a de facto equalizer in that regard.
By equalizing first, a more compact and contained sound is achievable, but often with more punch, as you can push certain frequencies into the compressor and have it react to them. This configuration works especially well on hip-hop, rap, or R&B music.
Monitoring Positions in Signal Path
Monitoring the audio signal at various positions in the mastering chain is critical to effective mastering. At minimum there must be a gain-matched flat listening position and a post-mastering listening position on the monitor controller. You could also have one at console output (before any post-AD digital signal processing [DSP]), or anywhere you can split signal off to a position on your monitor controller. This allows you to very quickly compare the differences between flat and mastered audio to verify adjustments. There are many options for monitoring, depending on how your mastering console/monitor section is set up.
To avoid over-processing the flat mix in mastering, regularly reference the flat mix while working, otherwise known as A/B-ing. Make sure to honor mix balances while A/B-ing between flat and mastered monitor positions. Your function is to enhance what the artist/engineer/producer created (unless otherwise instructed), rather than completely alter it. The gain-matched flat monitor position allows for focus on the EQ and compression changes by removing the more dramatic level change. The goal is to enhance the flat mix in an aesthetically appropriate and pleasing manner; continue the mastering process until this is achieved.
Oscillator Sweep the Signal Path
You must verify that the separate analog pieces in the signal path are compatible with each other. For example, combining balanced devices with unbalanced devices can cause added line noise, frequency roll-off, or signal level loss. Or, equipment with tubes and/or transformers can result in impedance loading issues when paired with solid-state equipment—again resulting in frequency or level loss. The simplest way to check for this is to sweep frequencies through the chain from an oscillator in the PBDAW. First, set the oscillator for 1kHz and monitor the oscillator output at your DA convertor. Make sure it is set at your operating reference level. As discussed in Chapter 4—Fundamental Mastering Tools, I use −14dBFS = 0VU = +4dBu (see Table 4.1). Then monitor the same tone after the RDAW DA converter with all equipment in, but set flat—the VU meter should still read 0VU. Next, sweep the oscillator from 20Hz–20kHz and make sure all frequencies give you an even 0VU reading. If there is roll-off, bypass each piece and sweep the tones once again to locate the problem, then either change the sequence of equipment, or use a device with buffered insert switches such as the Dangerous Liaison or other mastering console for better interaction between each piece of equipment. This is a quick overview of a very important lesson—before mastering audio, select, test, experiment, and then implement an effective mastering signal path.
Verify L/R Integrity Through Mastering System
Whenever you are patching equipment in and out, there is always the risk of inadvertently swapping left and right, especially if the analog signal path is extensive. Remember, as a Mastering Engineer, all problems are your problems. For this reason, I prefer to set up the Pro Tools PBDAW with multiple mono stereo panels so that I can quickly mute the left or right channel to verify that the corresponding speaker mutes while monitoring the output of my mastering chain at the RDAW output. You could also perform some L/R balancing, but I prefer to do that at the input of the analog console, if necessary.
Select the Critical First Mix to Master
The Best Sounding Mix
Select the best sounding mix fidelity-wise, taking into consideration the recording quality, the engineer, and the studio. If mastering a single, clearly this does not apply. If you are mastering two or more songs as a collection, it remains very important. This is one reason to ask the client how all the songs were recorded and mixed. Many times during the course of making an album, there are multiple studios or engineers working on the project. Some studios/engineers achieve a better sounding result, and you must use that knowledge to your advantage while mastering. In situations where the mixes are similar in fidelity, consider the mix with the most instrumentation, musical complexity, and fastest tempo. This is because it will represent one of the loudest sounding masters in the collection, and the other mixes can be referenced against it.
Organize the Mixes
Group mixes by production team/studio before moving on to the next best sounding production. Ballads or singer/songwriter-type productions can be done by production team group, or left for last. These can remain at a lower volume so as not to overtake up-tempo tracks. Always listen for vocal level cohesion between all songs.
Execution of The Mastering Game Plan
Gain Structure
This involves adjusting gain structure through the mastering system to reach the target level (see Table 5.1). In your mastering chain, there will be several places where you can add gain to achieve your chosen mastered target level. The distribution of this gain throughout the signal path is known as gain structure, a common term in all aspects of professional audio. For instance, in mixing, it is built up instrument by instrument and monitored via the stereo buss VU meters; in recording, it is the gain from the microphone preamplifier to a compressor to a console fader to the DAW. I get a rough gain setting through the mastering system first, and if re-sequencing of equipment is necessary later, I verify the gain structure again.
Let’s assume a pop/rock mix has come to you for mastering, meaning your target level is +12–+13dBu on a VU meter (see Table 5.1). Make sure your PBDAW has an actual VU meter connected to its output monitor position—or a plug-in VU meter (i.e. PSP VU-3) open on the Pro Tools stereo buss—and set for 0VU = +8dBu. Classic ‘textbook’ mixes have peaks at around +4dBu VU (the standard alignment of most analog mixing console VU meters); modern mixes can arrive for mastering much hotter. I’ve found it is ideal to have flat mix playback peaks between +6dBu and +8dBu. If the flat mix objective assessment is VU peaks at +4dBu, −3.0dBFS Peaks, and −14dBFS RMS level, 2.5dB of gain can safely be added within the headroom of 3dB at the PBDAW without clipping the DAW software—this playback level change represents your first mastering adjustment. Now you must add a total of 4dB–5dB throughout the remainder of the mastering chain to reach +12dBu–+13dBu. Applying this powerful knowledge frames one of the key functions you will perform as Mastering Engineer—achieving the intended target level. The best-sounding option remains a matter of experience, trial and error, and musical judgment. Remember, you can always do A/B tests on short sections of program material to help decide on the best approach fidelity-wise.
Gain Distribution in The Three Zone Mastering System
Whereas EQs perform frequency-dependent gain, I prefer to conceive of them as tonal devices rather than gain devices. As opposed to analog hardware EQs, many EQ plug-ins include input and output gain adjustments. This can help adjust gain structure, especially if there are over-levels at either the input or output of the plug-in, but I prefer to leave these gain settings flat as much as possible.
When mastering, always adjust gain through the three zones of the mastering system first (Table 7.1; see also Figure 3.9). Adding gain will change how the audio sounds, and may improve the perception of frequency response, depth, and dimension of the file independent of dynamics or EQ adjustments. Conversely, by EQing first, a frequency band that is enhanced risks becoming over-apparent if gain is added subsequently. This is especially true for mid-range frequencies, where our ears are most sensitive, as the Fletcher–Munson equal loudness contours indicate.1 Once you have adjusted gain structure through the mastering system, and VU peaks are at your target level, the next adjustments to tackle are dynamics and then EQ.
| Location | Mastering System Zone |
|---|---|
| PBDAW Plug-in (EQ/Compressor/Limiter) |
Zone 1 (before DA converter: digital) |
| Input of Mastering Console Analog Compressor(s) Output of Mastering Console |
Zone 2 (between DA and AD converters: analog) |
| Digital Peak-Limiter Post-Mastering Plug-ins |
Zone 3 (after AD converter: digital) |
Compression/Limiting (Dynamics)
Once the initial gain structure is set, managing peaks and/or increasing overall apparent volume via compression is important to avoid distortion and over-levels and to add impact to the mix. In a mastering context, compression is generally used to manage and control dynamics in the mix. Access to a variety of good analog compressors remains paramount to a great mastering system. The onboard gain stages often found on compressors are handy for adjusting gain structure to achieve the target level. As discussed in Chapter 4—Fundamental Mastering Tools, by adjusting the input, threshold, ratio, attack, release, and output gain settings on a compressor, an array of dynamics management or level results can be achieved. Proficiency at compression requires consistent practice, but I find that once I discover and like a particular compressor setting, I avoid drastic deviation and use the gain structure through the system to ‘hit’ the compressor for the desired result.
If more drastic dynamics control is required, a limiter can be utilized. A limiter generally has a higher ratio and quicker release times to manage more intense peaks. Most compressors with 10:1 or higher ratios can be set to function as a limiter. Additionally, in zone 3 after the AD converter, a BWL is very commonly used to protect the RDAW from any over-levels and also as an option for additional gain (as discussed previously).
EQ
It is best to begin EQing after the basic gain structure and compressor settings have been adjusted. This is because both gain adjustments and compression can affect the frequency response of the mix, so again, to avoid over-processing, EQing is best done third. As addressed in Chapter 4—Fundamental Mastering Tools, EQs boost or cut selected frequencies in the audio spectrum, and even slightly beyond. For mastering purposes a parametric equalizer remains most useful. A parametric equalizer allows you to independently adjust the frequency, the amount of boost or cut, and the bandwidth around the center frequency. EQing is often used for either tonal shaping across broad bandwidths, or it can be used surgically to lift up or diminish specific instruments or frequencies in the mix. Your observations from subjective assessment in Step II will inform the EQ approach. Proficiency with EQ is fundamental to the Mastering Engineer and begins with the memorization of frequencies as they correlate to musical instruments and continues with consistent practice (see Table 1.1).
Capture
Once gain structure, compression (dynamics), and EQ are adjusted for the desired result (and later advanced techniques), the next step is to capture or record the processed audio into the RDAW. As each track is captured, sample it and previously captured tracks against the next new mix to verify song-to-song cohesion in the collection. Once all tracks are captured, next comes Step IV—Assembly.
Conclusion
In this chapter, I’ve laid out approaching The Mastering Game Plan for a typical session and touched on the tasks that are completed therein. The options are vast for processing the mixes, ranging from digital and analog equipment selection to sequencing in the mastering chain, so experimentation remains beneficial. The setup and execution of approaches that constitute Step III are a vital and important aspect of the professional mastering process.
Exercises
- Select a mastering chain without a peak-limiter, utilizing only an EQ and compressor. Take extra care to avoid over-levels. Master three songs and verify cohesion between them. Make sure the VU meter does not exceed a target level of +8dBu peaks—about the loudest you can go without utilizing a peak-limiter. Notate flat and mastered levels using the three main objective assessment parameters: VU meter level, dBFS RMS, and dBFS Peak.
- Now, master the same three songs with a peak-limiter added after the AD converter to create. wav files that have a target level of +10dBu peaks. Then compare the leading edge transients, frequency response, macro-dynamics, and overall fidelity of the two sets of masters.