
Chapter 15
Mid-Side (M/S)
An Elixir of Mastering Hope
Mid-Side (M/S) processing represents an incredibly powerful method of enhancing stereo audio by encoding the left and right channels of a stereo recording into middle and side information from the stereo image. This is done via a matrix that encodes the stereo signal into M/S, where it is processed, and then decoded back to stereo. Considering typical panning relationships within the stereo image (see Tables 1.2–1.4 from Chapter 1), M/S processing allows you to isolate and process all mix elements in the center of the image separately from the mix elements that are panned or at the sides of the image. This can be handy for adding air to a lead vocal without making the stereo cymbals edgy; or adding some mid-range bite to electric guitars without affecting the snare and/or lead vocals. Additionally, by adjusting the level relationship between the middle channel and the sides channel, the stereo width of the mix may be adjusted. A multitude of options exist, and well-executed M/S processing can contribute to a very impressive mastering result.
M/S at Capitol Mastering
When I began mastering in 1995, M/S processing was barely a topic of discussion, and for the most part, the generation of Mastering Engineers at Capitol preceding mine did not implement it at all, except for Bob Norberg.1 Bob often experimented with mastering approaches and various techniques to process, enhance, and restore audio. He was involved with restoration work of noisy analog master tapes using Sonic Solutions NoNoise and later the AudioCube (an audio restoration DAW). Additionally, his background in recording classical music gave him familiarity with stereo recording techniques, including the Blumlein array.2 He utilized a method of centering off-center lead vocals while remastering Capitol catalog albums (an affliction of dual-function early stereo master tapes that were mono-compatible; standard centered vocal placement in stereo would pop the vocal level too far forward when collapsed to mono). This was a parallel process that used phase relationships to slightly center the sides. He also implemented a method of widening stereo images, which was the encoding portion of the M/S matrix that he would set up in a Sonic Solutions DAW. He would discuss and document these processes, and I would experiment and use them in my own remastering work for Capitol catalog projects.3 Then around the year 2000, it became common for Mastering Engineers to find schematics and build their own M/S analog encoder/decoder boxes. Our chief technician at the time, Tom Schlum,4 built one that I used regularly on mastering projects.
M/S Stereo Recording Technique—History and Origins
The technique dates to the early 1930s and is credited to EMI sound engineer Alan Blumlein, who has the original patent.5,6 This stereo microphone recording technique uses two coincident microphones: a figure-eight (bidirectional) microphone facing sideways and a cardioid or omnidirectional microphone at a 90° angle to it, facing the sound source.
The left and right channels are produced through a simple matrix on the recording console that creates the stereo image through a combination of signal polarity relationships and signal summing described following.
Microphone Signals
There is one mono signal from the cardioid microphone and one from the bidirectional microphone. With a bidirectional pattern, the two sides are 180° out of phase, so a positive charge to one side of the microphone diaphragm creates an equal negative charge to the other side.
At Console Input
There are three channels used: one for the cardioid microphone input, and the bidirectional microphone signal multed (duplicated) into the other two channel inputs, with one of those channels polarity-reversed.
Signal Summing Matrix at Console
In Figure 15.1, the front of the microphone (+ side), is pointed to the left of the sound stage, while the rear (− side) is pointed to the right. The left channel is created by the middle (cardioid microphone signal) panned center and combined with the in-phase side (front of figure-eight microphone signal) panned left. The right channel is created by the middle (cardioid microphone signal) panned center, and combined with the polarity-reversed side (rear of figure-eight microphone signal) panned right.
This configuration produces a completely mono-compatible stereo signal, and if the middle and side signals are recorded (rather than merely matrixed to left and right at the console), the stereo width can be manipulated after the recording has taken place. By substituting stereo program material for the microphone signals, M/S processing can be performed in other applications such as mastering.
In a Mastering Context
When mastering a stereo recording in M/S, the existing stereo signal is encoded into middle (M) and sides (S) components so that that they can be processed or balanced independently, and then decoded back to stereo.

Figure 15.1Diagram illustrating the Blumlein M/S microphone recording technique..
Encoding From Stereo Into M/S
In order to create the middle channel, combine the left and right channels in phase so the middle channel is a combination of left and right in mono (L + R). For the stereo component, combine the left channel with a right channel that is polarity-reversed so that the sides channel is a combination of left and polarity-reversed right in mono (L − R).7 This removes the common information between stereo left and right that constitutes the center (middle) of the image through phase cancellation.
With the audio encoded into M/S, a wide range of image-specific processing can occur. This is often isolated EQ on image-specific mix elements or careful balancing of instruments in the image, such as lifting a vocal or enhancing width or definition on stereo guitars or keyboards.
Decoding Out of M/S Back Into Stereo
Decoding the middle and sides signal back into stereo is the same process used by commercial M/S matrix systems and can also be accomplished by using three faders of a console: 1) bus the middle signal to fader 1 and pan center; 2) bus the sides signal to fader 2 and pan left; and 3) bus the sides signal to fader 3 with the polarity-reversed and pan right.
The result of this is that the left channel is a combination of M + S; or, substituting formulas from the previous encoding descriptions, (L + R) + (L− R) = 2L. Note that the original right channel disappears by combining it with a polarity-reversed duplicate. The right channel is a combination of M−S, or again substituting formulas from the previous encoding descriptions: (L + R) − (L − R) = 2R. Notice that the output level is doubled upon decoding, requiring you to decrease both the left and right channels by half (6dB) so that the level matches the original audio.
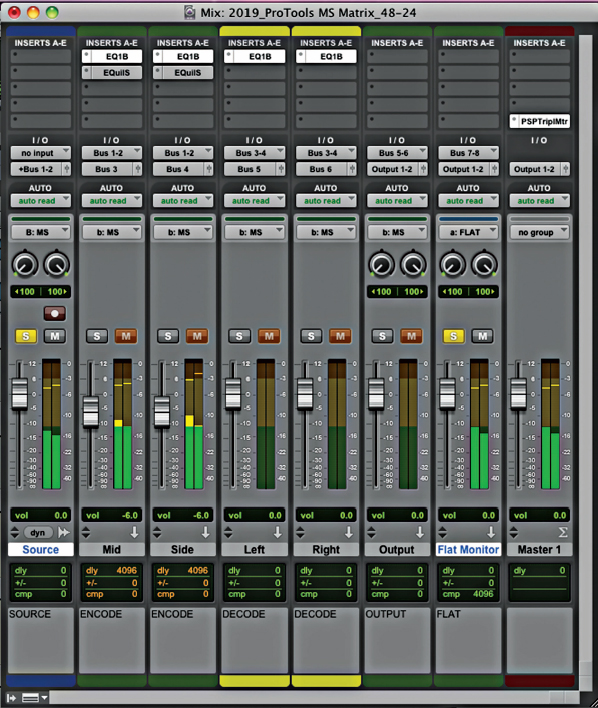
Creating an M/S Matrix in Pro Tools
Figure 15.2 Figure 15.3 Figure 15.4 Figure 15.5 outline a step-by-step method to set up a M/S matrix in a DAW such as Pro Tools. This is to help gain understanding of the process and grasp how it functions. You would likely not use this setup in a practical application, especially with the plethora of available M/S plug-ins and hardware available today.
Encoding (DAW Example)
Set the stereo source track output to bus 1 and 2. Create two stereo aux tracks, and label them M and S. In each aux track set the input to both bus 1 and 2, and insert a plug-in that is capable of reversing polarity on one of the channels (any EQ or compressor plug-in with a polarity-reverse option will work). Insert the same plug-in onto both stereo aux tracks to avoid possible latency issues, as left and right must perfectly combine to achieve the correct combinations and phase cancellations.
On the M stereo aux input, leave both sides of the plug-in in-phase and output only to bus 3. For the S aux input polarity-reverse the right channel of the plug-in and output only to bus 4. Also reduce the level of both M and S faders by 6 dB to avoid clipping and to provide the appropriate level reduction so that the output is not doubled. The stereo file is now encoded into middle and sides.
Decoding (DAW Example)
Again create two stereo aux tracks, and set the inputs for both to bus 3 and 4. The first one we will use as L and the second as R. On the L channel, keep both sides in-phase; on the right channel, reverse the phase of the right side of the plug-in. The outputs from these channels can then go directly to another stereo aux track (set inputs on bus 5/6) for further processing, or you can send the output directly to the DA converter by hard panning the L track left and R track right.

Figure 15.2An M/S matrix in ProTools, the signal path from source to processed output soloed.
Once all of this is set up, try reducing the M and S channels to hear the effect. Reducing M should make the stereo field sound ‘wider,’ increasing it more ‘monophonic.’ Next try inserting various plug-ins in both the M and S channels. You can bypass the plug-in in the channel where you are not going to use the effect; it’s just there to ensure that the latency is the same between both channels. Listen to the effect of EQing or compressing the M channel versus the S channel.
Practical Applications of M/S in Mastering
M/S is an extremely powerful tool, and allows for incredible flexibility in isolating and adjusting or enhancing aspects of the mix or audio image while leaving other elements largely unchanged. This is the great conundrum of audio mastering—changing anything changes everything. It is a proverbial house of cards; for example, if you brighten the vocal, the cymbals, snare, and guitars will also be affected. Or if you seek to enhance any of the mix elements, any element in a similar frequency range will be affected. Following, I list some practical applications of M/S processing you can experiment with.
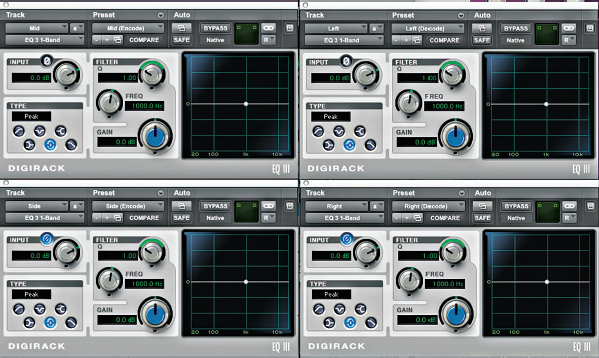

Figure 15.6SPL Gemini Mastering M/S processer.
Source: (courtesy SPL)

Figure 15.7Neve Portico II Master Bus Processor hardware with M/S functionality.
Source: (courtesy Rupert Neve Designs)
- Brighten a lead vocal without affecting the cymbals or other high-frequency stereo instruments (and vice versa)
- Enhance guitars by boosting mid-range frequencies without affecting the vocal or snare
- Enhance the bass without muddying the stereo guitars
- Add body to stereo keyboards without muddying the lead vocal
- Widen the mix by enhancing or adding level to the side channel
- Lift out the vocal by enhancing or adding level to the mid-channel
- Adjust the kick drum by adding or removing low frequencies in the mid-channel
There are myriad options for optimizing and adjusting a stereo mix with M/S, and the best approach is to experiment. Care is in order when utilizing M/S; remember to reference the flat mix often so that your adjustments are not excessive.
M/S Hardware Processors for Mastering
- t.c. electronic M6000 (see Figure 4.35)
- Dangerous Mid-Side or Master (see Figure 3.7)
- Maselec Mastering Consoles
- SPL Gemini Mastering M/S processer (Figure 15.6)
- Neve Portico II MBP (Figure 15.7)

Source: (courtesy Universal Audio)

Source: (courtesy Universal Audio)
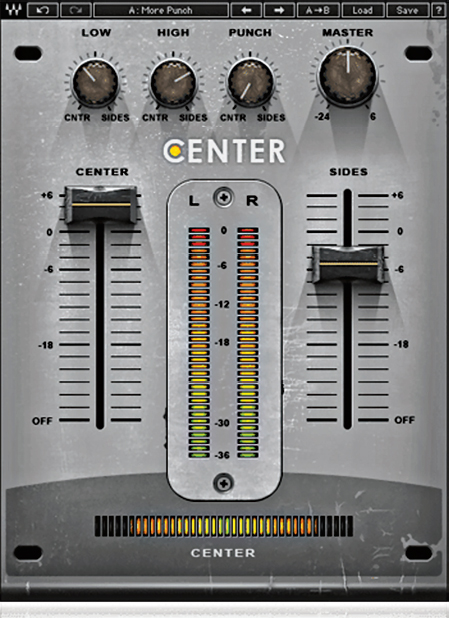
M/S Plug-Ins for Mastering
- Massey Bundle
- Waves Center (Figure 15.8)
- UAD K-Stereo (Figure 15.9)
- Brainworx EQ and Dynamic Compressor (Figure 15.10)
- DMG Equilibrium (see Figure 4.13)
- Ozone Mastering Bundle
- T-Racks Mastering Bundle
Conclusion
M/S processing embodies an advanced mastering technique that every Mastering Engineer must understand, gain proficiency with, and possibly configure into their mastering system. It may not be a regular weapon of choice or necessary for all projects, but when used judiciously, it offers impressive and impactful mastering results.
Exercises
- Using an M/S plug-in or hardware setup in a mastering chain, brighten primarily the lead vocal of a mix.
- With the same setup, widen the stereo image of the mix. Verify that it still sounds good in mono and that in stereo there isn’t information emanating from beyond the speaker edges.