
MOD YOUR ROD
CARS ARE HACKABLE PLATFORMS ON WHEELS
Illustrations by Nik Schulz
JAMES BOND DEPENDED ON Q TO TRICK OUT HIS CARS. BUT WITH MAKE’S GUIDE TO CAR HACKING, YOU’LL LEARN HOW TO TURN YOUR RIDE INTO A FULLY LOADED, GREASE-EATING, MP3-BLASTING, WI-FI-TRANSMITTING MONSTER MACHINE.

1 HACKABLE PLATFORM ON WHEELS
YOUR CAR’S 12-VOLT WIRING IS LOADED WITH OPPORTUNITIES FOR ENHANCING YOUR VEHICLE IN WAYS CARMAKERS ONLY DREAM OF.
I’ve installed computers in all my cars. I’ve also designed and installed circuits to control different parts of my cars. Here are some of the most obvious hackable access points on a car:
Engine Install a remote starter (such as the Commando EZ-2500 Remote Starter available from commandoalarms.com), and you can press a button on a key fob to make the car start up automatically. (Don’t try it on a car with manual transmission!)
Door locks We’ve all locked ourselves out of our car at one time. Wouldn’t it be nice to be able to unlock the car from any computer using a password?
Windows, lights, horns You can make a relay system to remotely unroll your car’s windows a couple of minutes before leaving the office to flush out the hot air. Or use it to blast your horn and flash your lights when you’re lost in the megamall parking lot.
Before we get into the specifics of my car hacks, here’s an introduction to relays, diodes, and parallel ports — all of which figure into most electric car hacks.
RELAYS AND HOW TO USE THEM
Many components in a car, such as car windows and door locks, use relays. Relays are electrically controlled switches. When you press the button on your key fob to lock your car’s doors, the fob activates a small current to the relay, which in turn flips a switch that allows a much stronger current to flow through the solenoids that activate the locks.
Relays with one switch are called single pole (SP). Relays with two switches are called double pole (DP). If the switch has only one position, i.e., two terminals, on or off, it’s a single throw (ST). If the switch has two positions, i.e., three terminals, it’s a double throw (DT).

The relay shown here is a SPDT (one switch, two positions). You can see that there are five numbered terminals. Two of them are used to activate the switch, and the other three make up the twopole (double pole) switch. When you power up the relay (putting 12V across 85 and 86), it activates a magnet that pulls a switch inside the relay, and this switch then connects 30 and 87. If you disconnect the voltage between 85 and 86, the magnet stops, and the spring-loaded switch clicks back to its normal position between 30 and 87a.
You can connect relays to make complex conditional switches (“If the car is on and the window is down and the trunk is open, then honk the horn”). For some examples of interesting car relay applications, visit the12volt.com/relays/relays.asp.
DIODES: A ONE-WAY STREET FOR ELECTRONS
Diodes are electronic components that ensure current only runs one way. They have a stripe indicating the negative terminal. The current can only flow from plus to minus, so you should put the stripe toward the direction you want the current to flow.
Let’s say you wanted to add a switch that keeps your radio on, even if your car’s keys are removed. You could just run a 12V line from your battery, through a switch, and to the “ignition” input on your radio. If you flipped that switch, your radio would turn right on. The problem is that current would flow back through the ignition wire and back into all the other devices it powered. The solution is to use two diodes: one between your new switch and the radio (stripe toward the radio) and another between the ignition and the radio (stripe toward the radio) to ensure current goes to the radio only.
IN CONTROL: PARALLEL PORTS
Parallel ports are an easy way to control switches from an in-car computer (see MAKE’s Halloween Project, this volume, page 86). A parallel port has eight pins that can be set at 5V or 0V. Using a resistor and a small 5V “reed” relay (such as a RadioShack 275-232 or 275-310), you can programmatically activate or deactivate a switch by setting 0 or 1 on a parallel port line.
If you’re triggering a light load, such as a small light, you can just connect the 12V through the relay. If you’re trying to switch a larger load, such as headlights or the door locks and windows, you’ll want to chain the relays together. The tiny 5V relay will pass 12V to the big 12V 30A automotive relay, which will control your heavy load.
You don’t have to hack a parallel port. There are many USB, serial, and parallel port-based relay controllers you can purchase and plug into your PC. These are already safety-fused and easy to program, and include example code. For instance, ontrak.net makes the ADR2010 that I used to control my Nash’s windows via an onboard computer.
PAGER POWER
I wanted to be able to activate and access my cars’ PCs from my house, so that I could connect via Wi-Fi to download music and grab email (via my company’s CarBot software) to be read to me as I drive. Instead of keeping the in-car computer on continuously (which would kill the car battery), I bought a pager (service is about $4/month) to connect to the “ignition” switch of the in-car PC. The power supply for the PC (an M1-ATX from mini-box.com) has a mode where it will turn on and then stay on for two hours, giving me time to do what I need to do.
By rigging the pager buzzer up to the ACC/ignition pin on the PC’s power supply (isolated by a diode, so that ACC doesn’t fry the pager), I can turn on the PC in my car from anywhere in the city.
The PC, running Windows XP Pro, is configured to automatically connect to the internet (via Wi-Fi or EVDO) and run Trillian, a popular instant-messaging client. I can now dial a pager number to make my car computer wake up, go online, and start up IM — at which point I can log in and start controlling the machine.
POWER WINDOWS HACK
I decided to upgrade my old Nash with power windows. The kit I purchased online took the good part of a day to install but was very simple electrically. It’s just a motor with two wires. If you apply 12V to one wire and ground to the other, the window goes up. Reverse the connection, and the window goes down. The rocker switches that came with the kit perform this reversal when you manually activate them, but to trigger this up-down with a computer required a more complicated arrangement of relays. You can see from the diagram (next page) that two of the relays apply 12V and ground to make the window go up, and the other two relays apply ground and 12V to make the window go down.
My friend developed an onscreen interface for controlling my windows, and I bought an ADR2010 controller board from ontrak.net. It has simple command language for turning ports on and off and was ideal for this application.
Using my in-dash touch screen, I can control the ADR2010, which activates the relays I’ve connected to the parallel port, which in turn can switch the bigger relays that control the windows.
DOOR LOCKS HACK
To unlock the doors via computer, I had to figure out how the switches work in my Caravan. After pulling the right door panel off, I disconnected the lock switch and used an ohmmeter to test all three positions: off, up, and down. I found that it usually has a 20Kohm reading, but that it drops to 2Kohm when I “unlock” the switch and 4Kohm when I “lock” the switch.
I used the voltmeter to measure the voltage of both lines that went to the switch, with respect to ground. One terminal was on the ground of the car, the other on each wire. (The leads on my ohmmeter have sharp ends, so I just poked a tiny hole into the wire to test the voltage.)

The voltages were both around 0V. I then followed the wires out through the door into the body of the car. One wire, a purple and green one, continued into the passenger footwell area. Using alligator clips and the sharp terminal probe, I connected that purple and green wire through the 2Kohm resistor to ground. Lo and behold, the pleasant “unlock” sound reverberated throughout the minivan.
Every one of author Damien Stolarz’s cars are outfitted with a computer and a Wi-Fi card. In addition, he’s added a pager to the computer - a CarBot PC, made by his company (carbotpc.com) - so he can call in from any phone and power up the system for two hours (to keep the car’s battery from running down). By adding a relay system controlled through the PC’s parallel port as shown here, Stolarz can control his windows and locks remotely, as well as fill his in-car PC with MP3s, videos, and email from his home computer.
Since the switches to unlock the doors are merely applying a resistance temporarily, I felt comfortable using a simple reed relay connected to parallel port pins.
Now, if I lock myself out of my car, I can call a friend or relative who can log into my car, and ask them to “unlock” my car.
Further exploration: the12volt.com, crutchfield.com, ontrak.net.
Inventor Damien Stolarz has spent over half his life making different kinds of computers talk to each other. His book, Car PC Hacks, was recently published by O’Reilly Media, Inc.
MAKING A MACSWAGEN
ADDING A MAC MINI TO A VW: A PRO TELLS US HOW HE DID IT.
Matt Turner is a professional fabricator and installer of mobile electronics. He’s been working in the industry for 12 years and has built numerous awardwinning show vehicles. His latest project, outfitting a 2001 VW GTi with Apple’s Mac mini, brings hope to all car owners looking to Macify their ride.
When the Mac mini was announced, along with its form-factor dimension, Turner spent two weeks planning how he would install the mini into his car. Through careful planning and examination of his VW GTi, he selected over a dozen off-the-shelf parts that would provide a driver/user with the best in-car computer experience from a variety of standpoints.
MINI POWER
In car computer systems, the first challenge is power. The Mac mini presented a new puzzle. The power button is located on the back of the enclosure — great for homes, but not so great when it’s inside a car. You can’t let the mini stay in sleep mode all the time (it’ll take it’s toll on the car’s battery), so Turner first contemplated a secondary battery bank with a relay, but “that didn’t really seem to me to fall in line with the inherent simplicity of Apple’s computers,” he says. After taking apart the mini, he discovered a simple, two-conductor momentary pushbutton switch that tells the hardware to fire up, and this actually made the process of relocating it (electrically, at least) pretty simple. “The wiring for the button actually terminates in a connector that plugs into the main board, so I simply unplugged it and cut the original wires, extended them with a Monster Cable 2-channel 3-meter RCA cable and soldered this cable to both ends of the cut switch wires,” says Turner. A drilled hole and button relocation solved the problem. Turner proclaims, “There’s really nothing quite like hopping in the car, starting it up, and pushing that button to be greeted with the signature Apple startup sound.”

Photograph by Matt Turner
Turner’s initial power setup took the electrical system’s output (which varies between 12V and 14V DC), converted it to 110V AC, and then stepped it back down to 18V DC through the Mac mini’s power supply brick. But the Monster Cable inverter he used would sometimes go into a protection mode and not allow the Mac to power up normally. The lack of ignition-controlled wake and sleep functions and the quirky workarounds to power the computer and inverter to stay on while pumping gas or running into a store for a quick pickup were solved with new hardware specifically designed for the Mac mini: the CarNetix CNX-P1900 ($90, carnetix.com).
MACSWAGEN SHOPPING LIST
> 1.42GHz Mac mini with 512MB RAM, SuperDrive
> Bluetooth and AirPort Extreme
> Xenarc 700TSV 7" USB touch screen monitor with VGA and dual composite video inputs
> Cirque Easy Cat USB Trackpad
> Griffin PowerMate assignable USB control knob
> LaCie 8-in-1 USB Flash Card reader
> Belkin USB 7-port hub
> Belkin USB 4-port bus-powered hub
> Belkin FireWire 6-port mini hub
> Alpine PXA-H701 Multimedia Manager with RUX-C701 Controller
> Monster Cable MCPI300 300-watt power inverter
> Female USB
> Ethernet and FireWire ports
> 40G iPod dock and a Griffin RadioShark USB AM/FM tuner
This dual-output, 140-watt intelligent DC to DC power regulator simply replaces the Mac mini’s standalone power brick. It accepts 7.5V to 18V of constant input, has an ignition sense and pulse trigger input, and outputs a stable and consistent 18.5V, a secondary 5V or 12V output for powering USB hubs or screens, a delayed 12V amplifier for accessory turn-on lead, and a pulsed ground output for triggering the Mac mini’s power button for automated operation of sleep, wake, and startup functions. The wide range of voltage input capability allows the P1900 to never sacrifice its output based on low voltages encountered during engine cranking, when battery voltage can often drop to as low as 7.5V.
When Turner was Slashdotted, the manufacturer leapt at the opportunity to fill the void for in-car power solutions for Macs. Turner says, “The unit I installed in my VW is a pre-production model using the GTi as a test environment.” Production models have been available since the end of April, and a Mac mini-specific plug-and-play wiring harness should be available in August 2005.
IT’S IN THE BOX
Turner first wanted to have the mini mount in-dash, but with all the connectors sticking out of it, the mini stretched out from 6.5 inches deep to over 10.5. The choice was to either rework all the airflow controls and ductwork in the car or find a new home, such as the glove box. Turner says, “I still wanted the Mac mini to look as if it were a factory-installed option, so simply mounting the computer in the glove box itself or in the glove box door wasn’t really what I wanted to do. That’s not the way that I felt Volkswagen would do it. Instead, I chose to modify the internal storage dividers in the glove box to make an actual compartment that would house the Mac.”
The full complement of connections was then routed through the sub-dash of the car, wire-tied along factory harness runs, and plugged into the computer. The Mac mini itself slides into the housing from the front to allow access to the back of the computer if removal of the computer is ever necessary.
DASH FABRICATION
The most striking feature of the mini installation is the in-dash LCD screen that controls the whole shebang. Turner adds, “The first thing to do when trying to make a large component fit in a small area (like a 7-inch monitor in a double DIN-sized opening) is to take it apart and remove as much stuff as you can that is extraneous or unnecessary for the project at hand. In the case of the Xenarc monitor, this meant opening the case of the monitor, removing the built-in speaker, reversing the orientation of the power lead, removing and relocating the infrared receiver for the remote control, and doing away with the front of the case entirely, including the buttons on the front bezel (all these functions are now performed via remote control). This gave me a flat surface to build trim on top of, as well as reduced the overall size of the monitor significantly.”
To make the aluminum panel, Turner made an acrylic version first. This was used as a cutting template for the aluminum. Turner notes, “All of the other aluminum parts in my vehicle (the iPod and trackpad plate, the port and flash reader plate, and the ring around the boost gauge) were all made with the same technique of using separate jigs to make a complete, one-piece, acrylic jig that was used to cut the aluminum parts. They were all then hand-sanded, polished, and brushed in the same manner.”
Turner then hand-sanded the inside of the beveled aluminum starting with 80-grit sandpaper and working through 120, 180, 220, 280, 320, 400, 600, and 1000-grit sandpaper to reach a polishable
“THERE’S REALLY NOTHING QUITE LIKE HOPPING IN THE CAR AND PUSHING A BUTTON TO BE GREETED WITH THE SIGNATURE APPLE STARTUP SOUND.”
surface. He used a pneumatic die grinder with a polishing head and a block of blue jeweler’s rouge to polish the aluminum bevel to a mirror finish.
CONTROL: RUB, ROLL, AND PUSH
The touchscreen isn’t the primary method of user interface; in fact, there are three ways the driver or passenger can operate the mini. The first is, of course, the touchscreen, but Turner comments, “The touchscreen doesn’t have the resolution to control the OS, nor should it.” The Griffin PowerMate USB control knob and the Cirque Easy Cat USB Trackpad control most of the functions.
What’s next for Turner? He’s interested in a turn-by-turn GPS and would like to see a Mac-based OBDII interface to show engine speed, timing, and vehicle speed. When that happens, Turner proclaims, “The dream will be complete.”
For more on Turner’s creations, along with extensive details on the Mac mini install, visit: tunertricks.com.
Phillip Torrone is associate editor of MAKE.
2 ÜBER TESTER

Photography by Dave Mathews
MAKE YOUR OWN 4-IN-1 CAR WIRING DIAGNOSTIC TOOL.
When you’re working on your car’s 12V wiring system, it helps to have a few special tools to get the job done. The Uber Tester is a 4-in-1 gadget that won’t remove door panel clips but does test for most wiring conundrums you might encounter. Plus, with its dual notification (buzzer and light), you’ll be able to use the tool when your stereo is blasting or when you’re contorted under the dash.
This 9V-powered handheld device will test the following scenarios with just three wires:
1. DC polarity — positive or negative voltage
2. Speaker polarity — “pop test”
3. Connectivity — wire loop back
4. Presence of voltage — fuse tester, constant or ignition switched power
Installing a 12V accessory or stereo properly — that is, with the correct speaker polarity, switched power source, and constant voltage for the clock and preset memory — requires a tester such as this. Tracing wires in today’s vehicles is next to impossible with their nearly identical colors and tight wire looms. This gadget will help you find that needle in a haystack.
SET UP.

MATERIALS:
[A] Enclosure (gadget box) 3"x2"x1"
(RadioShack #270-1801)
[B] 12V, snap-in, high-brightness lamp – blue
(RS #272-335)
[C] Mini 12V DC electric buzzer
(RS #273-055)
[D] 1" alligator insulated test/jumper cable set
(RS #278-001)
[E] Wire crimps, shrink tubing, or electrical tape
[F] Cotton balls
(to keep the innards from moving around)
[G] 9V battery snap connector
(RS #270-325)
[H] 9V battery

TOOLS:
[I] Soldering iron and solder
[J] Drill with large and small bits
[K] Wire cutters
Time: A Couple of Hours Complexity: Easy
START»
1. DRILL HOLES AND INSERT LAMP
Start by drilling a hole for the lamp in the bottom of the gadget box (not on the removable lid) about a quarter of an inch down. Then drill a hole just large enough to let the three jumper wires pass through it. Strip ¾" of insulation off the lamp wires and insert the lamp into the hole you drilled for it.

2. INSERT WIRES
Cut one alligator clip off the end of each of the red, green, and black wires and poke the wires into the gadget box, leaving the alligator clips outside of the box. Tie the three wires into a knot to prevent them from pulling through the hole, leaving about 2" of wire to work with inside the box. Strip the wires back ¾" to prepare for the connections.

3. CONNECT WIRES
Connect the black wire from the 9V harness to the black alligator clip wire.
Connect the red wire from the 9V harness to the red alligator clip wire, the red buzzer wire, and to one of the lamp wires.
Connect the black wire from the buzzer to the green alligator clip wire and to the second wire on the lamp.
Check wiring. Note that coming from the alligator clip jumpers, the red wire makes three connections, the green wire makes two, and the black one only connects to one. That’s it!

4. TEST YOUR UBER TOOL
Connect the 9V battery to the connector and touch the black and green alligator clips together — you should hear a tone and the light should illuminate. Connect the red wire to a positive 12V (or lower) source and the black to ground, and you should hear a tone and see the light illuminate. If so, your wiring is properly connected.

5. REINFORCE THE ALLIGATOR CLIPS
Now would be a good time to put some extra solder on the jumper wires inside the alligator clips. Usually they are merely crimped on, which will not provide a strong enough connection to allow you to let your tester dangle. Just pull back the protective covers on the jumpers, clip the jumpers to a piece of cardboard to keep them from moving around, and load up the solder under where the wires are crimped.

6. FINISHING UP
Now it’s time to stuff the buzzer, battery, and wires into the gadget box. Put the cotton balls in the leftover space to keep the tester from sounding like a baby’s rattle.

To prevent your battery from dying, keep the red wire from shorting on the black or green wires by pulling the insulation hood over the metal. You should see years of service from your battery since it is rarely used.
12V UBER TESTER WIRE GUIDE
Red/Black
9V output and speaker polarity pop test
Black/Green
Continuity test
Green/Red
Voltage presence — constant or switched
Memorize this guide, or copy it and paste it onto your gadget box.
Dave Mathews has been installing car stereos since his first go-kart in the 1980s and has never stopped tinkering with aftermarket audio. While this creation came to fruition in 1993, more stories and video clips on technology he is currently peering into can be found at davemathews.com.
3 STOMPBOX MOBILE HOTSPOT
TURN YOUR CAR INTO A WI-FI HOTSPOT, THEN USE GPS AND WEBCAM INPUT TO MAP YOUR CURRENT LOCATION ONLINE AND AUTO-GENERATE A PHOTO TRAVELOG.
When Verizon released its new BroadbandAccess service, I had to give it a try. $80 a month for DSL-like speeds in many cities? Yes, please!
I subscribed, bought the 5220 PCMCIA card, and it worked. But the card’s antenna was so weak that I often had to rotate my laptop. Also, it only served one computer. What if I wanted to run multiple machines or share connectivity with friends? Then it hit me: I could build the card into an access point and install it in my car with some beefy antennas. I called the project StompBox because this little box would bring my own network “stomping grounds” with me wherever I went.
OVERVIEW
In technical terms, the StompBox is a cellular router. Like all routers, its job is to push data back and forth between multiple interfaces. Ours has two interfaces: Verizon’s BroadbandAccess and Wi-Fi.
I decided to base StompBox on embedded hardware rather than on a laptop or full-blown PC. This makes it cheaper, smaller, more reliable, and better for “just plug and unplug” vehicular use. For the platform, I chose Pebble Linux, a Debian distribution from NYC Wireless. For hardware, I used the Soekris 4521, a compact embedded computer that runs on 12VDC and has a great user community. All the software needed — Pebble Linux plus drivers plus code — fits onto a 128MB Compact Flash card that functions like a computer hard drive but is tougher and more vibration-resistant.
The Wi-Fi interface is simple. The Linux driver HostAP can run an access point from any 802.11 card with a Prism2 chipset. You simply configure your choice of SSID and WEP key and turn it on.
As for the Verizon interface, wireless networking pioneer Phil Karn wrote a how-to on getting the 5220 card to work under Linux. His solution is to make the system treat the 5220 card as a USB modem, and then send it the proper Hayes AT commands to dialup Verizon’s network.
With this foundation in place, you can expand your access point’s capabilities by adding a USB card, a GPS unit, a webcam, and other devices. I hooked up a GPS and did some Google Maps hacking to create an auto-updated web page (hosted on my home network to avoid wireless traffic jams) that tracked my car’s route and showed its current location against a satellite photo. Unfortunately, this and many other bleeding-edge Google Maps hacks were rendered inoperative last May when Google changed the unsupported beta API that hackers’ code had been relying on. Then in late June, a Google Maps API beta was officially released, so now old map hacks can be repaired and new hacks written in a more stable environment. Meanwhile, the StompBox’s web page also shows photos captured by a webcam pointing out of the car window.
SET UP.
HARDWARE
Soekris net4521 (with case)
From soekris.com
» Verizon 5220 EVDO/1xRTT card
» Pigtail adapter (Orinoco to N-Female, panel mount)
» N-Male to FME-Female antenna adapter cable
» CDMA antenna (800/1900MHz dual-band)
For cellular network
» Senao 2511 Mini-PCI 802.11 card (or any Prism2-chipset equivalent)
» Pigtail adapter (Hirose U.FL to N-Female, panel mount) Wi-Fi antenna (2400MHz band)
For Wi-Fi
128MB Compact Flash card
An old mousepad, or other piece of foam less than ¼-inch thick
For vibration-proofing the cards
Serial cable (null modem, DB9-F to DB9-F)
12VDC car power to M-type (5.5mm) plug cable
» Any GPS unit with standard NMEA output via USB or serial port. If serial, add a USB-to-serial adapter, preferably one that uses the Prolific PL-2303 chip.
» 2-port USB PCMCIA card, low profile so that it fits inside the router
For GPS enhancement
D-Link DCS-900W wireless internet camera 12VDC to 6VDC power transformer
For webcam enhancement
12V battery power supply (optional)
(I used a Xantrex P400)
12V car power two-outlet splitter (optional)
To offload car battery while engine isn’t running (power enhancement)
SOFTWARE
StompBox .IMG file
Ready-to-go “disk image” for the CF card; downloadable at makezine.com/03/stompbox
Debian 2.4.26 distribution (optional)
Necessary if you want to compile extra code
TOOLS
Phillips screwdriver
Small and large pliers
Drill press (preferred) or drill
Stepper bit
For drilling antenna holes in the case
Dremel tool
For cutting an opening to the USB card
A host computer with a terminal emulator installed and a 9-pin serial port (or a USB-to-serial adapter, listed in previous column for GPS)
For setup. I cover Linux and Macintosh in this article. You could probably also use a Windows machine, but I haven’t tested this yet.
Compact Flash reader/writer
For setup
12VDC power supply (deep-cycle battery, lab-bench supply, wall wart, or even your car battery) 1.5 amps or higher, with a 5.5mm “M” plug
For testing

The stepper bit, with its Christmas-tree shape, lets you bore wide, round holes in sheet metal without having to swap in successively larger bits. Hole diameters are marked on the inside of the bit’s hollow, making it easy to set a drill press to stop at the right point. They’re great for drilling out metal cases and panels, for installing new ports. They’re also safer than regular drill bits and not very expensive.
MAKE IT.
Time: Two Weekends Complexity: Linux-Geek Easy
START»
1. CONFIGURE THE CF CARD
StompBox’s software resides on the Compact Flash card, and I’ve wrapped it all up in a ready-to-go image downloadable at makezine.com/03/stompbox. While all the software components on this card are open source and easily available, the specifics of configuring it are beyond the scope of this article. If you want to make your own setup from scratch so you can control exactly what’s in your system, see moro.fbrtech.com/~tora/EVDO/cfimg.html.
1a. Download the StompBox .IMG file to your host computer, then insert the CF card into the reader. It doesn’t matter what’s on the card for now; we’re going to overwrite it with the image.
LINUX: If the card was not blank, the system may try to auto-mount it. If so, please unmount the drive before continuing, using the umount command.
Mac OS X: If the card was blank, you’ll get a “not readable” pop up; click “Ignore.” Otherwise, it will auto-mount on the desktop. Run the Disk Utility and repartition the drive into “free space,” and then reinsert. Once OS X “ignores” the drive, you can continue.
1b. Find out your system’s physical address for the CF card. On my PowerBook, it’s usually /dev/disk2, but it differs for every system. Warning: Be sure you have the correct address before proceeding, or you can damage your other drives!
1c. Open a terminal window (Applications/Utilities/Terminal on a Mac) and copy the image to the card using the standard Linux command:
dd if=/files/stompbox.img of=/dev/disk2 bs=8192
Change the input file (IF) and output file (OF) parameters above to match your system. Copying can take up to six minutes, during which you should see the light on the CF reader blink. Once it’s done, remove the drive.
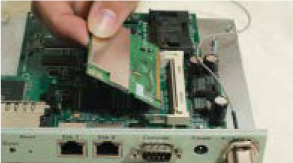
2. ASSEMBLE THE HARDWARE
2a. Remove the four screws on the bottom of the Soekris net4521 case, and then slide the top off.
2b. Remove all six screws in the motherboard and the two serial-port socket screws to detach the motherboard from the bottom case. Lift it out, and put it someplace safe.

Photography by Tor Amundson
2c. Hold the pigtail adapters’ N-Female plugs against the existing antenna holes in the Soekris case. Trace around them with a pencil, and then use the drill and stepper bit to make holes just large enough to accommodate the plugs. Brush away any burrs.

2d. Mount the Wi-Fi pigtail on the right-hand side of the case (the side closest to the power jack). This is the one with the tiny U.FL connector on the end of the cable. Insert the N-Female connector through the case hole and put the lockwasher on the outside. Then screw on the nut and tighten down, using two sets of pliers: one to hold the N-Female jack in place, and the other to turn the nut. Don’t over-tighten!

2e. Repeat step 2d above, this time on the left-hand side for the 5220 pigtail. When you are done, both N-Female jacks should be mounted to the case, the 802.11b on the right and the 5220 on the left.

2f. Insert the Mini-PCI card (Senao 2511) into the Soekris motherboard. It angles into the connector and then snaps downwards into place.
2g. Connect the Wi-Fi antenna pigtail’s U.FL connector to the antenna port closest to the mini-PCI socket. These connectors are tricky; you may have to use a tiny screwdriver or metal stick to gently snap it down into the socket. Be careful; these connectors are fragile.

2h. Insert the 5220 card into PCMCIA Slot 0 on the Soekris (the one on the right, closest to the mini-PCI socket). It should slide in smoothly, parallel to the motherboard.

2i. Look at the 5220 card end-on; you should see the connector socket. If it’s covered by a small plastic cap, remove the cap.

2j. Connect the CDMA antenna pigtail’s Orinoco connector to the tip of the card, just below the fold-out antenna. It should snap securely into place with just fingertip pressure.
2k. For GPS, insert the USB PCMCIA card into PCMCIA slot 1 (the remaining slot, away from the mini-PCI socket).

2l. Insert the Compact Flash card into the Soekris’ CF slot and secure with the bumper screw included in the case.

2m. Use the Dremel to cut two holes in the top of the case, just above each of the USB card’s ports and big enough to connect USB cables through.
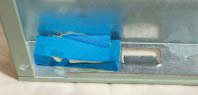
2n. Cut a small strip of foam and put it inside the upper case where the PCMCIA cards will touch. Once the case is closed, this will snug the cards into place and keep them from vibrating loose.
2o. Reassemble the case, sliding it together carefully. Secure it with the four screws on the bottom.

3. CONFIGURE THE PLATFORM
On the Soekris, the default speed of the BIOS (which does things like count memory, self-test, and handles machine-level communication) is 19,200 bps, while the higher-level Linux OS normally talks at 9,600 bps. For the very first boot up, we’ll need to change the speed of the Soekris BIOS to 9,600 bps. That way, we can run our host computer’s terminal emulator at one speed and be able to configure both the BIOS and OS.
3a. Plug the Soekris into your 12VDC power source, using an M-type (5.5mm) plug.
3b. Hook your host computer up to the Soekris using the serial cable and an USB-to-serial adapter, if necessary.
3c. Run the terminal program on your host, and set the baud rate to 19,200 8-N-1 (19,200bps, 8 data bits, no parity, 1 stop bit). I used ZTerm.
3d. Plug in the Soekris and watch for the BIOS screen. As it counts through memory, quickly press CTRL-P to access the BIOS set-up. You should see:
comBIOS Monitor. Press ? for help.
Now, reset the speed by typing:
set conspeed = 9600
3e. Enter Reboot to restart the system. You should see the BIOS boot up, followed by the operating system. This will take one to two minutes. If your system does not boot, the CF card might not have been written correctly or isn’t compatible with the Soekris (rare, but it happens). Other possibilities are that you have weak power supply or faulty hardware.

3f. You should now see the prompt:
Debian GNU/Linux 3.0 pebble ttyS0
pebble login:
Log in as root, with a null password (just hit Return). Your access point is now ready to configure; you can start by changing to a better password.
4. CONFIGURE THE ROUTER
4a. If you don’t have one already, create a dynamic DNS account. Browse to dyndns.org from your host (or any other) computer and follow the instructions for setting up an account for the DynDNS service.
4b. From your terminal, run the router configuration script on the Soekris by entering:
/usr/local/bin/initial-configuration
Answer all the questions, and the script will set up the system. You’ll need to know your DynDNS account info and the Verizon phone number for your 5220 card. Also, be ready to set some names, passwords, and private network IP addresses for wireless and wired clients (example: 192.168.1.0 and 192.168.2.0). Its last step is to generate new SSH keys, which takes several minutes. When the script completes, it prompts you to reboot; go ahead, and then unplug the Soekris. The router is now ready to go online!
5. GET ONLINE
Plug the router back in, and it should now attempt to log on to the 3G network automatically, a few moments after it boots. You can see if it worked by logging in via terminal and checking the “pppd” messages (from Linux’s point-to-point protocol daemon) in the “messages” logfile at /var/log/messages. Use the commands tail or grep to see the most recent messages or to search the entire file.
If it worked, you’ll see pppd messages that list your network’s IP addresses. Otherwise, check for an incorrect phone number, an inactive account with the provider, or poor reception. When you’re too far from coverage, or have bad antenna connections, you’ll see a “pppd: LCP timeout” message. You can check your coverage by swapping the 5220 card back into your host computer.
Any Wi-Fi client devices should now be able to join your new network, or you can physically plug Ethernet-enabled devices into the router’s ETH1 port.
6. INSTALL IT IN YOUR VEHICLE
Now that your device is online and powered, it’s time to put it in the car!
6a. Decide where you want to put your antennas. With regular, ground-plane antennas, reception will be best when they are centered on the largest available expanse of metal, such as your car’s roof. But they should not be positioned close to each other; keep the antennas at least 20cm apart, preferably farther. If you get terrible reception (or don’t have a metal roof), you may want to select a ground-plane-less antenna, like the kind that mount on truck mirrors. Visit a good ham radio store or local amateur radio club for advice.
6b. Using the N-Male to FME-Female adapter, connect the 3G antenna to the N-Female jack on the left of the router, away from the power jack. Hook the Wi-Fi antenna to the other jack, on the right. Then position and mount both antennas.
6c. Secure the router inside the vehicle where it won’t get knocked around, then hook it up to the cigarette lighter via the car power cable.
You now have the heart of the StompBox — a Wi-Fi access point that you can drive anywhere! The next page describes some fun ways to expand on it.

GOING FURTHER
EXPANSION: ADDING GPS
Since this is a standard x86 platform running Linux, it’s open for expansion. Add a GPS unit, and you get vehicular tracking. The router runs Linux’s gpsd in the background to poll data from an attached GPS unit and publish it as a network service. I connected my GPS serial port to the router using a USB-to-serial adapter with a Prolific PL-2303 chip. The software on the CF card finds the PL-2303 and attaches the gpsd program, but if you use a USB-connected GPS or a different adapter, you’ll need to manually softlink the device to /dev/gps.
Since I wanted something flashy and fun for the vehicle-tracking page, I used Google Maps as the interface. When I first did this last spring, the Google Maps API hadn’t been officially published yet, so this was still pretty new and shaky territory. And my scripts broke later, along with many other Google Maps hacks, when Google changed their API out from under us map hackers. But now that the Google Maps API beta has been released officially, it is a much more stable way of using Google’s mapping systems, and it gives beautiful results.
I didn’t want internet visitors curious about StompBox to flood and bog down my mobile network, so I used gpsd in combination with the dynamic DNS system to offload traffic onto my home network. I set up a PHP script on one of my servers at home to periodically telnet into Stomp-Box’s GPSd port (2947), then query it for position and speed. It then plugged those numbers into an XML document and fed them into the Google Maps Hacking tool set, generating a map. You can see the scripts that did the work on the StompBox website, makezine.com/03/stompbox.
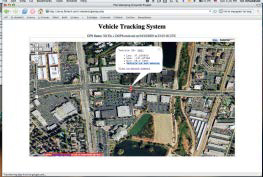
Note that this setup is designed for internet users to track the StompBox remotely, not for in-car, real-time GPS navigation! For that, you’re far better off using a dedicated navigation device or software.
GPS how-to: moro.fbrtech.com/~tora/howto/gps.html
EXPANSION PART II: ADDING A WEBCAM
Another fun trick is to add an onboard camera. I chose the easy route: a wireless web camera, the D-Link DCS-900W, which has its own onboard server and a wireless link. Plug one in, configure it, and you can pull still or moving images from it using any browser. It also points out of any window, sticking in place with a suction cup.
Our CF card software is configured to use a DCS-900W camera that’s set up on the IP address ending in “.8” on your network. So, for example, if you set 192.168.1.0 as your network, the camera should get the address 192.168.1.8. Set the camera’s SSID and WEP keys as you defined for your network.
You can view the camera input from within your StompBox network by going to that IP address. With the firewall rules I added, you can also view it from the public internet by visiting the dynamic DNS name of your system, at port 81 (i.e., http://192.168.1.8:81). Assign a password to limit demand on the camera, if word gets out!

To further avoid network traffic jams, use the getcam.sh script, also on the CF card. This offloads image serving onto a home server. Edit the script to point to your server, and an automatic process (known as a cron job) will upload the latest images every five minutes. Change the interval by editing the file /etc/cron.d/getcam and add cameras by duplicating the
Tor Amundson is a nomadic mad scientist based in Silicon Valley who’s studying our side of the temporary dimensional rift he discovered.
4 MAKING BIODIESEL
THE BEST WAY TO LEARN HOW TO MAKE YOUR OWN BACKYARD BIODIESEL IS TO START WITH A ONE-LITER BATCH.
It’s easy to make a small batch of biodiesel that will work in any diesel engine. You don’t need any special equipment — an old juice bottle will serve as the “reactor” vessel — and on such a small scale you can quickly refine your technique and perform further experiments. After a few liters’ worth of experience, you’ll know if you’ve been bitten by the biodiesel bug.
The principle behind biodieseling is to take vegetable oil (either new or used), and process it into a fuel that’s thin enough to spray from a regular diesel engine’s fuel-injection system. This is done chemically, by converting the oil into two types of compounds: biodiesel, which shares the original oil’s combustibility, and glycerin, which retains the oil’s thick, viscous properties. Drain away the glycerin, and you’re left with a fuel that you can pour into any diesel vehicle with no further modification.
Once you get to the far side of the learning curve, making biodiesel is very much like cooking. In fact, a commercial biodiesel production plant shares more in common with a large-scale bakery than a petroleum refinery. There’s organic chemistry involved in baking a cake, but most bakers wouldn’t consider themselves organic chemists.
SET UP.

Photography by Sara Huston
MATERIALS
[A] At least one liter of vegetable oil (you can double this recipe if desired, using a larger bottle).
Either new or waste vegetable oil is fine. If you are using waste oil, try making batches with samples from different restaurants’ grease barrels.
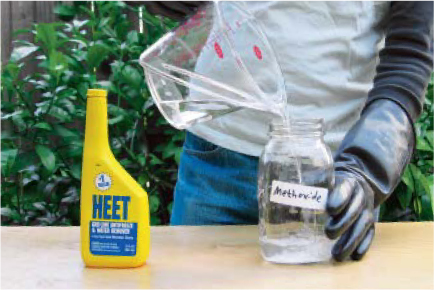
[B] One bottle methanol gasoline treatment, such as Heet (in the yellow bottle) or Pyroil brand.
Sold at auto parts stores. You can buy larger quantities in bulk from local auto-racing suppliers, petroleum distributors, and chemical suppliers.
[C] One bottle isopropyl alcohol gasoline treatment, such as Iso-HEET (in the red bottle) or Pyroil brand.
Carried by the same retailers as methanol. You won’t need much of this, even if you start making larger batches.
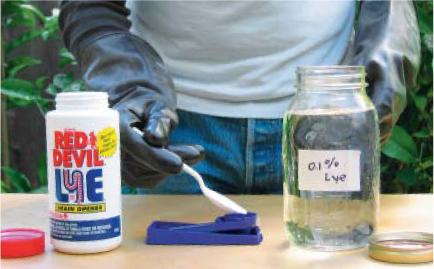
[D] Between 5 and 10 grams of lye, quantity explained below. You can use regular lye (sodium hydroxide, NaOH) or potash lye (potassium hydroxide, KOH). NaOH is easier to find, but KOH is easier to work with.
NaOH is widely available as Red Devil Lye drain cleaner. You can buy KOH from local soapmaking and tanning craft suppliers, or from braintan.com.
[E] Phenolphthalein solution.
Available from beer and winemaking and lab chemical suppliers. Also contained in many educational chemistry sets. Should be fresh.
[F] One or two gallons of distilled water.
Used for washing the fuel.
[G] Vinegar.
To neutralize discarded lye.
TOOLS
[H] Metric gram scale, sensitive to at least ½ gram.
Available at some tobacco and “head” shops, or look for a triple-beam scale at pawn shops and flea markets.
[I] Two syringes, eyedroppers, or pipettes, calibrated in milliliters. They should each hold up to 10ml, and be marked in increments no larger than .2ml.
Graduated eyedroppers and oral syringes are available in drugstores, sometimes with the baby supplies. You’ll use these for different chemicals that you shouldn’t mix up, so it helps to get one syringe and one eyedropper.
[J] Candy thermometer.
[K] Measuring cup, beaker, or other way of measuring 220ml and one liter of liquid.
[L] Two 1-pint glass Mason jars with tight lids, and three or more small Mason or babyfood-size glass jars.
[M] Two 2-liter bottles or larger, glass or PET/PETE (#1) plastic. Favor juice, water, or milk bottles over soda, since their wider mouths are easier to funnel into.
Two-liter pot, and a hot plate or electric burner (not gas).
Cheesecloth, clean rags, and a bucket.
Funnel and plastic spoon.
Masking tape or labels, and a marker for labeling.
[N] Safety goggles and gloves.
Litmus strips or electronic pH meter (optional).
MAKE IT.
Time: Six Hours over Three Days Complexity: Low
START»
1. FILTER AND DE-WATER YOUR OIL
If you’re using new oil, you can skip to Step #2. But if you’re starting with waste oil from a restaurant fryer, it will contain food particles, water, and free fatty acids (FFAs) — contaminants that you need to remove or adjust for. The FFAs make the oil more acidic, (a.k.a. rancid), which counters the effect of the lye. You can compensate for this by adding more lye into the main reaction later, but you need to perform a titration test beforehand in order to determine how much extra lye you’ll need.
While biodiesel is safe to handle and store, the homebrewing process involves flammable, poisonous, and caustic chemicals, alcohols, and lye. Keep all chemicals clearly labeled, sealed, and out of reach of children and pets. When handling methanol and lye, wear long sleeves, safety glasses, and gloves made out of nitrile — or, even better, PVC. Wash the gloves after each use, and be careful not to touch your skin or eyes. Keep a water hose nearby in case of skin contact. Methanol can be absorbed through the skin, so wash immediately with water if contact occurs. Immediately flush lye off skin with water or vinegar. Methanol fumes are poisonous, so wear a mask, or hold your breath while pouring, and work outside or with good ventilation.
1a. Start with more than one liter of oil, since the following steps will slightly reduce your oil’s volume. Warm the oil to about 95°F in a pot on an electric hot plate (don’t use a gas burner, here or anywhere else in this project), then filter it through a few layers of cheesecloth in a funnel (or use a coffee filter).

1b. Heat the oil to 140°F and maintain the temperature for 15 minutes. The water will fall to the bottom, so you’ll risk steam explosions if the temperature gets too high. Pour the oil into a bottle or other vessel and let it settle for at least 24 hours. This removes water, which would produce soap in your batch. If you see water at the bottom (it will be dirty, not clear), don’t pour it back out with the oil.

2. TEST YOUR OIL
Determining the acidity of the vegetable oil.
2a. Dissolve one gram of lye in one liter of distilled water (0.1% lye solution), or use an equivalent ratio to make a smaller amount. This is your reference test solution, which you can store sealed and re-use for later batches.
2b. In a small jar, dissolve 1ml of slightly warm oil in 10ml of isopropyl alcohol. Stir until clear, then add two drops of phenolphthalein solution.

2c. Using a graduated syringe or dropper, add your reference test solution drop-by-drop into the oil-alcohol solution, keeping track of how much you’re using. The more acidic the oil, the more you’ll need to add. Stir constantly, and continue adding solution until the mixture stays pink for ten seconds. Note the number of milliliters of lye solution you used; this is the number of extra grams of lye you’ll need to add per liter of oil.

This process is called “titration,” and it’s a standard method of determining a solution’s acidity.
3. PROCESS THE OIL
This is the main chemical reaction that produces the biodiesel.
3a. Determine how much lye you need. If you’re using new oil, use 5 grams of NaOH or 7 grams of KOH per liter. With used oil, use these amounts plus one gram for every milliliter of solution you used in the titration step 2c. For example, if it took 1.5ml of lye solution to turn the mixture pink, use 6.5g of NaOH or 8.5g of KOH.
3b. Measure your lye into a clean Mason jar. Add 220ml of methanol, cover securely, and tip the jar to make sure the lid doesn’t leak. Then swirl or shake the jar gently until the lye dissolves fully. This will take a few minutes, and the jar will become slightly warm in the process. This mixture is the methoxide solution, and it’s dangerous stuff; you’ll need to wash the Mason jar lid after you’re done with your batch, or its seal will dissolve. (Some regular homebrewers prepare methoxide ahead of time and store it in #2 HDPE plastic.)
3c. Warm a liter of your oil up to 130°F. Let it cool down if the temperature gets too high.
3d. Pour the oil into a large bottle, add the methoxide solution, cap tightly, and shake like crazy for about five minutes. The contents might change color a couple of times.

3e. Set this mixture aside, and admire. In half an hour or so, you should see a darker, dirty, glycerin layer start to sink toward the bottom, and a larger, lighter, biodiesel layer rise to the top. This is a good time to clean up. If you’re sure your bottle won’t leak, you may want to let it settle upside-down, so you can drain the glycerin out by cracking the bottlecap. Or you can lay it sideways to make it easier to pour off the biodiesel.
3f. Let the liquids continue to settle overnight.
4. SEPARATE, WASH, AND DRY THE BIODIESEL
Your bottle now contains biodiesel, glycerin, mono- and di-glycerides, soap, methanol, lye, and possibly a little leftover oil (triglycerides). The glycerides are all oil-soluble, so they’ll reside predominantly in the upper, biodiesel layer. The thin layer of glycerin, which is water-soluble, will sink. Depending on the oil and catalyst you used, it might be either liquid or solid. Soap, methanol, and lye, which are also water-soluble, will be mixed throughout both layers — although some of the soap can sometimes form its own thin layer between the biodiesel and glycerin.
If you see more than two layers, or only one, then something’s wrong — possibly excessive soap or monoglyceride formation. These are both emulsifiers, and in sufficient quantities they will prevent separation. In this case, check your scales, measurements, and temperatures. You can reprocess the biodiesel with more methoxide, or try again with fresher oil (or new oil). If you can, shake the bottle even harder next time. In an engine, glycerin droplets in biodiesel will clog fuel filters, soap can form ash that will damage injectors, and lye can also abrade fuel injectors. Meanwhile, methanol has toxic and combustible fumes that make biodiesel dangerous to store. You don’t want any of these contaminants in your biodiesel. If you left your biodiesel to settle undisturbed for several weeks, these water-soluble impurities would slowly fall out of the biodiesel (except for the methanol). Washing your biodiesel with water removes the harmful impurities, including the methanol, much faster.
Unfortunately, washing will not remove the invisible, oil-soluble mono- and di-glycerides. These are a problem in rare instances when large amounts of certain types of monoglycerides crystallize. This can clog fuel filters and injectors, and cause hard starts, especially in cold weather. High-quality, commercial biodiesel has very low levels of mono- and di-glycerides, which is the ideal for biodiesel homebrewing. You can roughly test for the presence of mono- and di-glycerides in your own batch by processing it a second time, as if it were vegetable oil. If more glycerin drops out, then your first reaction left some unfinished business behind.

4a. Pour the biodiesel layer off the top, into another bottle. Don’t pour off any of the glycerin, as it makes washing difficult; better to leave a little biodiesel behind. If you let the bottle settle upside-down, drain the glycerin from the bottom.

4b. Gently add some warm distilled water to the biodiesel.

4c. Rotate the bottle end over end, until the water starts to take on a little bit of white soapiness, which may take a few minutes. Do not shake the bottle. You want to bring water and biodiesel into contact, without mixing it too vigorously. The biodiesel contains soap, and if you overdo the agitation, the soap, biodiesel, and water will make a stable emulsion that won’t separate.
4d. Turn the bottle upside-down, crack the cap, and drain away the soapy water. If you’re using a soft drink bottle with a narrow neck, you can plug the opening with your thumb instead of using the cap.

4e. Add more warm water and keep repeating the sloshing and draining process. Each time there will be less soap, and you can mix a little more vigorously. If you go too far and get a pale-colored emulsion layer between the biodiesel and white, soapy water, don’t drain it away; it’s mostly biodiesel. Just keep washing and diluting until the water becomes clear and separates out quickly. It takes a lot of water. But if the emulsification layer persists, try applying heat, adding salt, and adding vinegar, in that order.
4f. After draining the last wash water away, let the biodiesel sit to dry in open air until it’s perfectly clear, which may take up to a couple of days. In general, the better your washing, the faster the fuel will clear. If you’re in a hurry, you can dry the fuel faster by heating it at a low temperature. As with the evaporation method, the fuel is done when it clears. If you can read a newspaper through the biodiesel, it’s dry and ready to pour into a vehicle. Congratulations — you’re done!
USE IT.
You can put your liter of biodiesel into a jar to pass around to your admiring friends, or use it in a diesel engine. We generally filter fuel before adding it to the vehicle to remove micro-abrasives, but a liter or two probably won’t do any damage. To be safe, you can filter your liter through several coffee filters. Since it’s a small quantity, don’t worry about whether it’s OK to add your homebrew to your tank, so long as it’s clear. Even if your liter contains a lot of mono- and di-glycerides, they’ll be safely diluted by the rest of the fuel in the car.
Litmus strips or a pH meter will test the fuel’s acidity — one indication of how clean it is. Biodiesel should measure a neutral 7, with a higher number indicating soap or leftover lye. To test for the presence of glycerin, you can use the Gly-Tek test kit (gly-tek.com), which detects leaked antifreeze in motor oil.
If you start using biodiesel regularly, however, you should have the fuel tested, and change your fuel filter often. Biodiesel can free petroleum residue stuck in the fuel system, which can cause clogs. Also, watch for old fuel lines, which may get sticky and need replacement. Biodiesel can degrade the natural rubber used in older cars’ hoses, but it’s fine with now-standard synthetic rubber.
Biodiesel will normally store for months, but, like petrodiesel, it can be attacked by certain bacteria. To prevent this, you can mix in the same biocide chemicals that are widely used for petrodiesel storage. Also note that biodiesel made from animal fats can gel in cold weather; if this might be a problem, test a sample in the freezer before filling your tank. Biodiesel made from canola oil has the lowest solidification point.
GOING FURTHER
There are numerous recipes for biodiesel, generally characterized by number and type of main reactions. The method described here is a single-stage process, which uses an alkali to catalyze the main reaction, and relies on titration to determine the proper amount. Two-stage methods dispense with titration and run reactions twice to achieve complete conversion. The two-stage, base-base method repeats the lye reaction, while the two-stage, acid-base method uses sulfuric acid for the first stage. These methods, while more complicated, are also more foolproof and better suited for large batches.
Homebrewers make and wash larger batches of biodiesel in a variety of tanks; one clever design uses a 55-gallon drum that’s tipped on its edge to make a drainage point at the bottom, which is fitted with a valve. This makes it easy to drain glycerin or water. Various recipes can turn the dirty leftover glycerin into soap, 40-weight oil, paintbrush cleaner, and other useful products. High-volume operations can buy a $31,000 glycerin-purification distiller from Recycling Sciences (rescience.com), which will convert dirty biodiesel glycerin into nice, clear, commercially valuable glycerin.
Popular, high-volume washing methods include mist washing, in which water droplets sprayed on the surface of biodiesel settle down through the liquid; bubble washing, which uses an aquarium air pump and air stone to gently agitate water and biodiesel; and bulk washing, in which water and biodiesel are agitated manually. For final filtration, down to 5 microns, biodiesel can be pumped through standard, under-cabinet, household water filters.
RESOURCES
This article is partly based on a series of articles by Maria “Mark” Alovert that first appeared in the Energy Self-Sufficiency Newsletter: rebelwolf.com
Mark Alovert’s site: localb100.com
Homebrewing forums: biodiesel.infopop.cc, veggieavenger.com/media
Biodiesel policy and activism forum: biodieselnow.com
Biodiesel processor designs and other info: journeytoforever.org/biodiesel.html
Biodiesel stations and industry info: nbb.org
VW Diesel forum: tdiclub.com
Setting up a commercial biodiesel pump in your town: propelfuels.com
Rob Elam is a founder of Propel Fuels, a Seattle-based biodiesel services and fuel distribution company.
BIOFUELS TODAY
THE NATION’S #1 MOCK-NEWSPAPER FOR MAKE READERS INTERESTED IN ALTERNATIVE FUELS.
Grassroots Network Offers Alternative to Big Oil
SEATTLE – Spotting an old, diesel Volvo with a bumper sticker promoting a cause is not unusual on the streets of Seattle. Spotting two or three of them parked on the same block is a little strange, however – especially when all of them advertise the same cause. But that’s the scene on the street outside of Dr. Dan’s Alternative Fuel Werks in Seattle, and the stickers all broadcast some variation of “Biodiesel-Powered.” The Fuel Werks promotes and sells biodiesel to a segment of the population that Dan Freeman (a.k.a. Dr. Dan) affectionately calls “affluent crackpots.” They are people willing to pay $3.67 a gallon to power their cars with a renewable energy source and decrease the amount of pollution released into the atmosphere from the burning of fossil fuels.
Oil and automobile companies have been slow to offer alternatives to the petroleum-fueled car, but conscientious drivers left out in the cold by those industries are addressing the issue themselves. Grassroots distributors like the Fuel Werks are popping into existence nationwide, to serve both private consumers and neighborhood biodiesel cooperatives who pitch in on large, shared storage tanks. Co-ops form via word-of-mouth, flyers posted at local garages, or online queries. One biodieseler, Eric Forrer, has been trolling craigslist for interested individuals in Seattle’s North End area. After he finds enough members, Dr. Dan will install a 270-gallon tank in a highly visible location near Forrer’s home, and keep it filled.
The biodiesel distribution chain favors local, independent businesses. Consumers buy fuel from co-ops or small distributors like Dr. Dan’s, while the distributors buy it from anyone who can make high-quality stuff, from backyard homebrewers to local startups like Seattle Biodiesel, which, in turn, gets the raw vegetable oil they use to produce biodeisel (mostly soybean) from, well, Iowa, for now.
We can seemingly leave lefty political stereotypes aside while viewing the National Biodiesel Board’s map of biodiesel distributors, at nbb.org/buyingbiodiesel/distributors. The vast majority are in the Midwest, where vegetable oil is grown and processed, rather than in coastal Sierra Club strongholds such as Seattle, San Francisco, and Berkeley. But it isn’t simply a matter of economics, as evidenced by the involvement of musician and farm advocate Willie Nelson. His company, Willie Nelson’s Biodiesel, markets biofuel as a way to empower independent farmers to plant crops that will let them participate in the energy market.
Back in Seattle, Dan Freeman hopes that the Fuel Werks will, one day, sell biodiesel that is not only processed, but also grown in-state – and all without the backing, consent or assistance of automobile manufacturers or oil companies.
Photograph by Phillip Torrone
Deep-Fried Ride: Veggie Oil Inside
FLORENCE, MA – Do-it-yourselfers are turning to an offbeat solution to rising fuel prices: they’re modding cars and trucks to run on discarded cooking oil. With a Greasecar system installed, any diesel vehicle can run on vegetable oil.
Instead of fueling at gas stations, Greasecar devotees tank up at restaurants, where deep-fryer oil is tossed out daily. Since many establishments pay disposal fees, they’re happy to give the stuff away.
Greasecar Vegetable Fuel Systems (greasecar.com) sells conversion kits for about $800, around the same price as its Missouri-based competitor Greasel Conversions (greasel.com).
Converted vehicles are actually dualfuel hybrids, capable of running on both diesel and vegetable oil. The engine can draw fuel from either the regular tank, or a heated oil tank in the trunk. The vehicle starts up in diesel, then switches over to pure veggie power once the grease is warm enough to flow through the fuel injection. This approach allows the grease-burners to work just fine in cold climates.
Bonus benefits: The air coming out of the tailpipe will smell faintly of French fries, and you can slap on a “Drive Vegan” bumper sticker. Greasecar representatives say converted vehicles experience no change in fuel economy, either – though they admit you may need to change your unit of measurement to “fries per gallon.”
Slippery Characters Steal Fryer Oil, Leave Mess
By Paul Spinrad
SPRINGFIELD, MO – The multibillion-dollar, used cooking oil recycling business is taking a beating from a new kind of criminal: the grease bandit, as reported in the Springfield News-Leader. In some regions, the growth of the biodiesel industry has given new value to old grease. As a result, bandits now cruise the backs of restaurants, sucking the substance out of discard bins with homemade pumper trucks. Many restaurant workers don’t realize that they’re the wrong trucks, but Keith Wendorf, spokesman for oil recycler Griffin Industries, says that his company’s shiny 18-wheelers steam-clean the pickup areas, while the thieves leave pools of grease.
Percentage of total environmental impact relative to gas-powered car.

Source: Argonne National Laboratory Transportation Technology R&D Center’s GREET model, www.transportation.anl.gov/software/GREET
By Polly Powledge
CHICAGO – Hybrids, EVs, or biodiesel – which is best for the environment? Figuring out the answer can be tricky. Diesel gets better mileage than gas, but it takes more petroleum to produce. Electric vehicles (EVs) don’t use gasoline at all, but if you plug them into the grid, you’re using energy from coal-burning power plants, which pollute. B20 biodiesel (a common blend containing 20% pure biodiesel and 80% petrodiesel) reduces fossil-fuel use, but a rigorous analysis must account for the diesel that’s used to truck the vegetable oil to the biodiesel processing plant.
Fortunately, scientists at Argonne National Laboratory have constructed a computer model that lets you do apples-to-apples comparisons of a variety of fuel technologies, and see how they rate ecologically. The results of these “well-to-wheel” calculations can be surprising. For example, while an EV consumes very little petroleum over its lifetime, hybrids are actually slightly better at reducing greenhouse gases.
5 HARDWIRED IPOD
WANT A BETTER WAY TO PLAY MP3s THROUGH YOUR CAR STEREO THAN USING AN FM TRANSMITTER OR A CASSETTE ADAPTER? CUT THE STATIC BY CONNECTING YOUR iPOD TO YOUR STEREO’S AUX JACK.
If you have an iPod (or any portable music device, for that matter), and you drive, it’s a no-brainer that you want to bring that audio experience into your car.
Here are my four goals for making a car-based portable music system:
1. I want to play the music through my car’s speakers.
2. I want to control the functions safely while I’m driving.
3. I want to mount it securely so it doesn’t fly around.
4. I want to power and charge it so it doesn’t run out of juice while I’m driving.
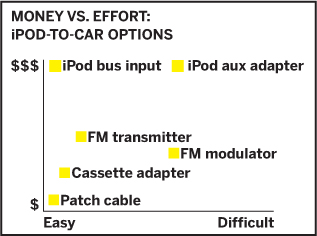
Each of these problems has a number of solutions depending on how much money and effort you are willing to spend. But clearly, the main problem to solve is: how do you get that audio signal into your car speakers?
To help you decide the best way to get your iPod into your vehicle (and there are probably a million possible permutations of device + car), we’re going to look at the different ways you can (or should be able to) integrate a portable MP3 player into a car.
The focus of all these approaches is to put the audio into the head unit. The head unit is the more technical term for the “radio” or “tuner” or “stereo” or “cassette deck” in your car; that is, the head unit is the thing in the dashboard with the dials and buttons that acts as the “analog hub” for your car’s audio media experience.
GOAL: PLAY YOUR IPOD THROUGH YOUR CAR SPEAKERS
You can get audio into your car’s receiver in one of four ways: FM transmitters, FM modulators, tape adapters, or directly into the head unit via an AUX in, CD, or satellite radio interface. This decision tree will help you find which method is right for you.

Getting Audio Out of the iPod
It’s worth noting that there are two ways to get audio out of the iPod: top or bottom. The top connector on the iPod is a variable output, amplified signal. It’s designed to power your headphones. The amplification is controlled with the volume function of the scroll wheel. When using the variable output with any of the adapters listed here, you wind up with two ways to increase volume: the iPod or the head unit. This may seem like a good idea, but it can cause distortion.
The best way to get audio out of the iPod is from the bottom, where there is a line level output. This provides a nice, fixed level designed for amplification by another device (i.e. your head unit). Keep this in mind when buying any adapter equipment.
The $50,000 Solution
If you’re about to buy a new BMW, you can skip this decision tree entirely and simply plug your iPod into the manufacturer-supplied cable. In 2004, iPod made a deal with BMW and created the first iPod integration adapters. These first adapters were really a hack that made the iPod emulate a CD changer, but they’ve since added steering wheel and head unit control of the iPod.
Since that time, Apple has started making more deals with auto manufacturers, which are implementing different levels of iPod display and integration depending on the model of the car. In the coming years, the iPod’s proprietary bottom-connector may become a de facto standard for in-car integration. So when you buy a new car, you may be able to simply ask for the “iPod integration” option. Pros: Excellent sound and control. Cons: You have to buy a BMW for it to work.
MOUNTING, CONTROL, AND CHARGING SOLUTIONS
MOUNTING IT
After deciding how to connect your iPod to your receiver, you need to figure out how to mount it. If you are using a system that lets you control your iPod through your stereo’s buttons and dials, then you should stow it in your glove compartment or other out-of-the-way place. If you want to use the iPod’s controls, then you should mount it on the dash or other accessible location.
The cheapest and most space-age mounting solution is good old Velcro. If it’s good enough for securing objects in the zero-G environment of the space shuttle, it’s good enough to affix your iPod securely to your dashboard. You’ll want some sort of iPod case or plastic belt clip, just to make sure you don’t gum up the back of your iPod. You can get sticky Velcro at craft and hardware stores.
The Apple iPod dock that comes with some models of iPod provides audio output and recharging. Since you already have it, you can also Velcro or tape this to the center console of your vehicle, if you can find a level surface.

MacMice PodBuddy offers FM transmitting, power, and mounting (dvforge. com/podbuddy.shtml).
Because iPods are about the size of some mobile phones, you can also use a mobile phone holder. Mobile phone holders come in a variety of forms — some clip to AC vents, while others stick to the dash. Check your local car wash for a deal.
There are dozens of mounting systems designed specifically for the iPod. Initially, these were all cast in white plastic to match the iPod, but recent versions from Belkin are being made in black to better match the interior of most cars. The iPod holders made by ProClip blend in almost seamlessly with the finish of most cars.
CONTROL IT
While the iPod has a great interface, it’s certainly not designed with automobile drivers — who must keep their eyes on the road — in mind.
The wired remote control that comes with the various generations of iPod can serve as an effective hands-free remote. You could even affix it on the steering wheel (given enough wire length) so that you have a “hands-free” remote.
If you’re interested in wiring up your own remote wired controller for the iPod, perhaps to connect it to your steering wheel controls or your own dash-mounted interface, the protocol and pinouts are available at Maushammer (see above for URL).

Learn about the Apple iPod remote control protocol at maushammer.com/systems/ipod-remote/ipod-remote.html.
POWER AND CHARGE IT
You can buy a FireWire-to-cigarette lighter adapter for less than $10. But if you must, you can build one. First, put 12 volts through a 1-amp fuse to the power pins on a six-pin FireWire cable. You simply put the +12V on pin 1 and the ground on pin 2. A FireWire has a flexible voltage range from 8V to 30V, so you can put the 12V from the car straight into it.
Since the FireWire end connector is fairly hard to solder, it’s probably easier to just cut a FireWire cable in half and put the voltage on the two relevant pins.

The $30 SiK imp iPod charger (sik.com) has line level audio output.
A great place to learn more about mounting and charging your iPod in the car is iPodlounge (ipodlounge.com).