
THE NIGHT LIGHTER 36
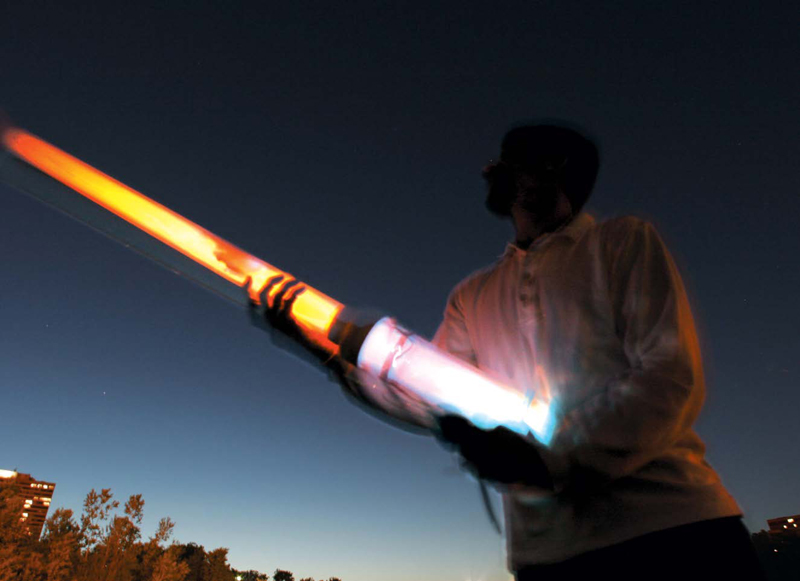
Photograph by Casimir A. Sienkiewicz
Launch potato projectiles 200+ yards with this stun-gun triggered, high-powered potato cannon with see-thru action. (Good thing potatoes are biodegradable.) »
Set up: p.112 Make it: p.114 Use it: p.118
POTATOES, BEWARE
The potato cannon, a.k.a. the spud gun, is a popular and very entertaining amateur science project. It’s simple to make, and few devices offer such bang for the buck. You can use the Night Lighter both day and night, but when it’s dark, the clear PVC provides an excellent view of the interior ballistics. Also, the stun gun gives better performance than weaker sparks from piezoelectric or flint/steel igniters. It’s fun both to fire and simply to watch in action.
A basic spud gun can be built with plain, white PVC for less than $25. The Night Lighter 36 costs more, but I scrounged leftovers from plastics suppliers and built mine for less than $50. After mastering basic gun construction, the intrepid potato cannoneer may want to design and assemble more complex and artistic devices.
PRINCIPLES OF SPUD GUNNERY:
Serious spud gun designers tinker with the ardor of hot-rod builders. Our NL-36 improves upon the basic potato cannon by substituting transparent tubing and a stun gun igniter.
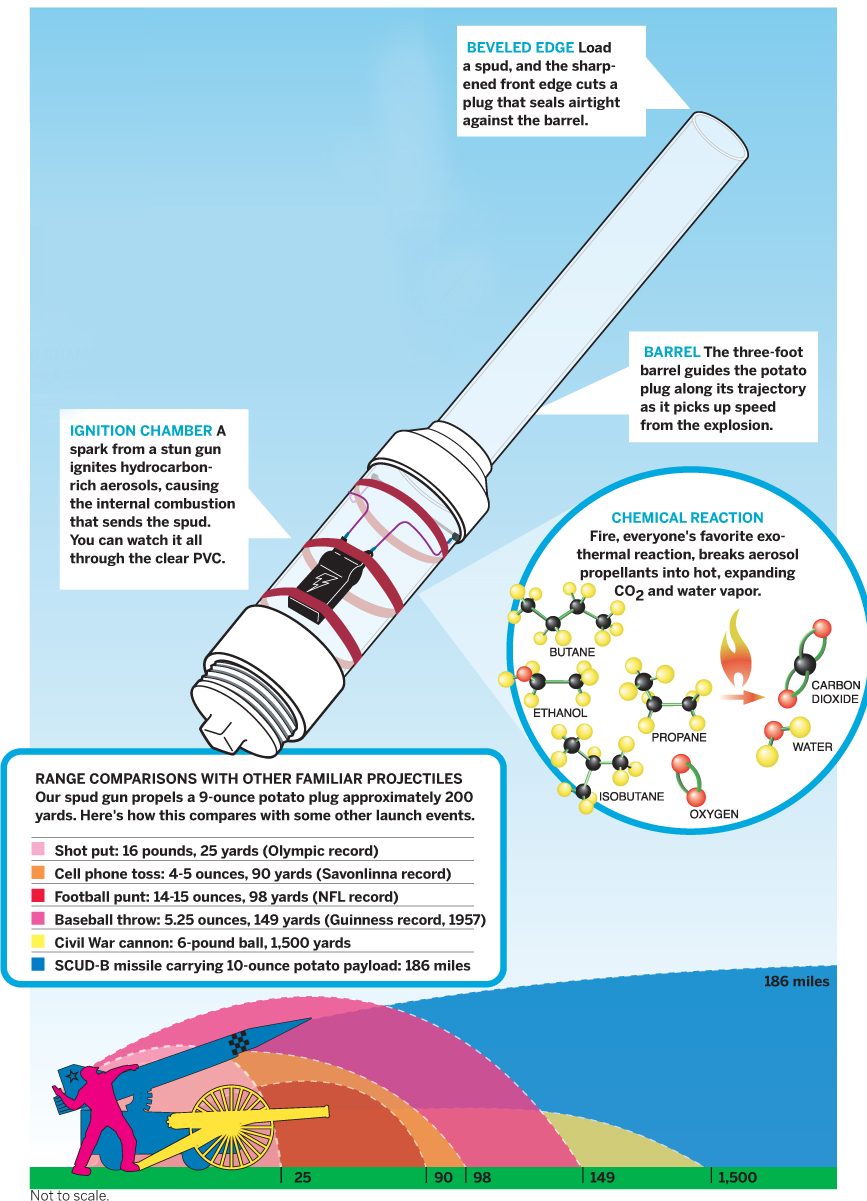
Illustration by Tim Lillis
SET UP.
Visit makezine.com/03/halloween for source list.

Photograph by Kirk von Rohr
MAKE IT.

CONSTRUCTING THE MIGHTY POTATO CANNON
Time: An Afternoon Complexity: Low
START »
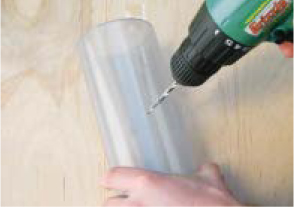
1. PREPARE THE PVC
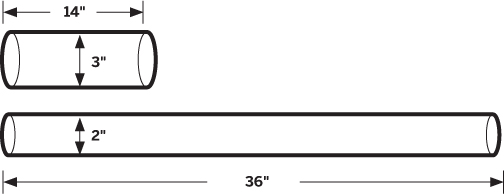
1a. Cut pipes. Measure and mark a cutting line 14 inches from one end of the 3-inch diameter PVC pipe. Use the hacksaw to cleanly and squarely cut the pipe. This will be the cannon’s combustion chamber. Then measure, mark, and cut a 36-inch length of the 2-inch diameter PVC pipe. This will be the cannon’s barrel.
1b. Taper end of gun. Use a file or a drill and sanding attachment to taper one end of the long 2-inch diameter pipe, so that it forms a sharp edge. A clean, sharp edge is important, since it should cut the perfect-sized potato plug projectile as you ram the potato into the muzzle of the gun.
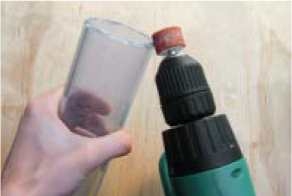
When PVC gets hot, it releases poisonous chlorine gas. Perform this step in a well-ventilated area.
2. ATTACH THE ELECTRODES
2a. Drill electrode holes. Four inches from one end of the 3-inch diameter pipe, drill a slightly undersized hole for the ¼-inch bolt. Drill a second hole directly opposite the first hole, four inches from the end.
The 3-inch pipe will contain the fuel and the spark, and act as the combustion chamber.
Photography by David Albertson
2b. Attach electrodes. Screw in the 2-inch long bolts, with nuts attached (two per bolt), into the holes in the 3-inch pipe. The nuts go outside the barrel. The bolts should tap themselves into the softer plastic, but don’t over-tighten or you’ll strip the PVC. Position and adjust the nuts as needed so there is a ¼-inch gap between the bolt ends inside the barrel.

This is the spark gap that will ignite the fuel, firing the cannon.
3. SOLVENT-WELD THE PVC
The spud gun is composed of PVC pipes and fittings that are solvent-welded in place using PVC cement and primer. To prevent leaks and weak spots where the parts are joined, the solvent welding must be done properly. Meanwhile, the primer and cement are toxic and flammable, so you need to work in a well-ventilated area, keep the chemicals away from open flames, and follow all safety precautions on the labels. First, we’ll solvent-weld the reducing connector to the front of the combustion chamber. Then we’ll follow the same procedure to attach the threaded adapter to the back of the chamber and to connect the barrel.
3a. Inspect parts. Check the 3-inch pipe ends and 3- to 2-inch reducing connector for cracks, dirt, and abrasion, and remove any plastic burrs with a knife. Don’t use damaged PVC pipe or fittings.
3b. Weld parts. Following the procedure at right, solvent-weld the 3- to 2-inch reducing connector to the end of the 3-inch pipe closest to the electrode bolts. Then join the unthreaded side of the female adapter to the other end of the 3-inch pipe, and attach the 2-inch barrel to the narrow end of the 3- to 2-inch reducing connector.
3c. Let the cannon dry for several hours in a well-ventilated area before using. You don’t want to fire it while the solvents are wet and flammable.
3d. Screw the 3-inch PVC end plug into the back of the chamber after drying.
1. Clean the weld surfaces with PVC primer. Apply the primer with a dauber or brush (usually inside the cap). The primer cleans and softens the PVC and allows the cement to penetrate the surface.
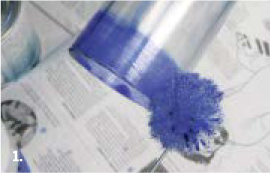
2. Brush on a thick coat of PVC solvent, first to the end of the pipe, and then to the fitting socket. Leave no bare spots.
3. Immediately join the pipe and the fitting socket, pushing the pipe to its full depth and making sure it’s seated squarely with a slight twist. If you’ve used enough solvent cement, you should see a small, continuous ooze of cement around the fitting. Once joined, you can’t reposition the pipes or otherwise fix errors. If you accidentally put the wrong fitting on a pipe, you need to trim it off and start over.

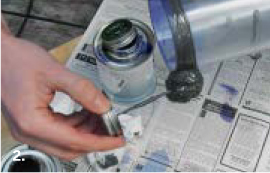
4. WIRE THE IGNITION
4a. Test-fit butt connectors. Using a sharp utility knife, remove excess insulation from each crimp-on butt connector. With the stun gun turned off, test-fit the trimmed ends of the connectors over the gun’s main electrodes. These are the twin electrodes that point forward, rather than toward each other, and we’re hooking these up to our ignition wires, in order to bring the spark into the combustion chamber.

(Depending on the make and model of the stun gun, you may need to modify these directions and connect the wires in other ways, such as with wire nuts or soldering.)
4b. Prepare ignition wires. Cut the wire into two, 1-foot wires. These are the ignition wires. For each, attach a crimp-on spade to one end and the untrimmed end of a butt connector to the other end.

4c. Attach ignition wires to stun gun electrodes by crimping on the modified butt connectors.
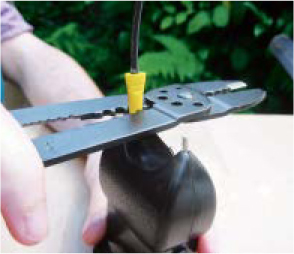
4d. Cover the stun gun test leads (inboard electrodes) with wire nuts cut down to size, or other high-voltage insulators. Insulate all exposed metal areas of the ignition path on the stun gun and bolt electrodes, with electrical tape or silicone glue. It’s easy for electricity to find its way underneath any insulation gap at the base of the electrodes.
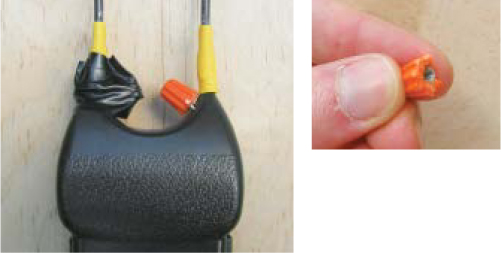
Wire nuts need to be trimmed to fit onto the test electrodes.
5. ATTACH THE IGNITER
5a. Attach the stun gun body to the rear of the chamber using two hose clamps. Do not over-tighten. Position the stun gun body at a 90-degree angle to the axis of the electrode bolts.
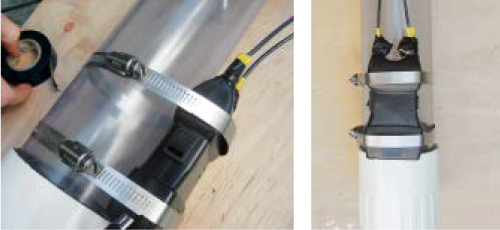
5b. Attach ignition wires to electrode bolts, securing the spade connectors underneath the bolt head or between the nuts. You may have to bend the spades to widen them enough to fit around the bolt.

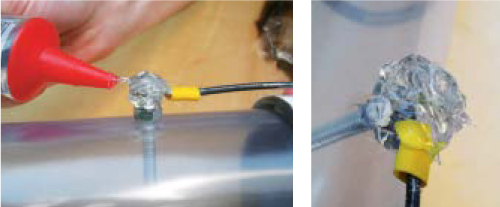
6. FINAL INSULATION
6a. Cover bolt connections with globs of silicone sealant. To further insulate, wrap the whole ignition area with bubble wrap, and tape down. The stun gun operates at such high voltage that the wrap still may not completely prevent shocks. Avoid contacting electrodes when operating the cannon. Don’t be the path of least resistance!
Congratulations! Your Night Lighter 36 potato cannon is complete.

FINISH X
NOW GO USE IT »
USE IT.

HOW TO USE YOUR SPUD GUN RESPONSIBLY
FIRING THE NIGHT LIGHTER 36 POTATO CANNON
1. Remove the end plug.
2. Center and push a potato into the cannon, keeping your hand clear of the edge. You may want to wear a leather glove. The muzzle’s sharp edge will cut the potato into a plug that should fit snugly on all sides. Any gaps will reduce performance.
3. Use the stick to push the potato plug 30 inches down into the barrel.
4. Direct a stream of aerosol into the firing chamber. Unscented deodorant works well, but check the label to make sure your choice contains hydrocarbons such as alcohol, propane, butane, or isobutane. Start out with a one- to two-second burst, and determine the optimal amount by trial and error.
5. Immediately replace the end plug and screw it in securely.
6. Turn the stun gun on, and double-check that the firing area is clear.
7. Press the stun gun’s ignition button. Enjoy your work. For a tracer, stick a glowstick into the spud.
If you have a misfire, and the projectile is not ejected, carefully remove the end cap, and ventilate the combustion chamber thoroughly.
MAINTENANCE
Aerosol chemicals can gum up the inside of the cannon. Every few shots, clean it out with a rag and cleaner. The residue can also make the end plug hard to unscrew. If necessary, use pliers.
SAFETY AND LEGALITY
During construction, don’t take shortcuts or substitute inferior materials. The vapors from PVC cement are flammable, so allow all joints to dry fully before exposing the gun to ignition sources.
When using the potato cannon, exercise extreme caution. Wear eye protection, and check the area in front of you before firing. Never look down the gun’s barrel, or point it at anything you don’t want to hit. Excess fluid stays in the chamber and evaporates slowly, so you should always treat the gun as if it can fire. Check frequently for signs of wear, and never operate a damaged gun. Avoid contact with (or proximity to) the ignition path. Stun guns hurt.
PVC is more brittle in cold weather, so don’t use the cannon in temperatures below 60°F.
Neither the author nor this magazine assumes liability for your spud gun or your actions.
Potato cannons may not be legal in your area (even if it is legal to tote a 12-gauge down Main Street). Check with local law enforcement regarding the rules in your area, and obey them. Also, check the laws regarding stun gun usage.
Editor’s note: Author William Gurstelle uses PVC for his Night Lighter 36 and other designs, but some spud gunners believe this is unsafe, since PVC can shatter and is not recommended for piping compressed gases. They advise using materials made out of ABS (with ABS cement), which is more flexible than PVC, but not available in transparent.
Alternatively, you can use Schedule 80 transparent PVC, which is thicker and stronger than Schedule 40, but more expensive.