
Revive five captivating classics. by dan weiss
Photography by Dan Weiss (left) and David Torrence (right)
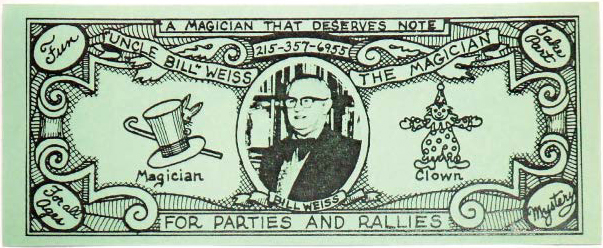
My father was a professional magician and a maker, among many other things. His stage name was Uncle Bill and his business card was Uncle Bill play money (get it?). He’s been dead for nearly 20 years now (don’t worry — he was born in 1909) and I fondly remember the tricks he built. Here are five of his “gadget tricks,” which rely primarily on equipment rather than sleight of hand. They’re all easy to perform after a little practice, but the audience should be at least a few feet away. I’ve included my dad’s usual script and patter, but these are just starting points. As with any jokes, you should fit these to your audience and the current moment.
By the time my dad stopped performing, he was in his 70s and walked with a cane. Yet he still had no trouble captivating young and old with these tricks. They’re classics, and I haven’t seen them since.
Dan Weiss is a second-generation maker who as a kid served as his father’s magic assistant. He remains a big fan of the brotherhood of magicians who perform simple tricks like these for the delight of their audiences.

CAN I GET A WITNESS: Many of my dad’s favorite tricks were “gospel magic,” with patters ranging from moral to flat-out religious. Here I am demonstrating his explicitly religious Burning Bible trick.
The Burning Bible
Dramatic flames leap out of an open Bible, and return every time you close and open it again.
PREPARATION
1. Dilute some white glue with an equal amount of water, and paint it on the edges of all the pages and the entire inside back cover of the book. Use lots of glue and riffle the pages to help it soak in. You want the book to be a solid block except for the front cover.
2. Place wax paper or plastic wrap under the front cover to keep it from gluing shut. Clamp the book or press under very heavy weights to prevent the pages from warping. If you can open any pages after it’s dry, use more glue.
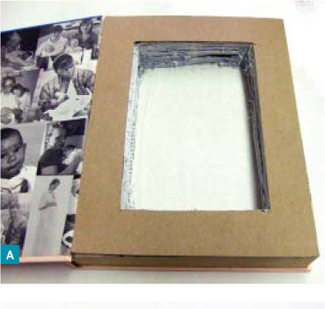
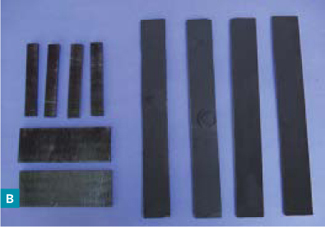
3. Cut a piece of cardboard to the book’s page size, then measure in 1½" from all sides, and cut out a frame shape. Use this template and a utility knife to cut the center out of the first page or two. Don’t try to cut through more than that yet. If the page comes loose, go back and apply more glue. Repeat and continue cutting down into the book. After a dozen pages or so, you shouldn’t need the template anymore, but be sure to cut straight down; a long blade helps. Also keep the corners square. Cut until you reach the back (Figure A), and don’t worry if the last few pages won’t come out.
4. Paint the inside of the hole with more diluted glue, then insert the wax paper and press dry as before.
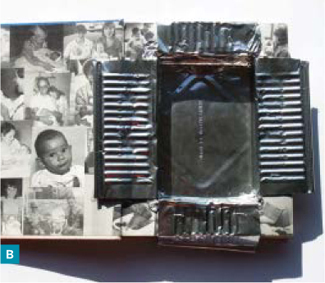
5. Now we’ll line the cavity with metal. Trace your template’s inner rectangle onto the bottom of a foil baking pan. Cut off the outside corners of the pan to meet the corners of the rectangle, then score and fold in the sides so the pan fits into the cavity. Press the tabs snug against the sides of the hole and fold them out flat at the top (Figure B). Trim them so they don’t stick out, and staple the metal in place. I found that a desk stapler works better than a staple gun. Staples in the bottom will come out the back of the book; fold these over by hand.
6. Out of the second pan, cut a piece of metal to line the inside cover, and staple it in place.
7. Paint the entire inside of the book with black heat-resistant spray paint. You don’t want to get the rest of the book black, so be careful or mask the other areas.
8. Paint the page edges with gold paint. You’ll be amazed at how much this “sells” the book as a Bible.
9. Cover the book with the black textured paper, glued on with spray-on glue or diluted white glue. You can tuck a bit in around the edges, but don’t go in too far or it could burn!
PERFORMANCE
Ready the prop by pouring a little lighter fluid on a handful of ceramic wool (not the whole bag) and putting it in the cavity along with your lighter (Figure C). At the start of the performance, light the lighter and tilt the book to bring the wool close to the flame. Doing this without being obvious takes practice. The lighter fluid will immediately start burning dramatically. I suggest you first try this outside, and be careful.

Photography by Dan Weiss (A, B, C) and David Torrence (far right)
Do not place your face over the book. Practice holding it out in front of you, which is safer and more theatrical anyway. Hold the book open flat and tilted toward you slightly, to hide the inner workings from the audience. The black paint helps obscure the details.
Practice opening and closing the book, keeping your thumb at the lower right corner so it doesn’t shut completely. If flames shoot out the sides, you used too much lighter fluid or didn’t close the cover enough. If the fire goes out, you used too little or closed it too tight. After a few openings and closings, shut the book completely and place it under your arm for a while to extinguish the fire.
The type of lighter used won’t catch on fire or explode, but it will get very hot, so you need to watch for that. The ceramic wool cools quickly. One possible upgrade is a clip to hold the lighter, to make it easier to flick.
PATTER
You need some patter, but understand that no one is listening; they are looking at the fire. From the moment you light it until you extinguish it under your arm (and everyone is worried that you will catch on fire) the fire is the star of the show.
Regardless of this, your patter should somehow explain why the book is burning in the first place, and why the fire continues even after you close the book. Something like, “The fire represents the power of God that is always available in the Bible, even when you’re not reading it. And when you open it again, it roars forth as powerful as before.” After 2 or 3 times, the audience will be amazed when you close the book for good, since they now believe the fire is nonextinguishable.

MATERIALS
Large hardcover book at least 1"–2" thick that you don’t mind destroying
White glue
Cardboard I got mine from the back of a used writing pad.
Disposable foil baking pans (2) at least as large as your book; I used lasagna pans.
Metal, non-butane lighter and lighter fluid I use a Ronson WindLite.
Ceramic wool sold as “glowing embers” for gas fireplaces
Black textured paper 24"×36" for book cover
Black heat-resistant spray paint
Gold spray paint
Paintbrush
Utility knife
Stapler
Wax paper or plastic wrap
Clamps or very heavy weights
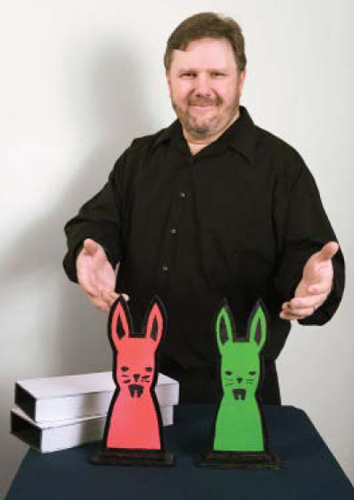
Hippity Hop Rabbits
Black and white rabbits invisibly trade places, and the audience thinks it knows how — until they magically appear pink and green.
PREPARATION
1. Cut 6 pieces of hardboard: 5"x11½" (4) and 4½"×11" (2). These are the main pieces for the rabbit houses and the 2 rabbits.
2. Cut 10 strips of ¼" plywood: 11½"×1½" (4), 4½"×½" (4), and 5½"×2" (2).
3. Primer-paint all the pieces. Then paint one side of each 5"×11½" piece matte black and the other side gloss white (Figure A). Paint all the plywood strips gloss black (Figure B).

4. Cut a paper stencil following the rabbit pattern at makezine.com/13/unclebill. It should be a bit taller than the printable area of letter-size paper, so print it full-page on legal size.
5. You can either cut your rabbits to shape, or keep them rectangular. If you keep them rectangular, paint all sides of the two 4½"×11" rabbit pieces matte black. Otherwise, cut them out along the outside edge of the pattern, making the shapes as identical as possible.
6. Stencil the rabbit pattern on both sides of the hardboard pieces. On the rougher sides, paint one rabbit neon green and the other neon pink (this may take several coats), then finish with the outline and details in gloss black. On the smooth sides, paint one gloss black with a gloss white outline and details, and the other gloss white with gloss black details.
7. Glue each rabbit onto a 5½"×2" base, centered and sandwiched on either side by two 4½"×½" strips. Glue all pieces together and clamp until dry.
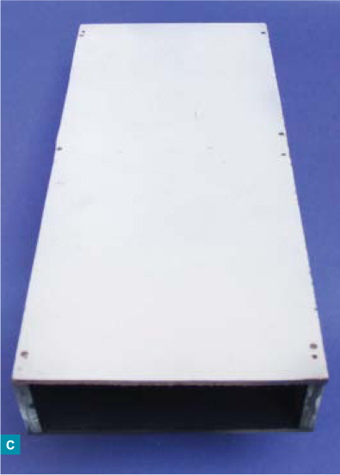
8. Build the houses out of the remaining pieces, facing the matte black inward. Glue and clamp together until dry. You can optionally reinforce the boxes with nails (Figure C). The rabbits should now stand up straight, and the houses should fit neatly over them.
9. Now for the trick part. Cut the sheet magnet, with the less-magnetic side facing you, into 2 rabbit shapes — following the template, but not including the base. If the less-magnetic side has adhesive, peel off the backing and replace it with heavy stock paper. Paint these sides as a black-on-white and a white-on-black rabbit, just like the hardboard. Then fit them over the colored rabbit sides and trim the edges so they don’t stick over (Figure D).

Photography by Dan Weiss (A, B, C, D) and David Torrence (far right)
10. Using leftover scraps of sheet magnet, create a magnetic edge for the colored rabbits, within the black outline, and paint it gloss black. With adhesive-backed magnet material, you can just stick it directly; otherwise use glue.
PERFORMANCE
Place the magnetic cover of the white rabbit on the back of the black rabbit, and vice versa. Place them in their houses so that one has the black rabbit facing front and the other has the white rabbit facing front, with the magnet cover sides both facing back. At the end of the trick, pinch the magnet cover against the inside of the house as you grab it to lift it off, lay the house down with the magnet inside, and rotate the rabbits around to reveal the colored sides.
PATTER
Explain that all magicians have rabbits, and yours live in these 2 houses. Reveal each rabbit and cover it back up. Show that the houses are empty by looking through them at the audience.
“White rabbit called black rabbit to invite him over. So white rabbit left his house (turn the house around) and started going to black rabbit’s. But black rabbit got impatient, and went over to white rabbit’s (turn the other house around) to see what was taking so long (reveal that the white rabbit is now at the black rabbit’s house, and vice-versa).”
“Then both rabbits went back home.” Turn both houses, and show the rabbits in their original places.
Repeat this story at least 2 or 3 more times. You will hear calls from the audience like, “Turn the rabbit around!” Pretend to not understand, then take off both houses, along with the magnetic covers.
Hold one rabbit closely in front of you. When asked to “turn it around,” you turn around yourself, hiding the color. Then turn the rabbit clockwise or counterclockwise. Finally, feign a flash of understanding and turn the rabbit to reveal the colored side. In the stunned silence, turn the other rabbit around to show its colored back as well.
MATERIALS
Sheet magnet 10"×12"
Heavy stock paper several sheets
Hardboard 2’×4’ aka masonite
Spray paint Get primer (1–2 cans), plus matte black, black gloss, white gloss, neon green, and neon pink.
¼" plywood 2’×2’
Table saw and scroll saw A small hand saw or jigsaw will also work.
Clamps
Glue
Masking tape, hobby knife, paper
Hammer and nails (optional)
Six Bill Repeat
You count out six dollar bills (or play money), keep giving bills away, and always still have six. Since my dad’s business cards were his Uncle Bill play money, this let him give them away at every event.
PREPARATION
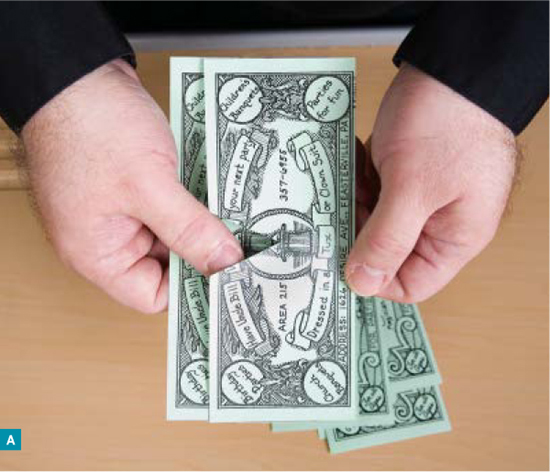
1. Make a pocket by loosely taping 2 bills together so they’re aligned to look like a single bill. The best way to do this is to tape them from the inside of the pocket, starting at the bottom and leaving a slight gag between bills. This hides the tape and ensures that no sticky stuff faces toward the bills, so they slide out easier.
2. Cut a V-shaped notch on the back side of the pocket, along the long edge. Make it just big enough for your finger to rest in (Figure A).
3. Load some bills in the pocket, all aligned in the same direction as the pocket.
PERFORMANCE
Put 4 bills under the loaded bill with its notch facing down. Then slide the free bills from the bottom, and make a production out of each one. This will cover any trouble you have working with the loaded bill.
For the fifth bill, slide one bill out of the pouch, and then count the loaded bill as the sixth. Making this believable takes practice. It helps to keep the stack of bills tilted toward the audience, and they should not be too close.
PATTER
There are many patters for this trick, ranging from the religious (the wages of sin) to the silly (I can magically make money).
The core of the patter is to give a reason for the money to keep appearing, even when you give the excess away. Be sure to give the bills out to the audience so they know you aren’t just picking up the same money you set down.
MATERIALS
Full-sized play money or real money uncreased and all of one denomination. I’ve never found play money that’s full-sized sold anywhere, so you may need to make your own.
Transparent tape
Scissors or utility knife
Mouth Coil
A torn scrap of paper put into your mouth turns into an impressively long, colorful streamer.
PREPARATION
1. Cut tissue paper the long way into 3"-wide strips, the more precise the better.
2. Glue strips end-to-end, overlapping them by about 2" and mixing colors, until you have a streamer 20’–30’ long.
3. Tape or glue 1 end of the streamer to itself around the paint-stirring paddle, then continue wrapping the entire streamer around the paddle in a tight coil. You’ll slide the coil off later, so I rub bar soap on the paddle beforehand to lubricate it.
4. Slice the coil along its middle across one flat side of the paddle and both edges. You can go around the other flat side a bit, but don’t cut it all the way around. Be sure to cut all the way to the stick.
5. Slide the coil off the stick and fold it back at the cut to expose the center, then tape the coil around the outside in this position (Figure A).

6. This is the hardest part: reach into the centers of the 2 coil halves and pull out just the innermost 1" of each streamer. These tails are what you’ll pull on (Figure B).

PERFORMANCE
After you’ve secretly popped the coil into your mouth (see Patter), tail facing out, push it against your teeth with your tongue. This will provide the pressure to hold it in place while it unravels.
Practice pulling the streamer out in front of a mirror. If you lean back and pull the streamer up, it looks like it’s coming from deep in your throat.
PATTER
Show a drawing on a piece of paper, and tell the audience that you can destroy it and put it back together before their eyes. Rip it up, say some magic words, and then act as if you believe the object repaired, only to find it is not. People love it when magicians mess up!
Pretend to repair it a few more times, offering a different excuse each time: not the right magic words, the audience wasn’t loud enough, the audience was too loud, everyone needs to sing, and so on. The lamer the excuse and the funnier the audience participation, the better. Get more frustrated each time, and cap the final attempt by vowing that if you do not get it this time, you will eat the drawing!
Finally, palm the mouth coil, then pick up the torn pieces with both hands, and make a big noisy show of shoving the pieces in your mouth as you get the mouth coil positioned. Palm the pieces and get rid of them; you can even just drop them. Make a loud coughing/retching sound, and start to pull out the streamer. The sudden change from failure to colorful streamer will surprise and delight the audience, and you can toss it into the audience afterward.
MATERIALS
Package of colored tissue paper
Glue, glue stick, or double-sided tape
Single-sided tape
Utility knife
Disposable paint-stirring paddle
Ruler
The Fiery Furnace
You tie three identical silk handkerchiefs together and place them into a “fiery furnace” container. When you remove them, a fourth, different-colored silk is tied between them.
PREPARATION
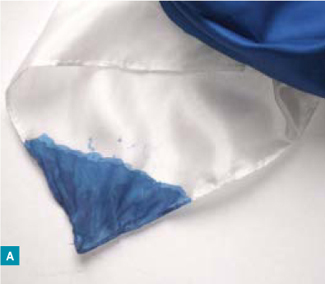
1. Make a pouch by sewing 2 dark silks together on all 4 sides, except for about 1" on each side of 1 corner.
2. Tie the contrasting silk to one of the open corners, then stuff it inside and position its opposite corner just inside the opening.
If the contrasting silk (the “load silk”) is obvious peeking out of the pouch, then dye or magic-marker its corner to match the outer silk (Figure A). My dad used blue silks and a white load silk with a blue corner.
PERFORMANCE
Tie a corner of an undoctored silk to the corner of the pouch silk opposite the opening (Figure B), then pretend to tie the corner of the pouch silk to the other undoctored one, but actually tie it to the contrasting silk loaded inside (Figure C).
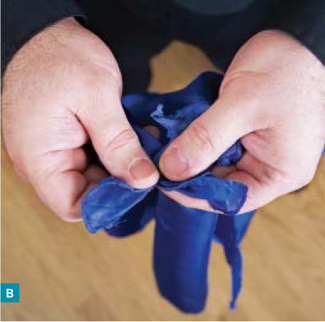

Photography by Dan Weiss (A) and David Torrence (B, C, and far right)
Stuff the silks in the jar. For the “fiery furnace” effect, turn the lid upside down on top, and then pour in and ignite a bit of lighter fluid.
Afterward, take the silks out and keep them bunched up in one hand. Then pull vigorously, which will extend the load silk and make it seem like it was always there.
PATTER
The 3 blue silks represent Shadrach, Meshach, and Abednego from the Old Testament story of the Fiery Furnace (Daniel 3:1–30). Each time you say the names, you should hold up the corresponding silk to emphasize the fact that there are 3 and only 3 silks.
“A long time ago there was a king named Nebuchadnezzar who had three favorite advisors, Shadrach, Meshach, and Abednego. King Nebuchadnezzar liked these advisors so much, it made his other advisors jealous. They wanted to get rid of Shadrach, Meshach, and Abednego, and started working on a plan.
“They realized that Shadrach, Meshach, and Abednego only worshipped God, so the evil advisors convinced the king that he was as important as a god, and that people should worship a statue of him. What’s more, they said, anyone who didn’t worship this idol should be burned in the Fiery Furnace.
“The king liked this idea, so he passed it as law. The advisors watched Shadrach, Meshach, and Abednego to see if they would worship the idol, and when they did not, they told the king. This angered King Nebuchadnezzar, and he called for Shadrach, Meshach, and Abednego to appear before him.
“‘Why won’t you worship the idol?’ he demanded. ‘We can only worship the true God,’ they said. The king said he would throw them in the fire if they did not comply, but still they refused. Even though he liked Shadrach, Meshach, and Abednego, he could not change his law, so he told the guards to tie them up and throw them in the fire.”
Stuff the silks into the jar and light the fire, continuing the story as it burns.
“The king was upset, but he had to watch. He couldn’t believe what he saw. Shadrach, Meshach, and Abednego were not burning up — in fact, they seemed to be walking around as if nothing was happening. But what was even more amazing was that they were not alone. Right there, inside the fire, was another person, all in white! How was this possible?”
By now the fire should have gone out. If not, use less lighter fluid next time. Knock the lid off (it will be hot) and remove the wad of silks.
“The king told the guards to pull Shadrach, Meshach, and Abednego out of the fire (don’t count the silks this time, keep them in a ball). He rushed to see them and find out how they had survived. ‘What happened?’ asked the king. ‘How did you survive? And who was that in the fire with you?’”
“Calmly, the three answered that their God protected them, because he was always with them.”
Pull the silks apart, revealing the white silk.
![]() For the Hippity Hop Rabbit stencil design, see makezine.com/13/unclebill.
For the Hippity Hop Rabbit stencil design, see makezine.com/13/unclebill.

MATERIALS
18" silks (5) You need 4 in a matching dark color or loud pattern, and 1 in a light or contrasting color. Available at magic shops, or make your own out of lightweight material; true silk is best.
Needle and thread
Small glass jar with metal lid like a peanut butter jar
Lighter fluid
Dye or marker (optional) that matches dark silks