Photography by Christophe Caron
IN-CAR CAMCORDER MOUNT
 Rig an onboard camera like the cops and NASCAR, for 15 bucks.
Some time ago, the Audi club I belong to held a track day at Infineon Raceway (formerly Sears Point Raceway) in Sonoma, Calif. I wanted to document my fast laps with onboard videos from my HD camcorder. But I needed an in-car camera mount to enable hands-free recording — ideally positioned behind the driver’s seat, to show my view through the windshield.
I looked online and found many types of video camera mounts, some that mount on roll bar cages (for race cars) and others that attach to headrests (for everyday vehicles). But while shopping, I realized that I wouldn’t receive any suitable mount in time, even if I ordered it right away. So I built one myself. I can see some refinements for it, but it works nicely and the footage it captures is pretty stable. You can watch a sample video at makezine.com/go/infineon.
Build the Mount
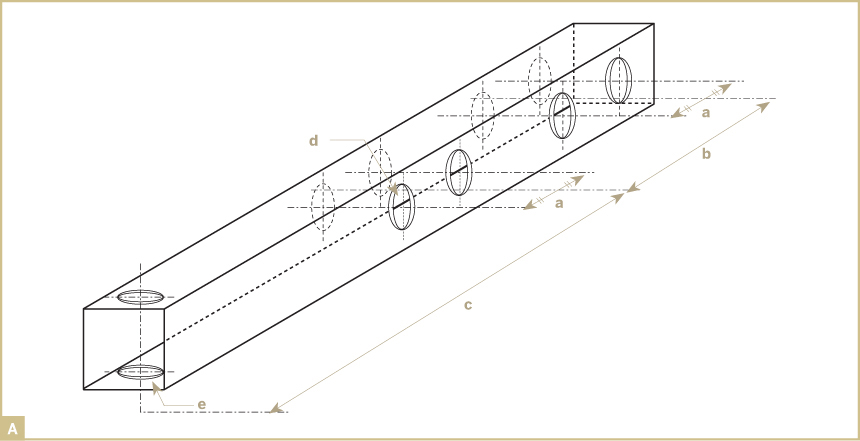
The mount is very simple, and its specific dimensions will depend on your car. At one end of the tube, drill 4 holes spaced to fit the U-bolts tightened around the headrest posts of your front passenger seat. Then drill another hole at the other end of the tube for the mounting screw, running perpendicular to the others and positioned to give the camera an unobstructed view when you attach the mount to the passenger-side headrest.
In Figure A, a is the width of the U-bolt, b is the distance between the 2 headrest posts, and c is the approximate distance between the inner headrest post and the midpoint between the front seats. For the holes to drill, d is the diameter that the U-bolts run freely through, and e is the diameter that the mounting screw will run through.
Ready for Action!
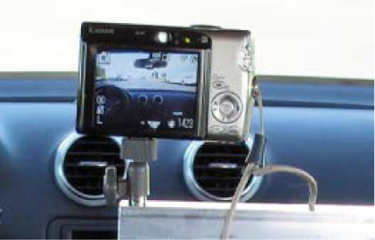
It’s time to take your mount for a test drive. First, bolt it onto the passenger headrest’s posts so that it grips tightly to the seat. Attach the camera with the mounting screw. You can make rudimentary adjustments to its pitch angle by playing with the seat-back reclining angle. Then turn on the camera, push Record, fasten your seatbelt, and go!
I suggest that you slide the passenger seat as far back as you can, to keep the tube away from the driver’s head. Also, don’t let anyone ride in the back. In an accident, the wing nuts and U-bolts could be dangerous to rear seat passengers.
Possible Improvements
Two safety improvements would be to tether the camera with a strap, so it isn’t ejected in a frontal collision, and to add end caps to the square tube, most importantly on the side that points toward the driver. Even safer would be to use a longer tube that attaches to both front headrests, but this would make it harder to adjust the pitch.
Finally, you could attach the camcorder using a swivel stand, like the ones that come with webcams, instead of the mounting screw. Then you could adjust the camera’s angle in any direction. But depending on the quality of the stand, the car’s vibrations might loosen it, even with a lighter camera.
Christophe Caron lives in the San Francisco Bay Area. Curious about just about everything, he enjoys making stuff, the outdoors, and IT. His biggest project to date: a daughter. [email protected]