MASTERING 3D VIEWS
William Gruber put the magic of stereoscopic photos in our hands.
Wouldn’t it be fun if you could take your own family pictures in thrilling 3D? That’s what William Gruber thought back in 1939. Although stereo photography had been around for years, creating your own 3D photos was more than a little complicated.
It required special cameras and lots of technical know-how to “fuse” together two images to create a deep 3D space. That was fine for hardcore hobbyists, but what about the average person? For them, Gruber cleverly combined several elements to create View-Master, a system for making and viewing 3D photos.
Gruber realized that the then-new Kodachrome 16mm film could be used for more than just movies. The long strip of film could be cut into tiny, individual frames — an economical way to make millions of vibrantly colored transparencies.
Gruber laid out the frames as stereo pairs in a ring around the edge of a flat disc. The intraocular distance (the distance between your eyes) determined the disc’s diameter at 3 inches. A disc that size (called a “reel”) was just big enough to hold seven pairs of 16mm frames of film. Voilà! The View-Master’s sequence of seven images per reel was born.
The first View-Master (V-M) viewer was made of brittle phenolic plastic with a split hinge that opened to change reels. As you pulled down on the lever, the reel swiveled on a center pin, swinging the next image into view with a snappy sound. That “tug, swirl, clack — wow!” is the well-known and beloved V-M 3D viewing experience. (To this day, V-M reels are still made with that same punched center hole, even though it hasn’t been used in viewers in the last 60 years! How’s that for backward compatibility?)
Forget Grandma’s clunky black and white stereopticon cards. With the V-M, everyone could easily view colorful 3D pictures anywhere. V-M went on to make and sell more than 1.5 billion reels with images from around the world — scenic wonders, coronations, animals, fairy tales, and more. Like the ad says, “The breathtaking beauty of View-Master pictures is a new and delightful experience.”
But how to take your own 3D V-M pictures? The second part of Gruber’s system was the early 1950s-era View-Master Personal Stereo Camera (Figure B). It used Kodachrome slide film for brilliant color and smooth, grain-free results. But where other stereoscopic cameras took full-frame 35mm images that required complicated mounting (more about that later), the V-M camera created 16mm images to fit the standard V-M reel. That meant only half the width of the 35mm filmstrip was used.

![]() Fig. A: A parade of View-Master viewers (left to right): Model B, 1940s; Model C with light attachment, 1950s; Model D with adjustable focus, 1960s; Model M with pushbutton advance, 1980s; Model Virtual Viewer with large lenses, 1999–present; and (top) Model L, sold today (with slight variations) as View-Master Classic, 1977–present.
Fig. A: A parade of View-Master viewers (left to right): Model B, 1940s; Model C with light attachment, 1950s; Model D with adjustable focus, 1960s; Model M with pushbutton advance, 1980s; Model Virtual Viewer with large lenses, 1999–present; and (top) Model L, sold today (with slight variations) as View-Master Classic, 1977–present.

![]() Fig. B: A 1950s magazine ad for the View-Master Personal Stereo Camera.
Fig. B: A 1950s magazine ad for the View-Master Personal Stereo Camera.
Bob Knetzger
The ingenious View-Master Personal Stereo Camera has moveable lenses for double the pictures!
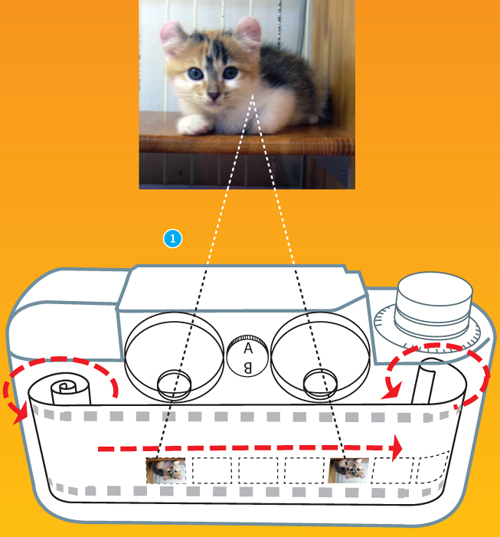
1. Camera takes stereo images along the bottom of the film.
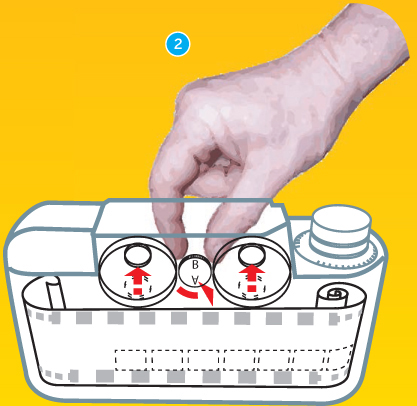
2. Turning the knob to position “B” moves the lenses up and changes the film winding direction.
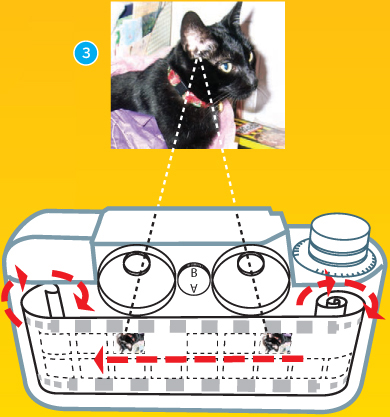
3. Camera takes a second strip of stereo images along the top of the film.
Gruber’s “Aha!” moment came when he envisioned running the film through the camera twice: once as the film was pulled out of the canister, then again as the film was wound back into the canister. What made it possible was the “Film Miser,” an elegant solution with movable lenses.
At the end of the roll you’d simply twist a dial. The swiveling twin lenses would be repositioned from the bottom half of the filmstrip to the top where they would make a second strip of stereo images. Using a 36-exposure roll of film, the Personal Stereo Camera yielded a whopping 69 stereo images. Wow!
With lots of other clever features, the V-M camera was a breeze to use. A bubble level appeared right in the viewfinder to help you hold the camera level. When taking pictures in “you-are-there” 3D, you don’t want tilted, seasick-inducing horizons.
Built into the top of the camera was the Expo-Sure, a clever light-metering system (Figure C). First, you’d set the speed of your film (ASA 100 was the top speed setting!) and select the season (“winter” or “summer” lighting). To take a picture, the f-stop and shutter speed control knobs were set to match up the subject color (marked “dark/average/ light”) to the sky brightness (“bright/sun” through “cloudy/dull”). When you lined up the marks, the f-stop and shutter speed were automatically set for a perfectly exposed picture, no light meter needed.

![]() Fig. C: The Expo-Sure system automatically dials in the matching f-stop and shutter speed settings for you.
Fig. C: The Expo-Sure system automatically dials in the matching f-stop and shutter speed settings for you.
It also indicated the depth of field right on the dial. To get more of the picture in deep focus, you’d simply use a smaller aperture. The Expo-Sure automatically adjusted for the new shutter speed setting — it was an all-mechanical analog computer!
The camera’s focus was fixed, but for close-up subjects a snap-on lens attachment added magnification and slightly changed the angle of the two lenses — like crossing your eyes to thread a needle (Figure D). For indoor or night shots there was a flash unit that synced to the camera and fired flash bulbs.
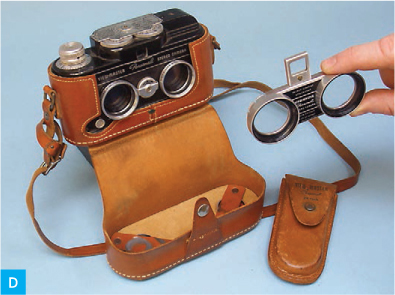
![]() Fig. D: Snap on this lens attachment to take “close-up” 3D pictures.
Fig. D: Snap on this lens attachment to take “close-up” 3D pictures.
After you took the pictures, the film was developed like any other roll of slide film. Instead of being cut up and mounted into individual slides, the film would be left uncut as one long strip.
With other 3D cameras, you’d have to carefully measure and cut the left and right images from the filmstrip, then manually trim and mount them into a frame, spacing and aligning the images by hand. One slip of the razor blade or sloppy alignment and you’d ruin your picture. Again, too much trouble for most casual photographers.
No worries. The next element of Gruber’s system, the View-Master Film Cutter, made it easy to create your own V-M reels. It had twin precision cutting dies and a rock-solid film-strip-advance mechanism. With a twist of the knob, the film’s sprocket holes automatically locked into position. Press the lever down — kaCHUNK! — and both left and right images were crisply punched out with a single stroke (Figure F).
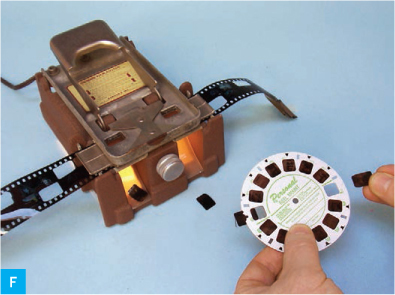
![]() Fig. F: Make your own 3D reels with the V-M film punch.
Fig. F: Make your own 3D reels with the V-M film punch.
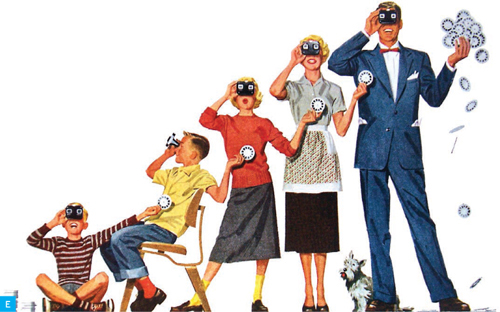
![]() Fig. E: This 1950s View-Master magazine ad shows Mom, Dad, Buddy, and Sis all diggin’ 3D.
Fig. E: This 1950s View-Master magazine ad shows Mom, Dad, Buddy, and Sis all diggin’ 3D.
Press the lever down — kaCHUNK! — and both left and right images were crisply punched out with a single stroke.
Each chip of film was inserted into its matching slot in an empty V-M reel. No tricky alignment needed: the precise slots snugly held the film in perfect registration. There were even blank spaces on the reel to write your own captions for each of your seven images.
Because the V-M reels you made would fit any V-M viewer, you could send reels to friends that they could view with their own (or borrowed) viewers. But for the ultimate in sharing your 3D V-M pictures with a group, there was the Stereo-matic 500 projector, the last part in the V-M system.
The Stereo-matic 500 projector featured twin lenses that automatically aligned the left and right views as you focused. Its polarized filters matched the lenses in the special glasses the audience wore. Your photos were projected in bright, colorful, thrilling 3D for all to see up on the silver screen (a metallic screen surface was required to maintain the polarization).
The entire V-M 3D system worked quite well — and still does! With their rugged construction and clever design, my camera, film punch, and projector still work flawlessly after 50 years. I’ve taken thousands of 3D images — birthdays and holidays, wedding albums, baby pictures and family events, scenic travel photos, even some “artsy” shots — all with great results (Figure G).
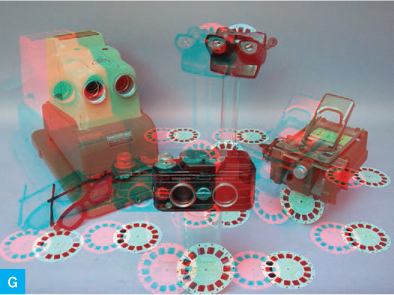
![]() Fig. G: View the anaglyph in Figure G using red/green filter 3D glasses. Remember: right eye = red.
Fig. G: View the anaglyph in Figure G using red/green filter 3D glasses. Remember: right eye = red.

![]() Fig. H: You can see Figure H in 3D by “free viewing.” Hold the page at arm’s length and cross your eyes. Relax your focus and adjust your gaze so that you see 3 boxes. The center, overlapped image will “pop” into 3D as you focus on the black camera in the middle.
Fig. H: You can see Figure H in 3D by “free viewing.” Hold the page at arm’s length and cross your eyes. Relax your focus and adjust your gaze so that you see 3 boxes. The center, overlapped image will “pop” into 3D as you focus on the black camera in the middle.
Traveling with the V-M camera is great fun and a real conversation starter among fellow travelers and other photographers. The camera’s unique sliding “guillotine” shutter makes a distinctive “pishhhhhht-click” sound with each picture you take and gets plenty of attention, wanted or not. I’ve gotten curious looks and been asked about my unusual camera on trips abroad. Qu’est-ce que c’est cette caméra? ¿Qué clase de cámara es ésa? I just pantomime holding up an imaginary V-M viewer while make the “flicking the lever” gesture, and I get smiles and nods back.
Once an all-ages, all-family product, today the View-Master brand continues only as a preschool toy. Making your own 3D V-M reels is getting harder and harder. Vintage V-M cameras, projectors, and accessories can pretty much only be found on eBay (and at collector prices!), and Kodachrome is now just a colorful song lyric. The empty V-M reels aren’t made anymore either: the manufacturer’s 60-year-old dies, used to punch out the reels, have gone dull and been abandoned.
But determined DIYers can still have fun making their own V-M 3D reels using modern digital cameras. Turn to page 155 for a new Toy Inventor’s Notebook project, the “‘Level Best’ 3D Camera Bar.” You can use it to take stereo digital photos, and then use Photoshop to create red/green anaglyph 3D images, or use a kit to create your own View-Master reels.
With a tug, a swirl, and a “clack,” you too can make friends and family go “Wow!” with your own View-Master 3D photos.
Bob Knetzger is an inventor/designer with 30 years’ experience making all kinds of toys and other fun stuff.