
Roy Ritchie
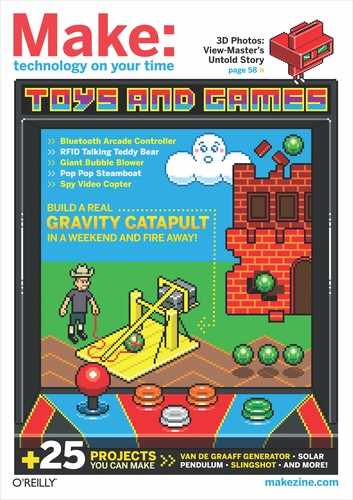
GRAVITY CATAPULT
Get medieval with this portable, stowable, gravity-powered trebuchet.
I have long been enamored of catapults. Invented around 400 B.C., they were used until nearly A.D. 1300. So for 1,700 years, catapults were arguably the largest, most expensive, and most powerful machines on the planet.
Today, people build catapults for fun: Scout troops, historical reenactors, fathers and daughters, beer-stoked college students. Having built more than a few, I’ve found it’s not nearly as easy as it might appear.
First, for any projectile larger than a golf ball, catapults have to be big, and building big things can be a challenge in terms of cost and tools.
Second, there are incredible stresses at work within the moving parts of a catapult. Unless good designs and materials are used, wooden support beams break, rods bend, and joints collapse in ways unexpected and sometimes even dangerous.
Third, they are big. Did I already say that? Well, it bears repeating because once you build the thing, you need space to use and store it. I’ve learned that finding a place to store a catapult is a huge pain — very few people are willing to park their cars in the driveway to free up garage space for their catapults, no matter how much they love to hurl.
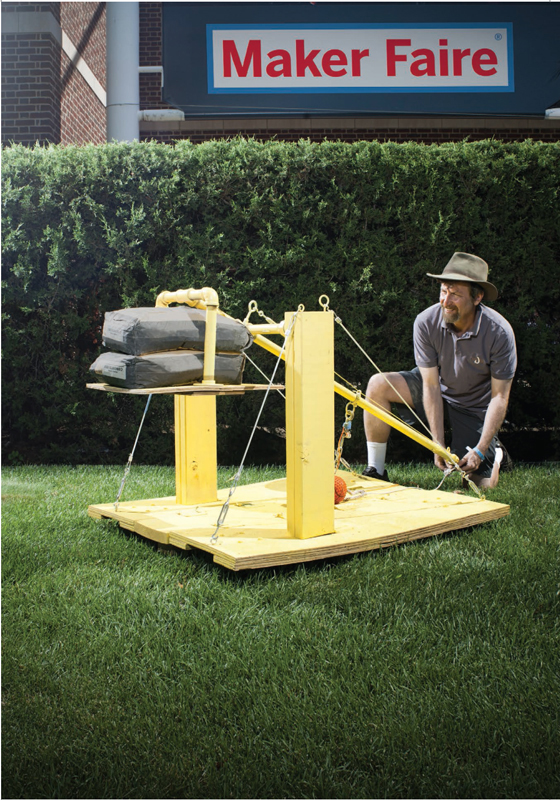
This gravity-powered catapult is fairly simple to build using a minimum number of tools. Built with modern materials instead of medieval timbers, it’s small and light enough for one person to push around. Best of all, it rolls around on wheels and folds flat (sort of) so it can be stored in a fraction of the space needed for traditional catapults.
While the Folding Catapult is customizable, don’t get carried away — 120lbs is about the maximum counterweight that can be used.
William Gurstelle is a contributing editor of MAKE. His new book, The Practical Pyromaniac, is available in the Maker Shed (makershed.com) and at other fine booksellers.
SET UP: p.87 |
MAKE IT: p.88 |
USE IT: p.93 |
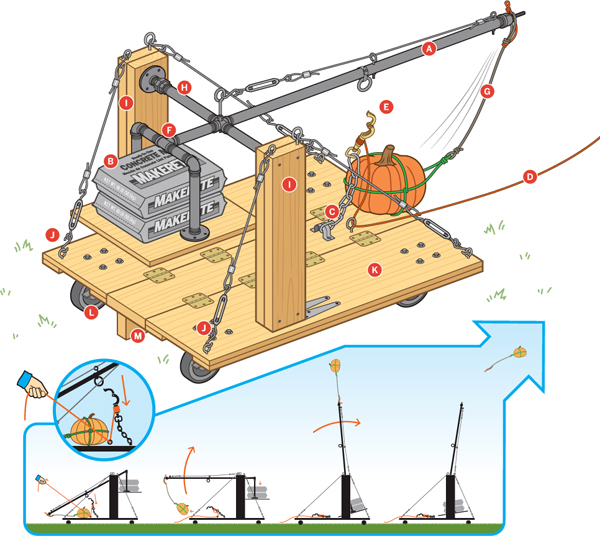
HEAVY HURLING
A catapult is any weapon that hurls large projectiles without the use of explosives. The trebuchet is a gravity-powered catapult, with a falling counterweight that rotates the throwing arm. Other catapults store and release force using bows, twisted skeins, or springs.
![]() Rotating arm works as a lever, with a long throwing arm at one end and a counterpoise at the other.
Rotating arm works as a lever, with a long throwing arm at one end and a counterpoise at the other.
![]() Heavy counterweight sits high on the counterpoise deck, storing gravitational potential energy.
Heavy counterweight sits high on the counterpoise deck, storing gravitational potential energy.
![]() Chain holds the throwing arm down close to the deck until launch.
Chain holds the throwing arm down close to the deck until launch.
![]() Catapult operator pulls the trigger cord to fire the weapon.
Catapult operator pulls the trigger cord to fire the weapon.
![]() Panic snap attached to the trigger cord disconnects the chain.
Panic snap attached to the trigger cord disconnects the chain.
![]() Falling counterpoise has its own small pivot. This design uses less space and releases more energy than a fixed counterpoise.
Falling counterpoise has its own small pivot. This design uses less space and releases more energy than a fixed counterpoise.
![]() Sacrificial sling hangs on the throwing arm hook and holds the projectile before and during flight. It’s easier than a permanent sling, which requires a lot of fiddling to release at the correct time.
Sacrificial sling hangs on the throwing arm hook and holds the projectile before and during flight. It’s easier than a permanent sling, which requires a lot of fiddling to release at the correct time.
![]() Main pivot holds the rotating arm.
Main pivot holds the rotating arm.
![]() Pivot runs between two uprights, hinged so they swing down for storage.
Pivot runs between two uprights, hinged so they swing down for storage.
![]() Guy wires stabilize the uprights, connecting them tightly to the deck.
Guy wires stabilize the uprights, connecting them tightly to the deck.
![]() Hinged deck folds for storage.
Hinged deck folds for storage.
![]() Casters raise the deck, enabling a longer throwing arm, and letting you roll the catapult.
Casters raise the deck, enabling a longer throwing arm, and letting you roll the catapult.
![]() Prop board unfolds under the deck to prevent rolling during setup or launch.
Prop board unfolds under the deck to prevent rolling during setup or launch.
Timmy Kucynda
SET UP.
MATERIALS:

A. Panic snap, equestrian style Find them at tack and saddle shops, feed stores, rural hardware stores, or online.
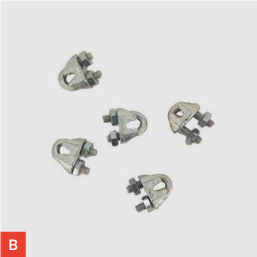
B. Ferrules or wire rope clamps (10) to fit ⅛” wire rope
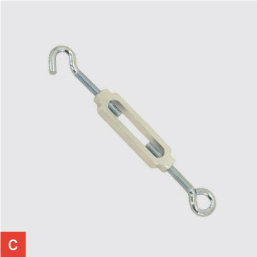
C. Turnbuckles, ¼"×5”, one end open (5)

D. Welded ring, 1½"

E. Steel pipe fittings, 1", threaded: flanges (4); 1½" close nipples (2); 8” nipples (3); 10” nipples (2); 4” nipples (2); 90° elbows (2); cap (1); unions (2); tee (1); cross (1) A pipe union is shown here.
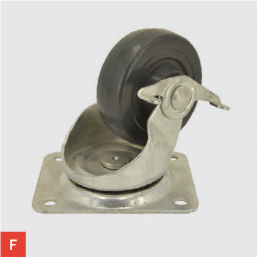
F. Casters, 4" (4)
![]() Plywood, ¾", 4’×8’ sheet
Plywood, ¾", 4’×8’ sheet
![]() Lumber, 2×6, 10’ length
Lumber, 2×6, 10’ length
![]() Deck screws: 2½" (1 box), 1¼" (1 box)
Deck screws: 2½" (1 box), 1¼" (1 box)
![]() Door hinges, steel, 3½" (10) with mounting screws
Door hinges, steel, 3½" (10) with mounting screws
![]() Strap hinges, 1½" (4) with mounting screws
Strap hinges, 1½" (4) with mounting screws
![]() Screw eyes, #4 (9)
Screw eyes, #4 (9)
![]() Eye bolts, with nuts and lock washers:
Eye bolts, with nuts and lock washers: ![]() "×6" (1); ¼"×4" (2)
"×6" (1); ¼"×4" (2)
![]() S-hooks, medium (10)
S-hooks, medium (10)
![]() Hose clamp, 2"
Hose clamp, 2"
![]() L-hook, 3"
L-hook, 3"
![]() Cord, nylon or cotton, ⅛", 25’
Cord, nylon or cotton, ⅛", 25’
![]() Wire rope, ⅛", 16’
Wire rope, ⅛", 16’
![]() Steel pipe, 1", threaded, 72" length
Steel pipe, 1", threaded, 72" length
![]() Bolt, ¼"×2", with nut and lock washer
Bolt, ¼"×2", with nut and lock washer
![]() Duct tape
Duct tape
![]() Wood screws: ¾" flathead; #10 round head
Wood screws: ¾" flathead; #10 round head
![]() Pipe strap, 1", 2-hole for the trigger support bracket
Pipe strap, 1", 2-hole for the trigger support bracket
![]() Chain or rope, 1’ or less for the trigger. We used a brass door-security chain (and used the bracket it came with instead of the pipe strap).
Chain or rope, 1’ or less for the trigger. We used a brass door-security chain (and used the bracket it came with instead of the pipe strap).
![]() Bolts,
Bolts, ![]() " ×1½" (16) with nuts (16) and washers (32) for the casters
" ×1½" (16) with nuts (16) and washers (32) for the casters
![]() Heavy counterweight The counterpoise will carry up to 120lbs; two 60lb sacks of cement mix work great.
Heavy counterweight The counterpoise will carry up to 120lbs; two 60lb sacks of cement mix work great.
![]() Bungee cords, 18" (optional, 2)
Bungee cords, 18" (optional, 2)
![]() PVC pipe, 4" diameter, 4’ length (optional) for a projectile trough
PVC pipe, 4" diameter, 4’ length (optional) for a projectile trough
![]() Lumber, 2×4, 3’ length, with ½"×3" bolt and nut (optional) for a deck cross-brace
Lumber, 2×4, 3’ length, with ½"×3" bolt and nut (optional) for a deck cross-brace
TOOLS
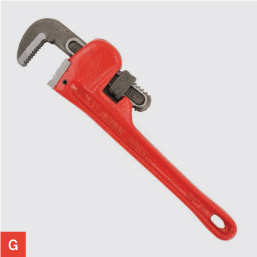
G. Pipe wrench
![]() Saw to cut plywood, such as table saw, panel saw, or handheld circular saw
Saw to cut plywood, such as table saw, panel saw, or handheld circular saw
![]() Tape measure
Tape measure
![]() Grease
Grease
![]() Electric drill with drill bits and screwdriver bits A drill press is good for drilling straight through steel pipe and fittings, but a handheld will do.
Electric drill with drill bits and screwdriver bits A drill press is good for drilling straight through steel pipe and fittings, but a handheld will do.
![]() Hammer
Hammer
![]() Socket set
Socket set
![]() High-speed rotary tool with cutoff wheel such as a Dremel, for cutting wire rope
High-speed rotary tool with cutoff wheel such as a Dremel, for cutting wire rope
![]() Locking pliers
Locking pliers
MAKE IT.

BUILD YOUR CATAPULT
Time: A Weekend
Complexity: Easy to Moderate
1. BUILD THE FOLDING DECK
NOTE: If you don’t have a table saw, don’t despair — most lumberyards will cut the pieces for you at little cost when you buy the wood. You could also use a handheld circular saw.
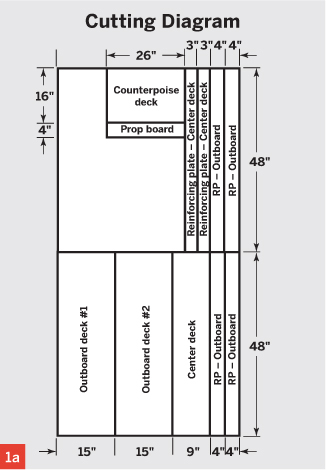
1a. Using a table saw, or better yet a panel saw, cut out the plywood parts from a 4’×8’ sheet of ¾"-thick plywood, referring to the Cutting Diagram at right.
Gerry Arrington
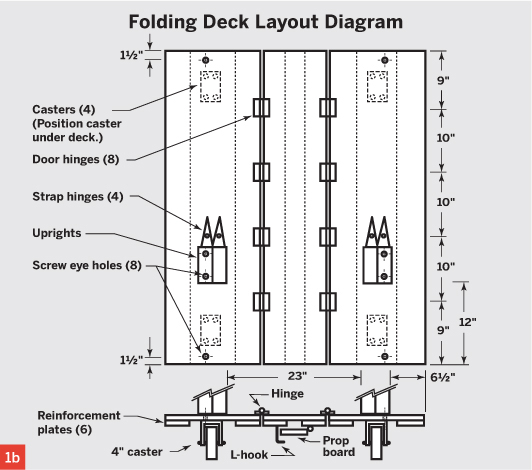
1b. Use the 1¼" deck screws to fasten the reinforcing plates to the deck, following the Folding Deck Layout Diagram below.
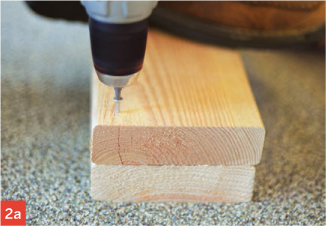
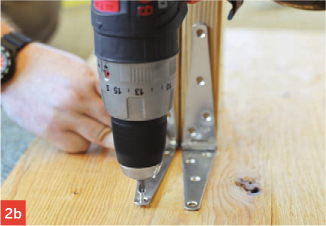
1c. Using an electric drill, mount the door hinges to the deck with their mounting screws (or ¾" flathead wood screws).
2. BUILD AND RIG THE UPRIGHTS
NOTE: Check out the placement of the uprights on the deck — each upright is a different distance from the edge. This allows the catapult to be folded compactly for storage.
2a. Cut 4 pieces of 2×6 lumber 28" long and fasten pairs together using 2½" deck screws to make the uprights.
2b. Place the uprights on the outboard deck pieces as shown in the Folding Deck Layout Diagram and attach them to the deck with the 4 strap hinges.

2c. Attach 1" pipe flanges to the uprights as shown using 1¼" deck screws.
![]() TIPS: Double-check measurements before cutting, and use locking pliers to grip the wire rope while cutting and clamping.
TIPS: Double-check measurements before cutting, and use locking pliers to grip the wire rope while cutting and clamping.
Gerry Arrington
Tighten carefully — the cables should be taut but not so taut that they bend the screw eyes or damage the deck.
Gregory Hayes
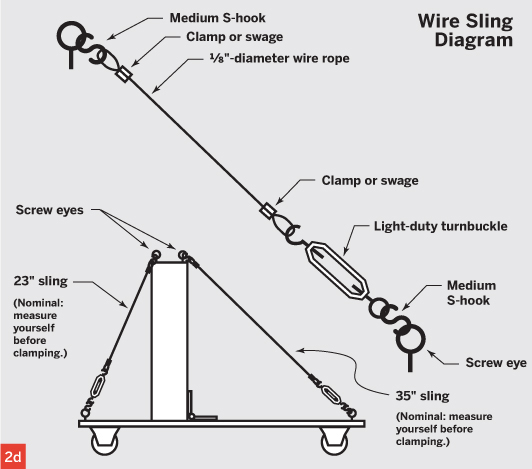
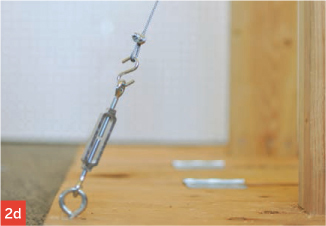
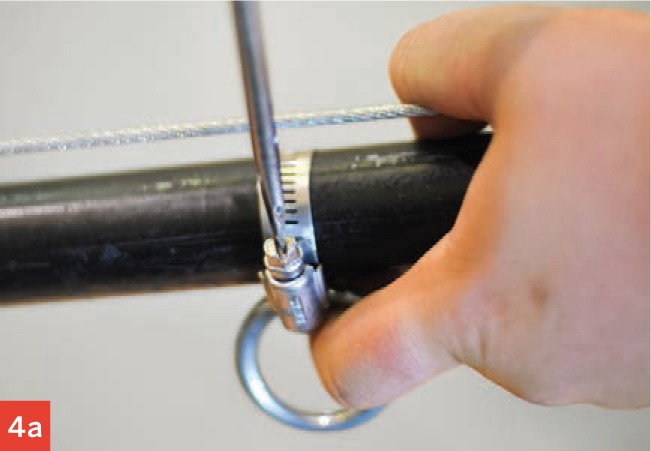
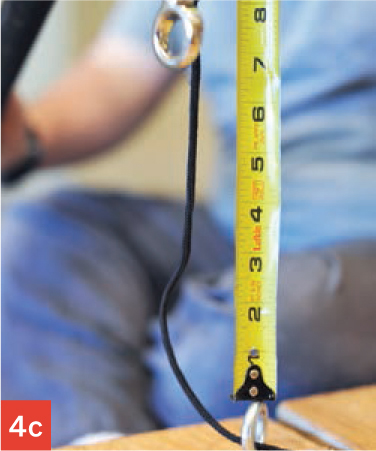
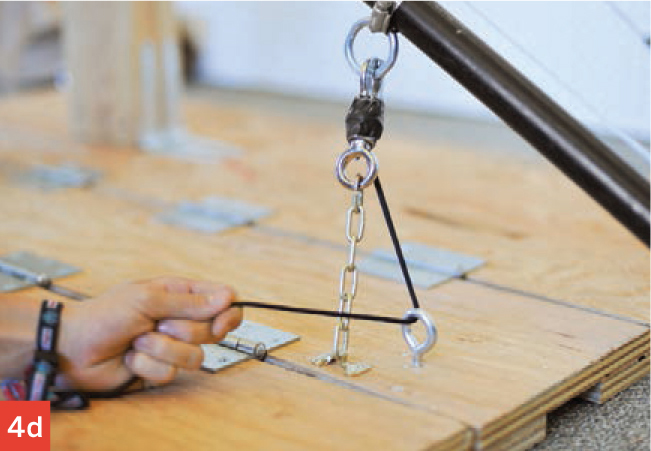
2d. Now make the guy wires. For this step, you’ll need to become familiar with using wire rope. But hey, this is a valuable skill that’ll come in handy on many different projects over a maker’s career.
Assemble 4 wire slings (clamped segments of wire rope) using the measurements given in the Wire Sling Diagram at right. You can either swage the ends with 8 ferrule fittings, or install 8 wire rope clamps to do the same job.
Install the #4 screw eyes on the ends of the uprights as shown in the Wire Sling Diagram, and on the outboard deck pieces as shown in the Folding Deck Layout Diagram.
Assemble the rigging as shown in the Wire Sling Diagram using the S-hooks, turnbuckles, and wire rope slings.
3. ASSEMBLE AND ATTACH THE ROTATING ARM
NOTE: There are 2 separate parts of the rotating arm assembly: the throwing arm and the counterpoise.
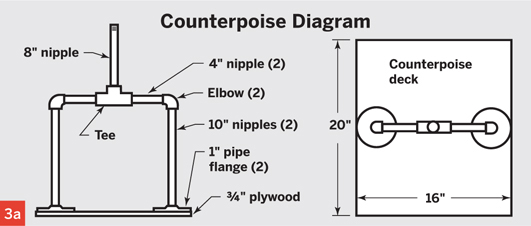
3a. Make the counterpoise. Attach two 1" pipe flanges to the counterpoise deck with ¾" wood screws. Connect two 10" nipples, two 90° elbows, two 4" nipples, a tee fitting, and an 8" nipple as shown in the Counterpoise Diagram. Twist all connections together securely.


![]() TIPS: To save money, we initially used only 1 union (and a 10" nipple) for the main pivot, but this made the throwing arm slower, and harder to remove. Use two 8" nipples and 2 unions instead.
TIPS: To save money, we initially used only 1 union (and a 10" nipple) for the main pivot, but this made the throwing arm slower, and harder to remove. Use two 8" nipples and 2 unions instead.
3b. Assemble the throwing arm. Drill a ¼" hole in the center of the pipe cap. Insert a ½"×2" bolt and tighten with a nut and lock washer. Wrap duct tape over the exposed threads to smooth them.
Next, drill two ![]() " holes in the 6’ pipe at the ½"×4" eye bolt locations shown in the Throwing Arm Diagram.
" holes in the 6’ pipe at the ½"×4" eye bolt locations shown in the Throwing Arm Diagram.
Drill a ⅜" hole through the center of the cross fitting. Insert the ![]() "×6" eye bolt and tighten with lock washers and nuts.
"×6" eye bolt and tighten with lock washers and nuts.

3c. Attach the throwing arm and counterpoise to the pivot. Connect the throwing arm assembly to the flanges on the uprights using two 8" nipples, 2 close nipples, and 2 pipe unions. Grease the turning threads.
Attach the throwing arm to the cross and assemble the rigging as shown in the Throwing Arm Diagram, using ½" eye bolts, a turnbuckle, S-hooks, and another wire rope sling. Tighten the wire sling by rotating the turnbuckle.
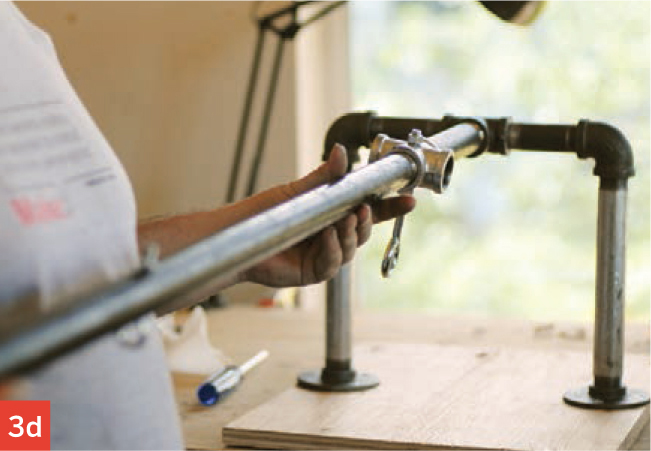
Refer to the Throwing Arm Diagram. You should be able to make the assembly fit perfectly between the 2 flanges attached to the uprights by adjusting the length of the engagement of the unions and the close nipples. However, if there’s a problem with the fit, you can reposition one of the uprights.
3d. Attach the counterpoise assembly by screwing it into the remaining opening on the cross fitting.
4. MAKE THE TRIGGER
Apply grease to the 2 pipe threads on the cross on which the throwing arm rotates. Make sure connections are solid but turn easily.
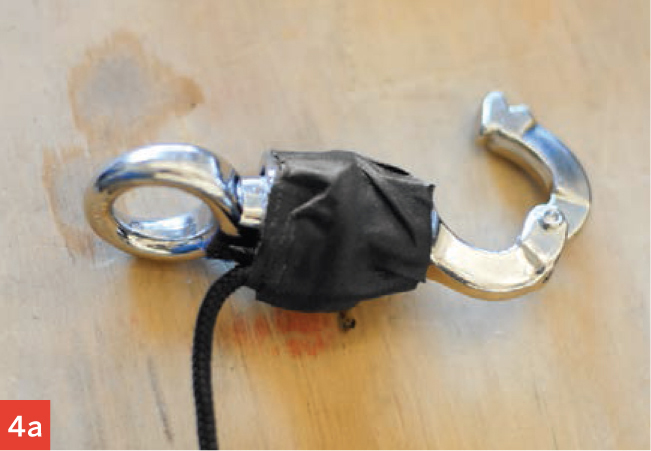
4a. Wrap several turns of the ⅛" cord around the panic snap, tie off, and secure with duct tape.
Place the loop of the panic snap around your finger and pull down on the cord. The panic snap should release easily. If not, reposition the cord and retie.
Have a helper hold the throwing arm in “ready to fire” position so you can more easily take measurements.
Attach the panic snap to the throwing arm using the hose clamp and welded ring at the point shown in the Throwing Arm Diagram.

4b. Use #10 round-head screws to install the pipe strap as a support bracket on the center deck as shown. (Here we used a different bracket that came with our brass door chain.)
4c. Measure the distance between the support bracket and the panic snap. Cut the chain or rope accordingly and affix one end to the support bracket and the other end to the panic snap.
4d. Mount a #4 screw eye on the center deck next to the support bracket. Run the ⅛" cord through the eye so that when pulled it releases the panic snap.
5. MAKE IT MOBILE

![]() TIP: If it’s easier, mark and drill from the top rather than flipping the deck over and drilling from the bottom.
TIP: If it’s easier, mark and drill from the top rather than flipping the deck over and drilling from the bottom.
5a. Flip the deck over. Position the casters between the reinforcing plates. Drill holes in the deck aligned with the holes in the caster mounting plates. Mount the casters to the deck bottom using ![]() " bolts with a washer on each side.
" bolts with a washer on each side.
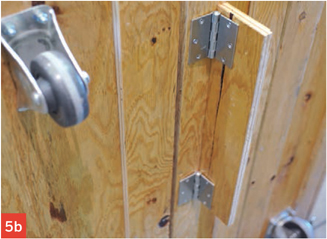
5b. Attach the prop board to the bottom of the center deck with the last 2 door hinges. Fold it down so it supports the deck when the catapult is in use. This prevents rolling during setup and firing.
Mount the L-hook next to the prop board as shown in the Folding Deck Layout Diagram. Rotate the hook to hold the prop board up when moving the catapult.
NOTE: Stepping on the deck can damage the strap hinges. To prevent this, bolt an optional 2×4 cross-brace to the center deck.
5c. (Optional) To make the deck even stronger, bolt a 2×4 cross-brace on top of the center deck with a ½" bolt. Rotate it crosswise during catapult use and lengthwise for storage.

![]() TEST BUILDERS: Brian Melani and Dan Spangler, MAKE Labs
TEST BUILDERS: Brian Melani and Dan Spangler, MAKE Labs
6. MAKE IT ACCURATE (OPTIONAL)
Projectiles fly farther and straighter when guided by a smooth channel on the deck. To make a projectile trough, saw a 4’ length of 4" PVC pipe in half lengthwise and use deck screws to attach it to the deck directly below the throwing arm.
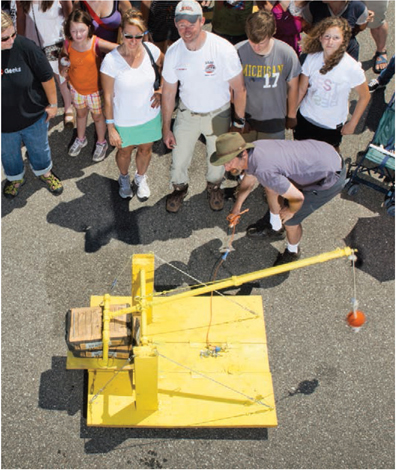
USE IT
KING OF FLING
Ready …
To move the catapult, fold the prop board up and twist the L-hook to keep it in place. Push the catapult to a location with at least 150’ of open space to hurl, with no nearby vulnerable targets, such as people, pets, or vehicles. Place the prop board in the down position.
Place up to 120lbs of weight on the counterpoise deck. (Two 60lb bags of concrete mix fit quite well.) If desired, attach two 18" bungee cords to the deck and counterpoise. This will increase the machine’s range and capacity.
Aim …
Point the catapult at the target. Pull the arm down. Latch the panic snap to the firing ring.
Attach a rope or cord to a soft, lightweight test item (plastic dog toys are a good choice). Determining the optimum length of the sling is done through trial and error. Start with a sling length ⅓ the length of the throwing arm and work from there. Be aware that too short a sling will hurl the projectile backward.
Tie a nontightening loop in the free end of the sling (a bowline is perfect) and place the loop over the ¼" bolt protruding from the pipe cap. Center the projectile on the center deck.
Fire!
Make sure the area in front and in back of the catapult is clear. Step 8 or 9 paces to the side. Grasp the cord and pull smartly to release the panic snap. The throwing arm will rotate and hurl the projectile toward the target.
You can optimize performance by making the sling longer or shorter, making the firing pin smoother or rougher, and adding or removing weight from the counterpoise.
![]() SAFETY NOTES
SAFETY NOTES
1. Keep all body parts away from the throwing arm’s swing area at all times.
2. Warn downrange bystanders of possible incoming projectiles.
3. Use care when pushing the catapult.
4. Don’t step or stand on the deck.
5. Remember that all hinges are pinch hazards. Keep hands and feet clear when folding.
![]() WARNING: Don’t trust the panic snap to hold the arm. Have a helper hold the arm while you latch it, and keep your head and other body parts out of the arm’s arc at all times.
WARNING: Don’t trust the panic snap to hold the arm. Have a helper hold the arm while you latch it, and keep your head and other body parts out of the arm’s arc at all times.
Roy Ritchie
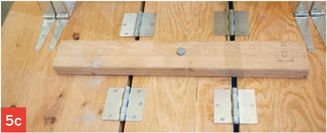
Store It
The Folding Catapult is designed for easy storage. First, remove the weight from the counterpoise deck.
Loosen the turnbuckle on the throwing arm, then loosen and remove the pipe unions on the throwing arm pivot. Remove the throwing arm. Finally, unscrew the pivot assembly pipe stubs from the flanges on the uprights.
Unscrew and remove the counterpoise assembly from the cross fitting.
Loosen turnbuckles and remove the guy wires from the screw eyes, making sure to collect all loose S-hooks. Fold the uprights, and then fold the deck for storage. ![]()