

Sam Murphy
Watch Case Wrench
Make a custom tool in minutes to open your watch.
MOST MAKERS DEVELOP A BUILT-IN sense of efficiency and economy that almost forces them to find better and less expensive ways of getting things done. This came through to me personally when my watch stopped running.
Given to me last holiday season by my loving wife, this watch has a battery-powered quartz movement. I assumed all I needed to do was pop the back off and make a quick battery change. But this was not to be the case.
Being water resistant, the watch has what’s known in watchmaking circles as a Jaxa-type screw-on back, which requires a specialty wrench usually found only on a jeweler’s workbench. Hmm!
As stated in the Owner’s Manifesto (aka “Maker’s Bill of Rights”) first published in MAKE Volume 04:
![]() Cases shall be easy to open.
Cases shall be easy to open.
![]() Batteries shall be replaceable.
Batteries shall be replaceable.
![]() Special tools are allowed only for darn good reasons.
Special tools are allowed only for darn good reasons.
In this case, perhaps a special tool was warranted, but I wasn’t happy. As Mister Jalopy tells us: “If you can’t open it, you don’t own it!”
A quick trip around the web pointed me to a number of sources where I could purchase the required wrench, but the shipping and handling costs frequently exceeded the tool cost. Spending $15 or more to replace a $2 watch battery just did not sit well with this maker. Time to head to my workbench!
The basic physics involved here applies to any wrench-type tool. You need a certain amount of torque to overcome the friction of the screw threads and twist open the watch back. How to do this without needing to buy a special tool?
MATERIALS AND TOOLS
Aluminum bar or sheet stock, ¾"×![]() " thick or similar. A scrap about 4" long is all you’ll need.
" thick or similar. A scrap about 4" long is all you’ll need.
Calipers or finely calibrated ruler
Marker pen or metal scribe
Hacksaw or other small handsaw
Pliers
File
1. Measure the watch back’s slots.
My first attempts at using various standard tools to open the watch merely scratched it. I can only assume a Rolex owner might get surly at this, hence the “professional” tool. So I set about measuring the slots on the watch back (Figure A), and the little maker LED in my head lit up.

2. Mark and cut the metal stock.
From my scrap metal pile, I took a short piece of aluminum stock ¾" wide and ![]() " thick. The thickness was close enough to the slot width on the watch cover that no further filing was required there.
" thick. The thickness was close enough to the slot width on the watch cover that no further filing was required there.
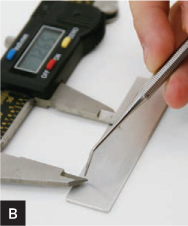
It was a simple matter to cut out a section corresponding to the slot distance (Figures B and C). I folded the cut-out section over, to give the wrench added strength; you can also cut or break the section off entirely for additional clearance, as shown here.

3. File it smooth.
A bit of filing and grinding cleaned up any sharp edges that might create scratches and dings on the watch back’s surface (Figure D).

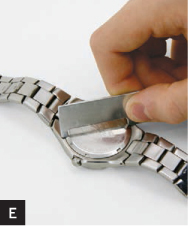
4. Open the watch.
The back was off with a quick twist (Figures E and F) and I was off to the store to buy the replacement battery.

So now I have a custom wrench to take care of any future battery replacement needs for this particular watch. Total time expended, about 15 minutes. Total cost, zero. Even if you bought new aluminum stock at your local home center or hardware store, your cost would still be significantly less than ordering the “proper” tool online.
You could probably use almost any metal stock to make the wrench. For my watch, aluminum was sturdy enough to perform the task; a tighter watch back might require using steel. Experiment!
Being able to take care of your own devices is what being a maker is all about. Doing it with tools of your own design and construction is even more fun. ![]()
T.J. “Skip” Arey has been a freelance writer to the radio/ electronics hobby world for over 25 years and is the author of Radio Monitoring: A How To Guide.
Andrew Lewis
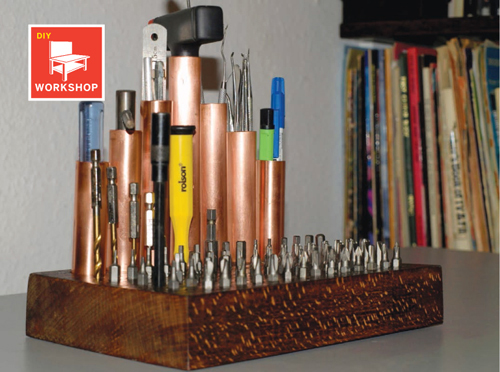
Copper Tool Tidy
Build a desktop stand for your essential small tools.
A TOOL TIDY IS A GREAT PROJECT TO FILL up a quiet autumn afternoon. I remember my woodworking teacher setting the task of making a workbench organizer. I was about 10 years old and thrilled at the thought of using real wood and proper workshop tools.
Fast forward 20 or so years, and I find myself sitting at my own workbench with a pile of screwdriver tips, picks, pincers, and assorted small tools in need of a home. It’s time to revisit my school days and make an improved version of the organizer that taught me how to use workshop tools.
1. Cut the copper pipe to size.
Cut the 30" length of copper pipe into the following sizes and quantities: 6" (1), 5" (2), 4" (2), 3" (2).
2. Prepare and cut the wood block.
Cut your wood block to the desired size. Mark a ½" border on the top surface. This border will help keep the block looking neat and serve as a guide for marking out the holes you’ll drill.
You’ll be drilling holes across the back of the block to accept the ¾" copper pipe, so mark a line horizontally across the block ⅜" (half the diameter of the pipe) in from the border you drew previously.
Mark the center of the horizontal line where the 6" piece of pipe will be positioned. I used a 9" block, so the center of my line was 4½" in from the edge of the block.
Divide up the space on the line for the remaining copper tubes. I spaced the tubes equally, although they can be offset if you prefer. Just remember that the edge of the copper tube should stay inside the ½" border.
3. Mark and drill the tool holes.
The front of the block will be used to hold screwdriver tips, so mark out a ½" grid inside the border. The intersection points of the grid lines will guide where to drill your holes.
If you want to drill larger or smaller holes to accommodate specific tools, be sure to mark this clearly on your grid. I opted to make the rear row of holes 9mm wide and to leave out a row in the middle. The missing row makes a handy place to rest a pencil and gives larger tools a little breathing room (Figure A).

Use a small drill bit, such as 3mm, to drill pilot holes, then step up to the larger bits; 7.5mm works great for screwdriver tips. Try to get the holes for the driver bits about ½" deep. If you don’t have a pillar drill (drill press) with a depth stop, wrap a piece of masking tape around the drill bit to set the depth.
The holes for the copper pipe can be a little deeper, but try not to drill all the way through the block by accident. The spiked point of a spade bit can be deceptively long.
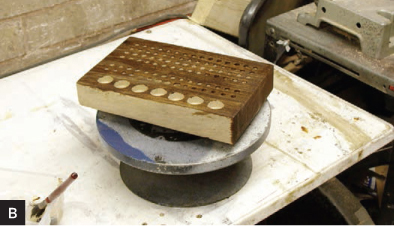
4. Sand, glue, and finish.
Sand the wood block smooth and apply wood stain if desired (Figure B). Add a little PVA glue to the ¾" holes, and push the copper tubes into place. Finish with polish or clear varnish (Figure C). ![]()

Andrew Lewis is a keen artificer and computer scientist with interests in 3D scanning, computational theory, algorithmics, and electronics. He is a relentless tinkerer, whose love of science and technology is second only to his love of all things steampunk.