12
Serverless Computing on Kubernetes
In this chapter, we will explore the fascinating world of serverless computing in the cloud. The term “serverless” is getting a lot of attention, but it is a misnomer. A true serverless application runs as a web application in a user’s browser or a mobile app and only interacts with external services. However, the types of serverless systems we build on Kubernetes are different. We will explain exactly what serverless means on Kubernetes and how it relates to other serverless solutions. We will cover serverless cloud solutions, introduce Knative - the Kubernetes foundation for functions as a service - and dive into Kubernetes Function-as-a-Service (FaaS) frameworks.
This chapter will cover the following main topics:
- Understanding serverless computing
- Serverless Kubernetes in the cloud
- Knative
- Kubernetes FaaS Frameworks
Let’s start by clarifying what serverless is all about.
Understanding serverless computing
OK. Let’s get it out of the way. Servers are still there. The term “serverless” means that you don’t have to provision, configure, and manage the servers yourself. Public cloud platforms were a real paradigm shift by eliminating the need to deal with physical hardware, data centers, and networking. But even on the cloud it takes a lot of work and know-how to create machine images, provision instances, configure them, upgrade and patch operating systems, define network policies, and manage certificates and access control. With serverless computing large chunks of this important but tedious work go away. The allure of serverless is multi-pronged:
- A whole category of problems dealing with provisioning goes away
- Capacity planning is a non-issue
- You pay only for what you use
You lose some control because you have to live with the choices made by the cloud provider, but there is a lot of customization you can take advantage of for critical parts of a system. Of course, where you need total control you can still manage your own infrastructure by explicitly provisioning VMs and deploying workloads directly.
The bottom line is that the serverless approach is not just hype, it provides real benefits. Let’s examine the two flavors of serverless.
Running long-running services on “serverless” infrastructure
Long-running services are the bread and butter of microservice-based distributed systems. These services must be always up, waiting to service requests, and can be scaled up and down to match the volume. In the traditional cloud you had to provision enough capacity to handle spikes and changing volumes, which often led to over-provisioning or increased delays in processing when requests were waiting for under-provisioned services.
Serverless services address this issue with zero effort from developers and relatively little effort from operators. The idea is that you just mark your service to run on the serverless infrastructure and configure it with some parameters, such as the expected CPU, memory, and limits to scaling. The service appears to other services and clients just like a traditional service that you deployed on infrastructure you provisioned yourself.
Services that fall into this category have the following characteristics:
- Always running (they never scale down to zero)
- Expose multiple endpoints (such as HTTP and gRPC)
- Require that you implement the request handling and routing yourself
- Can listen to events instead of, or in addition to, exposing endpoints
- Service instances can maintain in-memory caches, long-term connections, and sessions
- In Kubernetes, microservices are represented directly by the service resource
Now, let’s look at FaaS.
Running functions as a service on “serverless” infrastructure
Even in the largest distributed systems not every workload handles multiple requests per second. There are always tasks that need to run in response to relatively infrequent events, whether on schedule or invoked in an ad hoc manner. It’s possible to have a long-running service just sitting there twiddling its virtual thumbs and processing a request every now and then, but that’s wasteful. You can try to hitch such tasks to other long-running services, but that creates very undesirable coupling, which goes against the philosophy of microservices.
A much better approach known as FaaS is to treat such tasks separately and provide different abstractions and tooling to address them.
FaaS is a computing model where a central authority (e.g., a cloud provider or Kubernetes) offers its users a way to run code (essentially functions) without worrying about where this code runs.
Kubernetes has the concept of a Job and a CronJob object. These address some issues that FaaS solutions tackle, but not completely.
A FaaS solution is often much simpler to get up and running compared to a traditional service. The developers may only need to write the code of a function; the FaaS solution will take care of the rest:
- Building and packaging
- Exposing as an endpoint
- A trigger based on events
- Provisioning and scaling automatically
- Monitoring and providing logs and metrics
Here are some of the characteristics of FaaS solutions:
- It runs on demand (can scale down to zero)
- It exposes a single endpoint (usually HTTP)
- It can be triggered by events or get an automatic endpoint
- It often has severe limitations on resource usage and maximum runtime
- Sometimes, it might have a cold start (that is, when scaling up from zero)
FaaS is indeed a form of serverless computing since the user doesn’t need to provision servers in order to run their code, but it is used to run short-term functions. There is another form of serverless computing used for running long-running services too.
Serverless Kubernetes in the cloud
All the major cloud providers now support serverless long-running services for Kubernetes. Microsoft Azure was the first to offer it. Kubernetes interacts with nodes via the kubelet. The basic idea of serverless infrastructure is that instead of provisioning actual nodes (physical or VMs) a virtual node is created in some fashion. Different cloud providers use different solutions to accomplish this goal.
Don’t forget the cluster auto scaler
Before jumping into cloud provider-specific solutions make sure to check out the Kubernetes-native option of the cluster autoscaler. The cluster autoscaler scales the nodes in your cluster and doesn’t suffer from the limitations of some of the other solutions. All the Kubernetes scheduling and control mechanisms work out of the box with the cluster autoscaler because it just automates adding and removing regular nodes from your cluster. No exotic and provider-specific capabilities are used.
But you may have good reasons to prefer a more provider-integrated solution. For example, AWS Fargate runs inside Firecracker (see https://github.com/firecracker-microvm/firecracker), which is a lightweight VM with strong security boundaries (as a side note, Lambda functions run on Firecracker too). Similarly Google Cloud Run runs in gVisor. Azure has several different hosting solutions such as dedicated VMs, Kubernetes, and Arc.
Azure AKS and Azure Container Instances
Azure supported Azure Container Instances (ACI) for a long time. ACI is not Kubernetes-specific. It allows you to run on-demand containers on Azure in a managed environment. It is similar in some regards to Kubernetes but is Azure-specific. It even has the concept of a container group, which is similar to a pod. All containers in a container group will be scheduled to run on the same host machine.

Figure 12.1: ACI architecture
The integration with Kubernetes/AKS is modeled as bursting from AKS to ACI. The guiding principle here is that for your known workloads you should provision your own nodes, but if there are spikes then the extra load will burst dynamically to ACI. This approach is considered more economical because running on ACI is more expensive than provisioning your own nodes. AKS uses the virtual kubelet CNCF project we explored in the previous chapter to integrate your Kubernetes cluster with the infinite capacity of ACI. It works by adding a virtual node to your cluster, backed by ACI that appears on the Kubernetes side as a single node with infinite resources.

Figure 12.2: Virtual node architecture in AKS
Let’s see how AWS does it with EKS and Fargate.
AWS EKS and Fargate
AWS released Fargate (https://aws.amazon.com/fargate) in 2018, which is similar to Azure ACI and lets you run containers in a managed environment. Originally, you could use Fargate on EC2 or ECS (AWS’s proprietary container orchestration services). At the big AWS conference re:Invent 2019, Fargate became generally available on EKS too. That means that you now have a fully managed Kubernetes solution that is truly serverless. EKS takes care of the control plane and Fargate takes care of the worker nodes for you.

Figure 12.3: EKS and Fargate architecture
EKS and Fargate model the interaction between your Kubernetes cluster and Fargate differently than AKS and ACI. While on AKS a single infinite virtual node represents the entire capacity of ACI, on EKS each pod gets its own virtual node. But those nodes are not real nodes of course. Fargate has its own control plane and data plane that supports EC2, ECS, as well as EKS. The EKS-Fargate integration is done via a set of custom Kubernetes controllers that watch for pods that need to be deployed to a particular namespace or have specific labels, forwarding those pods to be scheduled by Fargate. The following diagram illustrates the workflow from EKS to Fargate.

Figure 12.4: EKS to Fargate workflow
When working with Fargate there are several limitations you should be aware of:
- A maximum of 16 vCPU and 120 GB memory per pod
- 20 GiB of container image layer storage
- Stateful workloads that require persistent volumes or filesystems are not supported
Daemonsets, privileged pods, or pods that useHostNetworkorHostPortare not supported- You can use the Application Load Balancer or Network Load Balancer
If those limitations are too severe for you, you can try a more direct approach and utilize the virtual kubelet project to integrate Fargate into your cluster.
What about Google - the father of Kubernetes?
Google Cloud Run
It may come as a surprise, but Google is the Johnny-come-lately of serverless Kubernetes. Cloud Run is Google’s serverless offering. It is based on Knative, which we will dissect in depth in the next section. The basic premise is that there are two flavors of Cloud Run. Plain Cloud Run is similar to ACI and Fargate. It lets you run containers in an environment fully managed by Google. Cloud Run for Anthos supports GKE, and on-premises lets you run containerized workloads in your GKE cluster.
Cloud Run for Anthos is currently the only serverless platform that allows you to run containers on custom machine types (including GPUs). Anthos Cloud Run services participate in the Istio service mesh and provide a streamlined Kubernetes-native experience. See https://cloud.google.com/anthos/service-mesh for more details.
Note that while managed Cloud Run uses gVisor isolation, the Anthos Cloud Run uses standard Kubernetes (container-based) isolation.
The following diagram shows both models and the layering of access methods and deployment options:

Figure 12.5: Cloud Run models
It’s time to learn more about Knative.
Knative
Kubernetes doesn’t have built-in support for FaaS. As a result many solutions were developed by the community and ecosystem. The goal of Knative is to provide building blocks that multiple FaaS solutions can utilize without reinventing the wheel.
But, that’s not all! Knative also offers the unique capability to scale down long-running services all the way to zero. This is a big deal. There are many use cases where you may prefer to have a long-running service that can handle a lot of requests coming its way in rapid succession. In those situations it is not the best approach to fire a new function instance per request. But when there is no traffic coming in, it’s great to scale the service to zero instances, pay nothing, and leave more capacity for other services that may need more resources at that time. Knative supports other important use cases like load balancing based on percentages, load balancing based on metrics, blue-green deployments, canary deployments, and advanced routing. It can even optionally do automatic TLS certificates as well as HTTP monitoring. Finally, Knative works with both HTTP and gRPC.
There are currently two Knative components: Knative serving and Knative eventing. There used to also be a Knative build component, but it was factored out to form the foundation of Tekton (https://github.com/tektoncd/pipeline) - a Kubernetes-native CD project.
Let’s start with Knative serving.
Knative serving
The domain of Knative serving is running versioned services on Kubernetes and routing traffic to those services. This is above and beyond standard Kubernetes services. Knative serving defines several CRDs to model its domain: Service, Route, Configuration, and Revision. The Service manages a Route and a Configuration. A Configuration can have multiple revisions.
The Route can route service traffic to a particular revision. Here is a diagram that illustrates the relationship between the different objects:

Figure 12.6: Knative serving CRDs
Let’s try Knative serving in a local environment.
Install a quickstart environment
Knative provides an easy development setup. Let’s install the kn CLI and quickstart plugin. Follow the instructions here: https://knative.dev/docs/getting-started/quickstart-install.
Now, we can run the plugin with KinD, which will provision a new KinD cluster and install multiple components such as the Knative-service, Kourier networking layer, and Knative eventing.
$ kn quickstart kind
Running Knative Quickstart using Kind
 Checking dependencies...
Kind version is: 0.16.0
Checking dependencies...
Kind version is: 0.16.0
 Creating Kind cluster...
Creating cluster "knative" ...
Creating Kind cluster...
Creating cluster "knative" ...
 Ensuring node image (kindest/node:v1.24.3)
  Preparing nodes
 Writing configuration
  Starting control-plane
  Installing CNI
  Installing StorageClass
  Waiting ≤ 2m0s for control-plane = Ready
  kind-knative | default
• Ready after 19s
kind-knative | default
• Ready after 19s  Set kubectl context to "kind-knative"
You can now use your cluster with:
kubectl cluster-info --context kind-knative
Have a nice day!
Set kubectl context to "kind-knative"
You can now use your cluster with:
kubectl cluster-info --context kind-knative
Have a nice day! 
 Installing Knative Serving v1.6.0 ...
CRDs installed...
Core installed...
Finished installing Knative Serving
Installing Knative Serving v1.6.0 ...
CRDs installed...
Core installed...
Finished installing Knative Serving
 Installing Kourier networking layer v1.6.0 ...
Kourier installed...
Ingress patched...
Finished installing Kourier Networking layer
Installing Kourier networking layer v1.6.0 ...
Kourier installed...
Ingress patched...
Finished installing Kourier Networking layer
 Configuring Kourier for Kind...
Kourier service installed...
Domain DNS set up...
Finished configuring Kourier
Configuring Kourier for Kind...
Kourier service installed...
Domain DNS set up...
Finished configuring Kourier
 Installing Knative Eventing v1.6.0 ...
CRDs installed...
Core installed...
In-memory channel installed...
Mt-channel broker installed...
Example broker installed...
Finished installing Knative Eventing
Installing Knative Eventing v1.6.0 ...
CRDs installed...
Core installed...
In-memory channel installed...
Mt-channel broker installed...
Example broker installed...
Finished installing Knative Eventing
 Knative install took: 2m22s
 Now have some fun with Serverless and Event Driven Apps!
Let’s install the sample hello service:
$ kn service create hello
--image gcr.io/knative-samples/helloworld-go
--port 8080
--env TARGET=World
Creating service 'hello' in namespace 'default':
  0.080s The Route is still working to reflect the latest desired specification.
  0.115s ...
  0.127s Configuration "hello" is waiting for a Revision to become ready.
 21.229s ...
 21.290s Ingress has not yet been reconciled.
 21.471s Waiting for load balancer to be ready
 21.665s Ready to serve.
Service 'hello' created to latest revision 'hello-00001' is available at URL:
http://hello.default.127.0.0.1.sslip.io
We can call the service using httpie and get the Hello, World! response:
$ http --body http://hello.default.127.0.0.1.sslip.io
Hello World!
Let’s look at the Service object.
The Knative Service object
The Knative Service combines the Kubernetes Deployment and Service into a single object. That makes a lot of sense because except for the special case of headless services (https://kubernetes.io/docs/concepts/services-networking/service/#headless-services) there is always a deployment behind every service.
The Knative Service automatically manages the entire life cycle of its workload. It is responsible for creating the route and configuration and a new revision whenever the service is updated. This is very convenient because the user just needs to deal with the Service object.
Here is the metadata for the helloworld-go Knative service:
$ k get ksvc hello -o json | jq .metadata
{
  "annotations": {
    "serving.knative.dev/creator": "kubernetes-admin",
    "serving.knative.dev/lastModifier": "kubernetes-admin"
  },
  "creationTimestamp": "2022-09-25T21:11:21Z",
  "generation": 1,
  "name": "hello",
  "namespace": "default",
  "resourceVersion": "19380",
  "uid": "03b5c668-3934-4260-bdba-13357a48501e"
}
And here is the spec:
$ k get ksvc hello -o json | jq .spec
{
  "template": {
    "metadata": {
      "annotations": {
        "client.knative.dev/updateTimestamp": "2022-09-25T21:11:21Z",
        "client.knative.dev/user-image": "gcr.io/knative-samples/helloworld-go"
      },
      "creationTimestamp": null
    },
    "spec": {
      "containerConcurrency": 0,
      "containers": [
        {
          "env": [
            {
              "name": "TARGET",
              "value": "World"
            }
          ],
          "image": "gcr.io/knative-samples/helloworld-go",
          "name": "user-container",
          "ports": [
            {
              "containerPort": 8080,
              "protocol": "TCP"
            }
          ],
          "readinessProbe": {
            "successThreshold": 1,
            "tcpSocket": {
              "port": 0
            }
          },
          "resources": {}
        }
      ],
      "enableServiceLinks": false,
      "timeoutSeconds": 300
    }
  },
  "traffic": [
    {
      "latestRevision": true,
      "percent": 100
    }
  ]
}
Note the traffic section of the spec that directs 100% of requests to the latest revision. This is what determines the Route CRD.
Creating new revisions
Let’s create a new revision of the hello service with a TARGET environment variable of Knative:
$ kn service update hello --env TARGET=Knative
Updating Service 'hello' in namespace 'default':
  0.097s The Configuration is still working to reflect the latest desired specification.
  3.000s Traffic is not yet migrated to the latest revision.
  3.041s Ingress has not yet been reconciled.
  3.155s Waiting for load balancer to be ready
  3.415s Ready to serve.
Now, we have two revisions:
$ k get revisions
NAME          CONFIG NAME   K8S SERVICE NAME   GENERATION   READY   REASON   ACTUAL REPLICAS   DESIRED REPLICAS
hello-00001   hello                            1            True             0                 0
hello-00002   hello                            2            True             1                 1
The hello-00002 revision is the active one. Let’s confirm:
$ http --body http://hello.default.127.0.0.1.sslip.io
Hello Knative!
The Knative Route object
The Knative Route object allows you to direct a percentage of incoming requests to particular revisions. The default is 100% to the latest revision, but you can change it. This allows advanced deployment scenarios, like blue-green deployments as well as canary deployments.
Here is the hello route that directs 100% of traffic to the latest revision:
apiVersion: serving.knative.dev/v1
kind: Route
metadata:
  annotations:
    serving.knative.dev/creator: kubernetes-admin
    serving.knative.dev/lastModifier: kubernetes-admin
  labels:
    serving.knative.dev/service: hello
  name: hello
  namespace: default
spec:
  traffic:
  - configurationName: hello
    latestRevision: true
    percent: 100
Let’s direct 50% of the traffic to the previous revision:
$ kn service update hello
--traffic hello-00001=50
--traffic @latest=50
Updating Service 'hello' in namespace 'default':
  0.078s The Route is still working to reflect the latest desired specification.
  0.124s Ingress has not yet been reconciled.
  0.192s Waiting for load balancer to be ready
  0.399s Ready to serve.
Service 'hello' with latest revision 'hello-00002' (unchanged) is available at URL:
http://hello.default.127.0.0.1.sslip.io
Now, if we call the service repeatedly, we see a mix of responses from the two revisions:
$ while true; do http --body http://hello.default.127.0.0.1.sslip.io; done
Hello World!
Hello World!
Hello World!
Hello Knative!
Hello Knative!
Hello Knative!
Hello Knative!
Hello World!
Hello Knative!
Hello World!
Let’s look at the route using the neat kubectl plugin (https://github.com/itaysk/kubectl-neat):
$ k get route hello -o yaml | k neat
apiVersion: serving.knative.dev/v1
kind: Route
metadata:
  annotations:
    serving.knative.dev/creator: kubernetes-admin
    serving.knative.dev/lastModifier: kubernetes-admin
  labels:
    serving.knative.dev/service: hello
  name: hello
  namespace: default
spec:
  traffic:
  - configurationName: hello
    latestRevision: true
    percent: 50
  - latestRevision: false
    percent: 50
    revisionName: hello-00001
The Knative Configuration object
The Configuration CRD contains the latest version of the service and the number of generations. For example, if we update the service to version 2:
apiVersion: serving.knative.dev/v1 # Current version of Knative
kind: Service
metadata:
  name: helloworld-go # The name of the app
  namespace: default # The namespace the app will use
spec:
  template:
    spec:
      containers:
        - image: gcr.io/knative-samples/helloworld-go # The URL to the image of the app
          env:
            - name: TARGET # The environment variable printed out by the sample app
              value: "Yeah, it still works - version 2 !!!"
Knative also generates a configuration object that now points to the hello-00002 revision:
$ k get configuration hello -o yaml
apiVersion: serving.knative.dev/v1
kind: Configuration
metadata:
  annotations:
    serving.knative.dev/creator: kubernetes-admin
    serving.knative.dev/lastModifier: kubernetes-admin
    serving.knative.dev/routes: hello
  creationTimestamp: "2022-09-25T21:11:21Z"
  generation: 2
  labels:
    serving.knative.dev/service: hello
    serving.knative.dev/serviceUID: 03b5c668-3934-4260-bdba-13357a48501e
  name: hello
  namespace: default
  ownerReferences:
  - apiVersion: serving.knative.dev/v1
    blockOwnerDeletion: true
    controller: true
    kind: Service
    name: hello
    uid: 03b5c668-3934-4260-bdba-13357a48501e
  resourceVersion: "22625"
  uid: fabfcb7c-e3bc-454e-a887-9f84057943f7
spec:
  template:
    metadata:
      annotations: kind-knative | default
        client.knative.dev/updateTimestamp: "2022-09-25T21:21:00Z"
        client.knative.dev/user-image: gcr.io/knative-samples/helloworld-go
      creationTimestamp: null
    spec:
      containerConcurrency: 0
      containers:
      - env:
        - name: TARGET
          value: Knative
        image: gcr.io/knative-samples/helloworld-go@sha256:5ea96ba4b872685ff4ddb5cd8d1a97ec18c18fae79ee8df0d29f446c5efe5f50
        name: user-container
        ports:
        - containerPort: 8080
          protocol: TCP
        readinessProbe:
          successThreshold: 1
          tcpSocket:
            port: 0
        resources: {}
      enableServiceLinks: false
      timeoutSeconds: 300
status:
  conditions:
  - lastTransitionTime: "2022-09-25T21:21:03Z"
    status: "True"
    type: Ready
  latestCreatedRevisionName: hello-00002
  latestReadyRevisionName: hello-00002
  observedGeneration: 2
To summarize, Knative serving provides better deployment and networking for Kubernetes for long-running services and functions. Let’s see what Knative eventing brings to the table.
Knative eventing
Traditional services on Kubernetes or other systems expose API endpoints that consumers can hit (often over HTTP) to send a request for processing. This pattern of request-response is very useful, hence why it is so popular. However, this is not the only pattern to invoke services or functions. Most distributed systems have some form of loosely-coupled interactions where events are published. It is often desirable to invoke some code when events occur.
Before Knative you had to build this capability yourself or use some third-party library that binds events to code. Knative eventing aims to provide a standard way to accomplish this task. It is compatible with the CNCF CloudEvents specification (https://github.com/cloudevents/spec).
Getting familiar with Knative eventing terminology
Before diving into the architecture let’s define some terms and concepts we will use later.
Event consumer
There are two types of event consumers: Addressable and Callable. Addressable consumers can receive events over HTTP through their status.address.url field. The Kubernetes Service object doesn’t have such a field, but it is also considered a special case of an Addressable consumer.
Callable consumers receive an event delivered over HTTP, and they may return another event in the response that will be consumed just like an external event. Callable consumers provide an effective way to transform events.
Event source
An event source is the originator of an event. Knative supports many common sources, and you can write your own custom event source too. Here are some of the supported event sources:
- AWS SQS
- Apache Camel
- Apache CouchDB
- Apache Kafka
- Bitbucket
- ContainerSource
- Cron Job
- GCP PubSub
- GitHub
- GitLab
- Google Cloud Scheduler
- Kubernetes (Kubernetes Events)
Check out the full list here: https://knative.dev/docs/eventing/sources.
Broker and Trigger
A broker mediates events identified by particular attributes and matches them with consumers via triggers. The trigger includes a filter of event attributes and an Addressable consumer. When the event arrives at the broker, it forwards it to consumers that have triggers with matching filters to the event attributes. The following diagram illustrates this workflow:

Figure 12.7: The workflow of brokers, triggers, and services
Event types and event registry
Events can have a type, which is modeled as the EventType CRD. The event registry stores all the event types. Triggers can use the event type as one of their filter criteria.
Channels and subscriptions
A channel is an optional persistence layer. Different event types may be routed to different channels with different backing stores. Some channels may store events in memory, while other channels may persist to disk via NATS streaming, Kafka, or similar. Subscribers (consumers) eventually receive and handle the events.
Now that we covered the various bits and pieces of Knative eventing let’s understand its architecture.
The architecture of Knative eventing
The current architecture supports two modes of event delivery:
- Simple delivery
- Fan-out delivery
The simple delivery is just 1:1 source -> consumer. The consumer can be a core Kubernetes service or a Knative service. If the consumer is unreachable the source is responsible for handling the fact that the event can’t be delivered. The source can retry, log an error, or take any other appropriate action.
The following diagram illustrates this simple concept:

Figure 12.8: Simple delivery
The fan-out delivery can support arbitrarily complex processing where multiple consumers subscribe to the same event on a channel. Once an event is received by the channel the source is not responsible for the event anymore. This allows a more dynamic subscription of consumers because the source doesn’t even know who the consumers are. In essence, there is a loose coupling between producers and consumers.
The following diagram illustrates the complex processing and subscriptions patterns that can arise when using channels:

Figure 12.9: Fan-out delivery
At this point, you should have a decent understanding of the scope of Knative and how it establishes a solid serverless foundation for Kubernetes. Let’s play around a little with Knative and see what it feels like.
Checking the scale to zero option of Knative
Knative is configured by default to scale to zero with a grace period of 30 seconds. That means that after 30 seconds of inactivity (no request coming in) all the pods will be terminated until a new request comes in. To verify that we can wait 30 seconds and check the pods in the default namespace:
$ kubectl get po
No resources found in default namespace.
Then, we can invoke the service and after a short time we get our response:
$ http --body http://hello.default.127.0.0.1.sslip.io
Hello World!
Let’s watch when the pods disappear by using the -w flag:
$ k get po -w
NAME                                      READY   STATUS        RESTARTS   AGE
hello-00001-deployment-7c4b6cc4df-4j7bf   2/2     Running       0          46s
hello-00001-deployment-7c4b6cc4df-4j7bf   2/2     Terminating   0          98s
hello-00001-deployment-7c4b6cc4df-4j7bf   1/2     Terminating   0          2m
hello-00001-deployment-7c4b6cc4df-4j7bf   0/2     Terminating   0          2m9s
hello-00001-deployment-7c4b6cc4df-4j7bf   0/2     Terminating   0          2m9s
hello-00001-deployment-7c4b6cc4df-4j7bf   0/2     Terminating   0          2m9s
Now that we have had a little fun with Knative, we can move on to discussing FaaS solutions on Kubernetes.
Kubernetes Function-as-a-Service frameworks
Let’s acknowledge the elephant in the room - FaaS. The Kubernetes Job and CronJob are great, and cluster autoscaling and cloud providers managing the infrastructure is awesome. Knative with its scale to zero and traffic routing is super cool. But, what about the actual FaaS? Fear not, Kubernetes has many options here - maybe too many options. There are many FaaS frameworks for Kubernetes:
- Fission
- Kubeless
- OpenFaaS
- OpenWhisk
- Riff (built on top of Knative)
- Nuclio
- BlueNimble
- Fn
- Rainbond
Some of these frameworks have a lot of traction and some of them don’t. Two of the most prominent frameworks I discussed in the previous edition of the book, Kubeless and Riff, have been archived (Riff calls itself complete).
We will look into a few of the more popular options that are still active. In particular we will look at OpenFaaS and Fission.
OpenFaaS
OpenFaaS (https://www.openfaas.com) is one of the most mature, popular, and active FaaS projects. It was created in 2016 and has more than 30,000 stars on GitHub at the time of writing. OpenFaaS has a community edition and licensed Pro and Enterprise editions. Many production features, such as advanced autoscaling and scale to zero, are not available in the community edition. OpenFaaS comes with two additional components - Prometheus (for metrics) and NATS (asynchronous queue). Let’s see how OpenFaaS provides a FaaS solution on Kubernetes.
Delivery pipeline
OpenFaaS provides a complete ecosystem and delivery mechanism to package and run your functions on Kubernetes. It can run on VMs too using fasstd, but this is a book about Kubernetes. The typical workflow looks like this:

Figure 12.10: A typical OpenFaaS workflow
The faas-cli allows you to build, push and deploy your functions as Docker/OCI images. When you build your functions, you can use various templates as well as add your own. These steps can be incorporated into any CI/CD pipeline.
OpenFaaS features
OpenFaaS exposes its capabilities via a gateway. You interact with the gateway via a REST API, CLI, or web-based UI. The gateway exposes different endpoints.
The primary features of OpenFaaS are:
- Function management
- Function invocations and triggers
- Autoscaling
- Metrics
- A web-based UI
Function management
You manage functions by creating or building images, pushing these images, and deploying them. The faas-cli helps with these tasks. We will see an example later in the chapter.
Function invocations and triggers
OpenFaaS functions can be invoked as HTTP endpoints or via various triggers such as NATS events, other event systems, and directly through the CLI.
Metrics
OpenFaaS exposes a prometheus/metrics endpoint that can be used to scrape metrics. Some of the metrics are only available with the Pro version. See a complete list of metrics here: https://docs.openfaas.com/architecture/metrics/.
Autoscaling
One of OpenFaaS’s claims to fame is that it scales up and down (including down to zero in the Pro version) based on various metrics. It doesn’t use the Kubernetes Horizontal Pod Autoscaler (HPA) and supports different scaling modes, such as rps, capacity, and cpu (the same as Kubernetes HPA). You can achieve similar results with a project like Keda (https://keda.sh), but then you’d have to build it yourself, while OpenFaaS provides it out of the box.
Web-based UI
OpenFaaS provides a simple web-based UI, available on the API gateway as the /ui endpoint.
Here is what it looks like:

Figure 12.11: The OpenFaaS web-based UI
OpenFaaS architecture
OpenFaaS has multiple components that interact to provide all its capabilities in an extensible and Kubernetes-native way.
The main components are:
- OpenFaaS API gateway
- FaaS Provider
- Prometheus and Alert Manager
- OpenFaaS Operator
- The API gateway
Your functions are stored as CRDs. The OpenFaaS Operator watches these functions. The following diagram illustrates the various components and the relationships between them.

Figure 12.12: OpenFaaS architecture
Let’s play with OpenFaaS to understand how everything works from a user perspective.
Taking OpenFaaS for a ride
Let’s install OpenFaaS and the fass-cli CLI. We will use the recommended arkade package manager (https://github.com/alexellis/arkade), developed by the OpenFaaS founder. So, let’s install arkade first. Arkade can install Kubernetes applications and various command-line tools.
On a Mac, you can use homebrew:
$ brew install arkade
On Windows, you need to install Git Bash (https://git-scm.com/downloads), and then from a Git Bash prompt:
$ curl -sLS https://get.arkade.dev | sh
Let’s verify that arkade is available:
$ ark
            _             _
  __ _ _ __| | ____ _  __| | ___
 / _` | '__| |/ / _` |/ _` |/ _
| (_| | |  |   < (_| | (_| |  __/
 \__,_|_|  |_|\_\__,_|\__,_|\___|
Open Source Marketplace For Developer Tools
Usage:
  arkade [flags]
  arkade [command]
Available Commands:
  chart       Chart utilities
  completion  Output shell completion for the given shell (bash or zsh)
  get         The get command downloads a tool
  help        Help about any command
  info        Find info about a Kubernetes app
  install     Install Kubernetes apps from helm charts or YAML files
  system      System apps
  uninstall   Uninstall apps installed with arkade
  update      Print update instructions
  version     Print the version
Flags:
  -h, --help   help for arkade
Use "arkade [command] --help" for more information about a command.
If you don’t want to use arkade there are other options to install OpenFaaS. See https://docs.openfaas.com/deployment/kubernetes/.
Next, let’s install OpenFaaS on our Kubernetes cluster:
$ ark install openfaas
Using Kubeconfig: /Users/gigi.sayfan/.kube/config
Client: arm64, Darwin
2022/10/01 11:29:14 User dir established as: /Users/gigi.sayfan/.arkade/
Downloading: https://get.helm.sh/helm-v3.9.3-darwin-amd64.tar.gz
/var/folders/qv/7l781jhs6j19gw3b89f4fcz40000gq/T/helm-v3.9.3-darwin-amd64.tar.gz written.
2022/10/01 11:29:17 Extracted: /var/folders/qv/7l781jhs6j19gw3b89f4fcz40000gq/T/helm
2022/10/01 11:29:17 Copying /var/folders/qv/7l781jhs6j19gw3b89f4fcz40000gq/T/helm to /Users/gigi.sayfan/.arkade/bin/helm
Downloaded to: /Users/gigi.sayfan/.arkade/bin/helm helm
"openfaas" has been added to your repositories
Hang tight while we grab the latest from your chart repositories...
...Successfully got an update from the "openfaas" chart repository
Update Complete.  Happy Helming!
VALUES values-arm64.yaml
Command: /Users/gigi.sayfan/.arkade/bin/helm [upgrade --install openfaas openfaas/openfaas --namespace openfaas --values /var/folders/qv/7l781jhs6j19gw3b89f4fcz40000gq/T/charts/openfaas/values-arm64.yaml --set gateway.directFunctions=false --set openfaasImagePullPolicy=IfNotPresent --set gateway.replicas=1 --set queueWorker.replicas=1 --set dashboard.publicURL=http://127.0.0.1:8080 --set queueWorker.maxInflight=1 --set autoscaler.enabled=false --set basic_auth=true --set faasnetes.imagePullPolicy=Always --set basicAuthPlugin.replicas=1 --set clusterRole=false --set operator.create=false --set ingressOperator.create=false --set dashboard.enabled=false --set serviceType=NodePort]
Release "openfaas" does not exist. Installing it now.
NAME: openfaas
LAST DEPLOYED: Sat Oct 1 11:29:28 2022
NAMESPACE: openfaas
STATUS: deployed
REVISION: 1
TEST SUITE: None
NOTES:
To verify that openfaas has started, run:
kubectl -n openfaas get deployments -l "release=openfaas, app=openfaas"
=======================================================================
= OpenFaaS has been installed. =
=======================================================================
# Get the faascli
kind-openfass | default
curl -SLsf https://cli.openfaas.com | sudo sh
# Forward the gateway to your machine
kubectl rollout status -n openfaas deploy/gateway
kubectl port-forward -n openfaas svc/gateway 8080:8080 &
# If basic auth is enabled, you can now log into your gateway:
PASSWORD=$(kubectl get secret -n openfaas basic-auth -o jsonpath="{.data.basic-auth-password}" | base64 --decode; echo)
echo -n $PASSWORD | faas-cli login --username admin --password-stdin
faas-cli store deploy figlet
faas-cli list
# For Raspberry Pi
faas-cli store list
--platform armhf
faas-cli store deploy figlet
--platform armhf
# Find out more at:
# https://github.com/openfaas/faas
Happy Helming!
VALUES values-arm64.yaml
Command: /Users/gigi.sayfan/.arkade/bin/helm [upgrade --install openfaas openfaas/openfaas --namespace openfaas --values /var/folders/qv/7l781jhs6j19gw3b89f4fcz40000gq/T/charts/openfaas/values-arm64.yaml --set gateway.directFunctions=false --set openfaasImagePullPolicy=IfNotPresent --set gateway.replicas=1 --set queueWorker.replicas=1 --set dashboard.publicURL=http://127.0.0.1:8080 --set queueWorker.maxInflight=1 --set autoscaler.enabled=false --set basic_auth=true --set faasnetes.imagePullPolicy=Always --set basicAuthPlugin.replicas=1 --set clusterRole=false --set operator.create=false --set ingressOperator.create=false --set dashboard.enabled=false --set serviceType=NodePort]
Release "openfaas" does not exist. Installing it now.
NAME: openfaas
LAST DEPLOYED: Sat Oct 1 11:29:28 2022
NAMESPACE: openfaas
STATUS: deployed
REVISION: 1
TEST SUITE: None
NOTES:
To verify that openfaas has started, run:
kubectl -n openfaas get deployments -l "release=openfaas, app=openfaas"
=======================================================================
= OpenFaaS has been installed. =
=======================================================================
# Get the faascli
kind-openfass | default
curl -SLsf https://cli.openfaas.com | sudo sh
# Forward the gateway to your machine
kubectl rollout status -n openfaas deploy/gateway
kubectl port-forward -n openfaas svc/gateway 8080:8080 &
# If basic auth is enabled, you can now log into your gateway:
PASSWORD=$(kubectl get secret -n openfaas basic-auth -o jsonpath="{.data.basic-auth-password}" | base64 --decode; echo)
echo -n $PASSWORD | faas-cli login --username admin --password-stdin
faas-cli store deploy figlet
faas-cli list
# For Raspberry Pi
faas-cli store list
--platform armhf
faas-cli store deploy figlet
--platform armhf
# Find out more at:
# https://github.com/openfaas/faas
 arkade needs your support: https://github.com/sponsors/alexellis
OpenFaaS creates two namespaces: openfaas for itself and openfass-fn for your functions. There are several deployments in the openfass namespace:
$ k get deploy -n openfaas
NAME                READY   UP-TO-DATE   AVAILABLE   AGE
alertmanager        1/1     1            1           6m2s
basic-auth-plugin   1/1     1            1           6m2s
gateway             1/1     1            1           6m2s
nats                1/1     1            1           6m2s
prometheus          1/1     1            1           6m2s
queue-worker        1/1     1            1           6m2s
The openfass-fn namespace is empty at the moment.
OK. Let’s install the OpenFaaS CLI:
$ brew install faas-cli
==> Downloading https://ghcr.io/v2/homebrew/core/faas-cli/manifests/0.14.8
######################################################################## 100.0%
==> Downloading https://ghcr.io/v2/homebrew/core/faas-cli/blobs/sha256:cf9460398c45ea401ac688e77a8884cbceaf255064a1d583f8113b6c2bd68450
==> Downloading from https://pkg-containers.githubusercontent.com/ghcr1/blobs/sha256:cf9460398c45ea401ac688e77a8884cbceaf255064a1d583f8113b6c2bd68450?se=2022-10-01T18%3A50%3A00Z&sig=V%
######################################################################## 100.0%
==> Pouring faas-cli--0.14.8.arm64_monterey.bottle.tar.gz
==> Caveats
zsh completions have been installed to:
  /opt/homebrew/share/zsh/site-functions
==> Summary
  /opt/homebrew/Cellar/faas-cli/0.14.8: 9 files, 8.4MB
==> Running `brew cleanup faas-cli`...
Disable this behaviour by setting HOMEBREW_NO_INSTALL_CLEANUP.
Hide these hints with HOMEBREW_NO_ENV_HINTS (see `man brew`).
/opt/homebrew/Cellar/faas-cli/0.14.8: 9 files, 8.4MB
==> Running `brew cleanup faas-cli`...
Disable this behaviour by setting HOMEBREW_NO_INSTALL_CLEANUP.
Hide these hints with HOMEBREW_NO_ENV_HINTS (see `man brew`).
First, we need to port-forward the gateway service so that faas-cli can access our cluster:
$ kubectl port-forward -n openfaas svc/gateway 8080:8080 &
[3] 76489
$ Forwarding from 127.0.0.1:8080 -> 8080
Forwarding from [::1]:8080 -> 8080
The next step is to fetch the admin password from the secret called basic-auth and use it to log in as the admin user:
$ PASSWORD=$(kubectl get secret -n openfaas basic-auth -o jsonpath="{.data.basic-auth-password}" | base64 --decode; echo)
echo -n $PASSWORD | faas-cli login --username admin --password-stdin
Now, we are ready to deploy and run functions on our cluster. Let’s look at the function templates available in the store:
$ faas-cli template store list
NAME                     SOURCE             DESCRIPTION
csharp                   openfaas           Classic C# template
dockerfile               openfaas           Classic Dockerfile template
go                       openfaas           Classic Golang template
java11                   openfaas           Java 11 template
java11-vert-x            openfaas           Java 11 Vert.x template
node17                   openfaas           HTTP-based Node 17 template
node16                   openfaas           HTTP-based Node 16 template
node14                   openfaas           HTTP-based Node 14 template
node12                   openfaas           HTTP-based Node 12 template
node                     openfaas           Classic NodeJS 8 template
php7                     openfaas           Classic PHP 7 template
php8                     openfaas           Classic PHP 8 template
python                   openfaas           Classic Python 2.7 template
python3                  openfaas           Classic Python 3.6 template
python3-dlrs             intel              Deep Learning Reference Stack v0.4 for ML workloads
ruby                     openfaas           Classic Ruby 2.5 template
ruby-http                openfaas           Ruby 2.4 HTTP template
python27-flask           openfaas           Python 2.7 Flask template
python3-flask            openfaas           Python 3.7 Flask template
python3-flask-debian     openfaas           Python 3.7 Flask template based on Debian
python3-http             openfaas           Python 3.7 with Flask and HTTP
python3-http-debian      openfaas           Python 3.7 with Flask and HTTP based on Debian
golang-http              openfaas           Golang HTTP template
golang-middleware        openfaas           Golang Middleware template
python3-debian           openfaas           Python 3 Debian template
powershell-template      openfaas-incubator Powershell Core Ubuntu:16.04 template
powershell-http-template openfaas-incubator Powershell Core HTTP Ubuntu:16.04 template
rust                     booyaa             Rust template
crystal                  tpei               Crystal template
csharp-httprequest       distantcam         C# HTTP template
csharp-kestrel           burtonr            C# Kestrel HTTP template
vertx-native             pmlopes            Eclipse Vert.x native image template
swift                    affix              Swift 4.2 Template
lua53                    affix              Lua 5.3 Template
vala                     affix              Vala Template
vala-http                affix              Non-Forking Vala Template
quarkus-native           pmlopes            Quarkus.io native image template
perl-alpine              tmiklas            Perl language template based on Alpine image
crystal-http             koffeinfrei        Crystal HTTP template
rust-http                openfaas-incubator Rust HTTP template
bash-streaming           openfaas-incubator Bash Streaming template
cobol                    devries            COBOL Template
What do you know! There is even a COBOL template if you’re so inclined. For our purposes we will use Golang. There are several Golang templates. We will use the golang-http template. We need to pull the template for the first time:
$ faas-cli template store pull golang-http
Fetch templates from repository: https://github.com/openfaas/golang-http-template at
2022/10/02 14:48:38 Attempting to expand templates from https://github.com/openfaas/golang-http-template
2022/10/02 14:48:39 Fetched 2 template(s) : [golang-http golang-middleware] from https://github.com/openfaas/golang-http-template
The template has a lot of boilerplate code that takes care of all the ceremony needed to eventually produce a container that can be run on Kubernetes:
$ ls -la template/golang-http
total 64
drwxr-xr-x  11 gigi.sayfan  staff   352 Oct  2 14:48 .
drwxr-xr-x   4 gigi.sayfan  staff   128 Oct  2 14:52 ..
-rw-r--r--   1 gigi.sayfan  staff    52 Oct  2 14:48 .dockerignore
-rw-r--r--   1 gigi.sayfan  staff     9 Oct  2 14:48 .gitignore
-rw-r--r--   1 gigi.sayfan  staff  1738 Oct  2 14:48 Dockerfile
drwxr-xr-x   4 gigi.sayfan  staff   128 Oct  2 14:48 function
-rw-r--r--   1 gigi.sayfan  staff   110 Oct  2 14:48 go.mod
-rw-r--r--   1 gigi.sayfan  staff   257 Oct  2 14:48 go.sum
-rw-r--r--   1 gigi.sayfan  staff    32 Oct  2 14:48 go.work
-rw-r--r--   1 gigi.sayfan  staff  3017 Oct  2 14:48 main.go
-rw-r--r--   1 gigi.sayfan  staff   465 Oct  2 14:48 template.yml
Let’s create our function:
$ faas-cli new --prefix docker.io/g1g1 --lang golang-http openfaas-go
Folder: openfaas-go created.
kind-openfaas | openfaas
  ___                   _____           ____
 / _  _ __   ___ _ __ |  ___|_ _  __ _/ ___|
| | | | '_  / _  '_ | |_ / _` |/ _` \___
| |_| | |_) |  __/ | | |  _| (_| | (_| |___) |
 \___/| .__/ \___|_| |_|_|  \__,_|\__,_|____/
      |_|
Function created in folder: openfaas-go
Stack file written: openfaas-go.yml
Notes:
You have created a new function which uses Go 1.18 and Alpine
Linux as its base image.
To disable the go module, for private vendor code, please use
"--build-arg GO111MODULE=off" with faas-cli build or configure this
via your stack.yml file.
See more: https://docs.openfaas.com/cli/templates/
For the template's repo and more examples:
https://github.com/openfaas/golang-http-template
This command generated 3 files:
openfaas-go.ymlopenfaas-go/go.modopenfaas-go/handler.go
Let’s examine these files.
The openfaas-go.yml is our function manifest:
$ cat openfaas-go.yml
version: 1.0
provider:
  name: openfaas
  gateway: http://127.0.0.1:8080
functions:
  openfaas-go:
    lang: golang-http
    handler: ./openfaas-go
    image: docker.io/g1g1/openfaas-go:latest
Note that the image has the prefix of my Docker registry user account in case I want to push the image. Multiple functions can be defined in a single manifest file.
The go.mod is very basic:
$ cat openfaas-go/go.mod
module handler/function
go 1.18
The handler.go file is where we will write our code:
$ cat openfaas-go/handler.go
package function
import (
    "fmt"
    "net/http"
    handler "github.com/openfaas/templates-sdk/go-http"
)
// Handle a function invocation
func Handle(req handler.Request) (handler.Response, error) {
    var err error
    message := fmt.Sprintf("Body: %s", string(req.Body))
    return handler.Response{
        Body:       []byte(message),
        StatusCode: http.StatusOK,
    }, err
}
The default implementation is sort of an HTTP echo, where the response just returns the body of the request.
Let’s build it. The default output is very verbose and shows a lot of output from Docker, so I will use the --quiet flag:
$ faas-cli build -f openfaas-go.yml --quiet
[0] > Building openfaas-go.
Clearing temporary build folder: ./build/openfaas-go/
Preparing: ./openfaas-go/ build/openfaas-go/function
Building: docker.io/g1g1/openfaas-go:latest with golang-http template. Please wait..
Image: docker.io/g1g1/openfaas-go:latest built.
[0] < Building openfaas-go done in 0.93s.
[0] Worker done.
Total build time: 0.93s
The result is a Docker image:
$ docker images | grep openfaas
g1g1/openfaas-go                   latest         215e95884a9b   3 minutes ago   18.3MB
We can push this image to the Docker registry (or other registries) if you have an account:
$ faas-cli push -f openfaas-go.yml
[0] > Pushing openfaas-go [docker.io/g1g1/openfaas-go:latest].
The push refers to repository [docker.io/g1g1/openfaas-go]
668bbc37657f: Pushed
185851557ef2: Pushed
1d14a6a345f2: Pushed
5f70bf18a086: Pushed
ecf2d64591ca: Pushed
f6b0a98cfe18: Pushed
5d3e392a13a0: Mounted from library/golang
latest: digest: sha256:cb2b3051e2cac7c10ce78a844e331a5c55e9a2296c5c3ba9e0e8ee0523ceba84 size: 1780
[0] < Pushing openfaas-go [docker.io/g1g1/openfaas-go:latest] done.
The Docker image is now available on Docker Hub.

Figure 12.13: The Docker image is available on Docker Hub
The last step is to deploy the image to the cluster:
$ faas-cli deploy -f openfaas-go.yml
Deploying: openfaas-go.
Handling connection for 8080
Deployed. 202 Accepted.
URL: http://127.0.0.1:8080/function/openfaas-go
Let’s invoke our function a few times with a different request body to see that the response is accurate:
$ http POST http://127.0.0.1:8080/function/openfaas-go body='yeah, it works!' -b
Handling connection for 8080
Body: {
    "body": "yeah, it works!"
}
$ http POST http://127.0.0.1:8080/function/openfaas-go body='awesome!' -b
Handling connection for 8080
Body: {
    "body": "awesome!"
}
Yeah, it works! Awesome!
We can see our function and some statistics, like the number of invocations and the number of replicas, using the list command:
$ faas-cli list
Handling connection for 8080
Function                        Invocations     Replicas
openfaas-go                     6               1
To summarize, OpenFaaS provides a mature and comprehensive solution for functions as a service on Kubernetes. It still requires you to build a Docker image, push it, and deploy it to the cluster in separate steps using its CLI. It is relatively simple to incorporate these steps into a CI/CD pipeline or a simple script.
Fission
Fission (https://fission.io) is a mature and well-documented framework. It models the FaaS world as environments, functions, and triggers. Environments are needed to build and run your function code for the specific languages. Each language environment contains an HTTP server and often a dynamic loader (for dynamic languages). Functions are the objects that represent the serverless functions and triggers are how the functions deployed in the cluster can be invoked. There are 4 kinds of triggers:
- HTTP trigger: Invoke a function via the HTTP endpoint.
- Timer trigger: Invoke a function at a certain time.
- Message queue trigger: Invoke a function when an event is pulled from the message queue (supports Kafka, NATS, and Azure queues).
- Kubernetes watch trigger: Invoke a function in response to a Kubernetes event in your cluster.
It’s interesting that the message queue triggers are not just fire-and-forget. They support optional response and error queues. Here is a diagram that shows the flow:

Figure 12.14: Fission mq trigger
Fission is proud of its 100 millisecond cold start. It achieves it by keeping a pool of “warm” containers with a small dynamic loader. When a function is first called there is a running container ready to go, and the code is sent to this container for execution. In a sense, Fission cheats because it never starts cold. The bottom line is that Fission doesn’t scale to zero but is very fast for first-time calls.
Fission executor
Fission supports two types of executors - NewDeploy and PoolManager. The NewDeploy executor is very similar to OpenFaaS and creates a Deployment, Service, and HPA for each function. Here is what function invocation looks like with the NewDeploy executor:

Figure 12.15: Fission function invocation
The PoolManager executor manages a pool of generic pods per environment. When a function for a particular environment is invoked, the PoolManager executor will run it on one of the available generic pools.
The NewDeploy executor allows fine-grained control over the resources needed to run a particular function, and it can also scale to zero. This comes at the cost of a higher cold start being needed to create a new pod for each function. Note that pods stick around, so if the same function is invoked again soon after the last invocation, it doesn’t have to pay the cold start cost.
The PoolManager executor keeps generic pods around, so it is fast to invoke functions, but when no new functions need to be invoked, the pods in the pool just sit there idle. Also, functions can control the resources available to them.
You may use different executors for different functions depending on their usage patterns.

Figure 12.16: Fission executors
Fission workflows
Fission has one other claim to fame - Fission workflows. This is a separate project built on top of Fission. It allows you to build sophisticated workflows made of chains of Fission functions. It is currently in maintenance mode due to the time constraints of the core Fission team.
See the project’s page for more details: https://github.com/fission/fission-workflows.
Here is a diagram that describes the architecture of Fission workflows:
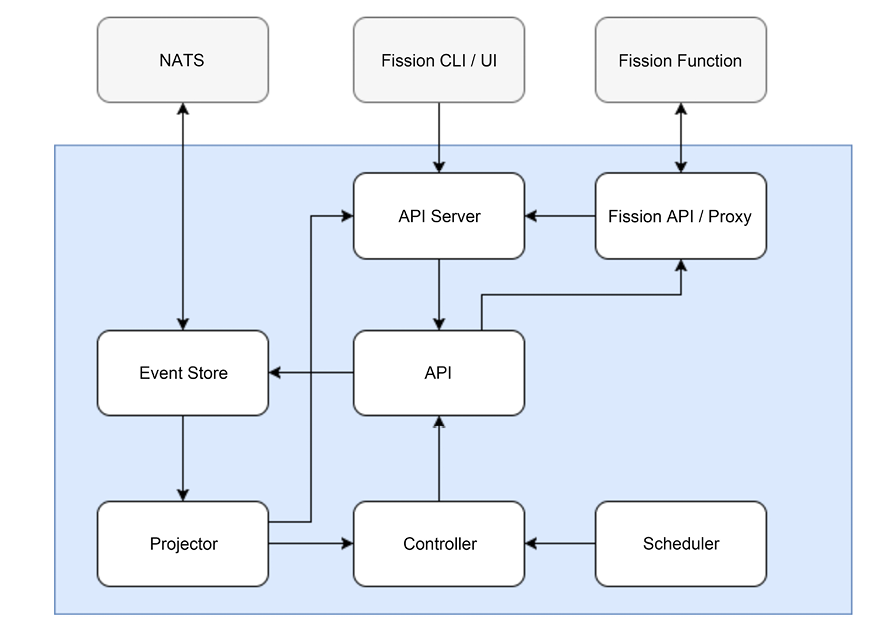
Figure 12.17: Fission workflows
You define workflows in YAML that specify tasks (often Fission functions), inputs, outputs, conditions, and delays. For example:
apiVersion: 1
description: Send a message to a slack channel when the temperature exceeds a certain threshold
output: CreateResult
# Input: 'San Fransisco, CA'
tasks:
  # Fetch weather for input
  FetchWeather:
    run: wunderground-conditions
    inputs:
      default:
        apiKey: <API_KEY>
        state: "{$.Invocation.Inputs.default.substring($.Invocation.Inputs.default.indexOf(',') + 1).trim()}"
        city: "{$.Invocation.Inputs.default.substring(0, $.Invocation.Inputs.default.indexOf(',')).trim()}"
  ToCelsius:
    run: tempconv
    inputs:
      default:
        temperature: "{$.Tasks.FetchWeather.Output.current_observation.temp_f}"
        format: F
        target: C
    requires:
    - FetchWeather
  # Send a slack message if the temperature threshold has been exceeded
  CheckTemperatureThreshold:
    run: if
    inputs:
      if: "{$.Tasks.ToCelsius.Output.temperature > 25}"
      then:
        run: slack-post-message
        inputs:
          default:
            message: "{'It is ' + $.Tasks.ToCelsius.Output.temperature + 'C in ' + $.Invocation.Inputs.default + ' :fire:'}"
            path: <HOOK_URL>
    requires:
    - ToCelsius
    # Besides the potential Slack message, compose the response of this workflow {location, celsius, fahrenheit}
  CreateResult:
    run: compose
    inputs:
      celsius: "{$.Tasks.ToCelsius.Output.temperature}"
      fahrenheit: "{$.Tasks.FetchWeather.Output.current_observation.temp_f}"
      location: "{$.Invocation.Inputs.default}"
      sentSlackMsg: "{$.Tasks.CheckTemperatureThreshold.Output}"
    requires:
    - ToCelsius
    - CheckTemperatureThreshold
Let’s give Fission a try:
Experimenting with Fission
First, let’s install it using Helm:
$ k create ns fission
$ k create -k "github.com/fission/fission/crds/v1?ref=v1.17.0"
$ helm repo add fission-charts https://fission.github.io/fission-charts/
$ helm repo update
$ helm install --version v1.17.0 --namespace fission fission
  --set serviceType=NodePort,routerServiceType=NodePort
  fission-charts/fission-all
Here are all the CRDs it created:
$ k get crd -o name | grep fission
customresourcedefinition.apiextensions.k8s.io/canaryconfigs.fission.io
customresourcedefinition.apiextensions.k8s.io/environments.fission.io
customresourcedefinition.apiextensions.k8s.io/functions.fission.io
customresourcedefinition.apiextensions.k8s.io/httptriggers.fission.io
customresourcedefinition.apiextensions.k8s.io/kuberneteswatchtriggers.fission.io
customresourcedefinition.apiextensions.k8s.io/messagequeuetriggers.fission.io
customresourcedefinition.apiextensions.k8s.io/packages.fission.io
customresourcedefinition.apiextensions.k8s.io/timetriggers.fission.io
The Fission CLI will come in handy too:
For Mac:
$ curl -Lo fission https://github.com/fission/fission/releases/download/v1.17.0/fission-v1.17.0-darwin-amd64 && chmod +x fission && sudo mv fission /usr/local/bin/
For Linux or Windows on WSL:
$ curl -Lo fission https://github.com/fission/fission/releases/download/v1.17.0/fission-v1.17.0-linux-amd64 && chmod +x fission && sudo mv fission /usr/local/bin/
We need to create an environment to be able to build our function. Let’s go with a Python environment:
$ fission environment create --name python --image fission/python-env
poolsize setting default to 3
environment 'python' created
With a Python environment in place we can create a serverless function. First, save this code to yeah.py:
def main():
    return 'Yeah, it works!!!'
Then, we create the Fission function called “yeah":
$ fission function create --name yeah --env python --code yeah.py
Package 'yeah-b9d5d944-9c6e-4e67-81fb-96e047625b74' created
function 'yeah' created
We can test the function through the Fission CLI:
$ fission function test --name yeah
Yeah, it works!!!
The real deal is invoking it through an HTTP endpoint. We need to create a route for that:
$ fission route create --method GET --url /yeah --function yeah --name yeah
trigger 'yeah' created
With the route in place we still need to port-forward the service pod to expose it to the local environment:
$ k -n fission port-forward $(k -n fission get pod -l svc=router -o name) 8888:8888 &
$ export FISSION_ROUTER=127.0.0.1:8888
With all the preliminaries out of the way, let’s test our function via httpie:
$ http http://${FISSION_ROUTER}/yeah -b
Handling connection for 8888
Yeah, it works!!!
You can skip the port-forwarding and test directly with the Fission CLI:
$ fission function test yeah --name yeah
Yeah, it works!!!
Fission is similar to OpenFaaS in its capabilities, but it feels a little bit more streamlined and easier to use. Both solutions are solid, and it’s up to you to pick the one that you prefer.
Summary
In this chapter, we covered the hot topic of serverless computing. We explained the two meanings of serverless - eliminating the need to manage servers as well as deploying and running functions as a service. We explored in depth the aspects of serverless infrastructure in the cloud, especially in the context of Kubernetes. We compared the built-in cluster autoscaler as a Kubernetes-native serverless solution to the offerings of other cloud providers, like AWS EKS+Fargate, Azure AKS+ACI, and Google Cloud Run. We then switched gears and dove into the exciting and promising Knative project, with its scale-to-zero capabilities and advanced deployment options. Then, we moved to the wild world of FaaS on Kubernetes.
We discussed the plethora of solutions out there and examined them in detail, including hands-on experiments with two of the most prominent and battle-tested solutions out there: OpenFaaS and Fission. The bottom line is that both flavors of serverless computing bring real benefits in terms of operations and cost management. It’s going to be fascinating to watch the evolution and consolidation of these technologies in the cloud and Kubernetes.
In the next chapter, our focus will be on monitoring and observability. Complex systems like large Kubernetes clusters with lots of different workloads, continuous delivery pipelines, and configuration changes must have excellent monitoring in place in order to keep all the balls in the air. Kubernetes has some great options that we should take advantage of.