
16
Governing Kubernetes
In the previous chapter, we discussed at length different ways to extend Kubernetes, including validating and mutating requests during the admission control phase.
In this chapter, we will learn about the growing role of Kubernetes in large enterprise organizations, what governance is, and how it is applied in Kubernetes. We will look at policy engines, review some popular ones, and then dive deep into Kyverno.
This ties in nicely with the previous chapter because policy engines are built on top of the Kubernetes admission control mechanism.
More and more enterprise organizations put more and more of their proverbial eggs in the Kubernetes basket. These large organizations have severe security, compliance, and governance needs. Kubernetes policy engines are here to address these concerns and make sure that enterprise organizations can fully embrace Kubernetes.
Here are the topics we will cover:
- Kubernetes in the enterprise
- What is Kubernetes governance?
- Policy engines
- A Kyverno deep dive
Let’s jump right in and understand the growing role and importance of Kubernetes in the enterprise.
Kubernetes in the enterprise
The journey and adoption rate of the Kubernetes platform are unprecedented. It launched officially in 2016, and in a few years it has conquered the world of infrastructure. 96% of organizations that participated in the most recent CNCF survey are using or evaluating Kubernetes. The penetration of Kubernetes is across multiple dimensions: organization size, geographical location, and production and no-production environments. What is even more impressive is that Kubernetes can go under the hood and become the foundation that other technologies and platforms are built on.
You can see this in its widespread adoption by all the cloud providers that offer various flavors of managed Kubernetes, as well as with the hosted platform-as-a-service offerings from many vendors. Check out the CNCF-certified Kubernetes software conformance list: https://www.cncf.io/certification/software-conformance.
Having a variety of certified vendors and value-added resellers, an ecosystem of multiple companies, etc. is extremely important for enterprise organizations. Enterprise organizations need much more than the latest shiny technology. The stakes are high, the failure rate of large infrastructure projects is high, and the consequences of failure are harsh. Combine all these factors, and the result is that enterprise organizations are very change-resistent and risk-averse when it comes to their technology. A lot of critical software systems in diverse fields like traffic control, insurance, healthcare, communication systems, and airlines are still running on software that was written 40–50 years ago, using languages like COBOL and Fortran.
Requirements of enterprise software
Let’s look at some requirements of enterprise software:
- Handling large amounts of data
- Integrating with other systems and applications
- Providing robust security features
- Being scalable and available
- Being flexible and customizable
- Being compliant
- Having support from trusted vendors
- Having strong governance (much more on that later)
How does Kubernetes fit the bill?
Kubernetes and enterprise software
The reason Kubernetes usage has grown so much in the enterprise software area is that it actually ticks all the boxes and keeps improving.
As the de facto standard for container orchestration platforms, it can serve as the foundation for all container-based deployment. Its ecosystem satisfies any integration needs, as every vendor must be able to run on Kubernetes. The long-term prospects for Kubernetes are extremely high, as it is a true team effort from many companies and organizations, and it is steered by an open and successful process that keeps delivering. Kubernetes spearheads the shift toward multi-cloud and hybrid-cloud deployments following industry-wide standards
The extensibility and flexibility of Kubernetes mean it can cater to any type of customization a particular enterprise will need.
It is truly a remarkable project that is designed on solid conceptual architecture and is able to deliver results consistently in the real world.
At this point it’s clear that Kubernetes is great for enterprise organizations, but how does it address the need for governance?
What is Kubernetes governance?
Governance is one of the important requirements for enterprise organizations. In a nutshell, it means controlling the way an organization operates. Some elements of governance are:
- Policies
- Ethics
- Processes
- Risk management
- Administration
Governance includes a way to specify policies and mechanisms to enforce the policies, as well as reporting and auditing. Let’s look at various areas and practices of governance in Kubernetes.
Image management
Containers run software baked into images. Managing these images is a critical activity in operating a Kubernetes-based system. There are several dimensions to consider: how do you bake your images? How do you vet third-party images? Where do you store your images? Making poor choices here can impact the performance of your system (for example, if you use large bloated base images) and crucially the security of your system (for example, if you use compromised or vulnerable base images). Image management policies can force image scanning or ensure that you can only use vetted images from specific image registries.
Pod security
The unit of work of Kubernetes is the pod. There are many security settings you can set for a pod and its containers. The default security settings are unfortunately very lax. Validating and enforcing pod security policies can remediate this. Kubernetes has strong support and guidance for pod security standards as well as several built-in profiles. Each pod has a security context as we discussed in Chapter 4, Securing Kubernetes.
See https://kubernetes.io/docs/concepts/security/pod-security-standards/ for more details.
Network policy
Kubernetes network policies control traffic flow between pods and other network entities at layers 3 and 4 of the OSI network model (IP addresses and ports). The network entities may be pods that have a specific set of labels or all pods in a namespace with a specific set of labels. Finally, a network policy can also block pod access to/from a specific IP block.
In the context of governance, network policies can be used to enforce compliance with security and regulatory requirements by controlling network access and communication between pods and other resources.
For example, network policies can be used to prevent pods from communicating with certain external networks. Network policies can also be used to enforce the separation of duties and prevent unauthorized access to sensitive resources within a cluster.
See https://kubernetes.io/docs/concepts/services-networking/network-policies/ for more details.
Configuration constraints
Kubernetes is very flexible and provides a lot of controls for many aspects of its operation. The DevOps practices often used in a Kubernetes-based system allow teams a lot of control over how their workloads are deployed, how they scale, and what resources they use. Kubernetes provides configuration constraints like quotas and limits. With more advanced admission controllers you can validate and enforce policies that control any aspect of resource creation, such as the maximum size of an auto-scaling deployment, the total amount of persistent volume claims, and requiring that memory requests always equal memory limits (not necessarily a good idea).
RBAC and admission control
Kubernetes RBAC (Role-Based Access Control) operates at the resource and verb level. Every Kubernetes resource has operations (verbs) that can be performed against it. With RBAC you define roles that are sets of permissions over resources, which you can apply at the namespace level or cluster level. It is a bit of a coarse-grained tool, but it is very convenient, especially if you segregate your resources at the namespace level and use cluster-level permissions only to manage workloads that operate across the entire cluster.
If you need something more granular that depends on specific attributes of resources, then admission controllers can handle it. We will explore this option later in the chapter when discussing policy engines.
Policy management
Governance is built around policies. Managing all these policies, organizing them, and ensuring they address the governance needs of an organization takes a lot of effort and is an ongoing task. Be prepared to devote resources to evolving and maintaining your policies.
Policy validation and enforcement
Once a set of policies are in place, you need to validate requests to the Kubernetes API server against those policies and reject requests that violate these policies. There is another approach to enforcing policies that involves mutating incoming requests to comply with a policy. For example, if a policy requires that each pod must have a memory request of at most 2 GiB, then a mutating policy can trim down the memory request of pods with larger memory requests to 2 GiB.
Polices don’t have to be rigid. Exceptions and exclusions can be made for special cases.
Reporting
When you manage a large number of policies and vet all requests it’s important to have visibility into how your policies can help you govern your system, prevent issues, and learn from usage patterns. Reports can provide insights by capturing and consolidating the results of policy decisions. As a human user you may view reports about policy violations and rejected and mutated requests, and detect trends or anomalies. At a higher level you can employ automated analysis, including an ML-based model to extract meaning from a large number of detailed reports.
Audit
Kubernetes audit logs provide a timestamped play-by-play of every event in the system. When you couple audit data with governance reports you can piece together the timeline of incidents, especially security incidents, where the culprit can be identified by combining data from multiple sources, starting with a policy violation and ending with a root cause.
So far, we have covered the terrain of what governance is and how it specifically relates to Kubernetes. We emphasized the importance of policies to govern your system. Let’s look at policy engines and how they implement these concepts.
Policy engines
Policy engines in Kubernetes provide comprehensive coverage of governance needs and complement built-in mechanisms, like network policies and RBAC. Policy engines can verify and ensure that your system utilizes best practices, follows security guidelines, and complies with external policies. In this section, we will look at admission control as the primary mechanism where policy engines hook into the system, the responsibilities of a policy engine, and a review of existing policy engines. After this, we will then dive deep into one of the best policy engines out there – Kyverno.
Admission control as the foundation of policy engines
Admission control is part of the life cycle of requests hitting the Kubernetes API server. We discussed it in depth in Chapter 15, Extending Kubernetes. As you recall, dynamic admission controllers are webhook servers that listen for admission review requests and accept, deny, or mutate them. Policy engines are first and foremost sophisticated admission controllers that register to listen for all requests that are relevant to their policies.
When a request comes in, the policy engine will apply all relevant policies to decide the fate of the request. For example, if a policy determines that Kubernetes services of the LoadBalancer type may be created only in a namespace called load_balancer, then the policy engine will register to listen for all Kubernetes service creation and update requests. When a service creation or update request arrives, the policy engine will check the type of the service and its namespace. If the service type is LoadBalancer and the namespace is not load_balancer, then the policy engine will reject the request. Note that this is something that can’t be done using RBAC. This is because RBAC can’t look at the type of service to determine if the request is valid or not.
Now that we understand how the policy engine utilizes the dynamic admission control process of Kubernetes, let’s look at the responsibilities of a policy engine.
Responsibilities of a policy engine
The policy engine is the primary tool for applying governance to a Kubernetes-based system. The policy engine should allow the administrators to define policies that go above and beyond the built-in Kubernetes policies, like RBAC and network policies. That often means coming up with a policy declaration language. The policy declaration language needs to be rich enough to cover all the nuances of Kubernetes, including fine-grained application to different resources and access to all the relevant information to base accept or reject decisions on for each resource.
The policy engine should also provide a way to organize, view, and manage policies. Ideally, the policy engine provides a good way to test policies before applying them to a live cluster.
The policy engine has to provide a way to deploy policies to the cluster, and of course, it needs to apply the policies that are relevant for each request and decide if the request should be accepted as is, rejected, or modified (mutated). A policy engine may provide a way to generate additional resources when a request comes in. For example, when a new Kubernetes deployment is created, a policy engine may automatically generate a Horizontal Pod Autoscaler for the deployment. A policy engine may also listen to events that occur in the cluster and take action. Note that this capability goes beyond dynamic admission control, but it still enforces policies on the cluster.
Let’s review some Kubernetes policy engines and how they fulfill these responsibilities.
Quick review of open source policy engines
When evaluating solutions, it’s very helpful to come up with evaluation criteria up front, since policy engines can deeply impact the operation of your Kubernetes cluster and its workloads’ maturity is a key element. Excellent documentation is crucial too, since the surface area of a policy engine is very large and you need to understand how to work with it. The capabilities of a policy engine determine what use cases it can handle. Writing policies is how administrators convey their governance intentions to the policy engine. It’s important to evaluate the user experience of writing and testing policies and what tooling is available to support these activities. Deploying the policies to the cluster is another must-have element. Finally, viewing reports and understanding the state of governance can be neglected.
We will review five policy engines along these dimensions.
OPA/Gatekeeper
Open Policy Agent (OPA) is a general-purpose policy engine that goes beyond Kubernetes (https://www.openpolicyagent.org). Its scope is very broad and it operates on any JSON value.
Gatekeeper (https://open-policy-agent.github.io/gatekeeper) brings the OPA policy engine to Kubernetes by packaging it as an admission control webhook.
OPA/Gatekeeper is definitely the most mature policy engine. It was created in 2017. It is a graduated CNCF project, and it has 2.9k stars on GitHub at the time of writing. It is even used as a foundation for Azure policy on AKS. See https://learn.microsoft.com/en-us/azure/governance/policy/concepts/policy-for-kubernetes.
OPA has its own special language called Rego (https://www.openpolicyagent.org/docs/latest/policy-language/) for defining policies. Rego has a strong theoretical basis inspired by Datalog, but it may not be very intuitive and easy to grasp.
The following diagram shows the architecture of OPA/Gatekeeper:

Figure 16.1: OPA/Gatekeeper architecture
Overall, OPA/Gatekeeper is very powerful but seems a little clunky compared to other Kubernetes policy engines, as the OPA policy engine is bolted on top of Kubernetes via Gatekeeper.
OPA/Gatekeeper has mediocre documentation that is not very easy to navigate. However, it does have a policy library you can use as a starting point.
However, if you appreciate the maturity, and you’re not too concerned about using Rego and some friction, it may be a good choice for you.
Kyverno
Kyverno (https://kyverno.io) is a mature and robust policy engine that was designed especially for Kubernetes from the get-go. It was created in 2019 and has made huge strides since then. It is a CNCF incubating project and has surpassed OPA/Gatekeeper in popularity on GitHub with 3.3k stars at the time of writing. Kyverno uses YAML JMESPath (https://jmespath.org) to define policies, which are really just Kubernetes custom resources. It has excellent documentation and a lot of examples to get you started writing your own policy.
Overall, Kyverno is both powerful and easy to use. It has huge momentum behind it, and it keeps getting better and improving its performance and operation at scale. It is the best Kubernetes policy engine at the moment in my opinion. We will dive deep into Kyverno later in this chapter.
jsPolicy
jsPolicy (https://www.jspolicy.com) is an interesting project from Loft that has brought virtual clusters to the Kubernetes community. Its claim to fame is that it runs policies in a secure and performant browser-like sandbox, and you define the policies in JavaScript or TypeScript. The approach is refreshing, and the project is very slick and streamlined with good documentation. Unfortunately, it seems like Loft is focused on other projects and jsPolicy doesn’t get a lot of attention. It has only 242 GitHub stars (https://github.com/loft-sh/jspolicy) at the time of writing, and the last commit was 6 months ago.
The idea of utilizing the JavaScript ecosystem to package and share policies, as well as use its robust tooling to test and debug policies, has a lot of merit.
jsPolicy provides validating, mutating, and controller policies. Controller policies allow you to react to events occurring in the cluster outside the scope of admission control.
The following diagram shows the architecture of jsPolicy:
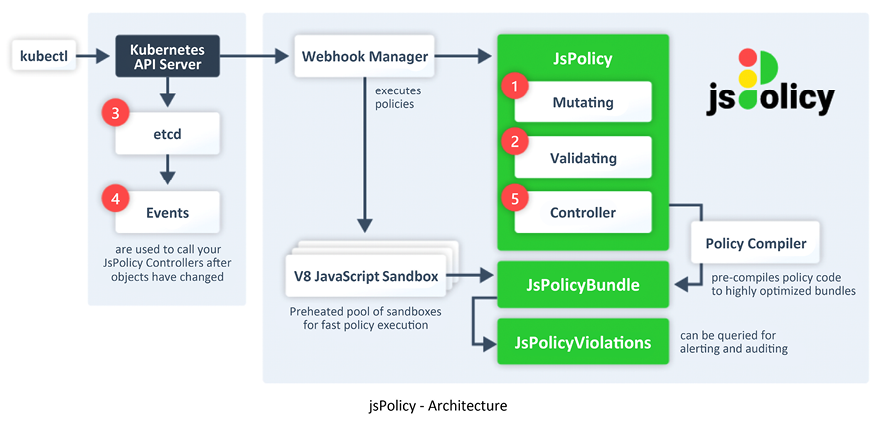
Figure 16.2: jsPolicy architecture
At this point, I wouldn’t commit to jsPolicy since it may have been abandoned. However, if Loft or someone else decides to invest in it, it may be a contender in the field of Kubernetes policy engines.
Kubewarden
Kubewarden (https://www.kubewarden.io) is another innovative policy engine. It is a CNCF sandbox project. Kubewarden focuses on being language-agnostic and allows you to write your policies in a variety of languages. The policies are then packaged into WebAssembly modules that are stored in any OCI registry.
In theory, you can use any language that can be compiled into WebAssembly. In practice, the following languages are supported, but there are limitations:
- Rust (of course, the most mature)
- Go (you need to use a special compiler, TinyGo, which doesn’t support all of Go’s features)
- Rego (using OPA directly or Gatekeeper – missing mutating policies)
- Swift (using SwiftWasm, which requires some post-build optimizations)
- TypeScript (or rather a subset called AssemblyScript)
Kubewarden supports validating, mutating, and context-aware policies. Context-aware policies are policies that use additional information to form an opinion of whether a request should be admitted or rejected. The additional information may include, for example, lists of namespaces, services, and ingresses that exist in the cluster.
Kubewarden has a CLI called kwctl (https://github.com/kubewarden/kwctl) for managing your policies.
Here is a diagram of Kubewarden’s architecture:

Figure 16.3: Kubewarden architecture
Kubewarden is still evolving and growing. It has some nice ideas and motivations, but at this stage, it may appeal to you most if you are on the Rust wagon and prefer to write your policies in Rust.
Now that we have looked at the landscape of Kubernetes open source policy engines, let’s dive in and take a closer look at Kyverno.
Kyverno deep dive
Kyverno is a rising star in the Kubernetes policy engine arena. Let’s get hands-on with it, and see how it works and why it is so popular. In this section, we will introduce Kyverno, install it, and learn how to write, apply, and test policies.
Quick intro to Kyverno
Kyverno is a policy engine that was designed especially for Kubernetes. If you have some experience working with kubectl, Kubernetes manifests, or YAML, then Kyverno will feel very familiar. You define policies and configuration using YAML manifests and the JMESPath language, which is very close to the JSONPATH format of kubectl.
The following diagram shows the Kyverno architecture:

Figure 16.4: Kyverno architecture
Kyverno covers a lot of ground and has many features:
- GitOps for policy management
- Resource validation (to reject invalid resources)
- Resource mutation (to modify invalid resources)
- Resource generation (to generate additional resources automatically)
- Verifying container images (important for software supply chain security)
- Inspecting image metadata
- Using label selectors and wildcards to match and exclude resources (Kubernetes-native)
- Using overlays to validate and mutate resources (similar to Kustomize!)
- Synchronizing configurations across namespaces
- Operating in reporting or enforcing mode
- Applying policies using a dynamic admission webhook
- Applying policies at CI/CD time using the Kyverno CLI
- Testing policies and validating resources ad hoc using the Kyverno CLI
- High-availability mode
- Fail open or closed (allowing or rejecting resources when the Kyverno admission webhook is down)
- Policy violation reports
- Web UI for easy visualization
- Observability support
This is an impressive list of features and capabilities. The Kyverno developers keep evolving and improving it. Kyverno has made big strides in scalability, performance, and the ability to handle a large number of policies and resources.
Let’s install Kyverno and configure it.
Installing and configuring Kyverno
Kyverno follows a similar upgrade policy as Kubernetes itself, where the node components version must be at most two minor versions below the control plane version. At the time of writing, Kyverno 1.8 is the latest version, which supports Kubernetes versions 1.23–1.25.
We can install Kyverno using kubectl or Helm. Let’s go with the Helm option:
$ helm repo add kyverno https://kyverno.github.io/kyverno/
"kyverno" has been added to your repositories
$ helm repo update
Hang tight while we grab the latest from your chart repositories...
...Successfully got an update from the "kyverno" chart repository
Update Complete. Happy Helming!
Let’s install Kyverno, using the default single replica, into its own namespace. Using one replica is NOT recommended for production, but it’s okay for experimenting with Kyverno. To install it in high-availability mode, add the --set replicaCount=3 flag:
$ helm install kyverno kyverno/kyverno -n kyverno --create-namespace
NAME: kyverno
LAST DEPLOYED: Sat Dec 31 15:34:11 2022
NAMESPACE: kyverno
STATUS: deployed
REVISION: 1
NOTES:
Chart version: 2.6.5
Kyverno version: v1.8.5
Thank you for installing kyverno! Your release is named kyverno.
 WARNING: Setting replicas count below 3 means Kyverno is not running in high availability mode.
 Note: There is a trade-off when deciding which approach to take regarding Namespace exclusions. Please see the documentation at https://kyverno.io/docs/installation/#security-vs-operability to understand the risks.
Let’s observe what we have just installed using the ketall kubectl plugin: (https://github.com/corneliusweig/ketall):
$ k get-all -n kyverno
NAME                                                          NAMESPACE  AGE
configmap/kube-root-ca.crt                                    kyverno    2m27s
configmap/kyverno                                             kyverno    2m26s
configmap/kyverno-metrics                                     kyverno    2m26s
endpoints/kyverno-svc                                         kyverno    2m26s
endpoints/kyverno-svc-metrics                                 kyverno    2m26s
pod/kyverno-7c444878f7-gfht8                                  kyverno    2m26s
secret/kyverno-svc.kyverno.svc.kyverno-tls-ca                 kyverno    2m22s
secret/kyverno-svc.kyverno.svc.kyverno-tls-pair               kyverno    2m21s
secret/sh.helm.release.v1.kyverno.v1                          kyverno    2m26s
serviceaccount/default                                        kyverno    2m27s
serviceaccount/kyverno                                        kyverno    2m26s
service/kyverno-svc                                           kyverno    2m26s
service/kyverno-svc-metrics                                   kyverno    2m26s
deployment.apps/kyverno                                       kyverno    2m26s
replicaset.apps/kyverno-7c444878f7                            kyverno    2m26s
lease.coordination.k8s.io/kyverno                             kyverno    2m23s
lease.coordination.k8s.io/kyverno-health                      kyverno    2m13s
lease.coordination.k8s.io/kyvernopre                          kyverno    2m25s
lease.coordination.k8s.io/kyvernopre-lock                     kyverno    2m24s
endpointslice.discovery.k8s.io/kyverno-svc-7ghzl              kyverno    2m26s
endpointslice.discovery.k8s.io/kyverno-svc-metrics-qflr5      kyverno    2m26s
rolebinding.rbac.authorization.k8s.io/kyverno:leaderelection  kyverno    2m26s
role.rbac.authorization.k8s.io/kyverno:leaderelection         kyverno    2m26s
As you can see, Kyverno installed all the expected resources: deployment, services, roles and role bindings, config maps, and secrets. We can tell that Kyverno exposes metrics and uses leader election too.
In addition, Kyverno installed many CRDs (at the cluster scope):
$ k get crd
NAME                                      CREATED AT
admissionreports.kyverno.io               2022-12-31T23:34:12Z
backgroundscanreports.kyverno.io          2022-12-31T23:34:12Z
clusteradmissionreports.kyverno.io        2022-12-31T23:34:12Z
clusterbackgroundscanreports.kyverno.io   2022-12-31T23:34:12Z
clusterpolicies.kyverno.io                2022-12-31T23:34:12Z
clusterpolicyreports.wgpolicyk8s.io       2022-12-31T23:34:12Z
generaterequests.kyverno.io               2022-12-31T23:34:12Z
policies.kyverno.io                       2022-12-31T23:34:12Z
policyreports.wgpolicyk8s.io              2022-12-31T23:34:12Z
updaterequests.kyverno.io                 2022-12-31T23:34:12Z
Finally, Kyverno configures several admission control webhooks:
$ k get validatingwebhookconfigurations
NAME                                      WEBHOOKS   AGE
kyverno-policy-validating-webhook-cfg     1          40m
kyverno-resource-validating-webhook-cfg   1          40m
$ k get mutatingwebhookconfigurations
NAME                                    WEBHOOKS   AGE
kyverno-policy-mutating-webhook-cfg     1          40m
kyverno-resource-mutating-webhook-cfg   0          40m
kyverno-verify-mutating-webhook-cfg     1          40m
The following diagram shows the result of a typical Kyverno installation:

Figure 16.5: Typical Kyverno installation
Installing pod security policies
Kyverno has an extensive library of pre-built policies. We can install the pod security standard policies (see https://kyverno.io/policies/pod-security/) using Helm too:
$ helm install kyverno-policies kyverno/kyverno-policies -n kyverno-policies --create-namespace
NAME: kyverno-policies
LAST DEPLOYED: Sat Dec 31 15:48:26 2022
NAMESPACE: kyverno-policies
STATUS: deployed
REVISION: 1
TEST SUITE: None
NOTES:
Thank you for installing kyverno-policies 2.6.5
We have installed the "baseline" profile of Pod Security Standards and set them in audit mode.
Visit https://kyverno.io/policies/ to find more sample policies.
We have installed the "baseline" profile of Pod Security Standards and set them in audit mode.
Visit https://kyverno.io/policies/ to find more sample policies.
Note that the policies themselves are cluster policies and are not visible in the namespace kyverno-policies:
$ k get clusterpolicies.kyverno.io
NAME                             BACKGROUND   VALIDATE ACTION   READY
disallow-capabilities            true         audit             true
disallow-host-namespaces         true         audit             true
disallow-host-path               true         audit             true
disallow-host-ports              true         audit             true
disallow-host-process            true         audit             true
disallow-privileged-containers   true         audit             true
disallow-proc-mount              true         audit             true
disallow-selinux                 true         audit             true
restrict-apparmor-profiles       true         audit             true
restrict-seccomp                 true         audit             true
restrict-sysctls                 true         audit             true
We will review some of these policies in depth later. First, let’s see how to configure Kyverno.
Configuring Kyverno
You can configure the behavior of Kyverno by editing the Kyverno config map:
$ k get cm kyverno -o yaml -n kyverno | yq .data
resourceFilters: '[*,kyverno,*][Event,*,*][*,kube-system,*][*,kube-public,*][*,kube-node-lease,*][Node,*,*][APIService,*,*][TokenReview,*,*][SubjectAccessReview,*,*][SelfSubjectAccessReview,*,*][Binding,*,*][ReplicaSet,*,*][AdmissionReport,*,*][ClusterAdmissionReport,*,*][BackgroundScanReport,*,*][ClusterBackgroundScanReport,*,*][ClusterRole,*,kyverno:*][ClusterRoleBinding,*,kyverno:*][ServiceAccount,kyverno,kyverno][ConfigMap,kyverno,kyverno][ConfigMap,kyverno,kyverno-metrics][Deployment,kyverno,kyverno][Job,kyverno,kyverno-hook-pre-delete][NetworkPolicy,kyverno,kyverno][PodDisruptionBudget,kyverno,kyverno][Role,kyverno,kyverno:*][RoleBinding,kyverno,kyverno:*][Secret,kyverno,kyverno-svc.kyverno.svc.*][Service,kyverno,kyverno-svc][Service,kyverno,kyverno-svc-metrics][ServiceMonitor,kyverno,kyverno-svc-service-monitor][Pod,kyverno,kyverno-test]'
webhooks: '[{"namespaceSelector": {"matchExpressions":
[{"key":"kubernetes.io/metadata.name","operator":"NotIn","values":["kyverno"]}]}}]'
The resourceFilters flag is a list in the format [kind,namespace,name], where each element may be a wildcard too, that tells Kyverno which resources to ignore. Resources that match any of the filters will not be subject to any Kyverno policy. This is good practice if you have a lot of policies to save the evaluation effort against all policies.
The webHooks flag allows you to filter out whole namespaces.
The excludeGroupRole flag is a string of comma-separated roles. It will exclude requests, where a user has one of the specified roles from Kyverno admission control. The default list is system:serviceaccounts:kube-system,system:nodes,system:kube-scheduler.
The excludeUsername flag represents a string consisting of Kubernetes usernames separated by commas. When a user enables Synchronize in generate policy, Kyverno becomes the only entity capable of updating or deleting generated resources. However, administrators have the ability to exclude specific usernames from accessing the delete/update-generated resource functionality.
The generateSuccessEvents flag is a Boolean parameter used to determine whether success events should be generated. By default, this flag is set to false, indicating that success events are not generated.
Furthermore, the Kyverno container provides several container arguments that can be configured to customize its behavior and functionality. These arguments allow for fine-tuning and customization of Kyverno’s behavior within the container. You can edit the list of args in the Kyverno deployment:
$ k get deploy kyverno -n kyverno -o yaml | yq '.spec.template.spec.containers[0].args'
- --autogenInternals=true
- --loggingFormat=text
In addition to the pre-configured --autogenInternals and --loggingFormat, the following flags are available:
admissionReportsallowInsecureRegistryautoUpdateWebhooksbackgroundScanclientRateLimitBurstclientRateLimitQPSdisableMetricsenableTracinggenWorkersimagePullSecretsimageSignatureRepositorykubeconfigmaxQueuedEventsmetricsPortotelCollectorotelConfigprofileprofilePortprotectManagedResourcesreportsChunkSizeserverIPsplitPolicyReport(deprecated – will be removed in 1.9)transportCredswebhookRegistrationTimeoutwebhookTimeout
All the flags have a default value, and you only need to specify them if you want to override the defaults.
Check out https://kyverno.io/docs/installation/#container-flags for details on each flag.
We installed Kyverno, observed the various resources it installed, and looked at its configuration. It’s time to check out the policies and rules of Kyverno.
Applying Kyverno policies
At the user level, the unit of work in Kyverno is policies. You can apply policies as Kubernetes resources, write and edit your own policies, and test policies using the Kyverno CLI.
Applying a Kyverno policy is as simple as applying any other resource. Let’s take a look at one of the policies we installed earlier:
$ k get clusterpolicies.kyverno.io disallow-capabilities
NAME                    BACKGROUND   VALIDATE ACTION   READY
disallow-capabilities   true         audit             true
The purpose of the policy is to prevent pods from requesting extra Linux capabilities beyond the allowed list (see https://linux-audit.com/linux-capabilities-101/). One of the capabilities that is not allowed is NET_ADMIN. Let’s create a pod that requests this capability:
$ cat <<EOF | kubectl apply -f -
apiVersion: v1
kind: Pod
metadata:
  name: some-pod
spec:
  containers:
  - name: some-container
    command: [ "sleep", "999999" ]
    image: g1g1/py-kube:0.3
    securityContext:
      capabilities:
        add: ["NET_ADMIN"]
EOF
pod/some-pod created
The pod was created, and we can verify that it has the NET_ADMIN capability. I use a kind cluster, so the cluster node is just a Docker process we can exec into:
$ docker exec -it kind-control-plane sh
#
Now that we’re in a shell inside the node, we can search for the process of our container, which just sleeps for 999,999 seconds:
# ps aux | grep 'PID|sleep' | grep -v grep
USER         PID %CPU %MEM    VSZ   RSS TTY      STAT START   TIME COMMAND
root        4549  0.0  0.0 148276  6408 ?        Ssl  02:54   0:00 /usr/bin/qemu-x86_64 /bin/sleep 999999
Let’s check the capabilities of our process, 4549:
# getpcaps 4549
4549: cap_chown,cap_dac_override,cap_fowner,cap_fsetid,cap_kill,cap_setgid,cap_setuid,cap_setpcap,cap_net_bind_service,cap_net_admin,cap_net_raw,cap_sys_chroot,cap_mknod,cap_audit_write,cap_setfcap=ep
As you can see the cap_net_admin is present.
Kyverno didn’t prevent the pod from being created because the policy operates in audit mode only:
$ k get clusterpolicies.kyverno.io disallow-capabilities -o yaml | yq .spec.validationFailureAction
audit
Let’s delete the pod and change the policy to “enforce” mode:
$ k delete po some-pod
pod "some-pod" deleted
$ k patch clusterpolicies.kyverno.io disallow-capabilities --type merge -p '{"spec": {"validationFailureAction": "enforce"}}'
clusterpolicy.kyverno.io/disallow-capabilities patched
Now, if we try to create the pod again, the result is very different:
$ cat <<EOF | kubectl apply -f -
apiVersion: v1
kind: Pod
metadata:
  name: some-pod
spec:
  containers:
  - name: some-container
    command: [ "sleep", "999999" ]
    image: g1g1/py-kube:0.3
    securityContext:
      capabilities:
        add: ["NET_ADMIN"]
EOF
Error from server: error when creating "STDIN": admission webhook "validate.kyverno.svc-fail" denied the request:
policy Pod/kyverno-policies/some-pod for resource violation:
disallow-capabilities:
  adding-capabilities: Any capabilities added beyond the allowed list (AUDIT_WRITE,
    CHOWN, DAC_OVERRIDE, FOWNER, FSETID, KILL, MKNOD, NET_BIND_SERVICE, SETFCAP, SETGID,
    SETPCAP, SETUID, SYS_CHROOT) are disallowed.
The Kyverno admission webhook enforced the policy and rejected the pod creation. It even tells us which policy was responsible (disallow-capabilities) and displays a nice message that explains the reason for the rejection, including a list of the allowed capabilities.
It is pretty simple to apply policies. Writing policies is much more involved and requires an understanding of resource requests, Kyverno matching rules, and the JMESPath language. Before we can write policies, we need to understand how they are structured and what their different elements are.
Kyverno policies in depth
In this section, we will learn all the fine details about Kyverno policies. A Kyverno policy has a set of rules that define what the policy actually does and several general settings that define how the policy behaves in different scenarios. Let’s start with the policy settings and then move on to rules and different use cases, such as validating, mutating, and generating resources.
Understanding policy settings
A Kyverno policy may have the following settings:
applyRulesvalidationFailureActionvalidationFailureActionOverridesbackgroundschemaValidationfailurePolicywebhookTimeoutSeconds
The applyRules setting determines if only one or multiple rules apply to matching resources. The valid values are “One” and “All” (the default). If applyRules is set to “One” then the first matching rule will be evaluated and other rules will be ignored.
The validationFailureAction setting determines if a failed validation policy rule should reject the admission request or just report it. The valid values are “audit” (default – always allows and just reports violations) and “enforce” (blocks invalid requests).
The validationFailureActionOverrides setting is a ClusterPolicy attribute that overrides the validationFailureAction for specific namespaces.
The background setting determines if policies are applied to existing resources during a background scan. The default is “true”.
The schemaValidation setting determines if policy validation checks are applied. The default is “true”.
The failurePolicy setting determines how the API server behaves if the webhook fails to respond. The valid values are “Ignore” and “Fail” (the default). If the setting is “Fail” then even valid resource requests will be denied, while the webhook is unreachable.
The webhookTimeoutSeconds determines the maximum time in seconds that the webhook is allowed to evaluate a policy. The valid values are between 1 and 30 seconds. The default is 10 seconds. If the webhook failed to respond in time, the failurePolicy (see above) determines the fate of the request.
Understanding Kyverno policy rules
Each Kyverno policy has one or more rules. Each rule has a match declaration, an optional exclude declaration, an optional preconditions declaration, and exactly one of the following declarations:
validatemutategenerateverifyImages
The diagram below demonstrates the structure of a Kyverno policy and its rules (policy settings are omitted):
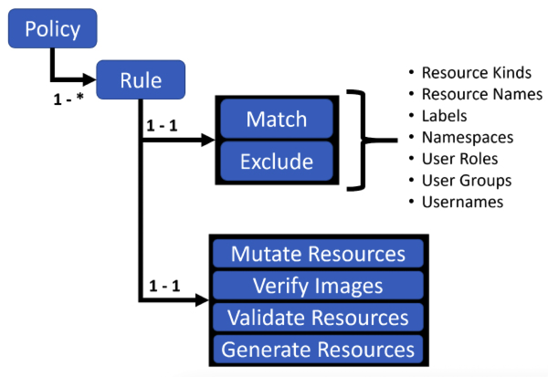
Figure 16.6: Kyverno rule structure
Let’s go over the different declarations and explore some advanced topics too.
Matching requests
When a resource request arrives, the Kyverno webhook needs to determine for each policy if the requested resource and/or operation is relevant for the current policy. The mandatory match declaration has several filters that determine if the policy should evaluate the current request. The filters are:
resourcessubjectsrolesclusterRoles
A match declaration may have multiple filters grouped under an any statement or an all statement. When filters are grouped under any, then Kyverno will apply OR semantics to match them, and if any of the filters match the request, the request is considered matched. When filters are grouped under all, then Kyverno will apply AND semantics, and all the filters must match in order for the request to be considered a match.
This can be a little overwhelming. Let’s look at an example. The following policy spec has a single rule called some-rule. The rule has a match declaration with two resource filters under an any statement. The first resource filter matches resources of kind Service with names service-1 or service-2. The second resource filter matches resources of kind Service in the namespace ns-1. This rule will match any Kubernetes service named service-1 or service-2 in any namespace, as well as any service in the namespace ns-1.
spec:
  rules:
  - name: some-rule
    match:
      any:
      - resources:
          kinds:
          - Service
          names:
          - "service-1"
          - "service-2"
      - resources:
          kinds:
          - Service
          namespaces:
          - "ns-1"
Let’s look at another example. This time we add a cluster role filter. The following rule will match requests where the kind is a service named service-1 and the requesting user has a cluster role called some-cluster-role.
  rules:
    - name: some-rule
      match:
        all:
          - resources:
              kinds:
                - Service
              names:
                - "service-1"
            clusterRoles:
              - some-cluster-role
The admission review resource contains all the roles and cluster roles bound to the requesting user or service account.
Excluding resources
Excluding resources is very similar to matching. It is very common to set policies that disallow all requests to create or update some resources unless they are made in certain namespaces or by users with certain roles. Here is an example that matches all services but excludes the ns-1 namespace:
rules:
- name: some-rule
  match:
    any:
      - resources:
          kinds:
            - Service
  exclude:
    any:
      - resources:
          namespaces:
            - "ns-1"
Another common exclusion is for specific roles like cluster-admin.
Using preconditions
Limiting the scope of a policy using match and exclude is great, but in many cases it is not sufficient. Sometimes, you need to select resources based on fine-grained details such as memory requests. Here is an example that matches all pods that request memory of less than 1 GiB.
The syntax for the key value uses JMESPath (https://jmespath.org) on the built-in request object:
  rules:
  - name: memory-limit
    match:
      any:
      - resources:
          kinds:
          - Pod
    preconditions:
      any:
      - key: "{{request.object.spec.containers[*].resources.requests.memory}}"
        operator: LessThan
        value: 1Gi
Validating requests
The primary use case of Kyverno is validating requests. Validating rules have a validate statement. The validate statement has a message field that will be displayed if the request fails to validate. A validating rule has two forms, pattern-based validation and deny-based validation. Let’s examine each of them. As you may recall, the result of a resource failing to validate depends on the validationFailureAction field, which can be audit or enforce.
Pattern-based validation
A rule with pattern-based validation has a pattern field under the validate statement. If the resource doesn’t match the pattern, the rule failed. Here is an example of pattern-based validation, where the resource must have a label called app:
   validate:
      message: "The resource must have a label named `app`."
      pattern:
        metadata:
          labels:
            some-label: "app"
The validation part will only be applied to requests that comply with the match and preconditions statements and are not excluded by the exclude statement, if there are any.
You can also apply operators to values in the pattern – for example, here is a validation rule that requires that the number of replicas of a deployment will be at least 3:
  rules:
    - name: validate-replica-count
      match:
        any:
        - resources:
            kinds:
            - Deployment
      validate:
        message: "Replica count for a Deployment must be at least 3."
        pattern:
          spec:
            replicas: ">=3"
Deny-based validation
A rule with deny-based validation has a deny field under the validate statement. Deny rules are similar to the preconditions that we saw earlier for selecting resources. Each deny condition has a key, an operator, and a value. A common use for the deny condition is disallowing a specific operation such as DELETE. The following examples use deny-based validation to prevent the deletion of Deployments and StatefulSets. Note the use of request variables both for the message and the key. For DELETE operations the deleted object is defined as request.oldObject and not request.object:
rules:
  - name: block-deletes-of-deployments-and-statefulsets
    match:
      any:
      - resources:
          kinds:
            - Deployment
            - Statefulset
    validate:
      message: "Deleting {{request.oldObject.kind}}/{{request.oldObject.metadata.name}} is not allowed"
      deny:
        conditions:
          any:
          - key: "{{request.operation}}"
            operator: Equals
            value: DELETE
There is more to validation, which you can explore here: https://kyverno.io/docs/writing-policies/validate/
Let’s turn our attention to mutations.
Mutating resources
Mutation may sound scary, but all it is is modifying the resource in a request in some way. Note that the mutated request will still go through validation even if it matches any policy. It is not possible to change the kind of the requested object, but you can change its properties. The benefit of mutation is that you can automatically fix invalid requests, which is typically a better user experience instead of blocking invalid requests. The downside (especially if the invalid resources were created as part of a CI/CD pipeline) is that it creates a dissonance between the source code and the actual resources in the cluster. However, it is great for use cases where you want to control some aspects that users don’t need to be aware of, as well as during migration.
Enough theory – let’s see what mutation looks like in Kyverno. You still need to select the resources to mutate, which means that the match, exclude, and precondition statements are still needed for mutation policies.
However, instead of a validate statement you will have a mutate statement. Here is an example that uses the patchStrategicMerge flavor to set the imagePullPolicy of containers that use an image with the latest tag. The syntax is similar to Kustomize overlays and merges with the existing resource. The reason the image field is in parentheses is because of a JMESPath feature called anchors (https://kyverno.io/docs/writing-policies/validate/#anchors), where the rest of the subtree is applied only if the given field matches it. In this case it means the imagePullPolicy will only be set for images that satisfy the condition:
mutate:
  patchStrategicMerge:
    spec:
      containers:
        # match images which end with :latest
        - (image): "*:latest"
          # set the imagePullPolicy to "IfNotPresent"
          imagePullPolicy: "IfNotPresent"```
The other flavor of mutation is JSON Patch (http://jsonpatch.com), which is specified in RFC 6902 (https://datatracker.ietf.org/doc/html/rfc6902). JSON Patch has similar semantics to preconditions and deny rules. The patch has an operation, path, and value. It applies the operation to the patch with the value. The operation can be one of:
addremovereplacecopymovetest
Here is an example of adding some data to a config map using JSON Patch. It adds multiple fields to the /data/properties path and a single value to the /data/key path:
spec:
  rules:
    - name: patch-config-map
      match:
        any:
        - resources:
            names:
              - the-config-map
            kinds:
              - ConfigMap
      mutate:
        patchesJson6902: |-
          - path: "/data/properties"
            op: add
            value: |
              prop-1=value-1
              prop-2=value-2
          - path: "/data/key"
            op: add
            value: some-string
Generating resources
Generating resources is an interesting use case. Whenever a request comes in, Kyverno may create new resources instead of mutating or validating the request (other policies may validate or mutate the original request).
A policy with a generate rule has the same match and/or exclude statements as other policies. This means it can be triggered by any resource request as well as existing resources. However, instead of validating or mutating, it generates a new resource when the origin resource is created. A generate rule has an important property called synchronize. When synchronize is true, the generated resource is always in sync with the origin resource (when the origin resource is deleted, the generated resource is deleted as well). Users can’t modify or delete a generated resource. When synchronize is false, Kyverno doesn’t keep track of the generated resource, and users can modify or delete it at will.
Here is a generate rule that creates a NetworkPolicy that prevents any traffic when a new Namespace is created. Note the data field, which defines the generated resource:
spec:
  rules:
  - name: deny-all-traffic
    match:
      any:
      - resources:
          kinds:
          - Namespace
    generate:
      kind: NetworkPolicy
      apiVersion: networking.k8s.io/v1
      name: deny-all-traffic
      namespace: "{{request.object.metadata.name}}"
      data:
        spec:
          # select all pods in the namespace
          podSelector: {}
          policyTypes:
          - Ingress
          - Egress
When generating resources for an existing origin resource instead of a data field, a clone field is used. For example, if we have a config map called config-template in the default namespace, the following generate rule will clone that config map into every new namespace:
spec:
  rules:
  - name: clone-config-map
    match:
      any:
      - resources:
          kinds:
          - Namespace
    generate:
      kind: ConfigMap
      apiVersion: v1
      # Name of the generated resource
      name: default-config
      namespace: "{{request.object.metadata.name}}"
      synchronize: true
      clone:
        namespace: default
        name: config-template
It’s also possible to clone multiple resources by using a cloneList field instead of a clone field.
Advanced policy rules
Kyverno has some additional advanced capabilities, such as external data sources and autogen rules for pod controllers.
External data sources
So far we’ve seen how Kyverno uses information from an admission review object to perform validation, mutation, and generation. However, sometimes additional data is needed. This is done by defining a context field with variables that can be populated from an external config map, the Kubernetes API server, or an image registry.
Here is an example of defining a variable called dictionary and using it to mutate a pod and add a label called environment, where the value comes from the config map variable:
    rules:
    - name: configmap-lookup
      context:
      - name: dictionary
        configMap:
          name: some-config-map
          namespace: some-namespace
      match:
        any:
        - resources:
            kinds:
            - Pod
      mutate:
        patchStrategicMerge:
          metadata:
            labels:
              environment: "{{dictionary.data.env}}"
The way it works is that the context named “dictionary” points to a config map. Inside the config map there is a section called “data” with a key called “env”.
Autogen rules for pod controllers
Pods are one of the most common resources to apply policies to. However, pods can be created indirectly by many types of resources: Pods (directly), Deployments, StatefulSets, DaemonSets, and Jobs. If we want to verify that every pod has a label called “app” then we will be forced to write complex match rules with an any statement that covers all the various resources that create pods. Kyverno provides a very elegant solution in the form of autogen rules for pod controllers.
The auto-generated rules can be observed in the status of the policy object. We will see an example in the next section.
We covered in detail a lot of the powerful capabilities Kyverno brings to the table. Let’s write some policies and see them in action.
Writing and testing Kyverno policies
In this section, we will actually write some Kyverno policies and see them in action. We will use some of the rules we explored in the previous section and embed them in full-fledged policies, apply the policies, create resources that comply with the policies as well as resources that violate the policies (in the case of validating policies), and see the outcome.
Writing validating policies
Let’s start with a validating policy that disallows services in the namespace ns-1 as well as services named service-1 or service-2 in any namespace:
$ cat <<EOF | k apply -f -
apiVersion: kyverno.io/v1
kind: ClusterPolicy
metadata:
  name: disallow-some-services
spec:
  validationFailureAction: Enforce
  rules:
    - name: some-rule
      match:
        any:
          - resources:
              kinds:
                - Service
              names:
                - "service-1"
                - "service-2"
          - resources:
              kinds:
                - Service
              namespaces:
                - "ns-1"
      validate:
        message: >-
         services named service-1 and service-2 and
         any service in namespace ns-1 are not allowed
        deny: {}
EOF
clusterpolicy.kyverno.io/disallow-some-services created
Now that the policy is in place, let’s try to create a service named “service-1” in the default namespace that violates the policy. Note that there is no need to actually create resources to check the outcome of admission control. It is sufficient to run in dry-run mode as long as the dry-run happens on the server side:
$ k create service clusterip service-1 -n default --tcp=80 --dry-run=server
error: failed to create ClusterIP service: admission webhook "validate.kyverno.svc-fail" denied the request:
policy Service/default/service-1 for resource violations:
disallow-some-services:
  some-rule: services named service-1 and service-2 and  any service in namespace
    ns-1 are not allowed
exclude-services-namespace:
  some-rule: services are not allowed, except in the ns-1 namespace
As you can see, the request was rejected, with a nice message from the policy that explains why.
If we try to do the dry-run on the client side, it succeeds (but doesn’t actually create any service), as the admission control check happens only on the server:
$ k create service clusterip service-1 -n default --tcp=80 --dry-run=client
service/service-1 created (dry run)
Now that we have proved the point, we will use only a server-side dry-run.
Let’s try to create a service called service-3 in the default namespace, which should be allowed:
$ k create service clusterip service-3 -n default --tcp=80 --dry-run=server
service/service-3 created (server dry run)
Let’s try to create service-3 in the forbidden ns-1 namespace:
$ k create ns ns-1
$ k create service clusterip service-3 -n ns-1 --tcp=80 --dry-run=server
error: failed to create ClusterIP service: admission webhook "validate.kyverno.svc-fail" denied the request:
policy Service/ns-1/service-3 for resource violation:
disallow-some-services:
  some-rule: services named service-1 and service-2 and  any service in namespace
    ns-1 are not allowed
Yep. That failed as expected. Let’s see what happens if we change the validationFailureAction from Enforce to Audit:
$ k patch clusterpolicies.kyverno.io disallow-some-services --type merge -p '{"spec": {"validationFailureAction": "Audit"}}'
clusterpolicy.kyverno.io/disallow-some-services patched
$ k create service clusterip service-3 -n ns-1 --tcp=80 --dry-run=server
service/service-3 created (server dry run)
However, it generated a report of validation failure:
$ k get policyreports.wgpolicyk8s.io -n ns-1
NAME                          PASS   FAIL   WARN   ERROR   SKIP   AGE
cpol-disallow-some-services   0      1      0      0       0      2m4s
Now, the service passes the admission control, but a record of the violation was captured in the policy report. We will look at reports in more detail later in the chapter.
For now, let’s look at mutating policies.
Writing mutating policies
Mutating policies are a lot of fun. They quietly modify incoming requests to comply with the policy. They don’t cause failures like validating policies in “enforce” mode, and they don’t generate reports you need to scour through like validating policies in “audit” mode. If an invalid or incomplete request comes in, you just change it until it’s valid.
Here is a policy that sets the imagePullPolicy to IfNotPresent when the tag is latest (by default it is Always).
$ cat <<EOF | k apply -f -
apiVersion: kyverno.io/v1
kind: ClusterPolicy
metadata:
  name: set-image-pull-policy
spec:
  rules:
    - name: set-image-pull-policy
      match:
        any:
          - resources:
              kinds:
                - Pod
      mutate:
        patchStrategicMerge:
          spec:
            containers:
              # match images which end with :latest
              - (image): "*:latest"
                # set the imagePullPolicy to "IfNotPresent"
                imagePullPolicy: "IfNotPresent"
EOF
clusterpolicy.kyverno.io/set-image-pull-policy created
Let’s see it in action. Note that for a mutating policy, we can’t use dry-run because the whole point is to actually mutate a resource.
The following pod matches our policy and doesn’t have imagePullPolicy set:
$ cat <<EOF | k apply -f -
apiVersion: v1
kind: Pod
metadata:
  name: some-pod
spec:
  containers:
    - name: some-container
      image: g1g1/py-kube:latest
      command:
        - sleep
        - "9999"
EOF
pod/some-pod created
Let’s verify that the mutation worked and check the container’s imagePullPolicy:
$ k get po some-pod -o yaml | yq '.spec.containers[0].imagePullPolicy'
IfNotPresent
Yes. It was set correctly. Let’s confirm that Kyverno was responsible for setting the imagePullPolicy by deleting the policy and then creating another pod:
$ k delete clusterpolicy set-image-pull-policy
clusterpolicy.kyverno.io "set-image-pull-policy" deleted
$ cat <<EOF | k apply -f -
apiVersion: v1
kind: Pod
metadata:
  name: another-pod
spec:
  containers:
    - name: some-container
      image: g1g1/py-kube:latest
      command:
        - sleep
        - "9999"
EOF
pod/another-pod created
The Kyverno policy was deleted, and another pod called another-pod with the same image g1g1/py-kube:latest was created. Let’s see if its imagePullPolicy is the expected Always (the default for images with the latest image tag):
$ k get po another-pod -o yaml | yq '.spec.containers[0].imagePullPolicy'
Always
Yes, it works how it should! Let’s move on to another type of exciting Kyverno policy – a generating policy, which can create new resources out of thin air.
Writing generating policies
Generating policies create new resources in addition to the requested resource when a new resource is created. Let’s take our previous example of creating an automatic network policy for new namespaces that prevents any network traffic from coming in and out. This is a cluster policy that applies to any new namespace except the excluded namespaces:
cat <<EOF | k apply -f -
apiVersion: kyverno.io/v1
kind: ClusterPolicy
metadata:
  name: deny-all-traffic
spec:
  rules:
  - name: deny-all-traffic
    match:
      any:
      - resources:
          kinds:
          - Namespace
    exclude:
      any:
      - resources:
          namespaces:
          - kube-system
          - default
          - kube-public
          - kyverno
    generate:
      kind: NetworkPolicy
      apiVersion: networking.k8s.io/v1
      name: deny-all-traffic
      namespace: "{{request.object.metadata.name}}"
      data:
        spec:
          # select all pods in the namespace
          podSelector: {}
          policyTypes:
          - Ingress
          - Egress
EOF
clusterpolicy.kyverno.io/deny-all-traffic created
The deny-all-traffic Kyverno policy was created successfully. Let’s create a new namespace, ns-2, and see if the expected NetworkPolicy is generated:
$ k create ns ns-2
namespace/ns-2 created
$ k get networkpolicy -n ns-2
NAME               POD-SELECTOR   AGE
deny-all-traffic   <none>         15s
Yes, it worked! Kyverno lets you easily generate additional resources.
Now that we have some hands-on experience in creating Kyverno policies, let’s learn about how to test them and why.
Testing policies
Testing Kyverno policies before deploying them to production is very important because Kyverno policies are very powerful, and they could easily cause outages and incidents if misconfigured by blocking valid requests, allowing invalid requests, improperly mutating resources, and generating resources in the wrong namespaces.
Kyverno offers tooling as well as guidance about testing its policies.
The Kyverno CLI
The Kyverno CLI is a versatile command-line program that lets you apply policies on the client side and see the results, run tests, and evaluate JMESPath expressions.
Follow these instructions to install the Kyverno CLI: https://kyverno.io/docs/kyverno-cli/#building-and-installing-the-cli.
Verify that it was installed correctly by checking the version:
$ kyverno version
Version: 1.8.5
Time: 2022-12-20T08:41:43Z
Git commit ID: c19061758dc4203106ab6d87a245045c20192721
Here is the help screen if you just type kyverno with no additional command:
$ kyverno
Kubernetes Native Policy Management
Usage:
  kyverno [command]
Available Commands:
  apply       applies policies on resources
  completion  Generate the autocompletion script for the specified shell
  help        Help about any command
  jp          Provides a command-line interface to JMESPath, enhanced with Kyverno specific custom functions
  test        run tests from directory
  version     Shows current version of kyverno
Flags:
      --add_dir_header           If true, adds the file directory to the header of the log messages
  -h, --help                     help for kyverno
      --log_file string          If non-empty, use this log file (no effect when -logtostderr=true)
      --log_file_max_size uint   Defines the maximum size a log file can grow to (no effect when -logtostderr=true). Unit is megabytes. If the value is 0, the maximum file size is unlimited. (default 1800)
      --one_output               If true, only write logs to their native severity level (vs also writing to each lower severity level; no effect when -logtostderr=true)
      --skip_headers             If true, avoid header prefixes in the log messages
      --skip_log_headers         If true, avoid headers when opening log files (no effect when -logtostderr=true)
  -v, --v Level                  number for the log level verbosity
Use "kyverno [command] --help" for more information about a command.
Earlier in the chapter we saw how to evaluate the results of a validating Kyverno policy without actually creating resources, using a dry-run. This is not possible for mutating or generating policies. With kyverno apply we can achieve the same effect for all policy types.
Let’s see how to apply a mutating policy to a resource and examine the results. We will apply the set-image-pull-policy to a pod stored in the file some-pod.yaml. The policy was defined earlier, and is available in the attached code as the file mutate-image-pull-policy.yaml.
First, let’s see what the result would be if we just created the pod without applying the Kyverno policy:
$ k apply -f some-pod.yaml -o yaml --dry-run=server | yq '.spec.containers[0].imagePullPolicy'
Always
It is Always. Now, we will apply the Kyverno policy to this pod resource and check the outcome:
$ kyverno apply mutate-image-pull-policy.yaml --resource some-pod.yaml
Applying 1 policy rule to 1 resource...
mutate policy set-image-pull-policy applied to default/Pod/some-pod:
apiVersion: v1
kind: Pod
metadata:
  name: some-pod
  namespace: default
spec:
  containers:
  - command:
    - sleep
    - "9999"
    image: g1g1/py-kube:latest
    imagePullPolicy: IfNotPresent
    name: some-container
---
pass: 1, fail: 0, warn: 0, error: 0, skip: 2
As you can see, after the mutating policy is applied to some-pod, the imagePullPolicy is IfNotPresent as expected.
Let’s play with the kyverno jp sub-command. It accepts standard input or can take a file.
Here is an example that checks how many arguments the command of the first container in a pod has. We will use this pod manifest as input:
$ cat some-pod.yaml
apiVersion: v1
kind: Pod
metadata:
  name: some-pod
spec:
  containers:
    - name: some-container
      image: g1g1/py-kube:latest
      command:
        - sleep
        - "9999"
Note that it has a command called sleep with a single argument, “9999”. We expect the answer to be 1. The following command does the trick:
$ cat some-pod.yaml | kyverno jp 'length(spec.containers[0].command) | subtract(@, `1`)'
1
How does it work? First it pipes the content of some-pod.yaml to the kyverno jp command with the JMESPath expression that takes the length of the command of the first container (an array with two elements, “sleep” and “9000”), and then it pipes it to the subtract() function, which subtracts 1 and, hence, ends up with the expected result of 1.
The Kyverno CLI commands apply and jp are great for ad hoc exploration and the quick prototyping of complex JMESPath expressions. However, if you use Kyverno policies at scale (and you should), then I recommend a more rigorous testing practice. Luckily Kyverno has good support for testing via the kyverno test command. Let’s see how to write and run Kyverno tests.
Understanding Kyverno tests
The kyverno test command operates on a set of resources and policies governed by a file called kyverno-test.yaml, which defines what policy rules should be applied to which resources and what the expected outcome is. It then returns the results.
The result of applying a policy rule to a resource can be one of the following four:
pass– the resource matches the policy and doesn’t trigger thedenystatement (only for validating policies)fail– the resource matches the policy and triggers the deny statement (only for validating policies)skip– the resource doesn’t match the policy definition and the policy wasn’t appliedwarn– the resource doesn’t comply with the policy but has an annotation:policies.kyverno.io/scored: "false"
If the expected outcome of the test doesn’t match the result of applying the policy to the resource, then the test will be considered a failure.
For mutating and generating policies, the test will include patchedResource and generatedResource respectively.
Let’s see what the kyverno-test.yaml file looks like:
name: <some name>
policies:
  - <path/to/policy.yaml>
  - <path/to/policy.yaml>
resources:
  - <path/to/resource.yaml>
  - <path/to/resource.yaml>
variables: variables.yaml # optional file for declaring variables
userinfo: user_info.yaml # optional file for declaring admission request information (roles, cluster roles and subjects)
results:
- policy: <name>
  rule: <name>
  resource: <name>
  resources: # optional, primarily for `validate` rules. One of either `resource` or `resources[]` must be specified. Use `resources[]` when a number of different resources should all share the same test result.
  - <name_1>
  - <name_2>
  namespace: <name> # when testing for a resource in a specific Namespace
  patchedResource: <file_name.yaml> # when testing a mutate rule this field is required.
  generatedResource: <file_name.yaml> # when testing a generate rule this field is required.
  kind: <kind>
  result: pass
Many different test cases can be defined in a single kyverno-test.yaml file. The file has five sections:
policiesresourcesvariablesuserInforesults
The policies and resources sections specify paths to all the policies and resources that participate in the tests. The variables and userInfo optional sections can define additional information that will be used by the test cases.
The results section is where the various test cases are specified. Each test case tests the application of a single policy rule to a single resource. If it’s a validating rule, then the result field should contain the expected outcome.
If it’s a mutating or generating rule, then the corresponding patchedResource or generatedResource should contain the expected outcome.
Let’s write some Kyverno tests for our policies.
Writing Kyverno tests
All the files mentioned here are available in the tests sub-directory of the code attached to the chapter.
Let’s start by writing our kyverno-test.yaml file:
name: test-some-rule
policies:
  - ../disallow-some-services-policy.yaml
resources:
  - test-service-ok.yaml
  - test-service-bad-name.yaml
  - test-service-bad-namespace.yaml
results:
  - policy: disallow-some-services
    rule: some-rule
    resources:
      - service-ok
    kind: Service
    result: skip
  - policy: disallow-some-services
    rule: some-rule
    resources:
      - service-1
    kind: Service
    result: fail
  - policy: disallow-some-services
    rule: some-rule
    resources:
      - service-in-ns-1
    kind: Service
    namespace: ns-1
    result: fail
The policies section contains the disallow-some-services-policy.yaml file. This policy rejects services named service-1 or service-2 and any service in the ns-1 namespace.
The resources section contains three different files that all contain a Service resource:
test-service-ok.yamltest-service-bad-name.yamltest-service-bad-namespace.yaml
The test-service-ok.yaml file contains a service that doesn’t match any of the rules of the policy. The test-service-bad-name.yaml file contains a service named service-1, which is not allowed. Finally, the test-service-bad-namespace.yaml file contains a resource named service-in-ns-1, which is allowed. However, it has the ns-1 namespace, which is not allowed.
Let’s look at the results section. There are three different test cases here. They all test the same rule in our policy, but each test case uses a different resource name. This comprehensively covers the behavior of the policy.
The first test case verifies that a service that doesn’t match the rule is skipped. It specifies the policy, the rule name, the resources the test case should be applied to, and most importantly, the expected result, which is skip in this case:
  - policy: disallow-some-services
    rule: some-rule
    resources:
      - service-ok
    result: skip
The second test case is similar except that the resource name is different and the expected result is fail:
  - policy: disallow-some-services
    rule: some-rule
    resources:
      - service-1
    kind: Service
    result: fail
There is one more slight difference. In this test case, the kind of the target resource is explicitly specified (kind: Service). This may seem redundant at first glance because the service-1 resource defined in test-service-bad-name.yaml already has the kind listed:
apiVersion: v1
kind: Service
metadata:
  labels:
    app: service-1
  name: service-1
  namespace: ns-2
spec:
  ports:
    - name: https
      port: 443
      targetPort: https
  selector:
    app: some-app
The reason the kind field is needed is to disambiguate which resource is targeted, in case the resource file contains multiple resources with the same name.
The third test case is the same as the second test case, except it targets a different resource and, as a consequence, a different part of the rule (disallowing services in the ns-1 namespace):
  - policy: disallow-some-services
    rule: some-rule
    resources:
      - service-in-ns-1
    kind: Service
    namespace: ns-1
    result: fail
OK. We have our test cases. Let’s see how to run these tests.
Running Kyverno tests
Running Kyverno tests is very simple. You just type kyverno test and the path to the folder containing a kyverno-test.yaml file or a Git repository and a branch.
Let’s run our tests:
$ kyverno test .
Executing test-some-rule...
applying 1 policy to 3 resources...
│───│────────────────────────│───────────│──────────────────────────────│────────│
│ # │ POLICY                 │ RULE      │ RESOURCE                     │ RESULT │
│───│────────────────────────│───────────│──────────────────────────────│────────│
│ 1 │ disallow-some-services │ some-rule │ ns-2//service-ok             │ Pass   │
│ 2 │ disallow-some-services │ some-rule │ ns-2/Service/service-1       │ Pass   │
│ 3 │ disallow-some-services │ some-rule │ ns-1/Service/service-in-ns-1 │ Pass   │
│───│────────────────────────│───────────│──────────────────────────────│────────│
Test Summary: 3 tests passed and 0 tests failed
We get a nice output that lists each test case and then a one-line summary. All three tests passed, so that’s great.
When you have test files that contain a lot of test cases and you try to tweak one specific rule, you may want to run a specific test case only. Here is the syntax:
kyverno test . --test-case-selector "policy=disallow-some-services, rule=some-rule, resource=service-ok"
The kyverno test command has very good documentation with a lot of examples. Just type kyverno test -h.
So far, we have written policies, rules, and policy tests and executed them. The last piece of the puzzle is viewing reports when Kyverno is running.
Viewing Kyverno reports
Kyverno generates reports for policies with validate or verifyImages rules. Only policies in audit mode or that have spec.background: true will generate reports.
As you recall Kyverno can generate two types of reports in the form of custom resources. PolicyReports are generated for namespace-scoped resources (like services) in the namespace the resource was applied. ClusterPolicyReports are generated for cluster-scoped resources (like namespaces).
Our disallow-some-services policy has a validate rule and operates in audit mode, which means that if we create a service that violates the rule, the service will be created, but a report will be generated. Here we go:
$ k create service clusterip service-3 -n ns-1 --tcp=80
service/service-3 created
We created a service in the forbidden ns-1 namespace. Kyverno didn’t block the creation of the service because of audit mode. Let’s review the report (that polr is shorthand for policyreports):
$ k get polr -n ns-1
NAME                          PASS   FAIL   WARN   ERROR   SKIP   AGE
cpol-disallow-some-services   0      1      0      0       0      1m
A report named cpol-disallow-some-services was created. We can see that it counted one failure. What happens if we create another service?
$ k create service clusterip service-4 -n ns-1 --tcp=80
service/service-4 created
$ k get polr -n ns-1
NAME                          PASS   FAIL   WARN   ERROR   SKIP   AGE
cpol-disallow-some-services   0      2      0      0       0      2m
Yep. Another failure is reported. The meaning of these failures is that the resource failed to pass the validate rule. Let’s peek inside. The report has a metadata field, which includes an annotation for the policy it represents. Then there is a results section where each failed resource is listed. The info for each result includes the resource that caused the failure and the rule it violated. Finally, the summary contains aggregate information about the results:
$ k get polr cpol-disallow-some-services -n ns-1 -o yaml
apiVersion: wgpolicyk8s.io/v1alpha2
kind: PolicyReport
metadata:
  creationTimestamp: "2023-01-22T04:01:12Z"
  generation: 3
  labels:
    app.kubernetes.io/managed-by: kyverno
    cpol.kyverno.io/disallow-some-services: "2472317"
  name: cpol-disallow-some-services
  namespace: ns-1
  resourceVersion: "2475547"
  uid: dadcd6ae-a867-4ec8-bf09-3e6ca76da7ba
results:
- message: services named service-1 and service-2 and  any service in namespace ns-1
    are not allowed
  policy: disallow-some-services
  resources:
  - apiVersion: v1
    kind: Service
    name: service-4
    namespace: ns-1
    uid: 4d473ac1-c1b1-4929-a70d-fad98a411428
  result: fail
  rule: some-rule
  scored: true
  source: kyverno
  timestamp:
    nanos: 0
    seconds: 1674361576
- message: services named service-1 and service-2 and  any service in namespace ns-1
    are not allowed
  policy: disallow-some-services
  resources:
  - apiVersion: v1
    kind: Service
    name: service-3
    namespace: ns-1
    uid: 62458ac4-fe39-4854-9f5a-18b26109511a
  result: fail
  rule: some-rule
  scored: true
  source: kyverno
  timestamp:
    nanos: 0
    seconds: 1674361426
summary:
  error: 0
  fail: 2
  pass: 0
  skip: 0
  warn: 0
This is pretty nice, but it might not be the best option to keep track of your cluster if you have a lot of namespaces. It’s considered best practice to collect all the reports and periodically export them to a central location. Check out the Policy reporter project: https://github.com/kyverno/policy-reporter. It also comes with a web-based policy reporter UI.
Let’s install it:
$ helm repo add policy-reporter https://kyverno.github.io/policy-reporter
"policy-reporter" has been added to your repositories
$ helm repo update
Hang tight while we grab the latest from your chart repositories...
...Successfully got an update from the "policy-reporter" chart repository
...Successfully got an update from the "kyverno" chart repository
Update Complete. Happy Helming!
$ helm upgrade --install policy-reporter policy-reporter/policy-reporter --create-namespace -n policy-reporter --set ui.enabled=true
Release "policy-reporter" does not exist. Installing it now.
NAME: policy-reporter
LAST DEPLOYED: Sat Jan 21 20:39:42 2023
NAMESPACE: policy-reporter
STATUS: deployed
REVISION: 1
TEST SUITE: None
The policy reporter has been installed successfully in the policy-reporter namespace, and we enabled the UI.
The next step is to do port-forwarding to access the UI:
$ k port-forward service/policy-reporter-ui 8080:8080 -n policy-reporter
Forwarding from 127.0.0.1:8080 -> 8080
Forwarding from [::1]:8080 -> 8080
Now, we can browse http://localhost:8080 and view policy reports visually.
The dashboard shows the failing policy reports. We can see our 20 failures in the kube-system namespace and our 2 failures in the ns-1 namespace.
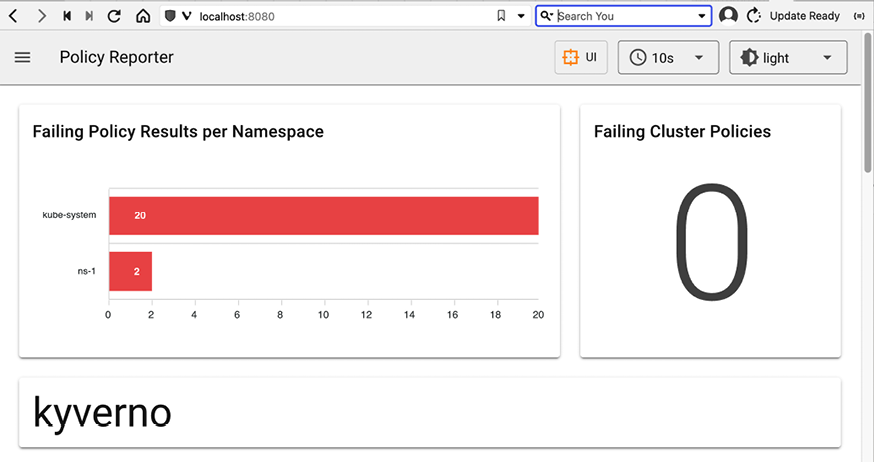
Figure 16.7: Policy Reporter UI – Dashboard
The failures in kube-system are due to the best practice security policies we installed with Kyverno.
We can scroll down and see more details about the failures:

Figure 16.8: Policy Reporter UI – Results
We can also select from the sidebar the “Policy Reports” option and then see passing results. We can also filter policy reports using different criteria like policies, kinds, categories, severities, and namespaces:
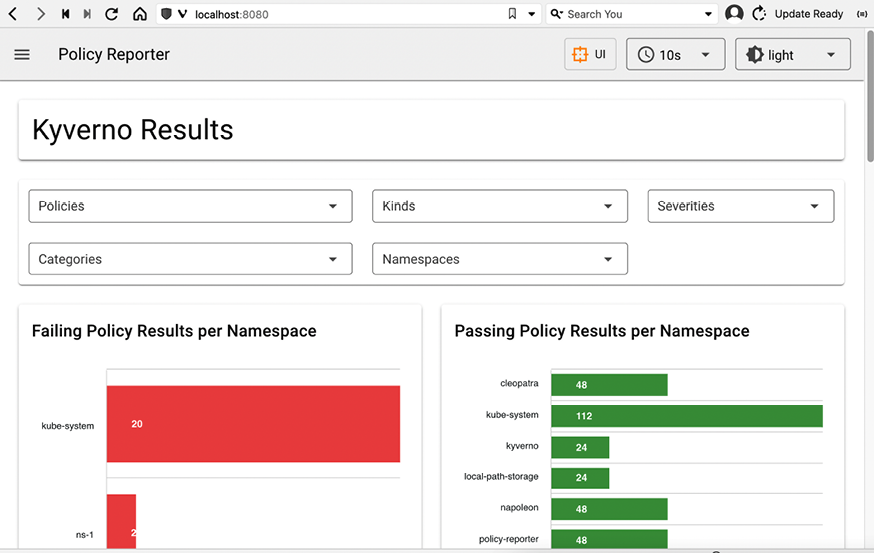
Figure 16.9: Policy Reporter UI – Policy Reports
Overall, the policy reporter UI has a slick look and provides a great option for exploring, filtering, and searching policy reports.
Summary
In this chapter, we covered the increasing adoption of Kubernetes in large enterprise organizations and the importance of governance in managing these deployments. We looked at the concept of policy engines and how they are built on top of the Kubernetes admission control mechanism. We discussed how policy engines are used to address security, compliance, and governance concerns. We also provided a review of popular policy engines. Finally, we did a deep dive into Kyverno, in which we explained in detail how it works. Then, we jumped in, wrote some policies, tested them, and reviewed policy reports. If you run a non-trivial production system on Kubernetes, you should very seriously consider having Kyverno (or another policy engine) as a core component. This is a perfect segue to the next chapter where we will discuss Kubernetes in production.