1
Understanding Kubernetes Architecture
In one sentence, Kubernetes is a platform to orchestrate the deployment, scaling, and management of container-based applications. You have probably read about Kubernetes, and maybe even dipped your toes in and used it in a side project or maybe even at work. But to understand what Kubernetes is all about, how to use it effectively, and what the best practices are requires much more.
Kubernetes is a big open source project and ecosystem with a lot of code and a lot of functionality. Kubernetes came out of Google, but joined the Cloud Native Computing Foundation (CNCF) and is now the de facto standard in the space of container-based applications. According to the 2021 CNCF survey, 96% of organizations use or evaluate Kubernetes.
In this chapter, we will build the foundation necessary to utilize Kubernetes to its full potential. We will start by understanding what Kubernetes is, what Kubernetes isn’t, and what container orchestration means exactly. Then we will cover important Kubernetes concepts that will form the vocabulary we will use throughout the book. After that, we will dive into the architecture of Kubernetes properly and look at how it enables all the capabilities it provides for its users. Then, we will discuss how Kubernetes supports multiple container runtimes in a generic way.
The topics we will discuss are:
- What is Kubernetes?
- What Kubernetes is not
- Understanding container orchestration
- Kubernetes concepts
- Diving into Kubernetes architecture in depth
- Kubernetes container runtimes
At the end of this chapter, you will have a solid understanding of container orchestration, what problems Kubernetes addresses, the rationale of Kubernetes design and architecture, and the different runtime engines it supports.
What is Kubernetes?
Kubernetes is a platform that encompasses a huge number of services and capabilities that keeps growing. The core functionality is scheduling workloads in containers across your infrastructure, but it doesn’t stop there. Here are some of the other capabilities Kubernetes brings to the table:
- Providing authentication and authorization
- Debugging applications
- Accessing and ingesting logs
- Rolling updates
- Using Cluster Autoscaling
- Using the Horizontal Pod Autoscaler
- Replicating application instances
- Checking application health and readiness
- Monitoring resources
- Balancing loads
- Naming and service discovery
- Distributing secrets
- Mounting storage systems
We will cover all these capabilities in great detail throughout the book. At this point, just absorb and appreciate how much value Kubernetes can add to your system.
Kubernetes has impressive scope, but it is also important to understand what Kubernetes explicitly doesn’t provide.
What Kubernetes is not
Kubernetes is not a Platform as a Service (PaaS). It doesn’t dictate many important aspects that are left to you or to other systems built on top of Kubernetes, such as OpenShift and Tanzu. For example:
- Kubernetes doesn’t require a specific application type or framework
- Kubernetes doesn’t require a specific programming language
- Kubernetes doesn’t provide databases or message queues
- Kubernetes doesn’t distinguish apps from services
- Kubernetes doesn’t have a click-to-deploy service marketplace
- Kubernetes doesn’t provide a built-in function as a service solution
- Kubernetes doesn’t mandate logging, monitoring, and alerting systems
- Kubernetes doesn’t provide a CI/CD pipeline
Understanding container orchestration
The primary responsibility of Kubernetes is container orchestration. That means making sure that all the containers that execute various workloads are scheduled to run on physical or virtual machines. The containers must be packed efficiently following the constraints of the deployment environment and the cluster configuration. In addition, Kubernetes must keep an eye on all running containers and replace dead, unresponsive, or otherwise unhealthy containers. Kubernetes provides many more capabilities that you will learn about in the following chapters. In this section, the focus is on containers and their orchestration.
Physical machines, virtual machines, and containers
It all starts and ends with hardware. In order to run your workloads, you need some real hardware provisioned. That includes actual physical machines, with certain compute capabilities (CPUs or cores), memory, and some local persistent storage (spinning disks or SSDs). In addition, you will need some shared persistent storage and to hook up all these machines using networking, so they can find and talk to each other. At this point, you run multiple virtual machines on the physical machines or stay at the bare-metal level (no virtual machines). Kubernetes can be deployed on a bare-metal cluster (real hardware) or on a cluster of virtual machines. Kubernetes in turn can orchestrate the containers it manages directly on bare-metal or on virtual machines. In theory, a Kubernetes cluster can be composed of a mix of bare-metal and virtual machines, but this is not very common. There are many more esoteric configurations with different levels of encapsulation, such as virtual Kubernetes clusters running inside the namespaces of another Kubernetes cluster.
The benefits of containers
Containers represent a true paradigm shift in the development and operation of large, complicated software systems. Here are some of the benefits compared to more traditional models:
- Agile application creation and deployment
- Continuous development, integration, and deployment
- Development and operations separation of concerns
- Environmental consistency across development, testing, staging, and production
- Cloud and OS distribution portability
- Application-centric management
- Resource isolation
- Resource utilization
Containers in the cloud
Microservices are the dominant architecture for modern large-scale systems. The primary idea is to break down the system into small services with well-defined responsibilities that manage their own data and communicate with other microservices through well-defined APIs.
Containers are ideal to package microservices because, while providing isolation to the microservice, they are very lightweight and you don’t incur a lot of overhead when deploying many microservices, as you do with virtual machines. That makes containers ideal for cloud deployment, where allocating a whole virtual machine for each microservice would be cost-prohibitive.
All major cloud providers, such as Amazon AWS, Google’s GCE, and Microsoft’s Azure, provide container hosting services these days. Many other companies jumped on the Kubernetes bandwagon and offer managed Kubernetes services, including IBM IKS, Alibaba Cloud, DigitalOcean DKS, Oracle OKS, OVH Managed Kubernetes, and Rackspace KaaS.
Google’s GKE was always based on Kubernetes. AWS Elastic Kubernetes Service (EKS) was added in addition to the proprietary AWS ECS orchestration solution. Microsoft Azure’s container service used to be based on Apache Mesos, but later switched to Kubernetes with Azure Kubernetes Service (AKS). You could always deploy Kubernetes on all the cloud platforms, but it wasn’t deeply integrated with other services. But, at the end of 2017 all cloud providers announced direct support for Kubernetes. Microsoft launched AKS, and AWS released EKS. Also, various other companies offer managed Kubernetes services such as IBM, Oracle, Digital Ocean, Alibaba, Tencent, and Huawei.
Cattle versus pets
In the olden days, when systems were small, each server had a name. Developers and users knew exactly what software was running on each machine. I remember that, in many of the companies I worked for, we had multi-day discussions to decide on a naming theme for our servers. For example, composers and Greek mythology characters were popular choices. Everything was very cozy. You treated your servers like beloved pets. When a server died it was a major crisis. Everybody scrambled to try to figure out where to get another server, what was even running on the dead server, and how to get it working on the new server. If the server stored some important data, then hopefully you had an up-to-date backup, and maybe you’d even be able to recover it.
Obviously, that approach doesn’t scale. When you have tens or hundreds of servers, you must start treating them like cattle. You think about the collective and not individuals. You may still have some pets like your CI/CD machines (although managed CI/CD solutions are becoming more common), but your web servers and backend services are just cattle.
Kubernetes takes the cattle approach to the extreme and takes full responsibility for allocating containers to specific machines. You don’t need to interact with individual machines (nodes) most of the time. This works best for stateless workloads. For stateful applications, the situation is a little different, but Kubernetes provides a solution called StatefulSet, which we’ll discuss soon.
In this section, we covered the idea of container orchestration and discussed the relationships between hosts (physical or virtual) and containers, as well as the benefits of running containers in the cloud. We then finished with a discussion about cattle versus pets. In the following section, we will get to know the world of Kubernetes and learn its concepts and terminology.
Kubernetes concepts
In this section, we’ll briefly introduce many important Kubernetes concepts and give you some context as to why they are needed and how they interact with each other. The goal is to get familiar with these terms and concepts. Later, we will see how these concepts are woven together and organized into API groups and resource categories to achieve awesomeness. You can consider many of these concepts as building blocks. Some concepts, such as nodes and the control plane, are implemented as a set of Kubernetes components. These components are at a different abstraction level, and we will discuss them in detail in a dedicated section, Kubernetes components.
Here is the Kubernetes architecture diagram:
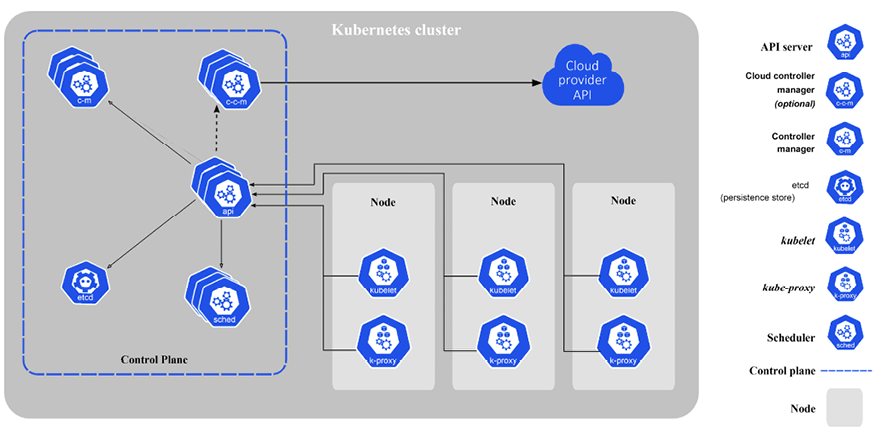
Figure 1.1: Kubernetes architecture
Node
A node is a single host. It may be a physical or virtual machine. Its job is to run pods. Each Kubernetes node runs several Kubernetes components, such as the kubelet, the container runtime, and the kube-proxy. Nodes are managed by the Kubernetes control plane. The nodes are the worker bees of Kubernetes and shoulder all the heavy lifting. In the past they were called minions. If you read some old documentation or articles, don’t get confused. Minions are just nodes.
Cluster
A cluster is a collection of hosts (nodes) that provide compute, memory, storage, and networking resources. Kubernetes uses these resources to run the various workloads that comprise your system. Note that your entire system may consist of multiple clusters. We will discuss this advanced use case of multi-cluster systems in detail later.
Control plane
The control plane of Kubernetes consists of several components, such as an API server, a scheduler, a controller manager and, optionally, a cloud controller manager. The control plane is responsible for the global state of the cluster, cluster-level scheduling of pods, and handling of events. Usually, all the control plane components are set up on the same host although it’s not required. When considering high-availability scenarios or very large clusters, you will want to have control plane redundancy. We will discuss highly available clusters in detail in Chapter 3, High Availability and Reliability.
Pod
A pod is the unit of work in Kubernetes. Each pod contains one or more containers (so you can think of it as a container container). A pod is scheduled as an atomic unit (all its containers run on the same machine). All the containers in a pod have the same IP address and port space; they can communicate with each other using localhost or standard inter-process communication. In addition, all the containers in a pod can have access to shared local storage on the node hosting the pod. Containers don’t get access to local storage or any other storage by default. Volumes of storage must be mounted into each container inside the pod explicitly.
Pods are an important feature of Kubernetes. It is possible to run multiple applications inside a single container by having something like supervisord as the main process that runs multiple processes, but this practice is often frowned upon for the following reasons:
- Transparency: Making the containers within the pod visible to the infrastructure enables the infrastructure to provide services to those containers, such as process management and resource monitoring. This facilitates a number of conveniences for users.
- Decoupling software dependencies: The individual containers may be versioned, rebuilt, and redeployed independently. Kubernetes may even support live updates of individual containers someday.
- Ease of use: Users don’t need to run their own process managers, worry about signal and exit-code propagation, and so on.
- Efficiency: Because the infrastructure takes on more responsibility, containers can be more lightweight.
Pods provide a great solution for managing groups of closely related containers that depend on each other and need to co-operate on the same host to accomplish their purpose. It’s important to remember that pods are considered ephemeral, throwaway entities that can be discarded and replaced at will. Each pod gets a unique ID (UID), so you can still distinguish between them if necessary.
Label
Labels are key-value pairs that are used to group together sets of objects, very often pods via selectors. This is important for several other concepts, such as replica sets, deployments, and services that operate on dynamic groups of objects and need to identify the members of the group. There is an NxN relationship between objects and labels. Each object may have multiple labels, and each label may be applied to different objects.
There are certain restrictions by design on labels. Each label on an object must have a unique key. The label key must adhere to a strict syntax. Note that labels are dedicated to identifying objects and are not for attaching arbitrary metadata to objects. This is what annotations are for (see the Annotation section).
Label selector
Label selectors are used to select objects based on their labels. Equality-based selectors specify a key name and a value. There are two operators, = (or ==) and !=, for equality or inequality based on the value. For example:
role = webserver
This will select all objects that have that label key and value.
Label selectors can have multiple requirements separated by a comma. For example:
role = webserver, application != foo
Set-based selectors extend the capabilities and allow selection based on multiple values:
role in (webserver, backend)
Annotation
Annotations let you associate arbitrary metadata with Kubernetes objects. Kubernetes just stores the annotations and makes their metadata available. Annotation key syntax has similar requirements as label keys.
In my experience, you always need such metadata for complicated systems, and it is nice that Kubernetes recognizes this need and provides it out of the box, so you don’t have to come up with your own separate metadata store and mapping object to their metadata.
Service
Services are used to expose some functionality to users or other services. They usually encompass a group of pods, usually identified by – you guessed it – a label. You can have services that provide access to external resources, or pods you control directly at the virtual IP level. Native Kubernetes services are exposed through convenient endpoints. Note that services operate at layer 3 (TCP/UDP). Kubernetes 1.2 added the Ingress object, which provides access to HTTP objects – more on that later. Services are published or discovered via one of two mechanisms: DNS, or environment variables. Services can be load-balanced inside the cluster by Kubernetes. But, developers can choose to manage load balancing themselves in case of services that use external resources or require special treatment.
There are many gory details associated with IP addresses, virtual IP addresses, and port spaces. We will discuss them in depth in Chapter 10, Exploring Kubernetes Networking.
Volume
Local storage used by the pod is ephemeral and goes away with the pod in most cases. Sometimes that’s all you need, if the goal is just to exchange data between containers of the node, but sometimes it’s important for the data to outlive the pod, or it’s necessary to share data between pods. The volume concept supports that need. The essence of a volume is a directory with some data that is mounted into a container.
There are many volume types. Originally, Kubernetes directly supported many volume types, but the modern approach for extending Kubernetes with volume types is through the Container Storage Interface (CSI), which we’ll discuss in detail in Chapter 6, Managing Storage. Most of the originally built-in volume types will have been (or are in the process of being) phased out in favor of out-of-tree plugins available through the CSI.
Replication controller and replica set
Replication controllers and replica sets both manage a group of pods identified by a label selector and ensure that a certain number is always up and running. The main difference between them is that replication controllers test for membership by name equality and replica sets can use set-based selection. Replica sets are the way to go as they are a superset of replication controllers. I expect replication controllers to be deprecated at some point. Kubernetes guarantees that you will always have the same number of pods running as you specified in a replication controller or a replica set. Whenever the number drops due to a problem with the hosting node or the pod itself, Kubernetes will fire up new instances. Note that, if you manually start pods and exceed the specified number, the replica set controller will kill some extra pods.
Replication controllers used to be central to many workflows, such as rolling updates and running one-off jobs. As Kubernetes evolved, it introduced direct support for many of these workflows, with dedicated objects such as Deployment, Job, CronJob, and DaemonSet. We will meet them all later.
StatefulSet
Pods come and go, and if you care about their data then you can use persistent storage. That’s all good. But sometimes you want Kubernetes to manage a distributed data store such as Cassandra or CockroachDB. These clustered stores keep the data distributed across uniquely identified nodes. You can’t model that with regular pods and services. Enter StatefulSet. If you remember earlier, we discussed pets versus cattle and how cattle is the way to go. Well, StatefulSet sits somewhere in the middle. StatefulSet ensures (similar to a ReplicaSet) that a given number of instances with unique identities are running at any given time. StatefulSet members have the following properties:
- A stable hostname, available in DNS
- An ordinal index
- Stable storage linked to the ordinal and hostname
- Members are created and terminated gracefully in order
StatefulSet can help with peer discovery as well as adding or removing members safely.
Secret
Secrets are small objects that contain sensitive info such as credentials and tokens. They are stored by default as plaintext in etcd, accessible by the Kubernetes API server, and can be mounted as files into pods (using dedicated secret volumes that piggyback on regular data volumes) that need access to them. The same secret can be mounted into multiple pods. Kubernetes itself creates secrets for its components, and you can create your own secrets. Another approach is to use secrets as environment variables. Note that secrets in a pod are always stored in memory (tmpfs in the case of mounted secrets) for better security. The best practice is to enable encryption at rest as well as access control with RBAC. We will discuss it in detail later.
Name
Each object in Kubernetes is identified by a UID and a name. The name is used to refer to the object in API calls. Names should be up to 253 characters long and use lowercase alphanumeric characters, dashes (-), and dots (.). If you delete an object, you can create another object with the same name as the deleted object, but the UIDs must be unique across the lifetime of the cluster. The UIDs are generated by Kubernetes, so you don’t have to worry about it.
Namespace
A namespace is a form of isolation that lets you group resources and apply policies. It is also a scope for names. Objects of the same kind must have unique names within a namespace. By default, pods in one namespace can access pods and services in other namespaces.
Note that there are cluster-scope objects like node objects and persistent volumes that don’t live in a namespace. Kubernetes may schedule pods from different namespaces to run on the same node. Likewise, pods from different namespaces can use the same persistent storage.
In multi-tenancy scenarios, where it’s important to totally isolate namespaces, you can do a passable job with proper network policies and resource quotas to ensure proper access and distribution of the physical cluster resources. But, in general namespaces are considered a weak form of isolation and there are other solutions more appropriated for hard multi-tenancy like virtual clusters, which we will discuss in Chapter 4, Securing Kubernetes.
We’ve covered most of Kubernetes’ primary concepts; there are a few more I mentioned briefly. In the next section, we will continue our journey into Kubernetes architecture by looking into its design motivations, the internals, and implementation, and even pick at the source code.
Diving into Kubernetes architecture in depth
Kubernetes has very ambitious goals. It aims to manage and simplify the orchestration, deployment, and management of distributed systems across a wide range of environments and cloud providers. It provides many capabilities and services that should work across all these diverse environments and use cases, while evolving and remaining simple enough for mere mortals to use. This is a tall order. Kubernetes achieves this by following a crystal-clear, high-level design and well-thought-out architecture that promotes extensibility and pluggability.
Kubernetes originally had many hard-coded or environment-aware components, but the trend is to refactor them into plugins and keep the core small, generic, and abstract.
In this section, we will peel Kubernetes like an onion, starting with various distributed systems design patterns and how Kubernetes supports them, then go over the surface of Kubernetes, which is its set of APIs, and then take a look at the actual components that comprise Kubernetes. Finally, we will take a quick tour of the source-code tree to gain even better insight into the structure of Kubernetes itself.
At the end of this section, you will have a solid understanding of Kubernetes architecture and implementation, and why certain design decisions were made.
Distributed systems design patterns
All happy (working) distributed systems are alike, to paraphrase Tolstoy in Anna Karenina. That means that, to function properly, all well-designed distributed systems must follow some best practices and principles. Kubernetes doesn’t want to be just a management system. It wants to support and enable these best practices and provide high-level services to developers and administrators. Let’s look at some of those described as design patterns. We will start with single-node patterns such as sidecar, ambassador, and adapter. Then, we will discuss multi-node patterns.
Sidecar pattern
The sidecar pattern is about co-locating another container in a pod in addition to the main application container. The application container is unaware of the sidecar container and just goes about its business. A great example is a central logging agent. Your main container can just log to stdout, but the sidecar container will send all logs to a central logging service where they will be aggregated with the logs from the entire system. The benefits of using a sidecar container versus adding central logging to the main application container are enormous. First, applications are not burdened anymore with central logging, which could be a nuisance. If you want to upgrade or change your central logging policy or switch to a totally new provider, you just need to update the sidecar container and deploy it. None of your application containers change, so you can’t break them by accident. The Istio service mesh uses the sidecar pattern to inject its proxies into each pod.
Ambassador pattern
The ambassador pattern is about representing a remote service as if it were local and possibly enforcing some policy. A good example of the ambassador pattern is if you have a Redis cluster with one master for writes and many replicas for reads. A local ambassador container can serve as a proxy and expose Redis to the main application container on the localhost. The main application container simply connects to Redis on localhost:6379 (Redis’s default port), but it connects to the ambassador running in the same pod, which filters the requests, and sends write requests to the real Redis master and read requests randomly to one of the read replicas. Just like with the sidecar pattern, the main application has no idea what’s going on. That can help a lot when testing against a real local Redis cluster. Also, if the Redis cluster configuration changes, only the ambassador needs to be modified; the main application remains blissfully unaware.
Adapter pattern
The adapter pattern is about standardizing output from the main application container. Consider the case of a service that is being rolled out incrementally: it may generate reports in a format that doesn’t conform to the previous version. Other services and applications that consume that output haven’t been upgraded yet. An adapter container can be deployed in the same pod with the new application container and massage their output to match the old version until all consumers have been upgraded. The adapter container shares the filesystem with the main application container, so it can watch the local filesystem, and whenever the new application writes something, it immediately adapts it.
Multi-node patterns
The single-node patterns described earlier are all supported directly by Kubernetes via pods scheduled on a single node. Multi-node patterns involve pods scheduled on multiple nodes. Multi-node patterns such as leader election, work queues, and scatter-gather are not supported directly, but composing pods with standard interfaces to accomplish them is a viable approach with Kubernetes.
Level-triggered infrastructure and reconciliation
Kubernetes is all about control loops. It keeps watching itself and correcting issues. Level-triggered infrastructure means that Kubernetes has a desired state, and it constantly strives toward it. For example, if a replica set has a desired state of 3 replicas and it drops to 2 replicas, Kubernetes (the ReplicaSet controller part of Kubernetes) will notice and work to get back to 3 replicas. The alternative approach of edge-triggering is event-based. If the number of replicas dropped from 2 to 3, create a new replica. This approach is very brittle and has many edge cases, especially in distributed systems where events like replicas coming and going can happen simultaneously.
After covering the Kubernetes architecture in depth let’s study the Kubernetes APIs.
The Kubernetes APIs
If you want to understand the capabilities of a system and what it provides, you must pay a lot of attention to its API. The API provides a comprehensive view of what you can do with the system as a user. Kubernetes exposes several sets of REST APIs for different purposes and audiences via API groups. Some APIs are used primarily by tools and some can be used directly by developers. An important aspect of the APIs is that they are under constant development. The Kubernetes developers keep it manageable by trying to extend (adding new objects, and new fields to existing objects) and avoid renaming or dropping existing objects and fields. In addition, all API endpoints are versioned, and often have an alpha or beta notation too. For example:
/api/v1
/api/v2alpha1
You can access the API through the kubectl CLI, via client libraries, or directly through REST API calls. There are elaborate authentication and authorization mechanisms we will explore in Chapter 4, Securing Kubernetes. If you have the right permissions you can list, view, create, update, and delete various Kubernetes objects. At this point, let’s get a glimpse into the surface area of the APIs.
The best way to explore the API is via API groups. Some API groups are enabled by default. Other groups can be enabled/disabled via flags. For example, to disable the autoscaling/v1 group and enable the autoscaling/v2beta2 group you can set the --runtime-config flag when running the API server as follows:
--runtime-config=autoscaling/v1=false,autoscaling/v2beta2=true
Note that managed Kubernetes clusters in the cloud don’t let you specify flags for the API server (as they manage it).
Resource categories
In addition to API groups, another useful classification of available APIs is by functionality. The Kubernetes API is huge and breaking it down into categories helps a lot when you’re trying to find your way around. Kubernetes defines the following resource categories:
- Workloads: Objects you use to manage and run containers on the cluster.
- Discovery and load balancing: Objects you use to expose your workloads to the world as externally accessible, load-balanced services.
- Config and storage: Objects you use to initialize and configure your applications, and to persist data that is outside the container.
- Cluster: Objects that define how the cluster itself is configured; these are typically used only by cluster operators.
- Metadata: Objects you use to configure the behavior of other resources within the cluster, such as HorizontalPodAutoscaler for scaling workloads.
In the following subsections, we’ll list the resources that belong to each group with the API group they belong to. We will not specify the version here because APIs move rapidly from alpha to beta to GA (general availability) and from V1 to V2, and so on.
Workloads resource category
The workloads category contains the following resources with their corresponding API groups:
- Container: core
- CronJob: batch
- ControllerRevision: apps
- DaemonSet: apps
- Deployment: apps
- HorizontalPodAutoscaler: autoscaling
- Job: batch
- Pod: core
- PodTemplate: core
- PriorityClass: scheduling.k8s.io
- ReplicaSet: apps
- ReplicationController: core
- StatefulSet: apps
Controllers create containers within pods. Pods execute containers and offer necessary dependencies, such as shared or persistent storage volumes, as well as configuration or secret data injected into the containers.
Here is a detailed description of one of the most common operations, which gets a list of all the pods across all namespaces as a REST API:
GET /api/v1/pods
It accepts various query parameters (all optional):
fieldSelector: Specifies a selector to narrow down the returned objects based on their fields. The default behavior includes all objects.labelSelector: Defines a selector to filter the returned objects based on their labels. By default, all objects are included.limit/continue: Thelimitparameter specifies the maximum number of responses to be returned in a list call. If there are more items available, the server sets thecontinuefield in the list metadata. This value can be used with the initial query to fetch the next set of results.pretty: When set to'true', the output is formatted in a human-readable manner.resourceVersion: Sets a constraint on the acceptable resource versions that can be served by the request. If not specified, it defaults to unset.resourceVersionMatch: Determines how theresourceVersionconstraint is applied in list calls. If not specified, it defaults to unset.timeoutSeconds: Specifies a timeout duration for the list/watch call. This limits the duration of the call, regardless of any activity or inactivity.watch: Enables the monitoring of changes to the described resources and returns a continuous stream of notifications for additions, updates, and removals. TheresourceVersionparameter must be specified.
Discovery and load balancing
Workloads in a cluster are only accessible within the cluster by default. To make them accessible externally, either a LoadBalancer or a NodePort Service needs to be used. However, for development purposes, internally accessible workloads can be accessed through the API server using the “kubectl proxy” command:
Endpoints:coreEndpointSlice:discovery.k8s.io/v1Ingress:networking.k8s.ioIngressClass:networking.k8s.ioService:core
Config and storage
Dynamic configuration without redeployment and secret management are cornerstones of Kubernetes and running complex distributed applications on your Kubernetes cluster. The secret and configuration are not baked into container images and are stored in the Kubernetes state store (usually etcd). Kubernetes also provides a lot of abstractions for managing arbitrary storage. Here are some of the primary resources:
ConfigMap:coreCSIDriver:storage.k8s.ioCSINode:storage.k8s.ioCSIStorageCapacity:storage.k8s.ioSecret:corePersistentVolumeClaim:coreStorageClass:storage.k8s.ioVolume:coreVolumeAttachment:storage.k8s.io
Metadata
The metadata resources typically show up as sub-resources of the resources they configure. For example, a limit range is defined at the namespace level and can specify:
- The range of compute resource usage (minimum and maximum) for pods or containers within a namespace.
- The range of storage requests (minimum and maximum) per
PersistentVolumeClaimwithin a namespace. - The ratio between the resource request and limit for a specific resource within a namespace.
- The default request/limit for compute resources within a namespace, which are automatically injected into containers at runtime.
You will not interact with these objects directly most of the time. There are many metadata resources. You can find the complete list here: https://kubernetes.io/docs/reference/generated/kubernetes-api/v1.24/#-strong-metadata-apis-strong-.
Cluster
The resources in the cluster category are designed for use by cluster operators as opposed to developers. There are many resources in this category as well. Here are some of the most important resources:
Namespace:coreNode:corePersistentVolume:coreResourceQuota:coreRole:rbac.authorization.k8s.ioRoleBinding:rbac.authorization.k8s.ioClusterRole:rbac.authorization.k8s.ioClusterRoleBinding:rbac.authorization.k8s.ioNetworkPolicy:networking.k8s.io
Now that we understand how Kubernetes organizes and exposes its capabilities via API groups and resource categories, let’s see how it manages the physical infrastructure and keeps it up with the state of the cluster.
Kubernetes components
A Kubernetes cluster has several control plane components used to control the cluster, as well as node components that run on each worker node. Let’s get to know all these components and how they work together.
Control plane components
The control plane components can all run on one node, but in a highly available setup or a very large cluster, they may be spread across multiple nodes.
API server
The Kubernetes API server exposes the Kubernetes REST API. It can easily scale horizontally as it is stateless and stores all the data in the etcd cluster (or another data store in Kubernetes distributions like k3s). The API server is the embodiment of the Kubernetes control plane.
etcd
etcd is a highly reliable distributed data store. Kubernetes uses it to store the entire cluster state. In small, transient clusters a single instance of etcd can run on the same node with all the other control plane components. But, for more substantial clusters, it is typical to have a 3-node or even 5-node etcd cluster for redundancy and high availability.
Kube controller manager
The Kube controller manager is a collection of various managers rolled up into one binary. It contains the replica set controller, the pod controller, the service controller, the endpoints controller, and others. All these managers watch over the state of the cluster via the API, and their job is to steer the cluster into the desired state.
Cloud controller manager
When running in the cloud, Kubernetes allows cloud providers to integrate their platform for the purpose of managing nodes, routes, services, and volumes. The cloud provider code interacts with Kubernetes code. It replaces some of the functionality of the Kube controller manager. When running Kubernetes with a cloud controller manager you must set the Kube controller manager flag --cloud-provider to external. This will disable the control loops that the cloud controller manager is taking over.
The cloud controller manager was introduced in Kubernetes 1.6, and it’s being used by multiple cloud providers already such as:
- GCP
- AWS
- Azure
- BaiduCloud
- Digital Ocean
- Oracle
- Linode
OK. Let’s look at some code. The specific code is not that important. The goal is just to give you a taste of what Kubernetes code looks like. Kubernetes is implemented in Go. A quick note about Go to help you parse the code: the method name comes first, followed by the method’s parameters in parentheses. Each parameter is a pair, consisting of a name followed by its type. Finally, the return values are specified. Go allows multiple return types. It is very common to return an error object in addition to the actual result. If everything is OK, the error object will be nil.
Here is the main interface of the cloudprovider package:
package cloudprovider
import (
    "context"
    "errors"
    "fmt"
    "strings"
    v1 "k8s.io/api/core/v1"
    "k8s.io/apimachinery/pkg/types"
    "k8s.io/client-go/informers"
    clientset "k8s.io/client-go/kubernetes"
    restclient "k8s.io/client-go/rest"
)
// Interface is an abstract, pluggable interface for cloud providers.
type Interface interface {
    Initialize(clientBuilder ControllerClientBuilder, stop <-chan struct{})
    LoadBalancer() (LoadBalancer, bool)
    Instances() (Instances, bool)
    InstancesV2() (InstancesV2, bool)
    Zones() (Zones, bool)
    Clusters() (Clusters, bool)
    Routes() (Routes, bool)
    ProviderName() string
    HasClusterID() bool
}
Most of the methods return other interfaces with their own method. For example, here is the LoadBalancer interface:
type LoadBalancer interface {
    GetLoadBalancer(ctx context.Context, clusterName string, service *v1.Service) (status *v1.LoadBalancerStatus, exists bool, err error)
    GetLoadBalancerName(ctx context.Context, clusterName string, service *v1.Service) string
    EnsureLoadBalancer(ctx context.Context, clusterName string, service *v1.Service, nodes []*v1.Node) (*v1.LoadBalancerStatus, error)
    UpdateLoadBalancer(ctx context.Context, clusterName string, service *v1.Service, nodes []*v1.Node) error
    EnsureLoadBalancerDeleted(ctx context.Context, clusterName string, service *v1.Service) error
}
Kube scheduler
The kube-scheduler is responsible for scheduling pods into nodes. This is a very complicated task as it needs to consider multiple interacting factors, such as:
- Resource requirements
- Service requirements
- Hardware/software policy constraints
- Node affinity and anti-affinity specifications
- Pod affinity and anti-affinity specifications
- Taints and tolerations
- Local storage requirements
- Data locality
- Deadlines
If you need some special scheduling logic not covered by the default Kube scheduler, you can replace it with your own custom scheduler. You can also run your custom scheduler side by side with the default scheduler and have your custom scheduler schedule only a subset of the pods.
DNS
Starting with Kubernetes 1.3, a DNS service is part of the standard Kubernetes cluster. It is scheduled as a regular pod. Every service (except headless services) receives a DNS name. Pods can receive a DNS name too. This is very useful for automatic discovery.
We covered all the control plane components. Let’s look at the Kubernetes components running on each node.
Node components
Nodes in the cluster need a couple of components to interact with the API server, receive workloads to execute, and update the API server regarding their status.
Proxy
The kube-proxy does low-level network housekeeping on each node. It reflects the Kubernetes services locally and can do TCP and UDP forwarding. It finds cluster IPs via environment variables or DNS.
kubelet
The kubelet is the Kubernetes representative on the node. It oversees communicating with the API server and manages the running pods. That includes the following:
- Receive pod specs
- Download pod secrets from the API server
- Mount volumes
- Run the pod’s containers (via the configured container runtime)
- Report the status of the node and each pod
- Run container liveness, readiness, and startup probes
In this section, we dug into the guts of Kubernetes and explored its architecture from a very high level of vision and supported design patterns, through its APIs and the components used to control and manage the cluster. In the next section, we will take a quick look at the various runtimes that Kubernetes supports.
Kubernetes container runtimes
Kubernetes originally only supported Docker as a container runtime engine. But that is no longer the case. Kubernetes now supports any runtime that implements the CRI interface.
In this section, you’ll get a closer look at the CRI and get to know some runtime engines that implement it. At the end of this section, you’ll be able to make a well-informed decision about which container runtime is appropriate for your use case and under what circumstances you may switch or even combine multiple runtimes in the same system.
The Container Runtime Interface (CRI)
The CRI is a gRPC API, containing specifications/requirements and libraries for container runtimes to integrate with the kubelet on a node. In Kubernetes 1.7 the internal Docker integration in Kubernetes was replaced with a CRI-based integration. This was a big deal. It opened the door to multiple implementations that can take advantage of advances in the container world. The kubelet doesn’t need to interface directly with multiple runtimes. Instead, it can talk to any CRI-compliant container runtime. The following diagram illustrates the flow:

Figure 1.2: kubelet and cri
There are two gRPC service interfaces ImageService and RuntimeService that CRI container runtimes (or shims) must implement. The ImageService is responsible for managing images. Here is the gRPC/protobuf interface (this is not Go):
service ImageService {
    rpc ListImages(ListImagesRequest) returns (ListImagesResponse) {}
    rpc ImageStatus(ImageStatusRequest) returns (ImageStatusResponse) {}
    rpc PullImage(PullImageRequest) returns (PullImageResponse) {}
    rpc RemoveImage(RemoveImageRequest) returns (RemoveImageResponse) {}
    rpc ImageFsInfo(ImageFsInfoRequest) returns (ImageFsInfoResponse) {}
}
The RuntimeService is responsible for managing pods and containers. Here is the gRPC/protobuf interface:
service RuntimeService {
    rpc Version(VersionRequest) returns (VersionResponse) {}
    rpc RunPodSandbox(RunPodSandboxRequest) returns (RunPodSandboxResponse) {}
    rpc StopPodSandbox(StopPodSandboxRequest) returns (StopPodSandboxResponse) {}
    rpc RemovePodSandbox(RemovePodSandboxRequest) returns (RemovePodSandboxResponse) {}
    rpc PodSandboxStatus(PodSandboxStatusRequest) returns (PodSandboxStatusResponse) {}
    rpc ListPodSandbox(ListPodSandboxRequest) returns (ListPodSandboxResponse) {}
    rpc CreateContainer(CreateContainerRequest) returns (CreateContainerResponse) {}
    rpc StartContainer(StartContainerRequest) returns (StartContainerResponse) {}
    rpc StopContainer(StopContainerRequest) returns (StopContainerResponse) {}
    rpc RemoveContainer(RemoveContainerRequest) returns (RemoveContainerResponse) {}
    rpc ListContainers(ListContainersRequest) returns (ListContainersResponse) {}
    rpc ContainerStatus(ContainerStatusRequest) returns (ContainerStatusResponse) {}
    rpc UpdateContainerResources(UpdateContainerResourcesRequest) returns (UpdateContainerResourcesResponse) {}
    rpc ExecSync(ExecSyncRequest) returns (ExecSyncResponse) {}
    rpc Exec(ExecRequest) returns (ExecResponse) {}
    rpc Attach(AttachRequest) returns (AttachResponse) {}
    rpc PortForward(PortForwardRequest) returns (PortForwardResponse) {}
    rpc ContainerStats(ContainerStatsRequest) returns (ContainerStatsResponse) {}
    rpc ListContainerStats(ListContainerStatsRequest) returns (ListContainerStatsResponse) {}
    rpc UpdateRuntimeConfig(UpdateRuntimeConfigRequest) returns (UpdateRuntimeConfigResponse) {}
    rpc Status(StatusRequest) returns (StatusResponse) {}
}
The data types used as arguments and return types are called messages and are also defined as part of the API. Here is one of them:
message CreateContainerRequest {
    string pod_sandbox_id = 1;
    ContainerConfig config = 2;
    PodSandboxConfig sandbox_config = 3;
}
As you can see messages can be embedded inside each other. The CreateContainerRequest message has one string field and two other fields, which are themselves messages: ContainerConfig and PodSandboxConfig.
To learn more about gRPC and CRI check out the following resources:
Now that you are familiar at the code level with what Kubernetes considers a runtime engine, let’s look at the individual runtime engines briefly.
Docker
Docker used to be the 800-pound gorilla of containers. Kubernetes was originally designed to only manage Docker containers. The multi-runtime capability was first introduced in Kubernetes 1.3 and the CRI in Kubernetes 1.5. Until then, Kubernetes could only manage Docker containers. Even after the CRI was introduced a Dockershim remained in the Kubernetes source code, and it was only removed in Kubernetes 1.24. Since then, Docker doesn’t get any special treatment anymore.
I assume you’re very familiar with Docker and what it brings to the table if you are reading this book. Docker enjoys tremendous popularity and growth, but there is also a lot of criticism towards it. Critics often mention the following concerns:
- Security
- Difficulty setting up multi-container applications (in particular, networking)
- Development, monitoring, and logging
- Limitations of Docker containers running one command
- Releasing half-baked features too fast
Docker is aware of the criticisms and has addressed some of these concerns. In particular, Docker invested in its Docker Swarm product. Docker Swarm is a Docker-native orchestration solution that competes with Kubernetes. It is simpler to use than Kubernetes, but it’s not as powerful or mature.
Starting with Docker 1.11, released in April 2016, Docker has changed the way it runs containers. The runtime now uses containerd and runC to run Open Container Initiative (OCI) images in containers:

Figure 1.3: Docker and OCI
Starting with Docker 1.12, swarm mode is included in the Docker daemon natively, which upset some people due to bloat and scope creep. As a result, more people turned to other container runtimes.
In September 2021, Docker required a paid subscription to Docker Desktop for large organizations. This wasn’t popular, as you might expect, and lots of organizations scrambled to find an alternative. Docker Desktop is a client-side distribution and UI for Docker and doesn’t impact the container runtime. But it eroded Docker’s reputation and goodwill with the community even further.
containerd
containerd has been a graduated CNCF project since 2019. It is now a mainstream option for Kubernetes containers. All major cloud providers support it and as of Kubernetes 1.24, it is the default container runtime.
In addition, the Docker container runtime is built on top of containerd as well.
CRI-O
CRI-O is a CNCF incubator project. It is designed to provide an integration path between Kubernetes and OCI-compliant container runtimes like Docker. CRI-O provides the following capabilities:
- Support for multiple image formats including the existing Docker image format
- Support for multiple means to download images including trust and image verification
- Container image management (managing image layers, overlay filesystems, etc.)
- Container process life cycle management
- Monitoring and logging required to satisfy the CRI
- Resource isolation as required by the CRI
It supports runC and Kata containers right now, but any OCI-compliant container runtime can be plugged in and integrated with Kubernetes.
Lightweight VMs
Kubernetes runs containers from different applications on the same node, sharing the same OS. This allows for running a lot of containers in a very efficient manner. However, container isolation is a serious security concern and multiple cases of privilege escalation occurred, which drove a lot of interest in a different approach. Lightweight VMs provide strong VM-level isolation, but are not as heavyweight as standard VMs, which allow them to operate as container runtimes on Kubernetes. Some prominent projects are:
- AWS Firecracker
- Google gVisor
- Kata Containers
- Singularity
- SmartOS
In this section, we covered the various runtime engines that Kubernetes supports as well as the trend toward standardization, convergence, and externalizing the runtime support from core Kubernetes.
Summary
In this chapter, we covered a lot of ground. You learned about the organization, design, and architecture of Kubernetes. Kubernetes is an orchestration platform for microservice-based applications running as containers. Kubernetes clusters have a control plane and worker nodes. Containers run within pods. Each pod runs on a single physical or virtual machine. Kubernetes directly supports many concepts, such as services, labels, and persistent storage. You can implement various distributed systems design patterns on Kubernetes. Container runtimes just need to implement the CRI. Docker, containerd, CRI-O, and more are supported.
In Chapter 2, Creating Kubernetes Clusters, we will explore the various ways to create Kubernetes clusters, discuss when to use different options, and build a local multi-node cluster.
Join us on Discord!
Read this book alongside other users, cloud experts, authors, and like-minded professionals.
Ask questions, provide solutions to other readers, chat with the authors via. Ask Me Anything sessions and much more.
Scan the QR code or visit the link to join the community now.
https://packt.link/cloudanddevops
