
The first three chapters of this book introduced you to the basics of designing applications with Visual Studio 2010 and the components of the Visual Basic language. You know how to design graphical user interfaces (GUIs) and how to use Visual Basic statements to program events for the various controls. You also know how to write functions and subroutines and how to call the functions and subroutines that are built into Visual Basic.
In this chapter, you'll design a few more Windows applications—this time, a few practical applications with more functional interfaces and a bit of code that does something more practical. You'll put together the information presented so far in the book by building Windows applications with the visual tools of Visual Studio, and you'll see how the applications interact with users by coding the events of interest. If you are new to Visual Studio, you should design the examples on your own using the instructions in the text rather than open the projects for this chapter (available for download at www.sybex.com/go/masteringvb2010) and look at the code.
In this chapter, you will learn how to do the following:
Design graphical user interfaces
Program events
Write robust applications with error handling
As you recall from Chapter 1, "Getting Started with Visual Basic 2010," the design of a Windows application consists of two distinct phases: the design of the application's interface and the coding of the application. The design of the interface is performed with visual tools and consists of creating a form with the relevant elements. These elements are the building blocks of Windows applications and are called controls.
The available controls are shown in the Toolbox and are the same elements used by all Windows applications. You can purchase additional controls from third-party vendors or create your own custom controls. After you install third-party or custom controls, they will appear in the Toolbox alongside the built-in controls. In addition to being visually rich, the controls embed a lot of functionality. The TextBox control, for example, can handle text on its own, without any programming effort on your part. The ComboBox control expands the list with its items when users click the arrow button and displays the selected item in its edit box. In general, the basic functionality of the controls is built in by design so that all applications maintain a consistent look.
The interface dictates how users will interact with your application. To prompt users for text or numeric data, use TextBox controls. When it comes to specifying one or more of several options, you have many choices: You can use a ComboBox control from which users can select an option, or you can put a few CheckBox controls on a form that users can select or clear. If you want to display a small number of mutually exclusive options, place a few RadioButton controls on the form. Every time the user selects an option, the previously selected one is cleared. To initiate actions, place one or more Button controls on the form. You will learn more about basic Windows controls and their properties in Chapter 5, "The Basic Windows Controls."
Controls expose a large number of properties, which are displayed in the Properties window at design time. You use these properties to adjust not only the appearance of the controls on the form but their functionality as well. The process of designing the interface consists mostly of setting the properties of the various controls. By the way, you can also set the properties of controls through code. The code will take effect in runtime. You will see some examples of such code in the next chapter.
An important aspect of the design of your application's user interface is the alignment of the controls on the form. Controls that are next to one another should be aligned horizontally. Controls that are stacked should have either their left or right edges aligned vertically. You should also make sure the controls are spaced equally. The integrated development environment (IDE) provides all the tools for sizing, aligning, and spacing controls on the form, and you'll see these tools in action through examples in this chapter.
By designing the interface you have practically outlined how the application will interact with the user. The next step is to actually implement the interaction by writing some code. The programming model of Visual Basic is event driven: As the user interacts with the controls on your form, some code is executed in response to user actions. The user's actions cause events, and each control recognizes its own set of events and handles them through subroutines, which are called event handlers. When users click a button, the control's Click event is fired, and you must insert the relevant code in the control's Click event handler. The event-driven programming model has proven very successful because it allows developers to focus on handling specific actions. It allows you to break a large application into smaller, manageable units of code and implement each unit of code independently of any other.
Developing Windows applications is a conceptually simple process, but there's a methodology to it and it's not trivial. Fortunately, the IDE provides many tools to simplify the process; it will even catch most of the errors in your code as you type. You have seen how to use some of the tools of the IDE in the first three chapters. In this chapter, I'll present these tools through examples.
One easy-to-implement, practical application is a program that calculates loan parameters. Visual Basic provides built-in functions for performing many types of financial calculations, and you need only a single line of code to calculate the monthly payment given the loan amount, its duration, and the interest rate. Designing the user interface, however, takes much more effort.
Regardless of the language you use, you must go through the following process to develop an application:
Decide what the application will do and how it will interact with the user.
Design the application's user interface according to the requirements of step 1.
Write the actual code behind the events you want to handle.
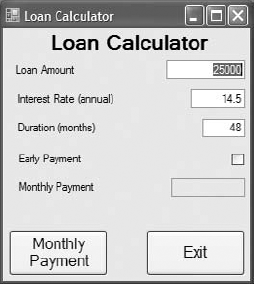
A prototype is an incomplete version of an application that simulates some aspects of application functionality. The prototype is created by using constant or hard-coded values to supplant values the program should calculate in runtime. For example, a prototype for the Loan Calculator application (see Figure 4.1) might display the form with all of the controls necessary for loan calculation. However, when the user presses the Monthly Payment button, the value that appears in the Monthly Payment text box would always be the same hard-coded value and would not vary with input from the other controls.
Most commonly, prototypes are used to simulate the user interface. The purpose of the prototype is to get the customer's approval on the appearance and functionality of an application. Instead of reading documentation or analyzing drawings of the interface, users can actually try out the application. This often facilitates user feedback in early application development stages. Some prototypes are throw-away applications while others can be evolved further into fully functional applications. Visual Basic is well known for its rapid prototyping features.
Following the first step of the process outlined previously, you decide that the user should be able to specify the amount of the loan, the interest rate, and the duration of the loan in months. You must, therefore, provide three text boxes in which the user can enter these values.
Another parameter affecting the monthly payment is whether payments are made at the beginning or at the end of each month, so you must also provide a way for the user to specify whether the payments will be early (first day of the month) or late (last day of the month). The most appropriate type of control for entering Yes/No or True/False type of information is the CheckBox control. This control is a toggle: If it's selected, you can clear it by clicking it; if it's cleared, you can select it by clicking again. The user doesn't enter any data in this control (which means you need not anticipate user errors with this control), and it's the simplest method for specifying values with two possible states.
Figure 4.1 shows a user interface that matches our design specifications. This is the main form of the LoanCalculator project, which you will find in this chapter's folder on the book's project download site.
The user enters all the information on the form and then clicks the Monthly Payment button to calculate the monthly payment. The program will calculate the monthly payment and display it in the lower TextBox control. All the action takes place in the Monthly Payment button's Click event handler.
To calculate the monthly payments on a loan, we call the built-in Pmt () function, whose syntax is as follows:
MonthlyPayment = Pmt(InterestRate, Periods, Amount, FutureValue, Due)
The Pmt () Function
Here's how the Pmt () function works. The interest rate, argument InterestRate, is specified as a monthly rate. If the annual interest rate is 14.5 percent, the value entered by the user in the Interest Rate box should be 14.5. The user will express the rate as a percentage, but the function accepts the decimal value. To convert percentage to a decimal value, you need to multiply the annual percentage rate by 0.01. Finally, since this is the annual rate and you need a monthly value, you need to divide the value by 12. The mathematical expression for converting the annual interest rate specified by the user to a monthly interest rate accepted by the Pmt() function is: 0.01 * annualInterestRate / 12. In this example, with a 14.5 annual rate, the monthly rate will be 0.145/12. The duration of the loan, the Periods argument, is specified in number of months, and the Amount argument is the total loan amount. The FutureValue argument is the value of the loan at the end of the period, which should be zero (it would be a positive value for an investment), and the last argument, Due, specifies when payments are due. The value of Due can be one of the constants DueDate.BegOfPeriod and DueDate.EndOfPeriod. These two constants are built into the language, and you can use them without knowing their exact value.
The present value of the loan is the amount of the loan with a negative sign. It's negative because you don't have the money now. You're borrowing it—it is money you owe to the bank. Future value represents the value of something at a stated time—in this case, what the loan will be worth when it's paid off. This is what one side owes the other at the end of the specified period. So the future value of a loan is zero.
You don't need to know how the Pmt () function calculates the monthly payment, just how to call it and how to retrieve the results. To calculate the monthly payment on a loan of $25,000 with an interest rate of 14.5 percent, payable over 48 months and payments due the last day of the payment period (which in this case is a month), you'd call the Pmt() function as follows:
Pmt(0.145 / 12, 48, −25000, 0, DueDate.EndOfPeriod)
The Pmt() function will return the value 689.448821287218. Because it's a dollar amount, you must round it to two decimal digits on the interface. Notice the negative sign in front of the Amount argument in the statement. If you specify a positive amount, the result will be a negative payment. The payment and the loan's amount have different signs because they represent different cash flows. The loan's amount is money you owe to the bank, whereas the payment is money you pay to the bank.
The last two arguments of the Pmt() function are optional. The Parameter Info feature of the IntelliSense autocompletion system built into Visual Studio will indicate optional parameters by placing them inside the square brackets in the Parameter Info pop-up window, as shown here.

If you omit optional parameters, Visual Basic uses their default values, which are 0 for the FutureValue argument and DueDate.BegOfPeriod for the Due argument. You can entirely omit these arguments and call the Pmt() function like this:
Pmt(0.145 / 12, 48, −25000)
Calculating the amount of the monthly payment given the loan parameters is quite simple. For this exercise, what you need to understand are the parameters of a loan and how to pass them to the Pmt() function. You must also know how the interest rate is specified to avoid invalid values. Although the calculation of the payment is trivial, designing the interface will take a bit of effort. You need to make sure the interface is easily understood and intuitive. When the user is confronted with the application, they should be able to guess easily what the application is doing and how they can interact with it. The application should also behave according to the principle of least surprise. For example, if the user presses the Tab button, they expect that focus of the controls will move from right to left or from top to bottom. Also, the user will expect the application to perform basic data validation. If the application detects invalid data, the user will expect that the focus will be set on the control containing the invalid value so that they can immediately correct the entered value. These are just a few example characteristics of well-behaved applications.
If you wish to learn more about GUI guidelines that Microsoft recommends for applications running on Windows 7 and Windows Vista, you can download the "Windows User Experience Interaction Guidelines" PDF file from MSDN. You will find the download link at the following URL: http://msdn.microsoft.com/en-us/library/aa511258.aspx.
Now that you know how to calculate the monthly payment and understand the basics of good interface design, you can design your own user interface. To do so, start a new Windows Forms project, name it LoanCalculator, and rename its form to frmLoan. Your first task is to decide the font and size of the text you'll use for the controls on the form. The form is the container for the controls, and they receive some of the form's properties, such as the font. You can change the font later during the design, but it's a good idea to start with the right font. At any rate, don't try to align the controls if you're planning to change their fonts. The change will, most likely, throw off your alignment efforts.
The book's sample project uses the 10-point Verdana font. To change it, select the form with the mouse, double-click the name of the Font property in the Properties window to open the Font dialog box, and select the desired font and attributes. I use the Verdana and Seago fonts a lot because they're clean and they were designed for viewing on monitors. Of course, this is a personal choice. Avoid elaborate fonts and don't mix different fonts on the same form (or in different forms of the same application).
To design the form shown in Figure 4.1, follow these steps:
Place four labels on the form and assign the captions (the
Textproperty of each control) listed in Table 4.1 to them.You don't need to change the default names of the four Label controls on the form because their captions are all you need. You aren't going to add any code to them.
Place a TextBox control next to each label. Use the information in Table 4.2 to set the
NameandTextproperty values. I used meaningful names for the TextBox controls because we'll use them in our code shortly to retrieve the values entered by the user on these controls. These initial values correspond to a loan of $25,000 with an interest rate of 14.5 percent and a payoff period of 48 months.The fourth TextBox control is where the monthly payment will appear. The user isn't supposed to enter any data in this box, so set the
ReadOnlyproperty to True to lock the control and prevent users from entering data. You'll be able to change its value from within your code, but users won't be able to type anything in it. (We could have used a Label control instead, but the uniform look of TextBoxes on a form is usually preferred.) You will also notice that the TextBox controls have a 3D frame. Experiment with the control'sBorderStyleproperty to discover the available styles for the control's frame (I've used theFixed3Dsetting for the TextBox controls).Next, place a CheckBox control on the form. By default, the control's caption is
CheckBox1, and it appears to the right of the check box. Because we want the titles to be to the left of the corresponding controls, we'll change this default appearance.Select the check box with the mouse, and in the Properties window locate the
CheckAlignproperty. Its value isMiddleLeft. If you expand the drop-down list by clicking the arrow button, you'll see that this property has many different settings, and each setting is shown as a square. Select the button that will center the text vertically and right-align it horizontally. The stringMiddleRightwill appear in the Properties window when you click the appropriate button.With the check box selected, locate the
Nameproperty in the Properties window, and set it tochkPayEarly.Change the CheckBox's caption by entering the string
Early Paymentin itsTextproperty field.Place a Button control in the bottom-left corner of the form. Name it
bttnShowPayment, and set itsTextproperty toMonthly Payment.Finally, place another Button control on the form, name it
bttnExit, and set itsTextproperty toExit.
Your next step is to align the controls on the form. The IDE provides commands to align the controls on the form, all of which can be accessed through the Format menu. To align the controls that are already on the form, follow these steps:
Select the four labels on the form. The handles of all selected controls will be black except for one control whose handles will be white. To specify the control that will be used as a reference for aligning the other controls, click it after making the selection. (You can select multiple controls either by using the mouse to draw a rectangle that encloses them or by clicking each control while holding down the Ctrl button.)
With the four text boxes selected, choose Format

Resize the CheckBox control. Its left edge should align with the left edges of the Label controls, and its right edge should align with the right edges of the Label controls. In case the resizing markers do not appear on the CheckBox control, set the value of its
AutoSizeproperty to False.Select all the Label and the CheckBox controls and choose Format
Your form should now look like the one shown in Figure 4.1. Take a good look at it and make sure no controls are misaligned. In the interface design process, you tend to overlook small problems such as a slightly misaligned control. The user of the application, however, instantly spots such mistakes.
Now you've created the interface, run the application, and seen how it behaves. Next you'll enter a few values in the text boxes, change the state of the check box, and test the functionality already built into the application. Clicking the Monthly Payment button won't have any effect because we have not yet added any code. If this were a prototype you were building for a customer, you would add a statement in the Monthly Payment button to display a random value in the Monthly Payment box.
When you double-click the control for the first time, Visual Studio will generate an empty default event handler declaration for you. Next time you double-click the control, Visual Studio will bring you to the event handler. If you're happy with the user interface, stop the application, open the form, and double-click the Monthly Payment Button control. Visual Basic opens the code window and displays the definition of the ShowPayment_Click event:
Private Sub bttnShowPayment_Click(...) Handles
    bttnPayment.Click
Because all Click event handlers have the same signature (they provide the same two arguments), I'll be omitting the list of arguments from now on. Actually, all event handlers have two arguments, and the first of them is always the control that fired the event. The type of the second argument differs depending on the type of the event. Place the pointer between the lines Private Sub and End Sub, and enter the rest of the lines of Listing 4.1. (You don't have to reenter the first and last lines that declare the event handler.)
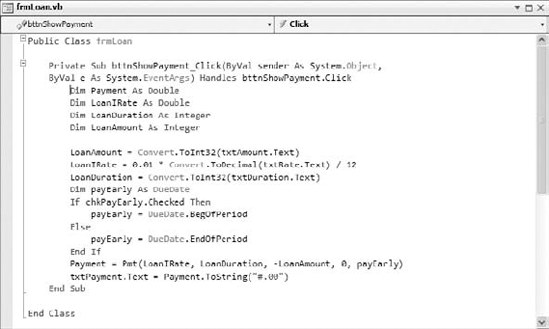
Example 4.1. The Code behind the Monthly Payment button
Private Sub bttnShowPayment_Click(ByVal (...)
                Handles bttnShowPayment.Click
    Dim Payment As Double
    Dim LoanIRate As Double
    Dim LoanDuration As Integer
    Dim LoanAmount As Integer

    LoanAmount = Convert.ToInt32(txtAmount.Text)
    LoanIRate = 0.01 * Convert.ToDecimal(txtRate.Text) / 12
    LoanDuration = Convert.ToInt32(txtDuration.Text)
    Dim payEarly As DueDate
    If chkPayEarly.Checked Then
        payEarly = DueDate.BegOfPeriod
Else
payEarly = DueDate.EndOfPeriod
End If
Payment = Pmt(LoanIRate, LoanDuration, -LoanAmount, 0, payEarly)
txtPayment.Text = Payment.ToString("#.00")
End SubThe code window should now look like the one shown in Figure 4.2. In previous versions of Visual Basic, you would use the underscore character at the end of the first part of the long line. For the most part, this is no longer necessary; Visual Basic in Visual Studio 2010 supports implicit line continuations. I'm using implicit line continuations in this book a lot to fit long lines on the printed page. The same statement you see as multiple lines in the book may appear in a single, long line in the project.
You don't have to break long lines manually as you enter code in the editor's window. Open the Edit menu and choose Advanced
Enumerations are a special kind of type in Visual Basic language used to define a set of logically related unchanging literal values. A typical example for an enumeration is DayOfWeek that contains members for each day of the week (DayOfWeek.Monday, DayOfWeek.Tuesday, and so on). Enumerations are declared with the Enum keyword, in following fashion:
Public Enum DayOfWeek
Monday
Tuesday
Wednesday
Thursday
Friday
Saturday
Sunday
End EnumBy using Enum instead of simple constant literal values, you add type safety to your application. For example, if you define the function that has a day as the DayOfWeek parameter, as in TicketPrice(movie as Movie, day as DayOfWeek) as Decimal, the code that is calling the function will have to pass a value defined in the DayOfWeek enum as a parameter, as in following statement:
Dim price = TicketPrice(avatarMovie, DayOfWeek.Saturday)
Had you defined the days of the week names as constants, as in following code, you would not be able to perform type checking:
Const Monday As String = "Monday" Const Tuesday As String = "Tuesday" Const Wednesday As String = "Wednesday" ' ...
Had you no Enum construct in Visual Basic, you would have to resort to constants. When you use constants, the TicketPrice function would have to declare the day parameter as String, meaning that when invoking the function, you could pass just any String value. Using the Enum type, however, you know that value belongs to predefined enumeration.
In Listing 4.1, the first line of code within the subroutine declares a variable. It lets the application know that Payment is a variable for storing a floating-point number (a number with a decimal part)—the Double data type. The line before the If statement declares a variable of the DueDate type. This is the type of argument that determines whether the payment takes place at the beginning or the end of the month. The last argument of the Pmt() function must be a variable of this type, so we declare a variable of the DueDate type. As mentioned earlier in this chapter, DueDate is an enumeration with two members: BegOfPeriod and EndOfPeriod.
The first really interesting statement in the subroutine is the If statement that examines the value of the chkPayEarly CheckBox control. If the control is selected, the code sets the payEarly variable to DueDate.BegOfPeriod. If not, the code sets the same variable to DueDate.EndOfPeriod. The ComboBox control's Checked property returns True if the control is selected at the time and False otherwise. After setting the value of the payEarly variable, the code calls the Pmt() function, passing the values of the controls as arguments:
The first argument is the interest rate. The value entered by the user in the
txtRateTextBox is multiplied by 0.01 so that the value 14.5 (which corresponds to 14.5 percent) is passed to thePmt()function as 0.145. Although we humans prefer to specify interest rates as integers (8 percent) or floating-point numbers larger than 1 (8.24 percent), thePmt()function expects to read a number that's less than 1. The value 1 corresponds to 100 percent. Therefore, the value 0.1 corresponds to 10 percent. This value is also divided by 12 to yield the monthly interest rate.The second argument is the duration of the loan in months (the value entered in the txtDuration TextBox).
The third argument is the loan's amount (the value entered in the txtAmount TextBox).
The fourth argument (the loan's future value) is 0 by definition.
The last argument is the payEarly variable, which is set according to the status of the chkPayEarly control.
The last statement in Listing 4.1 converts the numeric value returned by the Pmt() function to a string and displays this string in the fourth TextBox control. The result is formatted appropriately with the following expression:
Payment.ToString("#.00")The Payment variable is numeric, and all numeric variables provide the method ToString, which formats the numeric value and converts it to a string. The character # stands for the integer part of the variable. The period separates the integer from the fractional part, which is rounded to two decimal digits. The Pmt() function returns a precise number, such as 372.2235687646345, and you should round it to two decimal digits and format it nicely before displaying it. For more information on formatting numeric (and other) values, see the section "Formatting Numbers" in Chapter 2, "VB Programming Essentials." Finally, the formatted string is assigned to the Text property of the TextBox control on the form.
If you didn't know about the Pmt() built-in function, how would you go about calculating loan payments? Code snippets to the rescue!
Right-click somewhere in the code window, and from the context menu, choose the Insert Snippet command.
Double-click the Fundamentals folder to see another list of items.
This time, double-click the Math folder and then select the snippet Calculate a Monthly Payment on a Loan.
The following code will be inserted at the location of the pointer:
Dim futureValue As Double = 0 Dim payment As Double payment1 = Pmt(0.05 / 12, 36, −1000, futureValue, DueDate.EndOfPeriod)
The snippet demonstrates the use of the Pmt() function. All you have to do is replace the values of the various parameters with the data from the appropriate controls on the form.
If you don't know how to use the arguments of the Pmt() function, start editing the function's arguments and you will see their description in the usual tooltip box, as with all built-in functions.
The code of the LoanCalculator sample project is a bit different and considerably longer than what I have presented here. The statements discussed in the preceding text are the bare minimum for calculating a loan payment. The user can enter all kinds of unreasonable values on the form and cause the program to crash. In the next section, you'll see how you can validate the data entered by the user, catch errors, and handle them gracefully (that is, give the user a chance to correct the data and proceed) as opposed to terminating the application with a runtime error.
If you enter a non-numeric value in one of the fields, the program will crash and display an error message. For example, if you enter twenty in the Duration text box, the program will display the error message shown in Figure 4.3. A simple typing error can crash the program. This isn't the way Windows applications should work. Your applications must be able to handle all kinds of user errors, provide helpful messages, and in general, guide the user in running the application efficiently. If a user error goes unnoticed, your application will either end abruptly or will produce incorrect results without an indication.
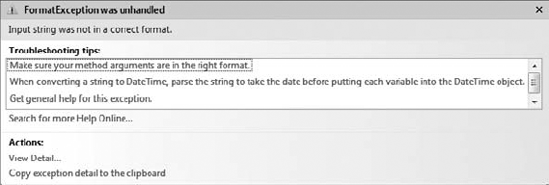
Figure 4.3. The FormatException error message means that you supplied a string where a numeric value was expected.
Visual Basic will take you back to the application's code window in which the statements that caused the error will be highlighted in green. Obviously, we must do something about user errors. One way to take care of typing errors is to examine each control's contents; if the controls don't contain valid numeric values, display your own descriptive message and give the user another chance. Listing 4.2 is the revised Click event handler that examines the value of each text box before attempting to use it in any calculations.
Example 4.2. Revised Show Payment button
Private Sub bttnShowPayment_Click(...) Handles bttnPayment.Click
Dim Payment As DoubleDim LoanIRate As Double
Dim LoanDuration As Integer
Dim LoanAmount As Integer
' Validate amount
If IsNumeric(txtAmount.Text) Then
LoanAmount = Convert.ToInt32(txtAmount.Text)
Else
MsgBox("Invalid amount, please re-enter")
txtAmount.Focus()
txtAmount.SelectAll()
Exit Sub
End If
' Validate interest rate
If IsNumeric(txtRate.Text) Then
LoanIRate = 0.01 * Convert.ToDouble(txtRate.Text) / 12
Else
MsgBox("Invalid interest rate, please re-enter")
txtRate.Focus()
txtRate.SelectAll()
Exit Sub
End If
' Validate loan's duration
If IsNumeric(txtDuration.Text) Then
LoanDuration = Convert.ToInt32(txtDuration.Text)
Else
MsgBox("Please specify the loan's duration as a number of months")
txtDuration.Focus()
txtDuration.SelectAll()
Exit Sub
End If
' If all data were validated, proceed with calculations
Dim payEarly As DueDate
If chkPayEarly.Checked Then
payEarly = DueDate.BegOfPeriod
Else
        payEarly = DueDate.EndOfPeriod
    End If
    Payment = Pmt(LoanIRate, LoanDuration, -LoanAmount, 0, payEarly)
    txtPayment.Text = Payment.ToString("#.00")
End SubFirst, we declare three variables in which the loan's parameters will be stored: LoanAmount, LoanIRate, and LoanDuration. These values will be passed to the Pmt() function as arguments. Each text box's value is examined with an If structure. If the corresponding text box holds a valid number, its value is assigned to the numeric variable. If not, the program displays a warning and exits the subroutine without attempting to calculate the monthly payment. Before exiting the subroutine, however, the code moves the focus to the text box with the invalid value and selects the text in the textbox because this is the control that the user will most likely edit. After fixing the incorrect value, the user can click the Show Payment button again. IsNumeric() is another built-in function that accepts a variable and returns True if the variable is a number and False otherwise.
You can run the revised application and check it out by entering invalid values in the fields. Notice that you can't specify an invalid value for the last argument; the CheckBox control won't let you enter a value. You can only select or clear it, and both options are valid. The actual calculation of the monthly payment takes a single line of Visual Basic code. Displaying it requires another line of code. Adding the code to validate the data entered by the user, however, is an entire program. And that's the way things are.
Well-behaved applications must contain data-validation code. If an application such as LoanCalculator crashes because of a typing mistake, nothing really bad will happen. The user will try again or else give up on your application and look for a more professional one. However, if the user has been entering data for hours, the situation is far more serious. It's your responsibility as a programmer to make sure that only valid data are used by the application and that the application keeps working, no matter how the user misuses or abuses it.
Our sample application is not typical because it calculates the result with a single function call, but in developing typical business applications, you must write a substantial amount of code to validate user input. The reason for validating user input is to control inputs to your code so that you can ensure that it behaves correctly and that you can provide specific error messages to help the user identify the error and correct it.
You will notice that the sample applications included in this book don't contain much data-validation code, because it would obscure the "useful" code that applies to the topic at hand. Instead, they demonstrate specific techniques. You can use parts of the examples in your applications, but you should provide your own data-validation code (and error-handling code, as you'll see in a moment).
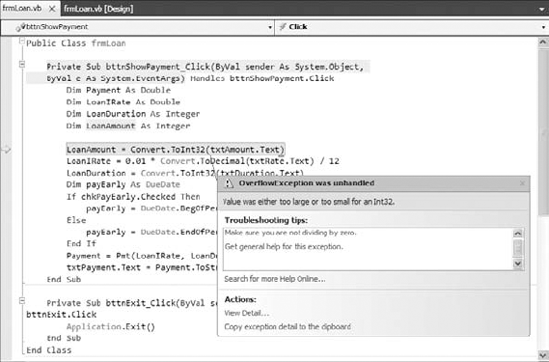
Now run the application one last time and enter an enormous loan amount. Try to find out what it would take to pay off the national debt with a reasonable interest rate in, say, 72 months. The program will crash again (as if you didn't know). This time the program will go down with a different error message, as shown in Figure 4.4. Visual Basic will complain about an overflow. The exact message is Value was either too large or too small for an Int32, and the program will stop at the line that assigns the contents of the txtAmount TextBox to the LoanAmount variable. Press the Break button and the offending statement in the code will be highlighted.
An overflow is a numeric value too large for the program to handle. This error is usually produced when you divide a number by a very small value. When you attempt to assign a very large value to an Integer variable, you'll also get an overflow exception.
Actually, in the LoanCalculator application, any amount greater than 2,147,483,647 will cause an overflow condition. This is the largest value you can assign to an Integer variable; it's plenty for our banking needs but not nearly adequate for handling government deficits. As you learned in Chapter 2, Visual Basic provides other types of variables, which can store enormous values (making the national debt look really small). In the meantime, if you want the loan calculator to be truly useful, change the declaration of the LoanAmount variable to the following:
Dim LoanAmount As Double
The Double data type can hold much larger values. Besides, the Double data type can also hold non-integer values. Not that anyone will ever apply for a loan of $25,000 and some cents, but if you want to calculate the precise monthly payment for a debt you have accumulated, you should be able to specify a non-integer amount. In short, I should have declared the LoanAmount variable with the Double data type in the first place. By the way, there's another integer type, the Long data type, which can hold much larger integer values.
An overflow error can't be caught with data-validation code. There's always a chance that your calculations will produce overflows or other types of math errors. Data validation won't help here; you just don't know the result before you carry out the calculations. You need something called error handling, or exception handling. This is additional code that can handle errors after they occur. In effect, you're telling VB that it shouldn't stop with an error message, which would be embarrassing for you and wouldn't help the user one bit. Instead, VB should detect the error and execute the proper statements to handle the error. Obviously, you must supply these statements. (You'll see examples of handling errors at runtime shortly.)
The sample application works as advertised, and it's fail-safe. Yet there's one last touch you can add to the application. The various values on the form are not always in synch. Let's say you've calculated the monthly payment for a specific loan and then you want to change the duration of the loan to see how it affects the monthly payment. As soon as you change the duration of the loan, and before you click the Monthly Payment button, the value in the Monthly Payment box doesn't correspond to the parameters of the loan. Ideally, the monthly payment should be cleared as soon as the user starts editing one of the loan's parameters. To do so, you must insert a statement that clears the txtPayment control. But what's the proper event handler for this statement? The TextBox control fires the TextChanged event every time its text is changed, and this is the proper place to execute the statement that clears the monthly payment on the form. Because there are three TextBox controls on the form, you must program the TextChanged event of all three controls or write an event handler inside the frmLoan class that handles all three events:
Private Sub txtAmount_TextChanged(ByVal (...) Handles
                txtAmount.TextChanged, txtDuration.TextChanged,
                txtRate.TextChanged
    txtPayment.Clear()
End Sub
Yes, you can write a common handler for multiple events, as long as the events are of the same type and they're all listed after the Handles keyword. You'll see another example of the same technique in the following sample project.
One of the sample projects for this chapter is a revised version of the LoanCalculator project, the LoanCalculator-Dates project, which uses a different interface. Instead of specifying the duration of the loan in months, this application provides two instances of the DateTimePicker control, which is used to specify dates. Delete the TextBox control and the corresponding Labels and insert two new Label controls and two DateTimePicker controls on the form. Name the DateTimePicker controls dtFrom and dtTo. Users can set the loan's starting and ending dates on these two controls and the program calculates the duration of the loan in months with the following statement:
LoanDuration = DateDiff(DateInterval.Month,
                        dtFrom.Value, dtTo.Value) + 1
The DateDiff() function returns the difference between two dates in the interval supplier as the first argument to the function. The rest of the code doesn't change; as long as the LoanDuration variable has the correct value, the same statements will produce the correct result. If you open the project, you'll find a few more interesting statements that set the dtFrom control to the first date of the selected month and the dtTo control to the last date of the selected month.
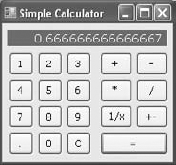
This next application is more advanced, but it's not as advanced as it looks. It's a calculator with a typical visual interface that demonstrates how Visual Basic can simplify the programming of fairly advanced operations. If you haven't tried it, you may think that writing an application such as this one is way too complicated for a beginner, but it isn't. The MathCalculator application is shown in Figure 4.5.
The application emulates the operation of a handheld calculator and implements basic arithmetic operations. It has the look of a math calculator, and you can easily expand it by adding more features. In fact, adding features such as cosines and logarithms is actually simpler than performing the basic arithmetic operations. This interface will also give you a chance to exercise most of the tools of the IDE for aligning and spacing the controls on a form.
The application's interface is straightforward, but it takes a bit of effort. You must align the buttons on the form and make the calculator look as much like a handheld calculator as possible. Start a new Windows Forms project, the MathCalculator project, and rename the main form from Form1.vb to frmCalculator.vb.
Designing the interface of the application isn't trivial because it's made up of many buttons, all perfectly aligned on the form. To simplify the design, follow these steps:
Select a font that you like for the form. All the command buttons you'll place on the form will inherit this font. The MathCalculator sample application uses 10-point Verdana font. I've used a size of 12 points for the Period button because the 10-point period was too small and very near the bottom of the control.
Add the Label control, which will become the calculator's display. Set its
BorderStyleproperty to Fixed3D so that it will have a 3D look, as shown in Figure 4.5. Change itsForeColorandBackColorproperties too, if you want it to look different from the rest of the form. The sample project uses colors that emulate the— now extinct— green CRT monitors. Name the Label controllblDisplay.Draw a Button control on the form, change its
Textproperty to1, and name itbttn1. Size the button carefully so that its caption is centered on the control. The other buttons on the form will be copies of this one, so make sure you've designed the first button as best as you can before you start making copies of it. You can also change the button's style with theFlatStyleproperty. (You can experiment with the Popup, Standard, and System settings for this property.)Place the button in its final position on the form. At this point, you're ready to create the other buttons for the calculator's digits. Right-click the button and choose Copy from the context menu. The Button control is copied to the Clipboard, and now you can paste it on the form (which is much faster than designing an identical button).
Right-click somewhere on the form, choose Paste, and the button copied to the Clipboard will be pasted on the form. The copy will have the same caption as the button it was copied from, and its name will be
Button1.Now set the button's
Nameproperty tobttn2and itsTextproperty to 2. This button is the digit 2. Place the new button to the right of the previous button. You don't have to align the two buttons perfectly now; later we'll use the commands of the Format menu to align the buttons on the form. As you move the control around on the form, one or more lines may appear on the design surface at times. These lines are called snap lines, and they appear as soon as a control is aligned (vertically or horizontally) with one or more of the existing controls on the form. The snap lines allow you to align controls with the mouse. Blue snap lines appear when the control's edge is aligned with the edge of another control. Red snap lines appear when the control's baseline is aligned with the baseline of another control. The baseline is the invisible line on which the characters of the control's caption are based.Repeat steps 5 and 6 eight more times, once for each numeric digit. Each time a new Button control is pasted on the form, Visual Basic names it
Button1and sets its caption to 1; you must change theNameandTextproperties. You can name the buttons anything you like, but a name that indicates their role in the application is preferred.When the buttons of the numeric digits are all on the form, place two more buttons, one for the C (Clear) operation and one for the Period button. Name them
bttnClearandbttnDecimalPoint, and set their captions accordingly. Use a larger font size for the Period button to make its caption easier to read.When all the digit buttons of the first group are on the form and in their approximate positions, align them by using the commands of the Format menu. You can use the snap lines to align horizontally and vertically the various buttons on the form, but you must still space the controls manually, which isn't a trivial task. Here's how you can align the buttons perfectly via the Format menu:
First, align the buttons of the top row. Start by aligning the 1 button with the left side of the
lblDisplayLabel. Then select all the buttons of the top row and make their horizontal spacing equal (choose FormatNow you can align the buttons in each row and each column separately. Use one of the buttons you aligned in the last step as the guide for the rest of them. The buttons can be aligned in many ways, so don't worry if somewhere in the process you ruin the alignment. You can always use the Undo command in the Edit menu. Select the three buttons on the second row and align their tops by using the first button as a reference. To set the anchor control for the alignment, click it with the mouse while holding down the Ctrl key. Do the same for the third and fourth rows of buttons. Then do the same for the four columns of buttons, using the top button as a reference.
Now, place the buttons for the arithmetic operations on the form—addition (+), subtraction (–), multiplication (*), and division (/). Name the addition button
bttnPlus, the subtraction buttonbttnMinus, the multiplication buttonbttnMultiply, and the division buttonbttnDivide.Finally, place the Equals button on the form, name it
bttnEquals, and make it wide enough to span the space of two operation buttons. Use the commands on the Format menu to align these buttons, as shown in Figure 4.5. The form shown in Figure 4.5 has a few more buttons, which you can align by using the same techniques you used to align the numeric buttons.
If you don't feel quite comfortable with the alignment tools of the IDE, you can still position the controls on the form through the x and y components of each control's Location property. (They're the x- and y-coordinates of the control's upper-left corner on the form.) The various alignment tools are among the first tools of the IDE you'll master, and you'll be creating forms with perfectly aligned controls in no time at all.
Now you're ready to add some code to the application. Double-click one of the digit buttons on the form and you'll see the following in the code window:
Private Sub bttn1_Click(ByVal sender As System.Object,
            ByVal e As System.EventArgs) Handles
            bttn1.Click

End Sub
This is the Click event's handler for a single digit button. Your first inclination might be to program the Click event handler of each digit button, but repeating the same code 10 times isn't very productive. (Not to mention that if you decide to edit the code later, the process must be repeated 10 times.) We're going to use the same event handler for all buttons that represent digits. All you have to do is append the names of the events to be handled by the same subroutine after the Handles keyword. You should also change the name of the event handler to something that indicates its role. Because this subroutine handles the Click event for all the digit buttons, let's call it DigitClick(). Here's the revised declaration of a subroutine that can handle all the digit buttons:
Private Sub DigitClick(ByVal sender As System.Object,
                ByVal e As System.EventArgs)
                Handles bttn0.Click, bttn1.Click, bttn2.Click,
                bttn3.Click, bttn4.Click, bttn5.Click, bttn6.Click,
                bttn7.Click, bttn8.Click, bttn9.Click
End Sub
You don't have to type all the event names; as soon as you insert the first comma after bttn0.Click, a drop-down list with the names of the controls will open and you can select the name of the next button with the down arrow. Press the spacebar to select the desired control (bttn1, bttn2, and so on), and then type the period. This time, you'll see another list with the names of the events for the selected control. Locate the Click event and select it by pressing the spacebar. Type the next comma and repeat the process for all the buttons. This extremely convenient feature of the language is IntelliSense: The IDE presents the available and valid keywords as you type.
When you press a digit button on a handheld calculator, the corresponding digit is appended to the display. To emulate this behavior, insert the following line in the Click event handler:
lblDisplay.Text = lblDisplay.Text + sender.Text
This line appends the digit clicked to the calculator's display. The sender argument of the Click event represents the control that was clicked (the control that fired the event). The Text property of this control is the caption of the button that was clicked. For example, if you have already entered the value 345, clicking the digit 0 displays the value 3450 on the Label control that acts as the calculator's display.
The expression sender.Text is not the best method of accessing the Text property of the button that was clicked, but it will work as long as the Strict option is off. As discussed in Chapter 2, we must cast the sender object to a specific type (the Button type) and then call its Text method:
CType(sender, Button).Text
The code behind the digit buttons needs a few more lines. After certain actions, the display should be cleared. After one of the buttons that correspond to math operations is pressed, the display should be cleared in anticipation of the second operand. Actually, the display must be cleared as soon as the first digit of the second operand is pressed and not as soon as the math operator button is pressed. Likewise, the display should also be cleared after the user clicks the Equals button. Revise the DigitClick event handler, as shown in Listing 4.3.
Example 4.3. The DigitClick event
Private Sub DigitClick(ByVal sender As System.Object,
                        ByVal e As System.EventArgs)
                        Handles bttn1.Click, bttn2.Click, bttn3.Click,
                        bttn4.Click, bttn5.Click, bttn6.Click,
                        bttn7.Click, bttn8.Click, bttn9.Click
   If clearDisplay Then
      lblDisplay.Text = ""
      clearDisplay = False
   End If
   lblDisplay.Text = lblDisplay.Text + sender.text
End Sub
The clearDisplay variable is declared as Boolean, which means it can take a True or False value. Suppose the user has performed an operation and the result is on the calculator's display. The user now starts typing another number. Without the If clause, the program would continue to append digits to the number already on the display. This is not how calculators work. When the user starts entering a new number, the display must be cleared. Our program uses the clearDisplay variable to know when to clear the display.
The Equals button sets the clearDisplay variable to True to indicate that the display contains the result of an operation. The DigitClick() subroutine examines the value of this variable each time a new digit button is pressed. If the value is True, DigitClick() clears the display and then prints the new digit on it. The subroutine also sets clearDisplay to False so that when the next digit is pressed, the program won't clear the display again.
What if the user makes a mistake and wants to undo an entry? The typical handheld calculator has no Backspace key. The Clear key erases the current number on the display. Let's implement this feature. Double-click the C button and enter the code of Listing 4.4 in its Click event.
Example 4.4. Programming the Clear button
Private Sub bttnClear_Click (ByVal sender As System.Object,
               ByVal e As System.EventArgs) Handles bttnClear.Click
   lblDisplay.Text = ""
End Sub
Now we can look at the Period button. A calculator, no matter how simple, should be able to handle fractional numbers. The Period button works just like the digit buttons, with one exception. A digit can appear any number of times in a numeric value, but the decimal point can appear only once. A number such as 99.991 is valid, but you must make sure the user can't enter numbers such as 23.456.55. After a decimal point is entered, this button must not insert another one. The code in Listing 4.5 accounts for this.
Example 4.5. Programming the Period button
Private Sub bttnDecimalPointClick(...) Handles bttnDecimalPoint.Click
   If lblDisplay.Text.IndexOf(".") >= 0 Then
      Exit Sub
   Else
      lblDisplay.Text = lblDisplay.Text & "."
   End If
End Sub
IndexOf is a method that can be applied to any string. The expression lblDisplay.Text is a string (the text on the Label control), so we can call its IndexOf method. The expression lblDisplay.Text.IndexOf(".") returns the location of the first instance of the period in the caption of the Label control. If this number is zero or positive, the number entered contains a period already and another can't be entered. In this case, the program exits the subroutine. If the method returns −1, the period is appended to the number entered so far, just like a regular digit.
Check out the operation of the application. We have already created a functional user interface that emulates a handheld calculator with data-entry capabilities. It doesn't perform any operations yet, but we have already created a functional user interface with only a small number of statements.
Now we can move to the interesting part of the application: the coding of the math operations. Let's start by defining the three variables listed in Table 4.3.
Table 4.3. Math operation variable definitions
Variable | Definition |
|---|---|
| The first number in the operation |
| The desired operation |
| The second number in the operation |
When the user clicks one of the math symbols, the application will store the value of the operand in the variable Operand1. If the user then clicks the Plus button, the program must make a note to itself that the current operation is an addition and set the clearDisplay variable to True so that the user can enter another value (the second value to be added). The symbol of the operation is stored in the MathOperator variable. The user enters another value and then clicks the Equals button to see the result. At this point, your program must do the following:
Read the value on the display into the
Operand2variable.Perform the operation indicated by the
MathOperatorvariable with the two operands.Display the result and set the
clearDisplayvariable toTrue.
The Equals button must perform the following operation:
Operand1 MathOperator Operand2
Suppose the number on the display when the user clicks the Plus button is 3342. The user then enters the value 23 and clicks the Equals button. The program must carry out the addition: 3342 + 23.
If the user clicks the Division button, the operation is as follows: 3342 ÷ 23.
Variables are local in the subroutines in which they are declared. Other subroutines have no access to them and can't read or set their values. Sometimes, however, variables must be accessed from many places in a program. The variables Operand1, Operand2, and Operator, as well as the clearDisplay variable, must be accessed from within more than one subroutine, so they must be declared outside any subroutine; their declarations usually appear at the beginning of the class code with the following statements:
Dim clearDisplay As Boolean
Dim Operand1 As Double
Dim Operand2 As Double
Dim MathOperator As String
These variables are called form-wide variables, or simply form variables, because they are visible from within any subroutine on the form. Let's see how the program uses the MathOperator variable. When the user clicks the Plus button, the program must store the value + in the MathOperator variable. This takes place from within the Plus button's Click event.
All variables that store numeric values are declared as variables of the Double type, which can store values with the greatest possible precision. The Boolean type takes two values: True and False. You have already seen how the clearDisplay variable is used.
With the variable declarations out of the way, we can now implement the operator buttons. Double-click the Plus button, and in the Click event's handler, enter the lines shown in Listing 4.6.
Example 4.6. The Plus button
Private Sub bttnPlus_Click(ByVal (...) Handles bttnPlus.ClickOperand1= Convert.ToDouble(lblDisplay.Text)MathOperator= "+" clearDisplay = True End Sub
The variable Operand1 is assigned the value currently on the display. The Convert.ToDouble() method converts its argument to a double value. The Text property of the Label control is a string. The actual value stored in the Text property is not a number. It's a string such as 428, which is different from the numeric value 428. That's why we use the Convert.ToDouble method to convert the value of the Label's caption to a numeric value. The remaining buttons do the same, and I won't show their listings here.
After the second operand is entered, the user can click the Equals button to calculate the result. When this happens, the code of Listing 4.7 is executed.
Example 4.7. The Equals button
Private Sub bttnEquals_Click(ByVal (...) Handles bttnEquals.Click DimresultAs DoubleOperand2= Convert.ToDouble(lblDisplay.Text) Select CaseMathOperatorCase "+" result =Operand1+Operand2Case "-" result =Operand1−Operand2Case "*" result =Operand1*Operand2Case "/" IfOperand2<> "0" Then result =Operand1/Operand2End IfEnd Select lblDisplay.Text = result.ToString clearDisplay = True End Sub
The result variable is declared as Double so that the result of the operation will be stored with maximum precision. The code extracts the value displayed in the Label control and stores it in the variable Operand2. It then performs the operation with a Select Case statement. This statement compares the value of the MathOperator variable to the values listed after each Case statement. If the value of the MathOperator variable matches one of the Case values, the following statement is executed.
Division takes into consideration the value of the second operand because if it's zero, the division can't be carried out. The last statement carries out the division only if the divisor is not zero. If Operand2 happens to be zero, nothing happens.
Now run the application and check it out. It works just like a handheld calculator, and you can't crash it by specifying invalid data. We didn't have to use any data-validation code in this example because the user doesn't get a chance to type invalid data. The data-entry mechanism is foolproof. The user can enter only numeric values because there are only numeric digits on the calculator. The only possible error is to divide by zero, and that's handled in the Equals button.
Of course, users should be able to just type the numeric values; you shouldn't force them to click the digit buttons on the interface. To intercept keystrokes from within your code, you must first set the form's KeyPreview property to True. By default, each keystroke is reported to the control that has the focus at the time and fires the keystroke-related events: the KeyDown, KeyPress, and KeyUp events. Sometimes we need to handle certain keystrokes from a central place, and we set the form's KeyPreview property to True so that keystrokes are reported first to the form and then to the control that has the focus. We can intercept the keystrokes in the form's KeyPress event and handle them in this event handler. Insert the statements shown in Listing 4.8 in the form's KeyPress event handler.
Example 4.8. Handling keystrokes at the form's level
Private Sub CalculatorForm_KeyPress(ByVal sender As Object,
            ByVal e As System.Windows.Forms.KeyPressEventArgs) Handles
            Me.KeyPress
    Select Case e.KeyChar
        Case "1" : bttn1.PerformClick()
        Case "2" : bttn2.PerformClick()
        Case "3" : bttn3.PerformClick()
        Case "4" : bttn4.PerformClick()
        Case "5" : bttn5.PerformClick()
        Case "6" : bttn6.PerformClick()
        Case "7" : bttn7.PerformClick()
        Case "8" : bttn8.PerformClick()
        Case "9" : bttn9.PerformClick()
        Case "0" : bttn0.PerformClick()
        Case "." : bttnDecimalPoint.PerformClick()
        Case "C", "c" : bttnClear.PerformClick()
        Case "+" : bttnPlus.PerformClick()
        Case "-" : bttnMinus.PerformClick()
        Case "*" : bttnMultiply.PerformClick()
        Case "/" : bttnDivide.PerformClick()
        Case "=" : bttnEquals.PerformClick()
    End Select
End Sub
This event handler examines the key pressed by the user and invokes the Click event handler of the appropriate button by calling its PerformClick method. This method allows you to "click" a button from within your code. When the user presses the digit 3, the form's KeyPress event handler intercepts the keystrokes and emulates the click of the bttn3 button. Because the large Select Case statement doesn't handle characters and punctuation symbols, there's no way for the user to enter invalid digits when a number is expected.
Our sample applications work nicely and are quite easy to test and fix if you discover something wrong with them (but only because they're very simple applications). As you write code, you'll soon discover that something doesn't work as expected, and you should be able to find out why and then fix it. The process of eliminating errors in logic—as opposed to errors in syntax, which are caught by the compiler—is called debugging. Visual Studio provides the tools to simplify the process of debugging. There are a few simple debugging techniques you should know, even as you work with simple projects.
Open the MathCalculator project in the code editor and place the pointer in the line that calculates the difference between the two operands. Let's pretend there's a problem with this line and we want to follow the execution of the program closely to find out what's going wrong with the application. Press F9 and the line will be highlighted in brown. This line has become a breakpoint: As soon as it is reached, the program will stop.
Another way to add a breakpoint is to use the Breakpoint option in the context menu. You can display the context menu in the editor by right-clicking the line of code where you wish the execution to stop. Finally, there is a special window in Visual Studio that displays breakpoints. You can display the Breakpoints window by navigating to the Debug
Press F5 to run the application and perform a subtraction. Enter a number; click the minus button and then another number, and finally, click the Equals button. The application will stop, and the code editor will open. The breakpoint will be highlighted in yellow. You're still in runtime mode, but the execution of the application is suspended. You can even edit the code in break mode and then press F5 to continue the execution of the application. Hover the pointer over the Operand1 and Operand2 variables in the code editor's window. The value of the corresponding variable will appear in a small ToolTip box. Move the pointer over any variable in the current event handler to see its value. These are the values of the variables just prior to the execution of the highlighted statement.
The result variable is zero because the statement hasn't been executed yet. If the variables involved in this statement have their proper values (if they don't, you know that the problem is prior to this statement and perhaps in another event handler), you can execute this statement by pressing F10, which executes only the highlighted statement. The program will stop at the next line. The next statement to be executed is the End Select statement.
Find an instance of the result variable in the current event handler, rest the pointer over it, and you will see the value of the variable after it has been assigned a value. Now you can press F10 to execute another statement or press F5 to return to normal execution mode.
You can also evaluate expressions involving any of the variables in the current event handler by entering the appropriate statement in the Immediate window. The Immediate window appears at the bottom of the IDE. If it's not visible, open the Debug menu and choose Windows
? Operand1 / Operand2
The quotient of the two values will appear in the following line. The question mark is just a shorthand notation for the Print command.
If you want to know the current value on the calculator's display, enter the following statement:
? lblDisplay.Text
This statement requests the value of a control's property on the form. The current value of the Label control's Text property will appear in the following line.
You can also evaluate math expressions with statements such as the following:
? Math.Log(3/4)
Log() is the logarithm function and a method of the Math class. With time, you'll discover that the Immediate window is a handy tool for debugging applications. If you have a statement with a complicated expression, you can request the values of the expression's individual components and make sure they can be evaluated.
Now move the pointer over the breakpoint and press F9 again. This will toggle the breakpoint status, and the execution of the program won't halt the next time this statement is executed.
If the execution of the program doesn't stop at a breakpoint, it means that the statement is never reached. In this case, you must search for the bug in statements that are executed before the breakpoint is reached. Chances are that the statement that was not reached was in an If statement that wasn't executed, or in a subroutine that has never been called. For example, if you didn't assign the proper value to the MathOperator variable, the Case clause for the subtraction operation will never be reached. You should place the breakpoint at the first executable statement of the Click event handler for the Equals button to examine the values of all variables the moment this subroutine starts its execution. If all variables have the expected values, you will continue testing the code forward. If not, you'd have to test the statements that lead to this statement—the statements in the event handlers of the various buttons.
Another simple technique for debugging applications is to print the values of certain variables in the Immediate window. Although this isn't a debugging tool, it's common practice among VB programmers. Many programmers print the values of selected variables before and after the execution of some complicated statements. To do so, use the statement Debug.WriteLine followed by the name of the variable you want to print, or an expression:
Debug.WriteLine(Operand1)This statement sends its output to the Immediate window. This is a simple technique, but it works. You can also use it to test a function or method call. If you're not sure about the syntax of a function, pass an expression that contains the specific function to the Debug.WriteLine statement as an argument. If the expected value appears in the Immediate window, you can go ahead and use it in your code.
In the project's folder, you will find the MoreFeatures.txt document, which describes how to add more features to the math calculator. Such features include the inversion of a number (the 1/x button), the negation of a number (the +/− button), and the usual math functions (logarithms, square roots, trigonometric functions, and so on).
Crashing this application won't be as easy as crashing the LoanCalculator application. If you start multiplying very large numbers, you won't get an overflow exception. Enter a very large number by repeatedly typing the digit 9; then multiply this value with another equally large value. When the result appears, click the multiplication symbol and enter another very large value. Keep multiplying the result with very large numbers until you exhaust the value range of the Double data type (that is, until the result is so large that it can't be stored to a variable of the Double type). When this happens, the string infinity will appear in the display. This is Visual Basic's way of telling you that it can't handle very large numbers. This isn't a limitation of VB; it's the way computers store numeric values: They provide a limited number of bytes for each variable. (We discussed oddities such as infinity in Chapter 2.)
You can't create an overflow exception by dividing a number by zero, either, because the code will not even attempt to carry out this calculation. In short, the MathCalculator application is pretty robust. However, we can't be sure that users won't cause the application to generate an exception, so we must provide some code to handle all types of errors.
How do you prevent an exception raised by a calculation? Data validation won't help. You just can't predict the result of an operation without actually performing the operation. And if the operation causes an overflow, you can't prevent it. The answer is to add a structured exception handler. Most of the sample application's code is straightforward, and you can't easily generate an exception for demonstration purposes. The only place where an exception may occur is the handler of the Equals button, where the calculations take place. This is where you must add an exception handler. The outline of the structured exception handler is the following:
Try
  ' statements block
Catch Exception
  ' handler block
Finally
  ' cleanup statements block
End Try
The program will attempt to perform the calculations, which are coded in the statements block. If the program succeeds, it continues with the cleanup statements in the Finally section of the handler. These statements are mostly cleanup code used to release reserved resources, and the Finally section of the statement is optional. If it's missing, the program execution continues with the statement following the End Try statement. If an error occurs in the first block of statements, the Catch Exception section is activated and the statements in the handler block are executed. If present, the Finally block is executed next. As you can see, the Finally block is executed no matter the outcome of statements block execution; error or no error, you can be certain that cleanup code is executed and important resources like database connections and file handlers are released.
The Catch Exception block is where you handle the error. There's not much you can do about errors that result from calculations. All you can do is display a warning and give the user a chance to change the values. There are other types of errors, however, that can be handled much more gracefully. If your program can't read a file from a CD drive, you can give the user a chance to insert the CD and retry. In other situations, you can prompt the user for a missing value and continue. If the application attempts to write to a read-only file, for example, chances are that the user specified a file on a CD drive or a file with its read-only attribute set. You can display a warning, exit the subroutine that saves the data, and give the user a chance to either select another filename or change the read-only attribute of the selected file.
A common programming mistake is to place the cleanup code inside the statements block and to omit the Finally block altogether. Such code can result in a dreaded memory leak problem. This way some precious computing resources end up without being recovered. When unmanaged resources (like file handles and database connections) are accessed, they have to be released explicitly or they will stay in memory and the program might eventually stall. Unfortunately, since the cleanup code is placed inside the statements block, the program executions will jump to the Catch block immediately after the error is raised, thus omitting the cleanup statements.
What makes such memory leak problems even more sinister is the fact that they are produced only under exceptional conditions. If everything goes well, all resources are recovered. If an error is produced, however, resources are leaked. Under such circumstances a program can go on without crashing for quite some time. Usual debugging techniques are often helpless under such circumstances. You will typically have to employ some special tools like memory profilers to pinpoint the exact block of code responsible for producing the memory leak.
The following snippet is a simplified illustration of such a scenario. The code assumes that the SomeFile.txt file has an integer written on the first line. If this is true, the application will correctly close the writer. However, if you encounter something else—for example, the characters abc on the first line in the file—the error handler will prevent the application from crashing but will not close the writer.
To test the snippet, create a new Console Application project. Change the name of Module1 to ResourceLeakingModule and make sure it is marked as a startup object. Copy the following code to ResourceLeakingModule:
Imports System.IO

Module ResourceLeakingModule

    Sub Main()
        Dim fileReader As StreamReader
        Dim firstNumber As Integer
        Try
            fileReader = File.OpenText("C:SomeFile.txt")
            firstNumber = fileReader.ReadLine
            Console.WriteLine("At this point execution already " &
                  "jumped over to catch block")
            fileReader.Close() 'should go to Finally block
        Catch ex As Exception
            Console.WriteLine("fileReader has not been closed")
            ' Wait so that output can be read
            Console.ReadLine()
        End Try
    End Sub

End Module
Now create a SomeFile.txt file in the root of your C drive and write abc on the first line of the file. You can place the file in some other location as long as you modify the snippet so it points to the correct location of the file.
The way you can resolve the memory leak problem in this case is to place a fileReader.Close() statement inside the Finally block. Another way to release unmanaged resources correctly is to employ Visual Basic's Using statement. This statement is convenient as long as you can release the resource inside the same block of code that you used to create the resource.
In general, there's no unique method to handle all exceptions. You must consider all types of exceptions that your application may cause and handle them on an individual basis. What's important about error handlers is that your application doesn't crash; it simply doesn't perform the operation that caused the exception (this is also known as the offending operation, or offending statement) and continues.
The error handler for the MathCalculator application must inform the user that an error occurred and abort the calculations—it does not even attempt to display a result. If you open the Equals button's Click event handler, you will find the statements detailed in Listing 4.9.
Example 4.9. Revised Equals button
Private Sub bttnEquals_Click(...) Handles bttnEquals.Click Dim result As DoubleOperand2= Convert.ToDouble(lblDisplay.Text) Try Select CaseMathOperatorCase "+"result=Operand1+Operand2Case "−"result=Operand1−Operand2Case "*"result=Operand1*Operand2Case "/" IfOperand2<> "0" Then result =Operand1/Operand2End Select lblDisplay.Text =resultCatch exc As Exception MsgBox(exc.Message)result= "ERROR" Finally clearDisplay = True End Try End Sub
Most of the time, the error handler remains inactive and doesn't interfere with the operation of the program. If an error occurs, which most likely will be an overflow error, the error-handling section of the Try...Catch...End Try statement will be executed. This code displays a message box with the description of the error, and it also displays the string ERROR on the calculator's display. The Finally section is executed regardless of whether an exception occurred. In this example, the Finally section sets the clearDisplay variable to True so that when another digit button is clicked, a new number will appear on the display.
- Design graphical user interfaces.
A Windows application consists of a graphical user interface and code. The interface of the application is designed with visual tools and consists of controls that are common to all Windows applications. You drop controls from the Toolbox window onto the form, size and align the controls on the form, and finally set their properties through the Properties window. The controls include quite a bit of functionality right out of the box, and this functionality is readily available to your application without a single line of code.
- Master It
Describe the process of aligning controls on a form.
- Program events.
Windows applications follow an event-driven model: We code the events to which we want our application to respond. For example, an application reacts to
Clickevents of the various buttons. You select the actions to which you want your application to react and program these events accordingly.When an event is fired, the appropriate event handler is automatically invoked. Event handlers are subroutines that pass two arguments to the application: the
senderargument (which is an object that represents the control that fired the event) and theeargument (which carries additional information about the event).- Master It
How will you handle certain keystrokes regardless of the control that receives them?
- Write robust applications with error handling.
Numerous conditions can cause an application to crash, but a well-written application should be able to detect abnormal conditions and handle them gracefully. To begin with, you should always validate your data before you attempt to use them in your code. A well-known computer term is "garbage in, garbage out," which means you shouldn't perform any calculations on invalid data.
- Master It
How will you execute one or more statements in the context of a structured exception handler?