
A major aspect of programming with VB 2010 is the knowledge of the .NET Framework. The vast majority of the functionality of any language in Visual Studio is the Framework, which is a massive collection of classes that address most of the common programming tasks, from handling dates to encryption and retrieving data from a remote web server. Even listing the classes that make up the Framework and their members would take another book of comparable size, so I've decided to provide a single chapter as an introduction to the basic classes of the Framework and include several tutorials in PDF format that discuss specific aspects of the Framework. These tutorials, which you will find at this book's site, discuss in detail topics like handling folders and files, graphics, and printing with VB.
In this chapter, you'll find an introduction to several major components of the Framework, including the following:
How to use the My component
The concept of Streams
How to use the StringBuilder class
How to use the Date and TimeSpan classes
The basics of drawing with the Framework
The basics of printing with the Framework
The Framework is a comprehensive collection of classes that encapsulate the most common (and many not so common) programming tasks. In essence, it's the foundation on which .NET applications are built. The Framework is a library of code organized into namespaces and classes that address typical programming tasks.
As software development becomes more and more complex, developers face new challenges on a daily basis. To assist developers, language designers keep adding to their compilers to the point that languages have started to bloat with new features. And as you can guess, there's no end to this trend. No matter how much functionality you build into a language, developers need more. It is a challenge to just know (or look up) the proper function name for a specific task. Now, add external libraries with hundreds, even thousands, of functions for all kinds of programming tasks, from the less trivial formatting and math functions to encryption functions, specialized drawing routines, and so on and so forth. There was clearly a need for a more concise, more organized approach.
To address that need, engineers at Microsoft identified the functionality most developers need in typical applications, organized it into "blocks" of related functionality, and the Framework was born. We're already in version 4.0 of the Framework, which includes methods for mundane tasks like reading data from files, math functions, and drawing methods. It also includes security-related methods, serialization methods (a powerful technique for converting complex objects into XML or binary format), encryption, compression, speech synthesis, and just about anything. Practically any routine that's used somewhere by the operating system belongs to the Framework. The Framework was an enormous software project on the surface, but in my opinion it was basically a classification project. Developers should be able to locate the information they need quickly, otherwise the Framework wouldn't be nearly as useful, or popular.
It's actually impossible to cover the entire Framework, so I've chosen a few parts of it to discuss in this book. You will also find several tutorials in PDF format at www.sybex.com/go/masteringvb2010 that explain some of the most practical aspects of the Framework, such as the handling of files and folders and the drawing and printing methods. This chapter contains an overview of these classes and a few shortcuts to the Framework, namely how to use the built-in snippets and the My component.
The Framework is the main reason developers love to work with Microsoft's languages. It's also the reason many developers have been reluctant to move from VB6 to VB.NET and following versions. The Framework is huge, and switching from a self-contained language like VB6 into programming with the Framework requires a shift in thinking about programming. To do justice to the Framework, developers who have made the switch wouldn't even think of moving back to an earlier version of VB. To address the qualms of developers considering moving away from VB6 and into the .NET world, Microsoft introduced the My component (which is unique to Visual Basic) and the snippets. The My component is a collection of functions that address many of the most common operations developers need to implement in their applications. With time, the My component along with the snippets have evolved into a productivity tool, worthy of the reputation of Visual Basic.
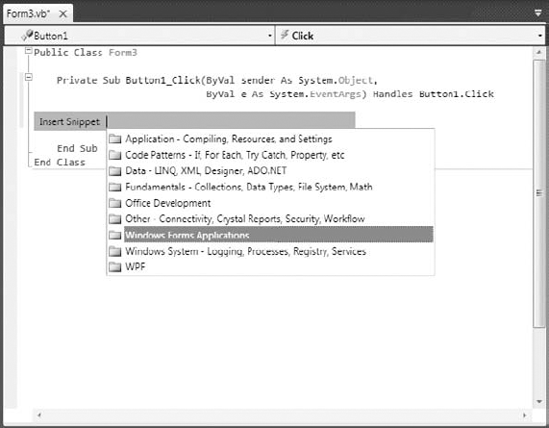
A code snippet is a predefined code segment that implements a very specific task. Every time you need to perform a task, such as writing to or reading from a file or playing back a sound, you can insert the appropriate snippet into your code and change a few variable names to match the rest of the code. Let's say you want to insert the statements for writing some text to a file, but you have no idea how to access files. Create an empty line in the listing (press the Enter key a couple of times at the end of a code line). Then, open the Edit menu and choose IntelliSense
You will see on the screen a list of the snippets, organized in folders according to function, as shown in Figure 11.1. Select the Fundamentals folder, which will display another list of options: Collections, Data Types, File System, and Math. Double-click the File System item to see a list of common file-related tasks, as shown in Figure 11.2. Locate the item Write Text To A File in the list and double-click it to insert the appropriate snippet at the current location in the code window.
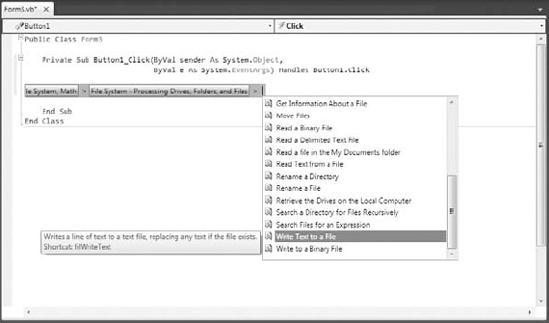
The following snippet will be inserted in your code:
My.Computer.FileSystem.WriteAllText("C: est.txt", "Text", True)To write some text to a file, you need to call the WriteAllText method of the My.Computer.FileSystem object. You can replace the strings shown in the snippet with actual values. The first string is the filename, the second string is the text to be written to the file, and the last argument of the method determines whether the text will be appended to the file (if False) or overwrite any existing text (if True).
The snippet shows you the basic statements for performing a common task, and you can edit the code inserted by Visual Studio as needed. Many of the snippets are one-liners. A real-world application would probably prompt the user for a filename via the File common dialog box and then use the filename specified by the user in the dialog box instead of a hard-coded filename.
Of course, there aren't snippets for every conceivable task. If this were the case, then the collection of snippets would compete in complexity with the Framework itself. There are snippets for a relatively small number of tasks and all snippets make use of the My component. Where the snippets are meant to minimize the code you write, the My component is meant to simplify the Framework by encapsulating the functionality of several statements into a single method. Let's start with an overview of the My component and then we'll move on to the Framework.
You have probably noticed that the code snippets of Visual Studio use an entity called My, which is a peculiar object that was introduced with VB 2005 to simplify many programming tasks. As you saw in the preceding code snippet, the My component allows you to write some text to a file with a single statement, the WriteAllText method. If you're familiar with earlier versions of Visual Basic, you know that you must first open a file, then write some text to it, and finally close the file. The My component allows you to perform all these operations with a single statement, as you saw in the preceding example.
Another example is the Play method, which you can use to play back a WAV file from within your code:
My.Computer.Audio.Play ("C:SoundsCountDown.wav")You can also use the following expression to play back a system sound:
My.Computer.Audio.PlaySystemSound(System.Media.SystemSounds.Exclamation)
The method that plays back the sound is the Play method, and the method that writes text to a file is the WriteAllText method. However, you can't call them directly through the My component; they're not methods of the My component. If they were, you'd have to dig hard to find out the method you need, and this is exactly what the My object attempts to remedy: the need to dig deep into the Framework to find out the method for the task at hand.
The My component exposes six subcomponents, which contain their own subcomponents. Here's a description of the basic components of the My component and the functionality you should expect to find in each.
The My.Application component provides information about the current application. The CommandLineArgs property of My.Application returns a collection of strings, which are the arguments passed to the application when it was started. Typical Windows applications aren't called with command-line arguments, but it's possible to start an application and pass a filename as an argument to the application (the document to be opened by the application, for example). The Info property is an object that exposes properties such as DirectoryPath (the application's default folder), ProductName, Version, and so on.
This component exposes a lot of functionality via a number of properties, many of which are objects. The My.Computer.Audio component lets you play back sounds. The My.Computer.Clipboard component lets you access the Clipboard. To find out whether the Clipboard contains a specific type of data, use the ContainsText, ContainsImage, ContainsData, and ContainsAudio methods. To retrieve the contents of the Clipboard, use the GetText, GetImage, GetData, and GetAudioStream methods respectively. Assuming that you have a form with a TextBox control and a PictureBox control, you can retrieve text or image data from the Clipboard and display it on the appropriate control with the following statements:
If My.Computer.Clipboard.ContainsImage Then
    PictureBox1.Image = My.Computer.Clipboard.GetImage
End If
If My.Computer.Clipboard.ContainsText Then
    TextBox2.Text = My.Computer.Clipboard.GetText
End If
You may have noticed that using the My component in your code requires that you write long statements. You can shorten them substantially via the With statement, as shown next:
With My.Computer.Clipboard
    If .ContainsImage Then
        PictureBox1.Image = .GetImage
    End If
    If .ContainsText Then
        TextBox2.Text = .GetText
    End If
End With
When you're executing multiple statements on the same object, you can specify the object in a With statement and call its methods in the block of the With statement by specifying the method name prefixed with a period. The With statement is followed by the name of the object to which all following methods apply and is terminated with the End With statement.
Another component of My.Computer is the FileSystem component that exposes all the methods you need to access and manipulate files and folders from within your code. If you enter the expression My.Computer.FileSystem followed by a period in the code window, you will see all the methods exposed by the FileSystem component. Among them, you will find DeleteFile, DeleteDirectory, RenameFile, RenameDirectory, WriteAllText, ReadAllText, and many more. Select a method and then type the opening parenthesis. You will see the syntax of the method in a ToolTip. The syntax of the CopyFile method, for example, is as follows:
My.Computer.FileSystem.CopyFile(
              sourceFileName As String, destinationFileName As String)
Just specify the path of the file you want to copy with the first argument and the new file's name with the second argument, and you're finished. This statement will copy the specified file to the specified location.
You will notice that the ToolTip box with the syntax of the CopyFile method has multiple versions, which are listed at the left side of the box along with arrow up and arrow down icons. Click these two buttons to see the next and previous versions of the method. The second version of the CopyFile method is as follows:
My.Computer.FileSystem.CopyFile(
          sourceFileName As String, destinationFileName As String,
          overwrite As Boolean)
The overwrite argument specifies whether the method should overwrite the destination file if it exists. The first overloaded form of the method will not overwrite the specified file, if it already exists.
The third overloaded form of the method accepts a different third argument that determines whether the usual copy animation will be displayed as the file is being copied. Try out this form of the method by copying a large file to a slow drive, such as a flash card, to see how easy it is to add a bit of the Windows look and feel to your application.
This component lets you access the forms of the current application. You can also access the application's forms by name, as you recall from Chapter 4, "GUI Design and Event-Driven Programming."
This component lets you access the application settings. These settings apply to the entire application and are stored in an XML configuration file. The settings are created from within Visual Studio, and you use the Settings component to read them. The settings are variables you can use in your code to parameterize the application. For example, you may store the user's name in a variable, let's say the UserName variable, so that you can display it initially when prompting users for their name and password. This variable can be declared as in the Settings tab of the project's Properties window, as shown in Figure 11.3.
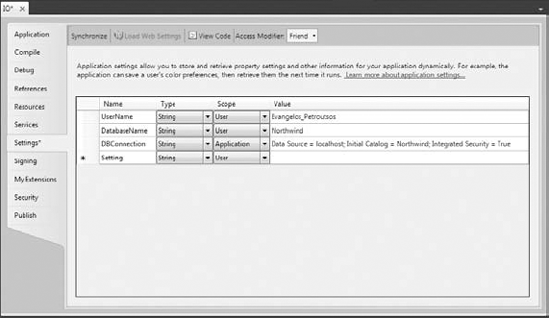
To read the value of the UserName variable, use the following expression:
My.Settings.UserName
Yes, the editor will create a class behind the scenes for your settings and make them available to your application as strongly typed values. You can also change the values of the application settings from within your code.
This component returns information about the current user. The most important property of the User component is the CurrentPrincipal property, which is an object that represents the credentials of the current user.
The WebServices component represents the web services referenced by the current application. For more information on web services and how they're used in an application, see Chapter 21, "Building and Using Web Services."
The My component gives VB developers of all levels unprecedented programming power and allows us to perform tasks that would require substantial code if implemented with earlier versions of the language, not to mention the research it would take to locate the appropriate methods in the Framework. You can explore the My component on your own and use it as needed. My is not a substitute for learning the language and the Framework. It can help you initially, but you can't go far without learning the methods of the Framework. It will help you accomplish a whole lot with a few simple statements, and it will also give you a head start with the Framework, as the My component is a miniature Framework.
Let's say you want to locate all the files of a specific type in a folder, including its subfolders. Scanning a folder and its subfolders to any depth is quite a task (you'll find the code in the tutorial "Accessing Folders and Files" at www.sybex.com/go/masteringvb2010). You can do the same with a single statement by using the My component as follows:
Dim files As System.Collections.ObjectModel.ReadOnlyCollection(Of String)
files = My.Computer.FileSystem.GetFiles("D:Data", True, "*.txt")
The GetFiles method populates the files collection with the pathnames of the text files in the folder D:Data and its subfolders. The second argument determines whether the method will scan the specified folder recursively, and although you can pass a True/False value for this argument, you can also set it to one of the members of the FileIO.SearchOption enumeration: SearchAllSubDirectories and SearchTopLevelOnly. However, it won't help you if you want to process each file in place. Moreover, this GetFiles method is synchronous: If the folder contains many subfolders with many files, it will block the interface until it retrieves all the files. Once you have retrieved the filenames you're interested in, you can process them by iterating through the files collection with a For Each loop. As for the method's return type, you need not remember it. You will see it in the IntelliSense box—not to mention that you can turn on inference and let the editor figure out the type of the files variable.
Want to save data to a file and read it back at a later session? It's trivial with the FileSystem component. To send text to a file, call the WriteAllText method passing the text to be saved as an argument:
My.Computer.FileSystem.WriteAllText("file_name", your_text, False)The first argument is the path of the file, the second argument is the text to be saved, and the last argument is a True/False value that determines whether the text will overwrite the file's original contents or append the text to the existing contents.
To read back the data from the file and use it in your application, use the ReadAllText method:
Dim txt As String = My.Computer.FileSystem.ReadAllText("file_name")Of course, not all information we save to files is in text format. The WriteAllBytes and ReadAllBytes methods move an array of bytes to and from a file. Converting data to an array of bytes is no piece of cake. You can use the WriteAllText and ReadAllText methods to quickly save and read text to a file, but if you need to create files with structured data, you must look into the methods of the IO namespace, which is discussed in detail in one of the tutorials you can download from www.sybex.com/go/masteringvb2010. You can also take advantage of the serialization techniques discussed in Chapter 12, "Storing Data in Collections."
If you're already familiar with VB, you may think that the My component is an aid for the absolute beginner or the nonprogrammer. This isn't true. VB is about productivity, and the My component can help you be more productive with your daily tasks regardless of your knowledge of the language or programming skills. If you can use My to save a few (or a few dozen) statements, do it. There's no penalty for using the My component because the compiler replaces the methods of the My component with the equivalent method calls to the Framework. If you're not familiar with the My component, or if you're new to the Framework, please explore this component on your own. It will simplify your coding effort, as long as you can locate the method you need for the task at hand.
In the next sections we'll explore the most commonly used classes of the Framework. The classes discussed here are a very small part of the Framework, but they're the classes you'll be using the most. I have chosen the topics I believe you will find most useful and focused on them. Once you start working with the Framework and you learn to navigate through its classes, you'll find it much easier to explore other parts of the Framework on your own.
The IO namespace contains all the classes that manipulate folders and files as well as access files. For a detailed discussion of the classes of the IO namespace, please download the tutorial "Accessing Files and Folders" from www.sybex.com/go/masteringvb2010. Table 11.1 contains a brief overview of the basic components for manipulating files and folders, more of a road map to the IO namespace.
To use the IO namespace in your code, you must import the System.IO namespace with this statement:
Using System.IO
Otherwise, you will have to fully qualify the property and method names in your code.
Table 11.1. IO namespace classes
Class | Description |
|---|---|
Directory | The Directory class exposes all the members you need to manipulate folders (retrieve the folders on a drive and their subfolders, retrieve the files in a folder, and other similar operations). |
File | The File class exposes methods for manipulating files (copy and move them around, open and close them), similar to the methods of the Directory class. |
DriveInfo | The DriveInfo class provides basic information about a drive. It also exposes the |
DirectoryInfo | The DirectoryInfo class provides information about the attributes of a specific folder. |
FileInfo | The FileInfo class provides information about the attributes of a specific file. This class also exposes the |
Path | The Path class exposes methods for performing simple tasks with file and folder path names, including methods for creating random file paths. |
The System.IO.Directory class exposes all the members you need to manipulate folders. It's a shared class, which means that you can call its methods without having to create an instance of the Directory class. The methods of the Directory class are listed in Table 11.2.
Table 11.2. System.IO.Directory methods
Method | Description |
|---|---|
| This method creates a new folder whose path is passed to the method as a string argument. The |
| This method deletes a folder and all the files in it. If the folder contains subfolders, the |
This method accepts a path as an argument and returns a True/False value indicating whether the specified folder exists. | |
| This method moves an entire folder to another location in the file system. The folder to be moved and its destination are passed as arguments. |
| Use these methods to retrieve and set the path of the current directory. By default, the |
| This method retrieves all the subfolders of a specific folder and returns their names as an array of strings. |
| This method returns the names of the files in the specified folder as an array of strings. |
| This method returns an array of all items (files and folders) in a path, which is passed to the method as argument. |
| This method returns an array of strings, which are the names of the logical drives on the computer. |
The IO.File class exposes methods for manipulating files. The names of the methods are self-descriptive, and most of them accept as an argument the path of the file on which they act. Use these methods to implement from within your application the common operations that users normally perform through the Windows interface. To get an idea about the functionality of the File class, I'm listing its most important methods in Table 11.3.
The DriveInfo class provides basic information about a drive. Its constructor accepts as an argument a drive name, and you can use the object returned by the method to retrieve information about the specific drive, as shown here:
Dim Drive As New DriveInfo("C")The argument is the name of a drive (you can include the colon if you want). Notice that you can't specify a Universal Naming Convention (UNC) path with the constructor of the DriveInfo object. You can only access local drives or network drives that have been mapped to a drive name on the target system.
To retrieve information about the specified drive, use the properties of the DriveInfo class listed in Table 11.4.
Table 11.3. IO.File class methods
Description | |
|---|---|
| Appends text to an existing file (both the file's path and the text to be written are passed as arguments). |
| Copies an existing file to a new location and accepts two arguments, the paths of the source and destination files. |
| Creates a new file and returns a FileStream object, which you can use to write to or read from the file. |
| Similar to the |
| Removes the specified file from the file system and accepts the path of the file to be deleted as an argument. |
| Accepts a file's path and returns a True/False value depending on whether the file exists or not. |
| Accepts a file path as an argument and returns the attributes of the specified file as a FileAttributes object. |
| Moves the specified file to a new location. |
| Opens an existing file for read-write operations. |
| Opens an existing file in read mode and returns a FileStream object associated with this file. |
| Opens an existing text file for reading and returns a StreamReader object associated with this file. |
| Opens an existing file for output. |
To create a new instance of the DirectoryInfo class that references a specific folder, supply the folder's path in the class's constructor:
Dim DI As New DirectoryInfo(path)
The members of the DirectoryInfo class are equivalent to the members of the Directory class, and you will recognize them as soon as you see them in the IntelliSense drop-down list. A few methods that are unique to the DirectoryInfo class are the CreateSubdirectory and GetFileSystemInfos methods. The CreateSubdirectory method creates a subfolder under the folder specified by the current instance of the class, and its syntax is as follows:
DI.CreateSubdirectory(path)
Table 11.4. DriveInfo class members
The CreateSubdirectory method returns a DirectoryInfo object that represents the new subfolder. The GetFileSystemInfos method returns an array of FileSystemInfo objects, one for each item in the folder referenced by the current instance of the class. The items can be either folders or files. To retrieve information about all the entries in a folder, create an instance of the DirectoryInfo class and then call its GetFileSystemInfos method:
Dim DI As New DirectoryInfo(path)
Dim itemsInfo() As FileSystemInfo
itemsInfo = DI.GetFileSystemInfos()
You can also specify an optional search pattern as an argument when you call this method:
itemsInfo = DI.GetFileSystemInfos(pattern)
Notice the differences between the GetFileSystemInfos method of the DirectoryInfo class and the GetFileSystemEntries of the Directory object. GetFileSystemInfos returns an array of objects that contains information about the current item (file or folder). GetFileSystemEntries returns an array of strings (the names of the folders and files).
The Path class's methods perform simple tasks such as retrieving a file's name and extension, returning the full path description of a relative path, and so on. The Path class's members are shared, and you must specify the path on which they will act as an argument. The most useful methods exposed by the Path class are utilities for manipulating filenames and pathnames, described in the following sections. Notice that the methods of the Path class are shared: You must specify the path on which they will act as an argument. The most important methods of the Path class are listed in Table 11.5.
Table 11.5. Path class methods
Description | |
|---|---|
| Changes the file name extension of the file you specify to a new extension, which is also specified as an argument. |
| Combines two path specifications into one by appending the second path to the first one and inserting a backslash if necessary. |
| Extracts the directory name from a path passed to the method as an argument. |
| Return the file name with and without extension from a full path passed to each method as an argument. |
| Return a temporary file and path name, which you can use to store data during the course of execution of your application. |
To access files for reading and writing data with the Framework, you must first understand the concept of streams. A stream is a channel between your application and the source of the data. The source of the data need not be a file, although in most cases we use streams to work with files. If you've been around for a while, you're probably expecting to read about commands that open a file, write to it (or read from it), and then close the file. The reason for introducing the concept of streams in the Framework is that streams can be connected to one another and perform multiple operations sequentially. A typical example is the cryptographic stream, which accepts data, encrypts it, and spits out a series of bytes. This stream can be connected to a file stream and send encrypted data to the file.
Let's start by looking at the process of writing data to a file. First, you must import the IO namespace with the Imports System.IO statement. Then create a StreamWriter object, which is associated with a file:
Dim streamOut As New StreamWriter(file_name)
In this statement, file_name is the name of the file you want to write to.
To write something to the file, you call the streamOut variable's Write method. Everything you write to the stream is saved automatically to the file. To save the contents of a TextBox control to a file, use the following statement:
streamOut.Write(TextBox1.Text)
When you're done, you must close the Stream object by calling its Close method. The following statements prompt the user to select a file name with the Save dialog box and then save the contents of the TextBox control to the selected file:
SaveFileDialog1.Filter = "Text Files|*.txt|All Files|*.*"
SaveFileDialog1.FilterIndex = 0
SaveFileDialog1.DefaultExt = ".txt"
SaveFileDialog1.FileName = ""
If SaveFileDialog1.ShowDialog = Windows.Forms.DialogResult.OK Then
    Dim strmOut As New StreamWriter(SaveFileDialog1.FileName)
    strmOut.Write(TextBox1.Text)
    strmOut.Close()
End If
To read back the data in a later session, you must display the OpenFile dialog box to allow users to select the file and then create the StreamReader object and call its ReadToEnd method. Here's the code that reads back the contents of the TextBox1 control:
OpenFileDialog1.Filter = "Text Files|*.txt|All Files|*.*"
OpenFileDialog1.FilterIndex = 0
OpenFileDialog1.DefaultExt = ".txt"
OpenFileDialog1.FileName = ""
If OpenFileDialog1.ShowDialog = Windows.Forms.DialogResult.OK Then
    Dim strmIn As New StreamReader(OpenFileDialog1.FileName)
    TextBox1.Text = strmIn.ReadToEnd
    strmIn.Close()
End If
This concludes the brief introduction to the System.IO namespace. You will find much more information on the topic in the tutorial "Accessing Folders and Files" at www.sybex.com/go/masteringvb2010, but you should also explore the My.Computer.FileSystem component, which provides may shortcuts to the Framework for simple tasks.
An interesting aspect of the Framework is dedicated to the generation of graphics. There are numerous methods for drawing and printing and they're discussed in detail in the tutorials "Creating Graphics with VB 2010" and "Printing with VB 2010," which are available for download from www.sybex.com/go/masteringvb2010. This section contains an overview of the graphics printing classes of the Framework and their basic functionality.
The Graphics object is the drawing surface—your canvas. All the controls you can draw on expose a Graphics property, which is an object, and you can retrieve it with the CreateGraphics method. Most of the controls provide a CreateGraphics method, but we normally draw on the Form object and the PictureBox control.
The Graphics object exposes all the methods and properties you need to create graphics on the control. Start by declaring a variable of the Graphics type and initialize it to the Graphics object returned by the control's CreateGraphics method:
Dim G As Graphics
G = PictureBox1.CreateGraphics
At this point, you're ready to start drawing on the PictureBox1 control with the methods discussed in the following section. To draw a rectangle, for example, call the DrawRectangle method of the G variable, passing the origin and dimensions of the rectangle as arguments. To display a string, call the DrawString method, which requires several arguments, such as the string to be drawn, the font in which it will be rendered, its location, and the brush object that will be used for the drawing. You'll see how to use these methods shortly.
Two properties of the Graphics object you should know about are the TextRenderingHint and the SmoothingMode properties. The TextRenderingHint method specifies how the Graphics object will render text, and its value is AntiAlias, AntiAliasGridFit, ClearTypeGridFit, SingleBitPerPixel, SingleBitPerPixelGridFit, or SystemDefault. The SmoothingMode property is similar to the TextRenderingHint, but it applies to shapes drawn with the Graphics object's drawing methods. Its value is one of the members of the SmoothingMode enumeration: AntiAlias, Default, HighQuality, HighSpeed, Invalid, and None.
Before showing some drawing examples, I must present a few classes that are used routinely in creating graphics.
The Point class represents a point on the drawing surface and is expressed as a pair of (x, y) coordinates. The x-coordinate is its horizontal distance from the origin, and the y-coordinate is its vertical distance from the origin. The origin is the point with coordinates (0, 0), and this is the top-left corner of the drawing surface.
The constructor of the Point class is as follows, where X and Y are the point's horizontal and vertical distances from the origin:
Dim P1 As New Point(X, Y)
Another class that is often used in drawing is the Rectangle class. The Rectangle object is used to specify areas on the drawing surface. Its constructor accepts as arguments the coordinates of the rectangle's top-left corner and its dimensions:
Dim box As Rectangle
box = New Rectangle(X, Y, width, height)
The following statement creates a rectangle whose top-left corner is 1 pixel to the right and 1 pixel down from the origin, and its dimensions are 100 by 20 pixels:
box = New Rectangle(1, 1, 100, 20)
The box variable represents a rectangle, but it doesn't generate any output on the monitor. If you want to draw the rectangle, you can pass it as an argument to the DrawRectangle or FillRectangle method, depending on whether you want to draw the outline of the rectangle or a filled rectangle.
The Size class represents the dimensions of a rectangle; it's similar to a Rectangle object, but it doesn't have an origin, just dimensions. To create a new Size object, use the following constructor:
Dim S1 As New Size(100, 400)
Another form of the Rectangle constructor uses a Point and a Size object to specify the location and dimensions of the rectangle:
box = New Rectangle(point, size)
The point and size arguments are properly initialized Point and Size objects.
The Color class represents colors, and there are many ways to specify a color. The simplest method to specify a color is to declare a variable of the Color type and initialize it to one of the named colors exposed as properties of the Color class:
Dim myColor As Color
myColor = Color.Azure
The 128 color names of the Color class will appear in the IntelliSense box as soon as you enter the period following the keyword Color. You can also use the FromARGB method, which creates a new color from its basic color components (the red, green, and blue components). To create a color that's mostly red, use a statement like the following:
Mycolor = Color.FrmARGB(255, 128, 128, 255)
The first argument is the opacity of the color (255 for maximum opacity, 0 for a totally transparent color), and the remaining three arguments are the intensities of the color's red, green and blue components (0 for minimum intensity, 255 for maximum intensity). For a more formal discussion of the Color class, see the tutorial on creating graphics with VB, available for download at www.sybex.com/go/masteringvb2010.
The Font class represents fonts, which are used when rendering strings via the DrawString method. To specify a font, you must create a new Font object; set its family name, size, and style; and then pass it as an argument to the DrawString method. Alternatively, you can prompt the user for a font via the Font common dialog box and use the object returned by the dialog box's Font property as an argument with the DrawString method. To create a new Font object in your code, use a statement like the following:
Dim drawFont As New Font("Verdana", 12, FontStyle.Bold)The Font constructor has 13 forms in all, as you will see in the IntelliSense box once you declare a new variable of the Font type.
The Pen class represents virtual pens, which you use to draw on the Graphics object's surface. To construct a new Pen object, you must specify the pen's color and width in pixels. The following statements declare three Pen objects with the same color and different widths:
Dim thinPen, mediumPem, thickPen As Pen
thinPen = New Pen(Color.Black, 1)
mediumPen = New Pen(Color.Black, 3)
thickPen = New Pen(Color.Black, 5)
The quickest method of creating a new Pen object is to use the built-in Pens collection, which creates a pen with a width of 1 pixel and the color you specify. The following statement can appear anywhere a Pen object is required and will draw shapes in blue color (the second statement is optional and it changes the default width of the pen):
thinPen = Pens.Blue
thinPen.Width = 3
The Brush class represents the instrument for filling shapes, including text; you can create brushes that fill with a solid color, a pattern, or a bitmap. In reality, there's no Brush object. The Brush class is actually an abstract class that is inherited by all the classes that implement a brush, but you can't declare a variable of the Brush type in your code. Instead, you can declare a variable of the following type: SolidBrush, HatchBrush, LinearGradientBrush, PathGradientBrush, and TextureBrush. To fill a shape with a solid color, create a SolidBrush object with the following constructor, where brushColor is a color value, specified with the help of the Color object:
Dim sBrush As SolidBrush
sBrush = New SolidBrush(brushColor)
Every filled object you draw with the sBrush variable will be filled with the color of the brush. A gradient brush fills a shape with a specified gradient. The LinearGradientBrush fills a shape with a linear gradient, and the PathGradientBrush fills a shape with a gradient that has one starting color and one or more ending colors.
Now that I've covered the auxiliary drawing objects, we can look at the drawing methods of the Graphics class. Before getting into the details of the drawing methods, however, let's write a simple application that draws a couple of simple shapes on a form. First, create a Graphics object with the following statements:
Dim G As Graphics
G = Me.CreateGraphics
Everything drawn on the surface represented by the G object will appear on the form. Then, create a Pen object to draw with. The following statement creates a Pen object that's 1 pixel wide and draws in blue:
Dim P As New Pen(Color.Blue)
You just created the two basic objects for drawing: the drawing surface and the drawing instrument. Now you can draw shapes by calling the Graphics object's drawing methods. The following statement will print a rectangle with its top-left corner near the top-left corner of the form (at a point that's 10 pixels to the right and 10 pixels down from the form's corner) and is 200 pixels wide and 150 pixels tall:
G.DrawRectangle(P, 10, 10, 200, 150)
Let's add the two diagonals of the rectangle with the following statements:
G.DrawLine(P, 10, 10, 210, 160)
G.DrawLine(P, 210, 10, 10, 160)
That's all the statements to create a shape on the form, but where do you insert them? The proper handler to create graphics is the form's Paint event handler, as the Paint event is fired every time the form is shown or resized, and this is when the graphics must be regenerated.
The Paint event handler passes the e argument, which (among other properties) exposes the form's Graphics object. You can create a Graphics object in the Paint event handler and then draw on this object. Take a look at the code in Listing 11.1.
Example 11.1. Drawing simple shapes in the Paint event
Private Sub Form1_Paint(...) Handles Me.Paint
   Dim G As Graphics
   G = e.Graphics
   Dim P As New Pen(Color.Blue)
   G.DrawRectangle(P, 10, 10, 200, 150)
   G.DrawLine(P, 10, 10, 210, 160)
   G.DrawLine(P, 210, 10, 10, 160)
End Sub
If you run the application now, it works like a charm. The shapes appear to be permanent, even though they're redrawn every time you switch to the form. A caveat of drawing from within the Paint event is that the event isn't fired when the form is resized. To force a refresh when the form is resized, you must insert the following statement in the form's Load event handler:
Me.SetStyle(ControlStyles.ResizeRedraw, True)
It is possible to make the graphics permanent by drawing not on the Graphics object, but directly on the control's (or the form's) bitmap. This technique is discussed in the tutorial "Creating Graphics with VB 2010" that is available for download from www.sybex.com/go/masteringvb2010.
The drawing methods can be categorized in two major groups: the methods that draw stroked shapes (outlines) and the methods that draw filled shapes. The methods in the first group start with the Draw prefix (DrawRectangle, DrawEllipse, and so on). The methods of the second group start with the Fill prefix (FillRectangle, FillEllipse, and so on). Of course, some DrawXXX methods don't have equivalent FillXXX methods. For example, you can't fill a line or an open curve, so there are no FillLine or FillCurve methods.
Another difference between the drawing and filling methods is that the filling methods use a Brush object to fill the shape—you can't fill a shape with a pen. So, the first argument of the methods that draw filled shapes is a Brush object, not a Pen object. The remaining arguments are the same because you must still specify the shape to be filled. To view the drawing methods, enter the expression:
Me.CreateGraphics.
and you will see the names of the shape drawing methods (they start with the Draw prefix) and the shape filling methods (they start with the Fill prefix). The DrawLine method draws a straight-line segment between two points with a pen supplied as an argument. The simplest forms of the DrawLine method are the following, where point1 and point2 are either Point or PointF objects, depending on the coordinate system in use:
Graphics.DrawLine(pen, X1, Y1, X2, Y2)
Graphics.DrawLine(pen, point1, point2)
The two most commonly used drawing methods are the DrawString and MeasureString methods. The DrawString method renders a string in a single line or multiple lines. The simplest form of the DrawString method is as follows:
Graphics.DrawString(string, font, brush, X, Y)
The first argument is the string to be rendered in the font specified by the second argument. The text will be rendered with the Brush object specified by the brush argument. X and Y, finally, are the coordinates of the top-left corner of a rectangle that completely encloses the string.
While working with strings, you need to know the actual dimensions of the string when rendered with the DrawString method in the specified font so you can determine its placement. The MeasureString method allows you to retrieve the metrics of a string before actually drawing it. This method returns a SizeF structure with the width and height, in pixels, of the string when rendered on the same Graphics object with the specified font. We'll use this method extensively in the tutorial "Printing with Visual Basic 2010" (available for download from www.sybex.com/go/masteringvb2010) to position text precisely on the printed page. You can also pass a Rectangle object as an argument to the MeasureString method to find out how many lines it will take to render the string on the rectangle.
The simplest form of the MeasureString method is the following, where string is the string to be rendered and font is the font in which the string will be rendered:
Dim textSize As SizeF
textSize = Me.Graphics.MeasureString(string, font)
To center a string on the form, use the x-coordinate returned by the MeasureString method, as in the following code segment:
Dim textSize As SizeF
Dim X As Integer, Y As Integer = 0
textSize = Me.Graphics.MeasureString(string, font)
X = (Me.Width - textSize.Width) / 2
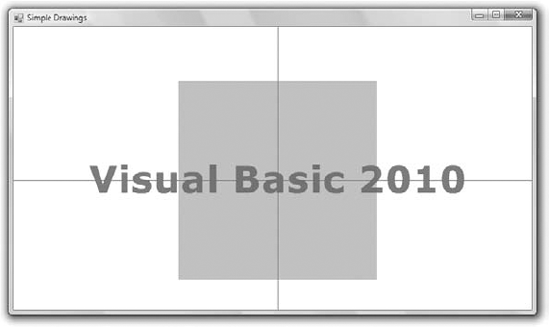
G.DrawString("Centered string", font, brush, X, Y)To center a string, you must subtract the rendered string's length from the form's width, split the difference, and render half on each side of the string.
Figure 11.4 shows a string printed at the center of the form and the two lines passing through the same point. Listing 11.2 shows the statements that produced Figure 11.4.
Example 11.2. Printing a string centered on the form
Private Sub Form1_Paint(...) Handles Me.Paint
    Dim G As Graphics
    G = Me.CreateGraphics
    G.FillRectangle(New SolidBrush(Color.Silver), ClientRectangle)
    G.TextRenderingHint = Drawing.Text.TextRenderingHint.AntiAlias
    Dim txtFont As New Font("Verdana", 36, FontStyle.Bold)
    G.DrawLine(New Pen(Color.Green), CInt(Me.Width / 2), CInt(0),
                   CInt(Me.Width / 2), CInt(Me.Height))
    G.DrawLine(New Pen(Color.Green), 0, CInt(Me.Height / 2),
                   CInt(Me.Width), CInt(Me.Height / 2))
    Dim str As String = "Visual Basic 2010"
    Dim txtSize As SizeF
    txtSize = G.MeasureString(str, txtFont)
    Dim txtX, txtY As Integer
    txtX = (Me.Width - txtSize.Width) / 2
    txtY = (Me.Height - txtSize.Height) / 2
    G.DrawString(str, txtFont,
                      New SolidBrush(Color.Red), txtX, txtY)
End Sub
For more information on the DrawString and MeasureString methods, please see the tutorial on generating graphics with VB 2010. You will find more examples of these two methods later in this chapter.
The DrawImage method renders an image on the Graphics object and its simplest syntax is as follows:
Graphics.DrawImage(img, point)
Both the image and the location of its top-left corner are passed to the method as arguments (as Image and Point arguments, respectively). Another form of the method draws the specified image within a rectangle. If the rectangle doesn't match the original dimensions of the image, the image will be stretched to fit in the rectangle. The rectangle should have the same aspect ratio as the Image object to avoid distorting the image in the process:
Graphics.DrawImage(img, rectangle)
The rectangle argument determines not only the placement of the image on the Graphics object, but also its dimensions.
Another very useful and interesting aspect of graphics is the generation of gradients. In addition to filling shapes with a solid color, you can fill them with various types of gradients. You can even fill text with a gradient, a topic that's demonstrated in the tutorial "Creating Graphics with VB 2010." The simplest yet most common type of gradient is the linear gradient. To fill a shape with a linear gradient, you must create an instance of the LinearGradientBrush class with statements like the following:
Dim lgBrush As LinearGradientBrush
lgBrush = New LinearGradientBrush(rect, startColor, endColor, gradientMode)
This method creates a gradient that fills a rectangle, specified by the rect variable passed as the first argument. This rectangle isn't filled with any gradient; it simply tells the method how long (or how tall) the gradient should be. The gradient starts with the startColor at the left side of the rectangle and ends with the endColor at the opposite side, while its color changes slowly as it moves from one end to the other. The last argument, gradientMode, specifies the direction of the gradient and its setting is a member of the LinearGradientMode enumeration: BackwardDiagonal, ForwardDiagonal, Horizontal, and Vertical. You will find an example of filling a shape with a linear gradient in the following section. The other types of gradients are discussed in the tutorial on graphics available for download from www.sybex.com/go/masteringvb2010.
Images are two-dimensional arrays that hold the color values of the pixels making up the image. This isn't how images are stored in their respective files—JPG or JPEG (Joint Photographic Experts Group), GIF (Graphics Interchange Format), TIFF (Tagged Image File Format), and so on—but it's a convenient abstraction for the developer. To access a specific pixel of an image, you need to specify only the horizontal and vertical coordinates of that pixel. Each pixel is a Long value; the first byte is the pixel's alpha value and the other three bytes are the red, green, and blue components.
The Image property of the PictureBox or Form control is an Image object, and there are several ways to create such an object. You can declare a variable of the Image type and then assign the Image property of the PictureBox control or the Form object to the variable:
Dim img As Image
img = PictureBox1.Image
The img Image variable holds the bitmap of the PictureBox1 control. This code segment assumes that an image was assigned to the control at design time. You can also create a new Image object from an image file by using the Image class's FromFile method:
Dim img As Image
img = Image.FromFile("Butterfly.png")
After the img variable has been set up, you can assign it to the Image property of a PictureBox control:
PictureBox1.Image = img
Or you can save the image to a file with the Save method, which also accepts as argument the name of the file where the bitmap will be saved. If you need to change the format of an image, all you have to do is open it with the FromFile method and save it to a file with a different extension.
The Image class exposes several members and here are the most important:
Width, HeightThese are the dimensions of the image in pixels.
HorizontalResolution, VerticalResolutionThese properties are the resolutions of the image in the two directions and are expressed as pixels per inch. If you divide the width of an image by its horizontal resolution, you'll get the actual horizontal size of the image in inches (the size of the image when printed).
The methods exposed by the Image class are the RotateFlip method (which rotates and/or flips an image), the GetThumbnailImage method (which returns a thumbnail with user-specified dimensions for the specified image), and the Save and FromFile methods (which save an image and reload an image from a disk file, respectively).
The topic of printing with Visual Basic is not trivial. Just consider the fact that none of the standard controls comes with built-in printing capabilities. It would be nice if certain controls, such as the TextBox or the ListView control, would print their contents, but this is not the case. Even to print a few text paragraphs entered by the user on a TextBox control, you must provide your own code.
Printing is identical to creating graphics. You must carefully calculate the coordinates of each graphic element placed on the paper, take into consideration the settings of the printer and the current page, and start a new page when the current one is filled. I'll start the exploration of Visual Basic's printing capabilities with an overview of the printing process, which is the same no matter what you print.
You will find a tutorial in PDF format at www.sybex.com/go/masteringvb2010. It explains the printing process in detail. The tutorial includes several examples to address the common printing tasks, such as printing plain and formatted text, tabular data, and bitmaps.
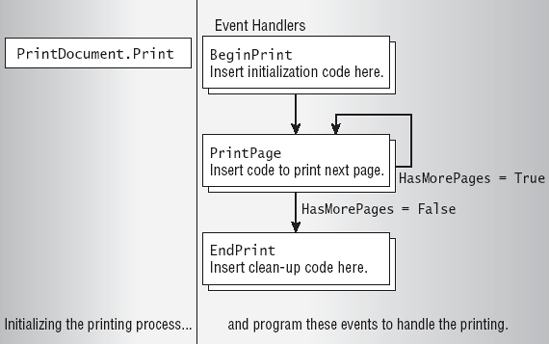
The PrintDocument control represents your printer, and you must add a PrintDocument control to any project that generates printouts. In effect, everything you draw on the PrintDocument object is sent to the printer. The PrintDocument control represents the printing device, and it exposes a Graphics object that represents the printing surface, just like the Graphics property of all Windows controls. You can program against the Graphics object by using all the graphics methods discussed earlier in this chapter. To print text, for example, you must call the DrawString method. You can also print frames around the text with the DrawLine or DrawRectangle method. In general, you can use all the methods of the Graphics object to prepare the printout.
The PrintDocument control is invisible at runtime, and its icon will appear in the Components tray at design time. When you're ready to print, call the PrintDocument control's Print method. This method doesn't produce any output, but it does raise the control's BeginPrint and PrintPage events. The BeginPrint event is fired as soon as you call the Print method, and this is where you insert the printout's initialization code. The PrintPage event is fired once for every page of the printout, and this is where you must insert the code that generates output for the printer. Finally, the EndPrint event is fired when the printout ends, and this is where you insert the code to reset any global variables.
The following statement initiates the printing:
PrintDocument1.Print
This statement is usually placed in a button's or a menu item's Click event handler. To experiment with simple printouts, create a new project, place a button on the form, add an instance of the PrintDocument control to the form, and enter the preceding statement in the button's Click event handler.
After the execution of this statement, the PrintDocument1_PrintPage event handler takes over. This event is fired for each page, so you insert the code to print the first page in this event's handler. The PrintPage event provides the usual e argument, which gives you access to the Graphics property of the current Printer object. The printer has its own Graphics object, which represents the page you print on, and you will see shortly how to create graphics to be printed.
If you need to print additional pages, you set the e.HasMorePages property to True just before you exit the PrintPage event handler. This will fire another PrintPage event. The same process will repeat until you've printed everything. After you finish, you set the e.HasMorePages property to False, and no more PrintPage events will be fired. Instead, the EndPrint event will be fired and the printing process will come to an end. Figure 11.5 outlines the printing process.
The code in Listing 11.3 shows the structure of a typical PrintPage event handler. The PrintPage event handler prints three pages with the same text but a different page number on each page.
Example 11.3. A simple PrintPage event handler
Private Sub PrintDocument1_PrintPage(...) Handles PrintDocument1.PrintPage
   Static pageNum As Integer
   Dim prFont As New Font("Verdana", 24, GraphicsUnit.Point)
   e.Graphics.DrawString(
               "PAGE " & pageNum + 1, prFont,
               Brushes.Black, 700, 1050)
   e.Graphics.DrawRectangle(Pens.Blue, 0, 0, 300, 100)
   e.Graphics.DrawString( _
               "Printing with VB 2010", prFont,
               Brushes.Black, 10, 10)
' Following is the logic that determines whether we're done printing
pageNum = pageNum + 1
If pageNum <= 3 Then
e.HasMorePages = True
Else
e.HasMorePages = False
pageNum = 0
End If
End SubThe pageNum variable is declared as Static, so it retains its value between invocations of the event handler and isn't reset automatically. The last statement, which is executed after you have printed the last page, resets the pageNum variable in anticipation of another printout. Without this statement, the first page of the second printout (if you clicked the button again) would become page 4, and so on.
The entire printout is generated by the same subroutine, one page at a time. Because pages are not totally independent of one another, you need to keep some information in variables that are not initialized every time the PrintPage event handler is executed. The page number, for example, must be stored in a variable that will maintain its value between successive invocations of the PrintPage event handler, and it must be increased every time a new page is printed. If you're printing a text file, you must keep track of the last printed line so that each page will pick up where the previous one ended, not from the beginning of the document.
To add printing features that adhere to the Windows standards to your applications, you must also use the PrintDialog and PageSetupDialog controls, which are discussed in the following section.
The PrintDialog control displays the standard Print dialog box, which allows users to select a printer and set its properties. If you don't display this dialog box, the output will be sent automatically to the default printer and will use the default settings of the printer.
To display the Print dialog box, call the PrintDialog control's ShowDialog method. However, you must first set the control's PrinterSettings property, as shown in the following code segment; if you do not, a runtime exception will be thrown:
PrintDialog1.PrinterSettings = PrintDocument1.PrinterSettings
If PrintDialog1.ShowDialog() = Windows.Forms.DialogResult.OK Then
    PrintDocument1.PrinterSettings = PrintDialog1.PrinterSettings
End If
When users select a printer in this dialog box, it automatically becomes the active printer. Any printout generated after the printer selection will be sent to that printer; you don't have to insert any code to switch printers.
The PageSetupDialog control displays the Page Setup dialog box, which allows users to set up the page (its orientation and margins). The dialog box returns the current page settings in a PageSettings object, which exposes the user-specified settings as properties. These settings don't take effect on their own; you simply read their values and take them into consideration as you prepare the output for the printer from within your code.
To use this dialog box in your application, drop the PageSetupDialog control on the form and call its ShowDialog method from within the application's code. The single property of this control that you'll be using exclusively in your projects is the PageSettings property, which exposes a number of properties reflecting the current settings of the page (margins and orientation). These settings apply to the entire document. The PrintDocument control has an analogous property: the DefaultPageSettings property. After the user closes the Page Setup dialog box, we assign its PageSettings property to the DefaultPageSettings property of the PrintDocument object to make the user-specified settings available to our code.
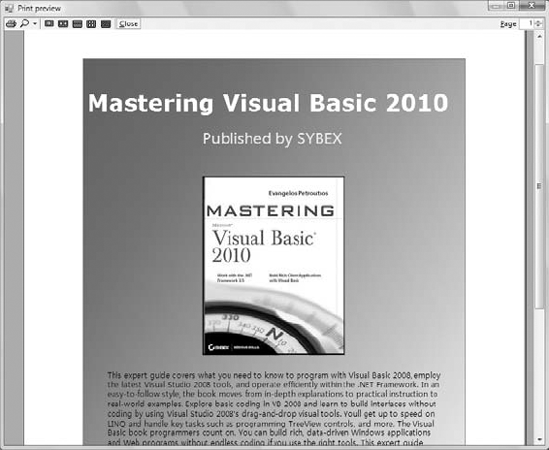
Print Preview is another dialog box that displays a preview of the printed document. It exposes a lot of functionality and allows users to examine the output and, optionally, to send it to the printer. After you write the code to generate the printout, you can direct it to the PrintPreviewDialog control. You don't have to write any additional code; just place an instance of the control on the form and set its Document property to the PrintDocument control on the form. Then show the PrintPreviewDialog control instead of calling the Print method of the PrintDocument object:
PrintPreviewDialog1.Document = PrintDocument1
PrintPreviewDialog1.ShowDialog
After the execution of these two lines, the PrintDocument control takes over. It fires the PrintPage event as usual, but it sends its output to the Print Preview dialog box, not to the printer. The dialog box contains a Print button, which the user can click to send the document being previewed to the printer. The exact same code that generated the preview document will print the document on the printer.
The first example of this chapter (refer to Listing 11.3) prints three simple pages to the printer. To redirect the output of the program to the PrintPreview control, add an instance of the PrintPreview control to the form and replace the statement that calls the PrintDocument1.Print method in the button's Click event handler with the following statements:
PrintPreviewDialog1.Document = PrintDocument1
PrintPreviewDialog1.ShowDialog
Run the project, and this time you will be able to preview the document on your monitor. If you're satisfied with its appearance, you can click the Print button to send the document to the printer.
Like the drawing surface on the monitor (the client area), the page on which you're printing has a fixed size and resolution. The most challenging aspect of printing is the calculation of the coordinates and dimensions of each graphic element on the page.
To access the margins of the current page, use the Margins property of the PrintDocument1.DefaultPageSettings object. This property, which is also an object, exposes the Left, Right, Top, and Bottom properties, which are the values of the four margins. Another property exposed by the DefaultSettings object is the PageSize property, which represents the dimensions of the page. The width and height of the page are given by the following expressions:
PrintDocument1.DefaultPageSettings.PaperSize.Width
PrintDocument1.DefaultPageSettings.PaperSize.Height
The top of the page is at coordinates (0, 0), which correspond to the top-left corner of the page. We never actually print at this corner. The coordinates of the top-left corner of the printable area of the page are given by the following expressions:
PrintDocument1.DefaultPageSettings.Margins.Top
PrintDocument1.DefaultPageSettings.Margins.Left
The basic methods you'll use to create printouts are no different than the methods you use to create graphics. The method for printing text is the DrawString method, which has the following syntax:
Graphics.DrawString(string, font, brush, X, Y)
This method will render its string argument in the font specified in the second argument, using a Brush object as specified by the brush argument at the coordinates specified by the last two arguments. To position multiple elements on the page, you need to know how much space each element takes so you can advance accordingly on the page. To find out the size of a string when rendered on the page, use the MeasureString method. The two methods are used in tandem and this is a common theme in printing text.
The simplest form of the MeasureString method is the following, where string is the string to be rendered and font is the font in which the string will be rendered:
Dim textSize As SizeF
textSize = Graphics.MeasureString(string, font)
To center a string on the form, subtract the string's width and height from the page's width and height and then split the difference equally between the two sides of the strings, vertically and horizontally. If the string's width is 320 pixels and the page's printable width is 780 pixels, you must start printing at the x-coordinate (780-320)/2. This will center the string on the page, leaving 320 pixels on either side. Basically, perform the following calculations using the x- and y-coordinates returned by the MeasureString method, as shown here:
Dim textSize As SizeF
Dim X As Integer, Y As Integer = 0
textSize = Me.Graphics.MeasureString(string, font)
X = (Me.Width – textSize.Width) / 2
Y = (Me.Height – textSize.Height) / 2
G.DrawString("Centered string", font, brush, X, Y)
To position your strings on the page you need to know the size of each string when rendered on the printer in a specific font. You can obtain this information with the MeasureString method, as discussed in the preceding section. As you will read in detail in the tutorial on printing with VB, a printing routine must first determine the printable area on the page.
In this section, we're going to build a simple, but certainly not trivial, printout to demonstrate the use of many of the print-related concepts discussed in the preceding sections. The printout, which contains centered strings and an image as well as a gradient, is shown in Figure 11.6.
Start a new form and drop on it a button and the PageSetupDialog, PrintDocument, and PrintDialog controls. Although we will add preview capabilities to the application, we won't use an instance of the PrintPreviewDialog control. Instead, we'll create an instance of this control from within the application's code.
The code for the application is shown in Listing 11.4. The Click event handler for the button displays the PrintDialog control to allow users to select a printer and set the properties of the printout. The PrintDialog control has a Preferences button, where users can set the page orientation. If you want users to be able to set the page's margins, you must also display the PageSetupDialog. Windows applications provide a Page Setup menu item, which displays the PageSetup dialog box.
After the user has selected a printer and set the orientation of the page, the code creates a new instance of the PrintPreviewDialog control, the prn variable, and assigns the PrintDocument control to the Document property of the prn object and calls the same object's Show method to initiate the printout.
Then the PrintPage event takes over. This event's handler contains quite a bit of code, but it's straightforward. First, it extracts the coordinates of the printable area's upper-left corner, taking into consideration the page's margins. These two values are stored in the variables topX and topY. Then it calculates the width and height of the page's printable area and stores these values in the pageWidth and pageHeight properties.
The following few statements create a LinearGradientBrush object, the LGBrush variable, which is then used to fill a large rectangle with the FillRectangle method. The following statements print the text and the image on the page. To print text, the code uses the MeasureString method to calculate the size of each string and center it horizontally on the page. Then, it advances to the y-coordinate of the next string by incrementing the Y variable.
The image is printed with the DrawImage method, but there's a slight trick here. Because the image has a portrait orientation, I've decided to reduce its size when it's printed in landscape mode because it would take up most of the page. The code examines the property of the e.PageSettings.Landscape property, and if it's True, it fits the image into a rectangle that's half as tall and half as wide as the original image. You can experiment with the SimplePrintout project's code and add more elements to the printout, possibly arrange differently the elements on the page, and break the printout into multiple pages.
Example 11.4. The code that generated the printout of Figure 11.5
Private Sub Button1_Click(...) Handles Button1.Click
    PrintDialog1.PrinterSettings = PrintDocument1.PrinterSettings
    If PrintDialog1.ShowDialog() = Windows.Forms.DialogResult.OK Then
        PrintDocument1.PrinterSettings = PrintDialog1.PrinterSettings
    End If
    Dim prn As New PrintPreviewDialog
    prn.Document = PrintDocument1
    prn.Show()
End Sub

Private Sub PrintDocument1_PrintPage(...) Handles
                  PrintDocument1.PrintPage
    Dim msg1 As String = "Mastering Visual Basic 2010"
    Dim msg2 As String = "Published by SYBEX"
    Dim topX = e.PageSettings.Margins.Left
    Dim topY = e.PageSettings.Margins.Top
    Dim pageWidth =  e.PageSettings.Bounds.Width –
                     e.PageSettings.Margins.Left –
                     e.PageSettings.Margins.Right
    Dim pageHeight = e.PageSettings.Bounds.Height –
                     e.PageSettings.Margins.Top –
                     e.PageSettings.Margins.Bottom
    Dim R As New RectangleF(topX, topY, pageWidth, pageHeight)
    Dim startColor As Color = Color.BlueViolet
    Dim EndColor As Color = Color.LightYellow
    Dim LGBrush As New System.Drawing.Drawing2D.LinearGradientBrush(
R, startColor, EndColor,
Drawing2D.LinearGradientMode.ForwardDiagonal)
e.Graphics.FillRectangle(LGBrush, R)
e.Graphics.DrawRectangle(Pens.Red,
New Rectangle(New Point(topX, topY),
New Size(pageWidth, pageHeight)))
Dim size = e.Graphics.MeasureString(msg1,
New Font("Verdana", 28, FontStyle.Bold))
Dim X = topX + (pageWidth - size.Width) / 2
Dim Y = 150
e.Graphics.DrawString(msg1,
New Font("Verdana", 28, FontStyle.Bold),
Brushes.White,
New RectangleF(X, Y, size.Width, size.Height))
size = e.Graphics.MeasureString(msg2,
New Font("Microsoft YaHei", 18, FontStyle.Regular))
X = topX + (pageWidth - size.Width) / 2
Y = Y + 70
e.Graphics.DrawString(msg2,
New Font("Microsoft YaHei", 18, FontStyle.Regular),
Brushes.Yellow,
New RectangleF(X, Y, 2 * size.Width, 2 * size.Height))
Dim img As Image
img = My.Resources.MVB2010
Dim imgSize As Size
If e.PageSettings.Landscape Then
imgSize = New Size(img.Width / 2, img.Height / 2)
Else
imgSize = New Size(img.Width, img.Height)
End If
Y = Y + 80
X = topX + (pageWidth - imgSize.Width) / 2
e.Graphics.DrawImage(img,
New Rectangle(New Point(X, Y), imgSize))
e.HasMorePages = False
Dim bookDescription As String =
"This expert guide covers ... .NET Framework. " &
vbCrLf &
"In a clear, easy-to-follow style, ... " & vbCrLf
Y = Y + imgSize.Height + 25
X = topX + 40
Dim txtRectangle As New Rectangle(X, Y, pageWidth - 80, 280)
e.Graphics.DrawString(bookDescription, _
New Font("Microsoft YaHei", 9, FontStyle.Regular),
Brushes.Black, txtRectangle)
e.HasMorePages = False
End SubThe .NET Framework provides two basic classes for manipulating text: the String and StringBuilder classes.
The String class exposes a large number of practical methods, and they're all reference methods: They don't act on the string directly but return another string instead. After you assign a value to a String object, that's it. You can examine the string, locate words in it, and parse it, but you can't edit it. The String class exposes methods such as the Replace and Remove methods, which replace a section of the string with another and remove a range of characters from the string, respectively. These methods, however, don't act on the string directly: They replace or remove parts of the original string and then return the result as a new string.
The StringBuilder class is similar to the String class: It stores strings, but it can manipulate them in place. In other words, the methods of the StringBuilder class are instance methods.
The distinction between the two classes is that the String class is better suited for static strings, whereas the StringBuilder class is better suited for dynamic strings. Use the String class for strings that don't change frequently in the course of an application, and use the StringBuilder class for strings that grow and shrink dynamically. The two classes expose similar methods, but the String class's methods return new strings; if you need to manipulate large strings extensively, using the String class might fill the memory quite quickly.
Any code that manipulates strings must also be able to manipulate individual characters. The Framework supports the Char class, which not only stores characters but also exposes numerous methods for handling them. Both the String and StringBuilder classes provide methods for storing strings into arrays of characters as well as for converting character arrays into strings. After extracting the individual characters from a string, you can process them with the members of the Char class. I'll start the discussion of the text-handling features of the Framework with an overview of the Char data type and continue with the other two major components, the String and StringBuilder classes.
The Char data type stores characters as individual, double-byte (16-bit), Unicode values, and it exposes methods for classifying the character stored in a Char variable. You can use methods such as IsDigit and IsPunctuation on a Char variable to determine its type and other similar methods that can simplify your string validation code.
To use a character variable in your application, you must declare it with a statement such as the following one:
Dim ch As Char
ch = Convert.ToChar("A")
The expression "A" represents a string, even if it contains a single character. Everything you enclose in double quotes is a string. To convert it to a character, you must cast it to the Char type. If the Strict option is off (the default value), you need not perform the conversion explicitly. If the Strict option is on, you must use one of the CChar() or the CType() functions (or the Convert class) to convert the single-character string in the double quotes to a character value. There's also a shorthand notation for converting one-character strings to characters—just append the c character to a single-character string:
Dim ch As Char = "A"c
If you let the compiler decipher the type of the variable from its value, a single-character string will be interpreted as a string, not as a Char data type. If you later assign a string value to a Char variable by using a statement such as the following, only the first character of the string will be stored in the ch variable:
ch = "ABC" ' the value "A" is assigned to ch!
The Char class provides two trivial properties: MaxValue and MinValue. They return the largest and smallest character values you can represent with the Char data type.
The Char data type exposes several useful methods for handling characters. All the methods described in Table 11.6 have the same syntax: They accept either a single argument, which is the character they act upon, or a string and the index of a character in the string on which they act.
Table 11.6. Char data type methods
Method | Description |
|---|---|
| This method returns a positive numeric value if called with an argument that is a digit and the value −1 otherwise. If you call |
| This method returns a numeric value that is a member of the |
| These methods return a True/False value indicating whether their argument, which is a character, is a letter, decimal digit, or letter/digit, respectively. You can write an event handler by using the |
| These methods return a True/False value indicating whether the specified character is lowercase or uppercase, respectively. |
| This method returns a True/False value indicating whether the specified character is a number. The |
These methods return a True/False value indicating whether the specified character is a punctuation mark, symbol, or control character, respectively. The Backspace and Esc keys, for example, are ISO (International Organization for Standardization) control characters. | |
| This method returns a True/False value indicating whether the character is categorized as a separator (space, new-line character, and so on). |
| This method returns a True/False value indicating whether the specified character is white space. Any sequence of spaces, tabs, line feeds, and form feeds is considered white space. Use this method along with the |
| These methods convert their argument to a lowercase or uppercase character, respectively, and return it as another character. |
| This method converts a character to a string. It returns a single-character string, which you can use with other string-manipulation methods or functions. |
IsLetter, IsDigit, IsLetterOrDigitThe IsLetter, IsDigit, and IsLetterOrDigit methods deserve a bit more discussion. I commonly use these methods to intercept keystrokes from within a control's KeyPress (or KeyUp and KeyDown) events. The e.KeyChar property of the e argument returns the character that was pressed by the user and that fired the KeyPress event. To reject non-numeric keys as the user enters text in a TextBox control, use the event handler shown here:
Private Sub TextBox1_KeyPres(
             ByVal sender As Object,
             ByVal e As System.Windows.Forms.KeyPressEventArgs)
             Handles TextBox1.KeyPress
   Dim c As Char
   c = e.KeyChar
   If Not (Char.IsDigit(c) or Char.IsControl(c)) Then
     e.Handled = True
   End If
End Sub
This code ignores any keystrokes that don't represent numeric digits and are not control characters. Control characters are not rejected because we want users to be able to edit the text on the control. The Backspace key, for example, is captured by the KeyPress event, and you shouldn't "kill" it. For more information on handling keystrokes from within your code, see the section "Capturing Keystrokes" in Chapter 5, "Basic Windows Controls." If the TextBox control is allowed to accept fractional values, you should allow the period character as well, by using the following If clause:
Dim c As Char
c = e.KeyChar
If Not (Char.IsDigit(c) or c = "." or
        Char.IsControl(c)) Then
    e.Handled = True
End If
The String class implements the String data type, which is one of the richest data types in terms of the members it exposes. We have used strings extensively in earlier chapters, and you're more than familiar with the String class by now, but I will review the basic members of the String class here for reasons of completeness.
To create a new instance of the String class, you simply declare a variable of the String type. You can also initialize it by assigning to the corresponding variable a text value:
Dim title As String = "Mastering VB2010"
Everything enclosed in double quotes is a string, even if it's the representation of a number. String objects are immutable: Once created, they can't be modified. The names of some of the methods of the String class may lead you to think that they change the value of the string, but they don't; instead, they return a new string. The Replace method, for example, doesn't replace any characters in the original string, but it creates a new string, replaces some characters, and then returns the new string. The Replace method, like all other methods of the String class, doesn't operate directly on the string to which it's applied. Instead, it creates a new string and returns it as a new string.
If you plan to create and manipulate long strings in your code often, use the StringBuilder class instead, which is extremely fast compared to the String class and VB's string-manipulation functions. This doesn't mean that the String data type is obsolete, of course. The String class exposes many more methods for handling strings (such as locating a smaller string in a larger one, comparing strings, changing individual characters, and so on). The StringBuilder class, on the other hand, is much more efficient when you build long strings bit by bit, when you need to remove part of a string, and so on. To achieve its speed, however, it consumes considerably more memory than the equivalent String variable.
The String class exposes only two properties, the Length and Chars properties, which return a string's length and its characters, respectively. Both properties are read-only. The Chars property returns an array of characters, and you can use this property to read individual characters from a string. Note that the Chars property returns the characters in the string, no matter what the encoding is (UTF7, UTF8, Unicode, and so on).
All the functionality of the String class is available through methods, which are described next. They are all shared methods: They act on a string and return a new string with the modified value.
CompareThis method compares two strings and returns a negative value if the first string is less than the second, a positive value if the second string is less than the first, and zero if the two strings are equal. Of course, the simplest method of comparing two strings is to use the comparison operators, as shown here:
If name1 < name 2 Then
    ' name1 is alphabetically smaller than name 2
Else If name 1 > name 2 Then
    ' name2 is alphabetically smaller than name 1
Else
    ' name1 is the same as name2
End If
The
Comparemethod is overloaded, and the first two arguments are always the two strings to be compared. The method's return value is 0 if the two strings are equal, 1 if the first string is smaller than the second, and −1 if the second is smaller than the first. The simplest form of the method accepts two strings as arguments:String.Compare(str1, str2)
The following form of the method accepts a third argument, which is a True/False value and determines whether the search will be case sensitive (if True) or not:
String.Compare(str1, str2, case)
Another form of the
Comparemethod allows you to compare segments of two strings. Its syntax is as follows:String.Compare(str1, index1, str2, index2, length)
index1andindex2are the starting locations of the segment to be compared in each string. The two segments must have the same length, which is specified by the last argument.The following statements return the values highlighted below each:
Debug.WriteLine(str.Compare("the quick brown fox", _ "THE QUICK BROWN FOX"))−1Debug.WriteLine(str.Compare("THE QUICK BROWN FOX", _ "the quick brown fox"))1Debug.WriteLine(str.Compare("THE QUICK BROWN FOX", _ "THE QUICK BROWN FOX"))0CompareOrdinalThe
CompareOrdinalmethod compares two strings, which is similar to theComparemethod, but it doesn't take into consideration the current locale. This method returns zero if the two strings are the same and a positive or negative value if they're different. These values, however, are not 1 and −1; they represent the numeric difference between the Unicode values of the first two characters that are different in the two strings.ConcatThis method concatenates two or more strings (places them one after the other) and forms a new string. The simpler form of the
Concatmethod has the following syntax and it is equivalent to the&operator:newString = String.Concat(string1, string2)
A more-useful form of the same method concatenates a large number of strings stored in an array:
newString = String.Concat(strings())
To use this form of the method, store all the strings you want to concatenate into a string array and then call the
Concatmethod. If you want to separate the individual strings with special delimiters, append them to each individual string before concatenating them. Or you can use theJoinmethod, discussed shortly.EndsWith, StartsWithThese two methods return True if their argument ends or starts with a user-supplied substring. The syntax of these methods is as follows:
found = str.EndsWith(string)
found = str.StartsWith(string)
These two methods are equivalent to the
Left()andRight()functions, which extract a given number of characters from the left or right end of the string, respectively. The two statements following the declaration of thenamevariable are equivalent:Dim name As String = "Visual Basic.NET" If Left(name, 3) = "Vis" Then ... If String.StartsWith("Vis") Then ...Notice that the comparison performed by the
StartsWithmethod is case sensitive. If you don't care about the case, you can convert both the string and the substring to uppercase, as in the following example:If name.ToUpper.StartsWith("VIS") Then ...IndexOf, LastIndexOfThese two methods locate a substring in a larger string. The
IndexOfmethod starts searching from the beginning of the string and stops when it reaches the target (or it fails to locate the substring), and theLastIndexOfmethod starts searching from the end of the string. Both methods return an integer, which is the position of the substring's first character in the larger string (the position of the first character is zero).To locate a string within a larger one, use the following forms of the
IndexOfmethod:pos = str.IndexOf(searchString) pos = str.IndexOf(SearchString, startIndex) pos = str.IndexOf(SearchString, startIndex, endIndex)
The
startIndexandendIndexarguments delimit the section of the string where the search will take place, andposis an integer variable.The last three overloaded forms of the
IndexOfmethod search for an array of characters in the string:str.IndexOf(Char()) str.IndexOf(Char(), startIndex) str.IndexOf(Char(), startIndex, endIndex)
The following statement will return the position of the string
Visualin the text of theTextBox1control or will return −1 if the string isn't contained in the text:Dim pos As Integer pos = TextBox1.IndexOf("Visual")IndexOfAnyThis is an interesting method that accepts as an argument an array of arguments and returns the first occurrence of any of the array's characters in the string. The syntax of the
IndexOfAnymethod isDim pos As Integer = str.IndexOfAny(chars)
where
charsis an array of characters. This method attempts to locate the first instance of any member of thecharsarray in the string. If the character is found, its index is returned. If not, the process is repeated with the second character, and so on until an instance is found or the array has been exhausted. If you want to locate the first delimiter in a string, call theIndexOfAnymethod with an array such as the following:Dim chars() As Char = {"."c, ","c, ";"c, " "c} Dim mystring As String = "This is a short sentence" Debug.WriteLine(mystring.IndexOfAny(chars))When the last statement is executed, the value 4 will be printed in the Output window. This is the location of the first space in the string. Notice that the space delimiter is the last one in the
charsarray.InsertThe
Insertmethod inserts one or more characters at a specified location in a string and returns the new string. The syntax of theInsertmethod is as follows:newString = str.Insert(startIndex, subString)
startIndexis the position in thestrvariable, where the string specified by the second argument will be inserted. The following statement will insert a dash between the second and third characters of the stringCA93010.Dim Zip As String = "CA93010" Dim StateZip As String StateZip = Zip.Insert(2, "-")
JoinThis method joins two or more strings and returns a single string with a separator between the original strings. Its syntax is the following, where
separatoris the string that will be used as the separator, andstringsis an array with the strings to be joined:newString = String.Join(separator, strings)
The following statement will create a full path by joining folder names:
Dim path As String Dim folders(3) As String = {"My Documents", "Business", "Expenses"} path = String.Join("/", folders)SplitJust as you can join strings, you can split a long string into smaller ones by using the
Splitmethod, whose syntax is the following, wheredelimitersis an array of characters andstris the string to be split:strings() = String.Split(delimiters, str)
The string is split into sections that are separated by any one of the delimiters specified with the first argument. These strings are returned as an array of strings.
The statements in the following listing isolate the parts of a path, which are delimited by a backslash character:
Dim path As String = "c:My DocumentsBusinessExpenses"
Dim delimiters() As Char = {""c}
Dim parts() As String
parts = path.Split(delimiters)
Dim iPart As IEnumerator
iPart = parts.GetEnumerator
While iPart.MoveNext
   Debug.WriteLine(iPart.Current.tostring)
End While
If the path ends with a slash, the
Splitmethod will return an extra empty string. If you want to skip the empty strings, pass an additional argument to the function, which is a member of theStringSplitOptionsenumeration:NoneorRemoveEmptyEntries.Notice that the
partsarray is declared without a size. It's a one-dimensional array that will be dimensioned automatically by theSplitmethod, according to the number of substrings separated by the specified delimiter(s).RemoveThe
Removemethod removes a given number of characters from a string, starting at a specific location, and returns the result as a new string. Its syntax is the following, wherestartIndexis the index of the first character to be removed in thestrstring variable andcountis the number of characters to be removed:newSrting = str.Remove(startIndex, count)
ReplaceThis method replaces all instances of a specified string in another string with a new one. It creates a new instance of the string, replaces the characters as specified by its arguments, and returns this string. The syntax of this method is
newString = str.Replace(oldString, newString)
where
oldStringis the part of thestrvariable to be replaced andnewStringis the string to replace the occurrences ofoldString. The following statements replace all instances of the tab character with a single space. You can change the last statement to replace tabs with a specific number of spaces—usually three, four, or five spaces:Dim txt, newTxt As String Dim vbTab As String = vbCrLf txt = "some text with two tabs" newTxt = txt.Replace(vbTab, " ")
PadLeft, PadRightThese two methods align the string left or right in a specified field and return a fixed-length string with spaces to the right (for right-padded strings) or to the left (for left-padded strings). After the execution of these statements
Dim LPString, RPString As String
RPString = " [" & "Mastering VB2010".PadRight(20) & "]"
LPString = " [" & "Mastering VB2010".PadLeft(20) & "]"
the values of the
LPStringandRPStringvariables are as follows:[Mastering VB2010 ] [ Mastering VB2010]
The StringBuilder class stores dynamic strings and exposes methods to manipulate them much faster than the String class. As you will see, the StringBuilder class is extremely fast, but it uses considerably more memory than the string it holds. To use the StringBuilder class in an application, you must import the System.Text namespace (unless you want to fully qualify each instance of the StringBuilder class in your code). Assuming that you have imported the System.Text namespace in your code module, you can create a new instance of the StringBuilder class via the following statement:
Dim txt As New StringBuilder
Because the StringBuilder class handles dynamic strings in place, it's good to declare in advance the size of the string you intend to store in the current instance of the class. The default capacity is 16 characters, and it's doubled automatically every time you exceed it. To set the initial capacity of the StringBuilder class, use the Capacity property.
To create a new instance of the StringBuilder class, you can call its constructor without any arguments or pass the initial string as an argument:
Dim txt As New StringBuilder("some string")If you can estimate the length of the string you'll store in the variable, you can specify this value by using the following form of the constructor so that the variable need not be resized continuously as you add characters to it:
Dim txt As New StringBuilder(initialCapacity)
The size you specify is not a hard limit; the variable might grow longer at runtime, and the StringBuilder will adjust its capacity.
If you want to specify a maximum capacity for your StringBuilder variable, use the following constructor:
Dim txt As New StringBuilder (
                 Intialcapacity, maxCapacity)
Finally, you can initialize a new instance of the StringBuilder class by using both an initial and a maximum capacity, as well as its initial value, by using the following form of the constructor:
Dim txt As New StringBuilder(
string, intialcapacity, maxCapacity)You have already seen the two basic properties of the StringBuilder class: the Capacity and MaxCapacity properties. In addition, the StringBuilder class provides the Length and Chars properties, which are the same as the corresponding properties of the String class. The Length property returns the number of characters in the current instance of the StringBuilder class, and the Chars property is an array of characters. Unlike the Chars property of the String class, this one is read/write. You can not only read individual characters, you can also set them from within your code. The index of the first character is zero.
Many of the methods of the StringBuilder class are equivalent to the methods of the String class, but they act directly on the string to which they're applied, and they don't return a new string:
AppendThe
Appendmethod appends a base type to the current instance of the StringBuilder class, and its syntax is the following, where thevalueargument can be a single character, a string, a date, or any numeric value:SB.Append(value)
When you append numeric values to a StringBuilder, they're converted to strings; the value appended is the string returned by the type's
ToStringmethod. You can also append an object to the StringBuilder—the actual string that will be appended is the value of the object'sToStringproperty.AppendFormatThe
AppendFormatmethod is similar to theAppendmethod. Before appending the string, however,AppendFormatformats it. The syntax of theAppendFormatmethod is as follows:SB.AppendFormat(string, values)
The first argument is a string with embedded format specifications, and
valuesis an array with values (objects, in general)—one for each format specification in thestringargument. If you have a small number of values to format, up to four, you can supply them as separate arguments separated by commas:SB.AppendFormat(string, value1, value2, value3, value4)
The following statement appends the string
Your balance as of Thursday, August 2, 2007 is $19,950.40
to a StringBuilder variable:
Dim statement As New StringBuilder
statement.AppendFormat(
       "Your balance as of {0:D} is ${1: #,###.00}",
       #8/2/2007#, 19950.40)
Each format specification is enclosed in a pair of curly brackets, and they're numbered sequentially (from zero). Then there's a colon followed by the actual specification. The
Dformat specification tells theAppendFormatmethod to format the specified string in long date format. The second format specification,#,###.00, uses the thousands separator and two decimal digits for the amount.InsertThis method inserts a string into the current instance of the StringBuilder class, and its syntax is as follows:
SB.Insert(index, value)
The
indexargument is the location where the new string will be inserted in the current instance of the StringBuilder, andvalueis the string to be inserted. A variation of the syntax shown here inserts multiple copies of the specified string into the StringBuilder:SB.Insert(index, string, count)
RemoveThis method removes a number of characters from the current StringBuilder, starting at a specified location; its syntax is the following, where
startIndexis the position of the first character to be removed from the string andcountis the number of characters to be removed:SB.Remove(startIndex, count)
ReplaceThis method replaces all instances of a string in the current StringBuilder object with another string. The syntax of the
Replacemethod is the following, where the two arguments can be either strings or characters:SB.Replace(oldValue, newValue)
Unlike with the String class, the replacement takes place in the current instance of the StringBuilder class and the method doesn't return another string. Another form of the
Replacemethod limits the replacements to a specified segment of theStringBuilderinstance:SB.Replace(oldValue, newValue, startIndex, count)
This method replaces all instances of
oldValuewithnewValuein the section starting at locationstartIndexand extendingcountcharacters from the starting location.ToStringUse this method to convert the StringBuilder instance to a string and assign it to a String variable. The
ToStringmethod returns the string represented by the StringBuilder variable to which it's applied.
The code segment included in Listing 11.5 demonstrates the efficiency of the StringBuilder class. The code extracts the words in a large text file and reverses their order. It's not a terribly practical demonstration of string operations, but it demonstrates very clearly the efficiency of the StringBuilder class. The code extracts the words with the Split method, using the space as separator, and stores them in the words array. Once the words have been extracted, the two loops go through each word in the array and build two variables with the words in the words array in reverse order: one of them a String variable and the other a StringBuilder variable.
Example 11.5. Reversing the order of words in a large string
Dim newString As String = ""
Dim words() = TextBox1.Text.Split(" ")
Dim SW As New Stopwatch
SW.Start()
For Each wrd In words
    newString = wrd & " " & newString
Next
SW.Stop()
MsgBox("Reversed word order with the String class in " &
         (SW.ElapsedMilliseconds / 1000).ToString)

Dim newSB As New System.Text.StringBuilder
SW = New Stopwatch
SW.Start()
For wrd = words.Count - 1 To 0 Step −1
    newSB.Append(words(wrd) & " ")
Next
SW.Stop()
MsgBox("Reversed word order with the StringBuilder class in " &
         (SW.ElapsedMilliseconds / 1000).ToString)
I've copied the text of this chapter and pasted it three times on a TextBox control. It took 15 seconds to reverse the words in the String class and less than half a second to do the same with the StringBuilder class. If you manipulate strings extensively in your code, you should definitely consider the StringBuilder class. If you're reading pieces of information from a file or other source, such as an XML file, and append them to a string, you should definitely use a StringBuilder class. I frequently have to build large strings that include formatting information and display them on a RichTextBox control, and the StringBuilder class is the only option. Keep in mind, however, that the StringBuider class doesn't provide nearly as many string manipulation methods as the String class. The StringBuilder class shines in applications that build long strings piecewise, an operation at which the String class has never been especially efficient.
Another common task in coding business applications is the manipulation of dates and time. To aid the coding of these tasks, the Framework provides the DateTime and TimeSpan classes. The DateTime class handles date and time values, whereas the TimeSpan class handles date and time intervals and differences. Variables that represent dates and times must be declared as DateTime, which is one of the basic data types of the Framework.
The DateTime class is used for storing date and time values, and it's one of the Framework's base data types. Date and time values are stored internally as Double numbers. The integer part of the value corresponds to the date, and the fractional part corresponds to the time. To convert a DateTime variable to a Double value, use the method ToOADateTime, which returns a value that is an OLE (Object Linking and Embedding) Automation-compatible date. The value 0 corresponds to midnight of December 30, 1899. The earliest date you can represent as an OLE Automation-compatible date is the first day of the year 100; it corresponds to the Double value −657,434.
To initialize a DateTime variable, a date value is enclosed in a pair of pound symbols. If the value contains time information, separate it from the date part by using a space:
Dim date1 As Date = #4/15/2011#
Dim date2 As Date = #4/15/2011 2:01:59#
If you have a string that represents a date and you want to assign it to a DateTime variable for further processing, use the DateTime class Parse and ParseExact methods. The Parse method parses a string and returns a date value if the string can be interpreted as a date value. Let's say your code prompts the user for a date and then it uses it in date calculations. The user-supplied date is read as a string, and you must convert it to a date value:
Dim sDate As String
Dim dDate As DateTime
sDate = InputBox("Please enter a date")
Try
    dDate = DateTime.Parse(sDate)
        ' use dDate1 in your calculations
    Catch exc As Exception
        MsgBox("You've entered an invalid date")
End Try
The Parse method will convert a string that represents a date to a DateTime value regardless of the format of the date. You can enter dates such as 1/17/2011, Jan. 17, 2011, or January 17, 2011 (with or without the comma). The ParseExact method allows you to specify more options, such as the possible formats of the date value.
Different cultures use different date formats, and Windows supports them all. However, you must make sure that the proper format is selected in Regional And Language Options. By default, dates are interpreted as specified by the current date format in the target computer's regional settings. The Parse method allows you to specify the culture to be used in the conversion. The following statements prompt the user for a date value and then interpret it in a specific culture (the en-GB culture, which is used in the United Kingdom):
Dim sDate1 As String
Dim dDate1 As DateTime
sDate1 = InputBox("Please enter a date")
Try
    Dim culture As CultureInfo = _
               New CultureInfo("en-GB", True)
    dDate1 = DateTime.Parse(sDate1, culture)
    MsgBox(dDate1.ToLongDateString)
Catch exc As Exception
    MsgBox("You've entered an invalid date")
End Try
To use the CultureInfo class in your code, you must import the System.Gobalization namespace in your project. These statements will convert any English date regardless of the regional settings. If you enter the string 16/3/2011 in the input box, the preceding statements will produce the following output:
Wednesday, March 16, 2011
Let's see how the same date will be parsed in two different cultures. Insert the following code segment in a button's Click event handler:
Dim sDate1 As String
Dim dDate1 As DateTime
sDate1 = InputBox("Please enter a date")
Try
    Dim culture As CultureInfo = _
                   New CultureInfo("en-GB", True)
    dDate1 = DateTime.Parse(sDate1, culture)
    Debug.WriteLine(dDate1.ToLongDateString)
    culture = New CultureInfo("en-US", True)
    dDate1 = DateTime.Parse(sDate1, culture)
    Debug.WriteLine(dDate1.ToLongDateString)
Catch exc As Exception
    MsgBox("You've entered an invalid date")
End Try
The method ToLongDateString returns the verbose description of the date so that we can read the name of the month instead of guessing it. Run the code and enter a date that can be interpreted differently in the two cultures, such as 4/9/2011. The following output will be produced:
Saturday, September 04, 2011
Friday, April 09, 2011
If the month part of the date exceeds 12, the exception handler will be activated. Dates are always a tricky issue in programming, and you should include the appropriate culture in the Parse method so that user-supplied dates will be converted correctly, even if the user's culture hasn't been set correctly in the regional settings or if you're processing a file that originated in a computer with different culture settings. You should also not prompt users for dates with a TextBox control; use the DateTimePicker control instead so that users can enter only valid dates.
The DateTime class exposes the properties listed in Table 11.7.
Table 11.7. DateTime class properties
Property | Description |
|---|---|
| The |
| These two properties return the day of the week (a string such as Monday) and the number of the day in the year (an integer from 1 to 365, or 366 for leap years), respectively. |
| These properties return the corresponding time part of the date value passed as an argument. If the current time is 9:47:24 p.m., the three properties of the DateTime class will return the integer values 9, 47, and 24 when applied to the current date and time as |
| These three properties return the day of the month, the month, and the year of a DateTime value, respectively. The |
This property returns the number of ticks from a date/time value. Each tick is 100 nanoseconds (or 0.0001 milliseconds). To convert ticks to milliseconds, multiply them by 10,000 (or use the TimeSpan object's |
The DateTime class exposes several methods for manipulating dates, as listed in Table 11.8. The most practical methods add and subtract time intervals to and from an instance of the DateTime class.
Table 11.8. DateTime class methods
Method | Description |
|---|---|
|
|
| This shared method returns the number of days in a specific month. Because February contains a variable number of days depending on the year, the
|
| This shared method returns a True/False value that indicates whether the specified year is a leap year:
|
| This method adds a TimeSpan object to the current instance of the
|
This method is the counterpart of the | |
| Various methods add specific intervals to a date/time value. Each method accepts the number of intervals to add (days, hours, milliseconds, and so on) to the current instance of the DateTime class. These methods are as follows: |
| This method converts a date/time value to a string, using a specific format. The DateTime class recognizes numerous format patterns, which are listed in Table 11.9 and Table 11.10. |
Table 11.9 lists the standard format patterns, and Table 11.10 lists the characters that can format individual parts of the date/time value. You can combine the custom format characters to format dates and times in any way you wish.
The syntax of the ToString method is as follows, where formatSpec is a format specification:
aDate.ToString(formatSpec)
The D named date format, for example, formats a date value as a long date; the following statement will return the highlighted string shown below the statement:
Debug.Writeline(#9/17/2010#.ToString("D"))
Friday, September 17, 2010
Table 11.9 lists the named formats for the standard date and time patterns. The format characters are case sensitive—for example, g and G represent slightly different patterns.
The following examples format the current date by using all the format patterns listed in Table 11.9. An example of the output produced by each statement is shown under each statement, indented and highlighted.
Debug.WriteLine(now().ToString("d"))
    2/2/2010
Debug.WriteLine(Now().ToString("D"))
    Tuesday, February 02, 2010
Debug.WriteLine(Now().ToString("f"))
    Tuesday, February 02, 2010 10:51 PM
Debug.WriteLine(Now().ToString("F"))
    Tuesday, February 02, 2010 10:51:16 PM
Debug.WriteLine(Now().ToString("g"))
    2/2/2010 10:51 PM
Debug.WriteLine(Now().ToString("G"))
    2/2/2010 10:51:16 PM
Debug.WriteLine(Now().ToString("m"))
February 02
Debug.WriteLine(Now().ToString("r"))
Tue, 02 Feb 2010 22:51:16 GMT
Debug.WriteLine(Now().ToString("s"))
2010-02-02T22:51:16
Debug.WriteLine(Now().ToString("t"))
10:51 PM
Debug.WriteLine(Now().ToString("T"))
10:51:16 PM
Debug.WriteLine(Now().ToString("u"))
2010-02-02 22:51:16Z
Debug.WriteLine(Now().ToString("U"))
Tuesday, February 02, 2010 8:51:16 PM
Debug.WriteLine(Now().ToString("y"))
February, 2010Table 11.9. The date and time named formats
Output | Format Name | |
|---|---|---|
| MM/dd/yyyy |
|
| dddd, MMMM dd, yyyy |
|
| dddd, MMMM dd, yyyy HH:mm:ss.mmm |
|
| dddd, MMMM dd, yyyy HH:mm.ss |
|
| MM/dd/yyyy HH:mm |
|
| MM/dd/yyyy HH:mm:ss |
|
| MMMM dd |
|
| ddd, dd MMM yyyy HH:mm:ss GMT |
|
| yyyy-MM-dd HH:mm:ss |
|
| HH:mm |
|
| HH:mm:ss |
|
| yyyy-MM-dd HH:mm:ss |
|
| dddd, MMMM dd, yyyy HH:mm:ss |
|
| MMMM, yyyy |
|
Table 11.10. Date format specifier
Description | |
|---|---|
| The date of the month |
| The day of the month with a leading zero for single-digit days |
| The abbreviated name of the day of the week (a member of the |
| The full name of the day of the week (a member of the |
| The number of the month |
| The number of the month with a leading zero for single-digit months |
| The abbreviated name of the month (a member of the |
| The full name of the month |
| The year without the century (the year 2001 will be printed as 1) |
| The year without the century (the year 2001 will be displayed as 01) |
| The complete year |
| The period or era (pattern ignored if the date to be formatted does not have an associated period as A.D. or B.C. have) |
| The hour in 12-hour format |
| The hour in 12-hour format with a leading zero for single-digit hours |
| The hour in 24-hour format |
| The hour in 24-hour format with a leading zero for single-digit hours |
| The minute of the hour |
| The minute of the hour with a leading zero for single-digit minutes |
| The second of the hour |
| The second of the hour with a leading zero for single-digit seconds |
| The first character in the a.m./p.m. designator |
| The a.m./p.m. designator |
| The time-zone offset (applies to hours only) |
| The time-zone offset with a leading zero for single-digit hours (applies to hours only) |
| The full time-zone offset (hour and minutes) with leading zeros for single-digit hours and minutes |
Table 11.10 lists the format characters that can be combined to build custom format date and time values. The patterns are case sensitive. If the custom pattern contains spaces or characters enclosed in single quotation marks, these characters will appear in the formatted string.
To display the full month name and the day in the month, for instance, use the following statement:
Debug.WriteLine(now().ToString("MMMM d"))
July 27
You may have noticed some overlap between the named formats and the format characters. The character d signifies the short date pattern when used as a named format and the number of the day when used as a format character. The compiler figures out how it's used based on the context. If the format argument is d/mm, it will display the day and month number, whereas the format argument d, mmm will display the number of the day followed by the month's name. If you use the character d on its own, however, it will be interpreted as the named format for the short date format.
The DateTime class supports methods for converting a date/time value to many of the other base types, which are presented briefly in Table 11.11.
The Date type encapsulates complicated operations, and it's worth taking a look at the inner workings of the classes that handle dates and times. Let's declare two variables to experiment a little with dates: a Date variable, which is initialized to the current date, and a Double variable:
Dim Date1 As Date = Now()
Dim dbl As Double
Insert a couple of statements to convert the date to a Double value and print it:
dbl = Date1.ToOADate
Debug.WriteLine(dbl)
Table 11.11. DateTime class conversion methods
On the date I tested this code, February 2, 2010, the value was 40211.9442577662. The integer part of this value is the date, and the fractional part is the time. If you add one day to the current date and then convert it to a double again, you'll get a different value:
dbl = (Now().AddDays(1)).ToOADate
Debug.WriteLine(dbl)
This time, the value 40212.9452653704 was printed; its integer part is tomorrow's value. You can add two days to the current date by adding (48 × 60) minutes. The original integer part of the numeric value will be increased by two:
dbl = Now().AddMinutes(48 * 60).ToOADate
Debug.WriteLine(dbl)
The value printed this time will be 40213.9456303588.
Let's see how the date-manipulation methods deal with leap years. We'll add 10 years to the current date via the AddYears method, and we'll print the new value with a single statement:
Debug.WriteLine(Now().AddYears(10).ToLongDateString)
The value that will appear in the Immediate window will be Sunday, February 02, 2020. The Double value of this date is 40211.9459967361. If you add 3,650 days, you'll get a different value because the 10-year span contains at least two leap years:
Debug.WriteLine(Now().AddDays(3650).ToLongDateString)
Debug.WriteLine(Now().AddDays(3650).ToOADate)
The new value that will be printed in the Immediate window will be Friday, January 31, 2020, and the corresponding Double value will be 43861.9468961111.
Can you figure out what time it was when I executed the preceding statements? If you multiply the fractional part (0.9468957639) by 24, you'll get 22.7254983336, which is 56.813745834 hours and some minutes. If you multiply the fractional part of this number by 60, you'll get 56.813745834, which is 56.813745834 minutes and some seconds. Finally, you can multiply the new fractional part by 60 to get the number of seconds: 48.82475004. So, it was 10:56:48 p.m. And the last fractional part corresponds to 824 milliseconds.
The last class discussed in this chapter is the TimeSpan class, which represents a time interval and can be expressed in many different units—from ticks or milliseconds to days. The TimeSpan is usually the difference between two date/time values, but you can also create a TimeSpan for a specific interval and use it in your calculations.
To use the TimeSpan variable in your code, just declare it with a statement such as the following:
Dim TS As New TimeSpan
To initialize the TimeSpan object, you can provide the number of days, hours, minutes, seconds, and milliseconds that make up the time interval. The following statement initializes a TimeSpan object with a duration of 9 days, 12 hours, 1 minute, and 59 seconds:
Dim TS As TimeSpan = New TimeSpan(9, 12, 1, 59)
As you have seen, the difference between two dates calculated by the Date.Subtract method returns a TimeSpan value. You can initialize an instance of the TimeSpan object by creating two date/time values and getting their difference, as in the following statements:
Dim TS As New TimeSpan
Dim date1 As Date = #4/11/1994#
Dim date2 As Date = Now()
TS = date2.Subtract(date1)
Debug.WriteLine(TS)
Depending on the day on which you execute these statements, they will print something like the following in the Output window:
5585.17:05:12.7623000
The days are separated from the rest of the string with a period, whereas the time parts are separated with colons. Notice that a TimeSpan object might represent an interval of many years, but it doesn't provide members to report months or years. The difference represented by TS variable in the preceding example is 5,585 days, 17 hours, 5 minutes, 12 seconds, and 762,300 nanoseconds (or 762.3 milliseconds).
The TimeSpan class exposes the properties described in the following sections. Most of these properties are shared (you don't have to create an instance of the TimeSpan class to use them).
TimeSpan exposes the simple properties shown in Table 11.12, which are known as fields and are all shared. You'll use these field values to convert the time difference represented by a TimeSpan object to common time units.
Table 11.12. The fields of the TimeSpan object
Property | Returns |
|---|---|
| An empty TimeSpan object |
| The largest interval you can represent with a TimeSpan object |
| The smallest interval you can represent with a TimeSpan object |
| The number of ticks in a day |
| The number of ticks in an hour |
| The number of ticks in a millisecond |
| The number of ticks in one minute |
| The number of ticks in one second |
| A TimeSpan object of zero duration |
In addition to the fields, the TimeSpan class exposes two more groups of properties that return the various intervals in a TimeSpan value (shown in Tables 11.13 and 11.14). The members of the first group of properties return the number of specific intervals (days, hours, and so on) in a TimeSpan value. The second group of properties returns the entire TimeSpan duration in one of the intervals recognized by the TimeSpan method.
If a TimeSpan value represents 2 minutes and 10 seconds, the Seconds property will return the value 10. The TotalSeconds property, however, will return the value 130, which is the total duration of the TimeSpan in seconds.
Table 11.13. The Intervals of a TimeSpan value
Returns | |
|---|---|
| The number of whole days in the current TimeSpan. |
| The number of whole hours in the current TimeSpan. |
| The number of whole milliseconds in the current TimeSpan. The largest value of this property is 999. |
| The number of whole minutes in the current TimeSpan. The largest value of this property is 59. |
| The number of whole seconds in the current TimeSpan. The largest value of this property is 59. |
| The number of whole ticks in the current TimeSpan. |
Table 11.14. The total intervals of a TimeSpan value
Property | Returns |
|---|---|
| The number of days in the current TimeSpan |
| The number of hours in the current TimeSpan |
| The number of whole milliseconds in the current TimeSpan |
| The number of whole minutes in the current TimeSpan |
| The number of whole seconds in the current TimeSpan |
The Duration property returns the duration of the current instance of the TimeSpan class. The duration is expressed as the number of days followed by the number of hours, minutes, seconds, and milliseconds. The following statements create a TimeSpan object of a few seconds (or minutes, if you don't mind waiting) and print its duration in the Output window. The first few statements initialize a new instance of the DateTime type, the T1 variable, to the current date and time. Then a message box is displayed that prompts to click the OK button to continue. Wait for several seconds before closing the message box. The last group of statements subtracts the T1 variable from the current time and displays the duration (how long you kept the message box open on your screen):
Dim T1, T2 As DateTime
T1 = Now
MsgBox("Click OK to continue")
T2 = Now
Dim TS As TimeSpan
TS = T2.Subtract(T1)
Debug.WriteLine("Total duration = " & TS.Duration.ToString)
Debug.WriteLine("Minutes = " & TS.Minutes.ToString)
Debug.WriteLine("Seconds = " & TS.Seconds.ToString)
Debug.WriteLine("Ticks = " & TS.Ticks.ToString)
Debug.WriteLine("Milliseconds = " & TS.TotalMilliseconds.ToString)
Debug.WriteLine("Total seconds = " & TS.TotalSeconds.ToString)
If you place these statements in a button's Click event handler and execute them, you'll see a series of values like the following in the Immediate window:
Total duration = 00:01:34.2154752Minutes = 1Seconds = 34Ticks = 942154752Milliseconds = 94215,4752Total seconds = 94,2154752
The duration of the TS TimeSpan is 1 minute and 34 seconds. Its total duration in milliseconds is 94,215.4752, or 94.2154752 seconds.
There are various methods for creating and manipulating instances of the TimeSpan class, and they're described in the following list.
IntervalmethodsThe methods in Table 11.15 create a new TimeSpan object of a specific duration. The
TimeSpanduration is specified as a number of intervals, accurate to the nearest millisecond.All methods accept a single argument, which is a Double value that represents the number of the corresponding intervals (days, hours, and so on).
AddThis method adds a TimeSpan object to the current instance of the class; its syntax is as follows, where
TS,TS1, andnewTSare all TimeSpan variables:newTS = TS.Add(TS1)
Table 11.15. Interval methods of the TimeSpan object
| Number of days specified by the argument |
| Number of hours specified by the argument |
| Number of minutes specified by the argument |
| Number of seconds specified by the argument |
| Number of milliseconds specified by the argument |
| Number of ticks specified by the argument |
The following statements create two TimeSpan objects and then add them:
Dim TS1 As New TimeSpan(1, 0, 1)
Dim TS2 As New TimeSpan(2, 1, 9)
Dim TS As New TimeSpan
TS = TS1.Add(TS2)
The duration of the new TimeSpan variable is 3 hours, 1 minute, and 10 seconds.
SubtractThe
Subtractmethod subtracts a TimeSpan object from the current instance of the TimeSpan class, similar to theAddmethod.
To simplify the task of timing operations, a new class was introduced with the .NET Framework version 4, the StopWatch class. This class implements a stopwatch, which you can start just before the code segment you want to time and stop it after the last statement in this code segment. In addition, you can pause the stopwatch (you may wish to exclude some debugging statements from the code to be timed).
To use the StopWatch class, declare a new variable of this type:
Dim SW As New StopWatch
Use the Start method to start the stopwatch and the Stop method to stop it or pause it. While the stopwatch is stopped or paused, you can request the elapsed time with the Elapsed property, which returns the elapsed time as a TimeSpan object. You can also retrieve the elapsed time in milliseconds with the ElapsedMilliseconds method, and in ticks of the internal clock with the ElapsedTicks method (as a reminder, a tick is 1/10 of a millisecond).
You can also use the Reset method to stop the stopwatch and zero the elapsed time or the StartNew method to zero the elapsed time and start the stopwatch.
Listing 11.6 demonstrates the basic members of the StopWatch class. Initially, the sample code declares and starts a new instance of the StopWatch class and then displays a message box prompting you to close the dialog box and stop the stopwatch. Leave the message box open for a few seconds before clicking the OK button to simulate some delay. Then the code displays another dialog box, prompting you to close it. Then it starts the stopwatch again and displays yet another message box. The time between stopping and restarting the stopwatch won't be included in the total elapsed time. When you close the last dialog box, you can see the results of the operation in the Output window.
Example 11.6. Timing operations with the StopWatch class
Private Sub timeButton_Click(...) Handles timeButton.Click
    Dim sw As New Stopwatch
    sw.Start()
    ' This is where the statements to be timed should appear
    ' Use the MsgBox() function to simulate a delay
    MsgBox("Stopwatch is running. Press any key to pause it")
    ' End of timing operations
    sw.Stop()
    Debug.WriteLine("Elapsed time")
    Debug.WriteLine(sw.Elapsed.ToString)
    Debug.WriteLine(sw.ElapsedMilliseconds.ToString)
    MsgBox("Stopwatch is not running. " &
           "Wait a few seconds and press any key to restart it")
    ' Continue timing the operations
    sw.Start()
    MsgBox("And now press a key to stop the stopwatch")
    Debug.WriteLine("Total elapsed time")
    Debug.WriteLine(sw.Elapsed.ToString)
    Debug.WriteLine(sw.ElapsedMilliseconds.ToString)
End Sub- Handle files with the
Mycomponent. The simplest method of saving data to a file is to call one of the
WriteAllBytesorWriteAllTextmethods of theMy.Computer.FileSystem component. You can also use theIOnamespace to set up a Writer object to send data to a file and a Reader object to read data from the file.- Master It
Show the statements that save a TextBox control's contents to a file and the statements that reload the same control from the data file. Use the
My.Computer.FileSystem component.
- Write data to a file with the IO namespace.
To send data to a file you must set up a FileStream object, which is a channel between the application and the file. To send data to a file, create a StreamWriter or BinaryWriter object on the appropriate FileStream object. Likewise, to read from a file, create a StreamReader or BinaryReader on the appropriate FileStream object. To send data to a file, use the
WriteandWriteStringmethods of the appropriate StreamWriter object. To read data from the file, use theRead, ReadBlock, ReadLine, andReadToEndmethods of the StreamReader object.- Master It
Write the contents of a TextBox control to a file using the methods of the
IOnamespace.
- Manipulate folders and files.
The
IOnamespace provides the Directory and File classes, which represent the corresponding entities. Both classes expose a large number of methods for manipulating folders (CreateDirectory, Delete, GetFiles, and so on) and files (Create, Delete, Copy, OpenRead, and so on).- Master It
How will you retrieve the attributes of a drive, folder, and file using the
IOnamespace's classes?
- Use the Char data type to handle characters.
The Char data type, which is implemented with the Char class, exposes methods for handling individual characters (
IsLetter, IsDigit, IsSymbol, and so on). We use the methods of the Char class to manipulate users' keystrokes as they happen in certain controls (mostly the TextBox control) and to provide immediate feedback.- Master It
You want to develop an interface that contains several TextBox controls that accept numeric data. How will you intercept the user's keystrokes and reject any characters that are not numeric?
- Use the StringBuilder class to manipulate large or dynamic strings.
The StringBuilder class is very efficient at manipulating long strings, but it doesn't provide as many methods for handling strings. The StringBuilder class provides a few methods to insert, delete, and replace characters within a string. Unlike the equivalent methods of the String class, these methods act directly on the string stored in the current instance of the StringBuilder class.
- Master It
Assuming that you have populated a ListView control with thousands of lines of data from a database, how will you implement a function that copies all the data to the Clipboard?
- Use the DateTime and TimeSpan classes to handle dates and time.
The Date class represents dates and time, and it exposes many useful shared methods (such as the
IsLeapmethod, which returns True if the year passed to the method as an argument is leap; theDaysInMonthmethod; and so on). It also exposes many instance methods (such asAddYears, AddDays, AddHours, and so on) for adding time intervals to the current instance of the Date class as well as many options for formatting date and time values.The TimeSpan class represents time intervals—from milliseconds to days—with the
FromDays, FromHours, and evenFromMillisecondsmethods. The difference between two date variables is a TimeSpan value, and you can convert this value to various time units by using methods such asTotalDays, TotalHours, TotalMilliseconds, and so on. You can also add a TimeSpan object to a date variable to obtain another date variable.- Master It
How will you use the TimeSpan class to accurately time an operation?
- Generate graphics by using the drawing methods.
Every object you draw on, such as forms and PictureBox controls, exposes the
CreateGraphicsmethod, which returns a Graphics object. ThePaintevent'seargument also exposes the Graphics object of the control or form. To draw something on a control, retrieve its Graphics object and then call the Graphics object's drawing methods.- Master It
Show how to draw a circle on a form from within the form's
Paintevent handler.
- Use the printing controls and dialog boxes.
To print with the .NET Framework, you must add an instance of the PrintDocument control to your form and call its
Printmethod. To preview the same document, you simply assign the PrintDocument object to theDocumentproperty of the PrintPreviewDialog control and then call theShowDialogmethod of the PrintPreviewDialog control to display the preview window. You can also display the Print dialog box, where users can select the printer to which the output will be sent, and the Page Setup dialog box, where users can specify the page's orientation and margins. The two dialog boxes are implemented with the PrintDialog and PageSetupDialog controls.- Master It
Explain the process of generating a simple printout. How will you handle multiple report pages?
- Master It
Assuming that you have displayed the Page Setup dialog box control to the user, how will you draw a rectangle that delimits the printing area on the page, taking into consideration the user-specified margins?