
Developing web applications in Visual Studio 2010 is similar to developing traditional desktop applications. You drag and drop controls onto a form and build your business logic with your language of choice — in our case, Visual Basic 2010. However, as you will see, there are also many differences. There are underlying technologies of which you, the developer, should have a solid understanding, and there are additional control sets to work with and some fundamental differences in the way the standard controls behave. Another important difference between web and desktop applications is the way the application state is managed. In desktop applications, the application state is implicit and it is managed by the .NET runtime environment. In web applications, on the other hand, the situation is much more complex. A web server can attend to numerous clients simultaneously, but thanks to ASP .NET internal mechanisms, you program your application as if you have only one user to serve. Another issue is the stateless nature of the underlying communication (HTTP) protocol. There is nothing to link two HTTP requests. In ADO .NET, the link is provided in the form of a connection object. While all of the state-related issues are resolved by ASP .NET technology, it is important to understand the underlying mechanisms because of the numerous implications for application characteristics, like performance and security.
In this chapter, you will learn how to do the following:
Create a basic XHTML/HTML page
Format a page with CSS
Set up a master page for your website
Use some of the ASP.NET intrinsic objects
In the early days of web development (not all that long ago!), a developer could earn big money creating what were essentially online brochures by using a basic knowledge of Hypertext Markup Language (HTML) and some simple design skills.
These days, we expect a great deal from websites and web applications. Entertainment sites are now fully equipped to engage the visitor with rich user interfaces incorporating a wide range of visual and aural experiences. Members of the corporate world expect their virtual presence to mirror their full range of business practices.
In addition, web development, although still seen as a specialized area, is now part of the corporate mainstream, and the developer is expected to be well versed across a range of technologies and techniques.
The modern web application combines a wide range of sophisticated technologies grafted onto the HTTP/HTML backbone. Cascading Style Sheets (CSS) are used to control the layout and appearance of a website. Data is managed with the use of Extensible Markup Language (XML) and back-end databases such as SQL Server, while rich user interfaces are developed using XML, JavaScript, and other technologies such as Adobe Flash. AJAX, a clever implementation of existing technologies, combines XML, JavaScript, and asynchronous technologies to enable the developer to create online applications that exhibit traditional desktop behavior. XML web services, multimedia content, RSS feeds, and the use of microformats to assist data aggregators have all become typical features of modern websites.
In addition, developers can now expect a website to be accessed by more than just a desktop computer. Mobile phones, PDAs, and other small form factor devices are all used to access the Web in the twenty-first century. Websites, to be truly ubiquitous, are increasingly expected to be able to dynamically render their content into an appropriate format.
Visual Studio 2010 provides a range of tools that enable the modern developer to meet the demands of website creation from the comfort of a Visual Basic environment. Database connectivity is simplified from the traditional complexity of hand-coding scripted server-side pages, and you don't need to build multiple versions of an individual site to dynamically render to suit a wide range of devices. By compiling much of the code used to drive a site, you can avoid many of the security issues that plagued scripted sites.
Typically, a modern website or web application relies on code that is executed both at the client (web browser) and server (web server) ends. In addition, there may be a whole range of other services provided by other servers on the hosting network, such as media or databases and even services sourced from other websites. Visual Studio 2010 provides the tools to tie all this together.
This chapter gives an overview of the core technologies that drive the modern web application and demonstrates the basic tools available to the developer in Visual Studio 2010.
I will begin with some basic concepts. If you are already familiar with HTML, JavaScript, and server technologies, you may wish to skip ahead to material that is new to you, such as the material in the section "Creating a Web Application."
HTML is essentially a language to describe text formatting and enable linking of documents (web pages) delivered over the Web. HTML has grown since its original inception but is still fundamentally limited. The area where it does excel is in its ability to act as a framework in which other technologies such as JavaScript can be embedded.
Extensible HTML (XHTML) is the latest incarnation of HTML. It was developed by the World Wide Web Consortium (W3C) to bring HTML syntax into line with other markup languages such as XML. Most of the tags from HTML 4 (the most recent update to HTML) remained the same, but much stricter syntax rules apply. The basic changes are as follows:
XHTML is case sensitive, and all tags are in lowercase.
All tags must be closed. You can no longer get away with using multiple
<p>tags without corresponding closing</p>tags. This includes tags such as<img>that previously had no corresponding closing tag. Close these tags with a trailing backslash before the final angle bracket, as shown in this example:<img src ='my_picture.jpg' alt ='picture' >
All tag attributes must be enclosed in quotation marks (either single or double).
All pages must include an XHTML
!DOCTYPEdefinition and an XML version declaration.JavaScript must also conform to case syntax — for example,
onmouseovernotonMouseOver.
The W3C encourages developers to use XHTML over HTML. However, for practical purposes, web browsers still support HTML, and you can get away with not updating older sites and continuing to work with HTML's lack of strict syntax. See the sidebar "Upgrading from HTML to XHTML" if you wish to upgrade older sites.
Converters exist for porting your HTML sites to XHTML. There are also tools to assist in the process manually. The W3C provides an online validator at http://validator.w3.org.
You can use the validator to initially ensure that your pages conform to the HTML 4 specification and that they all contain a !DOCTYPE definition such as the following:
<!DOCTYPE HTML PUBLIC "-//W3C//DTD HTML 4.01//EN"
"http://www.w3.org/TR/html4/strict.dtd">
After your pages are validated for HTML 4, you will need to add the XML declaration to the top of each page:
<?xml version="1.0" encoding="iso-8859-1"?>
Then convert the !DOCTYPE definition to the XHTML version:
<!DOCTYPE html PUBLIC "-//W3C//DTD XHTML 1.0 Transitional//EN"
"http://www.w3.org/TR/xhtml1/DTD/xhtml1-transitional.dtd">
Finally, modify the <HTML> tag to read as follows:
<HTML xmlns="http://www.w3.org/1999/xhtml">
Now that you have made all the correct syntax changes, run the validator again and see how your page performs.
As a Visual Studio programmer, you will find that knowledge of HTML and XHTML can prove invaluable when you are sorting out the inevitable formatting and design issues that arise when developing complex web applications. In addition, understanding the technologies involved can aid in optimizing the interactions between server and client.
To keep things simple, I will dispense with some of the finer points of XHTML and focus mainly on "straight" HTML. This section is meant as a basic HTML primer (and is by no means comprehensive), so feel free to skip ahead if you are already familiar with the language.
More information on HTML can be found easily on the Web or in Mastering Integrated HTML and CSS by Virginia DeBolt (Sybex, 2007). Useful websites for tutorials include www.w3schools.com and www.htmlcodetutorial.com.
You can use any standard text editor to author your HTML. Notepad is fine. More sophisticated tools that indent and highlight code, such as Notepad2 or EditPad Pro, are available on the Web. EditPad Pro is a commercial application available from www.editpadpro.com. Notepad2 is freeware and available from www.flos-freeware.ch/notepad2.html. Yet another fairly mature tool is NotePad++, available from http://notepad-plus.sourceforge.net.
Remember to save your files with an .html filename extension so they will be recognized as HTML pages.
HTML pages have two main sections nested between the opening and closing <html>...</html> tags.
The first section is known as the header area, and it is used to contain information not usually displayed on the page. (The main exception to this is the page title.) The header area is created by using the <head>...</head> tags and contains meta-information about the page such as the !DOCTYPE definition, author details, keywords, and the like. It is also used to hold style sheet information and scripts that may be called later in the page.
The second section of the page is the body, and it contains information that is typically displayed on the page in a web browser. The body is declared by using the <body>...</body> tags.
HTML tags are used to describe the formatting or nature of the information contained within the opening and closing tags. Tags may also contain attributes, which are used to apply further information to the content between the opening and closing tags. For example, the body tag can use the attribute bgcolor to set the background color of the web page. The syntax for setting a page color to blue is <body bgcolor ="blue">.
A basic page may appear as shown in Listing 20.1. Some long lines are wrapped here in print, but you can leave them all on one line in your code.
Example 20.1. A basic HTML page
<!DOCTYPE HTML PUBLIC "-//W3C//DTD HTML 4.01//EN" _
"http://www.w3.org/TR/html4/strict.dtd">
<html>
   <head>
      <title>Basic Page</title>
      <meta name="description" content="basic page" />
   </head>
<body bgcolor="cornsilk">
<p>Hello World</p>
</body>
</html>Save the page as index.html. You must include the .html as the filename extension. Figure 20.1 illustrates how such a page might appear in a web browser.
The <title> tag enables the title of the page to appear in the title bar of Internet Explorer. The <meta> tag provides a description phrase that can be accessed by search engines. The bgcolor attribute of the <body> tag sets the background color to blue, and the <p> tag is used to denote a simple block of text.
Note that I have used the !DOCTYPE definition for HTML 4. Also note that not closing the <title> tag correctly can cause the rest of the page to break.
There are a range of text management tags, including the previously mentioned <p> tag. The principal tags are as follows:
The heading tags — <
h1>...</h1>, <h2>...</h2>through to<h6>...</h6>— are used to control the size of text.<h1>is the largest format.The font tag,
<font>...</font>, has a number of attributes includingfacefor font type,colorfor text color, andsizefor font size. Font sizes range from 1 to 7, where 7 is the largest. An example of the tag's usage is<font face ="verdana" color ="red" size ="3">Hello World</font>.The small and big tags —
<small>...</small>, <big>...</big>— can be used to quickly adjust the relative size of text.
Styles can be managed with tags such as the following:
Another useful tag for working with text is the line break tag, <br>. In HTML, this tag does not require a closing tag.
You can generate and control spaces between text with more precision than simply relying on the client browser to insert your preferred amount of white space by using the following special character: .
A number of other special characters exist to accommodate symbols such as quotes, question marks, and copyright symbols. A comprehensive list of HTML tags and their attributes can be found at www.w3schools.com/tags/default.asp. You can also refer to the W3C specification for HTML 4.01 at www.w3.org/TR/html401/. The XHTML 1.1 specification can be found at www.w3.org/TR/2007/CR-xhtml-basic-20070713/.
The <hr> tag can be used to draw a line across the page. Its attributes include align, noshade, size, and width. Width can be declared as a percentage or as an exact amount in pixels. In HTML 4, there is no closing tag.
You can add images to web pages by using the <img> tag. This tag is not typically closed under HTML 4. This tag includes the following attributes:
The path to the image,
src, which can be relative or absolute (required).A text alternative to the image,
alt, which is normally recommended for accessibility.alignis used to align an image on a page and to wrap text around the image.borderis used to create a border around the image.widthandheightare used to help the page load more quickly and can also be used to scale an image.usemapis used to create image maps.
Here is an example of a typical use of the <img> tag:
<img src='images/myimage.jpg' border='0' width='150' _
height='150' align='left' alt='Test Image'>
For use in web pages, images must be in one of the following formats: GIF, PNG, or JPG. You usually use the GIF or PNG formats for drawings or line art and the JPG format for photographs.
Links can be created on web pages that link to other web pages within the site, other websites, other types of documents, email, or other locations within the host page. Links are created by using the <a>...</a> tag.
Typically, the <a> tag is used with the href attribute to define the destination of the link, as in the following example:
<a href='http://www.microsoft.com'>Microsoft</a>
The text contained between the tags (Microsoft) is what appears as the link on the page. The text can be formatted by using the <font> tag inside the <a> tags.
Other attributes commonly used include target (used inside framesets) and name (used for setting up in-page links such as tables of contents).
Media objects such as Windows Media Player, Apple's QuickTime, and Flash can be embedded in a page with the <embed> tag. At its very simplest, the tag can be made to work by simply specifying the source file for the media and the display size and then trusting the browser to have the required plug-in and to be able to sort it out:
<embed src='multimedia/myvideo.avi' height='200' width='200'></embed>
At a more sophisticated level, you can specify a range of options, including the type of plug-in, the controls to display, whether it should start automatically, and loop properties.
To insert comments into your HTML, use <!-- ... -->, as in the following example:
<!-- This is a comment -->
Comments enclosed in this tag are not displayed within the web page.
The <script>...</script> tag can be used to insert non-HTML script code such as JavaScript into your pages. Scripts can be written into the header area and called from the body or used directly in the body of the page. Before support for more-recent HTML versions and before JavaScript could be found in virtually every web browser, developers would typically comment out the code by using <!-- ... --> to prevent the code from appearing in the browser page. This is still common practice, although it is no longer usually necessary.
Here is a simple example of the script tag's usage:
<script language='javascript'>
   function mygreatscript(){
      etc etc
   }
</script>Bulleted and numbered lists can be displayed in a web page with the list tags <ul>...</ul> for a bulleted list or <ol>...</ol> for a numbered list. Individual items within the list are denoted by using the <li>...</li> tags. The following example creates a bulleted list:
<ul>
   <li>Item 1</li>
   <li>Item 2</li>
</ul>
Tables are used extensively in HTML, not only to display data but also to reassemble sliced images (a technique for minimizing the file size of large images) and to format pages. However, the W3C no longer recommends using tables to format pages. For accessibility reasons, technologies such as CSS are now the recommended method for creating sophisticated layouts.
Tables are still used for displaying tabular data and here is what you should know about constructing them. Tables are made of rows of cells. When constructing your table, you need to consider the desired width of the table, the number of rows, and the number of columns required. Other factors that you may wish to take into account are the padding between cells and the padding between the border of a cell and its contents.
Another important consideration is that a badly constructed table is one of the few things that can truly break an HTML page. You must ensure that all your tags are correctly closed. Tables can be nested within one another, but excessive nesting can place undue strain on the rendering engine of the browser and cause unexpected results.
A range of tags are used to create a typical table, and each has its own family of attributes:
The
<table>...</table>tag acts as the major framework for the table.<tr>...</tr>tags are used to create rows.Within a given row,
<td>...</td>tags are used to create the individual cells. The number of cells defined in the first row sets the number of columns in the table. This is important to consider in subsequent rows if you wish to add or subtract from the number of cells. Therowspanandcolspanattributes are used to alter the number of columns and rows employed at various points in the table. For example,colspan = '2'will force a cell to span over two columns.For headings, you can use
<th>...</th>tags to create cells in the first row. These offer a slightly different format than the<td>cells offer.
The following code snippet demonstrates a simple data table of three rows (one header) and three columns. The resulting table is shown in Figure 20.2.
<table width='400' border='1'>
   <tr bgcolor='silver'>
      <th width='100'>ID</th>
      <th width='200'>Name</th>
      <th width='100'>Age</th>
   </tr>
   <tr align='center'>
      <td valign='middle'>1</td>
      <td valign='middle'>Fred</td>
      <td valign='middle'>23</td>
   </tr>
   <tr align='center'>
      <td valign='middle' bgcolor='lightblue'>2</td>
      <td valign='middle' bgcolor='lightblue'>Mary</td>
      <td valign='middle' bgcolor='lightblue'>21</td>
   </tr>
   <tr align='center'>
<td valign='middle'>3</td>
<td valign='middle'>Wilma</td>
<td valign='middle'>25</td>
</tr>
</table>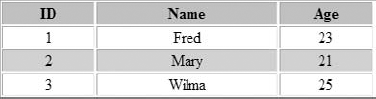
The following code snippet illustrates how a table might be used to reconstruct a sliced image. Note the use of the align attribute to set horizontal alignment and the valign attribute to set vertical alignment:
<table width='400' border='0' cellspacing='0' cellpadding='0'>
<tr>
<td valign='bottom' align='right'><img src='image1.gif'></td>
<td valign='bottom' align='left'><img src='image2.gif'></td>
</tr>
<tr>
<td valign='top' align='right'><img src='image3.gif'></td>
<td valign='top' align='left'><img src='image4.gif'></td>
</tr>
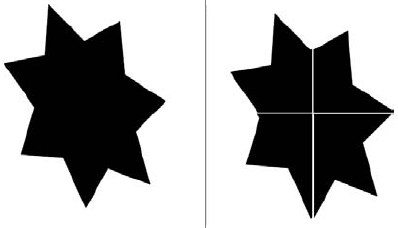
</table>Figure 20.3 illustrates how this image will appear in a web page (the left-hand image) and how the table cells come together to reassemble the image (the right-hand image). Cellspacing and cellpadding was increased when creating the right-hand image to make the individual parts of the image visible.
Various methods can be used to format pages in HTML. They all have inherent limitations, but the <div> tag offers the most flexibility. Table 20.1 describes the methods.
Table 20.1. HTML methods for formatting pages
Description | |
|---|---|
Flow format | This relies on the browser to format the page according to the order of items in the HTML. Flow format is easy to implement but of limited usefulness. |
A table | This is one of the more popular methods, although it is no longer officially recommended by the W3C for accessibility reasons. |
Frames | These effectively create the different parts of your page in separate HTML documents. You would use a frameset to reassemble them as a single page in the browser. |
These create a floating frame that can be placed within an HTML page. This is a popular method of displaying content from another website (such as a news feed) within your web page. | |
| These can be used to precisely locate content on your page. Combined with CSS, |
Later, when you look at Cascading Style Sheets, you will see how <div> tags can be used to lay out a page.
Forms are the traditional method by which users can communicate information back to the web server that is hosting the website being viewed. Information sent back by a form can then be processed in some way at the server, and the outcome can be dynamically incorporated into a new page that the user can view.
For example, a login page would likely use a form to collect the username and password from the user and return this information to the server for authentication before access to the rest of the site is granted. In addition, personal preferences for the site can be applied to the returned pages according to the stored preferences of the registered user.
A form is created by using the <form>...</form> tags. The following attributes are the ones most commonly used:
NameThe
Name attribute defines a unique name for the form.ActionThe
Actionattribute specifies the Uniform Resource Locator (URL), or Internet address, of the resource to process the form's response (required).MethodEither
postorget(default) will be specified by theMethodattribute. This specifies the HTTP method used to return the form's data. Thegetmethod sends the data as part of the URL (limited to a maximum of 100 ASCII characters), andpostsends the form's content in the body of the request.
Within the form, you create your HTML as usual. However, information that you wish to be processed by the form needs to be collected by using form controls. The controls that are available include the following:
- Buttons
Your form must have at least one button for submitting data. Another button that is commonly used clears the form's contents. Syntax for the buttons are as follows:
<input type='submit' value='Submit data'>
<input type='reset' value='Reset form'>
It is not necessary to include the
valueattribute because this sets the text that will appear in the button, and there are default text values of Submit and Reset.You can use the following to create other buttons on your forms to run client-side scripts:
<input type='button' value='Mybutton' onclick='myscript'>
A more flexible control, however, is the
<button>tag. This can be used anywhere on the HTML page to run scripts and can replace the traditional Submit and Reset buttons in your forms. It offers greater flexibility for formatting its appearance (especially when used with CSS). Its basic syntax is as follows:<button type='button' name='name' onclick='myscript'>Click Here</button>
By using an image tag in place of Click Here, you can set an image to be the button. Syntax for using the button as a submit button is simply the following:
<button type=submit' >Submit</button>
- Text
The Text control enables the user to enter a single line of text. This can be set as a password field to mask the user's entry. The syntax is as follows:
<input type='text' name='identity of input data'
value='data to be initially displayed in field'>
The
nameattribute specifies the identity of the data to be processed at the server end (for example, the username). Thevalueattribute displays text that you may wish to appear initially in the field (for example, Type user name here). You can also set other attributes such assizeandmaxlength. To create a password field, set thetypeattribute topassword.- TextArea
For larger amounts of text, use the
<textarea>tag. Its syntax is as follows:<textarea name='details' rows='10' cols='40' > Type your details here </textarea>Note that this control requires a closing tag.
- Lists
To create lists, use the
<select>tag. Lists can be either single select or multiple select, which is created by using themultipleattribute (simply typingmultiple). Thesizeattribute specifies the number of rows to display. Omitting thesizeattribute renders the control as a drop-down combo box. The contents of thevalueattribute are returned to the server. Individual items are denoted by using the<option>tags. When you typeselectedwithin one of the option tags, that item is automatically highlighted in the list. The syntax for the tag is as follows:<select name='items' size='4' multiple> <option value='1' selected>Chair</option> <option value='2'>Couch</option> <option value='3'>Arm Chair</option> <option value='4'>Lounge Chair</option> </select>
- Check boxes
To create a check box, you use a variation on the
<input>tag and set thetypeattribute to'checkbox'. To initially select a check box, type the attributechecked. The syntax is<input type = 'checkbox' name = 'Check1' checked>.- Radio buttons
These are yet another variation on the
<input>tag. Set thetypeattribute to'radio'. If you are using a set of linked radio buttons, type the samenameattribute for each radio button in the set. Thevalueattribute is used to return appropriate data when the radio button is selected. Here is the syntax:<input type='radio' name='radioset' value='1' checked> <input type='radio' name='radioset' value='2'> <input type='radio' name='radioset' value='3'>
- Hidden fields
Hidden fields contain information that you may want to make the round-trip to the server but that you do not want displayed on the client's web page. You can use this field to help maintain state (discussed later in this chapter in the section "Maintaining State"). This field is particularly useful when a client has disabled cookies or when the information is too long or sensitive to incorporate into the URL. For example, you may wish to maintain information gathered in previous forms from the client. ASP.NET uses hidden fields extensively. Here is the syntax:
<input type='hidden' name='name of information'
value='information to be stored'>
Cascading Style Sheets offer a powerful method of controlling the format and layout of the pages and content of your websites. Styles can be written directly into your HTML pages or created in a separate text document with the .css filename extension. The advantage to the developer of using separate CSS pages is that the format and layout of an entire site can be controlled from a single page. In large sites, consisting of tens or even hundreds of pages, this can be a huge time-saver as well as introducing a much higher level of consistency and reliability.
In addition, styles are applied sequentially and can override previously set styles. This enables the web developer to create specific styles for specific sections of the site that may modify the global settings. You can create and apply multiple style sheets in this manner and even write individual style settings onto individual pages if necessary. Styles can also be applied directly to individual elements within a page. As long as the desired settings are the last to be applied, the page will appear as required.
Syntax for CSS is quite different from syntax for HTML and is quite strict. You can apply styles directly to HTML tags (for example, you may wish to format the <h1> tag with a particular font and color) or set them up in their own classes that can be applied when required. For example, you may wish to create your own <h8> class.
You can include an external style sheet in an HTML page by using the <link> tag, which is typically placed in the head area of the web page. The following example incorporates a style sheet titled mystylesheet.css from the styles directory into the web page:
<link rel='stylesheet' type='text/css' href='styles/mystylesheet.css'>
You can create an internal style sheet directly in the HTML page by using the <style>...</style> tags. Again, this is typically created in the header area of the document.
If you wish to create a style locally to a particular tag, you add the style attributes inside the tag. For example, to extend the style of the <p> tag, you would use the following:
<p style='font-size:18pt; color:red;'>
Listing 20.2 illustrates a sample style sheet. It demonstrates several simple style attributes that can be applied to text. You can use the styles directly in a web page by inserting the listing between <style>...</style> tags or you can use it externally by saving the listing out to a separate text document with a .css filename extension (for example, mystylesheet.css). Some long lines are wrapped here in print, but you can leave them all on one line in your code.
Example 20.2. A sample style sheet
h1 {font-weight: bold; font-size: 24pt; color:red;
background: silver; text-align: center;}
p {font-family: arial, sans serif; font-size: 120%;}
p.quote {font-face:verdana; font-size: 10pt; font-style: italic;}
a {text-decoration:none; color:blue;}
a:visited {text-decoration:none; color:blue;}
a:hover {text-decoration:none; font-weight: bold;
font-size: 120%; color:darkblue;}
a:active {text-decoration:none; color:blue;}
If you were to use Listing 20.2 as an external style sheet, you could link it to your web page by inserting <link rel = 'stylesheet' type = 'text/css' href = 'mystylesheet.css'> somewhere in the header area of your web page. This also assumes that the style sheet is sitting in the same directory as your web page.
In Listing 20.2, note the following points:
The creation of a separate quote class for use with the
<p>tag. To employ this class in your HTML, simply use<p class = 'quote'>...</p>.By setting styles for the various permutations of the
<a>tag, I have also created a simple rollover effect for use with links. (The order in which these are applied is important for the rollover effect to work.)
Rollovers can be created by using other methods, such as JavaScript, but CSS offers a simple way of globally controlling the effect. You can also create quite sophisticated-looking buttons around your links by using the formatting and style properties of CSS.
CSS also can be used to define page formatting and layout for an HTML document. CSS is typically used to define and control <div> tags for this purpose, although you can also use it to set and control table properties.
Listing 20.3 demonstrates a CSS style sheet used to control basic formatting. Most of the items should be self-explanatory. (I have used named colors for the background colors for the purpose of clarity. Usually it is preferable to use the hexadecimal equivalents.)
Example 20.3. Style sheet to control page layout
title{
 height:80px;
 background:lightblue;
 margin:5px 10px 10px 10px;
 text-align: center;
 }

menu{
 position: absolute;
 top: 110px;
 left: 20px;
 width: 130px;
 background: silver;
 padding: 10px;
 bottom: 20px;
 }

content{
 background: lightblue;
 padding: 30px;
 position: absolute;
 top: 110px;
 bottom: 20px;
 left: 180px;
 right: 20px
 }
I have created three classes — title, menu, and content — to describe the three main areas of my page. The size of the area can be defined as well as its precise location. In the case of the title class, I haven't specified an exact location, and the title area will appear relative to where it is written into the code. Other properties of the areas can also be defined, such as padding (distance between the area's border and its internal elements) and background color. We use the margin property to set the width of the title area by defining how far it is located from adjacent elements and the page border.
Using the margin property in this context can be a little confusing. If four values are listed, they refer to top, right, bottom, and left, respectively. However, listing just one value will apply it to all four borders. Listing two values will apply them to the top/bottom and right/left in combination. If there are three values listed, the missing values are taken from the opposite side. It is sometimes easier to refer specifically to the margin-right, margin-top (and so on) properties.
You can either embed Listing 20.3 into an HTML page or access it by using an external style sheet. Listing 20.4 demonstrates the code embedded into an HTML page and utilized to set the layout of the page.
Example 20.4. Using a style sheet to set the layout of a web page
<!DOCTYPE HTML PUBLIC "-//W3C//DTD HTML 4.01//EN"
"http://www.w3.org/TR/html4/strict.dtd">
<html>
<head>
<title>Layout Page</title>

<style>

title{
 height:80px;
 background:lightblue;
 margin:5px 10px 10px 10px;
 text-align: center;
 }

menu{
 position: absolute;
 top: 110px;
 left: 20px;
 width: 130px;
 background: silver;
 padding: 10px;
 bottom: 20px;
 }

content{
 background: lightblue;
 padding: 30px;
 position: absolute;
 top: 110px;
bottom: 20px;
left: 180px;
right: 20px
}
</style>
</head>
<body>
<div class='title'>
<h1>Heading</h1>
</div>
<div class='menu'>
<p>Menu Item 1</p>
<p>Menu Item 2</p>
</div>
<div class='content'>
<p>Some Content</p>
</div>
</body>
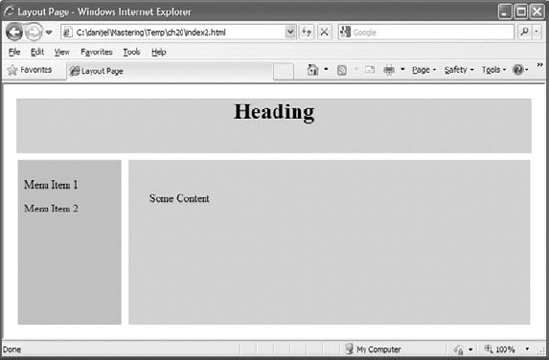
</html>Figure 20.4 illustrates how the layout from Listing 20.4 appears in a web page. Carefully look at the code and you will see how the individual layout classes are used inside the <div> tags to generate the layout structure of the page.
This is a very brief overview of CSS. For more-comprehensive coverage, please refer to Mastering Integrated HTML and CSS by Virginia DeBolt (published by Sybex and mentioned earlier). There are also many online tutorials available, such as those available at www.w3schools.com/css/.
You can embed JavaScript into your HTML pages to create interactive and dynamic elements at the client end. JavaScript can be used to create named functions inside the script tags that can be called later in the page. You can also use JavaScript attached directly to HTML elements.
Currently, 18 events specified in HTML 4 and XHTML 1 can be used as triggers to run individual scripts. Table 20.2 lists these events.
Table 20.2. Events available for use in HTML
Event | Description |
|---|---|
Not Valid in Base, BDO, BR, Frame, Frameset, Head, HTML, iFrame, Meta, Param, Script, Style, and Title Elements | |
| When a keyboard key is pressed |
| When a keyboard key is pressed and released |
| When a keyboard key is released |
Mouse Events () | Not Valid in Base, BDO, BR, Frame, Frameset, Head, HTML, iFrame, Meta, Param, Script, Style, and Title Elements |
| When an object is clicked with the mouse |
| When an object is double-clicked with the mouse |
| When the mouse is clicked on an object |
| When the mouse is moved |
| When the mouse is moved over an object |
| When the mouse is moved away from an object |
| When the mouse button is released |
Form Element Events | Valid Only in Forms |
| When the content of the field changes |
| When the submit button is clicked to submit the form |
| When the reset button is clicked to reset the form |
| When some content of the field is selected |
| When an object loses focus |
| When an object gains focus as the user selects the object |
Valid Only in Body and Frameset Elements | |
| When the page is loaded |
| When the page is unloaded |
The following code snippet gives an example of using JavaScript to create a rollover effect on a link:
<a href="newpage.html" >
<font color='blue' face="verdana" onmouseover="this.style.color ='lightblue';"
onmouseout="this.style.color ='blue';" size=1>New Page</font></a>
This script sets the link color to blue. Rolling the mouse over the link changes it to a light blue. Moving the mouse off the link resets it to the normal blue.
Listing 20.5 demonstrates how a JavaScript function can be embedded into a web page and then called from a button press. In this example, clicking the Test button will set the background color of the web page to blue. Note that the use of bgColor in the JavaScript function is case sensitive. Some long lines are wrapped here in print, but you can leave them all on one line in your code.
Example 20.5. Demonstration of a JavaScript function
<!DOCTYPE HTML PUBLIC "-//W3C//DTD HTML 4.01//EN"
"http://www.w3.org/TR/html4/strict.dtd
<html>
<head>
<title>Javascript example</title>
<script language='javascript'>
   function changecolor(){
      document.bgColor='blue'
   }
</script>
</head>

<body>
<button type='button' onclick='changecolor()'>Test</button>
</body>
</html>
We have only touched on the possibilities of JavaScript in these examples. Please refer to JavaScript Bible, Sixth Edition, by Danny Goodman and Michael Morrison (Wiley, 2007) for more-thorough coverage. There are many online tutorials also available. A good starting point is at www.w3schools.com/js/.
Asynchronous JavaScript and XML (AJAX) enables the web developer to create online applications that behave more like standard desktop apps in that the entire page need not be refreshed every time there is a round-trip between the browser and the web server. This eliminates the "flicker" users see when a page is refreshed/reloaded. The asynchronous nature of the technology enables you to make an HTTP request to the server and continue to process data while waiting for the response. Data transfers are handled by using the XMLHTTPRequest object. This combines with the Document Object Model (DOM), which combines with JavaScript to dynamically update page elements without the need for a browser refresh.
A detailed exploration of AJAX is beyond the scope of this book. For our purposes, it is important to note that AJAX has been incorporated into ASP.NET 4.0 and can be leveraged into your web applications from Visual Studio 2010.
An online AJAX tutorial is available from www.w3schools.com/ajax/default.asp.
You can use microformats to list data on your website so that it can be accessed by various data-aggregation tools. Microformats are really just specifications for formatting data such as address book details or calendar information. Thousands of microformats exist. The Microformats.org website (http://microformats.org) is a good starting point for the various specifications.
The hCard is an example of how microformats work. The hCard specification is modeled on the vCard specification, which is widely used for address books. You can use the hCard creator on the Microformats website to automatically generate the code for use on your own site. You can also roll your own according to the specification. The advantage of listing your address details in the hCard format is that anyone visiting your site can automatically add your details to their own address book according to the vCard specification.
Thus far, you have looked mainly at the technologies that drive the client side of a web-based application. This is only half of the equation. The website itself is normally hosted on some form of server platform and managed with a web server package. On a Microsoft platform, the web server is typically Microsoft's Internet Information Services (IIS). Requests from the client are processed by the web server and appropriate web pages are supplied. The server can also be used to process information supplied by the client as part of the request to provide a more interactive experience.
Although the range of technologies available at the client end is fairly limited, the server-side applications can be written in any language or form supported by the web server. In the case of IIS running an ASP.NET application, the application may be written in any of the .NET-supported languages.
Prior to ASP.NET, developers working in the Microsoft platform created web applications mainly using Active Server Pages (ASP). Pages written in ASP are scripted pages that combine a variety of technologies including HTML, JavaScript, server objects, Structured Query Language (SQL), and Visual Basic Script (VBScript). They are created as plain-text files and saved with the .asp filename extension. ASP is powerful and flexible, but maintaining large sites can be time consuming, and achieving and maintaining a decent level of security can be problematic.
With the introduction of ASP.NET, Microsoft gave developers a much tidier approach to creating their web applications. You can use Visual Studio to create your applications, and superficially at least, the process of building the application is not terribly different from building standard Windows applications. Much of the plumbing for connecting to back-end databases or sophisticated objects (which in ASP you would have to lovingly handcraft) is now taken care of. You also have the option to write much of the code into code-behind, where it can be safely compiled away from prying eyes and offer the performance enhancements integral to a compiled environment. A code-behind is a code file like the kind normally used to develop desktop applications. Code written into the code-behind is compiled into a library that is kept physically distinct from the scripted pages of the web application. At the scripted end of ASP.NET, files are plain text and saved with the .aspx filename extension.
However, there are differences between the desktop and web development environments, and to really take advantage of .NET and fully optimize your web applications, you need to be aware of the differences and how they can be accommodated and exploited.
My favorite example of the differences between desktop and web development in Visual Studio is in the use of fragment caching. Fragment caching can be used to cache portions of an ASPX page that are constantly reused (such as headings). This helps create a performance boost over an equivalent page that is completely regenerated each time it is called.
Another area where I have seen developers caught unprepared while making the transition from desktop to web applications is in the use of view state. View state is used to maintain information about the current property state of the various controls on a page. It is stored on the client's web page in a hidden field and thus makes the round-trip to the server. Depending on the application, it can get very big very quickly, and even fairly plain pages can suddenly start taking long periods to download to the client if view state is not managed correctly.
For the remainder of this chapter, I will discuss how to begin creating a web application in Visual Studio 2010 and examine the available web form and HTML controls. Finally, at the end of the chapter, I will put all of these together and guide you through creating a Northwind online orders application.
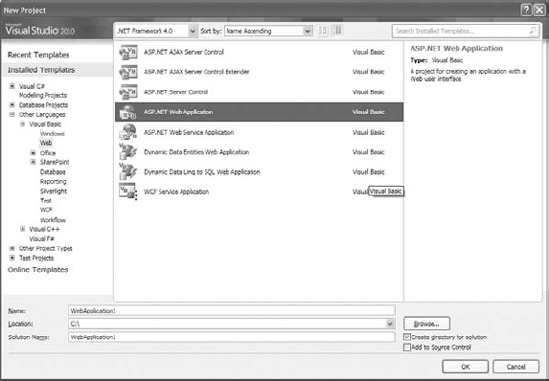
Developers have two project models in Visual Studio 2010. You can use either the ASP.NET Web Application from the New Project dialog box or the New Web Site option from the File menu. It is mainly a matter of preference. In the Web Application option, project resources are defined explicitly, and the developer has tighter control over the project. It tends to suit the VB programmer coming into web programming. The New Web Site option is more flexible and tends to suit the web programmer migrating to Visual Studio.
To create a web application, open Visual Studio and select the New Project option from the File menu. From the New Project dialog box, expand the Visual Basic tree and select the Web option. From this screen, choose ASP.NET Web Application, as shown in Figure 20.5.
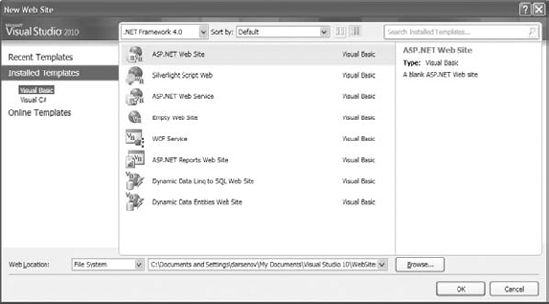
To create a new website project, open Visual Studio and select New Web Site from the File menu. This will open the New Web Site dialog box. From here, choose ASP.NET Web Site, as shown in Figure 20.6.
After the new project is open, the main difference between the interface for building a web application and that used for building a standard Windows application is that the Designer for web applications has three views: Design, Split, and Source. This enables you to alternate between a graphical view of the page and controls, an ASPX view, and a split view showing both.
The contents of the Toolbox also include HTML controls. You use the Standard controls mainly to create interactive applications, while the HTML controls are essentially client-side controls that mimic many of the traditional HTML elements such as tables and horizontal rules.
You can drag and drop controls onto the page in design view and edit properties by using the traditional Properties window, or you can switch to Source or Split view and directly edit the code.
You can actually do most of your coding directly onto the ASPX page in Source view. This includes not only your design elements but also your business logic. However, it makes sense to separate your business logic from your design and use code-behind by hitting F7, by choosing View Code from the Solution Explorer, or by double-clicking the control in question.
When you view your application, it will open in your default browser. You may get a message warning Debugging Not Enabled if you have used F5 or the green arrow. You can choose to either run the project without debugging or enable debugging in the Web.config file. You can either modify Web.config manually or choose to allow Visual Studio to do it for you. However, you will need to remember to disable debugging when you go to deploy your project. To manually modify Web.config, double-click the Web.config entry in Solution Explorer. Web.config should open as a page of code. Under compilation, set debug ="true" as shown in the following code snippet:
<compilation debug="true" strict="false" explicit="true">
The Web.config file is a text file that holds many of the global settings for your website or application. The file is automatically generated when you create a new project and it can be edited manually or through various Visual Studio 2010 wizards. You need to be careful when editing the file because unlike HTML, the XML in the Web.config file is case sensitive. Making a mistake in Web.config can break your whole application.
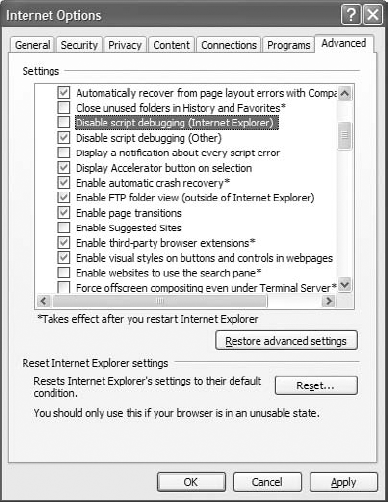
You may also need to enable script debugging in Internet Explorer. From the Tools menu, choose Internet Options and click the Advanced tab. Under Browsing, deselect the Disable Script Debugging check box, as shown in Figure 20.7.
Several sets of controls are available to the developer when creating web applications. These are accessible from the traditional Toolbox and are separated into several categories. These include Standard, Data, Validation, Navigation, Login, WebParts, AJAX Extensions, Reporting, and HTML. Many of these controls exhibit behavior similar to that of their desktop counterparts.
The Standard controls are also known as web form controls and have intrinsic server-side functionality that you can program against. Table 20.3 contains a list of the Standard controls and a brief description of each.
Table 20.3. Standard controls
Table 20.4 lists the controls available for data access, display, and manipulation in ASP.NET.
Validation controls are used to establish rules for validating data entry in web forms. Table 20.5 lists the Validation controls available.
Three controls exist for assisting in the creation of navigation menus in ASP.NET. Table 20.6 lists the Navigation controls available.
Table 20.4. Data controls
Description | |
|---|---|
For connecting to an Access database. | |
DataList | Control for displaying and interacting with data as a list. |
DataPager | Provides paging functionality for controls such as ListView. |
DetailsView | Renders a single record as a table and allows the user to page through multiple records. Used for master-details forms. Provides ability to create, delete, and modify records. |
FormView | Similar to DetailsView without predefined layout. |
GridView | Displays data as a table. |
LinqDataSource | For connecting to a LINQ data source. |
ListView | Displays data as a list and supports create, delete, and update functionality. |
ObjectDataSource | For connecting to a business object as a data source. |
Repeater | For creating customized lists out of any data available to a page. List format is specified by the developer. |
SiteMapDataSource | For use with site navigation. Retrieves navigation information from a site-map provider. |
SqlDataSource | For connecting to a SQL database. |
XmlDataSource | For connecting to an XML data source. |
Table 20.5. Validation controls
ASP.NET includes a membership system that can be used to look after authentication, authorization, and member details on your site. It is enabled by default and can be configured by using the Web Site Administration tool. You access this tool by choosing ASP.NET Configuration from the Website menu. (Note that if you are using the Web Application development environment, ASP.NET Configuration is accessed from the Project menu.)
Figure 20.8 illustrates the Web Site Administration tool. Table 20.7 lists the Login controls available.

WebParts enable users to personalize their view of your website by modifying the content, appearance, and behavior of the web pages from their browsers. Table 20.8 lists the WebParts controls available.
To fully utilize AJAX in your applications, you will also need to download the ASP.NET AJAX Control Toolkit from the ASP.NET Ajax website at http://asp.net/ajax/. Table 20.9 lists the available AJAX Extensions controls that ship in Visual Studio 2010.
Table 20.7. Login controls
Description | |
|---|---|
ChangePassword | Allows users to change their passwords |
CreateUserWizard | Displays a wizard for gathering information from a new user |
Displays an interface for user authentication | |
LoginName | Displays user's login name |
LoginStatus | Displays the logout link for an authenticated user and the login link for a nonauthenticated user |
LoginView | Displays different information for anonymous and authenticated users |
PasswordRecovery | Recovers passwords based on email details entered when account was created |
The reporting control creates data-driven reports in ASP.NET. MicrosoftReportViewer is the tool available for creating and displaying a report.
Table 20.10 lists the HTML controls available. These are not typically exposed to the server for you to program. However, you can convert any HTML control to an HTML server control by adding the attribute runat ="server" to the control in ASPX view. This will allow you to manipulate the HTML control's functionality from the server. If you wish to reference the control within your code, you will need to add an id attribute as well.
An issue for developers when working with web-based applications is that a web server does not intrinsically maintain an ongoing connection with the client and each request (even by the same client viewing the same website) is treated as an entirely separate request. The business of persisting information about the client and what the client is doing from one request to the next is called maintaining state. A set of related requests originating from a client viewing a particular website or using a web application is called the client's session.
As a web developer, you need to consider how you will maintain state for your clients and web applications. You need to come up with a way for the server to remember your client and the client session between requests and for your client to identify itself to the server with each request. The issue is complicated by the fact that there are multiple methods of maintaining state and each comes with its own set of advantages and disadvantages. At the client end, these methods include the following:
- Using cookies
Cookies are small files deposited in the client browser's cache. Many users turn these off or restrict their usage because of security and privacy concerns.
Table 20.8. WebParts controls
Table 20.9. AJAX extensions controls
Control | Description |
|---|---|
ScriptManager | Manages script resources for clients — required for Timer, UpdatePane, and UpdateProgress controls. Use only once on a page. |
ScriptManagerProxy | For use in circumstances where a page already has a ScriptManager control. |
Timer | Performs postbacks at specified interval. |
UpdatePanel | Enables you to asynchronously refresh portions of a page. |
UpdateProgress | Provides progress details on partial page updates. |
Table 20.10. HTML controls
Div |
|
Horizontal Rule |
|
Image |
|
Input (Button) |
|
Input (Reset) |
|
Input (Submit) |
|
Input (Text) |
|
Input (File) |
|
Input (Password) |
|
Input (Checkbox) |
|
Input (Radio) |
|
Input (Hidden) |
|
Select |
|
Table |
|
Textarea |
|
- Using hidden fields in the web page
This method is reliable, but you will need to code specifically at the server to read the content. Hidden fields can also end up carrying a lot of data, can pose a security risk because the information is available in cleartext in the page source code, and can get messy if your client uses unexpected navigation techniques such as the browser's back button rather than your built-in site navigation.
- Incorporating state information into the URL
This method is reliable but restrictive. It also can be a security risk (with data stored in a browser's history, for example) and may cause issues with unexpected navigation techniques.
At the server end, the following methods of maintaining state (after the client has been identified) are typical:
For simple sites, ASP.NET takes care of most of these issues for you by using a combination of techniques. You can use session variables to manage small amounts of data between pages and a database for anything more involved. It is, however, a good idea for you to keep an eye on the ViewState settings of your controls so as to minimize the amount of data making the round-trip from server to client and back again. You can enable/disable ViewState for any individual control by using the EnableViewState property in that control's Properties window.
To create a session variable, simply type Session("MyVariableName") ="variable content". Insert a relevant name and content. Be careful that you do not reuse a variable name for another purpose because the contents of the original variable will be overwritten.
To access the session variable, you refer to the full Session("MyVariableName").
If you are setting up a site that will employ identification of its users, require some form of authentication, and/or offer customization of settings, it is a good idea to use Microsoft's membership system, which is available through the Web Site Administration tool and the Login controls. Refer to the section "Login Controls" earlier in this chapter.
ASP.NET 2 introduced the idea of master pages as a method of maintaining a consistent look and feel for a website or application. This approach has been continued with ASP.NET 4.0.
The idea is to create a page (or a number of pages), known as a master page, from which your web pages derive their common elements. Web pages linked to master pages are known as content pages. It is a little like using CSS style sheets to control your web page styles and structure in a scripted setting.
To add a master page to a site, simply choose the Master Page template from the Add New Item option in the Website (for ASP.NET Web Site) or Project (for ASP.NET Web Application) menu. The master page has the filename extension .master. You can rename the master page appropriately, but do not change the filename extension!
In the master page, you can set up standard items that remain consistent across your site, such as headers, footers, and navigation bars. You can also place ContentPlaceHolder controls in those areas where you are planning on customizing your content pages. The ContentPlaceHolder controls provide editable locations where you can add additional controls and information. You will need to right-click the master controls and choose the Create Custom Content option. In addition, you can create a style sheet to control the appearance of your master page (and hence its attached content pages).
If you make changes to your master pages, these changes will be reflected in your attached content pages. (You will need to save your changes to the master page before the updates are reflected through the content pages.)
A master page is not automatically added to your pages. You must explicitly attach it. For example, to attach it to a new page, choose Web Form from the Add New Item dialog box and select the Select Master Page check box. Click the Add button and this will open another dialog from which you can choose the appropriate master page. Click OK and you are ready to go. You can add content into the ContentPlaceHolder controls inherited from the master page.
If you already have your master page open in the IDE, you can simply use the Add Content Page option from the Website menu to directly create a content page attached to the particular master page you are browsing.
Trying to connect an existing page, such as the default.aspx page initially created in the application, to a master page can be problematic, so it is often a good idea to delete it. To set a new default page for your website, right-click the desired page in Solution Explorer and choose the Set As Start Page option.
Objects are available in ASP.NET that can be used to provide you with information about the state of your application, each user session, HTTP requests, and more. You need to be familiar with some of these because they can be useful in your code. Many of them also expose useful utility methods for managing your web application. For example, you have already seen how you can use the Session object to create a session variable. In this section, you will briefly look at the main objects and some of their methods and properties.
- Application object
The Application object stores information related to the full web application, including variables and objects that exist for the lifetime of the application.
- Context object
The Context object provides access to the entire current context and can be used to share information between pages. This includes the current Request and Response objects.
- Request object
The Request object stores information related to the HTTP request, such as cookies, forms, and server variables. You can use this object to see everything passed back to the server from the client.
The Request object includes the properties shown in Table 20.11. Table 20.12 shows the methods for the Request object.
- Response object
The Response object contains the content sent to the client from your server. You can use the Response object to send data such as cookies to your client. The Response object includes the properties shown in Table 20.13 and the methods shown in Table 20.14.
- Server object
The Server object exposes methods that can be used to handle various server tasks. You can use these methods to create objects, to map paths, and to get error conditions.
The properties for the Server object are shown in Table 20.15, and the methods are in Table 20.16.
- Session object
The Session object stores information related to the user's session, including variables, session ID, and objects. Properties for the Session object are shown in Table 20.17; methods are in Table 20.18.
- Trace object
The Trace object can be used to display system and custom diagnostics in the page output. Properties for the Trace object are shown in Table 20.19 and a single method for the Trace object is shown in Table 20.20.
Table 20.11. Properties for the Request object
Description | |
|---|---|
| Indicates the virtual path of the application |
| Gets or sets information about the client's browser and its capabilities |
| Gets the client's security certificate |
| Gets the cookies sent by the client |
| Gets the virtual path of the request |
| Gets a collection of form variables |
| Indicates whether the request has been authenticated |
| Indicates whether the request originates from a local computer |
| Gets specified object from Cookies, Form, QueryString, or ServerVariables |
| Gets Windows identity for user |
| Gets the collection of HTTP query string variables |
| Gets the collection of web server variables |
| Gets the URL of the request |
| Gets the IP address of the client |
| Gets the DNS name of the client |
| Maps the virtual path in the requested URL to the physical path on the server |
| Saves the request to disk |
Table 20.12. Methods for the Request object
Method | Description |
|---|---|
| Returns the data sent to the server during post in the form of a byte array |
| Used to insert modified entity body into memory |
| Retrieves the coordinates of a form image that is sent to the server as a part of the current request |
| Saves the request to a file |
| Used to call validation feature from code if the validation was disabled by the page directive |
Table 20.13. Properties for the Response object
Description | |
|---|---|
| Gets or sets the value that determines whether to buffer output |
| Returns the response cookies collection |
| Gets or sets HTTP MIME type in output |
| Gets or sets the cache expiration of a page (in minutes) |
| Indicates whether a client is still connected |
Table 20.14. Methods for the Response object
Method | Description |
|---|---|
| Adds a cookie to the collection |
| Adds an HTTP header |
| Adds the session ID to the virtual path if a cookieless session is being used |
| Clears all content output from the buffer |
| Sends all buffered output to the client and stops execution of the page |
| Sends all buffered output to the client |
| Redirects the client to a new URL |
| Updates an existing cookie |
| Writes additional text to the response output |
Table 20.15. Properties for the Server object
Property | Description |
|---|---|
| Returns the server's name |
| Gets and sets time-out value for requests in seconds |
Table 20.16. Methods for the Server object
Description | |
|---|---|
| Commonly used to execute a URL to open another page from within your code |
| Decodes a string that has been encoded to remove illegal HTML characters |
| Encodes a string to display in a browser |
| Gets physical file path of the specified virtual path on the server |
| Encodes a string for transmission through the URL |
| Decodes a string encoded for transmission through a URL |
Table 20.17. Properties for the Session object
Property | Description |
|---|---|
| Returns the number of items in the current session state collection |
| Gets or sets individual session values |
| Gets or sets the locale identifier |
| Gets the identifier for the session |
| Gets or sets the time between requests in minutes before the session terminates |
Table 20.18. Methods for the Session object
Method | Description |
|---|---|
| Terminates the current session |
| Adds a new item to the session state collection |
| Clears all values from the session state collection |
| Removes an item from the session state collection |
| Removes all items from the session state collection |
An important aspect of the way that ASP.NET operates is that controls that run on the server are able to post back to the same page. This process is called postback. This is different from the old ASP model, in which often there would be two or three pages set up to host the controls, process the code, and provide a response.
Any ASP.NET page that has at least one visible control will include the JavaScript function _doPostBack. This function records the control that initiated the postback, plus additional information about the initiating event, and includes it in the data submitted back to the server.
The Postback property is a read-only value that is set to False when a page is first loaded and is then set to True when the page is subsequently submitted and processed. At the server end, you can use the function Page.IsPostBack() to determine the state of a page's postback and write code accordingly — this is particularly useful when deriving your page content from a database.
Now that you have learned about main elements used to construct ASP .NET applications, let's put these to work by building the online order placement application for the Northwind database. The application is based on a typical online shipping cart design. First, the user is presented with a list of products. They can choose a product from the list to add to a shopping cart. After they select the product, they need to decide on a quantity and thus the order item is placed inside the shopping cart. On a shopping cart page, they can choose to proceed to checkout or to return to a list of products to place some additional items into the shopping cart.
To implement this functionality, you will use Typed Dataset technology described in Chapter 18 for data access technology and some standard ASP .NET controls to implement the web GUI.
Let's start by creating a new Web Application Project:
Choose File

Add a new DataSet named Northwind to the project by choosing Project
To place the orders inside the Northwind database, you need to make several tables from the database available to the application. Follow the steps described in "Generating a Typed DataSet" in Chapter 18, "Building Data-Bound Applications," and add the following tables to the Northwind DataSet: Categories, Products, Orders, and Order_Details. Make sure that the Refresh The Data Table option is checked in the Advanced Options window when you're adding the Orders table.
Be sure to build the solution at this point; you can do so by pressing F6 or by invoking the Build command from the main menu: Build
You are now ready to construct the first application web form; it will display the list of products to the user.
To facilitate the product search, the Products form will include the DropDownList control used to display a list of categories. When the user clicks the Search button, Category Id is used to filter the list of products. The filtered list of products is displayed in a GridView control. Perform the following steps to create the Products Web Form:
Add a new web form to the project by choosing Project
Open the form in design view. Add a Label control (from the Toolbox) to the form and set the Text property of Label to Categories.
Add a DropDownList to the web form. Name it ddlCategories. It should initially display the text Unbound in the design view.
Add an ObjectDataSource control, found in the Data section of the Toolbox menu, and set the ID property to
odsCategories. Configure the data source forodsCategoriesby invoking the Configure Data Source Wizard. Select the CategoriesTableAdapter business object in the Configure Data Source window. In the Define Data Methods window, set the method to None on the Update, Insert, and Delete tabs. On the Select tab, leave the default GetData method.Configure the ddlCategories control data source by selectingodsCategories as the data source for the control. Set DataTextField for ddlCategories to CategoryName and DataValueField to CategoryID. The ddlCategories should now display the text Databound in design view.
You can now run the form for the first time; be sure the Products web form window is selected as active in Visual Studio and then press F5. You should see the form with a single drop-down list displaying all product categories.
It is time to prepare the application for displaying the list of products. For this, you need first to prepare the DataSet for a parameterized display of Products data:
Open the Northwind DataSet design window.
Right-click the Products table and select Add
When the TableAdapter Query Configuration Wizard opens, select the Use SQL Statements option and click Next.
In the Choose A Query Type window, choose SELECT, which returns rows, and click Next.
In the Specify A SQL SELECT statement window, click the Query Builder button.
When the Query Builder window opens, check all of the columns for selection.
Add the following filters to the query:
Set the Discontinued column filter to
= 0Set the CategoryId column filter to
= @CategoryIdExecute the query. You will be prompted for an
@CategoryIdparameter value. Enter 1 and click OK. You should see a number of rows returned in the query result table. Click OK and then click Next.In the Choose Methods To Generate window, check the Return A Data Table option and name the method
GetDataByCategoryId. Click Finish. Ignore the warnings that might be issued by Visual Studio.
It is now time to configure the grid view of the product data:
Add an ObjectDataSource control to the form. Name it odsProducts.
Select ProductsTableAdapter in the Configure Data Source window. Click Next.
Select GetDataByCategoryId(Nullable<Int32> CategoryID), Returns ProductsDataTable in the Choose A Method combo box on the Select tab of the Define Data Methods window. If this option is not displayed, click Cancel and rebuild the project so that the changes you made to DataSet in the previous section (where you prepared the Northwind DataSet) are reflected. Choose None as the data method on the Insert, Update, and Delete tabs. Click Next.
In the Define Parameters window, select Control as the parameter source. Select ddlCategories as the ContorlID and enter 1 as the default value. Click Finish.
Now you are ready to add the grid control to the form:
Add a GridView control to the form. Name it gwProducts.
Configure the data source for the GridView control. Select odsProducts from the Choose Data Source combo box.
Configure the data you wish the user to see. Right-click the gwProducts control and invoke the Edit Columns option.
Remove the SupplierID, CategoryID, UnitsOnOrder, ReorderLevel, and Discontinued fields from the list of selected fields.
Set the header text for the selected columns so it represents the column content. The wizard will use the table column names by default. You can add space characters to these names where necessary. For example, you can change ProductName to Product Name.
Click OK.
When the GridView Tasks window opens, check the Enable Paging, Enable Sorting, and Enable Selection options.
Make sure the DataKeyNames property has the values ProductID and ProductName.
You can explore further by setting any of the numerous display and paging options of GridView to your liking. You can now run the application. The products web form should display a grid populated with product data. In the browser, the form should look similar to the HTML page shown in Figure 20.9.
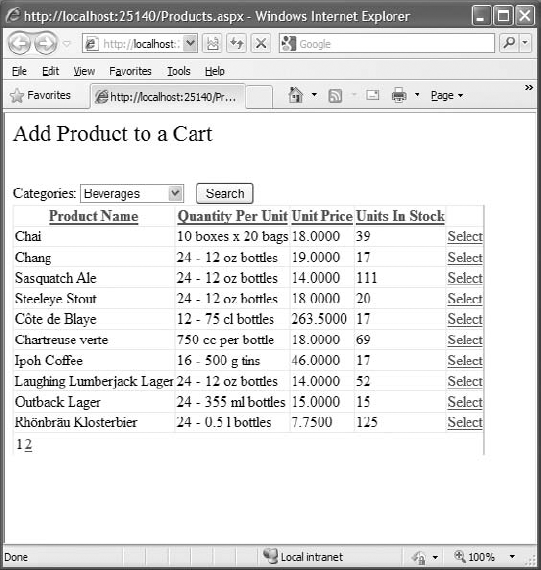
All that is left to do to finish the web form is to make the DropDownList filter the grid data. To that end, add the button to the form and change the button's Text property to Search. Notice that there is no need to implement any event-handling code for the Search button's click event. Even without an event handler, clicking the Search button will result in the web form being posted back to the server with the currently selected value in ddlCategories control. When the page is rendered again, it will show only the products belonging to the currently selected category. You are done with filtering functionality! When the user clicks the button, the new request is issued to the server and ddlCategories SelectedValue is passed to a parameter to odsProducts.
Now you need to handle the product selection. The user should be redirected to a new web form called Quantity.aspx to select the desired quantity for the product. This can be accomplished by writing an event handler for SelectedIndexChanged event of gwProducts. The product ID and product name data for the selected row is made available through GridView's SelectedDataKey property. You can take a look at the SelectedIndexChanged event handler in Listing 20.6.
Example 20.6. Handling of product selection
Protected Sub gwProducts_SelectedIndexChanged(ByVal sender As Object,
                ByVal e As System.EventArgs) Handles
                 gwProducts.SelectedIndexChanged
    Dim quantityUrl = "Quantity.aspx?productId=" &
        gwProducts.DataKeys.
        Item(gwProducts.SelectedIndex).Values("ProductID").ToString &
        "&productName=" &
        gwProducts.DataKeys.
        Item(gwProducts.SelectedIndex).Values("ProductName").ToString
    Response.Redirect(quantityUrl)
End Sub
Retrieving data keys of the selected row in a GridView is a bit involved. You need to use the SelectedIndex value of a GridView as an index for the DataKeys collection. Then you retrieve a value of DataKey by passing the name of the key. The product ID and product name are passed to the Quantity web form through the URL query string using the Redirect method of the Response object. Next let's take care of the Quantity.aspx web form.
On the Quantity.aspx web form, the user needs to decide on the quantity of the product they are ordering. To implement the form, the first thing you need to do is obtain the selected product ID and product name. As you can see in Listing 20.6, this information is passed to Quantity.aspx as a parameter in the query string. This parameter is made available to you through the QueryString property of a Request object, as in this example: Request.QueryString("productId").
The Quantity.aspx web form can be accessed by someone writing the Quantity web form URL directly in the browser in an uncontrolled manner and meddling with the productId parameter in an query string. Therefore, you must first make sure a valid product ID and product name is being passed with the query string. This validation is performed in the ValidateProduct method. If the product ID or name is invalid, the user is redirected back to the Products.aspx web form. Notice that this scenario is used only to handle some inquisitive user (should I say hacker?) who decided to experiment with what should be application internal data. (This is one of the reasons you should favor submitting data with web forms instead of using the query string parameters.) And while you usually want to give an explanation for a redirect to your user, there is no need to give any explanation here; redirecting the browser back to the Products.aspx page is polite enough for a user with such questionable intentions. Take a look at ValidateProductId method in Listing 20.7. This method is called from the web form Page_Load event.
Example 20.7. Query string parameter validation method
Private Sub ValidateProduct()
    If String.IsNullOrEmpty(Request.QueryString("productId")) Then
        Response.Redirect("Products.aspx")
    End If
    If Not IsNumeric(Request.QueryString("productId")) Then
        Response.Redirect("Products.aspx")
    End If
    If String.IsNullOrEmpty(Request.QueryString("productName")) Then
        Response.Redirect("Products.aspx")
    End If
End Sub
You can store the product ID in a web form field and display the product name on the form. Now you can add the necessary controls to the Quantity.aspx web form:
Add a Label named lblProduct to the form.
Add a TextBox named txtQuantity to the web form and set the
Textproperty to 1.Add a button named bttnAdd.
Add a button named bttnCancel.
Add a RangeValidator to the form to validate that the quantity entered by the user is a valid value. Set the
ControlToValidateproperty of the RangeValidator to txtQuantity, theMinimumValueproperty to 0, and theMaximimValueto 10000. Finally, set theErrorMessageproperty to Enter a value between 0 and 10 000.
The Quantity.aspx web form as appears in the browser is shown in Figure 20.10.
Now, you can use the data passed from the Products web form in the Page Load event. You will display the product name to the user in lblProduct and store the product ID in a web form field. You can take a look at the Page Load event handler in Listing 20.8, which shows the complete code listing for the Quantity.aspx web form.
You can implement the Cancel button event handler by redirecting the user back to the Products.aspx web form and displaying a message confirming the cancellation for the user.
Finally, you need to implement the Add button event handler. Since you will need the entered product quantity in the final web form, store this information inside the Session object. As the information on selected products accumulates during user visits to the site, you can use the Dictionary structure to store selected product quantities.
You can use the product ID as the key and the quantity as the value of the productQuantities Dictionary. You can create the productQuantities instance inside the bttnAdd_Click routine if it was not created already. You should always check for the productQuantities instance before creating the new one. Since users can navigate back and forth between forms, you might be erasing some products that were already added to a cart if you were to simply create a new instance. After that, you can add the productQuantities instance to Session collection. This way, the productQuantities instance can be accessed in a cart web form, as shown in Listing 20.9. Take a look at the Add and Cancel button event handler implementations in Listing 20.8.
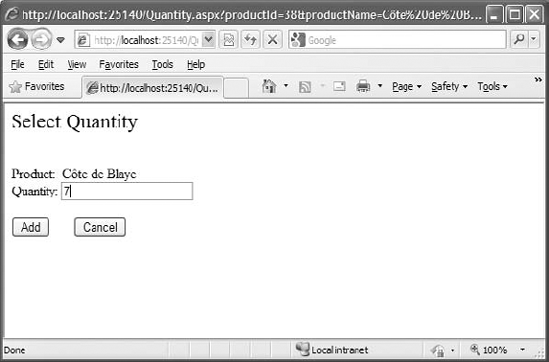
Example 20.8. Quantity.aspx Web Form code-behind
Public Partial Class Quantity
    Inherits System.Web.UI.Page

    Dim productId As Integer

    Protected Sub Page_Load(ByVal sender As Object,
                ByVal e As System.EventArgs) Handles Me.Load
        ValidateProduct()
        lblProduct.Text = Request.QueryString("productName")
        productId = CInt(Request.QueryString("productId"))
    End Sub

    Private Sub ValidateProduct()
        If String.IsNullOrEmpty(Request.QueryString("productId")) Then
            Response.Redirect("Products.aspx")
        End If
        If Not IsNumeric(Request.QueryString("productId")) Then
Response.Redirect("Products.aspx")
End If
If String.IsNullOrEmpty(Request.QueryString("productName")) Then
Response.Redirect("Products.aspx")
End If
End Sub
Protected Sub bttnCancel_Click(ByVal sender As Object,
ByVal e As EventArgs) Handles bttnCancel.Click
Response.Redirect("Products.aspx")
End Sub
Protected Sub bttnAdd_Click(ByVal sender As Object,
ByVal e As EventArgs) Handles bttnAdd.Click
Dim productQuantities As Dictionary(Of Integer, Integer)
productQuantities = Session("productQuantities")
If IsNothing(productQuantities) Then
productQuantities = New Dictionary(Of Integer, Integer)
Session("productQuantities") = productQuantities
End If
Dim quantity As Integer = CInt(txtQuantity.Text)
If quantity = 0 Then
productQuantities.Remove(productId)
Response.Redirect("Cart.aspx")
End If
If productQuantities.ContainsKey(productId) Then
productQuantities.Remove(productId)
End If
productQuantities.Add(productId, quantity)
Response.Redirect("Cart.aspx")
End Sub
End ClassYou are ready to implement the final web form (called Cart.aspx) where the user will be able to review and check out ordered items.
On the final cart web form, the user will be able to review products in the cart, check out and place the order, edit the quantity of the selected product, or go back to initial products web form to add more products to the cart.
Start by placing a GridView control with ID gwCart on the form. The grid will display products added to the cart. It should display the Product Name, Unit Price, Quantity, Online Discount Price, and Product Total columns. As you saw in the quantity web form code in Listing 20.8, selected products' identifiers and quantities are kept in the session variable productQuantities. To obtain the rest of the fields that need to be displayed in the gwCart grid, you will need to consult the database using the ProductID field as the selection criteria.
Matching selected products in the productQuantities Dictionary with products in the Products table in the Northwind DataSet and retrieving the rest of the product fields can be efficiently accomplished using a LINQ statement. Take a look at Listing 20.9. It shows a LINQ expression that matches the product IDs in the productQuantities object with product IDs in the Products table. It selects an anonymous type using a Select New With construct with a number of fields retrieved from the table and a number of calculated fields.
Example 20.9. Cart LINQ expression
queryResult = From p In table
        Where productQuantities.Keys.Contains(p.ProductID)
        Select New With {
         p.ProductID,
         p.ProductName,
         .Quantity = productQuantities.Item(p.ProductID),
         p.UnitPrice,
         .Discount = 0.02,
         .DiscountedUnitPrice = p.UnitPrice * DiscountIndex,
         .ProductTotal = p.UnitPrice * DiscountIndex *
                        productQuantities.Item(p.ProductID),
         .Edit = "Quantity.aspx?productId=" &
         p.ProductID.ToString & "&productName=" & p.ProductName
You'll want to pay special attention to several of the fields. The Discount field is set to a constant value of 0.02 — a standard discount for online orders. The DiscountedUnitPrice field is calculated based on the discount and original unit price. ProductTotal is calculated by multiplying the discounted price by the ordered quantity. Finally, the Edit fields are used to construct the URL that redirects the user to the quantity web form so that the quantity can be changed for any product on the order. This expression is used as a data source for the gwCart grid.
Now, you can add columns to the gwCart GridView control by following the procedure described in "Creating the Products Web Forms" section earlier in this chapter. A few things to bear in mind:
Keep the ProductID field visibility set to False.
When configuring the column used to display the Edit field, use the HyperLinkFiled field type. Name it Change and set the
Textproperty to Change. Most importantly, setDataNavigateUrlFieldstoProductIDandProductNameand setDataNavigateUrlFormatStringtoQuantity.aspx?productId={0}&productName={1}. This way, the final column of the grid will display the hyperlink that will redirect users to theQuantity.aspxweb form where they will be able to edit the quantity of selected product.
Next, you need to display the total for the cart. Again, this is best calculated using LINQ. The LINQ expression to calculate the cart total is shown in Listing 20.10.
Example 20.10. LINQ expression used to calculate cart total
total = (From p In table
             Where productQuantities.Keys.Contains(p.ProductID)).
            Sum(Function(p) p.UnitPrice * DiscountIndex *
            productQuantities.Item(p.ProductID))
The result of this expression can be shown as text in the Label control. Add the label with ID lblTotal to the form and assign the result of the total LINQ query to the lblTotal Text property in the Page_Load event handler.
You need to add few more buttons to the web form and you are done. Let's start with Check Out button.
When the user clicks the Check Out button, a new row should be inserted in the Orders table in the Northwind database. For each product, a row should be inserted in the Order_Details table.
Add a new button control to the web form. Name it bttnCheckOut. Implement the code that adds rows to the Orders and Order_Details tables. First, insert a row in the Orders table and then use that same row as the parent row when inserting rows in the Order_Details table since the Orders and Order_Details tables are in a one-to-many relationship. You can take a look at the bttnCheckOut event handler code in Listing 20.11.
You need to add two more buttons to the cart web form. Add a button named bttnEmpty and set the Text property to Empty. This button is used to empty the cart. To accomplish this, you need to empty the productQuantities Dictionary that was kept as a session scoped variable. The code for emptying the dictionary in the bttnEmpty event handling routine is shown in Listing 20.11.
Finally, users often want to go back to the product list and add more products after inspecting the cart. Add a button named bttnAddMore, set the Text property to Add More Products, and in the button event handler routine, redirect the user to products web form. The complete code for the Cart.aspx web form is shown in Listing 20.11.
Example 20.11. Cart.aspx code-behind
Imports OnlineOrdering.Northwind.OrdersRow
Imports OnlineOrdering.Northwind.Order_DetailsRow

Partial Public Class Cart
    Inherits System.Web.UI.Page

    Dim queryResult As EnumerableRowCollection
    Dim total As Decimal
    Private Const DiscountIndex = 0.98

    Protected Sub Page_Load(ByVal sender As Object,
                            ByVal e As System.EventArgs) Handles Me.Load
        'Set to real user Id after implementing Login functionality
        Session("userId") = "ALFKI"
        'Add "Online Employee" to database and set employeeId accordingly
        Session("employeeId") = 10
        GenerateOrder()
        lblTotal.Text = total.ToString()
        gwCart.DataSource = queryResult
        gwCart.DataBind()
    End Sub
Private Sub GenerateOrder()
Dim adapter As New NorthwindTableAdapters.ProductsTableAdapter
Dim table As Northwind.ProductsDataTable
Dim productQuantities As Dictionary(Of Integer, Integer)
productQuantities = Session("productQuantities")
If IsNothing(productQuantities) Then
Response.Redirect("Products.aspx")
End If
table = adapter.GetData
queryResult = From p In table
Where productQuantities.Keys.Contains(p.ProductID)
Select New With {
p.ProductID,
p.ProductName,
.Quantity = productQuantities.Item(p.ProductID),
p.UnitPrice,
.Discount = 0.02,
.DiscountedUnitPrice = p.UnitPrice * DiscountIndex,
.ProductTotal = p.UnitPrice * DiscountIndex *
productQuantities.Item(p.ProductID),
.Edit = "Quantity.aspx?productId=" &
p.ProductID.ToString & "&productName=" & p.ProductName
}
total = (From p In table
Where productQuantities.Keys.Contains(p.ProductID)).
Sum(Function(p) p.UnitPrice * DiscountIndex *
productQuantities.Item(p.ProductID))
End Sub
Protected Sub bttnAddMore_Click(ByVal sender As Object,
ByVal e As EventArgs) Handles bttnAddMore.Click
[aligning left is fine - DA]
Response.Redirect("Products.aspx")
End Sub
Protected Sub bttnCheckOut_Click(ByVal sender As Object,
ByVal e As EventArgs) Handles bttnCheckOut.Click
Dim productsAdapter As New NorthwindTableAdapters.ProductsTableAdapter
Dim products As Northwind.ProductsDataTable = productsAdapter.GetData
Dim ordersAdapter As New NorthwindTableAdapters.OrdersTableAdapter
Dim orders = ordersAdapter.GetDataDim orderDetailsAdapter As New
NorthwindTableAdapters.Order_DetailsTableAdapter
Dim orderDetails = orderDetailsAdapter.GetData
Dim order = orders.AddOrdersRow(
Session("userId"),
CInt(Session("employeeId")),
Date.Now.Date,
Date.Now.AddDays(7).Date,
Date.MinValue, 1,
Nothing, Nothing, Nothing, Nothing,
Nothing, Nothing, Nothing)
order.SetShippedDateNull()
ordersAdapter.Update(orders)
orders.AcceptChanges()
For Each orderDetail In queryResult
Dim product = products.FindByProductID(
orderDetail.ProductID)
orderDetails.AddOrder_DetailsRow(
order, product, orderDetail.UnitPrice,
orderDetail.Quantity, orderDetail.Discount)
Next
orderDetailsAdapter.Update(orderDetails)
orderDetails.AcceptChanges()
Response.Redirect("Confirmation.aspx")
End Sub
Protected Sub bttnEmpty_Click(ByVal sender As Object,
ByVal e As EventArgs) Handles bttnEmpty.Click
Dim productQuantities As Dictionary(Of Integer, Integer) =
Session("productQuantities")
productQuantities.Clear()
Response.Redirect("Products.aspx")
End Sub
End ClassIf you inspect the code in Listing 20.11 carefully, you will see that there are a few hard-coded features. Namely, since I did not implement the login feature, I assigned the value ALFKI to userId and used it when creating the order. Once the Login feature is implemented, a real user ID can be assigned to the userId variable.
Since the purpose of the online ordering application is to have users create their own orders without employee intervention, the employeeId variable is assigned a value of 10. This employee ID does not exist in the Northwind database, but you can generate it by adding a row to the Employees table and naming the user Online Ordering Application.
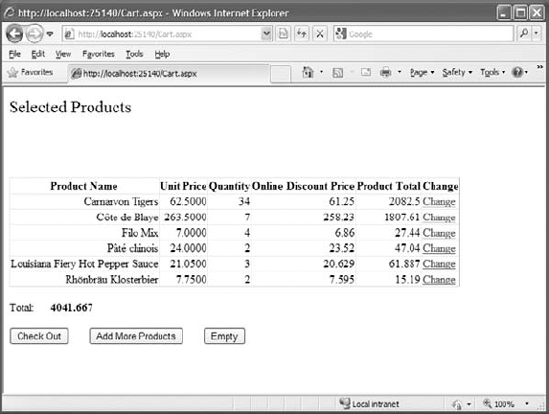
- Create a basic XHTML/HTML page.
Building a basic HTML page is a straightforward process using a simple text editor such as Notepad. Knowledge of XHTML/HTML is still a major asset when developing web applications with Visual Studio 2010.
- Master It
Develop a web page using HTML that features a heading, some text, an image, and a link to another page. Convert the page to XHTML and verify it by using the W3C verification tool at
http://validator.w3.org. You might find that you will need to run the validation a couple of times to get everything right. If you attach and use the style sheet in the following Master It challenge, you will find that validation will be less problematic.
- Format a page with CSS.
Cascading Style Sheets (CSS) is a powerful tool for controlling the styles and format of a website. You can manually create style sheets by using a text editor. An understanding of their operation and syntax is a useful skill when manipulating CSS in Visual Studio 2010.
- Master It
Create a CSS style sheet that defines the layout of the web page that you developed in the previous task, including a header section, a left-hand navigation section, and a main content section. Include a rollover for the link and apply formatting to the tags that you have used for your heading and text tags. Attach the style sheet to your web page.
- Set up a master page for your website.
Using master pages is a reliable method of controlling the overall layout and look and feel of your websites and applications. Master pages enable you to achieve a high level of consistency in your design and are particularly useful if the site has multiple developers working on it.
- Master It
Create a website with a master page and attached content page. Use appropriate controls to give the master page a page heading, My Page, which will appear on all attached content pages. Use a combination of Button and Label controls on the content page to create a simple Hello World application.
- Use some of the ASP.NET intrinsic objects.
ASP.NET objects such as the Response, Request, Session, and Server objects offer a range of important utilities in developing, running, and maintaining your websites and applications. In addition, they give you access to vital information about the client, the server, and any current sessions at runtime.
- Master It
Create a simple website with a master page and two attached content pages. Use the
Server.Executemethod attached to a LinkButton control to navigate between the two content pages.