
Chapter 9: Advanced Hardening for Windows Clients
Implementing a Windows baseline is a great step in your overall hardening, but it's also important to consider other areas of risk to tighten controls and reduce the attack surface. In this chapter, we will cover some of those areas, including securing enterprise web browsers, protecting Microsoft 365 apps, and enabling advanced features of Microsoft Defender for Endpoint as part of your baseline controls. In Chapter 8, Keeping Your Windows Client Secure, we covered enforcing a foundational security baseline that provides a robust layer of protection, but other apps, such as web browsers and the Microsoft Office suite, remain consistently vulnerable to exploits. The first part of this chapter will cover building baselines to protect these apps and how to apply a policy using MDM. We will provide examples using Intune security baselines, the settings catalog, the Office cloud policy service, and ADMX ingestion for third-party apps such as Google Chrome.
Next, we will cover enabling advanced features of Microsoft Defender that directly apply zero-trust security principles. This includes protection from unwanted software, attack surface reduction rules, enabling cloud-based protection, and leveraging hardware-based security to secure endpoints through virtualization-based security. It's important to think about protecting Windows from a holistic lens, as there are many areas to consider in your hardening efforts and not just one solution that can fit all these needs. Attack methodologies and techniques are constantly shifting and it's important to stay informed and learn about implementing new defense measures as threats evolve.
This chapter will include the following topics:
- Securing enterprise web browsers
- Securing Microsoft 365 apps
- Advanced protection features with Microsoft Defender
Technical requirements
To follow along with the instructions, you will need a Microsoft 365 subscription and rights to manage resources and policies in the Microsoft 365 admin center. In addition, to enable certain features with Microsoft 365 Defender and manage devices with Microsoft Endpoint Manager (MEM), you will need the following licenses or equivalent SKUs:
- Microsoft 365 E3 and/or E5
- Windows 10/11 Pro or Enterprise
- Hardware with support for VBS security
Let's start by discussing how to secure enterprise web browsers.
Securing enterprise web browsers
The modern-day web browser powers more applications than ever and plays a pivotal role in supporting many business functions. Part of this adoption can be attributed to the increase of SaaS-based apps coupled with the flexibility of cross-platform compatibility. Developers no longer need to build complex thick client applications to create a powerful and robust user interface full of features. Therefore, enterprise web browsers must receive the utmost attention when it comes to security controls and hardening. The following figure is the worldwide browser market share as reported by StatCounter, and can be found at the following reference link: https://gs.statcounter.com/browser-market-share.
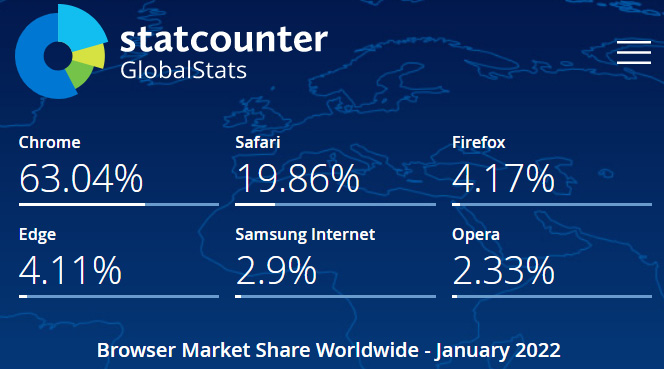
Figure 9.1 – StatCounter browser market share
As represented in Figure 9.1, Google Chrome dominates the market share followed by Safari, Firefox, and Microsoft Edge. In the following sections, we will discuss how to build and enforce security baselines for both Microsoft Edge and Google Chrome using Intune MDM based on recommendations from Microsoft and CIS. It's worth mentioning that support for Internet Explorer on Windows ended on June 15, 2022, and companies still relying on it will need to migrate as soon as possible. For more information about migrating from Internet Explorer, visit this link: https://techcommunity.microsoft.com/t5/windows-it-pro-blog/proven-tools-to-accelerate-your-move-to-microsoft-edge/ba-p/2504818.
First, we will review how to configure a Microsoft Edge security baseline.
Configuring a Microsoft Edge security baseline
Microsoft Edge is now a Chromium-based browser and supports many of the same functions and settings that are configurable in Google Chrome. Just like Windows, security baseline recommendations for Edge are available from the Microsoft Security and Compliance Toolkit and CIS. We can use the following methods to enforce the baseline controls:
- MDM
- Group Policy
- Microsoft Endpoint Configuration Manager
Let's review the recommendations from CIS and Microsoft to create the baseline. To do this, we will download and import the latest ADMX templates. Then, we will create a GPO from the Microsoft recommendations, compare it to CIS, and combine them into one GPO. Once the policy is final, we will create and deploy it using Intune.
Building the baseline
To complete the analysis, we followed the high-level steps listed as follows. We will go into more detail on each step throughout the section.
First, let's download the latest Microsoft Edge ADXM templates by visiting https://www.microsoft.com/en-us/edge/business/download:
- Download the Microsoft Security and Compliance toolkit, including Policy Analyzer and the Microsoft Edge security baseline: https://www.microsoft.com/en-us/download/details.aspx?id=55319.
- Create a new GPO named MSFT Edge Security Baseline – Computer and import the settings from the Microsoft Edge baseline GPO template. Apply the GPO to a Windows client to be used in the analysis.
- Assess the Microsoft recommendations against CIS Level 1 (L1) – Corporate/Enterprise Environment by downloading the CIS Microsoft Edge benchmark PDF file. The Microsoft toolkit includes a spreadsheet of the Edge baseline policies, or you can create one using Policy Analyzer locally on the client. To speed this process up, with a CIS SecureSuite membership, you gain access to the CIS-CAT Pro Assessor tool that can automatically analyze the benchmarks and create an assessment report. CIS benchmarks can be downloaded here: https://www.cisecurity.org/cis-benchmarks/.
- After the analysis is complete, manually combine the recommendations into the GPO to build the enhanced baseline.
Tip
CIS SecureSuite membership also includes access to build kits, which contain all the recommended policies pre-configured into a GPO.
- Export the GPO into XML and upload it for analysis using Group Policy analytics in MEM.
- Create the profiles in Intune and assign the baselines.
During our analysis, the current Microsoft Edge security baseline version 96 from the toolkit contains 21 policies. As mentioned in the preceding steps, we created a GPO named MSFT Edge Security Baseline – Computer from the recommendations and applied it to a client for analysis. If you don't have an Active Directory domain, you can use the LGPO tool that is part of the toolkit. The .zip file includes full documentation for usage on how to apply computer-based settings to a Local Group Policy (LGP). After the GPO was applied, we opened the administrative command prompt and ran gpupdate /force followed by gpresult /r /scope computer to view the Resultant Set of Policy (RSoP) output and confirmed that our GPO had been successfully applied.
Each setting maps to a registry entry, and to view them, we have to open Registry Editor as an administrator and navigate to HKLM:SOFTWAREPoliciesMicrosoftEdge. It should be populated with settings, as shown in the following screenshot:

Figure 9.2 – Microsoft Edge policies in the registry
You can also view the managed policies directly in the Edge browser by typing edge://policy in the address bar.
Next, we are going to run the CIS-CAT Pro Assessor to compare the Microsoft Edge security baseline against the Microsoft Edge benchmarks from CIS. After running the assessment, we came back with the results shown in Figure 9.3. We ran it against both the Level 1 and Level 2 profiles. On comparing Microsoft recommendations to CIS, there are only 7 policies out of 60 that pass the assessment. This isn't assuming the Microsoft baselines are inadequate, it's just to show the differences between the two.

Figure 9.3 – CIS comparison to the Microsoft Edge security baseline
After carefully reviewing and testing the CIS recommendations, we added the policies to the GPO created earlier to finalize the baseline that will be used as our reference template. Next, we are going to export the GPO to an XML file and analyze it using Group Policy analytics in MEM.
To assess our baseline to determine MDM support, follow these steps:
- Find the MSFT Edge Security Baseline – Computer group policy, right-click, and choose Save Report. Click the dropdown and choose the XML file.
- Sign in to MEM at https://endpoint.microsoft.com.
- Select Devices | Group Policy Analytics under Policy.
- Select Import and choose the saved XML file.
In the following screenshot, you can see there is a 97% support for policies that are backed by MDM and ready for migration. Some policies were obsolete to newer versions of Edge, so we removed them from the GPO template before importing them into MEM:
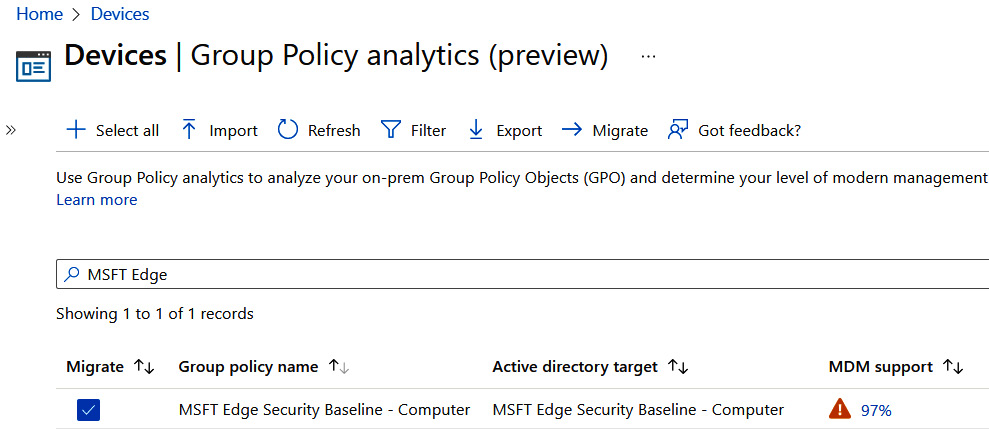
Figure 9.4 – Group Policy analytics analysis
On the MDM Support column, click on the percentage to view more details about each individual policy. Here, we can choose Export to save the report as a CSV file. We will use this report for our documentation as we work through building policies in Intune. This will help us reference policies in the future and know where they were applied in Intune without having to hunt them down later.
Tip
Microsoft recently added a migrate option to automatically create a Device Configuration profile from the Group Policy Settings.
Now that we have our report, we are going to follow a similar approach already demonstrated for building policies in Intune:
- Use the Microsoft Edge baseline in Intune security baselines for the initial policy payload. These baselines contain the bulk of the Microsoft recommended security baselines from the toolkit.
- Supplement additional settings using the settings catalog.
In Chapter 8, Keeping Your Windows Client Secure, we walked through how to append the CSV report and add additional headers to the MDM policy workload to track where settings are being applied. After running the review, we ended up creating two profiles in Intune that apply the Edge policy payloads, as follows:
- Using Intune security baselines, a security baseline named Microsoft Edge Baseline
- Using the settings catalog, a policy named Microsoft Edge Security Baseline
To easily find the policies using the settings catalog, search for the setting name in the spreadsheet using the Settings Picker. Most settings can be found listed in alphabetical order by choosing the Microsoft Edge category too. Repeat the process for the remainder of the policies until the profile is complete.
Once the client syncs into Intune, the Edge policies are imported into the registry and a mapping is created to know how to associate policies settings with their corresponding registry keys, just like with Group Policy. This process is called ADMX ingestion and happens conveniently all through the Intune UI. If the ControlPolicyConflicts CSP has been enabled on the client, a blocking record event is created to gracefully handle any potential conflicts with Group Policy settings. We will cover how to manually ingest ADMX policies in Intune for Google Chrome, but we can see this in action by opening Registry Editor and navigating to HKLM:SOFTWAREMicrosoftPolicyManagerAdmxDefault{GUID}. In the following figure, you can see the Microsoft Edge ADMX ingested policies that include the following taxonomy as a child item underneath the GUID registry key: Ingested name | Namespace | Category | Policy name:
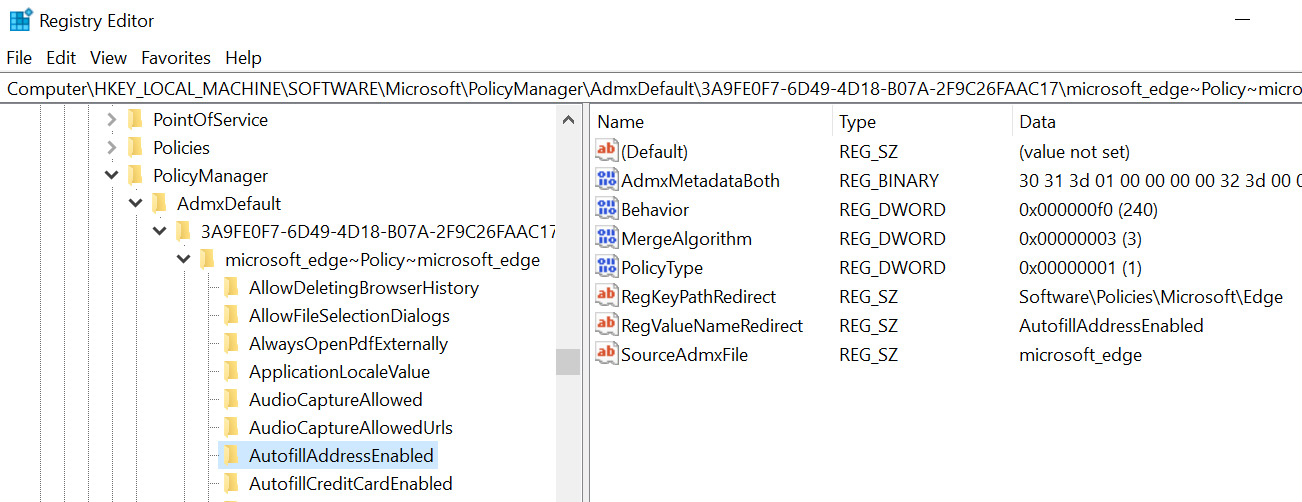
Figure 9.5 – ADMX ingestion of Microsoft Edge policies
This taxonomy can be seen in the full OMA-URI path for enforcing Microsoft Edge policies as follows:
./Device/Vendor/MSFT/Policy/Config/microsoft_edge~Policy~microsoft_edge.
In this example, most of the Microsoft Edge security settings are configurable through the settings catalog, and the mapping all happens conveniently through the Intune UI. Next, let's look at how to manage Edge browser extensions.
Managing Edge browser extensions
Brower extensions are a great way to add additional features and functionality to the web browser and are typically developed for all major browsers. A few examples of what an extension is used for could include password managers, copy-to-clipboard functions, auto-filling information, ad blockers, reading email, and even games. Although useful, browser extensions can present a significant security risk and must be managed effectively in an enterprise environment. Malicious extensions can be used to steal data, install malware, create persistent backdoors, log keystrokes, and send information to command-and-control servers. In an enterprise scenario, we can manage extensions in Microsoft Edge through the following policies:
- Configure allowed extension types to control the extension types that can be installed in the browser. Examples include browser themes, edge extensions, and hosted apps.
- Block external extensions from being installed will block any extensions that are not available through the Microsoft Edge Add-ons website.
- Control which extensions cannot be installed creates a blocklist. All extensions can be blocked by setting the policy using an asterisk.
- Allow specific extensions to be installed can be used as a safelist to allow extension installation if the Control which extensions cannot be installed policy is set to block all.
- Control which extensions are installed silently allows admins to push extensions directly to users without requiring interaction. The user cannot manually remove these through the browser.
- Configure extension management settings allows for configuring extension-specific permissions or for auto-pinning to the toolbar. An example of extension permissions could be blocking access to USB, preventing script injection, or modifying web requests.
By default, both the CIS and Microsoft baseline recommendation is to set the ExtensionInstallBlocklist policy to block all extensions. This is the most secure configuration but will require additional IT administration if there is a business requirement to install or allow an extension. Let's look at using the Control which extensions are installed silently policy to silently install the Office browser extension in Microsoft Edge.
To create the policy, we will need the extension ID and update URL of the Microsoft store extension repository, to ensure it updates automatically. The extension ID can be found by visiting the Microsoft Edge Add-ons website and copying the end of the URL. For example, the current URL for the Office browser extension is as follows: https://microsoftedge.microsoft.com/addons/detail/office/gggmmkjegpiggikcnhidnjjhmicpibll.
The app ID or extension ID is gggmmkjegpiggikcnhidnjjhmicpibll. Since this is hosted in the Microsoft Add-ons store, we can use the default Microsoft update URL, so the browser knows where to check for updates:
https://edge.microsoft.com/extensionwebstorebase/v1/crx.
Let's combine the two together to create the formatting string to be used by the policy, as in this example:
extension_id;update_url.
Tip
You can also use the Google Chrome Web Store update URL if the Microsoft Add-on store does not have the extension.
Next, let's update the Microsoft Edge Security Baseline policy we created earlier in MEM:
- Sign in to MEM at https://endpoint.microsoft.com, choose Devices | Configuration profiles, and click the policy created earlier.
- Click Edit next to Configuration settings.
- Once in Configuration settings, click on Add settings to open the Settings Picker.
- Search for Microsoft Edge. Double-click the Microsoft EdgeExtensions category to view the available settings.
- Select the Control which extensions are installed silently setting.
- Close the Settings Picker and find the Extensions subcategory and enable the Control which extensions are installed silently setting.
- Enter the following string in the input box: gggmmkjegpiggikcnhidnjjhmicpibll;https://edge.microsoft.com/extensionwebstorebase/v1/crx.
- Click Review + Save and finally Save to update the profile.
The following screenshot shows adding the extension ID and the update URL to the policy in MEM:

Figure 9.6 – Microsoft Edge extension policy
After the next Intune policy sync, the client should create a blocking record and add the new ExtensionInstallForcelist policy with the configured extension ID. To confirm the policy applied, open a command prompt and run the following command: gpupdate /force. The Office browser extension should install automatically. You can also view settings in the following locations in the registry:
HKLM:SOFTWAREMicrosoftPolicyManagercurrentdevicemicrosoft_edge~Policy~microsoft_edge~Extensions
HKLM:SOFTWAREPoliciesMicrosoftEdgeExtensionInstallForcelist
Multiple extensions can be added using this method, and creating a blocklist is done in a similar manner. Next, let's look at configuring enterprise sign-in mode to add sync capabilities for your users.
Configuring enterprise sign-in mode
A great feature available in Microsoft Edge is enterprise sync which can be used to sync favorites, passwords, and other settings to the Microsoft cloud. Earlier, in Chapter 7, Deploying Windows Securely, we covered Microsoft Edge sync and its uses for backing up user data and settings during device provisioning. Although the Level 1 CIS recommendation is to disable the synchronization of data using Microsoft sync services, this is required for Edge Sync to work. Using the Configure the list of types that are excluded from synchronization policy can limit the types of data that are allowed to sync if privacy is a concern.
Let's now look at configuring Edge sync using Intune by logging in to MEM at https://endpoint.microsoft.com and editing Microsoft Edge Security Baseline we created earlier. Choose Add settings to open the Settings Picker and filter for the Microsoft Edge category to view the settings. We will set the following policies:
- Browser sign-in is set to Enabled | Enable browser sign-in.
- Configure whether a user always has a default profile automatically signed in with their work or school account is set to Enabled. This will ensure that a user cannot sign out of their work or school account in Edge.
- Restrict which accounts can be used as Microsoft Edge primary accounts is set to Enabled and includes only your corporate domains. Use the following format to set specific domains: .*@mycompany.com.
- Disable synchronization of data using Microsoft sync services is set to Disabled. This will allow for cloud sync.
- Configure the list of types that are excluded from synchronization is set to Enabled and we recommend entering passwords, extensions, openTabs, and settings.
When a user first opens Microsoft Edge, they are asked whether they want to sync settings. If you wish to enforce synchronization, set Force synchronization of browser data and do not show the sync consent prompt to Enabled.
Review and save your policy and assign it to a group of users or devices. After the policies apply, the account pop-up menu in Edge should look something like the following screenshot:

Figure 9.7 – Microsoft Edge enterprise sync
If you have applied all the recommendations in the previous sections, Microsoft Edge is hardened and ready for company use. Depending on the version of Windows your company has rolled out, it should be automatically installed for users as the legacy Edge is out of support starting March 9, 2021. Next, let's take a similar approach and build a Google Chrome security baseline using Intune.
Configuring a Google Chrome security baseline
The Google Chrome browser has quickly become the most widely used browser in the world, accounting for almost 64% of the browser market share according to StatCounter. The latest worldwide browser usage statistics can be found at the following link: https://gs.statcounter.com/.
It is fast, user-friendly, offers cross-platform compatibility, and contains a large set of configurable security features. For Windows-based systems, Google offers an enterprise bundle that allows admins to configure fine-grained security controls over policies, add-ons, and customizations that can be configured using Group Policy, Configuration Manager, or MDM. Just as with Microsoft Edge, CIS also releases recommended Level 1 and Level 2 benchmarks for Google Chrome. We will use these recommendations to configure a security baseline for Google Chrome using Intune. Until recently, Google Chrome policies were not available natively in Intune through the settings catalog or other device configuration profiles.
To accomplish this, we will use a process called ADMX ingestion by pushing the ADMX-backed definitions to a client using Intune via the Policy CSP and OMA-URI. Under the hood, this is very similar to how Microsoft Edge policies are configured with the settings catalog. Since Intune has minimal support for controlling third-party apps, we need to ingest the Google Chrome ADMX metadata, so the client is aware of how to map the registry values. To do this, we will complete the following steps:
- Download the latest Google Chrome enterprise bundle that includes the ADMX templates from the following link: https://cloud.google.com/chrome-enterprise/browser/download.
- Configure a Custom template device configuration profile and ingest the ADMX metadata.
- Validate the data was ingested locally on a client.
- Configure policies from the CIS recommendations.
First, let's look to get a basic understanding of how ADMX ingestion works. We will identify how to find policy settings and the way they should be structured for successful delivery to the client.
ADMX ingestion using Intune
For Windows to ingest an ADMX file, it needs to be processed through the Policy CSP on the client using the following OMA-URI:
./Vendor/MSFT/Policy/ConfigOperations/ADMXInstall.
Windows maps the ingested policy by parsing the application ADMX metadata file and storing the policy definition in the MDM Policy CSP client store. From there, a SyncML command is used to tell the client which registry keys to set based on the value configured in the payload. The formatting in the following screenshot can be used as our reference of the OMA-URI for the Google Chrome ADMX metadata:

Figure 9.8 – OMA-URI of ADMX ingestion
In Intune, we are going to create a custom template using the following steps:
- From MEM, go to Devices, choose Configuration Profile, and click Create Profile.
- Choose Windows 10 and later for Platform, select Templates for Profile type, choose Custom, and then click Create.
- Give the profile a name and description, such as Google Chrome Security Baseline. Click Next.
- On Configuration Settings, click Add to add a row, and fill out the following information:
- Name: Google Chrome ADMX Ingestion
- OMA-URI: ./Device/Vendor/MSFT/Policy/ConfigOperations/ADMXInstall/Chrome/Policy/ChromeAdmx
- Data type: String
Follow these steps to copy the ADMX metadata and paste it into the value field:
- Download and extract the Google Chrome enterprise bundle.
- Open Configuration | ADMX folder and find the chrome.admx file.
- Right-click and open with Notepad.
- Click Edit and choose Select All. Click Edit and choose Copy.
- Go back to the Add Row settings and paste the contents into the value field.
The Add Row OMA-URI settings menu should look like the following figure:

Figure 9.9 – ADMX ingestion for Google Chrome
- Click Save to commit the settings, and Review + Save to commit the setting changes.
The policy is now ready to assign to users or device groups. Let's look at a client that received the policy to confirm it applied correctly.
Open Registry Editor, navigate to HKLM:SOFTWAREMicrosoftPolicyManagerAdmxInstalled, and expand the GUID. If the ADMX is ingested correctly, you should see the folder tree layout Chrome | Policy | ChromeAdmx, as in the following screenshot underneath the GUID:
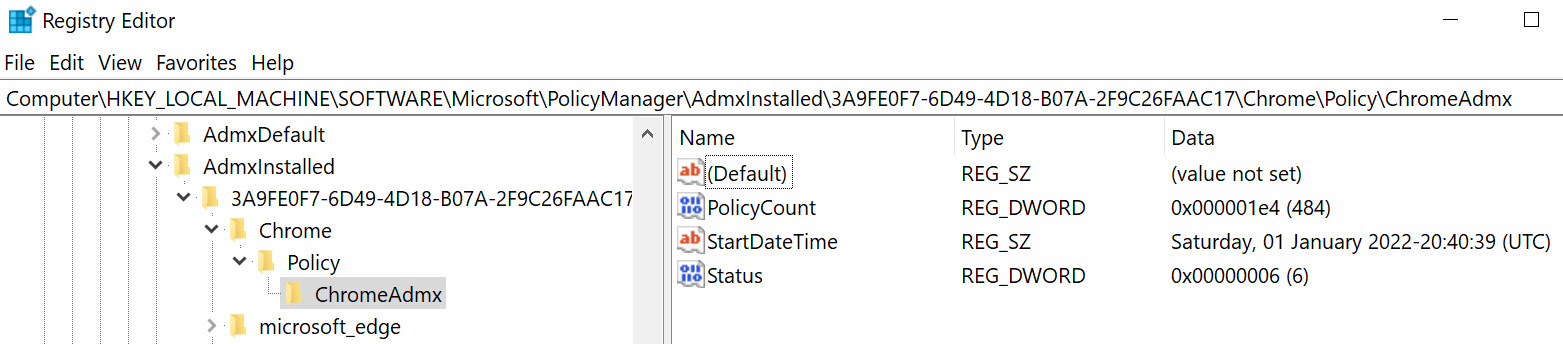
Figure 9.10 – ADMX ingested into the registry
We can confirm this in the event viewer under the DeviceManagement-Enterprise-Diagnostics-Provider-Admin logs looking for event ID 873 and 866. This should show the ADMX ingestion started and completed matching the GUID as the provider we expanded upon in the registry. Back in the registry, expand the GUID under PolicyManagerAdmxDefault to view all the available policy names and categories. These paths will be referenced in the OMA-URI when configuring our required policy. Let's look at how to disable the password manager by using the PasswordManagerEnabled policy as an example. Once we identify the correct settings from the ADMX metadata, the final OMA-URI path will be as follows:
./Device/Vendor/MSFT/Policy/Config/Chrome~Policy~googlechrome~PasswordManager/PassworeManagerEnabled
The following figure can also be used as a formula reference when building out the OMA-URI path for additional policies:

Figure 9.11 – OMA-URI reference for required settings
To understand exactly how the OMA-URI translates from the ADMX, let's find the password manager policy in the chrome.admx file:
- Open the chrome.admx file in Notepad or your favorite text editor.
- Search for PasswordManagerEnabled.
In the XML snippet from the following figure, we can match child elements and attributes inside the code tree structure and find {AdmxCategory} and {PolicyName} to construct our OMA-URI path. The text highlighted in bold in the XML code shows how to find these mappings:
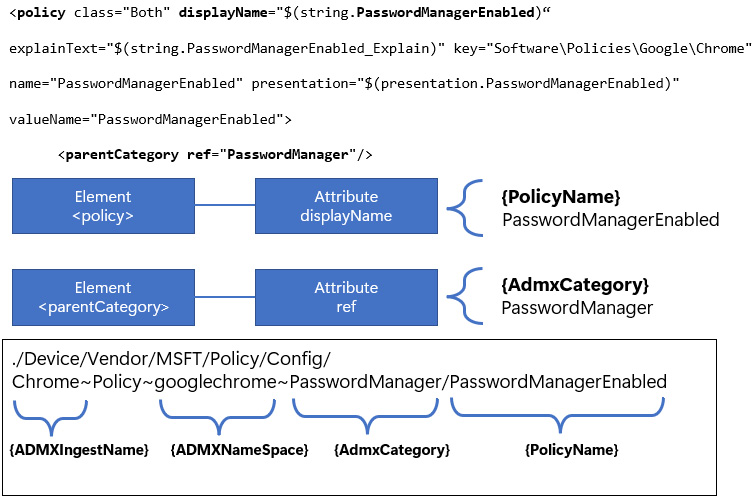
Figure 9.12 – ADMX XML tree structure
Once you get comfortable looking at the ADMX formatting, this will become apparent for any additional policies you want to configure.
Now that we have the OMA-URI path, the next step is to identify the possible values that can be accepted. In this case, it's a simple Boolean value, and the setting is either enabled (decimal value of 1) or disabled (decimal value of 0). Looking at the chrome.admx file, find the <enabledValue> element. It is highlighted with a border in the following screenshot:

Figure 9.13 – Identifying the policy value in ADMX
Since the policy is a Boolean type, the value of the string data type accepted in Intune will be <disabled/>. After applying the policy to a client, the corresponding registry entry will have a DWORD value of 0. Let's put this all together and add a row to our custom profile to configure the password manager:
- From MEM, open the Google Chrome Security Baseline – CIS Level 1 device configuration profile created earlier.
- Choose Edit in Configuration settings and then click Add to add a new row. Enter the following values:
- Name: Chrome - PasswordManagerEnabled
- OMA-URI: ./Device/Vendor/MSFT/Policy/Config/Chrome~Policy~googlechrome~PasswordManager/PasswordManagerEnabled
- Data type: String
- Value: <disabled/>
- Click Save and Review + Save to commit the setting changes.
After the client runs an Intune policy sync, let's confirm the setting applied. This time we will open Google Chrome and type Chrome://Policy in the address bar. You can see from the following screenshot that the PasswordManagerEnabled policy is set to false:

Figure 9.14 – Google Chrome applied policies
Next, let's look at expanding on ADMX ingestion and configuring Google Chrome extensions. Unlike the Boolean values for the password manager, there are a few additional steps to ensure the policy is configured correctly in Intune.
Managing Chrome browser extensions
Like Microsoft Edge, Google Chrome has an extensive catalog of add-ons and extensions available through the Chrome Web Store that can enhance user experience and add functionality. Because Microsoft Edge is a Chromium-based browser, similar policies are available for Chrome to manage these extensions. Both browsers are also aligned with the same CIS recommendations regarding their management of them. You can visit the Configuring a Microsoft Edge security baseline section in this chapter for more information about the different policy types.
In the following example, we are going to use ADMX ingestion to deploy an extension blocklist and silently install the Microsoft Defender Browser Protection and Windows 10 account extensions:
- First, let's find the ExtensionInstallBlocklist policy inside the chrome.admx file and look at the available values. These values are located inside the <elements> XML, which is highlighted in the following screenshot:

Figure 9.15 – Extension blocklist policy
Inside <elements>, there is a child element labeled <list id>. These elements map to REG_SZ registry strings as name/value pairs. When we input the value for the OMA-URI settings, <data id> must match the attribute shown inside <list id>. Each name/value pair is separated by using the Unicode character 0xF000 (encoded to ), and if the policy contains multiple entries, each entry needs to be separated by a semicolon. In the preceding example, the name/value pair is encoded as 1*. In the registry, the name would be 1, the type would be REG_SZ, and the value would be *.
- Let's push this setting down to the client by modifying the device configuration profile created earlier and adding a row with the following settings:
- Name: Chrome - ExtensionInstallBlocklist
- OMA-URI: ./Device/Vendor/MSFT/Policy/Config/Chrome~Policy~googlechrome~Extensions/ExtensionInstallBlocklist
- Data type: String
- Value: <enabled/> <data id="ExtensionInstallBlocklistDesc" value="1*" />
Tip
The OMA-URI and values are case-sensitive or else the policy will fail to apply.
- Once the client receives the policy from Intune, we can confirm this setting is applied by opening Registry Editor and navigating to HKLM:SOFTWAREPoliciesGoogleChromeExtensionInstallBlocklist.
If the policy is applied successfully, it should look like the following screenshot at the registry path:

Figure 9.16 – ExtensionInstallBlocklist policy applied
- Next, let's add the ExtensionInstallForcelist policy to silently install the Microsoft Defender Browser Protection and Windows 10 account extensions. Just like with the blocklist, this policy uses the <list id> element type and will have formatting like the blocklist policy.
To format the string, we need to gather the extension ID from the Google Chrome store. Earlier, in the Managing Edge browser extensions section of this chapter, we covered how to find the extension ID and format the string with the Add-ons store update URL if you need a review. Extension IDs for Google Chrome can be found at the Chrome Web Store from the following link: https://chrome.google.com/webstore/category/extensions?hl=en-US.
- The update URL is https://clients2.google.com/service/update2/crx. The following figure contains the formatted strings for both extensions:

Figure 9.17 – Google Chrome extension IDs
- Back in MEM, add a new row to the configuration settings and set the following values:
- Name: Chrome - ExtensionInstallForcelist
- OMA-URI: ./Device/Vendor/MSFT/Policy/Config/Chrome~Policy~googlechrome~Extensions/ExtensionInstallForcelist
- Data type: String
- Value: <enabled/> <data id="ExtensionInstallForcelistDesc" value="1ppnbnpeolgkicgegkbkbjmhlideopiji;https://clients2.google.com/service/update2/crx2bkbeeeffjjeopflfhgeknacdieedcoml;https://clients2.google.com/service/update2/crx "/>
- After the client receives the next Intune policy update, let's confirm on the client by opening Registry Editor and navigating to HKLM:SOFTWAREPoliciesGoogleChromeExtensionInstallForcelist.
- If the policy is applied successfully, it should look like the following screenshot. Notice that multiple registry entries were added by separating the name/value pairs with a semicolon.

Figure 9.18 – ExtensionInstallForcelist policy applied
Using the blocklist and force list policies is an effective way to manage extensions for Google Chrome and a great way to keep users secure from accidentally installing malicious extensions. If there is a business requirement to allow additional extensions but you don't want to force-install them, use the ExtensionInstallAllowlist policy as a safelist.
Next, let's put this all together and complete the implementation of the CIS Level 1 profile recommendations to finish building the baseline.
Building the baseline
Unlike Edge, Google Chrome doesn't have a recommended security baseline from Microsoft. For our baseline, we will only use the recommendations from CIS. We can run an analysis using Policy Analyzer and compare the Level 1 and Level 2 CIS profiles. In the following figure, you can see there are 22 total additional policies in Level 2, with 21 differences in settings for overlapping policies:

Figure 9.19 – Analysis of Level 1 and Level 2 CIS profiles using Policy Analyzer
If only applying the Level 1 recommendations, we recommended disabling the following setting:
- Browser Sign-in settings are set to Disabled. Unless you are a G Suite Enterprise customer, leaving this setting enabled is a significant security risk as corporate data can leak and synchronize with non-managed accounts.
The following are the high-level steps we took to build the baseline using ADMX ingestion in Intune:
- Download the Google Chrome enterprise bundle and import the latest ADMX files to the Group Policy Central Store.
- Use the CIS Google Chrome Benchmark Build Kit or manually build a GPO based on the Level 1 recommendations.
- Save the GPO report as an XML file and upload it to Group Policy analytics.
- Export the analysis as a CSV file.
- Audit each policy and update the CSP mapping column to reflect the OMA-URI path of the ADMX ingested policy specific to Google Chrome. By default, it will try to map them to Microsoft Edge.
- Use the chrome.admx file to determine the required policy values and format the correct value for Intune.
- Implement each policy by adding a row for each unique setting in our device configuration profile.
Unfortunately, the export will show Migrate to Edge in the MDM support column. We decided to use this CSV file as it's in a similar format to the Microsoft Edge baseline we audited and implemented earlier, but you can use whatever works best for you. In most instances, we can replace microsoft_edge~Policy~microsoft_edge of the OMA-URI path with Chrome~Policy~googlechrome. Use the registry entries under PolicyManagerAdmxDefault on a client that ingested the ADMX metadata as a reference for identifying the correct category and policy names. After updating the CSP mapping column, we had a reference file that looked like the following figure. We left a few Edge references to compare on rows 7 and 8.

Figure 9.20 – Policy analysis from Group Policy analytics
Next, let's look at setting the Allow download restrictions policy. This policy is again slightly different to build the formatting of the value and is worth covering:
- Open the chrome.admx file and search for DownloadRestrictions in the file. In this example, it contains <enum id>, which makes it an Enum type. This means that the policy settings can have one of the defined attributes as outlined in the XML tree. The CIS recommendations say to configure for BlockDangerousDownloads, which is a decimal value of 1. Once again, in the following figure, we can get an idea of how to configure the value for Intune:
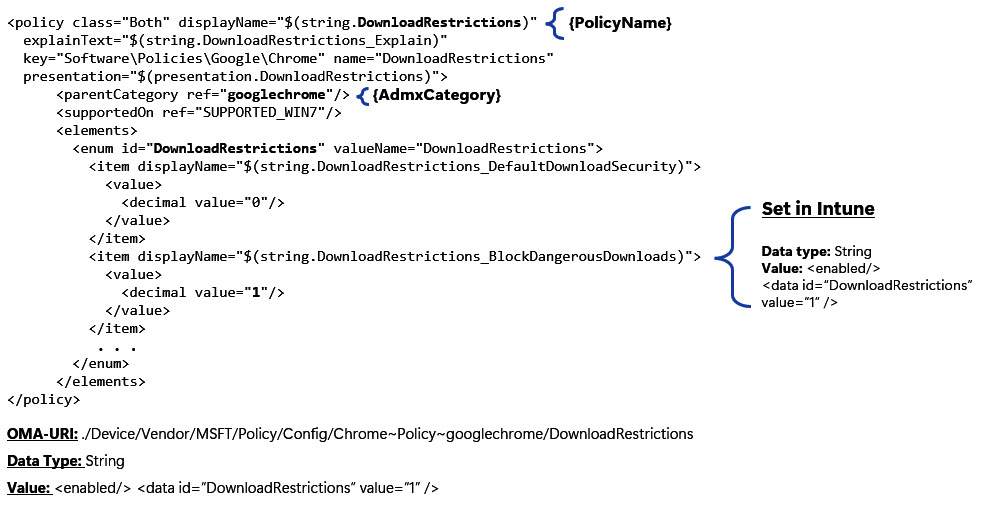
Figure 9.21 – DownloadRestrictions policy
Just as with <list id>, <enum id> will map to <data id> in the Intune value field.
- Let's add a row to our device configuration profile for the DownloadRestrictions policy and set the following values:
- Name: Chrome – DownloadRestrictions
- Description: Allow download restrictions
- OMA-URI: ./Device/Vendor/MSFT/Policy/Config/Chrome~Policy~googlechrome/DownloadRestrictions
- Data type: String
- Value: <enabled/> <data id="DownloadRestrictions" value="1" />
- After the client receives the next Intune policy update, confirm in Registry Editor by navigating to HKLM:SOFTWAREPoliciesGoogleChrome.
- If the policy is applied successfully, you should see DownloadRestrictions REG_DWORD with a value of 1.
ADMX ingestion isn't just limited to establishing apps that have ADMX configurations but can also be used for configuring your own custom policies. The following are a few additional resources that are helpful for understanding how ADMX-based policies work using MDM and Intune:
- https://docs.microsoft.com/en-us/windows/client-management/mdm/win32-and-centennial-app-policy-configuration
- https://docs.microsoft.com/en-us/windows/client-management/mdm/understanding-admx-backed-policies
Next, let's look at securing Microsoft 365 apps by creating a security baseline and enabling advanced features using Intune and the Microsoft 365 admin centers.
Securing Microsoft 365 apps
The Microsoft Office suite includes some of the world's most popular productivity apps used today, with programs such as Outlook, OneDrive, Word, Excel, PowerPoint, OneNote, SharePoint, and Teams. According to https://www.statista.com/, Microsoft Office 365 controls around 47.5% of the market share for major office suite technologies worldwide, and is used by over 731,000 companies in the United States alone. This wide usage rate makes it a great attack target to build exploits and should not be overlooked when building out security controls. According to https://www.cvedetails.com, there were 63 named CVE vulnerabilities for Microsoft Office in 2021 alone, with three having a score of 9.3 or greater. The following URL shows the total of all Office vulnerabilities since 1999: https://www.cvedetails.com/product/320/Microsoft-Office.html?vendor_id=26.
In addition to enforcing security controls through baselines, it's important to install security updates regularly and build a program to report on non-compliance. Modern versions of Microsoft 365 apps no longer use Windows Updates to download updates and instead rely on Microsoft Office's Content Delivery Network (CDN). The update mechanism or maintenance tasks that check for updates on a client are separate from Windows Updates, so it's important not to assume an updated Windows client is also successfully receiving Office updates. Let's look at how to build a security baseline for Microsoft 365 apps.
Building a security baseline for M365 apps
Security baselines for Microsoft Office apps are available from CIS and through the Microsoft Security and Compliance Toolkit. Just as with Windows and Edge, we recommend you review, audit, and combine recommendations from both controls to meet your company's security requirements. One fundamental difference worth mentioning with enforcing Office policies compared to Windows or web browsers is that most policies are user-targeted. This is important to note because your policy delivery mechanism must be able to import settings for the currently logged-on user, which could present a challenge as many device management solutions use a system context for payload delivery. Once the recommendations have been reviewed, we can use the following methods to apply them:
- ADMX policies for user and device scopes through the MEM settings catalog
- The Office cloud policy service for user-based policies
- Configuration baselines and LGPO application packages in Microsoft Endpoint Configuration Manager for both user and computer policies
- Group Policy
The Microsoft security baselines set includes recommendations for both computer and user-based policies bundled together across all apps in the Office suite. There are six pre-built GPOs in the toolkit, but the main MSFT Microsoft 365 apps for both the user and computer scope provide the best combination for security and compatibility. The additional four policies cover security settings specifically for macros and legacy files that should also be tested and implemented. The reason they are not combined is most likely that macro-specific policies tend to have a larger impact on user experience and were called out for awareness. The CIS benchmark recommendations include a Level 1 profile separated among each app individually for Word, Excel, Outlook, Access, PowerPoint, and common elements shared across all apps.
Choosing an approach for policy management of Office apps will depend on the deployment method . For example, if the Office deployment uses the MSI or Click-to-Run installer, the Office version, and the licenses purchased for users are all factors that determine how policy can be managed. It's worth reviewing the deployment prerequisites to understand what best suits your needs. A link to the Microsoft documentation, with detailed information on deployment planning, can be found here: https://docs.microsoft.com/en-us/deployoffice/plan-microsoft-365-apps.
First, let's look at auditing the baseline from Microsoft by downloading the reference GPOs and importing them into Group Policy analytics in Intune for analysis.
Building the baseline
To compile the baseline, we are going to complete the following steps:
- Download the latest Microsoft 365 Apps for enterprise security baseline. The baseline can be downloaded from the Security and Compliance toolkit at the following link: https://www.microsoft.com/en-us/download/details.aspx?id=55319.
- Download and import the latest Microsoft 365 Apps administrative templates. The latest administrative template files can be found by visiting this link: https://www.microsoft.com/en-us/download/details.aspx?id=49030.
Tip
The administrative templates for the legacy JScript block policies can be found in the SecGuide.admx files located in the templates folder of the download.
- Create a new GPO in the Group Policy Management Console for each of the baselines downloaded from the toolkit.
We created the following six group policies:
- MSFT Microsoft 365 Apps v2112 – Computer
- MSFT Microsoft 365 Apps v2112 – User
- MSFT Microsoft 365 Apps v2112 – DDE Block – User
- MSFT Microsoft 365 Apps v2112 – Legacy File Block – User
- MSFT Microsoft 365 Apps v2112 – Legacy JScript Block – Computer
- MSFT Microsoft 365 Apps v2112 – Require Macro Signing – User
- Save each report as an XML file and import them into Group Policy analytics for analysis.
The following screenshot shows the analysis of MDM supported policies from the Microsoft security baseline recommendations:

Figure 9.22 – Group Policy analytics for M365 app baselines
- Next, export each analyzed policy and consolidate them into a single CSV file. Then, we added a new header column to determine where each policy will be enforced for reference.
The latest approach for policy enforcement is to use the Office cloud policy service if you meet the prerequisites. We will go into more detail in the next section but decided to use this as our first choice. If there are any gaps in policies not available in the cloud policy service, we will supplement them using Intune. In our exported CSV, we will add the following column headers to columns H through K.
- Office Cloud Policy Service
- Settings Catalog
- Templates
- ADMX
Tip
We won't be covering supplementing policies in Intune in this section, but this can be accomplished through the settings catalog, as shown in previous examples in this chapter.
Both user and computer based policies support the migrate option in Group Policy analytics.
After combining the output of each analysis, we ended up with 358 unique policies across all M365 apps.
- Audit each policy and build the baseline in the respective areas, making a note on the master spreadsheet where each policy is applied.
This will be time-consuming, but once it's complete, your Office apps will have robust security controls applied. It is strongly recommended to review and test each policy to understand the effect they could have on user experience before deploying it into a production environment. Many business-driven processes are automated using functions inside of Office apps, such as macros. We need to ensure to minimize interruption.
Next, let's review how to use the Office cloud policy service for policy management of your Office apps.
Office cloud policy service
The Office cloud policy service allows you to create policies, configure servicing options, customize office deployments, and monitor the health, inventory, and security updates of Office apps through the Microsoft 365 apps admin center portal. The service operates independently of device management, such as Intune, Configuration Manager, and Group Policy. It offers great flexibility because, unlike with device management methods, the client does not need to be under company management for policies to be enforced. Policy assignment is handled by Azure AD group memberships and applied directly onto the device or can be configured for anonymous access to Office web apps. On a Windows client, the policy engine that drives enforcement is the Click-to-Run service that syncs with the Office cloud policy service to check for any assigned policies for the user currently signed into Office apps. The intervals occur during first sign-in and on a regular frequency every 90 minutes, or on a 24-hour basis if no policy assignments were previously found for the signed-in user.
To use the Office cloud policy service, you must meet the following requirements:
- Microsoft 365 Apps for enterprise (Click-to-Run) and is not compatible with the MSI or perpetual versions.
- Version 1808 or later of Microsoft 365 apps for Windows only.
- The client must be able to communicate with the cloud policy service endpoints.
Depending on your needs, policy configurations are flexible, and some examples could include structuring them by application type or grouping them together by department, business function, or for the entire organization. Let's create an organization-wide policy from the security baseline recommendations by following these steps:
- Sign in to the Microsoft 365 Apps admin center at https://config.office.com.
- Click the Customization dropdown and choose Policy Management.
- Click Create to open the Create Policy Configuration menu.
- Give the policy a name (for example, Microsoft 365 Apps Security Baseline Org Wide).
- Click Select type and choose This policy configuration applies to users.
- Click Select group and choose an Azure AD security group to assign the policies.
- Click Configure Policies to open the Select policies menu.
- Click the recommendation column and uncheck (select all) and choose Security Baseline. Click Filter.
The results should now be filtered by Microsoft's recommended security baselines. Not all user-based policy recommendations from the Security and Compliance Toolkit will be available, but new policies are being added frequently.
To create our baseline, we further sorted by platform and policy name and then used the search function to locate policies based on the setting name in the CSV exports from Group Policy analytics using the search bar. To apply a configuration, select the policy and leave the Microsoft recommended security baseline option checked, and click Save. This will apply the recommended setting from the security baseline. We continued this process for the remaining policies until we had our profile built and saved it.
In Policy Management, evaluations occur based on the assigned priority order listed in the Policy configurations pane in the admin center. If a user is in the scope of multiple policy assignments, this order will determine which settings take precedence, with 0 being the highest priority. Our security baseline can be seen in the following figure with a priority of 0. The order can easily be changed as more configurations are added:

Figure 9.23 – Office cloud policy service
Now that the policy is created, let's confirm the client has checked into the cloud policy service and settings are applied. Open Registry Editor and navigate to HKCU:SOFTWARE MicrosoftOffice16.0CommonCloudPolicy.
Click on the LastUser key and check the PolicyHash value. If it is blank or missing, then the client did not receive a policy from the Office cloud policy service. A successful policy check-in should look like the following screenshot, with a PolicyHash value populated:

Figure 9.24 – Office cloud policy check-in
Tip
For testing purposes, if you need to force a check-in, delete the entire CloudPolicy key and close and re-open Office apps to download a fresh policy set.
Next, let's check whether the actual settings are applied from the policy configuration. The location in the registry is different than where we typically see from Group Policy or MDM. To view the applied settings from the Office cloud policy service, navigate to HKCU:SOFTWAREPoliciesMicrosoftCloudOffice16.0. In the subkeys, you should see the different Office products listed with policy categories, as shown in the following screenshot:
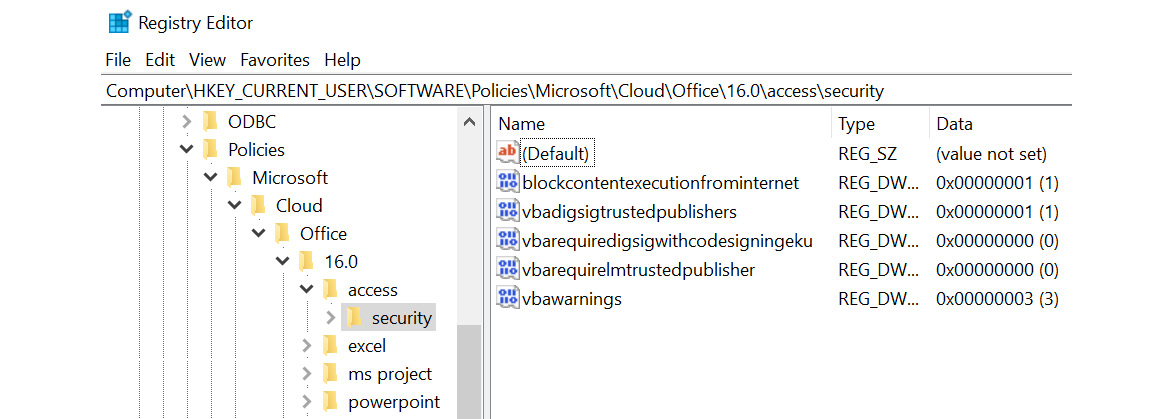
Figure 9.25 – Office cloud policy service policies
Remember, this service offers flexibility to manage Office policies for non-managed devices. If setting policies with the Office cloud policy service in addition to Group Policy or MDM, they will take precedence during conflict resolution even if more restrictive settings are configured. These configurations also roam with the user on other devices if the version of Office apps meets the requirements. This is an important consideration when determining whether the cloud policy service is right for your deployment.
For more information about the Office cloud policy service and using the Microsoft 365 Apps admin center features, visit this link: https://docs.microsoft.com/en-us/deployoffice/admincenter/overview-office-cloud-policy-service.
Next, let's look at enabling advanced features from the Microsoft Defender suite of protection capabilities.
Advanced protection features with Microsoft Defender
Microsoft Defender is the branding used by Microsoft for labeling their suite of security products that provide extended detection and response (XDR) capabilities. The individual products under the Defender moniker when combined are designed to protect, prevent, and respond to threats across multiple workloads as part of a holistic approach to security. Microsoft Defender products leverage Microsoft AI and machine learning (ML) to protect organizations through automation and real-time protection capabilities. Let's do a quick review of Microsoft Defender technologies to bring awareness around the different workloads it can protect and the admin portals where each solution can be accessed:
- Microsoft Defender for Endpoint powers client and server endpoint security and provides real-time protection and XDR capabilities to stop threats and persistence with a focus on zero-trust principles. This is the core feature set we will review in the following sections. The Microsoft 365 Defender portal can be found at the following link: https://security.microsoft.com.
- Microsoft Defender for Office 365 provides protection for email and collaboration tools against malware, phishing, and business email compromise. These tools are also located in the Microsoft 365 Defender portal.
- Microsoft Defender for Identity helps to protect on-premises and hybrid identities from targeted attacks by monitoring user behavior for suspicious activity and reducing the attack surface. The Microsoft Defender for Identity portal can be found at the following link: https://portal.atp.azure.com.
- Microsoft Defender for Cloud Apps is a cloud access security broker (CASB) that provides visibility into workloads across SaaS apps, discovers shadow IT processes, protects sensitive information, and provides governance and compliance over your cloud apps. The Microsoft Defender for Cloud Apps portal can be found at the following link: https://portal.cloudappsecurity.com.
- Microsoft Defender for Cloud is a vulnerability and threat protection solution that provides insights into the security posture of cloud resources by assessing, securing, detecting, and resolving threats to those resources. Microsoft Defender for Cloud can be accessed in Azure at the following link: https://portal.azure.com/#blade/Microsoft_Azure_Security/SecurityMenuBlade/0.
Let's look at enabling advanced features in Microsoft Defender for Endpoint to protect Windows clients at the endpoint.
Defense evasion with tamper protection
A defense evasion tactic is something an attacker would do to try and avoid detection on a compromised system. A few techniques commonly seen in defense evasion include leveraging trusted processes to hide malicious software, obfuscating code, or disabling security software. This is where tamper protection comes in. With tamper protection enabled, Microsoft Defender is locked down and threats such as human-operated ransomware and other malware can no longer disable Defender's real-time protection capabilities and other features used to pick up threats through the registry, PowerShell, or by modifying Group Policy.
Earlier, in Chapter 8, Keeping Your Windows Client Secure, we recommended tamper protection as part of the Defender Antivirus baseline using endpoint security in Intune. It can also be configured in Intune security baselines, Group Policy, PowerShell, and the organizational level through the Microsoft 365 Defender portal. To enable tamper protection organization-wide, go to https://security.microsoft.com and select Settings | Endpoints | Advanced Features | Tamper protection.
Cloud-delivered protection is a prerequisite to enable tamper protection through the Microsoft 365 Defender portal. By default, in Windows, this setting is enabled, but it's also recommended as part of the Defender Antivirus baseline. To confirm tamper protection is enabled on a client, open Windows Security | Virus & threat protection | Manage settings. It will look like the following screenshot:
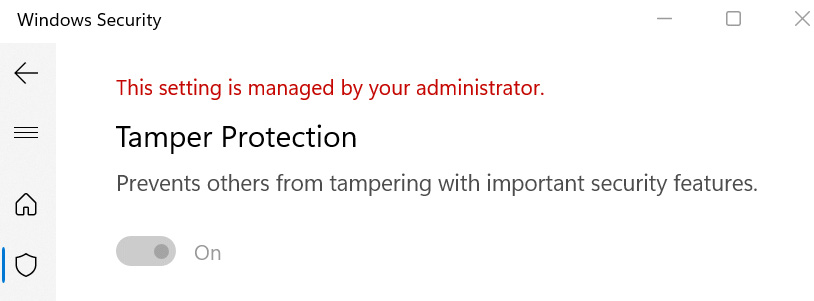
Figure 9.26 – Tamper Protection in Windows Security
For more information about tamper protection, visit this link: https://docs.microsoft.com/en-us/microsoft-365/security/defender-endpoint/prevent-changes-to-security-settings-with-tamper-protection?view=o365-worldwide.
Next, let's look at protecting against unwanted applications and malicious websites using Microsoft Defender's PUA protection and SmartScreen.
Protecting against untrusted applications and websites
Having protection in place from untrusted software and malicious websites is another zero-trust principle of always verify. Today, many freeware applications available on the internet often come bundled with add-ons as part of the installation. They may contain ads, which is why many software vendors are able to offer them free of charge. These software bundles may not necessarily be malicious in nature but are often unwanted, and having them installed can affect system performance and raise privacy concerns if they collect data about your computer and usage. In addition to protection from low-reputation software, users may inadvertently visit a malicious website facilitated by a phishing scam or by clicking on an unverified link. This can lead users to a credential harvesting website site or start a malware download. To provide protection against these common security risks, we can enable Defender SmartScreen and potentially unwanted applications (PUA) protection through Microsoft Defender features. PUA protection helps to detect and block unwanted software by verifying reputation against Microsoft's intelligence systems and safeguarding users through notifications and file quarantine. SmartScreen protects your users by cross-checking websites and files against a list of reported malware sites and validates reputation from intelligence sources collected from other Windows users. If the site or file in question is found, a warning notification will be presented to the user and the website or the file will be blocked depending on the level of enforcement. First, let's look at enabling PUA protection and review the user experience on a Windows client.
PUA blocking
In Chapter 8, Keeping Your Windows Client Secure, we recommended enabling PUA protection in block mode (or enabled) through the remediation section of the Defender Antivirus baseline in endpoint security. PUA protection can also be enabled in Intune security baselines, Group Policy, or with PowerShell. There are additional policies for PUA protection in Microsoft Edge, which are listed in the Microsoft and CIS recommendations.
If the policy is enabled for Microsoft Edge and a file is blocked during download, the user will receive a notification in the browser, as shown in the following screenshot:
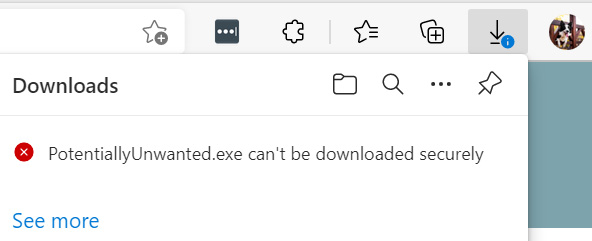
Figure 9.27 – PUA protection
If the download can succeed (as in a software bundle from a trusted reputation) and the installation program launches, PUA protection will quarantine any low-reputation files or additional software included in the bundle and show a notification like the following figure:
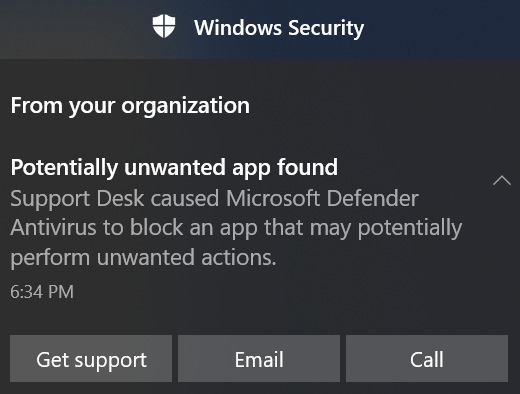
Figure 9.28 – PUA protection blocking an app
Tip
We configured the Windows security experience settings in Chapter 8, Keeping Your Windows Client Secure, to customize the text seen in the preceding notification.
For premium licensed customers, PUA events are logged in the Microsoft Defender for Endpoint portal and can be queried using an advanced hunting query. Automated workflows can be created from these alerts and trigger actions such as initiating an IT Service Management (ITSM) workflow into a ticketing system for follow-up. If a legitimate file is blocked from PUA protection, it can be added to the Defender exclusion list, which is configurable in the Microsoft Defender security baseline in endpoint security. To validate the fact that PUA protection is enabled on a client, open Windows Security | App & browser control | Reputation-based protection settings and look for Potentially unwanted app blocking. Enabling PUA protection does not require a premium license.
Next, let's enable Microsoft Defender SmartScreen features.
Checking apps and files with SmartScreen
Microsoft Defender SmartScreen provides protection against malicious apps and websites in Microsoft Edge, Windows, and the Microsoft App Store. When configuring a SmartScreen policy, there are a few recommended settings that should be enabled to provide the best level of protection for your users. First, let's look at enabling protection in Microsoft Edge. If you've implemented the Microsoft Edge recommended security baseline from Microsoft and CIS, then SmartScreen should already be enabled using Intune security baselines or through the settings catalog. If using the settings catalog, find these settings in the Settings Picker by searching for SmartScreen and selecting the Microsoft EdgeSmartScreen category to add the settings to your policy. We recommend enabling the settings seen in the following figure:
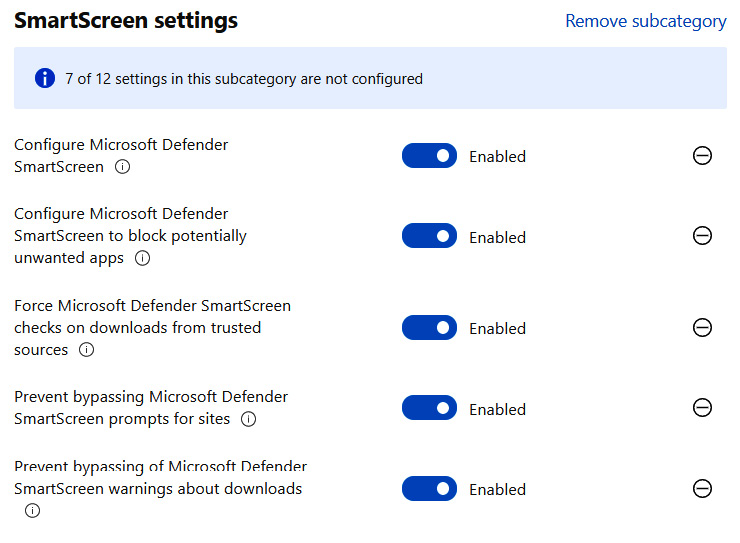
Figure 9.29 – SmartScreen browser settings
Once the policies have been applied, let's see what this looks like from an end user perspective on a client. In this example, we used Microsoft Edge to navigate to a potential phishing site. The user should see a notification as shown in the following screenshot and be blocked from proceeding through the warning:
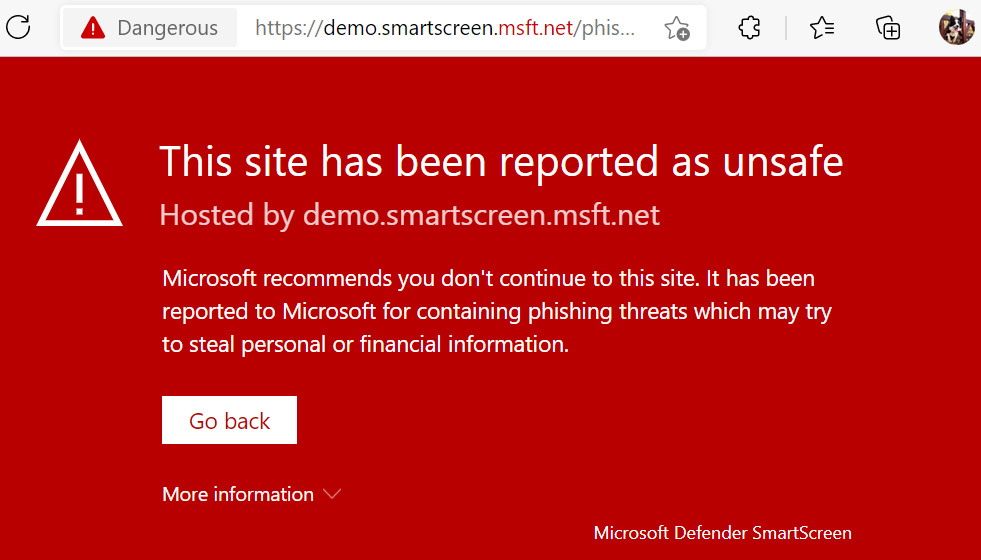
Figure 9.30 – SmartScreen protection in Microsoft Edge
Tip
SmartScreen protection can be enabled for Google Chrome by installing the Microsoft Defender Browser Protection extension.
Next, let's enable SmartScreen for Windows. By default, SmartScreen is configured to allow users to bypass warnings, but it is strongly encouraged to enable the Prevent Override For Files in Shell policy, and this is the recommended configuration from CIS and Microsoft. SmartScreen can be enabled for Windows through an Intune security baseline or using the settings catalog. To enable SmartScreen in block mode, search for Smart Screen in the Settings Picker and configure the settings shown in the following screenshot to follow the recommendations:

Figure 9.31 – Windows Defender SmartScreen policies
On the client, when a user tries to open an unverified or risky app that does not pass the SmartScreen check, they will be presented with the following notification:

Figure 9.32 – Windows Defender SmartScreen blocking a malicious app
Tip
If a false positive blocks an app from running, users can right-click the executable, open properties, and choose to unblock and allow the app to run.
To view the configured SmartScreen settings on the client, open Windows Security | App & browser control | Reputation-based protection settings.
Next, let's look at blocking access to the Microsoft Store to prevent users from installing unwanted consumer applications.
Block the Microsoft Store
The Microsoft Store is installed by default in Windows and contains many of the pre-installed applications available in Windows. By default, users are allowed to search for and install any additional applications from the app store without requiring admin rights. In an enterprise-managed environment, it may not be appropriate to allow users to install apps created for consumer purposes and that are not applicable for business functions. Applications installed through the app store increase the risk of installing vulnerable software that collects data and has privacy concerns. CIS recommends blocking access to the Microsoft Store completely or only enabling the private store for companies that distribute software through purchases from the Microsoft Store for Business and Education.
Tip
If you distribute online-licensed apps using the Microsoft Store, switch to the offline-license model otherwise required app assignments using Intune will fail.
Let's look at blocking access to the Microsoft Store with Intune and enabling access to the private store only. Once the store is disabled, the behavior in Windows 10 and 11 acts slightly differently. In Windows 10, the Microsoft Store will automatically open to the private store if enabled, but in Windows 11, users will need to use the Company Portal app to access the private store. This will require a separate deployment to ensure the Company Portal app is pushed to Windows devices if you plan on using the private store to distribute apps.
To configure this policy, we used the Settings catalog profile type for Windows 10 and later. We gave it the name Windows Security Baseline – Microsoft App Store and chose Microsoft App Store from the Settings Picker. The settings shown in the following screenshot are a good baseline recommendation for controlling the Microsoft App Store and will enable the use of the private store in the Company Portal app:
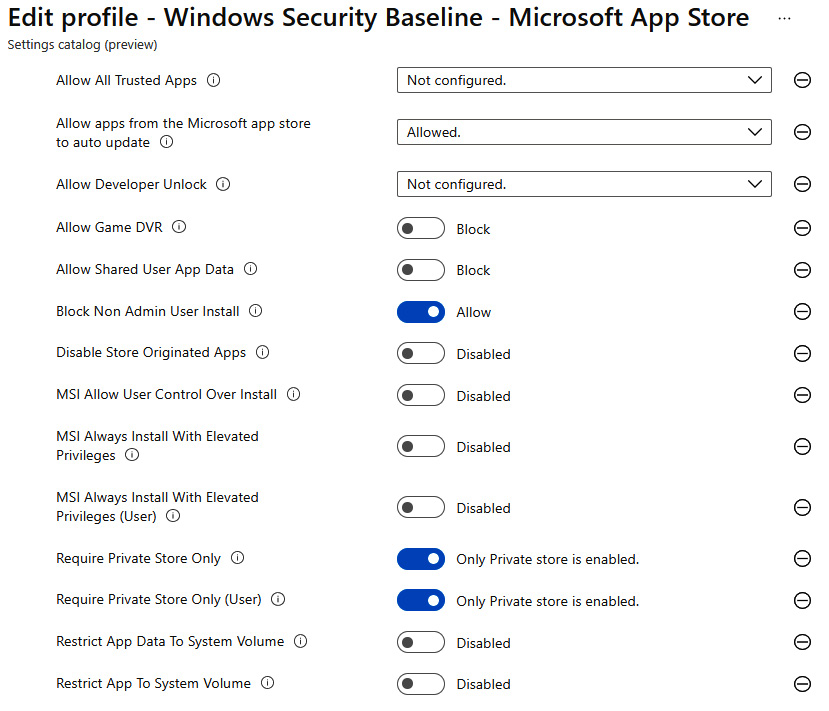
Figure 9.33 – Control Microsoft App Store
For instructions on how to push the Company Portal app to Intune devices, visit this link: https://docs.microsoft.com/en-us/mem/intune/apps/store-apps-company-portal-app.
After creating the policy and assigning it to a group of users and devices, when a user goes to open the Microsoft App Store, they will see the message displayed in the following screenshot:
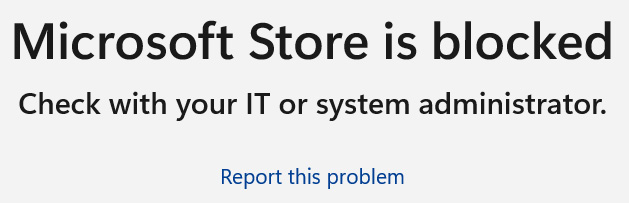
Figure 9.34 – Microsoft Store blocked in Windows 11
Next, let's look at enabled rules to reduce the attack surface and protect against ransomware using Microsoft Defender.
Reducing the attack surface
Attack surface reduction (ASR), in practice, is the enabling of security features that reduce the attack surface or areas in which an attacker can exploit to gain access to a system. Microsoft Defender includes many features that work together to help mitigate these risks and harden the attack surface. We already discussed Windows security features that enable these defenses, including hardware-based security with VBS, deploying a Windows Firewall security baseline, and enabling network and web protection for Microsoft Defender for Endpoint. Next, let's look at a few additional features of Microsoft Defender than can help harden our clients and further reduce the attack surface through ASR rules.
Enabling ASR rules
ASR rules are part of Microsoft's host intrusion prevention solution (HIPS). Enabling ASR rules is another tool in the tool belt to help mitigate attack risk and harden common areas that are likely to be abused by malicious code. These rules were created by Microsoft based on an analysis of the top identified areas based on their telemetry that malicious actors would try to exploit. Many of the processes that ASR rules protect are otherwise seemingly standard functionality in Windows-based systems. A few examples of the protection types in ASR include blocking scripts from executing in email or preventing apps such as Office macros from creating child processes. Many times, attackers leverage these techniques as part of their evasion tactics to hide malicious actions through otherwise seemingly harmless processes.
Microsoft's ASR rules can be enabled through Group Policy, Configuration Manager, PowerShell, and Intune. In the following screenshot, we can see some of the available ASR rules in an endpoint protection profile. There is no recommended best practice as to which rules to enable and each rule will require careful planning to understand how they will affect processes used in your organization:
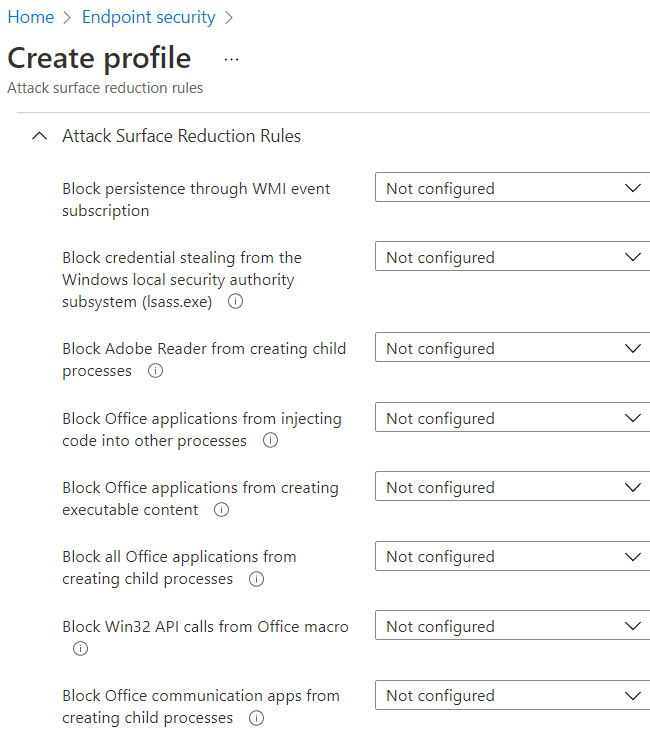
Figure 9.35 – ASR rules in endpoint security
For a full reference of ASR rules, including their GUID mapping, visit this link: https://docs.microsoft.com/en-us/microsoft-365/security/defender-endpoint/attack-surface-reduction-rules-reference?view=o365-worldwide.
In a policy where a rule is configured in warn mode, users will see a notification as displayed in the following screenshot, when an ASR rule is triggered on the client:

Figure 9.36 – ASR rule in warn mode
Microsoft documentation has detailed resources about how to plan for an ASR deployment, including incorporating phases for planning, testing, implementing, and operationalizing. We encourage reviewing these documents in detail by visiting this link: https://docs.microsoft.com/en-us/microsoft-365/security/defender-endpoint/attack-surface-reduction-rules-deployment?view=o365-worldwide.
While ASR rules can be enabled with minimal licensing requirements, to take advantage of the reporting and telemetry features in Microsoft 365 Defender as recommended in the deployment planning, Microsoft 365 Defender E5 or equivalent licenses are required.
Next, let's look at protecting files from ransomware with controlled folder access.
Prevent ransomware with controlled folder access
Ransomware attacks have become quite common as a way for attackers to steal data and extort businesses for monetary gain. Not only have these attacks targeted individual businesses, but more sophisticated human-operated ransomware groups have recently focused their sights on critical infrastructure sectors such as energy, water, and healthcare. Any interruption of operations in these sectors can have real-world detrimental effects on the commodities we depend on every day to survive. We covered ransomware preparedness in detail in Chapter 1, Fundamentals of Windows Security. But, as a reminder, building a ransomware playbook and having an incident response plan is a critical component of a well-rounded security program. An area of focus consists of enabling many tools to protect assets from ransomware attacks.
Typically, a ransomware attack starts with attackers gaining access to systems to gather information about what they can compromise. Once ready, they will detonate their encryption programs and encrypt files, documents, and processes that render them inaccessible, which can disrupt critical system processes. Threat actors will typically require a ransom be paid to decrypt files and restore operations or threaten to leak the data publicly or permanently delete it. As part of ASR planning, Microsoft Defender has a feature that can protect critical files and folders from unapproved modification using controlled folder access. Controlled folder access works by specifying directories on your clients that should be protected (such as desktop, documents, and system folders) from modification, except by identified processes or apps that are explicitly safe-listed. As a result, when a malicious program attempts to trigger encryption on these protected containers, the process will be stopped. Let's look at how to enable this feature.
For controlled folder access to work, Microsoft Defender Antivirus real-time protection must be enabled. If the baseline recommendations for Defender Antivirus are deployed as discussed in Chapter 8, Keeping Your Windows Client Secure, real-time protection is turned on and we can configure controlled folder access through an Attack Surface Reduction Rules policy in Endpoint Protection in Intune. The policy configuration will look like the following screenshot:

Figure 9.37 – Controlled folder access settings
The Use advanced protection against ransomware rule uses cloud-delivered protection to enhance real-time protection and help discover whether a file could be a product of ransomware.
The Enable folder protection setting enables the controlled folder access setting in the Windows Security app.
Once enabled, Windows system folders and common locations such as documents, pictures, and videos are protected by default. For a reference about which folders are protected by enabling the policy and for additional information about controlled folder access, visit this link: https://docs.microsoft.com/en-us/microsoft-365/security/defender-endpoint/controlled-folders?view=o365-worldwide.
Just as with the features we've covered, events are logged in the Microsoft 365 Defender portal. To view the status of controlled folder access on a client, open the Windows Security app and go to Virus & threat protection | Manage settings | Manage Controlled folder access. Click on Block history to view any protected folders that have blocked access from unapproved apps. If notifications are enabled on the client, users will see a Windows security notification when access to a protected folder was blocked, as seen in the following screenshot:

Figure 9.38 – Controlled folder access block
Next, let's look at enabling another intrusion prevention capability of Defender called Windows Defender exploit protection.
Enabling Defender exploit protection
Windows Defender exploit protection is another feature that is part of Windows Defender Exploit Guard. We've covered three of these features already: ASR rules, controlled folder access, and network protection. Exploit protection works to stop attackers from leveraging operating system processes and apps from malicious activities by applying specific mitigation tactics. A few examples of mitigation techniques that can be enabled in an exploit protection policy include the following:
- Arbitrary code guard helps by preventing memory protection flags from being marked as executable and allowing code not originating from the application to be loaded. Attackers try to leverage the permissions of trusted applications to execute malicious code.
- Do not allow child processes prevents applications from creating a new child application. This is an evasion technique that uses a trusted process to spin up a potentially malicious child process to remain under the radar.
- Control flow guard prevents memory corruption attacks that overwrite memory and change function pointers to be directed to execute malicious code instead of the expected application.
Exploit protection can apply many additional mitigation tactics and allow the creation of a policy audit mode to measure any potential compatibility impacts. To read more details about each mitigation control, visit the following link: https://docs.microsoft.com/en-us/microsoft-365/security/defender-endpoint/exploit-protection-reference?view=o365-worldwide.
Let's view the exploit protection features on a client by opening the Windows Security app and going to the App & browser control | Exploit protection settings. Exploit protection is automatically enabled in Windows at the recommended settings for both system processes and individual apps. Any additional mitigations you wish to add for protecting apps can be added in Program settings and will take precedence over preset system settings.
To deploy exploit protection settings to your clients, we can build a baseline template using the local Windows Security app. Once the mitigations have been added and tested, we can export the XML file and distribute it using Intune or Group Policy.
To export the policy for distribution, click on Export settings from the Exploit protection settings in the Windows Security app and save the XML file. In Intune, create an Exploit protection profile for Windows 10 and later using the Attack surface reduction profile type in Endpoint security.
Upload the XML file and choose Yes on the Block users from editing the Exploit Guard protection interface setting to prevent users from making changes. The profile should look like the following screenshot when creating it in Intune:

Figure 9.39 – Exploit protection profile in Endpoint security
Review and save your policy and assign it to the user or device groups to complete the deployment. Exploit protection settings should now be managed by Intune and match the exported baseline configurations.
Tip
If exploit protection settings were configured in the past for earlier Windows baselines, the Windows Security baselines from the SCT include a script to reset them back to the closest Windows default settings.
Just as with ASR rules and controlled folder access, when mitigation occurs on the client because of the exploit protection policy, the user will see a notification from Windows Security. To read more about testing policies in audit mode, visit the following link: https://docs.microsoft.com/en-us/microsoft-365/security/defender-endpoint/evaluate-exploit-protection?view=o365-worldwide.
Next, let's look at enabling Application Guard and use hardware-based process isolation to protect Windows from malicious code executed inside Office and Edge.
Zero trust with Application Guard
Application Guard is a technology available for Microsoft Office apps and the Edge browser to prevent untrusted files and websites from accessing resources on the host operating system through hardware-based isolation. This isolation, which is powered by virtualization-based security, provides zero-trust protection against zero-day threats. We covered the hardware virtualization technologies that drive Application Guard in Chapter 3, Hardware and Virtualization, and we recommend carefully reviewing the system requirements at the following link before enabling the feature. Currently, Application Guard is not officially supported in virtualized environments: https://docs.microsoft.com/en-us/windows/security/threat-protection/microsoft-defender-application-guard/reqs-md-app-guard.
First, let's look at enabling Application Guard for the Microsoft Edge browser and configuring a list of trusted cloud domains using enterprise-managed mode.
Application Guard for Microsoft Edge
Application Guard for Microsoft Edge opens non-trusted websites in isolation to help protect against malicious code and browser-based threats. Historically, admins may have enabled trusted sites or used firewalls to explicitly restrict the permissions websites had by placing them in trusted zones. With Application Guard, you can configure trusted domains and know that when a user visits a website outside of the safelist, they will be protected. Policies configurable through Intune can also be set to allow certain interactions with the host OS, such as allowing copying and pasting or printing. This protection can extend to other browsers, such as Google Chrome and Firefox, by installing an extension that will redirect untrusted sites to open in an Application Guard window of Microsoft Edge. Let's look at enabling an Application Guard policy with enterprise-managed mode using Endpoint Security in MEM.
To create a policy in MEM, use an App & browser isolation profile for Windows 10 and later using the Attack surface reduction profile type in Endpoint Security.
There are several settings in the profile that determine how websites inside Application Guard can interact with the host and we recommend configuring them to fit your company's needs. Use Windows network isolation policy to configure trusted network boundaries that safelist company IP ranges, cloud resources, and domains that can access the host computer. Any website not in the isolation policy will open in Application Guard and be subjected to the policies you configure in the profile. The following screenshot shows some of the configurable settings available for Application Guard:

Figure 9.40 – Application Guard settings in Endpoint Security
In our profile, we are going to leave the defaults and configure the following settings:
- Turn on Application Guard is set to Enabled for Edge.
- Enable hardware graphics acceleration (Microsoft Edge only) is configured to Yes.
- Windows network isolation policy is set to Configure.
Reviewing the CSP reference documentation, typically, leaving the default setting of Not configured means that the functionality is turned off. More information about the Application Guard CSPs can be found at the following reference link: https://docs.microsoft.com/en-us/windows/client-management/mdm/windowsdefenderapplicationguard-csp.
Tip
Enabling Application Guard turns on new Windows features and a reboot may be required before the settings take effect.
Let's see what this looks like on a client after the policy applies. By visiting a website not listed in the network boundaries, a new window will open and load the web page in Application Guard, as can be seen in the following screenshot:

Figure 9.41 – Application Guard in Microsoft Edge
Notice how there are two instances of Edge open in the Windows taskbar, and the Application Guard window is depicted by an icon over it. Keep in mind that this isolation may have unwanted effects and could reduce the functionality of certain websites. For example, downloading files will be prevented unless specified in the policy, and be sure to test websites with redirects to make sure they behave as expected, especially if they are in your safe-listed domains. General troubleshooting can be done directly inside the Edge browser. For example, to determine why a site is opening in a container and not on the host, you can visit edge://application-guard-internals in the address bar and test a URL.
Application Guard policies are also supported for some third-party browsers. Next, let's review the requirements to enable Application Guard for Google Chrome and Firefox.
Third-party browser support
To extend Application Guard for use in Google Chrome, you will need to install the extension and companion app. You can find the Defender Application Guard extension at the following link: https://chrome.google.com/webstore/detail/application-guard-extensi/mfjnknhkkiafjajicegabkbimfhplplj?hl=en-US.
The Microsoft Defender Application Guard companion app can be installed from the Microsoft Store and pushed to managed devices using Intune app deployments. There are a few recommended policy settings for Google Chrome that should be reviewed and detailed usage instructions for both Google Chrome and Firefox can be found at this link: https://docs.microsoft.com/en-us/windows/security/threat-protection/microsoft-defender-application-guard/md-app-guard-browser-extension.
Once the prerequisites are configured and the extension and companion app is installed, whenever a user visits a website not in the configured trusted network boundary list, they will be redirected to a new Microsoft Edge Application Guard window automatically.
Tip
If blocking the Microsoft Store, the companion app will need to be added to the Microsoft Store for Business with an offline license to push as required to users' devices in Intune.
Next, let's look at enabling Application Guard for Microsoft Office apps.
Application Guard for Microsoft Office
Microsoft Application Guard technology is also extended to Office apps to help reduce the attack surface from Office-based exploits. Just like with Edge, Microsoft Office will open untrusted files in an isolated container that prevents interaction with the host OS. As mentioned previously, with Edge, policies can be configured to allow users the ability to print and copy/paste to minimize productivity loss. Application Guard for Office does require a Microsoft 365 E5 or equivalent license SKU. You can find the link to the reference documentation for additional prerequisites in the Zero trust with Application Guard section.
If you are familiar with the protected view feature in Office, documents will follow a similar behavior and will open in Application Guard if the following conditions are met:
- Files are downloaded from the internet.
- Files are not located in defined trusted locations.
- Attachments are opened from emails.
Since the interaction between the file and host is restricted, if a document is deemed trustworthy, the user can remove protection from the file by saving it locally and then re-opening it like any other trusted Office document. Since this is a fundamental change in how Office documents open and users interact with them, we recommend communicating these changes throughout your organization to help avoid confusion and to reduce service desk tickets.
Let's enable an Application Guard policy for Office using Endpoint Security in Intune. We can use the same profile created earlier or build a new profile using the App & browser isolation profile for Windows 10 and later and selecting the Attack surface reduction profile type in Endpoint Security.
To keep Application Guard enabled for both Edge and Office, set the Turn on Application Guard setting to Enabled for Edge AND isolated Windows environments.
After the policy applies, Office will open untrusted documents in the Application Guard container in a protected mode, as can be seen in the following screenshot:
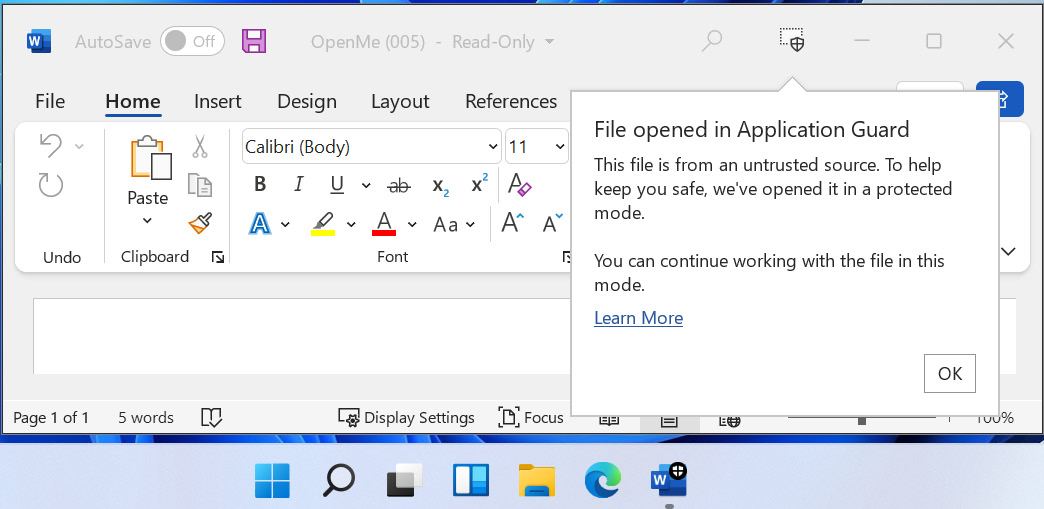
Figure 9.42 – Microsoft Office Application Guard
If the file does not contain malicious content, users can remove protection through the File menu and save the file locally if allowed by policy. Users will see this option, as shown in the following screenshot:

Figure 9.43 – Removing Application Guard protection
To enable Application Guard, Microsoft Office must be on version 2011 build 16.0.13530.10000 or later and on Current Channel or Monthly Enterprise Channel. Additional policies for how users can interact with files inside of Application Guard can be configured using the Office cloud policy service, and a reference can be found at this link: https://docs.microsoft.com/en-us/microsoft-365/security/office-365-security/install-app-guard?view=o365-worldwide.
Next, let's add an extra layer of protection before opening office files by enabling real-time document scanning with Microsoft Defender using Safe Documents.
Enabling Safe Documents for M365 apps
Safe Documents is a feature of Microsoft 365 Defender that sends untrusted Office documents to the Microsoft Defender service and scans them in real time before allowing them to be opened in edit mode by the user. Once the file is cleared through Microsoft Defender, the document will then open in Protected View or Application Guard and the user can enable content and interact with the document instead of being in read-only mode.
To enable Safe Documents, a Microsoft 365 E5 or equivalent license is required and is not currently available as a license add-on. Safe Documents can be configured organization-wide through the Microsoft 365 Defender portal, or individually for users by using PowerShell. Let's look at enabling this using the Microsoft 365 Defender portal:
- Log in to the Microsoft 365 Defender portal at https://security.microsoft.com and go to Policies & rules | Threat policies | Safe attachments.
- Click on Global Settings to open the pop-up menu. Toggle the option for Turn on Safe Documents for Office clients to enable the feature.
- If a file is identified as malicious and you wish to allow users to proceed, enable the option to Allow people to click through Protected View even if Safe Documents identifies the file as malicious.
The global settings pop-up will look like the following screenshot:

Figure 9.44 – Safe Documents in the Microsoft 365 Defender portal
After the policy has been applied, when a user opens an untrusted file using the Office client, the document will be scanned against the Microsoft Defender for Endpoint service. Depending on the size of the document, this may take several seconds. After the file is verified and found safe, the user will see an Enable Editing button, as in the following screenshot, and be able to work with the file as expected:

Figure 9.45 – Safe Documents banner notification
For more information on licensing requirements and how to enable using PowerShell for individual users, visit this link: https://docs.microsoft.com/en-us/microsoft-365/security/office-365-security/safe-docs?view=o365-worldwide.
For information about Microsoft Defender for Endpoint data storage and privacy, visit this link: https://docs.microsoft.com/en-us/microsoft-365/security/defender-endpoint/data-storage-privacy?view=o365-worldwide.
Next, let's review Windows Defender Application Control (WDAC) for creating application safelists. WDAC can be used to harden the attack surface by determining which applications are allowed to run in Windows.
WDAC
WDAC helps to harden the attack surface and mitigate risk from malicious applications by restricting what applications are allowed to run on a Windows client. To configure WDAC, a policy is created that acts as a safelist that lists trusted applications and file paths that apps and processes can run from. A WDAC policy can also be used to specify what Component Object Model (COM) objects can run and enforce script signing requirements to protect your system from unsigned or unauthorized script modifications. WDAC is fundamentally aligned with core zero-trust principles, as applications and processes must prove their trust before they are able to execute. If the application, process, or path is not on the safe list, it will be blocked or audited.
WDAC is the recommended approach by Microsoft for applying application control and is a successor to other technologies such as AppLocker. Unlike traditional application control policies such as AppLocker, WDAC policies are enforced at the device level and cannot be assigned to specific users and groups. WDAC policies can be protected from modification by enabling hypervisor-protected code integrity (HVCI) and VBS security for an added layer of protection. In the past, the combination of these two technologies deployed together was known as Device Guard and it provides full protection for both user and kernel-mode operations.
Later, in Chapter 12, Keeping Your Windows Server Secure, we will cover how to build a WDAC policy for Windows Server, but the same methodology applies to creating policies for clients. Once the baseline policy is created, it can be exported and distributed through Intune, Configuration Manager, or Group Policy.
Tip
WDAC policies are built in XML format. They are configured using PowerShell and are converted into binary before they are deployed. Windows has preconfigured baseline controls that can be used to build your own XML definitions around. To view the rules of these policies, use the Get-CIPolicy cmdlet in PowerShell. Example policies are stored in the following path: %SystemDrive%WindowsschemasCodeIntegrityExamplePolicies.
It is recommended that you thoroughly understand and test the effects that WDAC policies will have on your systems. As mentioned earlier, they are designed with zero-trust principles and improper configuration can block critical system components from running. We recommend deploying a policy in audit mode first and reviewing the logging to understand the effects on your Windows clients.
WDAC logs can be found in the event viewer under Applications and ServicesMicrosoftWindowsCodeIntegrityOperational or by using advanced hunting in the Microsoft 365 Defender portal if your clients are onboarded to Defender for Endpoint.
Intune can natively deploy Application Control using AppLocker CSP policies through the Endpoint protection template in the Templates profile type. Support for customized policies and further fine-grained control can be distributed using a Custom template and by referencing the ApplicationControl CSP policies. The following screenshot shows the built-in Intune policy for Application Control set to deploy in Audit Only mode using Endpoint protection:
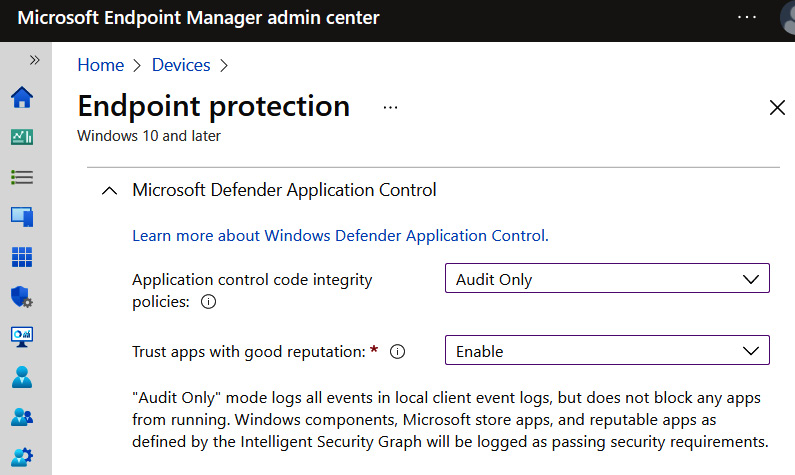
Figure 9.46 – Application Control in Intune
Considerations for WDAC or AppLocker
As previously mentioned, Microsoft recommends implementing WDAC over AppLocker if possible as they have committed to providing enhancements and support for WDAC over AppLocker in the future. We recommend reviewing the capabilities of each to determine what policy or combination of the two is appropriate for your organization. For more information about comparing WDAC to AppLocker, visit this link: https://docs.microsoft.com/en-us/windows/security/threat-protection/windows-defender-application-control/wdac-and-applocker-overview.
Configuring and testing custom policies can be extremely time-consuming and should be carefully considered if you're planning a deployment. Microsoft has created a lot of documentation around deployment planning and a link to the reference materials can be found at https://docs.microsoft.com/en-us/windows/security/threat-protection/windows-defender-application-control/windows-defender-application-control-deployment-guide.
Next, let's look at applying removable storage protection through a removable storage access control policy in Microsoft Defender.
Protecting devices with a removable storage access control policy
Removable storage can be defined as any storage device that is not built into the computer itself. This includes peripherals such as USB drives, CD/DVD, and non-volume devices such as cameras and smartphones. It is a convenient way to store data and quickly transfer files from one system to another. It is also portable and is a fast alternative for data backup comparable to network and cloud storage. Removable media poses a significant weakness in any data loss prevention program by allowing data to easily leave the company in an unauthorized way. It can be used as an attack surface for executing malicious code and for exfiltrating data from a system. Traditionally, to control the use of removable storage, IT admins could deploy a device installation restriction policy to block or allow hardware types by specifying a device class, instance, or identifier. While effective, configuring these policies can be complicated and impacts the use of other peripherals such as audio headsets, keyboards, and mice. This level of control is extremely fine-grained and, depending on your company's compliance and security policies, is an effective method for controlling peripherals.
For companies that don't need that fine level of control over hardware installation, Microsoft Defender allows you to control removable media through a removable storage access control policy. We can configure actions to audit, allow, or prevent the read, write, and execution of data to removable storage. These policies are designed to help complement any existing DLP program with significantly less overhead compared to an installation restriction policy by following these high-level steps:
- Defining the removable media group or groups in which the policy should apply, including exclusion group.
- Creating the policy and setting the enforcement action.
- Deploying the policy to your endpoints using Intune or Group Policy
When defining your policies, a minimum of two XML files will be created. The first will define the removable storage groups for organizing devices, and the other will define the access controls that are applied to those groups. To simplify the creation of removable storage groups, devices can be scoped into groups by defining a PrimaryId. This can simplify the organization process instead of adding devices by listing their unique HardwareId, SerialNumberId, or InstancePathId in the policy. PrimaryId is defined as follows:
- RemovableMediaDevices includes USB data storage devices.
- CdRomDevices includes optical drives such as CD/DVD/Blu-Ray.
- WpdDevices are Windows Portal Devices (WDPs), including mobile phones.
Building policies can get complex quickly and we strongly encourage reviewing the reference documentation in detail. For a full list of the available policy properties, visit the link at https://docs.microsoft.com/en-us/microsoft-365/security/defender-endpoint/device-control-removable-storage-access-control?view=o365-worldwide.
Let's build a policy that denies write and execute access to all removable media types by using PrimaryId. We will set the options to show a notification to the user when an action is blocked. The following screenshot shows the formatted XML file to define our removable media group. It includes PrimaryID of all supported removable media types as specified from the policy properties reference link shared previously:

Figure 9.47 – Removable storage group XML file
Tip
To create a unique GUID to be used as a group ID, use the following PowerShell command: [guid]::NewGuid().
Next, let's look at the format of the access control policy. In the following screenshot, you can see it includes a unique GUID for <PolicyRule Id> and includes the GUID of our media group created previously in <IncludedIdList>. This tells the access control policy that every device in that removable media group will have the policy enforced. We will create a new GUID to define <Entry ID> and set the deny action for write and execute using <AccessMask> with the option to show notifications to the user.

Figure 9.48 – Access control policy XML file
After creating the policies, we saved each XML file to be uploaded into Intune.
An audit mode is supported and allows you to analyze the telemetry data in Microsoft Defender for Endpoint to determine the effects that enforcing a policy will have on your devices. Use audit mode to start piloting the policy to help minimize the impact on end users. To leverage the streaming of telemetry to Microsoft Defender for Endpoint, a Microsoft 365 E5 license or equivalent is required. Let's look at delivering this policy to devices using Intune.
Enabling a removable storage access control policy
A removable storage access control policy can be deployed using Group Policy and Intune. It's important to note that the formatting of the XML file will differ slightly depending on the method. The reference links for building the XML file can be reviewed in the Protecting devices with a removable storage access control policy section.
In this example, we will use a Custom template from the Templates profile type for Windows 10 and later in Intune to deploy the policies.
First, we will add our removable media group by clicking Add row and entering the following details:
- Name: All Removable Media
- OMA-URI: ./Vendor/MSFT/Defender/Configuration/DeviceControl/PolicyGroups/%7b1c5d166a-9f15-4f7f-85c3-d429b8c919c3%7d/GroupData
The OMA-URI path of our removable media groups should be in the following format and include the GUID for the Group ID in the path: %7b**GroupGUID**%7d/GroupData. Our Group ID in the example was {1c5d166a-9f15-4f7f-85c3-d429b8c919c3}.
- Data type: String (XML file)
The XML file will need to be uploaded. Next, we added a new row for the access control policy with the following details:
- Name: Deny Write and Execute All Media
- OMA-URI: ./Vendor/MSFT/Defender/Configuration/DeviceControl/PolicyRules/%7bf582defe-506d-4492-9d70-dcd352cd2b56%7d/RuleData
The OMA-URI path of our access control policy should be in the following format and include the GUID for the PolicyRule ID in the path: %7b**PolicyRuleGUID**%7d/RuleData. Our PolicyRule ID in the example was {f582defe-506d-4492-9d70-dcd352cd2b56}.
- Data type: String (XML file)
The XML file for the access control policy rules will also need to be uploaded.
If you have multiple removable media groups and policies, each will need to be added as its own OMA-URI in Intune or the policy enforcement will fail. After you have added the rows, save, and assign the policy to a user or device group. Let's see what the behavior looks like for end users.
After the policy applies to a client and the user goes to write a file to removable media, they will see a notification as shown in the following screenshot:

Figure 9.49 – User notification
Also, if the user opens File Explorer and attempts to add a new file by right-clicking on the removable media drive, the option for New will be missing. With auditing enabled, you can review the audit logs using advanced hunting in the Microsoft 365 Defender portal. KQL query examples are listed on the reference documentation page listed previously. The following screenshot shows an example of the parsed log file from the Microsoft 365 Defender portal for the triggered deny event:
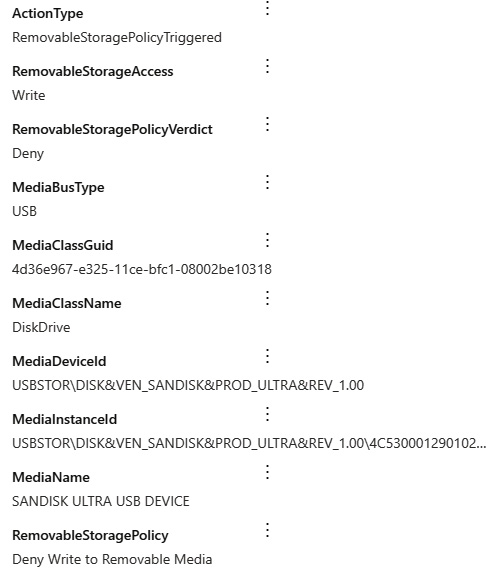
Figure 9.50 – Microsoft 365 Defender advanced hunting
Deploying a removable storage access control policy is very powerful and quite flexible. It is a great way to lock down the use of removable storage and provides much of the same flexibility as an installation restriction policy. Using the reporting from the Microsoft 365 Defender portal, dashboards can be built to help analyze removable media usage and determine the impact before enforcing any deny actions on your users. Phased deployments can be accomplished by assigning the policy to different device groups in Intune.
Summary
In this chapter, we reviewed additional areas and next-generation features to incorporate into baseline controls that complement a Windows security baseline. Taking a holistic approach to security is key for improving your overall hardening and establishing a robust layer of protection for your endpoints. We covered baseline recommendations from CIS and Microsoft for Edge and Chrome, and how to manage sign-in settings and control extensions. We provided examples of the different methods for delivering policies using Intune with Intune security baselines, the settings catalog, and ADMX ingestion for managing third-party apps. We discussed the importance of protecting Microsoft 365 apps and provided an overview of using the Office cloud policy service in the Microsoft 365 Apps admin center.
Next, we reviewed many of the advanced protection features available in the Microsoft Defender suite of products and the importance of enabling them to reduce the attack surface beyond standard antivirus protection. This included protecting users from unwanted apps, enabling ASR rules, and protecting them from ransomware using controlled folder access. We then covered enabling Application Guard for Edge and Office to isolate processes and protect against zero-day threats. Finally, we finished the chapter by discussing application control policies and how to administer a removable storage access control policy to protect against data leakage.
In the next chapter, we are going to expand on ASR and discuss common attack vectors. We will review techniques such as Adversary-in-the-Middle, and discuss how to protect against lateral movement and privilege escalation.