Chapter 3: Hardware and Virtualization
In this chapter, we will cover the importance of hardware and virtualization as it relates to security. These items can be easily overlooked but are critical components of the overall strategy for securing your Windows systems. As you purchase hardware, you need to consider the process that exists for the supply chain. Who is manufacturing the hardware and how do we trust that the components building the final product are clean and free from vulnerabilities? How do we validate that no additional components have been added that could compromise our security and privacy? We also need to take into consideration the existence of hardware vulnerabilities that become extremely difficult to manage. Ensuring your hardware is the latest available version and secure is just as important as protecting your operating system (OS). Vulnerabilities such as Meltdown and Spectre are prime examples of this. You can learn more about Meltdown and Spectre by reading this article: https://www.us-cert.gov/ncas/alerts/TA18-004A.
In addition to the underlying physical hardware is the hardening and securing of virtualized infrastructure that's used to deploy your data center and virtual workstations. Chances are, most of you have some form of virtualization deployment within your environment. Moving from a decentralized management model to a centralized model for your systems could allow a single point of compromise (SPOC) to morph into a major compromise of many systems within your virtual infrastructure. For this reason, it is critical that you take time to understand the hardware being used within your environment and ensure it is protected correctly and is secured. A weakness within your hardware is a vulnerability to the running OS, and all the investment you've spent on hardening the OS becomes obsolete.
Throughout this chapter, we will provide the awareness needed to ensure you know the best hardware-based security features for protecting your Windows OS. As you read through this chapter, you will learn more about the following topics:
- Physical servers and virtualization
- Introduction to hardware certification
- The firmware interface, Trusted Platform Module (TPM), and Secure Boot
- Isolated protection with virtualization-based security (VBS)
- Protecting data from lost or stolen devices
- Hardware security recommendations and best practices
Technical requirements
For the Physical servers and virtualization section, you will need a Windows OS running with the supported hardware listed throughout to set up Hyper-V. You will also need access to an Azure subscription to set up a virtual machine (VM) within Azure. To do this, go to https://portal.azure.com/.
For the remainder of this chapter, each section will have baseline requirements needed to turn on specific hardware-based security features and will include links for further reference.
Physical servers and virtualization
Today, your organization likely has physical hardware for both your data center and end users. In both scenarios, the Windows OS will be running on top of the physical hardware layer. This adds an extra layer of concern as it relates to security. Within the physical device, your OS requires interaction with the hardware and your data will interact with hardware components such as the central processing unit (CPU) and random-access memory (RAM). The same will apply to hard drives, which contain the OS and any personal data stored locally at rest. If no action is taken regarding your storage devices, your data will be in cleartext and easily readable. Understanding the physical layer of your devices and what can be done to better protect them is a critical step in protecting data and the Windows OS.
In addition to running a single OS on a physical device comes the concept of virtualization. Virtualization, in its simplest form, allows you to take a physical server and install multiple isolated VMs and OSs on top of shared underlying physical hardware. This allows for greater efficiency and workloads with your current hardware and resources. Prior to cloud and virtualization technology, you were required to deploy a physical server for each app/service you wanted to deploy (not accounting for High Availability (HA) configurations). This was a manageable process in the early days of server compute data centers, but as more demand came along with the extremely fast pace of technology and the need for more apps, the ability to deploy physical servers quickly became very challenging and expensive.
Fortunately, the advancement of data center virtualization became available, and the ability to deploy multiple OSs on a single piece of server hardware has been a game-changer within the enterprise. In the following diagram, the physical server deployment underlying hardware only has one OS, while the virtualized deployment has many sharing the same hardware host:

Figure 3.1 – Physical server deployment versus virtualized deployment
Within the end user world, virtualization has also been widely adopted. Virtualization of the desktop has allowed companies to overcome many challenges as it relates to quickly deploying desktops to contractors/vendors and offshore employees. Virtualization also provides access to legacy applications that may not be supported on the latest OS and provides additional desktops to users for development and testing. It is also a great scenario for part-time workers or those who only need limited access intermittently. Virtualization provides ample opportunity with great flexibility, but we must remember that it still runs on physical hardware with similar security concerns when it comes to protecting Windows.
Microsoft virtualization
Let's review the virtualization technologies Microsoft provides for both the Windows Server environment and end-user desktop.
Hyper-V
For traditional on-premises deployments, Microsoft has Hyper-V technology, which is a hypervisor-based virtualization platform. As with other enterprise-grade platforms, Hyper-V allows you to manage, deploy, and run multiple VMs on a single piece of hardware, thus allowing better use of your hardware resources. The following requirements are needed to run VMs in Hyper-V:
- Windows hypervisor
- The Hyper-V Virtual Machine Management service
- The virtualization Windows Management Instrumentation (WMI) provider
- The Virtual Machine Bus (VMBus)
- Virtualization service provider (VSP)
- Virtual infrastructure driver (VID)
The following tools can be used for managing the Hyper-V environment:
- Hyper-V Manager
- Hyper-V module for Windows PowerShell
- VM connection (sometimes called VMConnect)
- Windows PowerShell Direct
- System Center Virtual Machine Manager (VMM)
For further information about Hyper-V technology, visit this link:
https://docs.microsoft.com/en-us/windows-server/virtualization/hyper-v/hyper-v-technology-overview
Hyper-V can be run on both Windows Server and Windows desktop, with the latest versions being Windows Server 2022 and Windows 11. Hyper-V on Windows Server is designed for more of an enterprise-grade deployment, thus allowing the migration of VMs between hosts and access to enterprise-grade storage for improved VM performance. It also supports advanced hardware protection features using TPM attestation with Guarded Fabric and Shielded VMs. Hyper-V for Windows desktops allows users to spin up multiple VMs for testing/development purposes and can run multiple OSs. Hyper-V also supports multiple OSs aside from Windows.
Tip
To view a list of supported OSs that can run on Hyper-V, visit this link:
To get started with Hyper-V on Windows Server, you will need the following minimum requirements:
- 64-bit processor with second-level address translation (SLAT).
- VM monitor mode extensions.
- At least 4 gigabytes (GB) of RAM. This will increase the more VMs you would like to run concurrently.
- Virtualization support turned on in the Basic Input/Output System (BIOS) or Unified Extensible Firmware Interface (UEFI) with the following:
- Hardware-assisted virtualization
- Hardware-enforced Data Execution Prevention (DEP) > Intel: execute disable bit (XD bit); Advanced Micro Devices (AMD): no execute bit (NX bit)
In addition to the basic requirements for Hyper-V, you will want to ensure you enable Guarded Fabric and Shielded VMs for the best protection and security. Guarded Fabric is the infrastructure component used to enable and protect Shielded VMs from being compromised. Shielding a VM allows it to only be run on an approved host and prevents unauthorized access within the environment, offline or outside of the protected environment. Shielded VMs first became available in Hyper-V 2016 and require the following features:
- UEFI 2.3.1 (Ensure boot is configured to use UEFI)
- TPM v2.0
- Input-output memory management unit (IOMMU) and SLAT
- Secure Boot enabled
You will need to be using generation 2 (Gen 2) VMs and will require a minimum Windows Server 2012 OS to enable the Shielded VM feature. More information on Guarded Fabric and Shielded VMs can be found at this link: https://docs.microsoft.com/en-us/windows-server/security/guarded-fabric-shielded-vm/guarded-fabric-and-shielded-vms.
Tip
The following link is for the installation documentation for Hyper-V on Windows Server. This deployment is more involved and will require multiple physical devices in order to be set up and secured correctly: https://docs.microsoft.com/en-us/windows-server/virtualization/hyper-v/get-started/install-the-hyper-v-role-on-windows-server.
Getting started with Hyper-V on Windows desktop is a painless task. The feature is free to enable, and you will only need licenses for the respective OS you would like to run.
The minimum requirements needed to enable Hyper-V on Windows desktop are listed here:
- Latest Windows OS
- 64-bit processor with SLAT
- CPU support for VM Monitor Mode Extension (Virtualization Technology (VT)-c on Intel CPUs)
- Minimum of 4 GB memory
- Enabled in BIOS: VT and hardware-enforced DEP
Before you enable this feature, verify the hardware is compatible by opening PowerShell or Command Prompt, type systeminfo, and press Enter. Scroll down to the Hyper-V requirements and verify Yes is listed next to all items.
To view the additional Windows requirements to run Hyper-V, visit the following informational link: https://docs.microsoft.com/en-us/virtualization/hyper-v-on-windows/reference/hyper-v-requirements.
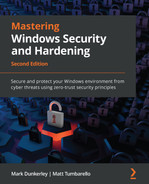
To install Hyper-V through the Windows graphical user interface (GUI), follow these instructions:
- On your supported Windows device, go to Search and type Turn Windows features on or off.
- Select Turn Windows features on or off to open the Windows Features window.
- Search for Hyper-V and select it. Ensure all sub-options are selected.
- Click OK in the Windows Features window, as shown in the following screenshot, and click Restart Now when prompted to reboot your device:
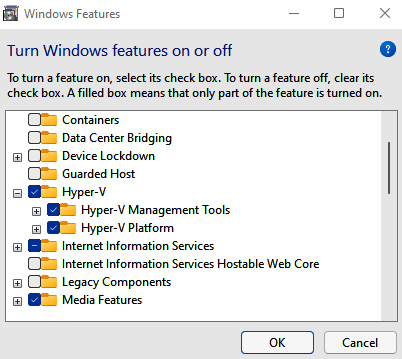
Figure 3.2 – Hyper-V in Windows Features
Tip
For additional methods to enable Hyper-V, visit the following link:
https://docs.microsoft.com/en-us/virtualization/hyper-v-on-windows/quick-start/enable-hyper-v
Now that Hyper-V is enabled, you can start creating VMs and set up your own lab to implement and test the recommendations being provided in this book.
For more information on setting up your first VM, follow the instructions provided here: https://docs.microsoft.com/en-us/virtualization/hyper-v-on-windows/quick-start/quick-create-virtual-machine. You will need a license to run any Windows VMs that you have set up.
Azure Stack HCI
To date, Microsoft has announced that Hyper-V Server 2019 will be the last version of the product, but will continue to be available on newer versions of Windows and supported through January 2029.
Tip
You can view end of life (EOL) for all Microsoft products at https://docs.microsoft.com/en-us/lifecycle/products/.
Microsoft's next generation of a hypervisor platform is Azure Stack HCI. Azure Stack HCI is an Azure service that provides a hyper-converged infrastructure (HCI) and acts as a virtualized host. The solution allows you to run virtualized Windows and Linux similar to Hyper-V and bridges your on-premises infrastructure with your Azure cloud services. Azure Stack HCI can be managed with current tools you are familiar with, including Windows Admin Center and PowerShell. An Azure Stack HCI includes the following:
- An OS (Azure Stack HCI)
- An original equipment manufacturer (OEM) partner's validated hardware
- Hybrid services on Azure
- The Windows Admin Center user interface (UI)
- Compute resources within Hyper-V
- Software-defined storage using Storage Spaces Direct
- Software-defined networking (SDN) with an optional network controller
You can learn more about the Azure Stack HCI solution, including how to deploy, requirements, how to manage, and more here:
https://docs.microsoft.com/en-us/azure-stack/hci/overview
Azure VMs
Microsoft's Azure cloud Infrastructure-as-a-Service (IaaS) offering allows us to set up and consume VMs on-demand with no underlying infrastructure required from the consumer. To create a VM within Azure, follow the next steps. As a reminder, you will need an active Azure subscription to create VMs:
- Log in to the Azure portal at https://portal.azure.com.
- Click on the Portal menu at the top left (if the menu is hidden).
- Select All services and choose Compute.
Here, you will see all the compute services, including VMs. You can either click on the Virtual machines option to be directed to the VM portal or you can hover over Virtual machines to view additional information and options, as illustrated in the following screenshot:

Figure 3.3 – VM tooltip in Microsoft Azure
In addition to the VM management portal, the Azure Marketplace has predefined images provided by Microsoft available to deploy. To view the available images within the Marketplace, follow these steps:
- Search for Marketplace within the top search menu and choose Marketplace.
- Select Compute in the Categories blade.
- Search for Windows to view all the available Windows images, as illustrated in the following screenshot:

Figure 3.4 – Windows images from the Azure Marketplace
For more information about Windows VMs running in Azure, visit this link:
https://docs.microsoft.com/en-us/azure/virtual-machines/windows/overview
We recommend that you use Azure to deploy and test security configurations for Windows Server and desktop for topics that are covered in this book.
Azure Virtual Desktop
Another option available for virtualization in Azure is Azure Virtual Desktop (AVD). This Platform-as-a-Service (PaaS) offering from Microsoft provides both desktop and app virtualization within the Azure cloud. The following features are provided with the AVD service:
- Multi-session Windows 11 hosts for non-persistent and persistent VMs
- Desktop and application virtualization with Microsoft Software Installer Package (MSIX) support and app attach for app streaming
- FSLogix profile containers using Azure NetApp files or Azure files for highly available streaming profiles
- Office 365 ProPlus and OneDrive are fully compatible
- Unified management portal to deploy hosts, manage user sessions, publish applications, manage scaling, and monitor performance
Visit the following link to learn more about the AVD service running in Azure:
https://docs.microsoft.com/en-us/azure/virtual-desktop/overview
Windows 365 Cloud PC
Microsoft's latest Windows virtualization service is Windows 365 Cloud PC. Windows 365 Cloud PC helps simplify the ability to consume Windows VMs. With the recent adoption and ongoing need for a hybrid work model, Microsoft has built a service that allows for a secure Windows PC to be personalized and easily accessed from any device, including personal devices. Windows 365 Cloud PC is considered a Software-as-a-Service (SaaS) in which Microsoft manages the platform for you, taking away the need for any virtualization subject-matter experts (SMEs). The model is designed for ease of use with the ability for anyone to manage and consume, whereas AVD is a virtual desktop infrastructure (VDI) platform that requires some experienced expertise to architect, deploy, and manage, but provides greater flexibility over the management plane.
Some of the benefits of using Windows 365 Cloud PC are outlined here:
- Simple to set up, manage, and consume.
- Security is built into the model with a focus on Zero Trust.
- Access your Windows Cloud PC from any device.
- Latest OS with Windows 10 or Windows 11.
- Cloud PC can be personalized to meet your needs.
- Two editions are available: Windows 365 Business and Windows 365 Enterprise.
- Ideal for contractors, developers, and interns.
To learn more on Windows 365 Cloud PC, visit https://docs.microsoft.com/en-us/windows-365/.
Next, we'll look at the security concerns that affect the underlying hardware of our systems.
Hardware security concerns
Protecting the hardware of your systems is a critical task and one that may not have been at the forefront of your security priorities in the past. Over the years, we have invested heavily in the software side of security but recently, the impact of hardware vulnerabilities has shown the criticality of ensuring your hardware is protected from exploits, thus requiring more attention in this area to address risks.
The following list outlines some risks with hardware that must be addressed:
- Hardware vulnerabilities, including the following:
- Rootkits embedded in the BIOS and UEFI
- Side-channel attacks toward CPUs
- Kernel-level exploits
- Firmware attacks
- Memory vulnerabilities
- Insider threats such as those with physical access to hardware and privileged access to your environment.
- Referencing back to the National Institute of Standards and Technology (NIST) Cybersecurity Framework, Cybersecurity Supply Chain Risk Management was added to the latest version (1.1) in 2018. NIST references the following cybersecurity supply chain risks to be aware of:
- Any insertion of counterfeit items as part of the supply-chain process
- The production of items that have not been approved
- Tampering with any items within the process
- Theft of any items
- The insertion of malicious software and hardware at any time during the process
- Manufacturing and development practices not maintaining expected standards during the supply-chain process
You can view additional information about the NIST Cybersecurity Supply Chain Risk Management project and the risks at this link:
https://csrc.nist.gov/Projects/Supply-Chain-Risk-Management
In 2021, MITRE and the Cybersecurity and Infrastructure Security Agency (CISA) released the first version of the Common Weakness Enumeration (CWE) Most Important Hardware Weaknesses list. You can view the list here: https://cwe.mitre.org/scoring/lists/2021_CWE_MIHW.html.
Now that we've covered various security concerns and common scenarios that can cause exposure to risk, let's look at concerns for the virtualized environment.
Virtualization security concerns
Now that it's commonplace to centralize hundreds and thousands of standalone workloads requiring significantly less hardware as a result of virtualization, it is just as critical that we ensure our virtualized infrastructure is protected correctly. A breach of a virtualized host could mean a compromise to hundreds of servers over a single physical server in past models.
Here are some risks with virtualization that must be addressed:
- Everything listed in the Hardware security concerns section we just covered. Your virtualized infrastructure will be running on the same hardware.
- Hypervisor threats.
- VM escape or the ability to interact with the physical host OS or hypervisor directly from a VM.
- Non-segregation of resources, network, and data.
- VM sprawl.
- Non-encrypted storage, physical drives, virtual disk files, and network traffic.
Although there are security tools and configurations that help ensure the security of your VMs and the data within them, you may want to consider the physical separation of specific functions within your virtualized infrastructure. For example, the management plane, the production environment, the demilitarized zone (DMZ), and highly confidential applications and databases should be separated. Ensure the separation of these functions includes the physical host, network, and storage—this will help safeguard against the risks. The following diagram shows a representation of using virtualization and isolation to separate different functions within an infrastructure deployment:
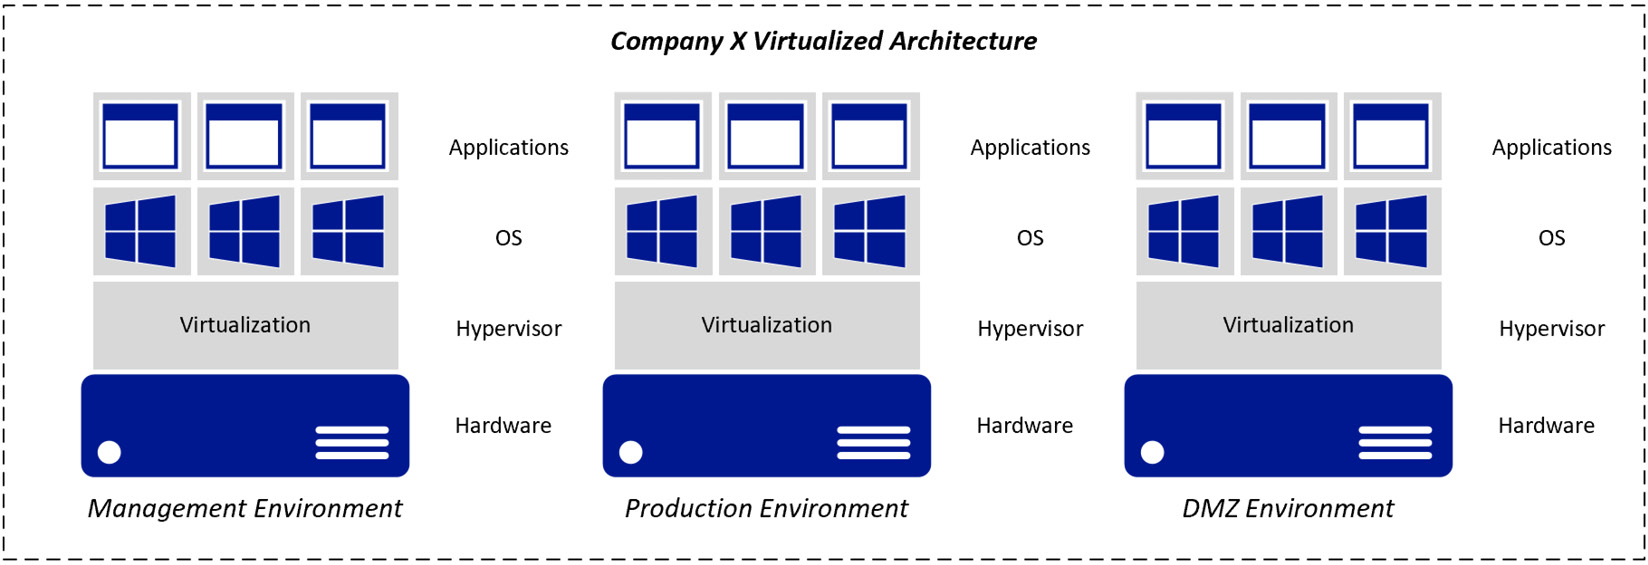
Figure 3.5 – Architecture separating core functions on its own hardware
Tip
Microsoft Docs has an article on Hyper-V security in Windows Server that can be found at this link:
Next, let's briefly review some concerns relating to cloud hardware and virtualization.
Cloud hardware and virtualization
As you move workloads to the cloud, you will, at a minimum, subscribe to an IaaS. Because of the dynamic changes with the cloud offering, you will no longer have any responsibilities regarding the hardware layer and the virtualized hypervisor layer. This will shift your efforts from needing to implement any best practices being recommended in this chapter to validating that the provider has these best practices implemented and in place. With Microsoft Azure, Microsoft is only responsible for implementing the security requirements for both the hardware and virtualized hypervisor layer of the services being provided to you. Any additional security hardening on the software layer—including the OS—is the customer's responsibility. You will need to work with Microsoft (or your cloud provider) to ensure evidence is provided to you, including responses to surveys and/or questionnaires, that ensures they have implemented the best security practices with their cloud hardware and virtualization offerings. This could also include audits, penetration tests, and security assessments.
Microsoft currently invests more than United States dollars (USD) $1 billion on cybersecurity research and development annually. With this investment, it continues to release and evolve new security features within Azure to provide the best protection against hardware and virtualization services. A couple of solutions that are worth becoming familiar with (as they relate to hardware and virtualization) include Azure Confidential Computing (https://azure.microsoft.com/en-us/solutions/confidential-compute/) and Microsoft Azure Attestation (https://azure.microsoft.com/en-us/services/azure-attestation), which provide an additional layer of security by applying encryption to data in memory, along with validations that the hardware and software being used is approved before allowing access.
As we go through the remainder of this chapter, you will be provided with an overview of the hardware security components and recommendations to ensure your systems are as secure as possible. In the next section, we will review hardware certification.
Introduction to hardware certification
Ensuring your hardware is certified is a critical process of the overall security program. As you purchase new servers, PCs, storage, and peripherals, it is critical you validate that the hardware is compatible with your deployed systems. Using non-compliant hardware could make your hardware vulnerable to a compromise, or the additional hardware components could even have a compromise already embedded in them.
An example would be allowing the use of Universal Serial Bus (USB) drives on your devices. Users receiving a free USB drive don't realize that the drive itself could be infected and that, once inserted into a company device, it could compromise the entire organization. Because of this, it is critical you only allow pre-certified USB drives that are encrypted and provided by the organization to be used by employees. Any data that is copied from a USB drive to a company device must require encryption. Another concern, as mentioned previously, is the supply-chain process. Ensuring the vendor has certified the hardware for Windows significantly reduces the risk the hardware could be pre-infected with vulnerabilities. This doesn't necessarily mean it will be 100% guaranteed, but your risk is reduced significantly.
Purchasing and procurement teams are a critical component in validating that the hardware you purchase has been through an appropriate certification process. These teams will help during the supply-chain process to ensure vendors are compliant with your requirements and contracts are maintained as promised, and to maintain vendor relationships. You will need to work closely with procurement as they work through the request for proposal (RFP) and requirements for hardware-related requests. To ensure the procurement process is optimized, guidelines from technical and security experts should be clearly defined. One important point to call out is that you should be careful with going cheap on your hardware purchases. There is always a drive to bring costs down, but opting for hardware that is cheaper than certified hardware could be a costly mistake. It may prove more cost-effective to get a contract with a vendor, standardize on hardware, and purchase a warranty program. There's a good saying in life: you get what you pay for!
Tip
Auditing, including vendor management, will be covered in more detail in Chapter 15, Testing and Auditing. This chapter will cover vendor management as it relates to compliance with your suppliers.
In addition to verifying the supply-chain process is clean, you will want to ensure you are using hardware that has been certified and approved by Microsoft to run the Windows OS. Microsoft has a very well-defined Windows Hardware Compatibility Program for vendors to follow to ensure they are maintaining the highest standards of security and compatibility for running Windows. Using any hardware outside of this compatibility list could render your Windows OS unstable and, even more importantly, create security gaps within your systems.
Tip
Information about the Windows Hardware Compatibility Program can be found at this link:
https://docs.microsoft.com/en-us/windows-hardware/design/compatibility/
To view the Windows Compatible Products List, browse to https://partner.microsoft.com/en-us/dashboard/hardware/search/cpl, type in a product name, and click Search. You will be provided with a list of compatible hardware based on your search. The following example shows the first couple of items returned with Laptop in the product name:

Figure 3.6 – Windows Compatible Products List for hardware compatibility
There is an additional portal where you can view certified products specific to Windows Server within the Windows Server Catalog. To view supported hardware for Windows Server, browse to https://www.windowsservercatalog.com/. Within the landing page, go to the Hardware section and click on the version of Server or the specific product category that you would like to view. As you browse through the items, you will see which specific version is supported by Microsoft, along with the badges that were awarded for certification. As you can see, a Windows Server 2022 badge has already been created and applied to identify hardware that supports Windows Server 2022.

Figure 3.7 – Windows Server Catalog badges
As you read through this section, you will have probably realized there is a lot more due diligence needed before you go out and purchase any hardware. Although there is an incredible ecosystem of hardware that supports Windows, you will want to ensure that the hardware you are purchasing is the latest and supports the latest versions of Windows Server and Windows 11. The most current hardware will provide more enhanced features over older hardware. The following sections will cover the hardware security features that need to be enabled on your hardware. In the next section, we will review the BIOS, UEFI, Secure Boot, and TPM components.
The firmware interface, TPM, and Secure Boot
A firmware interface is typically low-level software that acts as the medium between the OS and hardware to provide a basic UI for configuring device features and providing instructions for the boot procedure. BIOS and UEFI are the standard firmware interfaces used in these operations. Just as with the OS, firmware is also at risk to vulnerabilities and will need to be updated to remain secure. Next, we will review the different interfaces and some of their security features.
Protecting the BIOS
The BIOS is loaded directly onto a PC motherboard. Its purpose is to initialize the physical hardware, go through a series of processes, and eventually boot into Windows. Just as with the OS or PC software, the BIOS in your systems can become outdated and vulnerable to unauthorized modification. Furthermore, the BIOS initializes privileged hardware processes with greater rights than the OS itself. As a result, malware developers not only target the OS but other mechanisms in the boot process, including the boot loader and hypervisor used for virtualization, to gain access to these privileges. To mitigate these vulnerabilities, it's important to have a system of authorized update mechanisms for updating the BIOS and ensure it's only configured and signed by an authentic source such as the device manufacturer. To help maintain the integrity of the BIOS and protect against malware such as bootkits, digital signature verification should be used for updates and include a manual rollback and recovery process.
Tip
A bootkit is a manipulation of the Master Boot Record (MBR), which allows malicious software to load prior to the OS and remain active after the OS loads.
According to the NIST BIOS Protection Guidelines, organizations should have an authenticated BIOS update mechanism using the Root of Trust for Update (RTU) measurement with approved digital signature algorithms for verification, as specified in NIST FIPS 186-3, Digital Signature Standard. The updated standard (186-4) can be found at this link: https://nvlpubs.nist.gov/nistpubs/FIPS/NIST.FIPS.186-4.pdf.
The NIST security guidelines for protecting BIOS are specified in four system BIOS functionalities and state the following:
- Use an authenticated BIOS update mechanism with digital signatures to validate the integrity of updates.
- Secure the local update process with system passwords and physical locks, or only allow BIOS updates through a local update process with a physical information technology (IT) presence.
- Use integrity protection features to prevent modifications to BIOS.
- Implement non-bypassability features to ensure only the authenticated update mechanism is used.
To read more about the NIST security guidelines for protecting BIOS, visit this link:
https://nvlpubs.nist.gov/nistpubs/Legacy/SP/nistspecialpublication800-147.pdf
Understanding UEFI
UEFI is the successor to BIOS and is now standard on most manufactured hardware. Both BIOS and UEFI have a similar boot process regarding the initializing flow, but with some differences. UEFI does not rely on a boot sector to copy an MBR and uses what's known as a boot manager to determine what to boot. The traditional BIOS runs 16-bit code and leverages only the MBR, which presents limitations such as support for drives larger than 2 terabytes (TB). UEFI uses the GUID Partition Table (GPT) and supports 32-bit or 64-bit code processes in a protected mode before transferring control over to the OS during the runtime (RT) processes. The higher bit support has more space that allows for friendlier UIs and faster boot times. UEFI incorporates security technologies such as Secure Boot and supports traditional BIOS methods, such as booting over the network or from flash memory.
As with the BIOS, the first phase in the UEFI boot process is known as the Security Phase (SEC). This acts as a core root of trust (or boot block in BIOS) to validate the integrity of the code and other firmware components before moving to the rest of the boot process. One of the biggest security advantages of using UEFI over BIOS is the ability to validate boot loaders by checking their digital signature using Secure Boot. If a boot loader has been replaced by malicious code, it won't be allowed to execute based on an invalid or revoked digital signature. This check starts the entire trusted boot process, which secures the boot chain all the way until Windows loads.
There are many types of security features built into the UEFI setup, and they will vary by vendor. Some of the more common security features found in the UEFI setup are outlined here:
- Password settings that include setting a supervisor password and lock settings, preventing users from making changes without entering the supervisor password. You can also require a password at unattended boot, at restart, and even at the boot device list.
- Fingerprint settings to use biometrics during pre-desktop authentication as an alternative or in conjunction with entering a supervisor password.
- Security chip settings for the TPM.
- UEFI BIOS update settings to add protection regarding BIOS updates, including rollbacks.
- Memory protection for execution prevention against virus and worm attacks that create memory buffer overflows.
- Virtualization settings to enable or disable virtualized hardware support such as Intel VT-x or AMD-V.
- I/O port access to enable or disable the use of devices such as wireless, Bluetooth, USBs, cameras, and microphones.
- Internal device access tamper detection of the physical covers of storage devices.
- Anti-theft to enable a lo-jack for your PC using a third-party provider.
- Secure Boot settings.
- Trusted execution environments (TEEs) such as Intel Software Guard Extensions (SGX) for hardware-based isolation of application code in memory.
- Device Guard, which is a feature set that consists of Configurable Code Integrity (CCI), Virtual Secure Mode (VSM) Protected Code Integrity, and Secure Boot. Device Guard features set the foundation for VBS, which we will discuss in more detail later.
Now you better understand what UEFI is, we will next cover UEFI Secure Boot and how to enable it.
UEFI Secure Boot
Secure Boot is a hardware-based security feature available in the UEFI environment that ensures only trusted software and firmware can execute in the boot chain. Each software, driver firmware, and OS boot loader (Windows Boot Manager) has a digital signature or hash that is validated by referencing signature keys stored in the Secure Boot database. Secure Boot consists of a Platform Key (PK) created by the OEM that creates the trust to the Key Exchange Key (KEK) with a public/private key pair. The KEK has public signing keys and is used to modify or add signatures to the safelist database (or db) and the revoked signature database (or dbx), to accommodate for new releases of Windows and known bad signatures for revocation purposes. These allow or deny databases are used for validation against the certificates, keys, or image hashes of boot loaders, firmware, and drivers. For example, if malware such as a bootkit invalidates the boot loader, then UEFI checks the Secure Boot database and won't allow the OS to boot when the signature doesn't exist or is blacklisted. This is important to note because rootkits are typically low-level software and hide from the OS, making them undetectable by most antivirus software.
The following diagram provides an example of Secure Boot validating the signature of Windows Boot Manager:
Figure 3.8 – Sample flow of Secure Boot validating the signature of Windows Boot Manager
Secure Boot is typically easily configured in UEFI by following these similar steps, depending on the manufacturer and BIOS:
- Boot into the UEFI setup. Typically, pressing F12 or F10 during startup will load a boot device list where you can choose this setup.
Tip
If you're logged in to Windows, hold down Shift and choose Restart to be presented with an Advanced Options feature to boot into UEFI.
- Secure Boot settings are typically found under the Security tab.
- Change Secure Boot to On, as shown in the following screenshot:

Figure 3.9 – Secure Boot configuration on a Lenovo ThinkPad workstation
Next, we'll look at the features of the TPM security chip that is embedded in the hardware.
TPK (TPM 2.0)
A TPM provides hardware-based security, typically in the form of a tamper-resistant chip built directly onto a motherboard. A TPM helps by providing an additional hardware layer separated from the memory and OS. Its main purpose is to perform cryptographic functions in isolation and is often considered the hardware root of trust. TPMs primarily deal with the encryption and decryption of security keys and run passively, so they do not rely on the OS to process instructions. Each TPM chip has its own unique Rivest-Shamir-Adleman (RSA) private key that's imprinted directly on the chip itself. This private key is never exposed to another external process, therefore only allowing the decryption of TPM-encrypted keys to be handled by the same TPM chip.
The TPM also has built-in protection against dictionary attacks, which are used to guess the authorization value for gaining access to protected keys. This is known as a TPM lockout, and in Windows, a maximum count threshold of 32 is set with a 10-minute healing time to protect against this type of tampering. TPM lockout settings can be managed using Group Policy and are located under Computer ConfigurationAdministrative TemplatesSystemTrusted Platform Module Services.
For more information about managing TPM lockout in Windows 11 and Windows Server 2016 and later, visit this link:
https://docs.microsoft.com/en-us/windows/security/information-protection/tpm/manage-tpm-lockout
Windows computers containing a TPM provide enhanced hardware security features that can be used across a variety of functions, such as the following:
- Encryption, decryption, and other cryptographic functions
- Key storage and generation
- Integrity validation (security such as Secure Boot for firmware and boot loaders)
- Strong user and device authentication technologies (Windows Hello and virtual smart cards (VSCs))
- Antimalware boot measurements for start state integrity checks
- Virtualized-based security features such as Windows Device Guard and Credential Guard
- BitLocker drive encryption
- Health attestation services for both local and remote attestation
In some use cases, such as BitLocker drive encryption, a USB drive can act as a TPM alternative and must be present for the computer to start Windows. This is known as a TPM start up key and allows the use of BitLocker without a physically compatible TPM chip. In conjunction with a TPM chip or PIN, this enables a form of BitLocker two-factor authentication (2FA).
Unlike in earlier versions of Windows, Windows handles most of the provisioning of the TPM and reduces the need for manual configuration. For more information on how Windows uses the TPM, visit this link: https://docs.microsoft.com/en-us/windows/security/information-protection/tpm/how-windows-uses-the-tpm.
TPM 2.0 and Windows support a feature known as the Health Attestation service. This allows mobile device management (MDM) services such as Intune to collect telemetry data from Windows-managed devices in your organization for remote device health attestation reports. The state of your device's health attestation can be used with risk-based conditional access and block access to resources if certain compliance conditions aren't met. The additional level of analysis provides RT protection of hardware after boot. The following screenshot shows a Windows Health Attestation telemetry report from Microsoft Endpoint Manager:
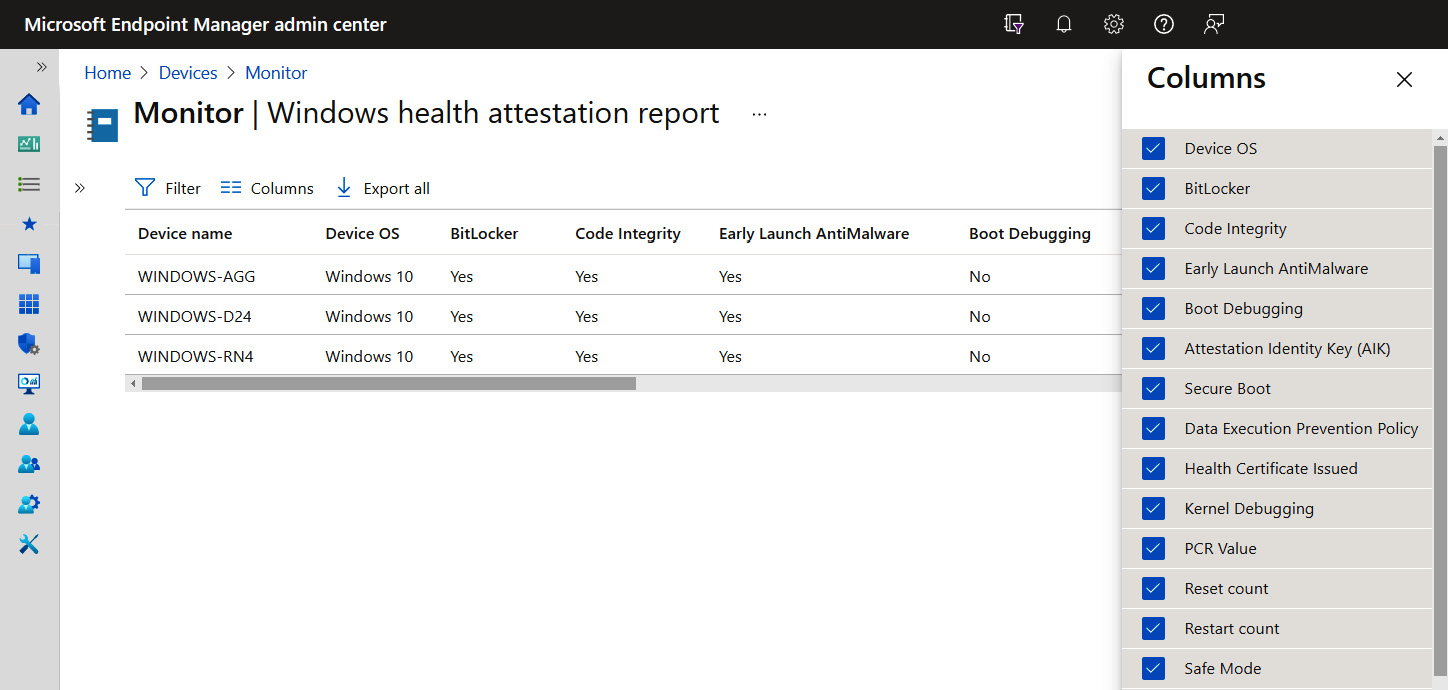
Figure 3.10 – Windows Health Attestation report from Microsoft Endpoint Manager
The TPM security chip is typically enabled in the Security tab of the UEFI setup, as illustrated in the following screenshot:
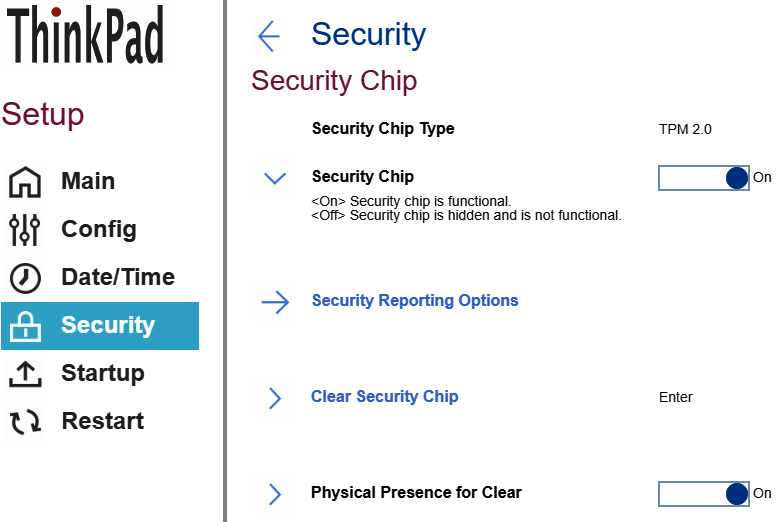
Figure 3.11 – TPM 2.0 enabled on a Lenovo ThinkPad workstation
In the next section, we are going to talk about how VBS can protect your system with isolation and by enabling VBS-based security features.
Isolated protection with VBS
First available in Windows 10 and Windows Server 2016, VBS was not a requirement but highly recommended. In Windows 11 Enterprise, many available features of VBS will be enabled by default on supported hardware and can be managed with Group Policy or MDM. VBS leverages hardware virtualization and the Windows hypervisor to isolate memory from the OS. This separation is known as virtual secure mode, which provides protection for critical system processes to help prevent exploitation. For example, if malware infects the OS, it will remain contained to the OS and be inaccessible to VSM.
For a system to be considered VBS-capable, it needs to meet the following minimum hardware requirements:
- TPM 2.0
- 64-bit processor running Intel VT-x or AMD-v virtualization extensions
- IOMMU or system memory management unit (SMMU) (Intel VT-D, AMD-Vi, ARM64 SMMUs) IOMMU
- SLAT for virtual address translation (VAT)
- UEFI memory reporting
- Compatible drivers with Hypervisor-Protected Code Integrity (HVCI)
- Secure Memory Overwrite Request (MOR) v2
- System Management Mode (SMM) protection
For more detailed information on VBS and the hardware requirements for VBS, visit this link:
https://docs.microsoft.com/en-us/windows-hardware/design/device-experiences/oem-vbs
The following diagram shows the level of separation that is accomplished through VBS security. Normal Windows operating processes occur on the left and are blocked from accessing secure mode on the right.

Figure 3.12 – A hypervisor isolates normal user and kernel modes
The following security features leverage VBS or are enhanced with VBS enablement:
- Windows Defender Credential Guard
- HVCI
- Microsoft Defender Application Guard
- System Guard
- Kernel DMA Protection
The following screenshot is from System Information on Windows and shows that VBS is running:

Figure 3.13 – MSinfo32.exe displaying VBS features on this system
Let's look at some of the features that leverage VBS. First, we will cover Microsoft Defender Credential Guard.
Windows Defender Credential Guard
Credential Guard helps protect user authentication and access tokens in the Local Security Authority Subsystem Service (LSASS) or Lsass.exe file from being stolen. Without Credential Guard enabled, derived credentials such as Kerberos tickets and password hashes are stored in memory without the secure isolated protection of a VBS hypervisor and are vulnerable to password-stealing malware. With Credential Guard enabled, credentials are stored in a protected isolated process called LsaIso.exe. LSA Isolated (LSAISO) is only accessible by LSASS using secured Remote Procedure Calls (RPCs), and credentials stored in LSAISO are not exposed to processes outside of this protected container. This mitigates tools from stealing New Technology LAN Manager (NTLM) password hashes and Kerberos ticket-granting tickets (TGTs) stored in the memory thanks to VSM's isolation.
The following screenshot shows an LSAISO process running in Task Manager:

Figure 3.14 – LsaIso.exe process running in Task Manager
Here are some types of attacks that Credential Guard helps protect us against:
- Pass-the-Hash (PtH) is where an attacker can bypass entering a user's credentials by passing a captured password hash as an alternative authentication method.
- Pass-the-Ticket (PtT) is like PtH but where an attacker authenticates by using a Kerberos ticket instead of the user's password.
Tip
With Credential Guard enabled, single sign-on (SSO) does not work with NTLMv1, MS-CHAPv2, Digest, and CredSSP authentication methods, making applications prompt for credentials.
If you're considering enabling Credential Guard, it is recommended to read about the important considerations mentioned in the preceding information tip before turning it on. More information can be found at this link: https://docs.microsoft.com/en-us/windows/security/identity-protection/credential-guard/credential-guard-considerations.
Next, we'll look at how to enable Credential Guard using Endpoint Security in Microsoft Endpoint Manager.
Enabling Credential Guard with Microsoft Endpoint Manager
To enable Credential Guard, follow these steps:
- Log in to Microsoft Endpoint Manager at https://endpoint.microsoft.com.
- Choose the Endpoint Security blade and select Account Protection under Manage.
- Click Create Policy.
- Choose Windows 10 and later under Platform and Account Protection under Profile.
- Click Create.
- Give it a descriptive name such as Microsoft Defender Credential Guard and a description. Click Next.
- Under Account Protection, click the dropdown next to Turn on Credential Guard and select Enable with UEFI Lock.
- Click Next.
- Set a scope tag if required or click Next.
- Under Assignments, select a security group to assign the policy to and click Next.
- Review the summary and click Create. Your policy should look like this:
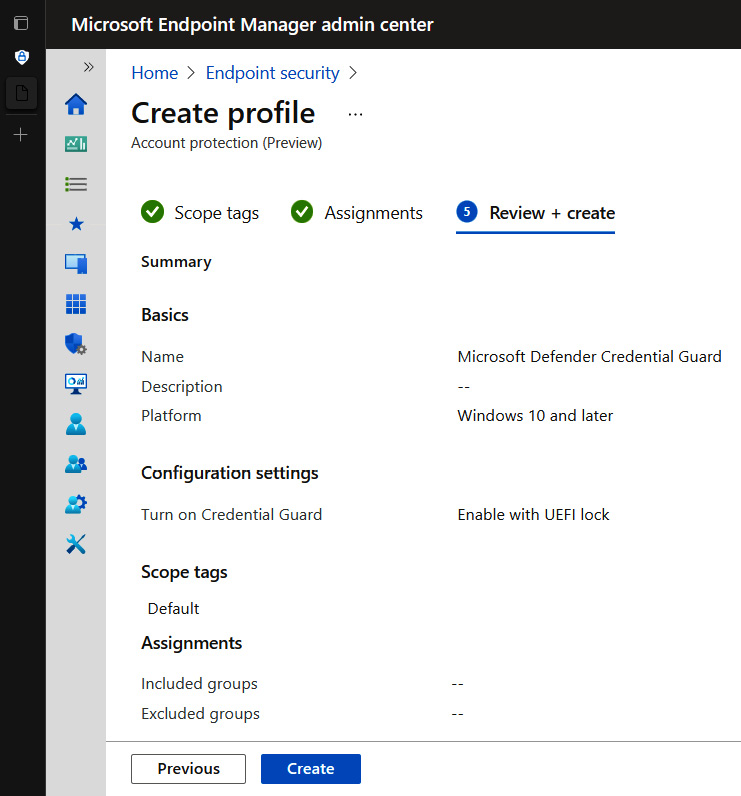
Figure 3.15 – Microsoft Defender Credential Guard profile in Endpoint Security
Tip
Enable with UEFI Lock (recommended) ensures that Credential Guard cannot be remotely disabled. If you need to disable it remotely, choose Enable without UEFI lock.
For more information about how Windows Defender Credential Guard works, visit this link:
HVCI
HVCI combines virtualization and code integrity verification to protect the Windows OS from malicious code. HVCI is the key component of the Memory integrity functionality of the Core isolation security features in Windows system security. This helps to ensure that the code integrity service used to validate the signatures of drivers and kernel-mode processes are contained with hypervisor isolation, thus making them protected from tampering. HVCI is not only applicable to a single system running on physical hardware, but can also protect Gen 2 VMs with a Hyper-V host in Server 2016 or later.
In the following screenshot, you can see the Memory integrity feature being enabled in Core isolation:
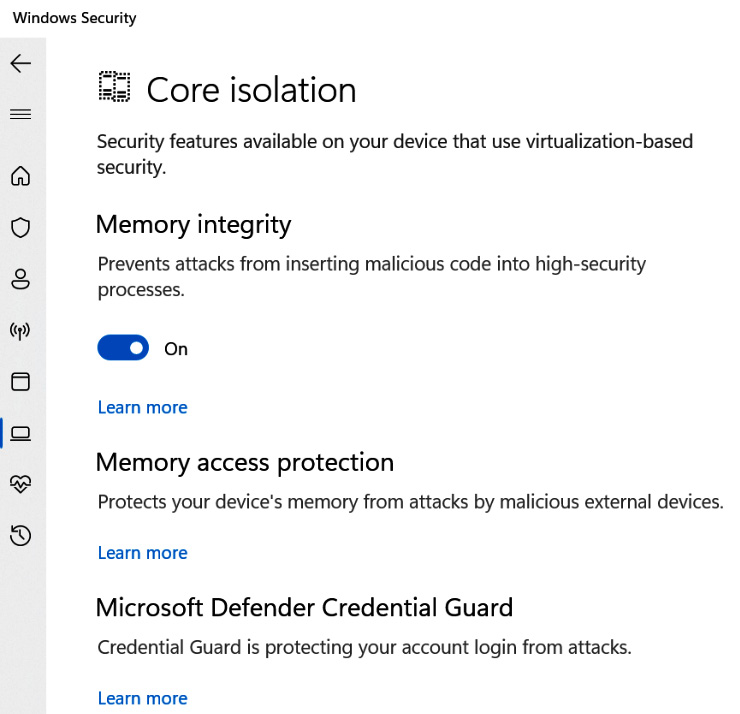
Figure 3.16 – Memory integrity feature enabled in Core isolation in Windows Security
HVCI can also be combined with Windows Defender Application Control (WDAC) code integrity policies, designed for whitelisting what applications, drivers, and file paths can run in Windows. Hypervisor-protected code integrity enhances protection by adding an extra layer on top of code integrity policies and expanding them into the VBS features of hypervisor isolation. This helps to ensure that WDAC policies remain resilient against tampering and modification. WDAC working together with VBS used to be branded as key features known in Device Guard.
Tip
While most modern systems have the hardware and drivers to fully support HVCI, it is important to point out that all drivers must be HVCI-compatible; otherwise, it can result in blue screens or system failures.
To view a list of baseline protections that are required for both VBS and HVCI, visit this link:
Let's review how to enable HVCI using Group Policy.
Enabling HVCI
To enable HVCI, follow these steps:
- Open GPMC and create a new Group Policy Object (GPO) or modify an existing one.
- Go to Computer Configuration | Policies | Administrative Templates | System | Device Guard.
- Open Turn on Virtualization Based Security and choose Enabled (radio button).
- Ensure the dropdown under Virtualization Based Protection of Code Integrity is set to Enabled with or without a UEFI lock, as follows:
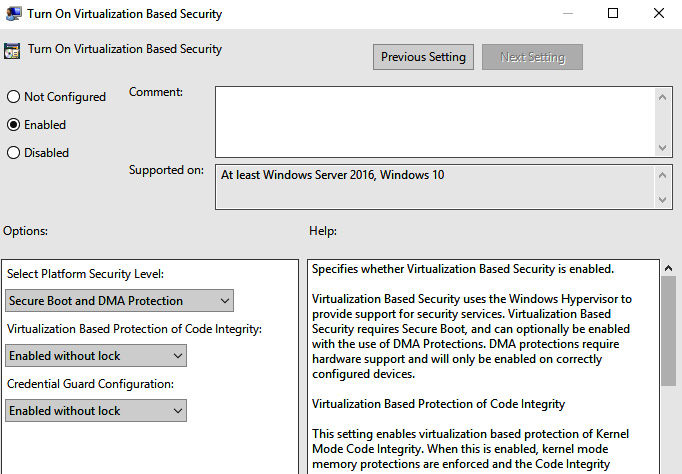
Figure 3.17 – Group Policy for HVCI and VBS features
HVCI and other hardware-based security features can be validated using Windows Management Instrumentation (WMI) class Win32_DeviceGuard or in System Information. The WMI class is only available on enterprise versions of Windows. To check hardware-based security features, open an administrative PowerShell window and run the following command:
Get-CimInstance -ClassName Win32_DeviceGuard -Namespace rootMicrosoftWindowsDeviceGuard
The following output shows the hardware-based security features on your device:
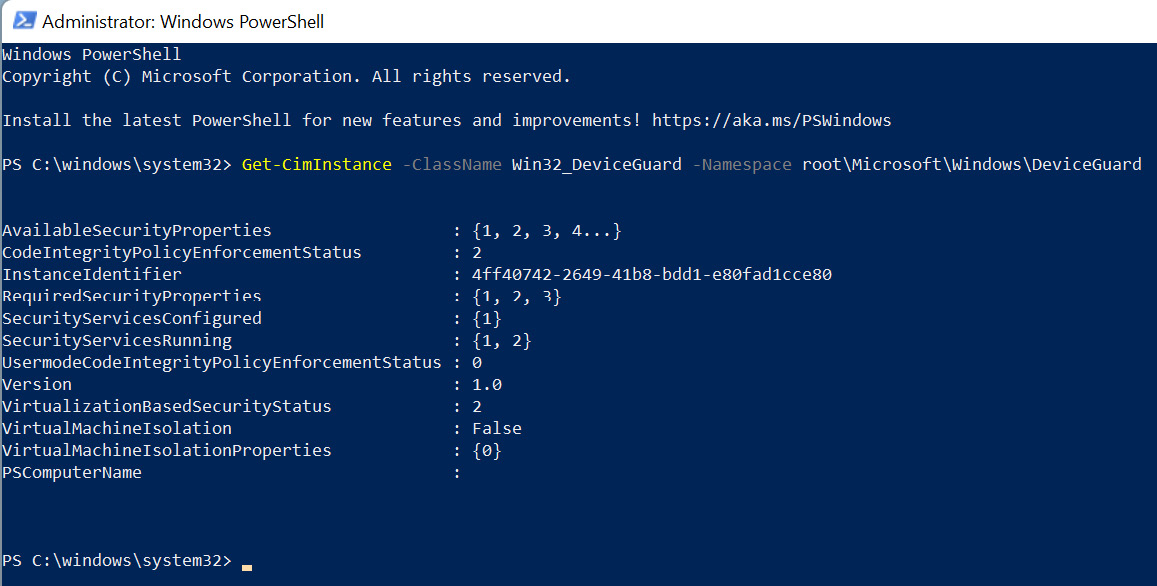
Figure 3.18 – Win32_DeviceGuard class from WMI
For additional details on the available hardware-based security features, visit this link:
Next, we'll have a look at Microsoft Defender Application Guard.
Microsoft Defender Application Guard
Microsoft Defender Application Guard is designed to leverage the VSM hypervisor isolation of VBS to protect Microsoft Office and Edge through containerization. What's great about this protection is that it helps protect against novel types of attacks due to the nature of the isolation of the application from the host OS. Microsoft Office and Edge are constant targets for malware developers due to their wide usage. Application Guard has built-in support for Microsoft Office and Edge browser but also extends these features to Google Chrome and Firefox through browser extensions. This allows untrusted sites that are opened in Chrome or Firefox to be redirected to a protected Edge browsing session. In the following screenshot, you can see how to obtain the extension from the Google Chrome web store:

Figure 3.19 – Application Guard Extension available in the Google Chrome web store
Tip
When enabling the extension or deploying it through Intune, a Win32 component will need to be installed to activate Application Guard. A restart will be required.
Application Guard for web browsers protects users from sites that aren't defined as trusted in a network isolation policy configuration. Whenever a site is opened that's not in this policy, a new containerized browsing session is opened in Microsoft Edge, leveraging the VSM of VBS and isolating this session from user and kernel-mode attacks on the underlying system.
A few examples of attacks that Application Guard protects against are given here:
- Zero-day and unpatched vulnerabilities exploited from a website
- Drive-by attacks where malicious code is injected into a website
- Cross-site scripting (XSS) attacks and other web-based malware
There are specific hardware and software requirements needed to support enabling Application Guard, as outlined here:
- 64-bit CPU processor
- SLAT and Intel VT-x or AMD-v virtualization features
- 8 GB RAM
- Windows 10 or later (Enterprise, Professional, or Education)
Application Guard has two working modes, as follows:
- Standalone mode allows the user to control when to enable or disable Application Guard and does not require the endpoint to be managed by policy.
- Enterprise-managed mode is the policy-managed version that can be configured and controlled by MDM or Group Policy.
Application Guard can be enabled through Endpoint Security in Microsoft Endpoint Manager, Group Policy, or Configuration Manager. The following screenshot shows an Application Guard policy in Endpoint Security in Microsoft Endpoint Manager:
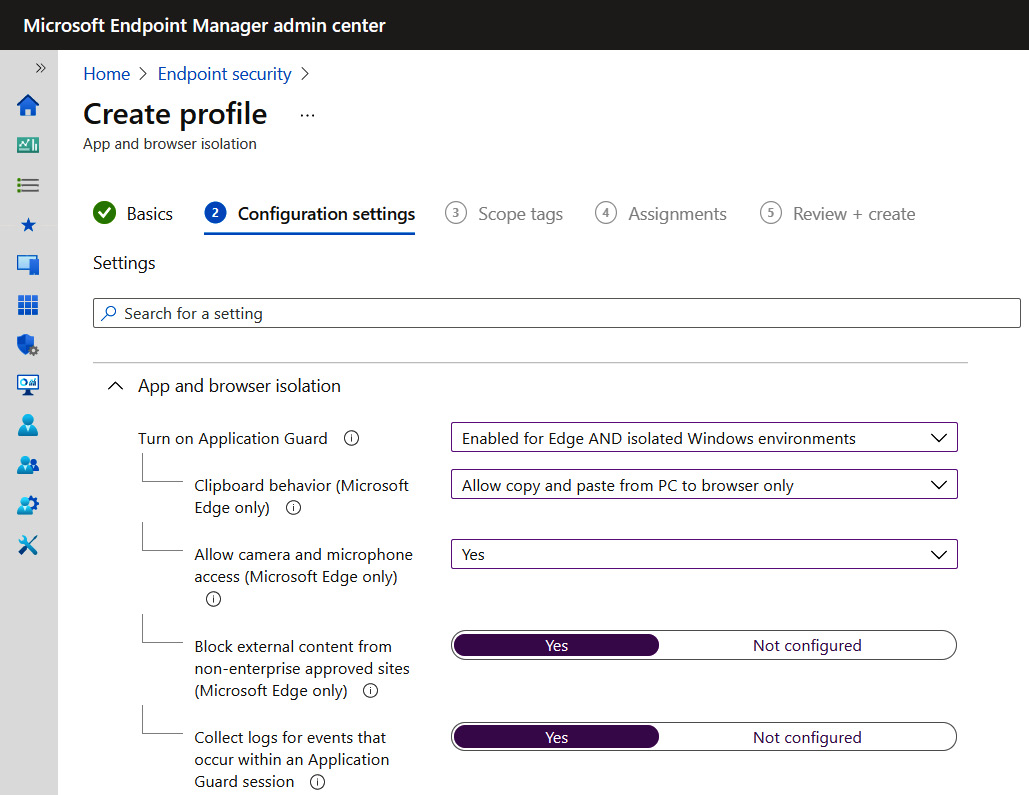
Figure 3.20 – App and browser isolation profile in Microsoft Endpoint Manager Endpoint security
The following screenshot shows how to configure network boundaries using the Windows network isolation policy settings:

Figure 3.21 – Windows network isolation policy configuration in Endpoint Security
A network boundary policy can also be configured in Intune using device configuration templates.
When turning on Application Guard, you can select to enable it for Edge and/or isolated Windows environments. Isolated Windows environments allow other applications that support Application Guard (including Office) to be enabled. The policy is flexible and allows administrators to determine which features can interact with the host OS, such as copying and pasting or printing.
Next, we'll look at Windows Defender System Guard and how it uses a set of integrity checks to keep your system safe.
Windows Defender System Guard
Windows Defender System Guard is a collection of hardware protection features (including Secure Boot) that ensure the integrity of your system is protected during boot, as well as after Windows is running. Using local attestation through Root of Trust Management (RTM) measurements and remote attestation, RTM measurements can be sent for analysis to an MDM solution such as Intune or Configuration Manager. If a PC is determined to be untrustworthy, remote action can be taken to isolate the device or prevent access to resources. This helps to protect the system after boot through analysis and monitoring of these measurements. System Guard, by design, is aligned with the Zero Trust security model and assumes that all processes could be compromised until verified.
For added flexibility, System Guard supports Dynamic Root of Trust for Measurement (DRTM) with a process known as Secure Launch to dynamically protect and add management flexibility over the Static RTM (SRTM) that's typically used for local attestation of boot processes. As we discussed earlier, the SEC in UEFI is loaded at the start of boot and begins the Trusted Boot process. To achieve compliance with an SRTM, each piece of code in the entire boot process must be validated from start to finish against a whitelist of known trusted measurements. Due to a large number of hardware vendors, executables, libraries, BIOS versions, code updates, and length of code, support for scaling this whitelist is difficult. Also, SRTM does not protect the RT after load operations and requires trust to be maintained through the entire boot process. DRTM and the Secure Launch technology of System Guard help overcome these challenges.
DRTM simplifies SRTM management by allowing for the boot process (sometimes unvalidated) to be executed and immediately controlled by being forced into a secure launch code container. This launch code is known-good code that's used to continue the boot process and is independent of specific hardware configurations. This dynamic measurement allows for more flexibility, and code that's not added to SRTM measurements can boot the system before Secure Launch takes control. The system can maintain a Trusted Computing Base (TCB) standard without you having to reset the entire TPM and validate the entire boot chain end to end (E2E). The Trusted Computing Group (TCG) has defined a TCB as something that protects the system and enforces computer security policy.
For more information on the DRTM specification, visit this link:
https://trustedcomputinggroup.org/wp-content/uploads/DRTM-Specification-Overview_June2013.pdf
Tip
Only TPM 2.0 supports System Guard Secure Launch and remote attestation. To enable System Guard Secure Launch, all requirements for Device Guard, Credential Guard, and VBS must be met.
We have just covered many of the hardware-based security features that are used to protect your systems all the way through the boot process. Now, we'll review an additional hardware security feature known as Kernel DMA Protection.
Kernel DMA Protection
Kernel DMA Protection helps protect PCs from external devices that can be plugged into exposed hot-plugged Peripheral Component Interconnect Express (PCIe) ports such as a Thunderbolt connection. PCI hotplug ports are direct memory access (DMA)-capable, which makes them a vulnerable target for attackers due to their privileged access in the system. A malicious actor can quickly insert a USB such as a peripheral in an unattended device and execute code or steal data without any interaction or having to log in to the computer. A DMA-capable device has direct access to system memory by design to allow it to support high-powered peripherals such as graphics cards.
By leveraging the IOMMU hardware feature, enabling DMA protection will keep these peripherals isolated from memory until the user logs back in to the computer. DMA protection also works in conjunction with DMA remapping-compatible driver standards. A driver that meets these standards can automatically be started without requiring a user to log in.
Kernel DMA Protection can be enabled in Endpoint Security in Intune or with Group Policy. The following screenshot is from the Device Control profile in an attack surface reduction policy in Endpoint Security:
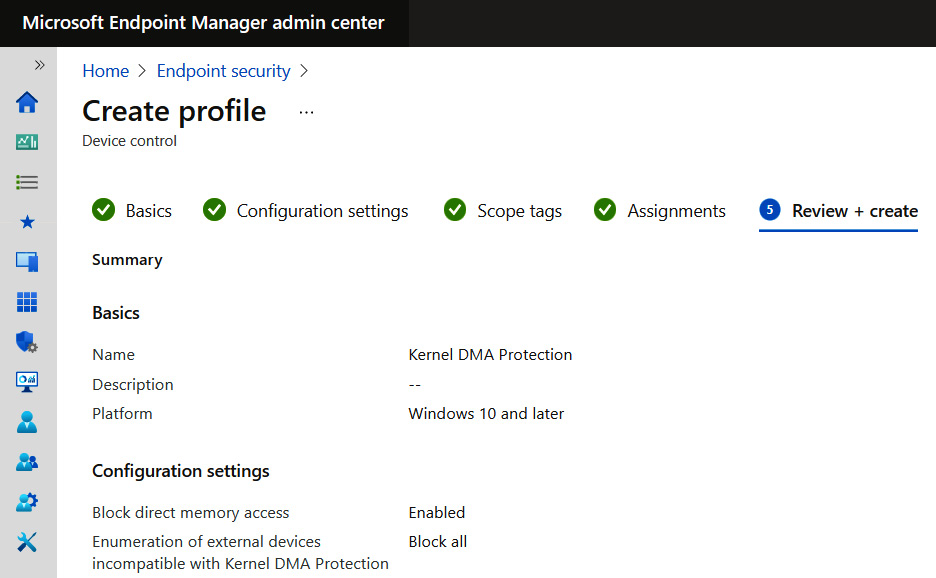
Figure 3.22 – DMA Protection settings in the Device control profile in Endpoint Security
Tip
Setting Block all for the enumeration of external devices incompatible with Kernel DMA Protection will block devices not compatible with DMA remapping
VBS security is not required to enable Kernel DMA protection settings.
Next, let's look at hardware security features available on the market to help protect against data stored in memory from lost or stolen devices.
Protecting data from lost or stolen devices
Unfortunately, physical devices such as laptops can be prone to being lost or stolen. Certain protections need to be in place to help protect the data on the system from being exfiltrated, assuming the device will not be recovered. Fortunately, for devices under corporate management, MDM remote actions can be triggered to wipe a device the next time it comes online. Additionally, BitLocker encryption will prevent data loss from the hard drive, but what kinds of protections are available for data such as credentials or encryption keys stored in memory? Recently, both Intel and AMD have made significant hardware security advances to cover these types of scenarios and protect data stored in memory with encryption.
Secure Memory Encryption (AMD)
Secure Memory Encryption (SME) is a feature specific to AMD-based systems. Pages in the memory are encrypted through page tables using a 128-bit ephemeral Advanced Encryption Standard (AES) key that is generated at random during boot time and is not accessible by external software. Additionally, AMD extends this protection to VMs with Secure Encrypted Virtualization (SEV), which allows VMs to run fully encrypted and can only be decrypted by the underlying VM itself. SME can be enabled in the BIOS of AMD systems.
Total Memory Encryption (Intel TME)
Total Memory Encryption (Intel TME) is a similar feature to SME developed by Intel. As with SME, Intel TME encrypts memory using AES XTS with a randomly generated encryption key that is not accessible to software. Intel has recently expanded on this technology to add support for multiple encryption keys called Multi-Key Total Memory Encryption (MKTME).
Recently, Microsoft has also announced a collaboration effort with multiple CPU vendors to build and release the Microsoft Pluton processor. The Pluton processor was built to offer enhanced protection around vulnerabilities in the communications bus that transfers data from the TPM cryptography chip to the CPU and helps mitigate the risks of an attacker stealing data with physical access to the device through that communication channel. Visit this link to read more: https://aka.ms/pluton.
Purchasing devices that support these hardware-based security features will help ensure data will remain protected if a device is lost or stolen. Next, let's wrap up the chapter by recapping hardware security recommendations and best practices.
Hardware security recommendations and best practices
When looking at the security of hardware, it's important to keep these considerations in mind:
- Only purchase hardware that has been through a proper hardware certification program. The Windows Hardware Compatibility Program certification process is a great resource to help ensure the hardware is reliable and compatible with Windows.
- Keep your hardware up to date. Just as with software, hardware continues to evolve to become more secure.
- Have an effective and secure system for upgrading firmware/BIOS and ensure the proper protections are enabled to ensure only approved sources can update them.
- Purchase physical hardware that supports BitLocker (TPM 2.0), DRTM, SMM, Secure Boot, DMA Protection, Memory Encryption (AMD/Intel), and hardware-based isolation of application code in memory (TEE with Intel SGX). This will allow you to enable software features that support hardware-based security.
- Turn on VBS as soon as possible and enable Credential Guard, HVCI, Application Guard, Windows Defender Application Control, and Kernel DMA Protection to put the power of your hardware into action.
- Ensure your data is also protected if lost or stolen by protecting your data stored in memory with encryption. SME (AMD) and Intel TME features provide this level of security for your data.
- Ensure you are aware of the latest risks and hardware weaknesses with resources available to you, such as the NIST Cybersecurity Supply Chain Risk Management project and CWE's Most Important Hardware Weaknesses list.
- Subscribe to receive notifications as vulnerabilities are identified. A couple of examples include the CISA alerts (https://us-cert.cisa.gov/ncas/alerts) and advisories from the Center for Internet Security Multi-State Information Sharing and Analysis Center (CIS MS-ISAC) (https://learn.cisecurity.org/ms-isac-subscription).
Summary
In this chapter, we provided an overview of the hardware-based security features used to protect Windows from the boot chain, the OS layer, and for virtualization of the OS. We covered hardware concerns in terms of vulnerabilities such as rootkits and bootkits and the importance of the supply chain to ensure your organization purchases hardware that has been properly certified. Next, we covered BIOS, Secure Boot, and TPM and how these hardware components are the framework for hardware-backed VBS. We talked about the latest advanced protection features leveraging VBS, such as Credential Guard and Microsoft Defender Application Guard, as well as how to enable them using MDM or through Group Policy.
Finally, we finished by discussing how System Guard uses dynamic root-of-trust measurements and remote attestation to help protect your systems and hardware-based security features to secure data from lost or stolen devices, along with an overview on hardware security recommendations and best practices.
In the next chapter, we will discuss networking and the fundamentals that play a large role in securing your Windows systems. We will discuss physical hardware components used in the network infrastructure and the Windows Defender Firewall software, including configurations with Intune, Group Policy, and Configuration Manager. Finally, we will provide an overview of Azure network solutions that are used to secure Windows systems inside an Azure virtual network (VNet).