Chapter 4: Networking Fundamentals for Hardening Windows
In this chapter, we will cover the importance of Windows networking components for the overall security and hardening of your Windows systems. Network security has traditionally been at the heart of security, but recently this has shifted. It hasn't become any less important, but with the adoption of cloud computing and the rapid acceleration of remote work, security strategies need to shift from a strong focus on the network perimeter to the application, device, and identity levels of focus. Devices are no longer sitting within corporate offices and users require the flexibility to access company resources from anywhere.
Even though the workforce has become more decentralized, there is still a need to maintain stringent network security controls within your offices and any on-premises data centers. In addition, you will need to implement strong controls at the desktop level and adopt a strategy for securing Virtual Networks (VNETs) and cloud resources. With this comes new complexity, and it's important to have the right tools and skill sets that support the strategic vision, deployment, and maintenance of your network tools and solutions.
Throughout this chapter, we will cover security fundamentals to raise awareness of the supporting network infrastructure of a Windows environment. We will review some of the network security tools available, including the software-based Windows Defender Firewall. Finally, we will cover network security solutions that protect and allow access to your Windows workloads running in Azure. This chapter includes the following topics:
- Network security fundamentals
- Understanding Windows network security
- Windows Defender Firewall and Advanced Security
- Web protection features in Microsoft Defender for Endpoint
- Introducing Azure network security
Technical requirements
We recommend having the following to follow along with the examples in the chapter:
- An Active Directory (AD) domain with Group Policy and an updated central store.
- A Windows 10/11 Pro or Enterprise workstation domain joined and/or Intune enrolled.
- A Microsoft Intune license
- A Microsoft Defender for Endpoint license
- An Azure tenant
Network security fundamentals
Networking can be a very challenging task for technology teams. Networks can be very sensitive and commonly take the blame for most outages, without people even knowing the true root cause of an issue. This is simply because most of our data traverses over a network, so it's critical that it performs optimally. If it doesn't, it can bring a business to its knees because of how dependent we have become on the network. In addition to the already challenging task of network operations, we are also concerned with network security. Ensuring that the data we transmit is secure, no perpetrators are accessing our network who shouldn't be, preventing traffic that isn't welcome, and ensuring confidential data is isolated are some of the challenges faced in this space.
As we mentioned previously, this shift in security is mainly due to the evolution of device access and cloud technologies that have forced us to change our strategies. Although this has shifted the core from a network security perimeter-focused strategy, network security has never been more important than it is today. Additional advanced security features are now required to secure and harden both the device and the cloud technologies in use.
Before we review some of the core network security technologies, it's important that we review and cover the Open Systems Interconnection (OSI) and Internet Protocol Suite (TCP/IP) models. These models have been built to allow for an open standard/framework to be referenced. The OSI model is a framework that is used as more of a guideline that provides a standard for network communications. It provides a great reference that allows us to understand the flow of network traffic from one endpoint to the other and serves as a great troubleshooting tool for us to understand where any breakdowns or failures may be occurring. The TCP/IP model is comprised of open standard protocols for network communication and has become more widely adopted over the OSI model.
The following diagram provides a comparison of the OSI model and TCP/IP model, including examples of what falls within each layer. Understanding where communication is failing within the network will significantly help a security expert with any investigative and/or troubleshooting tasks:
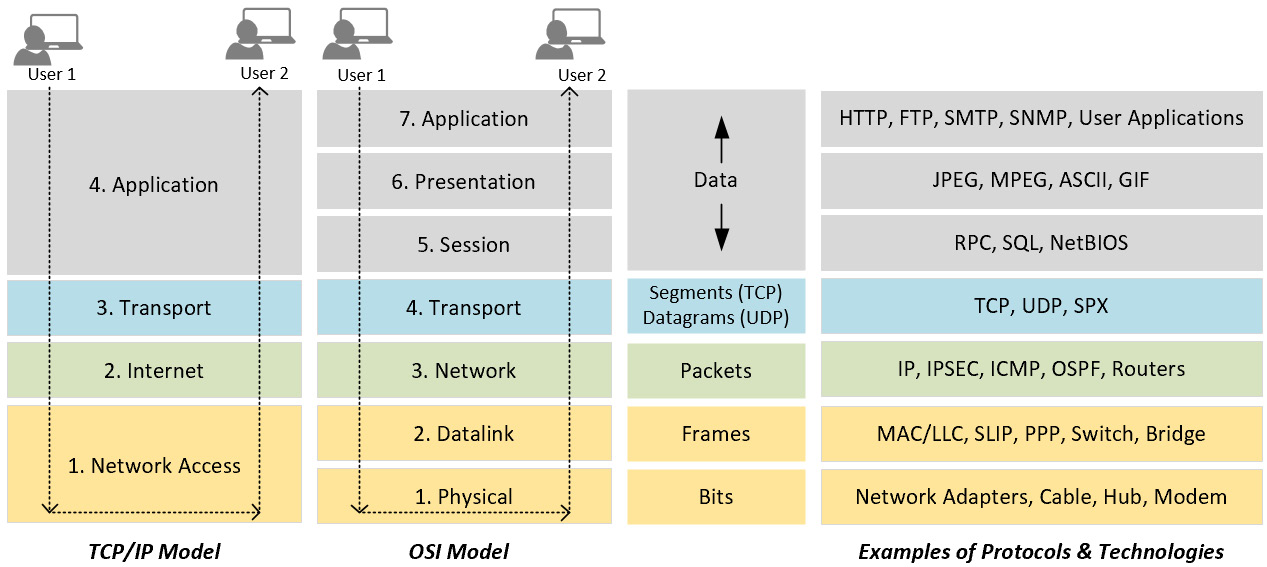
Figure 4.1 – The OSI and TCP/IP models
In addition to being familiar with the OSI and TCP/IP models, understanding common ports used in communications is somewhat an expectation of any network or security professional. As you build out and architect your solutions and integrate your technologies, knowing which ports are used by which protocols allows for more intelligent decisions so that you can provide better controls.
Tip
When building Network Security Groups (NSGs) or firewall rules, a best practice is to limit communications from known sources using only the required ports needed to create the connections.
Being able to quickly identify the type of traffic and which ports are being used may speed up your ability to mitigate an attack. The following is a list of some of the more common ports and the protocols/services that use them:

Figure 4.2 – Common ports and services
The Internet Assigned Numbers Authority (IANA) website provides a list of all registered service names and port numbers at the following link:
https://www.iana.org/assignments/service-names-port-numbers/service-names-port-numbers.xhtml
There are many components involved within a network architecture and the topology can be extremely complex. The following technologies are considered more critical for your enterprise deployment as they relate to your network security and should be implemented to protect your Windows environment:
- Routers and switches using VLANs
- Next-generation-type firewalls
- A Virtual Private Network (VPN) to encrypt connections
- Intrusion Detection Systems (IDSs)/Intrusion Prevention Systems (IPSs) to proactively detect and prevent threats
- Wi-Fi with a minimum of WPA2-Enterprise security
- Network Access Control (NAC) to better manage endpoint access to your network.
- Proxy/web content filters to prevent malicious websites
- Next-generation antivirus and anti-malware tools for more intelligent protection
- Data Loss Prevention (DLP) to prevent the loss of sensitive data
- Email/spam filtering to protect users against spamming, phishing, and so on
- Security Information and Event Management (SIEM) to help you detect abnormal activity
- DNSSEC to protect your DNS services
- Public Key Infrastructure (PKI) to provide digital certificates for encryption
From a network device management perspective, the following are important:
- Ensure you keep the software of your network devices current.
- Enable auditing on devices.
- Integrate authentication using LDAP.
- Use a Privileged Access Management (PAM) solution.
- Disable or prevent local account access and change default usernames and passwords.
- Ensure the management of devices is encrypted (SSH).
- Isolate the management network.
- Don't allow the management of network devices from the internet.
For a more detailed review on securing network infrastructure devices, the Department of Homeland Security has a security tip reference available at this link:
https://www.us-cert.gov/ncas/tips/ST18-001
These technologies are very complex and, in most cases, require specialized skill sets to implement and manage daily. Some of these technologies are both hardware- and software-based. Hardware-based technologies are typically the rack-mounted gear in your Main Distribution Frame (MDF) and primarily protect your facilities and data centers. Software-based technologies protect the OS, end users, and VNETs. An example would be your computer's software firewall. Ensure you deploy the latest next-generation hardware or virtual-based firewalls at your data center locations (including the cloud) and physical offices and enable the software-based firewalls on your Windows devices for additional protection. Software-based technologies are becoming more critical for end user devices due to the shift from centralized offices to a dispersed and remote workforce.
The Microsoft technology stack offers many solutions that can be compared to other networking vendor offerings either as an alternative or as a complement. As a security professional, it is important you are aware of and understand each of the technologies referenced earlier to provide the best protection within your organization. Throughout the remainder of this chapter, we will review the Microsoft-specific network technologies that provide the best protection for Windows devices.
Understanding Windows network security
In this section, we will review the core networking components of Windows clients and servers. Having familiarity with these components is a must for any security professional when managing and troubleshooting Windows devices. It's also recommended that you apply the baseline recommendations for network-related settings to ensure your system is hardened correctly.
Network baselining
Referencing back to Chapter 2, Building a Baseline, you will want to ensure that your network-specific components have been configured based on the recommendations. There are many network-related settings for Windows and implementing the baseline recommendations is the more practical approach compared to building your own standards from scratch. As an example, referencing back to the latest Microsoft security baseline for Windows clients, simply filtering for the network keyword in the Security Template worksheet provides 40 settings.

Figure 4.3 – Network-specific configurations within the Windows 11 security baselines
The preceding settings will need to be configured using Group Policy or Mobile Device Management (MDM) to ensure enforcement and consistency. Unless you only have a few devices or servers to manage, individually configuring these settings is not realistic.
The CIS security benchmarks make a great complement to the Microsoft security baselines when building out your security controls. The CIS benchmarks are typically more recognized as a standard for hardening your systems and although there will be a lot of overlap between the Microsoft and CIS baselines, you will find that CIS tends to include tighter security controls. If using the Microsoft security baselines and CIS security benchmarks, we recommend focusing on the following areas regarding network communications between Windows clients and servers:
- Microsoft network client settings focus on how clients communicate with servers and how those communications are handled.
- Microsoft network server settings focus on how servers accept communications from clients and handle those sessions.
- Network access settings control how clients and users connect and interact remotely with each other and to file shares.
- Network security settings focus on hardening the protocols and authentication methods used to authorize communication between clients and servers.
In addition to the recommended local policies, there are additional recommendations within the CIS Benchmarks document you will want to review and configure related to network settings. Some of these recommended settings include the following:
- DNS client
- LanmanWorkstation
- Link Layer Topology Discovery
- Peer Name Resolution Protocol
- Network connections
- Network provider
- TCPIP
- Windows Connect Now
- Windows Connection Manager
- WLAN services
Tip
As a reminder, be extremely cautious when enabling any new settings and, more specifically, network settings on any devices or servers. They can be very disruptive to production if they're not tested correctly.
Next, we will review the network and internet management console on Windows clients.
Windows clients
To access the network and internet settings, open Windows Settings and click on Network & internet. You will be presented with the Network & internet management console, as shown in the following screenshot taken on Windows 11:

Figure 4.4 – Windows 11 Network & internet management console
Here, you will have access to all the networking-related components on your Windows device. You can view your current network status, adapter-specific settings (Wi-Fi, VPN, Ethernet, and so on), Mobile hotspot, Airplane mode, Proxy, and Dial-up settings. Within Advanced network settings, you will have the ability to disable your network adapters, view data usage, view hardware and connection properties, network reset your adapters, and link out to More network adapter options and Windows Firewall settings.
If you click on More network adapter options, you will be able to view your network connections and active adapters on your device, as shown in the following screenshot:

Figure 4.5 – Windows 11 Network Connections
Here, you can view your network settings for any connected adapters by right-clicking and clicking Status. You will be able to view settings such as IPv4/6 connectivity, Media State, Duration, and Speed, and more specific details, such as the IP, MAC, Default Gateway, DHCP, and DNS addresses.
The following network connection technologies are considered more critical for your end user devices and need to be set up correctly to ensure a safer environment for your users.
WLAN/Wi-Fi
Wireless technology is a necessity within the world of technology today. Almost every laptop and mobile device will have some form of Wi-Fi connectivity available for use. With all technologies, there are threats, and this applies to Wi-Fi. Unfortunately, Wi-Fi is much more susceptible to vulnerabilities than Local Area Network (LAN) technologies due to the information being transmitted over the air and not through a cable, which is much more difficult to breach. There are many threats when it comes to Wi-Fi, and some of the more known ones include rogue access points or networks, man-in-the-middle attacks, and unauthorized access to insecure Wireless Local Area Network (WLAN) systems.
Securing your corporate Wi-Fi is not a small task and will require very skilled network engineers to architect and implement correctly, especially with implementing enterprise-grade security. Here are a few important tips for Wi-Fi security and your Windows clients:
- Do not use Wired Equivalent Privacy (WEP).
- Enable enterprise-grade authentication – WPA2-Enterprise with EAP-TLS: https://docs.microsoft.com/en-us/windows/win32/nativewifi/wpa2-enterprise-with-tls-profile-sample.
- Ensure any guest networks, Operational Technology (OT) networks, and Internet of Things (IoT) networks are isolated from more sensitive production networks and ensure all guest access is protected. If using a guest SSID with a password, implement a process to rotate the password regularly.
- Ensure the WLAN infrastructure is kept current and up to date.
For a more comprehensive list regarding how to secure your enterprise-grade wireless infrastructure, the Department of Homeland Security has a guide available for reference: https://www.us-cert.gov/ncas/tips/ST18-247.
As part of your baselines and the management of your devices, you will want to ensure you enforce the required security settings for your users. This can be accomplished using device administration tools such as Group Policy or Intune MDM. The following is an example of configuring Wi-Fi settings using the Intune settings catalog:
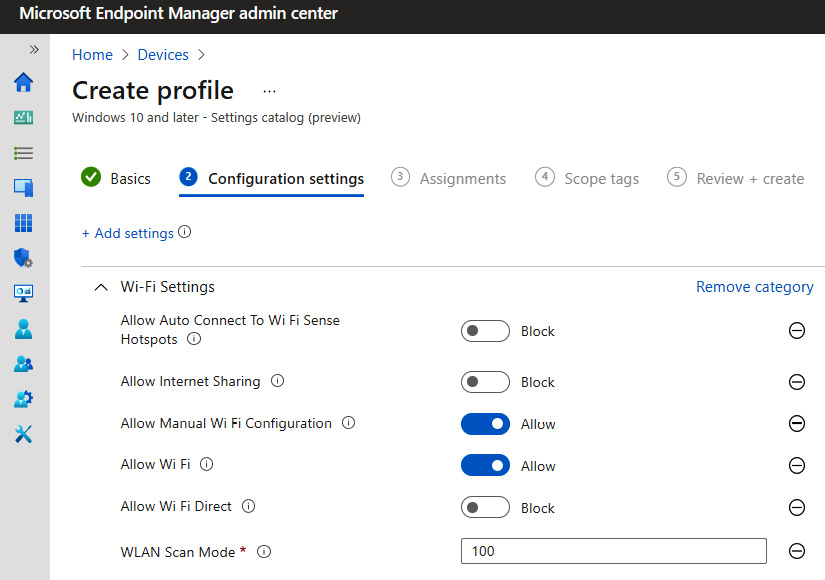
Figure 4.6 – Wi-Fi settings in Intune
We will cover creating device configuration profiles using Intune in more detail in Chapter 6, Administration and Policy Management.
We recommend configuring the following security policies for Wi-Fi/WLAN settings on your corporate devices:
- Block connections to suggested open hotspots and networks shared by contacts or paid services. These features are known as Wi-Fi Sense.
- Block internet sharing.
- Block Wi-Fi Direct.
- Minimize the number of simultaneous connections to the internet or a Windows domain. Set preventing Wi-Fi when on Ethernet.
- Block connections to a non-domain network when connected to an authenticated domain network.
- Block access to the Windows Connect Now (WCN) wizards.
- Block the configuration of wireless settings using WCN.
- Remove any unused Wi-Fi networks if possible.
Always be cautious when using open Wi-Fi in public places because of the ongoing threats from attackers. We don't know how well other Wi-Fi networks have been configured, and vulnerabilities may exist within their networks. When traveling, use cellular data to connect to the internet if it's an option or ensure you connect to a VPN when connecting to any public Wi-Fi. It's important to provide security awareness to your users and advise them about the risks of public Wi-Fi and what they should be doing to protect themselves.
Tip
Your home is just as vulnerable to threats regarding Wi-Fi and even more so as we connect more devices (IoT) within our home to it. Educate your users and provide them with the awareness needed to protect themselves from the ongoing threat landscape. The Department of Homeland Security provides home network security tips here: https://www.us-cert.gov/ncas/tips/ST15-002.
Next, let's look at Bluetooth technology and discuss a few recommendations to ensure secure Bluetooth connections.
Bluetooth
Your Windows device most likely has Bluetooth as a connectivity option since many peripherals, such as keyboards, mice, and audio speakers, use it as a standard connection type. Although an extremely convenient technology, it also comes with many flaws. There are many Bluetooth threats today that you should be familiar with. Some well-known threat types include bluejacking, bluesnarfing, and bluebugging. The best protection against Bluetooth is to disable it and prevent your users from using it. Unfortunately, this may not be a reality for most, so it is important to understand the technology and the risks associated with it. To help you understand Bluetooth and the risk it entails, NIST has published a Guide to Bluetooth Security, also known as NIST Special Publication 800-121 Revision 2: https://nvlpubs.nist.gov/nistpubs/SpecialPublications/NIST.SP.800-121r2-upd1.pdf.
The Guide to Bluetooth Security is an extremely comprehensive document that provides you with all the knowledge needed to secure your Windows devices using Bluetooth, including a security recommendation checklist. In addition, the following recommendations are provided in the guide to help you improve your Bluetooth security:
- Ensure the strongest Bluetooth security mode is enforced for all users where Bluetooth is enabled. Bluetooth operates in two security modes with four levels of differing variance that can be mixed if supported by the device.
- For the strictest security, use security mode 2 with level 4 and require communications that are paired, encrypted, and signed. For the least restrictive, you would use level 1, which will not require any security at all.
- Ensure Bluetooth is listed and referenced in the company security policies and that the device settings have been modified to reflect these policies.
- Ensure any users enabled to use Bluetooth are fully aware of security issues with Bluetooth and their responsibilities while using it.
- Delete unused Bluetooth pairings or configure allowed Bluetooth services and policies using MDM.
Bluetooth security should also be part of your defined baseline and you will want to configure and deploy specific security settings for your users. The following screenshot shows some of the available Bluetooth settings from the Intune settings catalog:
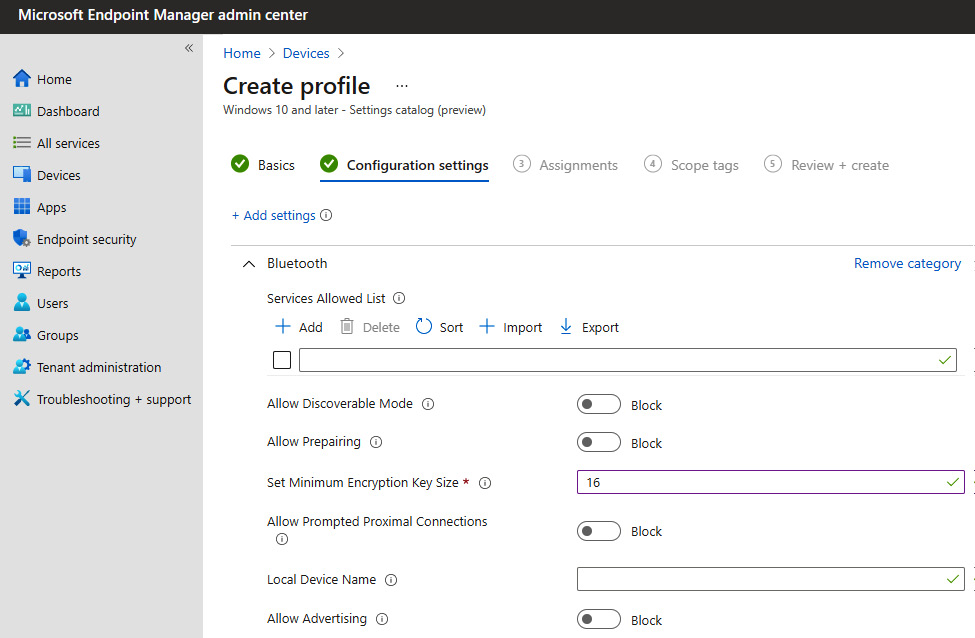
Figure 4.7 – Bluetooth settings in the Intune settings catalog
Bluetooth settings can also be configured in the Attack Surface Reduction rules within Endpoint security.
By configuring the Bluetooth allowed services policy, it will only allow pairings with explicitly defined Bluetooth profiles and services using Universally Unique Identifiers (UUIDs). For more information about configuring the UUID allowed services list for Bluetooth using MDM, visit this link:
Unfortunately, many of the inherent flaws and vulnerabilities in Bluetooth are typically not fixed simply by updating firmware or applying updates and require the hardware to be physically updated. Due to how these chips share physical resources with other system components, a successful exploit can allow attackers to invoke code execution and try to read data on your systems. If you're interested in reading more about notable Bluetooth vulnerabilities, visit this link:
https://awesomeopensource.com/project/engn33r/awesome-bluetooth-security
Now that we have covered Wi-Fi and Bluetooth connections, let's discuss VPN and its use within an organization to connect to internal resources.
VPN
The more remote the workforce has become, the more we rely on VPN connectivity. VPN is essentially a technology that allows users to connect to their corporate network over an encrypted secure connection over the internet. VPN allows a user to be anywhere at any time and access corporate data securely. As part of your policies and remote strategy, it is critical that you ensure users are connecting to a VPN when working remotely. The risk of connecting your work device (or any device) to open Wi-Fi connections in public places creates significant risk. When connecting to any network outside of your corporate office, a VPN should be connected to ensure a secure working session. VPN technology has been around for a long time and is a tool that users are most likely familiar with when working remotely.
One primary challenge with VPNs is that they require user interaction to connect once logged into the device. For the most secure working environment, the VPN should automatically connect once connected to an internet connection. Microsoft has a technology known as Always On VPN, which is a configurable Windows VPN profile that can automatically connect when off your corporate network. This is a great technology and works very well! To use the Always On VPN technology with Windows 11, you need several components for the infrastructure to support it. The following documentation provides more details on the Always On VPN configuration for Windows clients: https://docs.microsoft.com/en-us/windows-server/remote/remote-access/vpn/vpn-device-tunnel-config. The following screenshot shows what a Windows Always On VPN connection looks like in Windows 11:
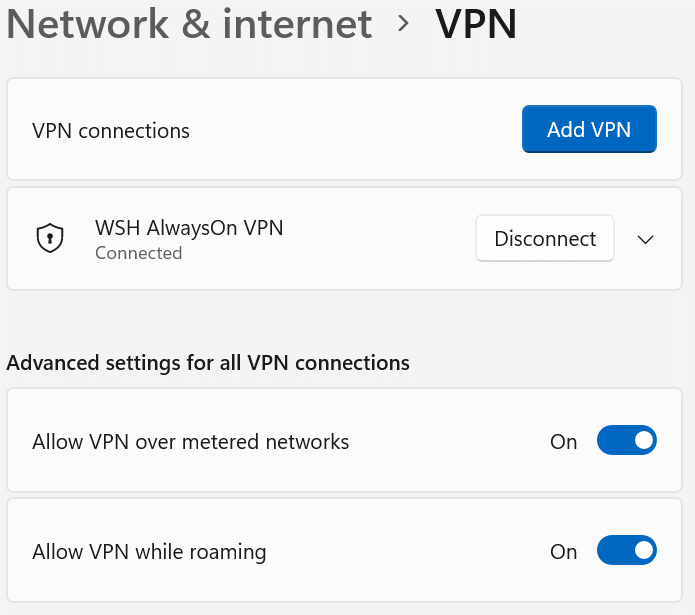
Figure 4.8 – Windows 11 VPN connection
To manually configure or modify a VPN profile in Windows, open Windows Settings, click on Network & internet, and click on VPN.
To administer a VPN profile using device management, the Windows Always On VPN technology uses the VPNv2 configuration service provider in MDM. There are quite a few settings to configure manually, but all the profile properties can be configured by using a ProfileXML schema file instead of configuring each node individually. The ProfileXML file can be enforced on clients using PowerShell, Configuration Manager, or Intune through MDM or the WMI-to-CSP Bridge component. The following screenshot shows how to configure the Windows auto VPN using the Intune Windows 10 and later custom profile type and a ProfileXML file:

Figure 4.9 – Always On VPN in Intune
Additional always-on VPN solutions for Windows are available from Palo Alto Networks through their GlobalProtect client and Cisco's AnyConnect. There is also an option within Windows 11 to use the built-in VPN client to connect to other third-party services or providers. To learn more about setting up a VPN connection from your Windows client, visit this link:
Tip
For personal use, you may want to consider using a consumer-grade VPN service if working from a café or public Wi-Fi hotspot.
Next, let's look at the network security components in Windows Server and the roles and features that can be enabled as components of a network infrastructure.
Windows Server
For Windows Server, the networking-based components are also available in the Network & Internet settings. To open them, search for Network, click on Settings, and then select Network & Internet.

Figure 4.10 – Windows Server 2022 network status in settings
Just like on client devices, the Network & Internet management console for Windows Server will provide access to all the Windows network components, such as the current network status, Windows Firewall, the Network and Sharing Center, adapter-specific settings for VPN and Ethernet, proxy settings, and network reset functions.
LAN/Ethernet
Windows server implementations should only be connected using Ethernet for security purposes and for any needed internet access. Ethernet is much more secure than Wi-Fi and provides greater reliability and performance. In addition to using Ethernet, servers should be on a separate network segment from your client devices if possible. Separation should go as far as containing segments for different data classification types, including a Demilitarized Zone (DMZ), and segments for traffic that flows to apps and databases. To accomplish this, you will need to implement VLANs on your LAN and organize the segmentation of the network based on the classification level of the information stored on the servers.
Server roles and features
In addition to the base OS for Windows Server, there are server roles and features. There are many available roles and features that will provide separate services for your enterprise. A few of the more common ones include AD Domain Services, Web Server (IIS), and SMTP Server for email relay.
To access these roles and features, search for Server Manager within the search area and click on it. Once Server Manager is open, ensure you are within the dashboard and click Add Roles and Features. Here, you can add your desired network-related server roles and features, as seen in the following screenshot:

Figure 4.11 – Windows Server roles and features
There are many roles and features available that support network-specific functions. Some of them include the following:
- DNS server
- DHCP Server
- Active Directory Certificate Services
- Network Policy and Access Services
- Remote Access
- Network Load Balancing
- SMTP Server
- SNMP service
To implement the Microsoft's Always On VPN we discussed earlier, the following needs to be deployed within your server environment:
- AD Domain Services
- DNS server
- Network policy and access services (NPS-RADIUS)
- AD Certificate Authority (CA)
- Remote access (direct access and VPN-RAS)
Next, let's look at the network security components in Hyper-V and the recommended network security configurations.
Networking and Hyper-V
As discussed in Chapter 3, Hardware and Virtualization, virtualization has become prevalent within organizations but brings a lot of additional risk compared to a traditional model of deploying physical servers. Similar security controls should apply to the network layer within the Hyper-V or virtualization architecture and ensuring the network is set up correctly and following best practices is a must. Just like with physical servers, the most concerning risk within the network layer is allowing services to use the same network segment or VLAN as servers with strict data classification standards. Network isolation is critical within the virtualization architecture and must be implemented correctly for the best security.
The following documentation provides an overview of networking within Hyper-V:
There is also this reference for Hyper-V security for Windows Server that should be reviewed as part of your baseline:
Within this reference, the network-specific security items include the following:
- Use a secure network for both host management and Virtual Machines (VMs).
- Use separate networks and dedicated physical adapters for the physical hosts.
- Use a separate secure network to access virtual hard disk files and VM configurations.
- Use a separate secure network for any VM migrations and ensure encryption is enabled.
- For VMs, ensure the virtual network interface cards (NIC) are connected to the correct virtual switch and are configured with the correct security settings.
Now that we have reviewed the network components of Windows Server and tips for securing virtualized networking, let's review some of the tools that are helpful when troubleshooting network-related issues.
Network troubleshooting
As a security professional, you are going to need to be familiar with troubleshooting and investigative work especially when trying to build a timeline during an incident. Chances are that the network layer will be a key component in the troubleshooting and investigative process. Microsoft initially had its own tool that was able to capture and analyze network traffic, known as Microsoft Network Monitor, which was replaced with Microsoft Message Analyzer (MMA). Unfortunately, MMA has been retired and Microsoft has no plans to replace it. Fortunately, there are many alternatives, and these tools are widely used today by network and security professionals alike. A couple of the more widely adopted freeware tools that allow for the inspection and analysis of network traffic include the following:
- Wireshark: https://www.wireshark.org/
- Telerik Fiddler: https://www.telerik.com/fiddler
Before using any of these tools, ensure you have the authority or have been provided with permission to run them on a network you do not own.
In this section, we reviewed some of the basic Windows networking components found in Windows clients, servers, and Hyper-V. We resurfaced the topic of baselining for network-specific hardening within your environment. We also provided recommendations for configuring Wi-Fi and Bluetooth settings using Intune. In the next section, we will look at network security features within Windows, including Windows Firewall and enabling web protection features with Microsoft Defender for Endpoint.
Windows Defender Firewall and Advanced Security
Windows Defender Firewall is a software-based firewall that's enabled out of the box and used to control network connections to your PC. To view the basic firewall settings, including the status of each profile, open Windows Security from the Settings app and select Firewall & network protection. There are local security settings you can change from here, including configurations specific to each network profile, such as blocking incoming connections, allowing an app through the firewall, and restoring the default firewall settings.
The three network profile types in Windows Firewall are domain, private, and guest/public, as follows:
- Domain profile settings are defined by the domain profile and are set systemically using Group Policy or from network devices located on the corporate network. Local policy settings are typically overwritten if they're managed systemically.
- Private profile is used for home networks or Small Office Home Networks (SOHOs) where a domain controller may not be present. A private profile can be configured by a local security policy and by default, incoming connections to apps are blocked if they are not on the list of allowed apps.
Tip
If an app is blocked, you can view the event log or firewall log for more details. EventID 5031 in Windows Logs/Security will show you if the firewall blocked an incoming connection from an application.
- Public profile is used for guest or public networks. Network discovery is turned off by default in Windows for this profile, which blocks file and print sharing. Incoming connections are set identical to the private profile where apps are blocked that are not on the list of allowed apps.
Clicking on Advanced Settings and elevating user account control with an administrative account will open Windows Defender Firewall with Advanced Security. With Advanced Security, you have fine-grained control over inbound, outbound, and connection security rules for both ingress and egress flows. The inbound/outbound rules can specify specific ports or programs or use custom settings that may include a combination of ports, programs, and physical network adapters. Windows Defender Firewall already comes configured with a set of predefined rules and these rules cannot be directly modified, but they can be enabled or disabled.
Tip
A green checkbox next to the rule name means that it is enforced. If many modifications are needed in addition to the predefined rules, consider building them into a prehardened image or use MDM to configure them.
Connection security rules are used to secure the communications between the source and destination using IPsec and define the authentication conditions needed to establish the connections. Typically, advanced connection security rules will be managed through third-party devices or software. An example of a connection security rule would be to specify a required method of authentication needed to establish a secure connection. If the source and destination systems do not meet the conditions, then the connection is denied. Connection security rules can be defined to require and/or request authentication, both inbound and outbound, and include settings for common authentication methods, such as using certificates or Kerberos and NTLMv2 for computer and user authentication.
Important Note
An important difference between firewall rules and connection security rules is that, simply put, firewall rules are used to allow or deny traffic.
Advanced Security also includes a monitoring section that shows a high-level overview of the status of each network profile. It has helpful links to view active firewall rules, active connection security rules, security associations, and logging settings.
Typically, Windows does a good job of allowing applications through the firewall that are known and trusted. In fact, when enabling certain Windows features or installing software, rules are automatically enabled. In some scenarios, a rule may need to be added to allow inbound/outbound access to an application. This can be accomplished using Group Policy in a Windows Server AD environment or through MDM on Windows clients. Let's look at how to use Group Policy to configure a custom line-of-business app through Windows Firewall.
Configuring a firewall rule with Group Policy
For this example, we need to allow an app named BusinessApp.exe whose binaries are located under the C:Program Files (x86)MyLOBApp path. We want to allow both inbound/outbound connections over the domain profile only. This will ensure that connectivity will work only while connected to the corporate network. Follow these steps to allow the app through the firewall with Group Policy:
- Open the Group Policy Management snap-in from your management workstation and create a new GPO linked to an organizational unit (OU) that contains the computer systems you wish to target.
- Give it a friendly name, such as Windows Defender Firewall – Inbound Allow Rules, right-click it, and choose Edit.
- Navigate to Computer Configuration | Policies | Windows Settings | Security Settings | Windows Firewall with Advanced Security, expand it, and then expand it again.
- Right-click Inbound Rules and choose New Rule to open New Inbound Rule Wizard.
- Select Program, click Next, and select the radio button next to This program path.
- Enter the path of the executable file for the custom line-of-business app from the install directory, for example, %ProgramFiles% (x86)MyLOBAppBusinessApp.exe. Click Next.
- Select the Allow the connection on Action menu.
- Select the domain profile only and click Next.
- Give it a friendly name, such as Allow BusinessApp, and click Finish.
- Repeat the same process, but for Outbound Rules.
The following screenshot shows the applications allowed in the inbound rules of Windows Defender Firewall after a Group Policy refresh:

Figure 4.12 – Inbound rules in Windows Defender Firewall with Advanced Security
Tip
Configuring firewall rules through Group Policy does not support environmental variables used to resolve the context of the current user. This can cause some challenges if non-administrative users are being prompted to allow an app through the firewall that is running from the %APPDATA% or %USERPROFILE% locations.
To configure a Windows Defender Firewall rule using Intune, use the Endpoint protection template in a device configuration profile for Windows 10 and later. In this template, you can also manage other firewall settings, including the ability to create a rule for a specific network profile.
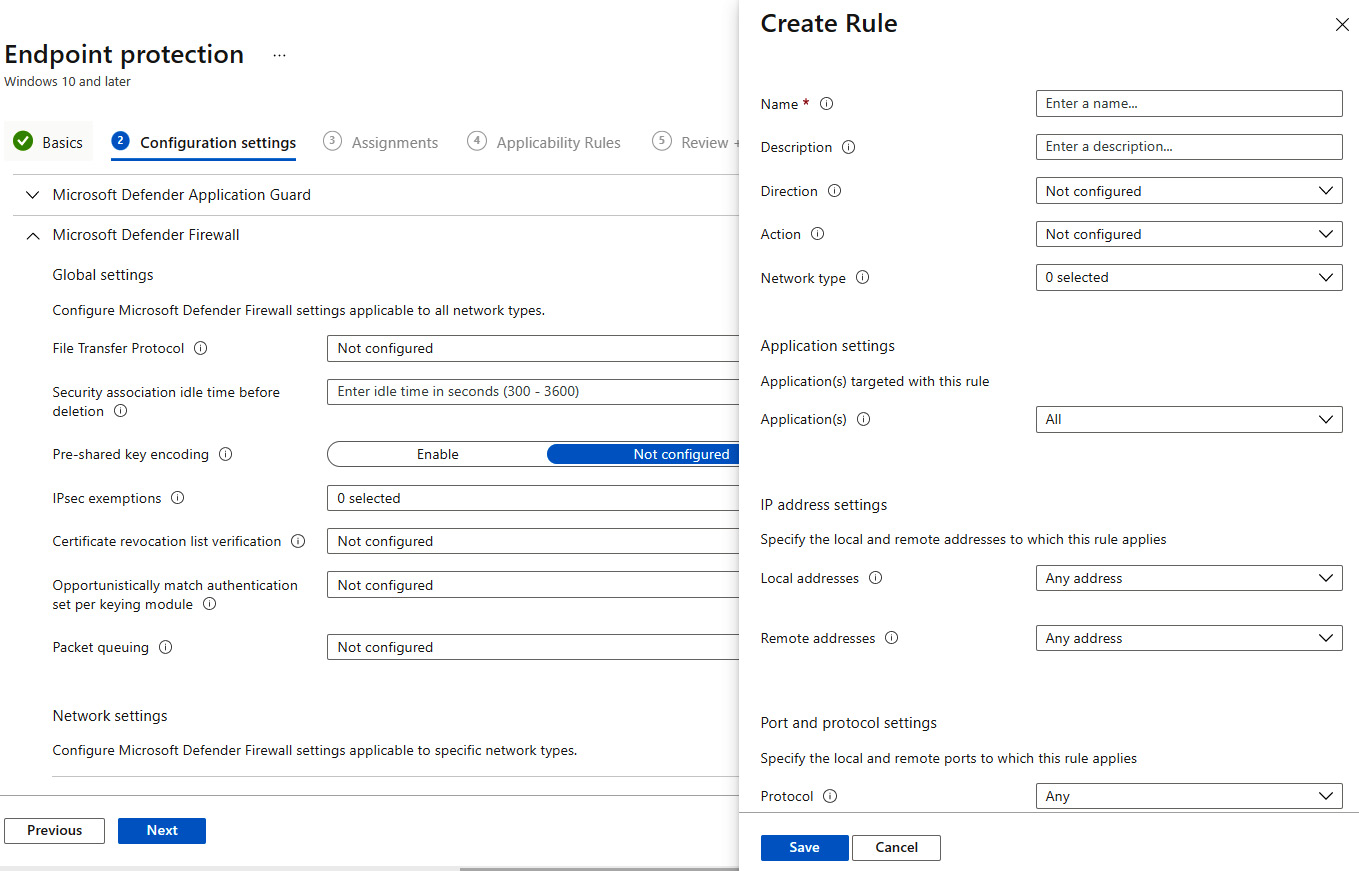
Figure 4.13 – Microsoft Defender Firewall template in Intune
Next, let's look at configuring a security baseline for Windows Firewall.
Configuring a Windows Defender Firewall security baseline
As mentioned earlier, Windows is already configured with a great set of default settings for Defender Firewall. In fact, Microsoft recommends keeping the default settings and not changing any of the defaults for the most secure configuration. However, it is recommended to enforce the default policies to avoid end users from making changes. Intune has a recommended security baseline available in the Intune Security Baselines feature located in the Firewall section of the Microsoft Defender for Endpoint baselines. The preconfigured values will help get you started with enforcement.
Two additional configuration policies worth noting, known as rule merging, can be set independently in each network profile. Ignore all local firewall rules and Ignore connection security rules control whether rules created locally by administrators can be merged with rules from a policy-managed firewall.
Tip
If disabling the merge of local firewall and security rules, set the Display a notification policy to No, so end users are not prompted when a firewall rule blocks a connection.
Windows Firewall has another built-in feature known as Shielded mode. This setting can help isolate a client from the network by blocking all traffic, including connections for apps on the allow list. Shielded mode can be set independently on each profile type by going to the Windows Security app | Firewall & network protection, choosing the network profile, and selecting Blocks all incoming connections, including those in the list of allowed apps. Later, we will also discuss a feature in Defender for Endpoint that allows you to isolate devices from the network if they are deemed compromised without having to push policies directly to a device.
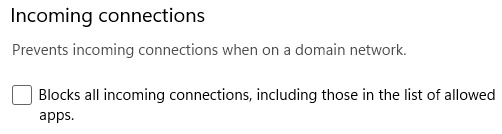
Figure 4.14 – Shield mode in Firewall & network protection in Windows Security
Next, we will look at the web protection features available in Microsoft Defender for Endpoint.
Web protection features in Microsoft Defender for Endpoint
Microsoft Defender for Endpoint has a list of features known as next-generation protection that are available for customers who have purchased a Microsoft Defender Endpoint Plan 1 or 2 license type. Included in these features are a set of network and web protection solutions that can help control network connections to your clients. These features, known as web protection and network protection, can complement or possibly replace a traditional network proxy service for web traffic control. Let's look at some of these features. To view the endpoint settings of Defender for Endpoint, log in to the Microsoft 365 Defender portal at https://security.microsoft.com, choose Settings, and then select Endpoints.
Using custom indicators
Custom Indicators of Compromise (IOCs) allow security teams to create blocklists of file hashes, IP addresses, URLs/domains, and certificates. When an entry is added to the custom indicators list, a response action can be set to allow, audit, warn, or block. If using Defender for Endpoint operationally for SecOps, you can also generate alerts and set the severity and category for each item. The indicators list can be found at this link in the Microsoft 365 Defender security portal for endpoints and will look as in the following screenshot:
https://security.microsoft.com/preferences2/custom_ti_indicators/files
Tip
Custom network indicators must be enabled in the Advanced Features section of the Microsoft 365 Defender for Endpoints portal.

Figure 4.15 – Custom indicators in Microsoft 365 Defender
Custom indicators are a great way to block not only IOCs but also any other specific websites or connections you don't want your end users to visit. For example, you can add a streaming service such as Netflix and when a user tries to visit it in a web browser, they will receive a Windows Security toast notification informing them the content is blocked. To enable the blocking feature on the client, it will require a Defender SmartScreen (for Edge) or network protection (other browsers) policy to be enabled.
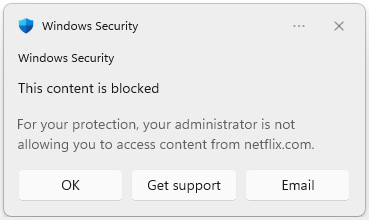
Figure 4.16 – Windows Security toast notification for a blocked network connection
The flexibility to manually add URLs and IPs to block is a great added feature available in Microsoft Defender for Endpoint. If you don't have the bandwidth to manage these lists manually, use Microsoft Defender's web content filtering policy to configure policies based on specific content categories. Let's take a look at the web content filtering capabilities in Defender for Endpoint.
Web content filtering
By creating a web content filtering policy, you can rely on Microsoft's security stack to help filter websites based on content category. This solution works in all major browsers and can be set up to enforce block mode if using the network protection policies. When configuring a web content filtering policy, there are five parent categories, and each has several child categories to further refine the scope. The following content categories are available:
- Adult content contains child categories for cults, gambling, nudity, pornography or sexually explicit content, sex education, tasteleess images, and violence.
- High bandwith allows you to block sites that are categorized as download sites, image sharing, peer-to-peer, or streaming media and downloads.
- Legal liability contains categories for child abuse, criminal activity, hacking, hate and intolerance, illegal drugs, illegal software, school cheating, self-harm, and weapons.
- Leisure allows you to block chat and gaming sites, instant messaging, professional networking sites, social networking, and web-based email.
- Uncategorized lets you block websites that are newly registered or parked domains.
Just like creating a custom indicator, you can scope a web content filtering policy to all devices or a subset of devices in your organization. If the content categories are blocking a website needed for business purposes, you can allow it by adding it to the URL list in the custom indicators and setting the action to allow. Microsoft 365 Defender includes a Web Threat Protection report so you can get an idea about the types of websites that would be blocked under a content policy. To view these reports, log in to the Microsoft 365 Defender portal at https://security.microsoft.com, choose Reports, and select Web Protection. Click on the details under the web activity summary, and you will gain better insight into the clients and domains that were visited under each content category. This will be helpful when planning your filtering policies.

Figure 4.17 – Microsoft 365 Defender report for web content filtering
Next, let's look at how to turn on network protection to configure the blocking of network connections on the client.
Blocking connections with network protection
Network protection is a security feature that can be enabled through the Exploit Guard features of Microsoft Defender. Network protection helps to reduce attacks from low-reputation IP and URL sources known for phishing, social engineering, and malicious browser redirects based on analytics from Microsoft's threat intelligence service. Its protection covers all major browsers, including Google Chrome and Mozilla Firefox. If you're licensed for Microsoft 365 Defender for Endpoint, activity logs from devices that trigger the policy are sent into the portal for the advanced hunting of queries, alerting, and reporting. Network protection is a great feature for small- or medium-sized businesses or those looking to get away from third-party proxy services and the administration required to maintain them. It supports the following three modes:
- Not Configured keeps the feature disabled, which is the default Windows setting.
- Enabled will block connections and send activity logs to Microsoft 365 Defender.
- Audit only will allow connections but will also send activity logs to Microsoft 365 Defender.
Tip
If network protection is alerting false positives, Microsoft recommends opening a support case so that their threat team can investigate.
When a connection is blocked, a notification informs the user of the blocked connection through Windows Security notifications. You can also customize the details in the action buttons on the notification, such as setting a support email or web URL to the IT support portal. The notification from Windows Security looks like the one previously shown in the custom indicators policy, Figure 4.16.
In the following screenshot, Kusto Query Language (KQL) is being used to query the Microsoft 365 Defender logs for Exploit Guard network protection events in Advanced hunting:

Figure 4.18 – KQL query in Advanced hunting in Microsoft 365 Defender
Network protection can be enabled through PowerShell, Group Policy, or MDM. For information about managing a Group Policy central store and the latest downloads for administrative templates, visit the following link:
After importing the ADMX templates, the feature can be found under Windows components | Microsoft Defender Antivirus | Windows Defender Exploit Guard | Network Protection.
To enable network protection using Group Policy, follow these steps:
- Open the Group Policy Management snap-in console from a management workstation and create a new Group Policy Object (GPO) linked to an OU that contains the computer systems you wish to target.
- Give it a friendly name, such as Microsoft Defender Exploit Guard – Network Protection, right-click it, and choose Edit.
- Navigate to Computer Configuration | Policies | Administrative Templates | Windows Components | Microsoft Defender Antivirus | Windows Defender Exploit Guard | Network Protection.
- Open the Prevent users and apps from accessing dangerous websites policy setting and set it to Enabled.
- Choose the enforcement mode of Block or Audit Mode.
Tip
If a user turns off notifications, they may not receive any notice that a connection has been blocked.
If using Intune, network protection can be configured using templates or through Endpoint Security by going to the Microsoft Defender Antivirus profile and choosing the Windows 10, Windows 11, or Windows Server platform, and then set Enable Network Protection to Enabled (block mode) as in the following screenshot:

Figure 4.19 – Enable network protection in Endpoint security
In the previous sections, we covered Windows Defender Firewall with Advanced Security, including how to create custom rules using Group Policy. We discussed enforcing a security baseline and recommended a few specific policies to enforce. Next, we covered web protection features of Microsoft Defender, including custom indicators, web content filtering, and enabling network protection to block connections to suspicious hosts. In the next few sections, we'll shift focus and discuss Azure cloud solutions that can be used to provide network security to your Windows-based endpoints in Azure.
Introducing Azure network security
At its foundation, the Azure networking plane in regard to private addressing consists of a VNET containing a defined address space. Just like traditional networking concepts, the VNET can then be further segmented into subnets, where resources are assigned to a designated space. Resources inside the same VNET are typically allowed to communicate with each other as well as with other Azure services using the underlying networking fabric or service endpoints. Depending on the networking topography in your environment, if you need to enable communications into other VNETs, a feature known as VNET peering will allow cross-VNET communication. When protecting your Windows resources in Azure, there are a few features available for controlling traffic flow inbound and outbound to your endpoints. Using a combination of User-Defined Routing (UDR), NSGs, Azure Firewall, and Network Virtual Appliances (NVAs) will help ensure communications are locked down to only allow the appropriate traffic to reach your resources.
Tip
When creating a new VNET, outbound connectivity to the internet is allowed by default.
In the next section, we are going to review network security access controls using a feature known as NSGs.
Controlling traffic with NSGs
An NSG is an Azure resource that acts as a stateful firewall for evaluating inbound and outbound traffic. It is used to allow or deny communications through a set of weighted security rules that are evaluated based on a priority integer value using five-tuple information. NSG resources can be associated with subnets or VNET interfaces. As a best practice, it is recommended that NSGs are applied at the subnet level over a direct assignment to a network interface. This helps minimize the amount of NSGs for simplification purposes. A security rule inside an NSG has the following five-tuple properties:
- Name, which is used to identify it; for example, AllowRDP.
- Priority, between 100 and 4,096, which is used as the weight during evaluation.
- Source or Destination. The options can include ANY, an individual IP, a range specified in CIDR notation, or a service tag.
- Protocol support for TCP, UDP, ICMP, or Any.
- Direction (inbound or outbound).
- Port range.
- Action, such as allow or deny.
Tip
When assigning a priority, it is recommended to assign them at intervals of 50 or 100 to ensure there is plenty of space to insert rules in the future.
To help simplify the rule definitions in your NSG, a service tag can be used to help minimize this complexity for connectivity to Azure services.
Using service tags for Azure services
The destination value for a security rule in an NSG can also be set to an Azure service tag. Service tags are available to help simplify the creation and maintenance of security rules. Instead of manually specifying IP ranges for common connection points or managing connections that have changing details, Microsoft maintains the connection information for these services inside of a service tag. Examples of service tags in Azure include values for VNETs, storage, SQL, or the internet. The full list of available VNET service tags can be found at this link:
https://docs.microsoft.com/en-us/azure/virtual-network/service-tags-overview
Tip
Security rules can also be augmented security rules that contain a comma-separated list of IP ranges in CIDR notation instead of you having to create separate rules for each IP block.
The following screenshot shows the NSG inbound security rules. You can see the service tags depicted as Internet and VirtualNetwork in the Source and Destination sections.

Figure 4.20 – NSG inbound security rules in Azure
Next, we will review grouping resources with Application Security Groups (ASGs).
Grouping resources with ASGs
ASGs are an additional enhancement for simplifying NSG rules as they allow you to group together multiple components that may power the backend of an application. You can use this custom group and use it inside a security rule, such as a service tag. For example, let's say you have a few shared backend app servers and database servers. As the business requirements evolve, there may be a need to use these resources to service other business functions that are housed in different subnets. By grouping these resources together and creating an ASG, you can specify the source as this grouping in the NSG rule and don't have to granularly define each component moving forward.
Creating an NSG in Azure
It's common when building new infrastructure in Azure to deploy a jump box server. This is helpful to allow connectivity from the internet to access resources inside your private network without needing a VPN or virtual desktop infrastructure (VDI) environment. Although we strongly recommend only using a jump box as needed for emergency use and shutting it down when not in use, we want to demonstrate how to create an NSG rule that allows RDP traffic over the internet to a Windows server. To do this, we will set a non-common port to help deter malicious actors actively looking for connections listening on port 3389 (RDP) over the internet.
This demo assumes the following resources have already been configured in Azure:
- A resource group, Azure VNET, and a subnet
- Windows VM with a public IP address assigned
The new NSG will contain two inbound security rules. One will use 3389 to allow connections using the standard default RDP port, and the other set to port TCP 65001, which will be the new, modified port for RDP on the underlying VM. Finally, we will create an inbound firewall rule in Windows Firewall and set the listening port to 65001 for RDP through the registry on the VM. Let's get started:
- Log in to the Azure portal at https://portal.azure.com.
- Search for Network Security Groups and select it.
- Click Add or Create network security group if none have been created.
- Choose the subscription and then select the resource group that contains your Windows VM. Give it a friendly name, such as NSG-Identity-Prod. In our example, we are creating an NSG for a subnet that contains domain controllers.
- Select the region that your subnet resides in and choose Review + Create. Then, select Create after the validation passes. Go to the resource after the deployment completes.
NSGs have predefined security rules out of the box and cannot be deleted. Their priority is specifically set high to allow for plenty of space for custom security rules. The maximum integer for a custom-defined security rule is 4096.
- Click on Inbound security rules under Settings.
- Click Add to create a new inbound rule with the following settings:
- Source: Service Tag
- Source service tag: Internet
- Source port ranges: *
- Destination: VirtualNetwork
- Destination port ranges: 3389
- Protocol: TCP
- Action: Allow
- Priority: 1001
- Name: IBA_RDP_3389
- Click Add to create the rule.
- Repeat these steps to create the inbound allow rule for the custom TCP port 65001, but with the following changes:
- Destination port ranges: 65001.
- Priority: 1050.
- Name: IBA_RDP_65001. This is short for inbound allow, Remote Desktop Protocol, and port number 65001.
- Click Add to create the second rule.
Notice the warning symbol in the following screenshot next to the inbound allow rule for 3389. Azure does a good job of warning you that a common port is open to the internet:

Figure 4.21 – Inbound security rules inside an NSG in Azure
Now, let's associate the NSG with a subnet.
- Click on Subnets in Settings.
- Choose Associate, select a VNET from the dropdown, and select the subnet that contains your Windows VMs. Click OK.
Now that we have created the NSG rules and associated them with a subnet, we can remote into the Windows VM and modify the settings to change the RDP listening ports to 65001. Follow the next steps to do so.
- Find the VM by searching for it by name in the Azure portal. On the Overview tab, click Connect to download the RDP file and connect over a public IP with the default RDP port of 3389.
- Log in to the VM using the administrative account you used when creating the VM to load the desktop.
- Once at the desktop, search for Windows Defender Firewall with Advanced Security to open the advanced menu. Click on Inbound Rules.
- Click New Rule and create a new inbound rule.
- Select Port as the rule type to create and click Next. Select TCP and enter 65001 in the box to specify Specific local ports and click Next.
- Keep the default of Allow the connection selected and click Next.
- Keep all three profiles selected and click Next.
- Give the rule a friendly name, such as Remote Desktop – IBA 65001, and click Finish.
- Open the registry editor (regedit), go to the HKEY_LOCAL_MACHINESystemCurrentControlSetControlTerminal ServerWinStationsRDP-Tcp registry subkey, and look for the DWORD port number.
- Open the DWORD port number, choose Decimal, and modify the port number so that it states 65001. Click OK.
- Restart the VM.
- Validate the port number change worked by connecting to the VM with RDP by specifying the IP and port, for example, 40.70.223.4:65001.
If using the Azure portal, the following screenshot shows the Connect to virtual machine menu that appears after clicking Connect:
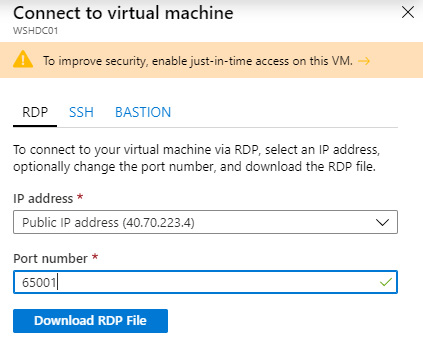
Figure 4.22 – Connect to virtual machine menu in Azure VM overview
To recap, we just created a new NSG with two inbound rules to allow TCP ports 3389 and 65001 to accommodate RDP traffic. Then, we modified the default RDP listening port on the VM host to TCP 65001 and created a new inbound allow firewall rule in Windows Defender Firewall to allow for TCP 65001. Next, let's review a few security recommendations when working with Azure networking.
Security recommendations for Azure Networking
While working with Azure networking can be highly complex, here are a few recommended security best practices to consider whenever creating new resources, in particular, Windows VMs:
- Ensure RDP access is not allowed directly from the internet. Use a VPN deployment or VDI environment for connectivity internally.
- Disable SSH access from the internet using an NSG.
- Disable UDP services from the internet using an NSG.
- Only allow the necessary ports, protocols, and services to connect to your resources through NSGs.
Connecting privately and securely to Azure services
Earlier, we mentioned how, by default, internal resources connect to Azure services using service endpoints over the Azure networking fabric. This communication doesn't occur over your own private and secure network and doesn't prevent access to other resources inside of Azure. To accommodate this, Azure has a service called private endpoints. Private endpoints allow internal resources to connect directly to PaaS services privately over your own VNET, allowing for greater control and privacy. When creating a private link resource, an internal private IP is assigned to it and, therefore, you will need to use DNS lookups for name resolution and connecting using an alias. To date, there are many services that support private links. One example is using Azure Files to host company file shares in the cloud over a standard on-premises file server. Without private endpoints, client devices would connect to file shares directly over the internet. If using private endpoints on the Azure file share, clients would then only be able to connect through a VPN connection or from a VM already in your private IP space. You could also connect Azure App Service to a private link if you wanted to host traditional intranet sites in Azure and not have to deploy IIS on a traditional physical server.
Protecting Windows workloads in Azure
Two additional network security solutions in Azure worth noting for Windows deployments are Azure Web Application Firewall (WAF) and Azure DDoS Protection. Both services can be deployed to sit in front of your Windows IaaS and PaaS workloads and help protect against common attacks from over the internet.
WAF is a service that is typically used to complement the frontend entry point of a web app and is added to Azure Front Door or Application Gateway. The WAF uses OWASP rules to help protect your web app from common generic attack techniques, such as cross-site scripting, local file inclusion, and SQL injection. By deploying a WAF in front of your web application, it helps to reduce the need to prevent these attacks directly in the application code itself. To read more about Azure WAF, visit the following link:
https://docs.microsoft.com/en-us/azure/web-application-firewall/overview
Azure DDoS Protection is a service that helps protect against Distributed Denial of Service (DDoS) attacks. DDoS attacks are typically used to target resources with the purpose of taking them offline or making them unusable by consuming all available resources. If you're deploying services in Azure, there is a basic level of DDoS protection from Microsoft available by default through Azure's global infrastructure. For other Windows workloads deployed into your own VNET, Microsoft offers an enhanced version called Azure DDoS Protection Standard. This will help to directly protect your specific resources that are available over the public internet. To read more about Azure DDoS, visit this link:
https://docs.microsoft.com/en-us/azure/ddos-protection/ddos-protection-overview
Summary
In this chapter, we started by looking at network security fundamentals and covered the OSI and TCP/IP models, reviewed common ports and protocols, and looked at the important technologies needed to help with network security. After that, we covered Windows network security, which started with network baselining for your Windows devices. This section then covered the Windows 11 network management pane, before moving on to securing WLAN/Wi-Fi, Bluetooth, and VPN, including Microsoft's Always On VPN. The following section covered the Windows Server network management pane, including LAN and Ethernet best practices for your servers, and provided an overview of the server roles and features. The final sections overviewed Hyper-V networking and security before finishing off with network troubleshooting tools.
Following Windows network security, we covered Windows Defender Firewall and Advanced Security, which provided steps you can follow to configure firewall rules and enforce policies. Then, we discussed web protection features that are available in Microsoft Defender for Endpoint, including Web Threat Protection, a web content filtering policy, and how to enable network protection in block mode. The final topic of this chapter discussed Azure network security features, where we covered NSGs, connecting privately to Azure services, and additional features for protecting Windows workloads running in Azure.
In the next chapter, we will review identity and access management and its importance in Windows management and zero-trust security. We will review components involved in the life cycle of accounts and the types of access needed. Then, we will review different authentication technologies and provide recommendations on how you should be using these protocols in today's world. We will finish with a review of implementing Azure Conditional Access and Identity Protection to help protect from identity-based attacks.