
Lesson 8
Working with Multichannel Audio
In this lesson, you learn to work with multichannel audio. You learn how to create stereo and surround sound pans and you’ll learn how to import, capture, and create multichannel clips.
Media Used: Agent MXZero
Duration: 45 minutes
GOALS
![]() Learn how multichannel editing differs from single-channel editing
Learn how multichannel editing differs from single-channel editing
![]() Understand the usage scenarios for stereo, 5.1, and 7.1 audio tracks
Understand the usage scenarios for stereo, 5.1, and 7.1 audio tracks
![]() Create multichannel audio clips through importing, capturing, and modifying existing clips
Create multichannel audio clips through importing, capturing, and modifying existing clips
![]() Use the Track control panel for soloing and muting audio tracks
Use the Track control panel for soloing and muting audio tracks
![]() Automate the pan of audio clips in both a stereo and surround sequence
Automate the pan of audio clips in both a stereo and surround sequence
![]() Differentiate between sequence format and the mix mode
Differentiate between sequence format and the mix mode
![]() Use the Advanced Panner feature of the Audio Mixer
Use the Advanced Panner feature of the Audio Mixer
Understanding Tracks, Channels, and Voices
Media Composer’s support of multichannel audio allows you create surround sound audio mixes directly within the editing system, using standard tools like the Audio Mixer. Multichannel support is relatively new in Media Composer, with stereo support being added in Media Composer 5 and surround sound being added in Media Composer 6.
There are a few terms—tracks, channels, and voices—that are helpful to understand when dealing with multichannel audio. These terms are also used throughout the Avid documentation.
Tracks Contain Clips of the Same Type
A track is the traditional track in the sense of a sequence. It’s where you place a clip. Tracks are specific to the kind of clip they can contain.
For example, a video track contains a video clip, whereas an audio track contains an audio clip. New in Media Composer 6 is support for 7.1 and 5.1 surround sound audio clips, while Media Composer 5 added support for stereo tracks. Just as a video track contains a video clip, a 5.1 surround audio track contains a 5.1 surround audio clip.
A Channel Is a Physical Connection
A channel is a hardware input or output. In the sense of Media Composer, channels will correspond to something physical with your computer or video/audio I/O hardware. For example, an Avid Nitris DX has four analog audio channel inputs and outputs. A laptop often has two channels for output (to the left and right of the stereo headphone jack).
Channel also refers to a component of a multichannel clip, hence the name multi-channel. For example, a stereo audio clip has two channels of audio. The clip itself goes on one stereo track.
A Voice Is a Distinct Sound
A voice refers to an individual stream of audio played back by Media Composer. A voice corresponds to a media file. Media Composer separates audio on the media drive—one file per channel—and each one that is being played simultaneously is referred to as a voice.
If all the audio media files are a choir, the members who are actively singing are the ones who have a voice. Media Composer is capable of playing back 16 voices at once and not a single voice more. It’s important for you to consider how many voices individual clips require so you don’t accidentally have a scenario whereby a clip’s voice is unheard because it’s the 17th voice.
For example, a 7.1 surround sound clip will use eight voices during playback. That means you can play only two 7.1 surround sound clips simultaneously because their total voice count is 16. This is covered in more detail later in this lesson in “Using Audio Scrub” on page 306.
Multichannel Enhancements in Media Composer
It’s helpful for understanding the power of multichannel editing to compare it to the older, non-multichannel workflow.
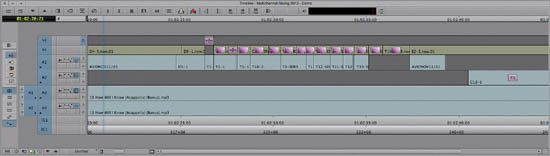
In the traditional workflow, Media Composer only supported what are now referred to as mono audio tracks. If you imported a stereo MP3 music file, the resulting clip in your bin would have two mono audio channels—one representing the voice intended for the left speaker, and the other representing the voice for the right speaker. When the clip is placed in a sequence, it uses two tracks. The left channel appears on one track and the right channel appears on another, as shown in Figure 8.1.
Figure 8.1
Traditionally, an imported stereo MP3 results in two mono tracks: A1 and A2.
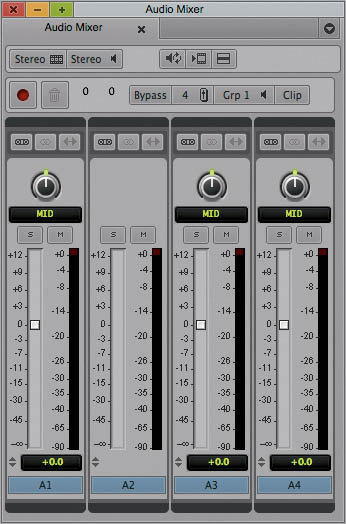
As the audio is spread over two separate tracks, the Audio Mixer allows separate adjustments to the left and the right side, shown in Figure 8.2. Separate adjustments for the left and right channels of a stereo music file originally created in stereo isn’t the natural way to adjust the levels of stereo audio. On your portable music player, when listening to your favorite artist, you adjust the volume and both speakers adjust. You do not have separate volume controls for left and right speakers.
Figure 8.2
Mono tracks are adjusted separately using the Audio Mixer.
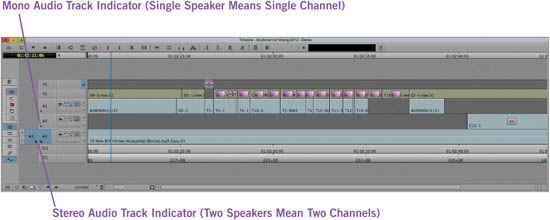
By tapping into the multichannel capabilities of Media Composer, you can specify that the clip is genuinely stereo and it will appear on the timeline using a single track, as shown in Figure 8.3. The track is called a stereo audio track and the double-speaker icon on the track selector indicates that the clips it contains actually consist of two separate voices.
Figure 8.3
A sequence having two mono tracks (A1-2) and a single stereo track (A3) is represented by the double-speaker icon.
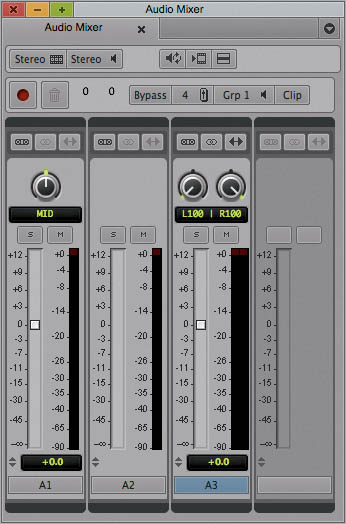
Mono tracks can only represent one channel of the stereo pair, whereas a stereo track will represent both channels. When the Audio Mixer is used with a stereo track, a single slider is available to adjust the volume, just like a portable music player, as shown in Figure 8.4. When the slider is adjusted, the levels of both the left and right channels are affected uniformly.
Figure 8.4
The Audio Mixer handles stereo audio tracks by presenting a single slider.
You can also explicitly specify that clips contain stereo audio, and those clips will now take a single track on the timeline instead of two separate tracks. Likewise, you can specify that clips contain 5.1 or 7.1 surround sound mixes, and those will take a single track on the timeline instead of 6 or 7 tracks, respectively.
Tip: Like pairs with like. If you have a clip with a 7.1 surround track format, you must put that clip on a 7.1 surround audio track. Mono audio only goes on mono tracks.
Even if you don’t create surround sound mixes, you can benefit from using the multichannel capabilities of Media Composer.
Creating Multichannel Sequence Tracks
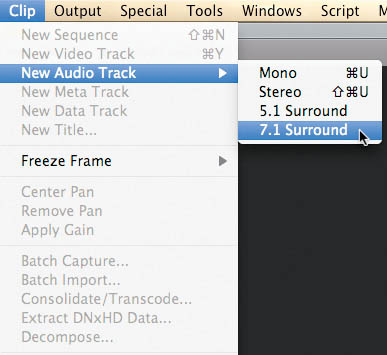
You create multichannel audio tracks the same way you create traditional (mono) audio tracks. Choose the Clip menu as shown in Figure 8.5, or right-click in the timeline.
Figure 8.5
Create multichannel audio tracks by choosing Clip > New Audio Track.
The kind of track is indicated on the track selector in the timeline, as shown in Figure 8.6.
Figure 8.6
A sequence having multiple types of audio tracks.
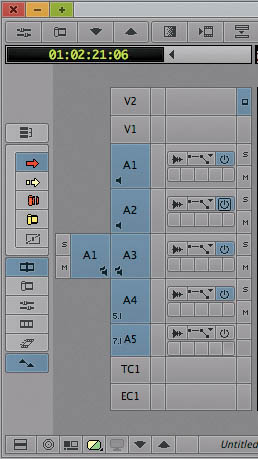
In Figure 8.6:
![]() Track A1 and A2 are mono tracks
Track A1 and A2 are mono tracks
![]() Track A3 is a stereo track
Track A3 is a stereo track
![]() Track A4 is a 5.1 surround track
Track A4 is a 5.1 surround track
![]() Track A5 is a 7.1 surround track
Track A5 is a 7.1 surround track
Media Composer supports 24 audio tracks per sequence, in any combination, but that doesn’t mean you’ll hear all 24 tracks. Media Composer is limited to just 16 voices, as previously discussed in “A Voice Is a Distinct Sound” on page 294.
Note: Lesson 11, “Real-Time AudioSuite (RTAS),” introduces the topic of mixing down audio. Through an audio mixdown, you can combine the 16 tracks and multiple voices into a reduced number of voices that Media Composer is able to play back concurrently. Refer to Lesson 11 for more information on audio mixdowns.
Creating Multichannel Source Clips
In the previous sections, you’ve learned that a stereo sequence track can only receive a stereo clip, and a 7.1 surround track can only receive a 7.1 surround track. This is the like receives like principle. But where do those multichannel source clips come from? They come from the same places mono source clips come from—you import them, capture them, or modify an existing mono source clip to make one.
One of the beautiful things about editing multichannel audio in Media Composer is that in the timeline, you don’t treat it any differently than traditional mono tracks.
The techniques for creating multichannel clips are discussed in the following sections.
Importing Multichannel Clips
Audio files that you import may contain multiple embedded channels. That should come as no surprise: An imported MP3 song will almost certainly come with at least a left and right channel. You can also have audio files (or video + audio files) with 16 audio tracks.
While importing an audio file, you can tell Media Composer that the individual channels in the file should be grouped together into stereo or surround sound clips. Specify the multichannel configuration of a file by opening the Import options, selecting the Audio tab and selecting Multichannel.
Figure 8.7 shows the multichannel import options.
Figure 8.7
Import options allow you to specify the multichannel configuration of the source file.
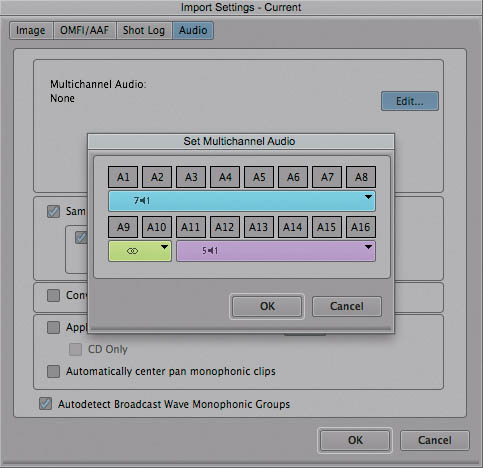
In this example, channels 1-8 in the file will be grouped together as a 7.1 surround clip (the blue bar), whereas channels 9-10 are a stereo pair (green bar), and the remaining channels are a 5.1 surround clip. It’s unlikely you would actually receive an audio file embedding these separate channel configurations into a single file, but it’s possible and Media Composer can handle it.
If you were just importing a stereo music clip, you’d indicate that A1 and A2 are a stereo pair, after which they would have a green bar beneath them, as A9 and A10 do in Figure 8.7.
Capturing Multichannel Clips
Capturing from tape involves patching the Audio Out channels of your deck to the Audio In channels of your I/O hardware, which may be Avid’s Nitris DX, Mojo DX, or a third-party hardware device supported through Avid Open I/O.
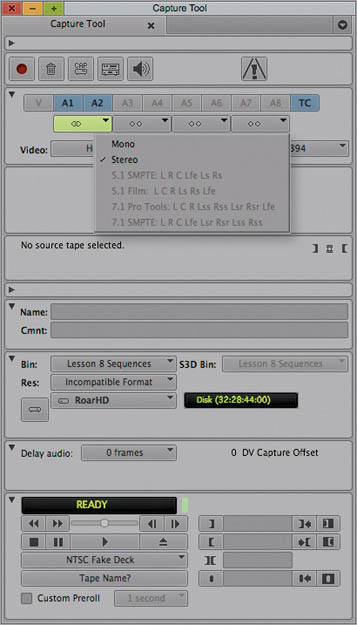
The Capture tool can be configured to automatically group related channels together during the capture, as shown at the top of Figure 8.8.
Figure 8.8
Creating multichannel clips during capture.
Modifying a Clip’s Track Format
When you create a clip, either through importing or capturing, and you specify that the audio is multichannel, you’re just setting the metadata. You’re not actually changing how the media is written to the media drive. It’s just a switch that’s being flipped, a switch that Media Composer uses to determine what can and can’t be done with the audio file.
Even if a clip has already been captured, you can flip the switch at any point by modifying the clip’s track format, which converts a clip from discrete mono channels to a stereo or surround multichannel clip.
To modify a clip’s track format:
1. Select the master clip or subclip in the bin.
2. Choose CLIP > MODIFY... > SET MULTICHANNEL AUDIO.
3. Set the format as shown in Figure 8.9.
Figure 8.9
Modifying a track for multichannel audio.
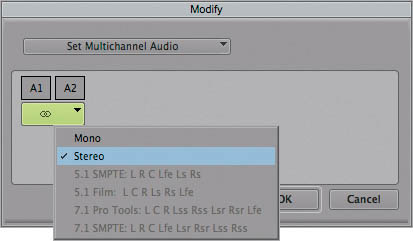
Using the example in Figure 8.9 as a reference, a clip that had two mono tracks has been configured to use the stereo track format. It can now be placed on stereo tracks in the sequence.
Tip: If you want a clip to be used both on stereo tracks and on mono tracks, duplicate the clip in the bin first. You can modify one while leaving the other, allowing you to use the same media on either kind of track. This does not duplicate the media, and doesn’t affect sound quality.
Displaying Track Formats in Bins
A clip that has audio will be set to use any of the four track formats: mono, stereo, 5.1, or 7.1. It’s useful to know the track format of a clip so you can properly prepare your sequence to receive the clip. But how can you tell a clip’s track format? Although you could open each clip and inspect its track selector panels in the time-line, there’s an easier way to do it all from the bin.
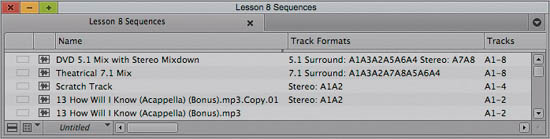
You simply add the Track Formats column to the bin as shown in Figure 8.10.
Figure 8.10
The Track Formats column displays multichannel track configuration.
The Track Formats column can be added to the bin the same way any other columns are added—by choosing the bin’s Fast menu and then selecting Choose Columns.
Referring to Figure 8.10:
![]() The first clip has eight tracks, as shown by A1-8 in the Tracks column. The first six audio tracks are used for the 5.1 surround mix and the final two are used for a stereo mix, as referenced in the Track Formats column.
The first clip has eight tracks, as shown by A1-8 in the Tracks column. The first six audio tracks are used for the 5.1 surround mix and the final two are used for a stereo mix, as referenced in the Track Formats column.
![]() The second clip also has eight tracks, all of which are used for a 7.1 surround mix.
The second clip also has eight tracks, all of which are used for a 7.1 surround mix.
![]() The third clip, Scratch Track, has four tracks, as referenced in the Tracks column. The first two tracks are used for stereo mix, which implies the final two tracks are mono tracks.
The third clip, Scratch Track, has four tracks, as referenced in the Tracks column. The first two tracks are used for stereo mix, which implies the final two tracks are mono tracks.
![]() The fourth clip is a two-channel stereo clip, having just two tracks, A1-2.
The fourth clip is a two-channel stereo clip, having just two tracks, A1-2.
![]() The final clip in the bin has nothing in the Track Formats column, yet the Tracks column indicates that it does have A1-2, which means the audio tracks must be mono.
The final clip in the bin has nothing in the Track Formats column, yet the Tracks column indicates that it does have A1-2, which means the audio tracks must be mono.
Tip: When a clip has audio but displays nothing in the Track Formats column, the audio tracks are mono.
EXERCISE Take a moment to complete Exercise 8, Part 1.
Using the Track Control Panel
The Track control panel is used to configure the playback of audio tracks, and to adjust the display of audio features on the timeline on a track-by-track basis. Audio features include the waveform display, or overlays that indicate the volume and pan of individual clips.
Prior to the addition of the Track control panel in Media Composer 5, you had to enable these features using the timeline’s fast menu, and they would be enabled for all tracks. The Track control panel is also used to apply RTAS effects, which is covered in Lesson 11.
Expand or collapse the Track control panel using the arrow indicated in Figure 8.11.
Figure 8.11
Toggle the display of the Track control panel.

Mute and Solo
The playback of audio tracks can be soloed or muted using the buttons shown in Figure 8.12.
Figure 8.12
Location of the solo (S) and mute (M) buttons.
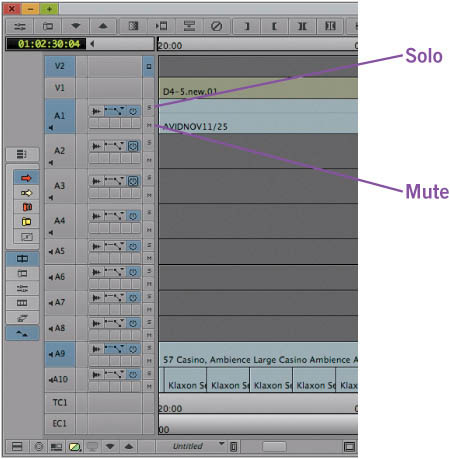
You may solo one or more tracks, which causes the other tracks to be implicitly muted. It’s similar to a choir: When someone is performing a solo, the other members don’t sing—they are implicitly mute. Implicitly muted tracks have a faded orange color on their mute buttons.
You can explicitly mute a track by clicking its mute button. That’s like telling someone in the choir, “Please don’t sing.” Explicitly muted tracks have a strong orange color on their mute buttons, as shown in Figure 8.13.
Figure 8.13
A soloed track in green (A1), two explicitly muted tracks in a strong orange (A6-7), and the remaining audio tracks are implicitly muted (faded orange).

Tip: Toggle the Solo or Mute status for all tracks by Alt/Option+clicking the solo or mute buttons. If multiple tracks are being soloed, this can be a quick way to deactivate the solo for all tracks simultaneously.
When a track is muted, you don’t hear it but Media Composer still processes the audio. It still performs real-time level adjustments and still processes any audio effects applied to the muted track. You simply don’t hear it: The output of the sound is suppressed.
If you want Media Composer to totally ignore the track and not process anything on it, muting is not the feature you’re looking for. You want to make the track inactive.
Making a Track Inactive
When a track is inactive, effects and automation are not applied, the audio media is not even read from the media drive, and no CPU power is used for the inactive audio track. That’s in contrast to mute.
Making an audio track inactive is like cutting the power to the track. In fact, Avid uses a power button icon to toggle the inactive status of a track, as shown in Figure 8.14.
Figure 8.14
A power button is used to make a track active or inactive.

An active track can also be a primary active track or just an active track (non-primary). Media Composer supports two primary tracks. A primary track is indicated with a square around the power button, shown on tracks A1 and A2 in Figure 8.14.
A primary active track is guaranteed to play back regardless of the playback speed, whereas non-primary tracks may not be able to play back at faster than real-time speeds. Audio information in the primary active tracks is not dropped when the play speed increases during scrubbing. You’d typically make sure your dialogue tracks are the primary active tracks, whereas background music is more likely to be a non-primary active track.
An active track has the power button enabled but does not have a rectangle around it, shown in Figure 8.14 on track A3.
An inactive track does not have the power button enabled, shown in Figure 8.14 as A4.
To set the primary active tracks:
Alt/Option+click on the active (power) button.
Note: In Lesson 11, you will learn the audio mixdown workflow, which involves making tracks inactive after they have been mixed down, so you still have a record of their original arrangement in your timeline.
Although Media Composer supports 18 tracks, which could each be 7.1 surround tracks and theoretically support up to 192 voices, Media Composer supports 16 voices. The voices are allocated based on which tracks are active when playback begins. They are not dynamically distributed based on where clips are located on the timeline, so give consideration to which tracks of the 18 are going to use the 16 available voices.
Using Audio Scrub
Audio scrubbing allows you to hear the audio as you move through the footage at times other than when Media Composer is playing back footage normally. Scrubbing means moving back and forth in the same spot (like scrubbing burnt eggs out of a frying pan). Usually, you scrub the timeline with the Current Position indicator until you find a particular audio cue. There are two kinds of audio scrubbing: digital and analog.
Media Composer’s Digital Audio Scrub feature is enabled whenever the keyboard is set to uppercase mode. How do you make the letters uppercase? Press Shift or press Caps Lock. That’s how you engage Digital Audio Scrub.
With Digital Audio Scrub enabled, moving the Current Position indicator (blue line) plays back one frame’s worth of audio. It sounds very computerized, hence the “digital” part of the name.
You can also use Analog Audio Scrub when using J-K-L to play back at speeds faster or slower than real-time, normal video speed. The more times you press L, the faster Media Composer plays back forward. Likewise, the more times you press J, the faster it plays backward.
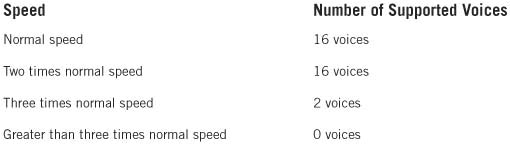
The playback rates are 1x, 2x, 3x, 5x, and 8x the normal frame rate. As Media Composer plays back faster and faster, it’s less able to keep up with processing all of the audio tracks and some will not be played. The tracks that won’t be dropped, however, are the primary active audio tracks.
Table 8-1 summarizes the number of voices that are supported at specific play rates.
EXERCISE Take a moment to complete Exercise 8, Part 2.
Table 8-1 Supported Voices at Scrubbing Speeds
Working with Surround Sound
You don’t need a stereo, 5.1, or 7.1 timeline track in order to create surround sound mixes. You can create a delightful 7.1 surround sound mix from a sequence having only mono tracks. It’s not what kind of tracks or source clips you have; it’s how the clips on those tracks are played out of the various speakers. That’s what gives you a surround sound mix.
Media Composer supports surround sound environments having six or eight speakers, in which one of them is a LFE (subwoofer), designated by .1, and the other five or seven speakers are positioned around the listener. Put together, you get 5.1 and 7.1 surround, meaning five main speakers plus one LFE, shown in Figure 8.15, or seven main speakers plus one LFE, shown in Figure 8.16 from the Media Composer 6 User’s Guide.
Figure 8.15
5.1 SMPTE Surround Sound Configuration: left (L), center (C), right (R), left surround rear (LSR), right surround rear (RSR), and low frequency effects (LFE) speakers.
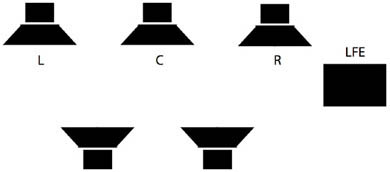
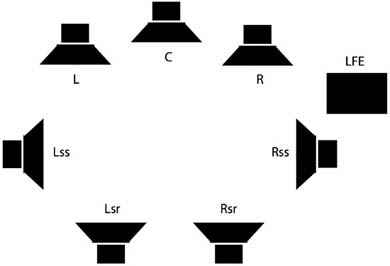
Figure 8.16
7.1 SMPTE Surround Sound Speakers: left (L), center (C), right (R), left surround side (LSS), right surround side (RSS), left surround rear (LSR), right surround rear (RSR), and low frequency effects (LFE) speakers.
Editing in surround sound and monitoring surround sound are different things. Monitoring requires specific hardware: you need the speakers. Editing doesn’t require specific hardware, although it can be challenging to paint when you’re blindfolded. Likewise it’s challenging to edit a surround sound mix when you can’t hear it in surround.
Nonetheless, Media Composer differentiates between surround sound editing and surround sound monitoring. You can edit in multiple formats (stereo, surround 5.1, and surround 7.1) and have Media Composer remap the output channels to a different format. For example, you could edit in surround, and then perform three separate outputs: surround, stereo, and mono.
Sequence Audio Format
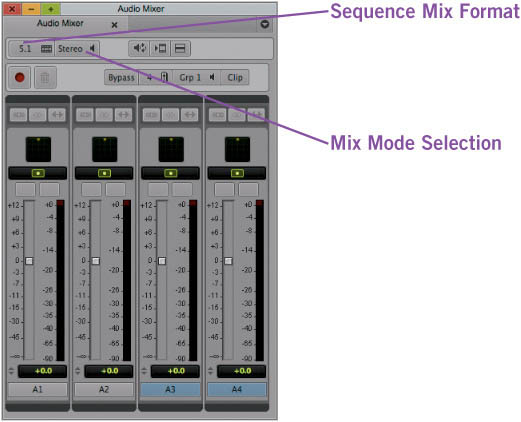
Your sequence has a picture format, specified in the Project window. It also has an audio format, specified in the Audio Mixer. You indicate your sequence’s audio format from the Sequence Mix Format button shown in Figure 8.17, and your hardware output using the Mix Mode Selection button, also shown in Figure 8.17.
Figure 8.17
Sequence Mix Format and Mix Mode Selection buttons of the Audio tool.
Sequence formats may be any of the following:
![]() Stereo sequence
Stereo sequence
![]() 5.1 surround
5.1 surround
![]() 7.1 surround
7.1 surround
Changes to the sequence format result in changes to how the Audio Mixer processes pan. In a surround sound sequence, Media Composer allows you to pan the sound among the front, back, and sides of the room. In the Stereo sequence format, Media Composer allows you to pan the sound only between the left and the right sides of the room.
Audio Mix Mode and Monitoring Options
In order to hear a surround sound mix, you need surround sound hardware. That hardware connects to the speakers through which your surround sound mix will play. The software-based version of Media Composer can use a third-party card such as a SoundBlaster card, or you can use the Avid Nitris DX or Mojo DX hardware, which has an HDMI connector capable of transmitting surround sound to a receiver. You can also use the digital and analog connectors on the Avid Nitris DX hardware.
The mix mode sets your speaker layout, so Media Composer sends the correct signals to the associated outputs on your hardware. The mix mode addresses the following questions:
![]() Do you have two, six, or eight speakers?
Do you have two, six, or eight speakers?
![]() How are your surround sound speakers connected to your hardware?
How are your surround sound speakers connected to your hardware?
![]() How does a stereo sequence play back when you have 7.1 surround speakers?
How does a stereo sequence play back when you have 7.1 surround speakers?
![]() How does a 5.1 sequence play back when you only have two speakers?
How does a 5.1 sequence play back when you only have two speakers?
The mix mode is separate from your sequence format. The mix mode formats may be among any of the following:
![]() Stereo
Stereo
![]() Mono
Mono
![]() 5.1 Film: L C R Ls Rs Lfe
5.1 Film: L C R Ls Rs Lfe
![]() 5.1 SMPTE: L R C Lfe Ls Rs
5.1 SMPTE: L R C Lfe Ls Rs
![]() 7.1 Pro Tools: L C R Lss Rss Lsr Rsr Lfe
7.1 Pro Tools: L C R Lss Rss Lsr Rsr Lfe
![]() 7.1 SMPTE: L R C Lfe Lsr Rsr Lss Rss
7.1 SMPTE: L R C Lfe Lsr Rsr Lss Rss
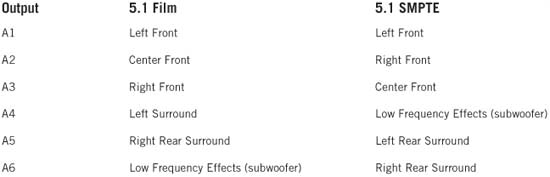
You’ll notice there are two kinds of 5.1 surround and two kinds of 7.1 surround. That’s because there are different standards for how the output channels on the hardware are mapped to specific speakers in the room. The list of speaker positions that follows corresponds to the audio outputs for that mix mode format.
Table 8-2 compares the two 5.1 formats. Notice that if you selected the 5.1 format for your particular hardware setup, you’d be sending the subwoofer (low frequency effects) sound to one of your rear monitoring speakers. If you don’t know how your audio monitors are configured in your room, ask your site engineer.
Table 8-2 Comparison of 5.1 Film and 5.1 SMPTE Mix Modes
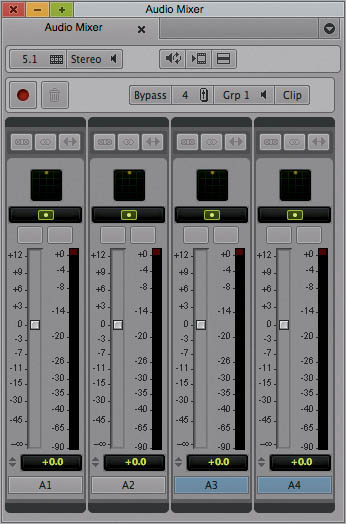
If your sequence format is surround, but your mix mode is stereo, Media Composer will route the sound intended for the surround speakers to one of the two stereo speakers. It knows to do this because of the combination of sequence format and mix mode settings. Figure 8.18 has an Audio Mixer set to edit in surround but creates a stereo mix on playback.
Figure 8.18
The Audio Mixer using a 5.1 surround sequence format and a Stereo mix mode.
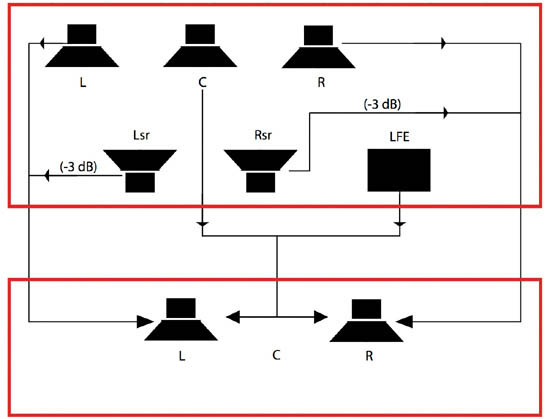
The settings of Figure 8.18 result in audio being remapped as shown in Figure 8.19.
Figure 8.19
The sequence format of 5.1 is mapped to a Stereo mix mode during playback.
Note: For the exact mappings between the sequence format and mix mode, check the Avid Media Composer User’s Guide section called “Surround Monitoring.” It presents a table that shows how the matching is performed for a number of format and mix mode combinations.
Note: Avid Nitrix, Mojo DX support analog and digital audio surround sound monitoring. You can also use third-party hardware. See the Media Composer Editing Guide for instructions on how to configure your audio hardware for surround sound monitoring. It’s available within Media Composer from Help > Documentation (PDF).
Using the Audio Mixer for Multichannel Mixing
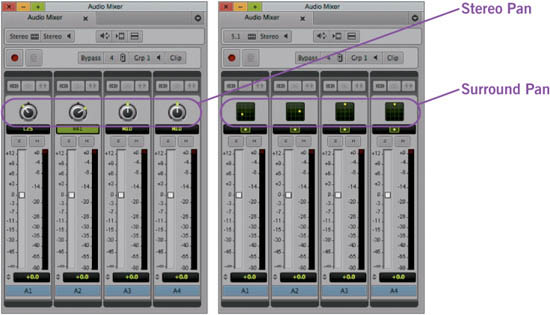
You can use the Audio Mixer to adjust the extent to which individual speakers play a clip through any of the speakers. The Audio Mixer tool updates its interface with controls or buttons that are appropriate for mixing in the specified sequence format. For example, you mix differently for a stereo sequence format than a surround sequence format because they have a different number of speakers. The Audio Mixer reflects the sequence format, as shown in Figure 8.20.
Figure 8.20
Audio Mixer for Stereo (left) and Surround Sound (right) mixing.
This section focuses on using the Audio Mixer for adjusting pan, whereas Lesson 9, “Fundamentals of Audio Mixing,” focuses on adjusting audio levels.
Stereo Panning
When your sequence is set to a stereo sequence format, the Audio Mixer displays the pan value and knobs as shown in Figure 8.20. The sequence being mixed in Figure 8.20 has mono tracks in the timeline. If the sequence has stereo tracks, two pan knobs will be present for each strip in the mixer, as shown in Figure 8.21.
Figure 8.21
Tracks A5 and A22 are stereo audio tracks; they have two pan knobs per mixer strip.
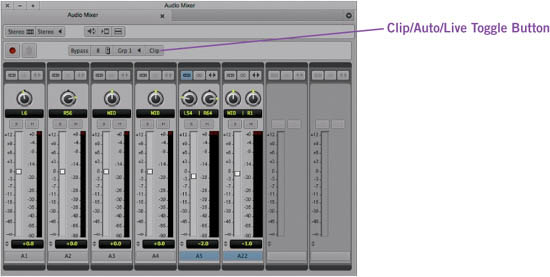
When your sequence format is set to stereo, the pan knobs specify how much of the clip’s sound is coming out of the left or right speakers. You can pan the sound of a train moving from left to right by setting the Audio Mixer to auto and then making adjustments to the pan values. This is referred to as automating the pan.
To automate a sound’s pan from left speaker to right speaker:
1. Place the CURRENT POSITION INDICATOR toward the beginning of the clip.
2. Set the AUDIO MIXER to AUTO MODE by clicking the CLIP/AUTO/LIVE TOGGLE BUTTON, shown in Figure 8.21.
3. Rotate the PAN KNOB to the left.
4. Reposition the CURRENT POSITION INDICATOR to a later point in the same clip.
5. Rotate the PAN KNOB to the right.
6. Play through the clip to hear the pan.
You can use the Track control panel to enable the display of pan information on a clip in the timeline, as shown in Figure 8.22.
Figure 8.22
An audio track in the timeline displaying pan keyframes.
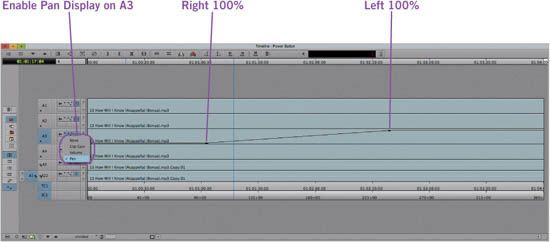
Displaying pan information in the timeline is helpful in confirming the presence of automated pans and also helpful in adjusting the pans. Once the pan information is shown on the timeline, you can also drag the keyframes on the clip in the timeline to further adjust the pan.
EXERCISE Take a moment to complete Exercise 8, Part 3.
Surround Panning
You perform basic surround sound mixing using techniques similar to those used when mixing stereo. Instead of a pan knob that adjusts from left to right, you’re presented with a surround panner, which represents a view from the ceiling of the listening environment. Refer to Figure 8.23 and note the surround panners (green grids) at the top of each track.
The presence of the surround panners has nothing to do with the kind of tracks you have on the timeline. It has everything to do with the sequence format. Surround panners are available when your sequence format is set to 5.1 or 7.1 surround.
The surround sound panner contains a yellow dot, which represents the current pan location within the surround environment. As you drag the dot within the box, you are panning the sound. Media Composer then adjusts how much of the sound is sent to each speaker in order to position the sound in the room.
Figure 8.23
Surround sound panners and Advanced Panner buttons are available when the Sequence Format is 5.1 or 7.1 surround.
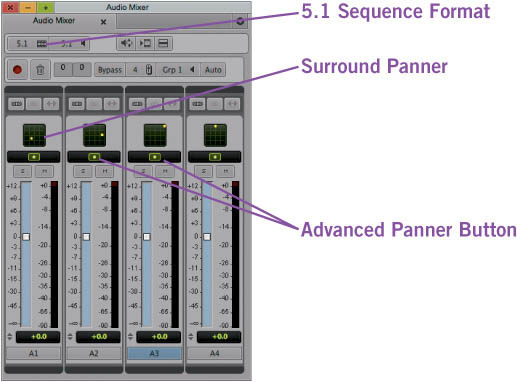
![]() Referring once again to the surround panners in Figure 8.23: The clip on track A1 will be played mostly from the left surround (rear) speaker.
Referring once again to the surround panners in Figure 8.23: The clip on track A1 will be played mostly from the left surround (rear) speaker.
![]() The clip on track A2 will be played equally from the left front and left surround speakers, because this is a 5.1 sequence format playing to a 5.1 mix format.
The clip on track A2 will be played equally from the left front and left surround speakers, because this is a 5.1 sequence format playing to a 5.1 mix format.
If the mix format was 7.1, the majority of the sound would be played by the left center surround speaker, because 7.1 surround systems have that speaker, unlike 5.1 surround systems.
![]() The clip on A3 will play using the front left speaker.
The clip on A3 will play using the front left speaker.
![]() The clip on A4 will play through the center speaker.
The clip on A4 will play through the center speaker.
The center speaker is often used for character dialogue, particularly during medium and wide shots, which suggests A4 is a dialogue track, and the other tracks are ambience and effects or possibly music.
You pan a sound within the 5.1 or 7.1 surround sound environment as easily as you do in a stereo environment. The only difference is that you are repositioning the yellow dot in the panner, instead of rotating the pan knob. Refer to the previous section, called “Stereo Panning,” for the technique.
Advanced Surround Panning
Media Composer 6 has a fantastic new addition to the Audio Mixer tool, which makes surround panning a breeze. It’s called the advanced panner, and it’s activated by clicking the Advanced Panner button located under the standard panner, as was shown in Figure 8.23.
The advanced panner, shown in Figure 8.24, takes over the Audio Mixer window in order to provide a detailed room with added controls for the LFE (subwoofer) and center speaker, which are not adjustable using the standard surround panner.
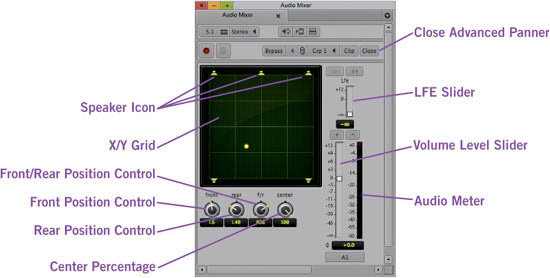
The advanced panner’s larger interface for the X/Y grid makes it easier to position the yellow dot, which represents where the sound will be positioned in the sound field of the listening environment. In Figure 8.24, the sound for this clip will be positioned toward the rear of the audience’s left side.
Aside from dragging the yellow dot, you can also adjust the control knobs for more accurate placement. For example, the f/r (front/rear) control will position the dot toward the top (front) or bottom (rear) of the X/Y grid (listening environment) without the possibility of it moving to the left or the right.
You can also direct sound to the low-frequency effects (LFE/subwoofer) using the LFE slider. On its scale of 0–100, you could direct 80% of the sound of rumbling thunder to the LFE, which, when played on a well equipped home entertainment system, is sure to be felt as well as heard.
Sometimes you want sound to come from a specific speaker, as opposed to a region of the room, such as when a character is off-screen left and is yelling to someone on screen right. The quickest way to pan a clip to a specific speaker is to simply click the speaker. The yellow dot will snap to the speaker icon in the X/Y grid.
To close the advanced panner and return to the standard Audio Mixer, click the close button, indicated in Figure 8.24.
Tip: If you frequently use the advanced panner and find yourself closing the advanced panner then opening it for another track, there is an easier way! You can Alt/Option+click the track number in the lower-right corner of the advanced panner. A menu will appear containing the names of the other audio tracks. Use that menu to work on another track.
With an understanding of the techniques for working with multichannel mixing, you are now ready to move onto Lesson 9, in which you’ll continue your learning of the Audio Mixer by adjusting audio levels to achieve balance.
EXERCISE If you have surround sound hardware, take a moment to complete Exercise 8, Part 4.
Review/Discussion Questions
1. What’s the difference between a track and a channel? (See “Understanding Tracks, Channels, and Voices” on page 294.)
2. What’s a voice? (See “Understanding Tracks, Channels, and Voices” on page 294.)
3. Why is it important for a Media Composer editor to understand how many voices are used by a specific kind of audio track? (See “Using Audio Scrub” on page 306.)
4. In Figure 8.6, how many voices are required to play the timeline? (Assume there is a clip on each track.) (See “Understanding Tracks, Channels, and Voices” on page 294.)
5. Under what circumstance would you want to create a stereo track instead of one or more mono tracks in a sequence? (See “Creating Multichannel Sequence Tracks” on page 297.)
6. When would you want to create a 5.1 or 7.1 surround sound track in a sequence? (See “Creating Multichannel Sequence Tracks” on page 297.)
7. What are two ways to create a 5.1 surround sound clip? (See “Creating Multichannel Source Clips” on page 299.)
8. You’ve imported a music file and it has two mono audio tracks. You delete the original file, then realize that it would be better if it had a single stereo track. What can you do? (See “Creating Multichannel Source Clips” on page 299.)
9. You’re about to import an audio clip. It has six tracks and was provided to you by an audio effects engineer, who informs you that the tracks conform to the 5.1 SMPTE surround format. How do you properly import this file? (See “Importing Multichannel Clips” on page 299.)
10. An HDCAM SR tape has been delivered to your suite. The audio on the tape’s eight tracks conforms to the 7.1 Pro Tools format. The deck is connected using dual link HD SDI cables, which is the correct way to connect this deck in this scenario. How do you configure the Capture tool to properly ingest the audio in the 7.1 format? (See “Capturing Multichannel Clips” on page 300.)
11. You notice a track in the timeline has a letter “m” with a faded orange background. What does this tell you about one or more other tracks in the timeline? (See “Mute and Solo” on page 303.)
12. When playing back your sequence faster than real-time, the tracks containing dialogue drop out—you can’t hear them. How can you fix this? (See “Using Audio Scrub” on page 306.)
13. How many 7.1 surround tracks can be active simultaneously in a sequence? (See “Making a Track Inactive” on page 304 and “A Voice Is a Distinct Sound” on page 294.)
14. What’s the difference between sequence format and mix mode? (See “Working with Surround Sound” on page 307.)
15. You are unable to set your audio mix mode to any of the surround sound options. Why is that? (See “Audio Mix Mode and Monitoring Options” on page 309.)
16. You’ve mixed a 5.1 surround sequence and now must create a stereo output. How do you configure the Audio Mixer? (See “Audio Mix Mode and Monitoring Options” on page 309.)
17. A producer has dropped in to your edit suite, concerned about the stereo output that you are creating from a sequence originally mixed in 5.1 surround. (This is the scenario from Question 16.) He’s worried that the stereo mix will not include any of the sound originally intended for the surround (rear) or center speaker. How do you alleviate his concern? (See “Audio Mix Mode and Monitoring Options” on page 309.)
18. Why would you choose to use the advanced panner as opposed to the standard panner? (See “Using the Audio Mixer for Multichannel Mixing” on page 312.)
19. You want your audience to feel, as well as hear, the deep rumbling of an avalanche. The theatre that is screening the film has an excellent sound system. How can you make this happen? (See “Advanced Surround Panning” on page 315.)
20. You have a mono sound effect of an airplane flying overhead. How do you add life to this sound effect after placing it in the timeline? (See “Using the Audio Mixer for Multichannel Mixing” on page 312.)