Chapter 5. Customizing Data Validation
Data validation is one of the most significant responsibilities of line-of-business applications. In fact, an application that accepts input from users needs to validate data before sending it to the back-end database. Think of fields that only accept numeric values: They need to validate the user input to ensure that no alphabetic characters are entered, and then the application must notify the user of validation errors. Modern relational databases usually provide built-in validation rules, such as constraints, null values, or default values. Database validation is important, but in modern data-centric applications it cannot be the only validation mechanism, for several reasons:
• Database built-in validation rules are difficult to share across the application tiers.
• It is hard to convert database errors to understandable error messages for the user.
• Scalability and manageability: Immediate feedback on a client tier lets the user know what is bad. The system scales better because the database is not yet involved at this point.
So, this is the point at which validation rules at the application level come in. Such rules are generally written by developers and have basically two goals: validating data before it is submitted to the database, and validating data when it is being written into the database. In both cases, validation rules need to raise error messages in a way that is catchable by the user interface, so that end users can easily understand what invalid data they attempted to submit. Typically, writing validation rules requires big effort from developers because they generally write rules that are specific to the context and that are also very complex.
Continuing in its purpose to make building business applications easier, Visual Studio LightSwitch simplifies the way developers write validation rules. It provides an infrastructure with built-in rules for specific data types (as you learned in Chapter 3, “Building Data-Centric Applications,” and Chapter 4, “Building More-Complex Applications with Relationships and Details Screens”). It also provides a validation model based on the .NET Framework that validates data before and after users submit changes and that sends notifications to the user interface (based merely on a small amount of code that you need to write in custom scenarios).
With LightSwitch, you do not have to understand the complexity of the validation framework or write code to interact with it. Instead, designers guide you as to where to write your rules and the runtime handles and when to call them at the appropriate time. You just need to understand which objects are involved in the validation process and how to submit them for validation.
Understanding the Validation Model
In this section, you learn how the validation mechanism works and what the validation workflow is. As it typically happens in n-tier business applications, LightSwitch validation rules run on both the client and the server. Therefore, when end users enter data within a screen, such data is first validated on the client. If any validation errors occur, changes are not sent to the server, and the user interface immediately notifies the user of errors (which must be fixed before attempting to save the data again). Once changes pass validation on the client, they are validated again when they reach the server. Although a double validation might seem tricky, it is a best practice for at least three reasons:
• Applications scale better. If client validation fails, the server is not involved unless the user fixes errors, and this provides better performance.
• User input could comply with the entity definition but it also must comply with the data store, and this kind of validation is performed on the server. Put simply: Never assume that submitted data is valid.
• In multiuser environments, the data set can change before going to the data store, so you should merge data coming from the client with data stored in the database.
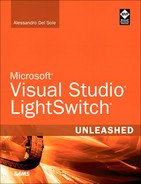
The really good news is that LightSwitch takes care of all this for you. It runs validation rules on both the client and the server, and it merges data when required. Validation rules run in LightSwitch against three types of elements: entity properties, screen properties, and entities. Table 5.1 shows the various scenarios under which validation rules run.
Table 5.1. LightSwitch Validation Rule Types
The last type (entity validation rules) is accomplished in the DataService class, which is the .NET provider for entities, meaning that it exposes entities and data operations (including queries and validation) over entities.
Avoid Confusion Between the Server and the Middle Tier
When talking about server-side validation in LightSwitch, we actually refer to validation that occurs in the middle tier. When validation passes in the middle tier, data is sent to the data store, which is available in SQL Server.
Entity validation is about entity properties and entities as a whole. Each entity property can be validated against one or more rule; in this case, rules run when the entity changes (including when a new instance of the entity is created). As a developer, you can take advantage of built-in validation rules (accessible from the Entity Designer) and of custom validation rules that you specify in code. Screen validation basically validates screen properties and screen data. Also, in the case of screen validation, rules run when data changes. In both entity validation and screen validation, the user interface immediately shows the validation results by displaying error messages and by adorning invalid fields with a red border. Finally, DataService validation occurs when the application attempts to save changes to the database. This validation runs only on the server, and you can write your own rules via the Entity Designer. In this case, the user interface is not notified of validation results when data changes, but only when it is submitted to the database.
From this discussion, you want to pay particular attention to a couple of things. First, validation runs when data changes. Therefore, the validation mechanism in LightSwitch is based on an event-driven model. Later in this chapter, you learn how to easily leverage your existing skills in developing for the .NET Framework when handling validation events. Second, data is validated twice: The first time is when the data changes, and the second time is when it is submitted to the database. This double-validation process makes sense for the reasons explained previously. There is even a third step, although it is not specific to LightSwitch: the database validation mechanism. For example, you might have marked an entity property as nullable in the data model, but the database counterpart does not allow null values.
The validation occurs as follows:
1. Entity property validation: This runs on both the client and the server. When running on the client, it runs when data is changed and then when the changes are submitted. When running on the server, the rule runs only when the save operation is requested.
2. Screen property validation: This runs only on the client because it is all about screen properties and screen data. This kind of validation runs when data changes and then when the changes are submitted.
3. Entity validation: This validation runs only on the server and only when the save operation is requested.
Note a few things about these validation processes. Each time the user enters a value in a field, this is validated. When the user clicks the Save button on screens, all client-side validation rules run again; if the validation fails for some reason, changes are not submitted to the server and the user is notified of errors via specific user interface adornments. After the user fixes the errors and then tries to save changes again, changes are submitted to the server. When the data set reaches the server, server-side validation rules run; if any validation errors occur, the server rejects the save operation and sends validation errors back to the client. At this point, the user must fix errors to save the data again. When no validation errors occur, the server submits the information to the data store.
How Does Lightswitch Handle Built-in and Custom Rules?
The LightSwitch validation mechanism treats both built-in and custom validation rules the same way. Therefore, behind the scenes, all rules follow the same validation process. This is crucial because even if you write the most complex validation rule possible, LightSwitch will still work through the validation process without more effort from you.
Now that you know how the validation system in LightSwitch works, you are almost ready to begin writing custom validation rules. Before doing so, though, it is a good idea to recap what built-in validation rules are and which data types they affect.
Built-In Validation Rules
As you know from Chapter 3, Visual Studio LightSwitch offers some built-in validation rules that are executed by default, without any manual effort from the developer. Built-in validation rules apply to the following data types:
• String: The runtime ensures that strings are not longer than the prefixed length.
• EmailAddress: The runtime checks whether an email address is well formed.
• Numeric and date types: The runtime ensures that a number (Int16, Int32, Int64, Decimal, Double) falls within a specified range. The same happens for properties of type Date and DateTime, but the difference is that the range is of dates rather than numbers.
• Entities: Some validation rules always run, such as required fields and database constraints.
As in lots of other scenarios, built-in behaviors offer basic features, but cannot cover every situation. So, in real-world applications, you need some stronger validation rules. In Visual Studio LightSwitch, you accomplish this by writing custom validation rules, as explained in next section.
Writing Custom Validation Rules
Let’s begin discussing custom validation rules with an example. In the Invoice Management application example discussed in Chapter 4, an OrderHeaders table stores customer orders. In particular, there are the OrderDate and ShippedDate properties, both of type Date. The first one represents when the order is placed, and the second one represents the moment when the ordered products ship to the customer. Currently, there is no check on dates, so the user could enter a date of shipment that is before the date of the order, which is obviously incorrect. LightSwitch does not know that one property value cannot be less than another one, and therefore it does not know how to handle such situations. So, as the developer, this is your responsibility. This is a typical situation in which you write a custom validation rule, which means writing code that ensures that the entered data matches both the database and the application requirements. With regard to entity properties, you write code that validates and affects a single property from an entity. With regard to entities, you write code that validates and affects one table. An example of entity property validation is when you check the validity of a date from an entity.
An example of entity validation is when you check that an entity collection (that is, a table) does not contain duplicates. This section covers both kinds of validation, describing how you use the code editor and which events you handle to communicate to the UI that something went wrong. In particular, this chapter describes how to write custom validation rules for a number of data types, including errors, warnings, and information messages. As the base for the code examples, the Invoice Management application written in Chapter 4 is used.
What You Need to Know About Code
This chapter focuses on writing code for business logic. As you can imagine, explaining here programming concepts such as event-driven models, object-oriented programming, and the syntax of the .NET languages is not possible. When you complete this chapter, you just need to know the most basic concepts of the Visual Basic or Visual C# languages, in particular about string and number manipulation and, possibly, some basic knowledge about regular expressions for pattern matching. The MSDN Library offers the following pages to start with language references:
Visual Basic: http://bit.ly/jP5fCc
Visual C#: http://bit.ly/bio6Xy
If you are a programmer working with Visual Basic, you might consider Visual Basic 2010 Unleashed.
Client Validation: Validating Entity Properties
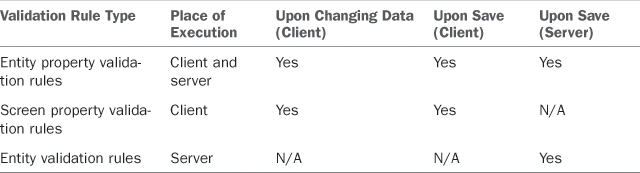
To write a custom validation rule that validates an entity property, you must handle the Validate event for that property. As a general rule, this applies to all available data types in LightSwitch, although you typically write custom rules for strings, dates, and numbers. Customizing data validation for the EmailAddress, PhoneNumber, Money, and Image data types does not make sense because LightSwitch provides the best mechanism possible. However, customizing the validation for these types becomes necessary if you want to override the default error messages. You usually write a conditional code block (which is an If..End If block in Visual Basic or an if {} block in C#) that raises a validation failure if the specified condition evaluates as true. To understand how custom validation rules work, consider the String data type and suppose you want to prevent users from entering digits in the ContactName property of the Customer entity, ensuring that only alphabetic characters are entered. So, first double-click the Customers table in Solution Explorer, and then when the entity is visible in the Entity Designer, select the ContactName property. Next, press F4 to open the Properties window and locate the Validation group. You will also see a Custom Validation hyperlink (see Figure 5.1).
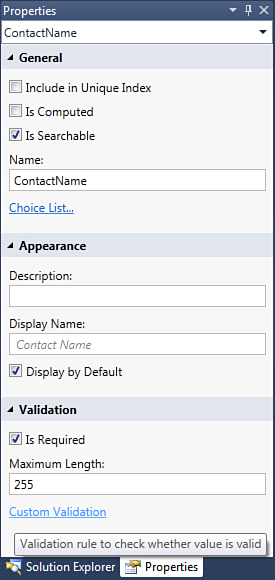
Figure 5.1. Locating the Custom Validation hyperlink.
If you click this hyperlink, Visual Studio LightSwitch opens the code editor, generating an event handler stub, as shown in Figure 5.2.
Figure 5.2. The event handler stub in the code editor.
As you can see, LightSwitch generates a new method, which is actually a handler for the ContactName.Validate event. This handler receives just one argument: results, of type EntityValidationResultsBuilder. This is a .NET class from the Microsoft.LightSwitch namespace that acts like a container of validation results and at runtime will store the complete list of validation errors and messages. In addition, the validation mechanism in LightSwitch binds the user interface controls to this collection to get notified of all existing, unresolved errors so that it can notify the user via the red border adornments and messages you saw in Chapters 3 and 4. Continuing the current example, a good way to ensure that a string (like the ContactName property) does not contain digits is to use a regular expression. Here is the code that validates the string, raising an error if the user enters digits:
Private Sub ContactName_Validate(ByVal results As _
EntityValidationResultsBuilder)
' results.AddPropertyError("<Error-Message>")
If Me.ContactName IsNot Nothing AndAlso
Not
System.Text.RegularExpressions.Regex.IsMatch(Me.ContactName,
"^D*[a-zA-Z]+$") Then
results.AddPropertyError("Contact Name has invalid characters.")
End If
End Sub
• Uses an If..End If conditional code block that evaluates the condition that raises a validation failure in case such a condition is true.
• Checks whether the ContactName property is not null.
• Subsequently checks whether the property value matches the specified regular expression, which ensures that no digits are entered. (Both not null and regular expression conditions must be true.)
• (If the validation against the regular expression fails) adds a new error to the collection of errors. This is performed by invoking the EntityValidationResultsBuilder.AddPropertyError method and passing the desired error message as an argument.
Find Ready-to-Use Regular Expressions
Regular expressions are efficient but can be quite complex. A good resource for ready-to-use regular expression is the Regular Expression Library at www.regexlib.com. This library offers (for free) hundreds of regular expressions that you can easily reuse in your custom validation rules.
If you now try to run the application, entering a value that contains digits in the Contact Name field, you get a validation error, as you would exactly expect. Figure 5.3 demonstrates this.
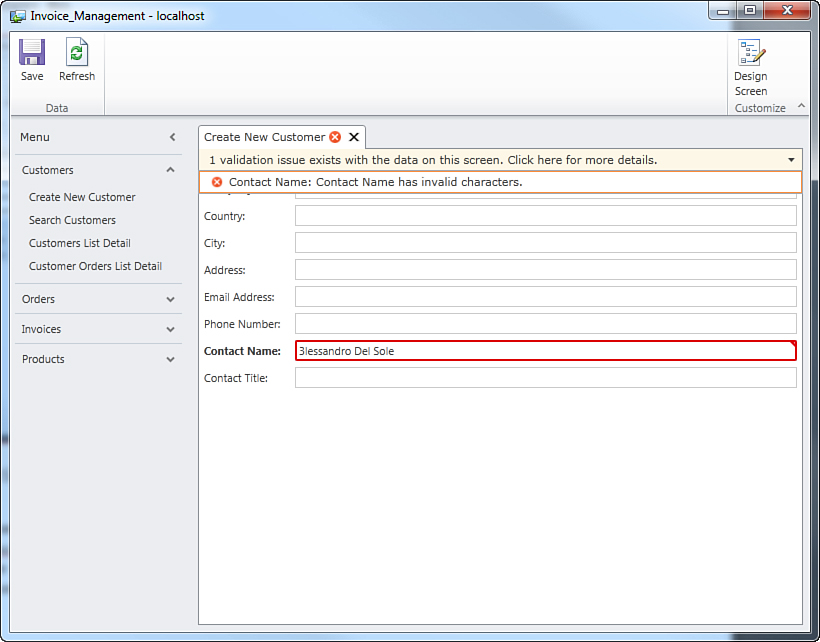
Figure 5.3. The user interface shows a validation error after you run the custom rule.
This demonstrates how the error collection of type EntityValidationResultsBuilder is bound to the user interface controls. Notice that as expected, you cannot save data unless you fix the error. Now that you know how to write a custom validation rule, it is convenient to repeat the same kind of validation for the ContactTitle and Country properties in the Customer entity.
Visual Basic: Accessing Validation Methods Quickly
If you are working with Visual Basic, there is a fast way to access validation event handlers once you are already in the code editor. You can simply expand the Declarations combo box, which displays the full list of a property’s members (see Figure 5.4). Among other things, you can find the validation methods for each property. When a member is highlighted in bold, it means that it has been edited and that it is already available in the code editor.
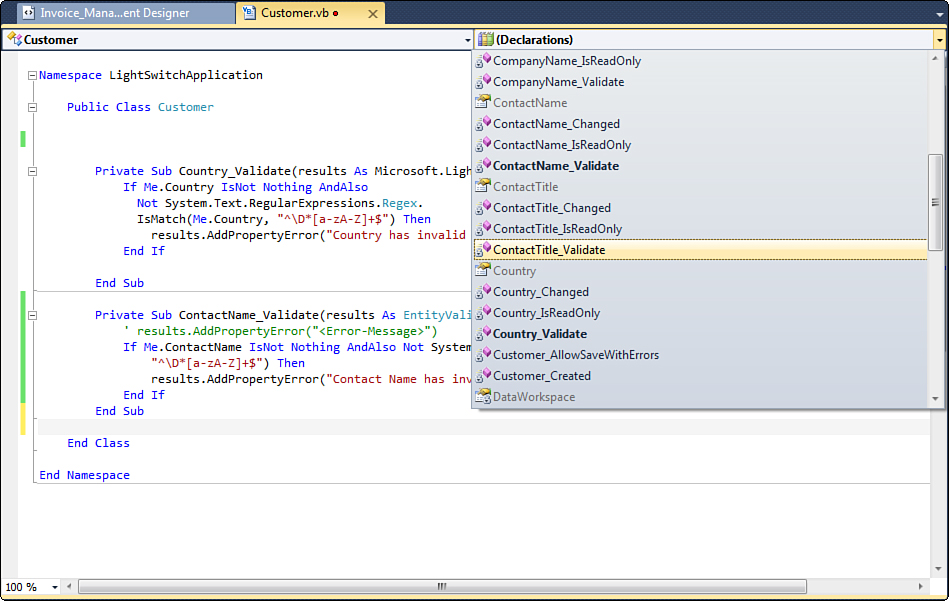
Figure 5.4. Visual Basic: Displaying the list of editable members via the Declarations combo box.
Go back to the Table Designer, select the Country property, and then click the Custom Validation hyperlink. LightSwitch generates a new event handler stub, where you write the following validation rule:
Private Sub Country_Validate(ByVal results _
As EntityValidationResultsBuilder)
' results.AddPropertyError("<Error-Message>")
If Me.Country IsNot Nothing AndAlso
Not System.Text.RegularExpressions.Regex.
IsMatch(Me.Country, "^D*[a-zA-Z]+$") Then
results.AddPropertyError("Country has invalid characters.")
End If
End Sub
This rule works exactly like the previous one, but it affects the Country property. Similarly, write a custom validation rule for the ContactTitle property like this:
Private Sub ContactTitle_Validate(ByVal results As _
Microsoft.LightSwitch.
EntityValidationResultsBuilder)
If Me.ContactTitle IsNot Nothing AndAlso
Not System.Text.RegularExpressions.Regex.IsMatch(Me.ContactTitle,
"^D*[a-zA-Z]+$")
Then
results.AddPropertyError("Contact title has invalid characters.")
End If
End Sub
So, the AddPropertyError method adds a new error message to the collection of validation errors, preventing users from saving data. By the way, sometimes this scenario is too restrictive. For example, you might simply want to advise that the user entered information that is not considered as invalid but that needs additional attention. With regard to this, LightSwitch offers three kinds of validation messages: errors, warnings, and informational messages.
Validation Types: Errors, Warnings, and Informational Messages
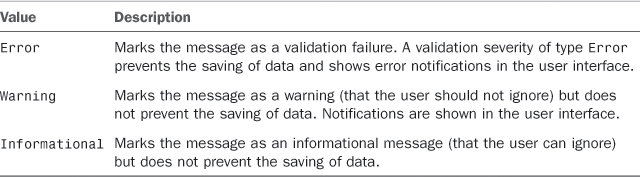
So far, you have seen how to add errors to the entity property by invoking the EntityValidationResultsBuilder.AddPropertyError method. This is the usual way you use to notify the user interface that some data validation failed. There is also another important method, EntityValidationResultsBuilder.AddPropertyResult, which offers more flexibility because it not only allows adding validation errors to the results collection, it also allows specifying whether the validation failure is actually an error or if it is just a warning or informative message that the user should address (but that does not prevent saving the data). The aforementioned AddPropertyResult method has four overloads, but the most important accepts two arguments: the error/information message and a value from the Microsoft.LightSwitch.ValidationSeverity enumeration, whose values are summarized in Table 5.2.
Table 5.2. Values for the ValidationSeverity Enumeration
Continuing this example on the Customer entity, consider the City property. It is true that lots of city names are short, but it can be a good idea to inform the user that the entered city name is shorter than or equal to three characters. This is because an invalid city name could be entered accidentally. Using the techniques described earlier, add an event handler for the City.Validate event, called City_Validate, and write the following code, which stores the message as a warning, by passing the ValidationSeverity.Warning parameter:
Private Sub City_Validate(ByVal results As EntityValidationResultsBuilder)
' results.AddPropertyError("<Error-Message>")
If Me.City IsNot Nothing AndAlso Me.City.Length <= 3 Then
results.AddPropertyResult("City is shorter " & _
"than 3 characters. Is this correct?",
ValidationSeverity.Warning)
End If
End Sub
If you run the application and then try to enter a city name that is shorter than (or equal to) three characters, a validation issue occurs in the user interface, but this time the validated field gets bordered with a black adornment. In addition, the validation message is represented by a yellow triangle, which recalls a similar warning message icon in the Windows operating system. Figure 5.5 shows what the warning message looks like.
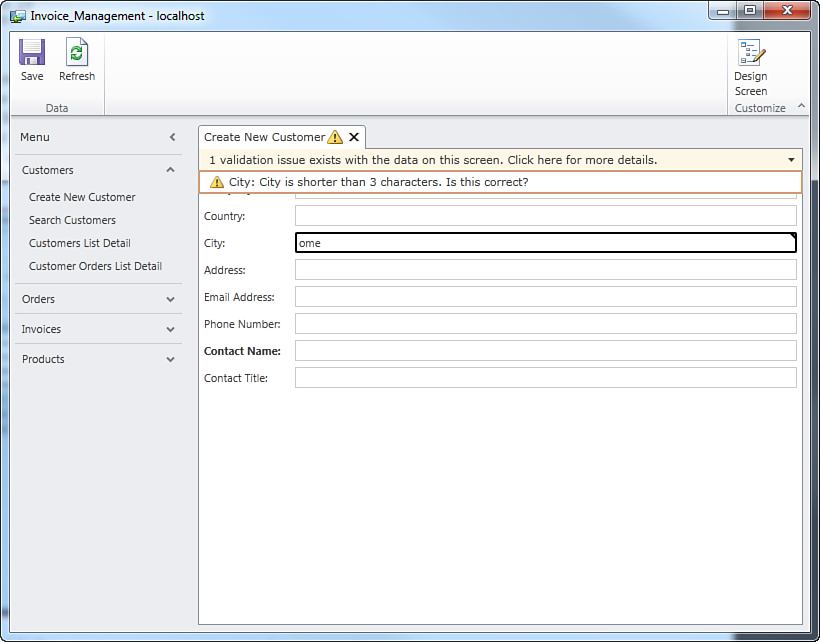
Figure 5.5. The warning message is shown in the user interface.
You can easily understand how AddPropertyResult has a more versatile behavior than the AddPropertyError method. Now let’s take a look back at the ContactName property validation. In the previous code snippet, the validation fails if the ContactName property value contains nonalphabetic characters, such as digits. This is very common, but you might want to leave the user free to store the contact name as preferred. So, in this case, you can use the ValidationSeverity.Informational value to communicate an informational message. Replace the ContactName_Validate event handler as follows:
Private Sub ContactName_Validate(ByVal results _
As EntityValidationResultsBuilder)
' results.AddPropertyError("<Error-Message>")
If Me.ContactName IsNot Nothing AndAlso
Not System.Text.RegularExpressions.Regex.
IsMatch(Me.ContactName,
"^D*[a-zA-Z]+$") Then
results.
AddPropertyResult("Contact Name has invalid characters. " & _
"Is this correct?",
ValidationSeverity.Informational)
End If
End Sub
When an invalid character is entered, the user interface is notified of the situation and hooks up the message as pure information. The user control gets bordered with a black adornment, and the validation message is displayed via the typical information icon, as shown in Figure 5.6.
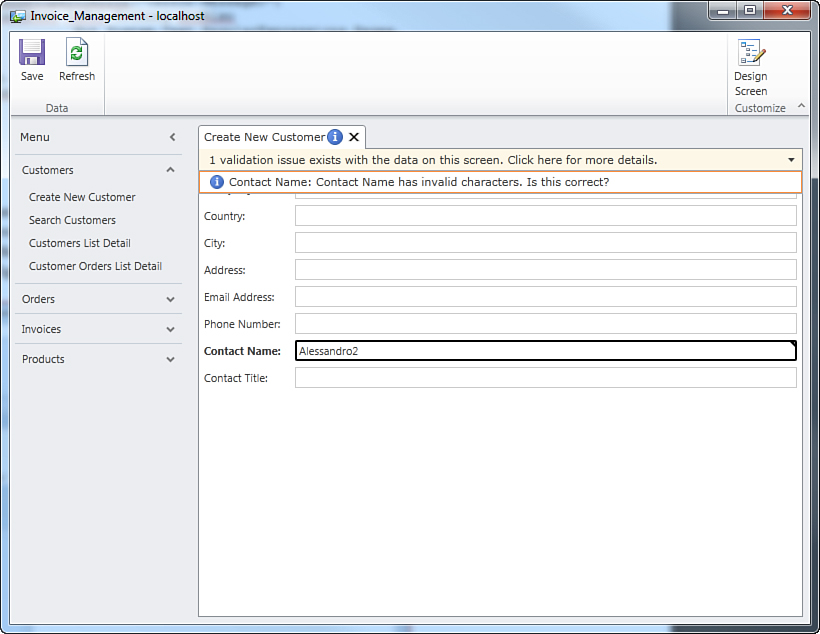
Figure 5.6. Displaying a simple, informational message.
Validating Data Types Other Than Strings
Of course, in a business application, you need to implement a number of other validation rules. For example, consider the OrderHeader entity. Such an entity exposes the OrderDate, RequiredDate, and ShippedDate properties, all of type Date. In reality, RequiredDate and ShippedDate cannot be less than the OrderDate. In addition, the ShippedDate should not be greater than the RequiredDate; otherwise, a malfunction occurred in the shipment process, and the user should at least be notified that the entered information might be wrong. With that said, open the Entity Designer and point to the OrderHeader entity. Select the RequiredDate property and, in the Properties window, click Custom Validation in the Validation group. This action opens the code editor on a new event handler stub in the OrderHeader.vb file, for the RequiredDate.Validate event. Very simply, our custom code looks like this:
Private Sub RequiredDate_Validate(ByVal results _
As EntityValidationResultsBuilder)
' results.AddPropertyError("<Error-Message>")
If Me.RequiredDate < Me.OrderDate Then
results.AddPropertyError("Required date cannot " &
"be less than the order date")
End If
End Sub
A simple condition check raises a validation failure if the value of RequiredDate is less than the order date. Similarly, you write a custom validation rule for the ShippedDate property, which performs the same check:
Private Sub ShippedDate_Validate(ByVal results _
As EntityValidationResultsBuilder)
' results.AddPropertyError("<Error-Message>")
If Me.ShippedDate < Me.OrderDate Then
results.AddPropertyError("Shipped date cannot " & _
"be less than the order date")
End If
End Sub
This event handler could be extended with another conditional block that raises a warning message if the ShippedDate property value is greater than the RequiredDate property value. This is accomplished by invoking the previously discussed AddPropertyResult method when the condition is true. After this consideration, the ShippedDate_Validate event handler looks like this:
Private Sub ShippedDate_Validate(ByVal results _
As EntityValidationResultsBuilder)
' results.AddPropertyError("<Error-Message>")
If Me.ShippedDate < Me.OrderDate Then
results.AddPropertyError("Shipped date cannot " &
"be less than the order date")
End If
If Me.ShippedDate > Me.RequiredDate Then
results.AddPropertyResult("Date of shipment should not " &
"be later than required date. Please fix if incorrect or " &
"make your excuses to the customer",
ValidationSeverity.Warning)
End If
End Sub
You might have noticed that in the latest example the code does not check for null values (instead, checking for items of type String). The reason is that strings in .NET are reference types that can have a null value, whereas a date is a value type. In the .NET programming, value types have a default value that is zero for numeric types and Today for dates.
Multiple Business Rules for One Property
The last code snippet is interesting because it demonstrates how you are not limited to one business rule per property. In fact, you can add multiple conditions, each contained inside an If..End If conditional block. Conditions are evaluated in the order you write them, but LightSwitch evaluates all of them unless you explicitly exit from the code block; for example, by calling Exit Sub. Another way to add multiple validation conditions is to use short-circuiting operators, such as And or Or, as you would do in any other conditional code block.
Notice how multiple validation rules on the same entity property can coexist inside one event handler in standalone conditional code blocks. To ensure that validation rules work as expected, run the application and launch the Create New Order Header screen. Then, enter a value for RequiredDate that is less than (before) OrderDate and enter a value for ShippedDate that is greater than (later than) RequiredDate. In such a situation, the screen shows two validation issues: one error for the RequiredDate property, and one warning for ShippedDate. Figure 5.7 shows an example.
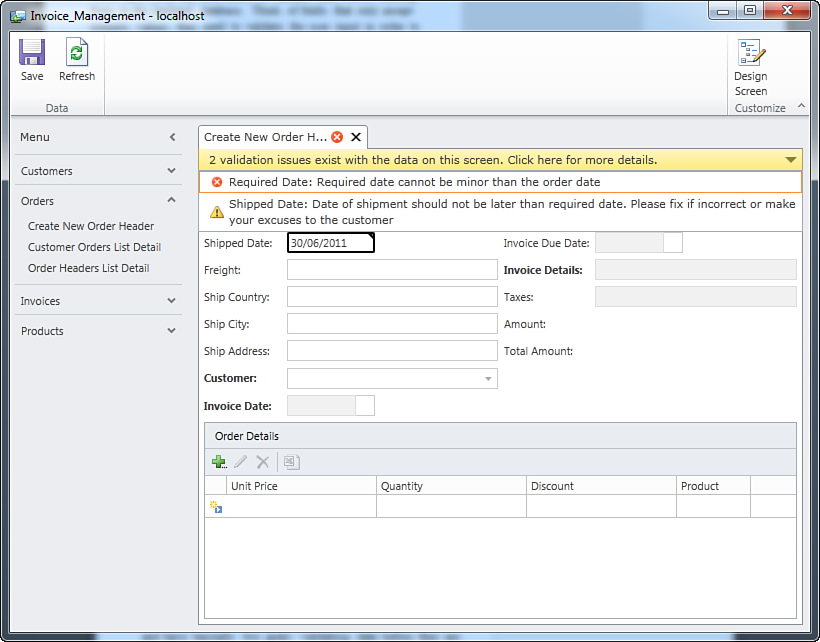
Figure 5.7. A validation error and a warning message ask the user to enter correct dates.
Note that in the last validation rule, the code successfully uses both the AddPropertyError and the AddPropertyResult methods to provide a complete validation mechanism. Of course, in this case, data cannot be saved unless you fix all the errors. If you have only the warning message on ShippedDate, however, you can still save changes to the database. The OrderHeader entity offers another interesting point of discussion about custom validation rules, which is the Freight property of type Money. As you recall from Chapter 4, the Money type is not actually a real .NET type; instead, it is just a LightSwitch representation for monetary values that takes the System.Decimal type from .NET as its base. Therefore, when you write a custom validation rule for items of type Money, you actually validate its Nullable(Of Decimal) .NET counterpart.
Generally, you do not need to write custom validation rules for the Money type because you can just specify the minimum and maximum values in the Properties window and let the LightSwitch built-in validation mechanism do the rest. Anyway, you might want to override the default error message, and this requires custom code. So, suppose you want to ensure that the freight’s value is not less than 50 and that you want to supply a custom validation message. Select the Freight property in the OrderHeader entity definition and go to the code editor by using one of the techniques described throughout this chapter. You simply need to handle the Freight.Validate event; in the code, the Freight property is represented by a Nullable(Of Decimal) (or Decimal?, which is the alternative syntax) .NET type. Because of this, you refer to decimal numbers by adding the D literal at the end of the number, as you would normally do in any other .NET application. After these considerations, the code you write is as follows:
Private Sub Freight_Validate(ByVal results _
As EntityValidationResultsBuilder)
' results.AddPropertyError("<Error-Message>")
If Me.Freight <= 50D Then
results.AddPropertyError("Freight cost is too low. " & _
"Please fix")
End If
End Sub
Although it might not be evident, this code meets two objectives concurrently. The first one is checking for a minimum value in code, and the second objective is overriding a default error message. When you run the Create New Order Header screen in the running application and supply a freight cost that is less than 50, you can see how the default message is overridden by the custom message added via AddPropertyError. Figure 5.8 demonstrates this.
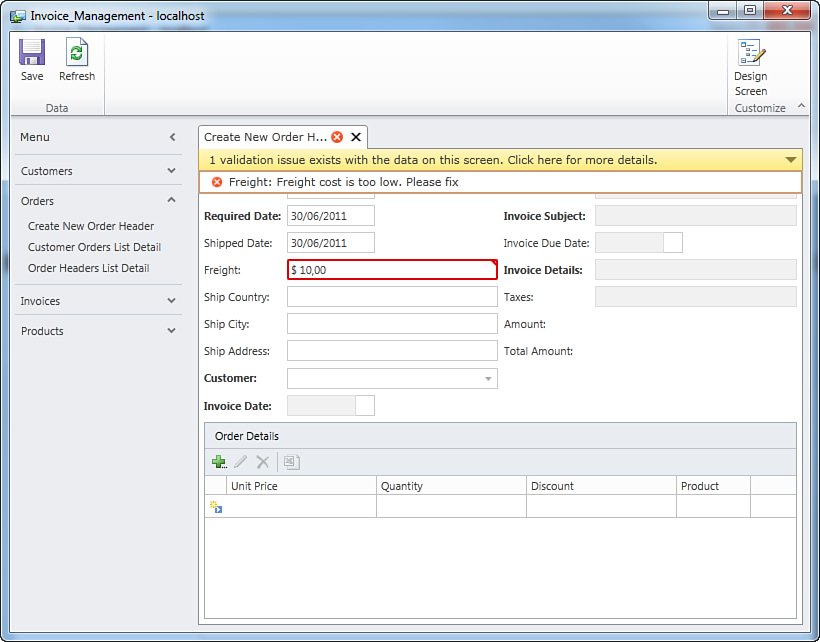
Figure 5.8. Validating items of type Money, which is Decimal? in .NET code.
Moving our attention to the Invoice entity, two kinds of custom validation can be performed. The first custom rule is similar to what we did in the OrderHeader entity (that is, ensuring that the InvoiceDueDate is not less than [earlier than] InvoiceDate). This is accomplished via the following simple code:
Private Sub InvoiceDueDate_Validate(ByVal results _
As EntityValidationResultsBuilder)
If Me.InvoiceDueDate < Me.InvoiceDate Then
results.
AddPropertyError("Invoice Due Date is minor than Invoice Date")
End If
End Sub
The second rule ensures that the InvoiceDetails property value is not shorter than 10 characters by raising a warning if it is. After all, a detailed description should be longer than 10 characters. Here is the code that performs this type of validation via AddPropertyResult:
Private Sub InvoiceDetails_Validate(ByVal results _
As EntityValidationResultsBuilder)
If Me.InvoiceDetails IsNot Nothing AndAlso
Me.InvoiceDetails.Length < 10 Then
results.
AddPropertyResult("You should write a more detailed description",
ValidationSeverity.Warning)
End If
End Sub
Not surprisingly, when you run the application and enter invalid values for the previously mentioned properties, you have two validation issues, as shown in Figure 5.9.
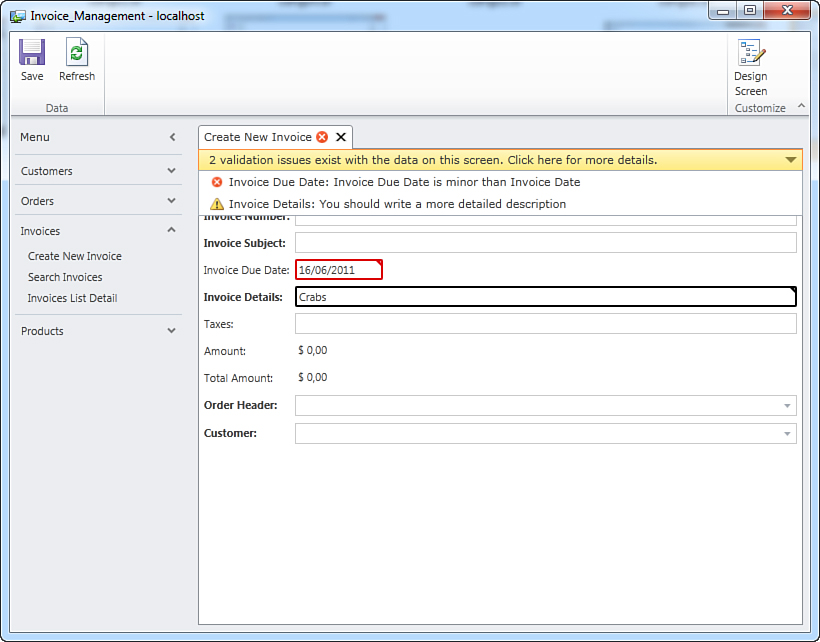
Figure 5.9. Custom validation results in the Invoice entity.
Now that you know how entity property validation works, you can easily add your own validation rules for other entities.
Preventing Duplicates with Unique Indexes
In most cases, you want to prevent users from adding duplicate items to a table. Every entity property can be included in a unique index so that LightSwitch will automatically ensure (based on the unique property) that no duplicate items are entered. For example, suppose you want to prevent users from entering duplicate product names when creating new products. Open the Table Designer for the Product entity and click the ProductName property. In the Properties window, you can see the Include in Unique Index property, as shown in Figure 5.10.
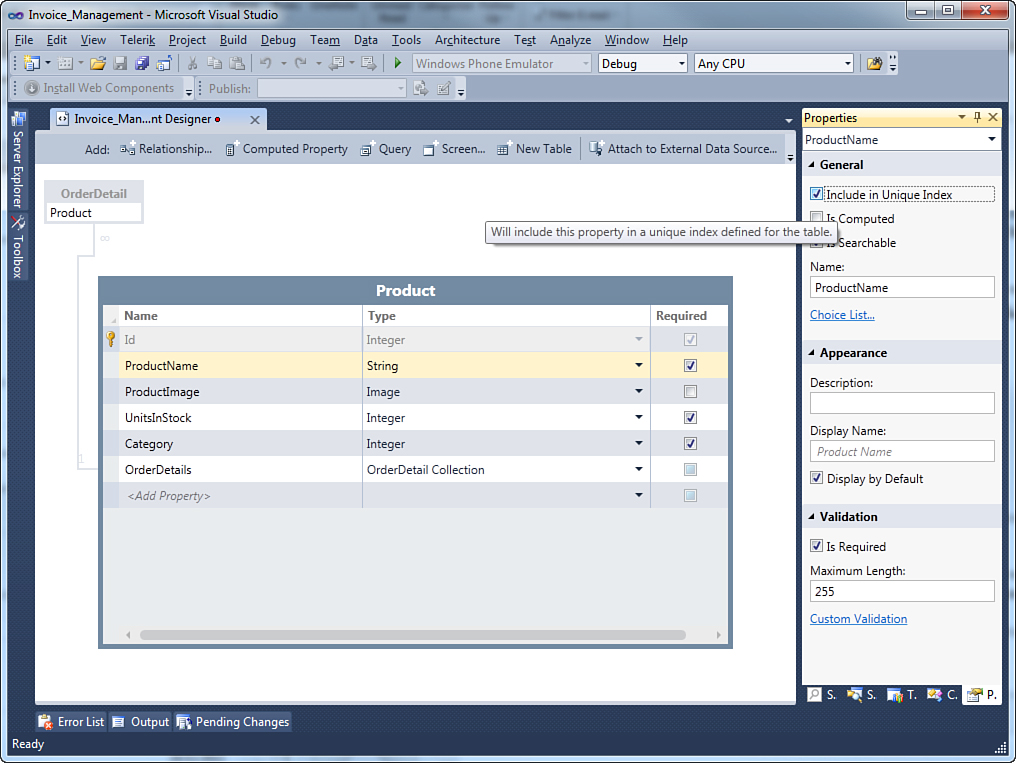
Figure 5.10. Including an entity property to a unique index.
Simply check the check box. If you run the application and try to enter a duplicate product name, the LightSwitch validation mechanism throws a validation error, as shown in Figure 5.11.
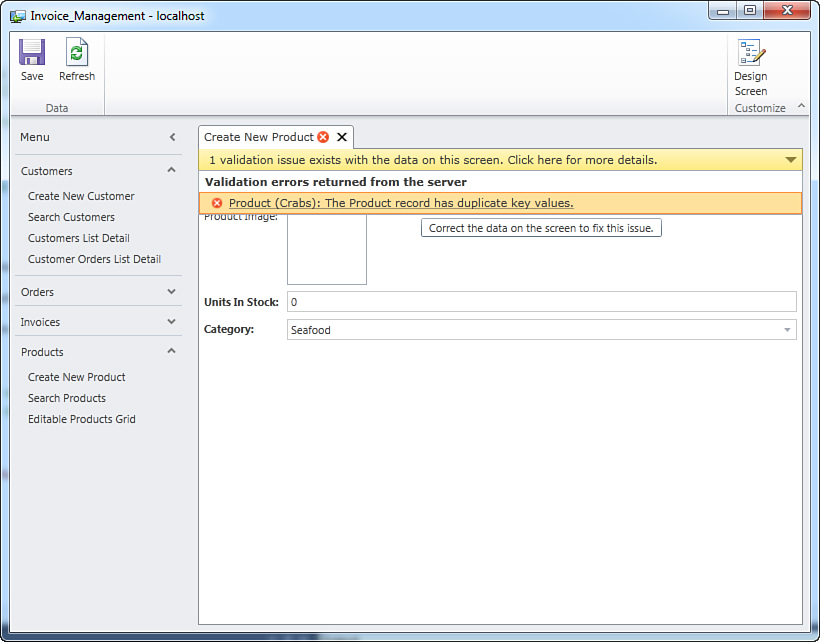
Figure 5.11. Checking for duplicates is easy in LightSwitch.
As mentioned at the beginning of this section, custom validation rules in LightSwitch also affect entities and entity collections; this is explained in the next sections.
Client and Server Validation: Validating a Single Entity
So far, you have seen how to validate entity properties and how to raise validation failures by invoking the AddPropertyError and AddPropertyResult methods. Although both invocations prevent the saving of changes at the entity level, the validation mechanism gets notified of the failure of a single property. However, you can mark an entity as a whole with validation notifications. To accomplish this, you invoke the AddEntityError or AddEntityResult methods. Both work like AddPropertyError and AddPropertyResult, but the difference is that they notify the user of an entity validation failure, instead of a property validation failure. There are also two other important differences:
• The first difference is that validating a single property causes the user interface to immediately notify the user of a problem, by highlighting the invalid field. In contrast, validating an entity as a whole with AddEntityError does not cause the user interface to highlight anything, even though the Validate event is still raised at the same time.
• The second difference, which is a consequence of the first one, is that the user is notified of the validation failure only when submitting changes. The reason is that this kind of validation runs on both the client and the server but is finalized only when running on the server.
Consider the previous example in which the code checks for the invoice details length; you can rewrite the code replacing AddPropertyError with AddEntityError, as follows:
Private Sub InvoiceDetails_Validate(ByVal results _
As EntityValidationResultsBuilder)
If Me.InvoiceDetails IsNot Nothing AndAlso
Me.InvoiceDetails.Length < 10 Then
results.
AddEntityError("You should write a more detailed description")
End If
End Sub
When you run the application and try to enter an invalid value for the invoice details, you get validation errors only when you try to submit changes, as shown in Figure 5.12.
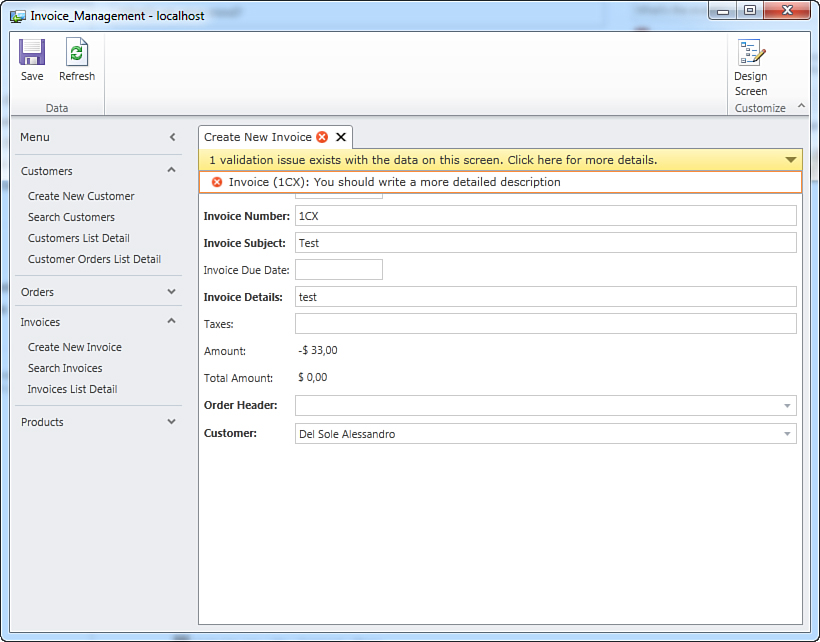
Figure 5.12. “Entity as a whole” validation does not highlight invalid fields.
Also notice how Figure 5.12 demonstrates that the invalid field is not adorned but the error message is correctly shown in the validation summary. This makes sense if you think that AddPropertyError marks as invalid a property that is data-bound to a user control, as in the case of the InvoiceDetails property, which is data-bound to a text box; whereas AddEntityError marks as invalid an entire entity, which is not data-bound to a single user control but to the whole screen. After this highlighting, you might wonder where AddEntityError could be useful. When reading about the LightSwitch validation model, you learned that on the client side, data is validated in two specific times: when it changes and when it is being saved. AddEntityError is something that comes in when data needs to be saved, so you should invoke it when you have data that needs to be validated when saved and that cannot be validated when changing. Finally, there is the AddEntityResult, whose syntax is equal to AddPropertyResult but that works like AddEntityError with regard to the validation time and behavior.
Data Validation on the Server: Validating Entity Collections
The AddEntityError and AddEntityResult methods described in the previous section are generally used to raise validation failures on entity collections, too. Validating entity collections is useful when you want to tell the user that one collection contains multiple invalid entities. For example, consider the Product entity. Multiple entities of this type are stored inside a Products entity collection. If you go in the Entity Designer and click the arrow near the Write Code button, in the General Methods section you can find one named Products_Validate (see Figure 5.13). This method affects the Products collection rather than a single Product entity. Notice that this method is actually executed on the server, as described in the tooltip.
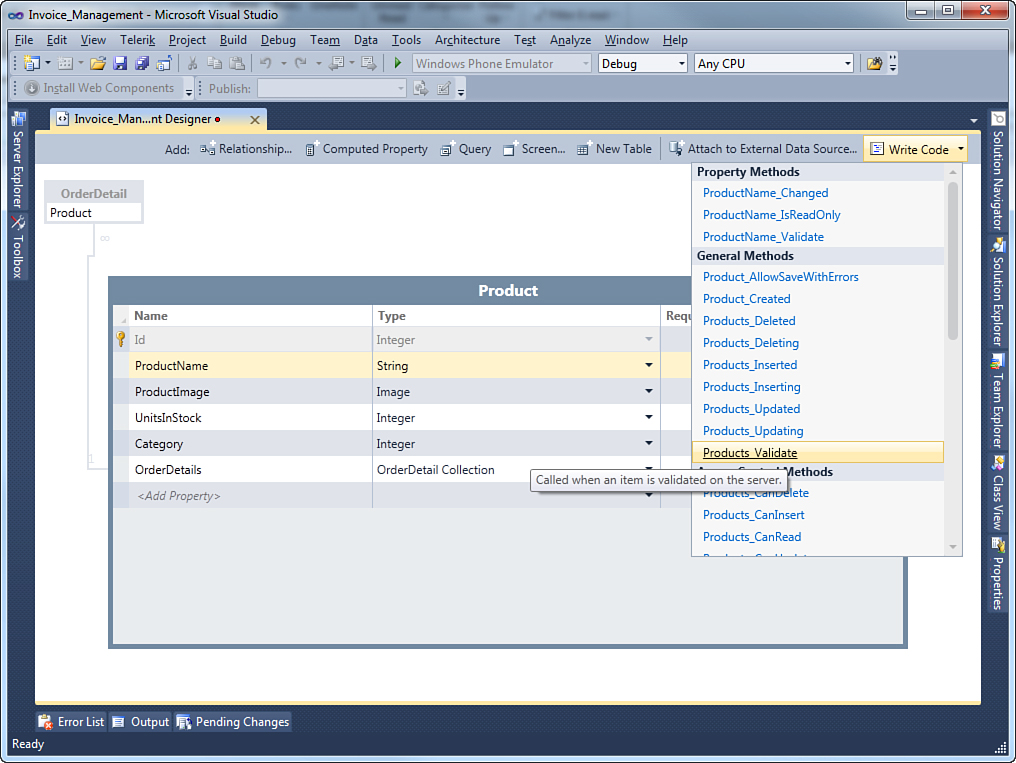
Figure 5.13. Selecting the Products_Validate method, which is run on the server.
If you click this method, LightSwitch displays the code editor, providing a method stub for Products_Validate that looks like this:
Private Sub Products_Validate(ByVal entity As Product,
ByVal results As _
EntitySetValidationResultsBuilder)
End Sub
The important thing to notice here is that such a method is exposed by the ApplicationDataService class, which only defines members that are executed on the server. In addition, in contrast to other validation methods, this takes an argument named entity of type Product, representing a single item in the collection. This argument is used to compare other elements in the collection. For example, you can prevent product images larger than 5KB from being entered:
Private Sub Products_Validate(entity As Product,
results As EntitySetValidationResultsBuilder)
If entity.ProductImage IsNot Nothing AndAlso entity.ProductImage.Length > 5120 Then
results.AddEntityError("The image for " +
entity.ProductName + " is too big.")
End If
End Sub
The code determines the size of product images (Length property) and raises an error via AddEntityError if the image size is bigger than 5KB (5120 bytes). When you run the application and attempt to save changes, the validation rule is executed against each entity, and the code adds an error for every entity whose image is bigger than 5KB to the validation results collection.
Validation in Master-Details Relationships
When you work with master-details relationships, you sometimes need to validate the “details” entity collection related to the “master” item. In the previous section, you saw how to validate a collection of products as a standalone set of items, but in the sample application, you have multiple products that are part of one order. So, you should also ensure that no duplicate items exist in the collection of products for each order.
To accomplish this, in Solution Explorer, right-click the OrderDetails source and select View Table Code from the pop-up menu. When the code editor shows the OrderDetail class definition, you can expand the (Declarations) box in the upper right and see that there is a validation method named Product_Validate. This method allows validating instances of a Product entity, which has a relationship with the current OrderDetail instance. The examined Validate event is raised on the client side, which means that it is raised when data changes and so the user does not have to wait for the save to get validation notifications. For example, you can write the validation logic for Product_Validate as follows, by using a LINQ query:
Private Sub Product_Validate(ByVal results As _
EntityValidationResultsBuilder)
If Me.Product IsNot Nothing Then
'Iterates the related OrderDetails collection
'and selects non-null Product instances
'whose product Id equals the current product Id
Dim duplicatesQuery = From detail In Me.OrderHeader.OrderDetails
Where detail.Product IsNot Nothing AndAlso
detail.Product.Id = _
Me.Product.Id AndAlso
detail IsNot Me
'If the query returns one or more
'results, there are duplicates
If duplicatesQuery.Any Then
results.
AddPropertyError("Cannot add the same product twice (" & _
Product.ProductName & ")")
End If
End If
End Sub
LINQ (Language Integrated Query) is a programming model available since .NET Framework 3.5 that allows querying (by using a strongly typed approach) any data source that implements the IEnumerable interface. LINQ injects keywords that recall the Structured Query Language (SQL) syntax directly into the managed languages, such as Visual Basic and Visual C#, so that you can write strongly typed queries that are immediately validated by the background compiler and that prevent from a plethora of runtime errors that result from writing query strings. Explaining LINQ is not possible here because it would require an entire book, but you can check out the MSDN documentation:
C#: http://msdn.microsoft.com/en-us/vcsharp/aa336746
VB: http://msdn.microsoft.com/en-us/vbasic/bb688088
If you now run the application and try to enter a duplicate product, the user is immediately notified of the validation issue because the validation rules are running on the client, meaning that the validation error is raised when the data changes, as shown in Figure 5.14.
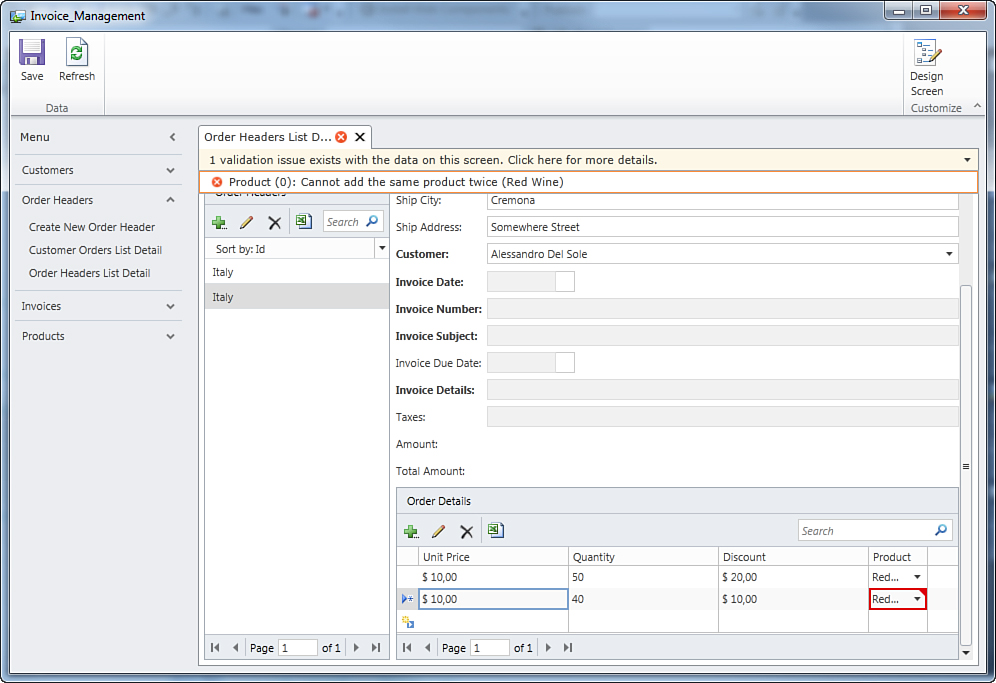
Figure 5.14. Client-side validation provides immediate notifications for failures.
After this discussion, your preference now (probably) is to write custom validation rules on the client, remembering that Visual Studio LightSwitch takes care of running validation rules on the server side for you.
For the Experts: Implementing Complex Validation Rules with the .NET Framework
LightSwitch applications are nothing but .NET applications running on the Silverlight 4 platform. That said, as a professional Visual Basic or Visual C# programmer, you can reuse in LightSwitch many concepts that you already know. After all, in LightSwitch, you still write VB or C# code. For example, you can use extension methods, which were first introduced into .NET in version 3.5.
Extension methods are shared methods that are added to existing types. The main benefit that extension methods introduce to the .NET Framework is that they can extend existing types without having their source code. Therefore, you apply extension methods to a plethora of objects, including classes that you have the source code for, classes contained in class libraries, and classes in the Base Class Library. Learn more about extension methods by reading the MSDN documentation: http://msdn.microsoft.com/en-us/library/bb384936.aspx.
To demonstrate how this works, let’s consider again the Customer entity. It would be useful to add a WebSite property so that for each customer it is possible to store the website address, if any. To accomplish this, follow these steps:
1. In Solution Explorer, double-click the Customers table so that the Entity Designer displays.
2. In the entity definition, click Add Property and add a new property named WebSite, of type String, not required.
3. In Solution Explorer, double-click the CreateNewCustomer screen so that the Screen Designer displays.
4. From the CustomerProperty data source on the left, drag the WebSite property onto the screen definition and drop it under the ContactTitle text box. Doing so generates a new TextBox control named WebSite.
Run the application and ensure that the WebSite property is displayed as expected on the screen. Now close the application. What you would expect now is to open the code editor somewhere, but at this point there is a first problem: Extension methods are implemented in modules, if you work with Visual Basic, or in static classes if you work with Visual C#. But while in Visual Studio 2010 (and earlier versions) you can add a new item to the project, such as a code file, in Visual Studio LightSwitch you cannot directly. To be able to add new items, you need to click the Logical View drop-down in Solution Explorer and switch to the File View. At this point, Solution Explorer displays the physical structure of projects in the solution. Among the available projects, the one called Common contains code that is executed on both the client and the middle tier, so this is the place where you add code for custom extension methods. Right-click the Common project in Solution Explorer, and then select Add New Item. In the Add New Item dialog, choose an item of type Module for Visual Basic or a class for Visual C#. This is nothing different from what you are used to do in Visual Studio 2010 projects. Name the new item Extensions, and then write the following code, which uses the System.Uri.IsWellFormedUriString method to check whether the supplied address can be used to construct a valid uniform resource identifier (URI):
Module Extensions
<System.Runtime.CompilerServices.Extension()>
Function IsValidUri(ByVal address As String) As Boolean
Return Uri.IsWellFormedUriString(address, UriKind.Absolute)
End Function
End Module
You can validate web addresses in many different ways, such as regular expressions or the IsValidUri function from the native Windows API. The System.Uri.IsWellFormedUriString here is convenient enough for the sake of the simplicity (other than it works).
The IsValidUri extension method takes a String as a parameter and simply extends the String type by adding the method itself. Notice that we assume that the user enters an absolute web address, including the protocol (such as http or https); this is why the code passes a UriKind.Absolute parameter. Now that you have the extension method ready to be used, it is time to write a handler for the WebSite.Validate event. Just use whatever way you like to access the code editor and write the following code:
Private Sub WebSite_Validate(ByVal results _
As EntityValidationResultsBuilder)
If Me.WebSite IsNot Nothing AndAlso Me.WebSite.IsValidUri = False Then
results.AddPropertyError("You entered an invalid Web address. " & _
"Please fix!")
End If
End Sub
Notice how you just invoke the IsValidUri method from the WebSite property (of type String, which has just been extended). If the user enters a badly formed web address, the user interface displays a validation error, as shown in Figure 5.15.
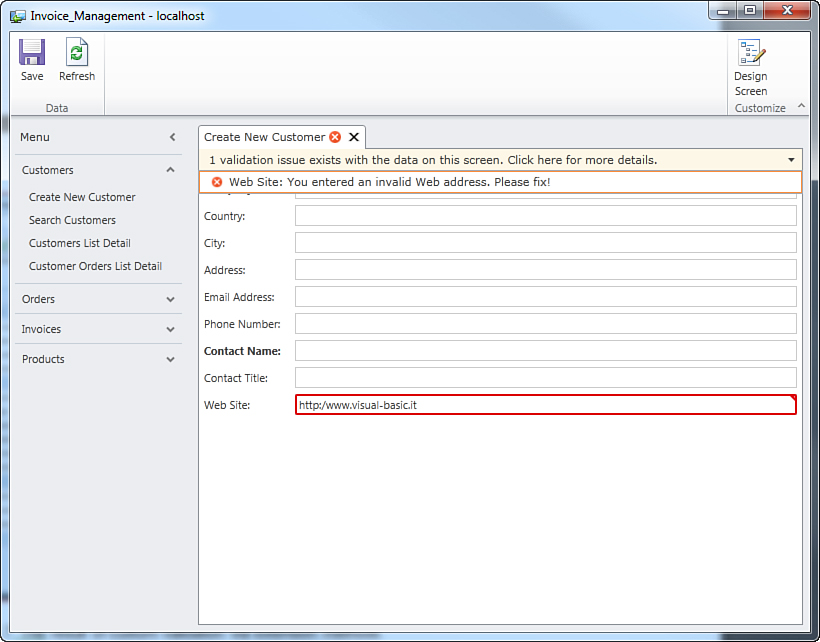
Figure 5.15. The result of custom validation via extension methods.
So, taking advantage of extension methods can help you encapsulate all your business rules and use them easily on all your entity validations.
Summary
Implementing data validation is an important step in the process of developing business applications. Although Visual Studio LightSwitch offers built-in rules, the validation mechanism provides an easy way to implement custom validation rules by writing managed code, especially by handling the Validate event for each entity. This event is available on both client and server validation, and it is also available for entities as a whole, entity collections, and entity properties. Typically, you write your custom validation rules by using a conditional code block (If..End If) that evaluates the specified condition. If the condition is True, you raise a validation error by invoking the AddPropertyError or AddEntityError methods, according to the validation scope. In this chapter, you learned how the validation system in LightSwitch works, and then you learned how to validate entity properties. This was the base for understanding how to validate entities as a whole, entity collections, and master-details relationships. So far, you have learned many LightSwitch development concepts, but you can do even more with the development environment, such as building queries with minimal effort, as described in the next chapter.