
Chapter 6. Querying, Filtering, and Sorting Data
Companies use business software to manage huge quantities of data and information. Data can be of so many kinds, and sometimes just a few users are authorized to manipulate a particular data set. For example, the shipments department is not usually interested in manipulating employee badges. So, according to the user’s job and to the particular kind of information the user needs to manipulate, full data sources need to be filtered by specific criteria. As typically happens in data-centric applications that use a database as the data store, queries, filters, and sorting become an important way to simplify how the user works with the data set of interest. As in many other scenarios that you have already seen, and some that you will discover later in this book, Visual Studio LightSwitch offers the perfect environment to easily build and customize queries with filters that make working with data a task that perfectly suits both the application’s and the user’s needs.
Querying Data in LightSwitch
In business applications, users need to retrieve and display data stored in a database. Retrieving data, in database terminology, is a task known as a query. There are many different types of queries. For example, getting the complete list of customers is a query. Another example of query is retrieving all the orders from a specified customer. The difference is that in the latter case there is a condition, which is the specified customer. This information restricts the data set retrieved from the data store. A third example of a query is retrieving only the list of products that are discounted. When a query includes conditions that restrict the result, it contains a filter. Filters are really important because they allow the retrieval of only the data set that the application actually needs in the specified context. In most cases, the data extracted from a query is displayed in the user interface.
To display data in the most appropriate way possible for a given context, the user might need to sort the list of items according to a specified criterion. For example, if the user wants to know the sequence of shipments, a good idea is to sort orders by the shipment date, instead of the order identity number. LightSwitch application architecture relies heavily on queries, filters, and sorting. You have seen many examples thus far, especially with regard to search screens, because these implement built-in features for querying, filtering, and sorting data. This is possible because, on the server side, Visual Studio LightSwitch automatically implements some built-in queries inside entity collection definitions that can be easily data-bound to screens. At a higher level, LightSwitch provides two kinds of built-in queries:
• Retrieving the complete list of items from a collection of entities: This includes paging the data according to the setting on the query. The default setting is 45 entities per page. (You can replace this number, as shown later in this chapter.) Talking in SQL terms, this sounds like a SELECT * FROM Table Top 45 syntax.
• Retrieving a single item from an entity collection: Actually, this kind of query invokes the SingleOrDefault method from LINQ.
For a better understanding, think of the SearchCustomers screen that is part of the Invoice Management application example. You did not write a single line of code or make any screen-level edits to bind the list of customers to the screen, but the screen itself can automatically display the full list of customers. The only task you performed (when creating the new screen) was to associate the screen with a collection of entities. This kind of automation is possible because the Customers collection exposes a method named Customers, which executes a query against the Customers table, whose result is an unfiltered collection of Customer entities. Then, search screens in LightSwitch are intelligent enough to automatically bind the result of the default method to the user interface, asynchronously load the data, and provide paging support to retrieve small sets at a time.
LightSwitch loads data asynchronously. The main impact of this is that the user interface never freezes. Even if you are not required to know how this works behind the scenes, asynchrony is a default behavior in WCF RIA Services that LightSwitch uses to query data sources. Along with asynchrony, there is paging. As you learned back in Chapter 3, “Building Data-Centric Applications,” paging allows retrieving small sets of data at a time and works over queries. As a result, the combination of asynchrony and paging makes LightSwitch applications highly scalable and responsive.
Next, think of the OrderHeader entity. When you associate an instance of the Order entity to an instance of a Customer, as a part of a one-to-many relationship, the Customer instance is associated with the Order by invoking the Customer_SingleOrDefault method exposed by the Customers collection; such a method retrieves, given its identity number, the one and only instance of a Customer entity.
Queries in LightSwitch, like any other kind of query, are composed of filters and sorting logic. This is true for built-in queries, too, but the difference is that built-in queries have no default filter and a default sorting logic that orders data by the Id property of each entity. In real-world business applications, additional filters and sorting logic are needed, such as displaying a filtered list of orders by the customer identity and so on. Visual Studio LightSwitch makes applying filters and sorting to queries really easy via a simple-to-use designer but also by writing code. In addition, in LightSwitch, you customize queries by applying filters and sorting to both the data source and screens. This chapter covers filters and sorting techniques in LightSwitch, from the data source to the screen level, passing through LINQ.
What You need to Know About Programming
The first part of this chapter describes features in LightSwitch that do not require writing code, so they can be applied even if you are not an expert developer. The second part requires some knowledge of programming concepts in the .NET Framework, such as LINQ. For your convenience, all sections where knowledge of code is required are titled in a way that you can easily locate them, so you can skip them. When you become familiar with LINQ, you can go back to those sections and complete your reading.
This chapter uses the Invoice Management application that was extended in Chapter 5, “Customizing Data Validation.” So, open the project in Visual Studio LightSwitch and use it as the base for all the examples described here.
Applying Filters
Search screens and grids are really important in business applications because they make it possible to display items from a table in the database. So far, you have seen how to display complete lists of items of a specified type, such as the list of orders, of customers, and so on. Most business applications must limit user choices to a particular set of items based on a specified criterion. For example, users must be able to display only orders from a specific customer or a list of invoices falling within a specified range of dates. To retrieve a data set that matches just the specified criterion, you apply one or more filters. A filter allows extracting from a collection of entities only the items that match a particular criterion and builds a secondary collection containing the extracted items, known as query result.
When you create an entity, you know that LightSwitch also creates an entity set with a backing table (or a collection of entities, if using the LightSwitch terminology). Behind the scenes, LightSwitch also generates a default query that retrieves all the items from that collection. When you associate a search screen with a collection of entities, the screen invokes nothing but the default query, which is actually a query with no filters applied.
If you are familiar with LINQ in the .NET programming or with Structured Query Language (SQL) for databases, this is what you generally accomplish using the Where keyword. For example, you might want to retrieve a list of orders made only by customers from the United States. In this scenario, the filter is that every single order associated with a customer living in the United States must be considered; the others are excluded from the query result. In Visual Studio LightSwitch, you typically apply filters to a data source in the Query Designer. This special designer enables you to define queries by applying filters via a visual tool so that you do not need to write a single line of code. In some situations, however, you need to add information to a query that the designer does not contain by default. So, Visual Studio LightSwitch enables you to customize queries by writing code, meaning that you can apply filters specifying in code your criteria (such as the Where clause in LINQ). At a higher level, a filter has three requirements:
• An entity property, which is what you want to filter
• A comparison value, which is the value that the entity property must match according to a criterion
• An operator, which establishes the criterion that the entity property must be filtered with the comparison value
For example, suppose you want to retrieve only customers from the United States. In this case, the Country property of the Customer entity is the entity property you want to apply the filter to. The comparison value is the name of the country, and the operator is the equality operator, which actually establishes how the filter is applied. If you know LINQ or SQL, you can think of a filter as the Where keyword. Therefore, you express this case in LINQ as follows:
Dim result = From customer in Customers
Where customer.Country = "United States"
Select customer
The good news is that in Visual Studio LightSwitch, you do not need to write code to filter a data set. The Query Designer provides a good set of tooling that makes filtering data easier and generates the appropriate code for you. When working with filters, in LightSwitch you have two options: filtering data directly on the data source or filtering data within a screen. In this section, you learn both techniques.
Each query in LightSwitch runs on the middle tier. This is important to remember because filtering data directly within a screen, in contrast, works on the client. You will read more about filtering on screens later in this chapter. For now, just focus on where queries run.
Applying Filters at the Data Level
To apply a filter to a data set, you use the Query Designer. Consider the previous example, where you want to filter the list of current orders for customers who live in the United States. To accomplish this, first double-click the Orders table in Solution Explorer. When the Entity Designer shows the entity definition, click the Query button in the toolbar. At this point, the Query Designer appears, as shown in Figure 6.1.
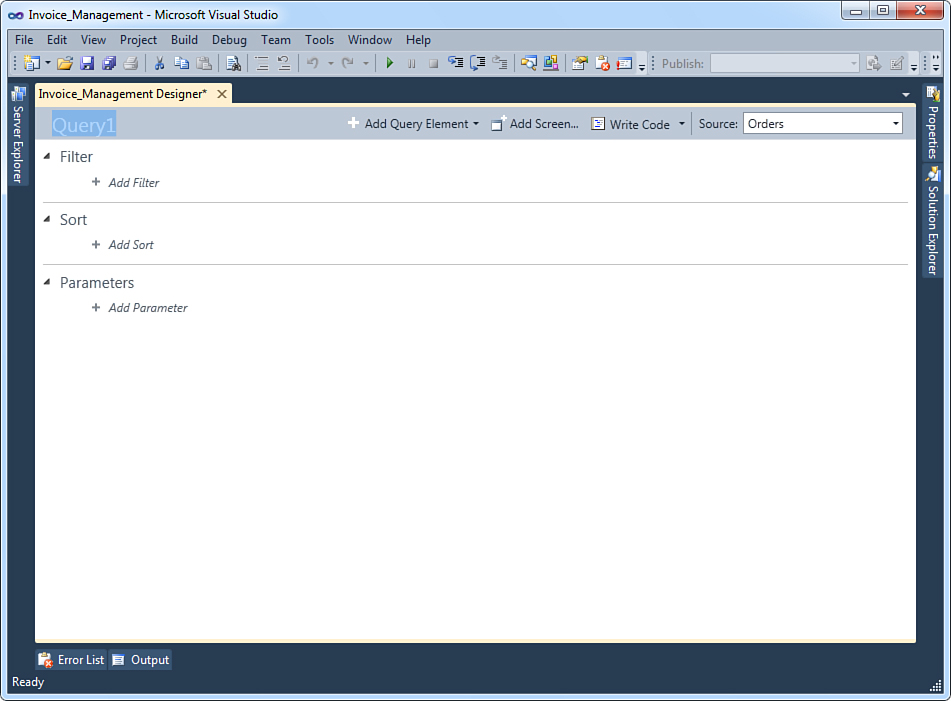
Figure 6.1. The first appearance of the Query Designer.
The goal of the Query Designer is to provide a visual tool to help build queries without writing a single line of code. Notice how the designer is divided into three sections: Filter, Sort, and Parameters. Each section can define multiple rules for filtering and sorting data. At this point, the first thing you can do is provide a meaningful name for your query, which is Query1 by default. Replace the default name with OrdersFromTheUnitedStatesQuery. Now click the Add Filter button; this will enable the Filter Designer, shown in Figure 6.2, when it runs for the first time over an entity.
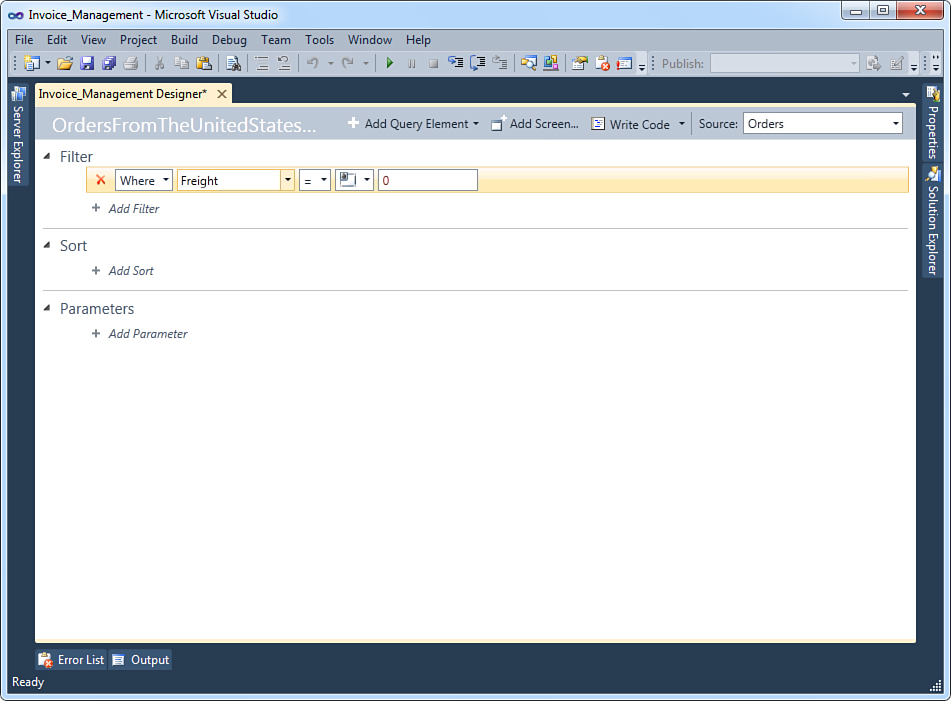
Figure 6.2. The Filter Designer.
The Filter Designer enables you to specify the following information:
• The condition, which is Where or Where Not.
• The entity property to be filtered. Notice that this can be exposed by an entity that has a relationship with the current one.
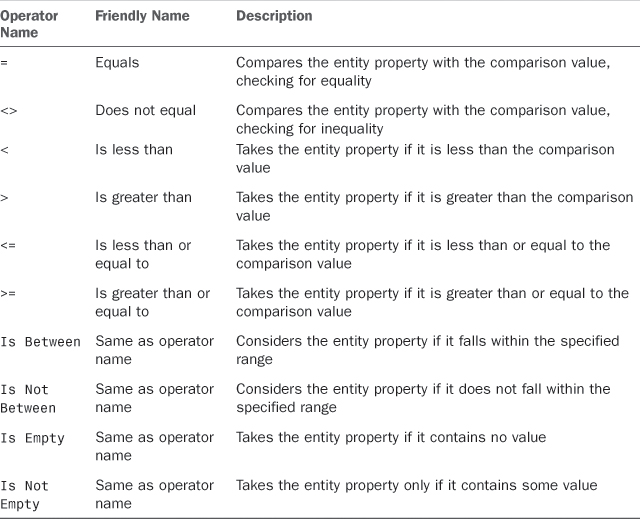
• A comparison operator that establishes the filter criterion. Available operators are listed in Table 6.1.
Table 6.1. Available Comparison Operators
• A comparison type, which can be a literal, another entity property, a query parameter, or a global value. (The last one works only with the Date type.)
• The comparison value.
In addition, LightSwitch offers single filters and groups of filters. A single filter applies a single condition, but multiple single filters can be combined to apply multiple conditions, via logical operators such as And/Or. Single filters are evaluated in sequence, according to the specified logical operator. Groups of filters, in contrast, are evaluated as a single unit. To understand this, think of a mathematical expression where the expression is rounded by parentheses. In a group, filters are evaluated as if they were enclosed in parentheses.
Let’s start by discussing single filters. Continuing the current example, we want to get all the orders from customers residing in the United States. Therefore, you need a query that basically tells LightSwitch this: Give me all orders where the Country property of the associated Customer entity equals United States. In the Query Designer, this is translated into the following steps:
1. Select Where as the filter condition.
2. Expand the drop-down list for the entity property and notice how you can select not only properties from the Order entity but also properties from the Customer entity (see Figure 6.3). In this particular case, you need to retrieve the content of the Country property for the associated Customer. So, expand Customer in the drop-down list, and then select Country.

Figure 6.3. The Query Designer after defining our first query.
3. Select the Equals To operator as the comparison operator.
4. Select Literal as the comparison type. By doing so, you can specify a custom string rather than another entity property.
5. Type United States in the Comparison Value field.
At the end of these steps, the Query Designer looks like Figure 6.3.
By defining the query shown in Figure 6.3, you can restrict the display of orders to customers residing in the United States only. This obviously requires adding an appropriate screen to the application’s user interface. To display a query result, you typically use Search Screen or Editable Grid Screen templates. You can edit an existing screen to show the query result or you can add a brand-new screen. In the current scenario, it is a good idea to add a new search screen so that you maintain the previous infrastructure. On the designer’s toolbar, click the Add Screen button, and in the Add New Screen dialog, select the Search Screen template and then the OrdersFromTheUnitedStatesQuery item from the Screen Data combo box. Then, name the screen as SearchOrdersFromTheUSA, as shown in Figure 6.4.
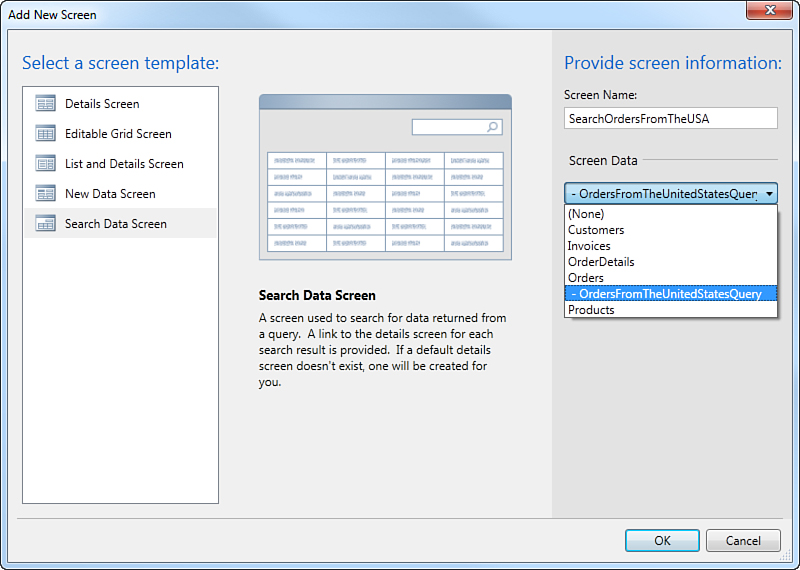
Figure 6.4. Selecting a query as the data source for a search screen.
For the sake of simplicity in this chapter, you are not asked to customize display names for screens and screen items, so you will find references to screens via the autogenerated name. Of course, you can replace display names as you like, as you learned in Chapter 3.
So, using a query as the data source for a search screen is really simple, because you can select queries the same way you select entity collections. In addition, queries in the Screen Data combo box appears nested inside the entity collection they derive from so that you can easily individuate them. You can also notice how the new query appears in Solution Explorer as a new data item in the Data SourcesApplicationData container; in particular, it appears as a child element of the Orders collection, as shown in Figure 6.5.
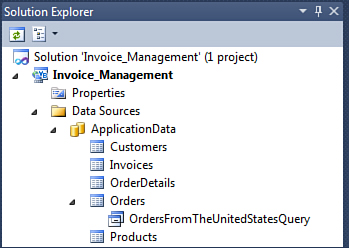
Figure 6.5. The new query appears as a nested data item in Solution Explorer.
Rearranging the Screen Navigation
In Chapter 4, “Building More-Complex Applications with Relationships and Details Screens,” you learned how to arrange the screen navigation by creating groups of screens and by moving screens within groups. When you arrange the screen navigation and then add new screens later, these are added to the Customers group, which is not appropriate. So, open the Screen Navigation tab in the project Properties and move the new screen to the Orders group (or where you consider more appropriate).
Now run the application. Suppose you have a mixed list of orders requested by customers from different parts of the world that you display via the Order Headers List Detail screen created in Chapter 4. Figure 6.6 displays a list in which there are two orders from the United States and two from Italy.
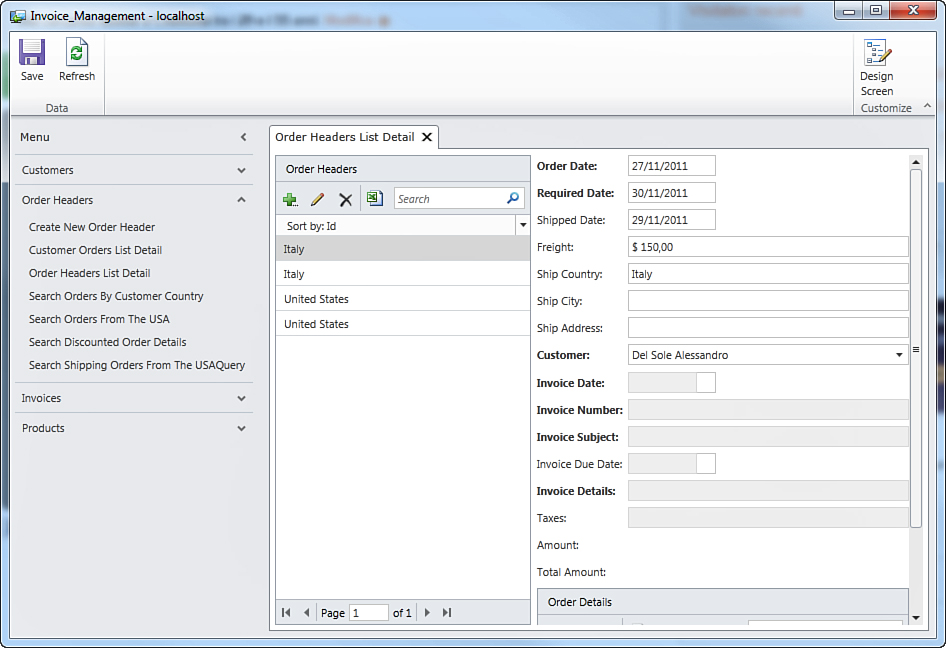
Figure 6.6. A list of orders from customers in different parts of the world.
Now launch the Search Orders From The USA screen that you created a few minutes ago. When the screen is displayed, you can see how it actually shows only orders made from customers living in the United States, which is exactly what we requested in the query with filters. Figure 6.7 displays the new search result.
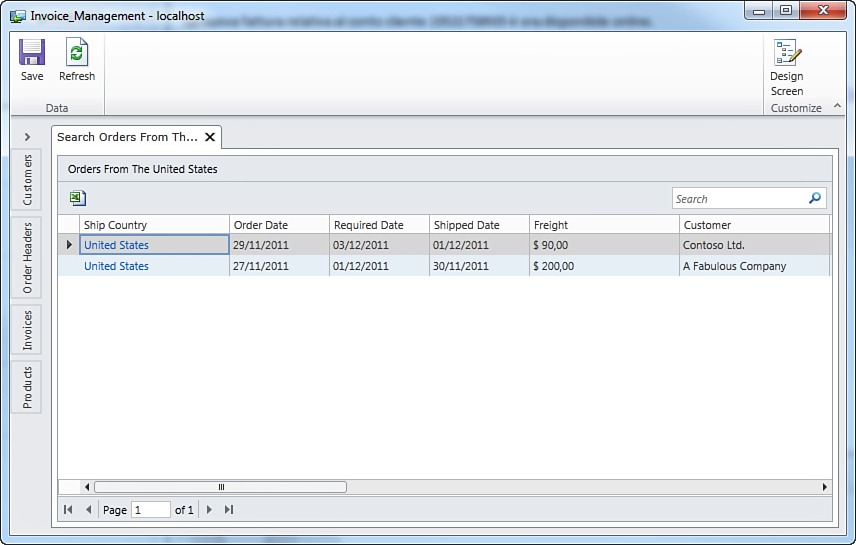
Figure 6.7. The filtered list of orders made by customers living in the United States.
Collapsing the Navigation Panel
You can collapse the navigation panel (the area that contains the list of available screens) by clicking the left arrow near the Menu item. This is useful if you want to take advantage of all the available space for showing data. Click the same arrow again to restore the navigation bar to its original state.
So now you understand how a filter works, but Visual Studio LightSwitch enables you to apply filters that are even more complex. For example, you can filter the list of orders by taking only items whose freight cost is greater than or equal to 100. In the Query Designer, pass the mouse over the Add Filter button and click the down arrow when it becomes visible so that you can see the Single and Group choices (see Figure 6.8).
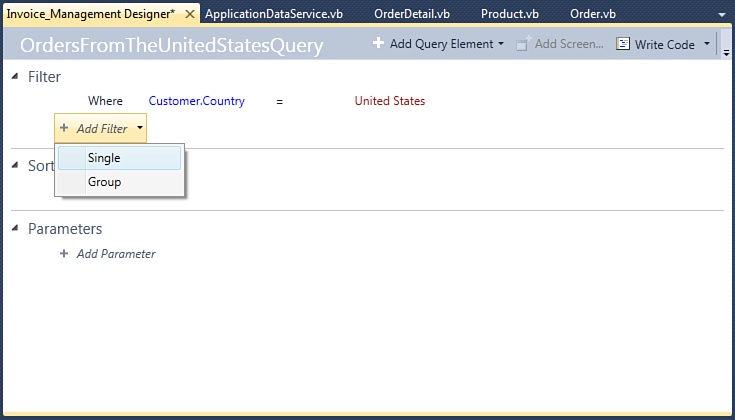
Figure 6.8. Adding a new single filter.
At this point, edit the new filter by specifying the And logical operator, and then the Freight property as the source to be filtered. Then select the Greater Than Or Equal To comparison filter and enter 100 as the comparison value. Figure 6.9 shows what the new filter looks like.
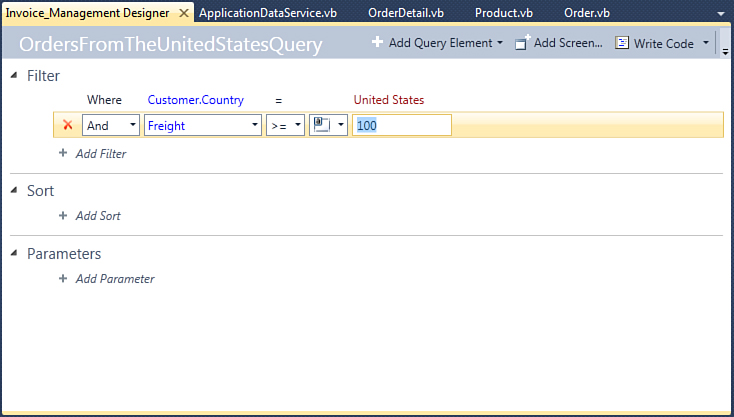
Figure 6.9. The new single filter completed, using an And logical operator.
If you now run again the application and then open the Search Orders From The USA screen, the application will display orders from customers living in the United States and whose freight cost is greater than (or equal to) 100. If you consider the complete list of orders shown in Figure 6.6, you expect just one result, as in fact happens (see Figure 6.10).
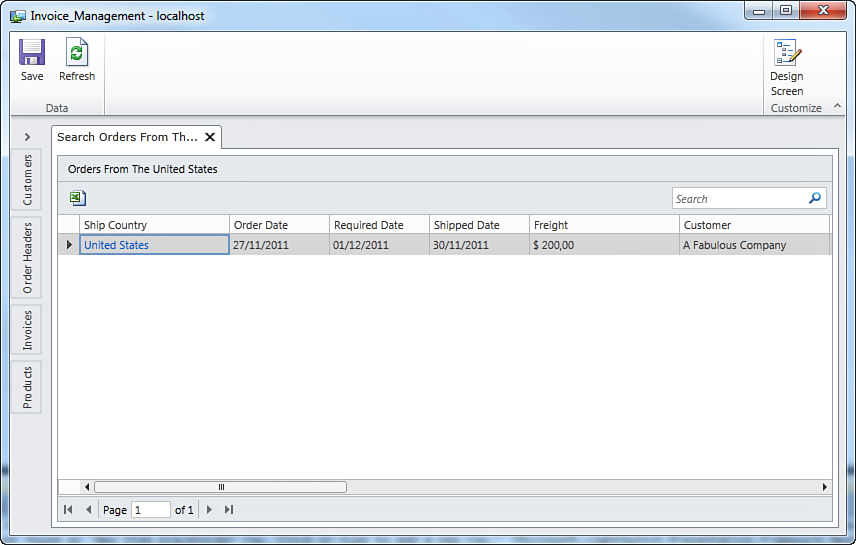
Figure 6.10. Two single filters combined, showing orders from customers living in the United States and with freight cost greater than/equal to 100.
Now close the application and go back to the Query Designer. Previously, you used the And logical operator, which basically returns a data set in which the two specified conditions need to be True. If you replace And with Or, the query will return all the items that match either the first or the second condition, which means a data set in which entities match at least one of the conditions. In the current example, this means getting entities where the customer lives in the United States and the freight cost is greater than, or equal to, 100. Figure 6.11 shows how the list appears if using Or.
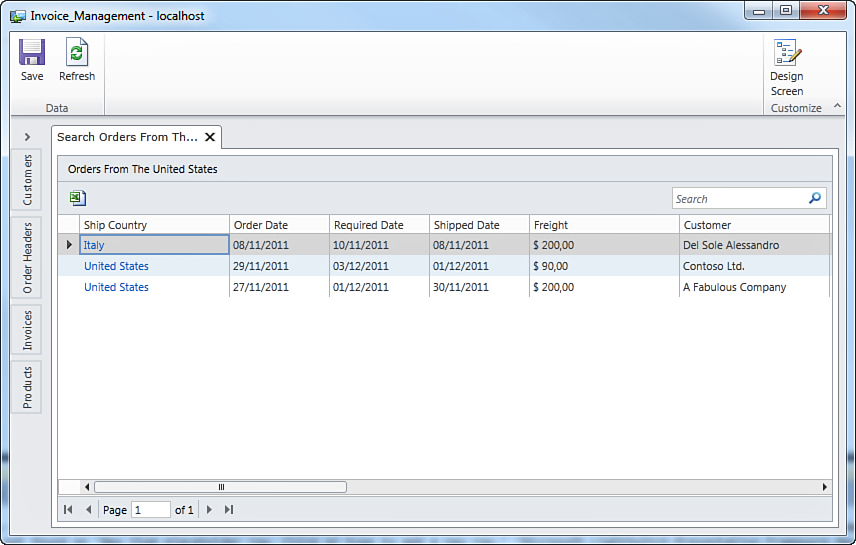
Figure 6.11. Using the Or logical operator to filter data.
All the query results retrieved so far required a literal as the comparison type. This is useful if you want to specify a static value.
By the way, you will sometimes want to compare entity properties without knowing their values. To understand this concept, consider the current customer/orders relationship. The Customer entity exposes a property named City, which represents the place where the customer resides. The Order entity exposes a property named ShipCity, which represents the place where products are shipped to the customer. It is not uncommon for the city where the customer resides and the one where products are shipped to differ; after all, a customer can have a subsidiary in a completely different city.
In this sort of context, you might be interested in retrieving all the orders shipped to a different city from the one where the customer resides. You can do so easily by comparing the Order.ShipCity property to the Customer.City property. And comparing entity properties offers another advantage: You do not need to know in advance the property values, because the comparison happens all at runtime. To apply this kind of filter, go back to the Query Designer and remove the previous filters by clicking the red cross to the left of the filter. Then, add a brand-new single filter. Leave unchanged the Where clause, and then select ShipCity from the first combo box. Then, select the inequality operator (< >) as the comparison operator; at this point, select Property as the comparison type, and in the last combo box, select the Customer.City property. Figure 6.12 shows what the designer looks like now.
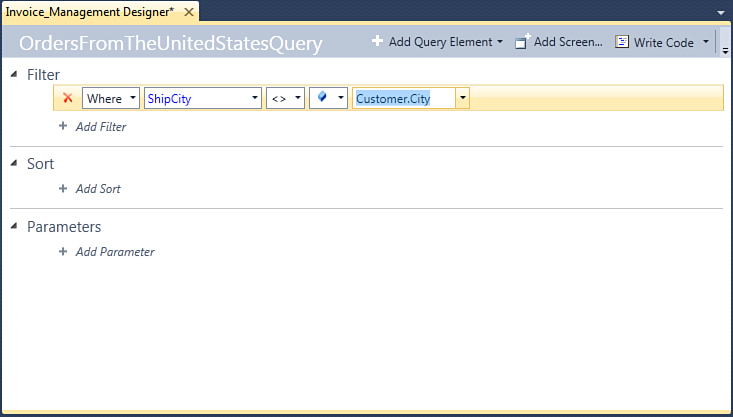
Figure 6.12. Comparing properties within a filter.
At this point, follow these steps:
1. Replace the query name with ShipCitiesDifferentThanCustomerCity.
2. Remove the Search Orders From The USA screen.
3. Add a new search screen, setting the new query as its data source.
When you run the application again, in the new screen you will be able to display all the orders shipped to cities different from the one where the customer resides. Now restore the query to filters shown in Figure 6.9. This is required for the last example in this chapter, which is about query inheritance.
Adding Group Filters
In addition to single filters, Visual Studio LightSwitch enables you to define sets of filters known as group filters. A group filter contains multiple filters that are evaluated as a unit, meaning that all filters in the group are evaluated together before any other filter in the query. This behavior recalls mathematical (or conditional) expressions in which a complex expression enclosed in parentheses is evaluated before any other expression in the block.
For example, suppose you want to monitor sales for a specific period by querying order details having an effective discount but whose price is less than 100. In addition, the result must return order details where the order date is between two specific dates. In Solution Explorer, double-click the OrderDetails table. At this point, the Entity Designer is ready and points to the OrderDetail entity. Click Add Query, and when the Query Designer is ready, rename the new query DiscountedOrderDetails. Then, select Add Filter, click the down arrow, and highlight the Group item, as shown in Figure 6.13.

Figure 6.13. Selecting a group filter.
When you click Group, LightSwitch adds a new combined filter that offers a Where clause at the root level that can be changed into Where Not. In addition, LightSwitch adds to the group a default filter that points to the first property in the selected entity and an Add Filter button that you can use to add new filters to the group. Figure 6.14 shows what the group looks like when it is created, before editing.
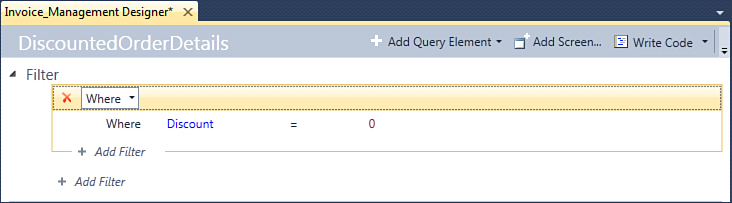
Figure 6.14. The new group filter showing the default settings.
Following the idea of the example described at the beginning of this subsection, we just need to replace the comparison operator from Equals (=) to Is Greater Than (>), leaving unchanged the other settings for the Discount property. At this point, you can add a new filter to the group by clicking the Add Filter button inside the group. Actually, this allows adding single or group filters. Select a single filter and leave unchanged the And logical operator, and then select the UnitPrice property and replace the comparison operator with Is Less Than (<). Then, specify 100 as the comparison value. At this point, you have two filters grouped inside the Where condition, which is at the root, as shown in Figure 6.15.
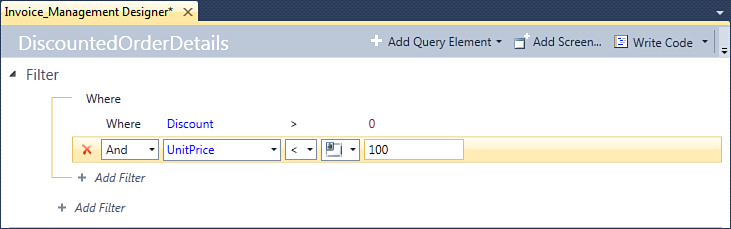
Figure 6.15. The new group filter is now completed.
To demonstrate how group filters are evaluated as a unit before other filters, click the Add Filter button that is bound to the Where condition at the root level via a relationship line. Here you can define the last filter as a single filter, out of the group one. For example, we decided that the last filter would extract details for orders received between two dates (say, between the first and the last day of November). Leave unchanged the And logical operator and select the Order.OrderDate property; the comparison operator will be Is Between, which allows choosing between a range. At this point, notice how LightSwitch automatically recognizes that OrderDate is of type Date, proposing two values compliant with this type. Set the first value of the range to 11/01/2010 and the second value to 11/30/2010. Now the complete filter looks like Figure 6.16.
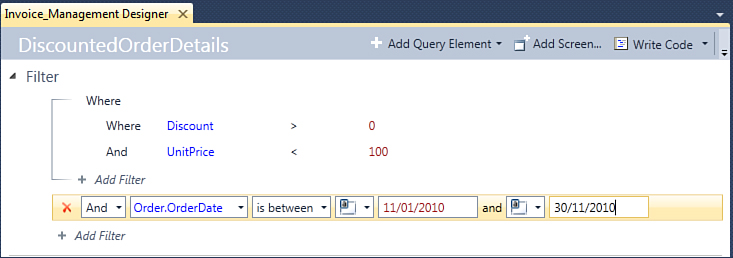
Figure 6.16. The completed set of filters.
Based on your acquired experience, now you just need a new screen to display the result collected by the new query. (You could certainly edit an existing screen to grab the query as the data source.) So, create a new search screen, selecting the new query as the data source and naming the new screen SearchDiscountedOrderDetails. Figure 6.17 shows the Add New Screen dialog.
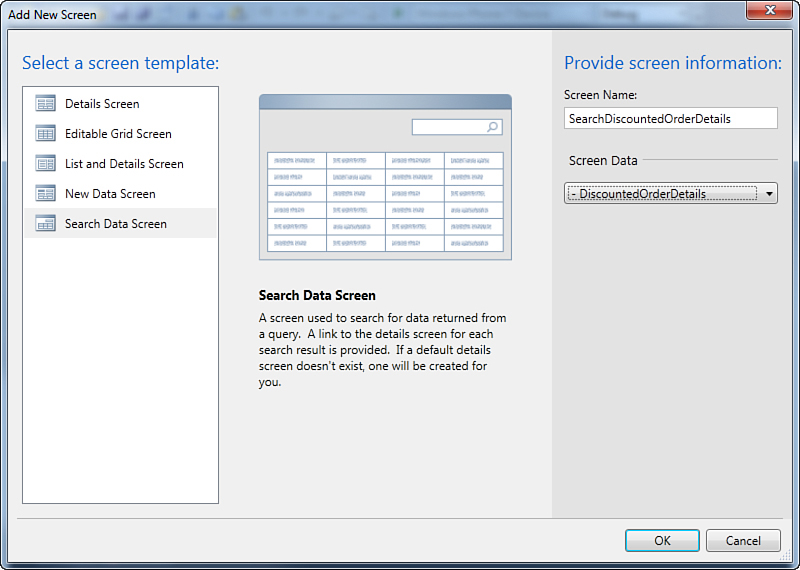
Figure 6.17. Creating a search screen for the DiscountedOrderDetails query.
When you run the application and open the new screen, you can display the list of order details having a discount value greater than 0 and a unit price less than 100, for the given period of time. Figure 6.18 shows an example of the query result.
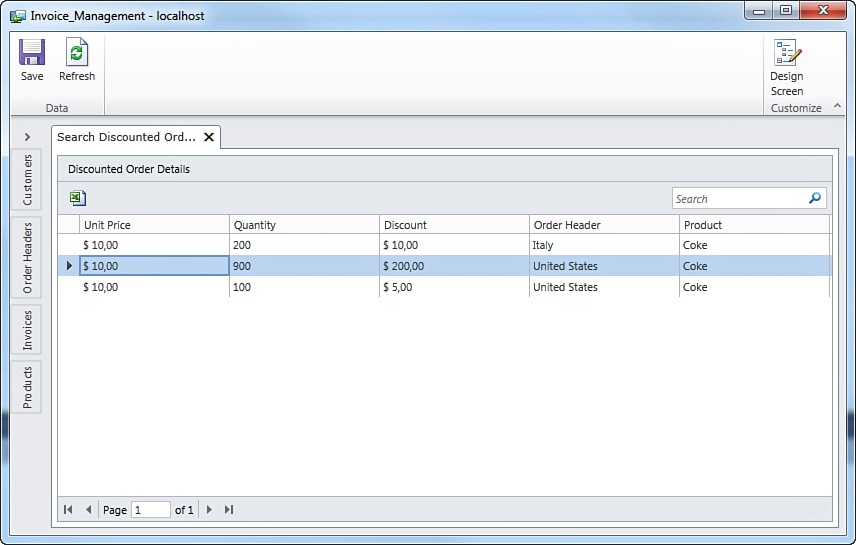
Figure 6.18. Filtering order details by discount and unit price, for a given period of time.
Although filters are really powerful, Visual Studio LightSwitch offers another great feature: query parameters.
Using Query Parameters
A query parameter is an object that you can pass to a query to constrain the query result to return only a specific data set. A typical example is when you want to retrieve orders for one customer: You pass the customer ID value as the parameter for a query that returns orders so that such a query restricts the result to the specified customer’s information. If you are familiar with SQL or LINQ terminology, this kind of scenario is known as parameterized query.
Query parameters are really useful because you can use them to dynamically filter query results. The word dynamically means that you can allow users to enter a value at runtime that you then pass to a query as a parameter. For example, you could ask the user to enter the customer identifier via a text box and then retrieve the list of orders based on the user input. As in lots of other scenarios, Visual Studio LightSwitch makes it easy to define query parameters and then show the query results in the user interface.
Among the plethora of possible examples, probably the most useful one is describing how you use parameterized queries with lookup tables, which is exactly the scenario described earlier: You have an entity (for example, a customer), and you want to retrieve a data set related to that entity, which is stored in a different table (for example, orders). As we continue to work on the Invoice Management application, the goal is now to show a list of orders for the specified customer, based on the customer identifier that will be entered by the user while the application is running. So in Solution Explorer, right-click the Orders entity collection and select Add Query. Rename the new query to OrdersByCustomerIdQuery and click Add Parameter. Here you just need to supply a parameter name and its data type. To accomplish our goal, we need a parameter to be compared with the Customer.Id property (which is an integer) for each instance of the Order entity. So, in the Parameter text box, enter CustomerId, and in the Type box, select Int32. The new query parameter looks like Figure 6.19.
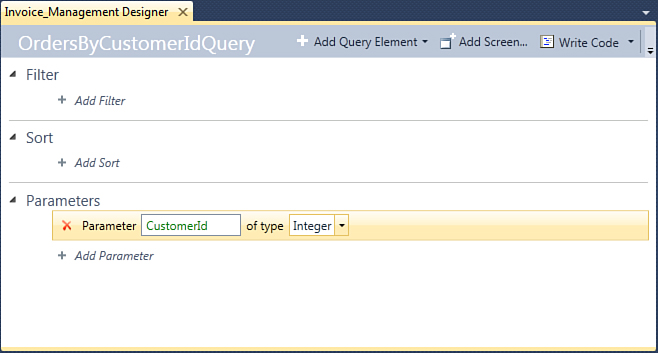
Figure 6.19. Creating a new query parameter.
Now that you have a parameter, you need to associate it with a filter that compares it to the desired entity property. To do so, click Add Filter, and then follow these steps:
1. Specify a Where condition.
2. Select the Customer.Id property. This is the property that will be compared to the query parameter, for each instance of the Order entity.
3. From the Comparison Type combo box, select Parameter.
4. From the last combo box on the right, select the CustomerId query parameter that you created previously.
At this point, the filter looks like Figure 6.20.
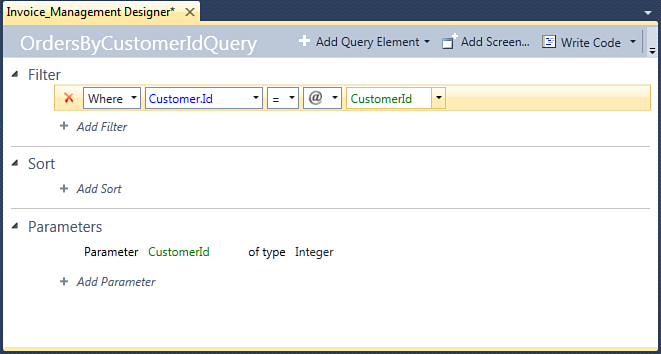
Figure 6.20. The new filter compares an entity property to a query parameter.
Instead of adding first a query parameter and then a filter, you can create a new query parameter directly from within the Filter Designer. In fact, when you click the combo box where you specify the parameter name. If no parameter has been defined yet, you can click Add New and create the new parameter.
Now that you have a query parameter, you need to add a screen, and this happens exactly as with other queries. In the Query Designer, click Add Screen. For this particular example, the most appropriate screen templates are the Search Screen and the Editable Grid templates, but to make the user’s life easier with regard to editing data, the best choice is the Editable Grid Screen template. Figure 6.21 shows what the Add New Screen dialog looks like when you associate the newly created query with the screen template.
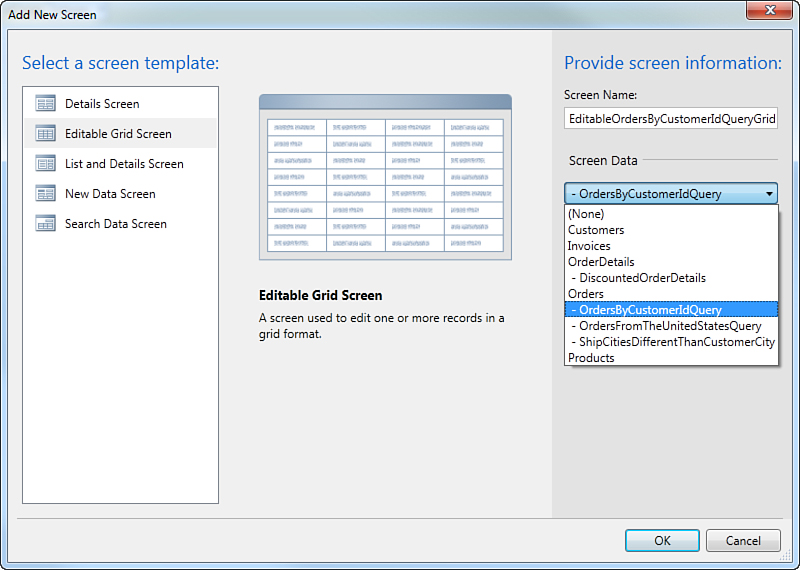
Figure 6.21. Creating a new screen based on the parameterized query.
When the new screen is ready, you will see in designer a Data Grid control, which is typical for this kind of screen, and a TextBox control named CustomerId. The reason is that Visual Studio LightSwitch is powerful enough to understand that the screen needs to pass a parameter to a query and so automatically implements a control that allows users to enter some input. By the way, this implies that the user manually types the customer identifier; however, we want to make things more user-friendly and allow the user to choose the customer from a drop-down list. To accomplish this, remove the CustomerId text box from the designer. (Right-click the control and then choose Remove.) Now, before implementing a control that allows users to pick from a list of customers, you need such a list as a data source. Visual Studio LightSwitch enables you to provide screens with additional data sources via the Add Data Item button. Click this button, and you will see a new dialog named Add Screen Item, as shown in Figure 6.22.
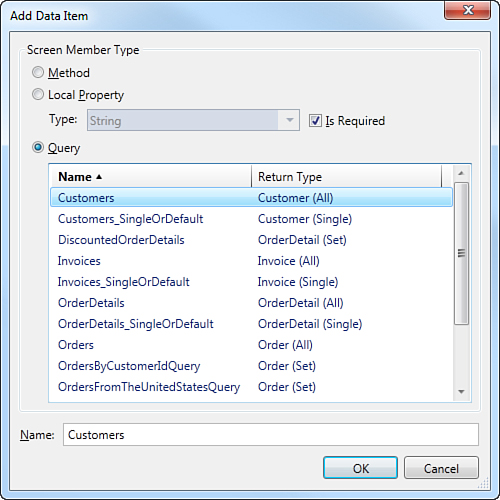
Figure 6.22. The Add Screen Item dialog.
This is a very interesting dialog in that it enables you to enhance the screen with additional data sources, which can be of the following types:
• Methods that return a result.
• Properties of the specified type.
• Queries. LightSwitch provides a number of built-in queries that return the full list of items from a collection of entities or a single item from a collection.
All these additional data sources can be data-bound later to the screen, although this is not mandatory. In this case, you need the complete list of customers as a data source because it is from where the user will select one customer. So, select Queries and then the Customers item (see Figure 6.22). You can eventually replace the default name with a different one. When you click OK, the new data item is added to the Screen Designer, but it is not added to the user interface. You can find it on the left of the designer, as shown in Figure 6.23.

Figure 6.23. The new customer collection is added to the screen designer.
This is important because you can work with data at the screen level without modifying the user interface. The next step is to add to the Screen Designer a new property, this time of type Customer. This will represent the single customer that the user will select on the screen. So, click Add Data Item again, and in the Add Screen Item dialog select the Local Property object, and in the Type box, select the Customer type. Then rename the new property to SelectedCustomer. Figure 6.24 shows the result of these steps.
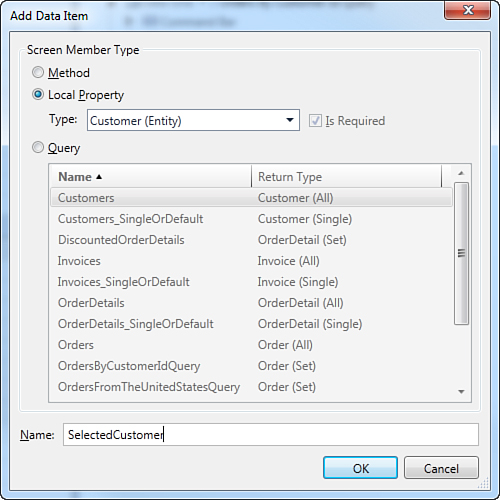
Figure 6.24. Adding a new local property.
When you click OK, notice that the new item is visible on the Screen Designer. Now you need to bind the new property to the user interface. To do so, drag the SelectedCustomer property onto the Screen Designer between the Screen Command Bar element and the Data Grid control. Figure 6.25 shows the result of the previous steps.

Figure 6.25. The screen designer after dragging the SelectedCustomer property.
In Figure 6.25, you can see that a highlighted item named CustomerId, which is related to the OrderCollection data item. This makes sense because the collection of orders will be filtered according to the CustomerId. However, because this is supplied at runtime, it cannot be considered as a parameter with a value now. Therefore, you need to leave unselected the Is Parameter option in the Properties window.
It is important to emphasize that another CustomerId element is nested inside the Query Parameters item. This is the item in the collection that must be data-bound to the query parameter. So, select such an item and then open the Properties window. Note the presence of a property called Parameter Binding, which you need to populate with a valid value (in this particular case, the Id property of the selected customer). Fill the property value with SelectedCustomer.Id. Note that LightSwitch helps you to specify the value while typing, as shown in Figure 6.26.
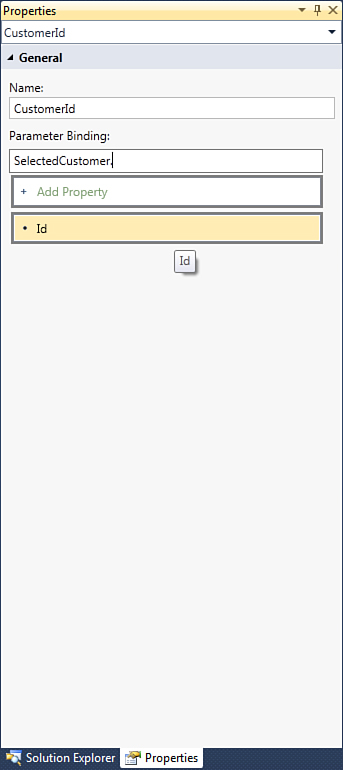
Figure 6.26. LightSwitch helps you populate data-bound property values.
If you are now wondering what the next step is, the answer is easy: Run the application. In fact, no other steps are required. In all honesty, however, there is a final step before pressing F5, which is rearranging the new screen position in the Screen Navigation control. Now that you have placed the new screen in a more convenient position, press F5. When the application is running, open the OrdersByCustomerIdEditableGrid screen. The new screen shows a combo box at the top from which you can pick a customer from the list. When you do so, related orders will display in the data grid at the bottom, as shown in Figure 6.27.
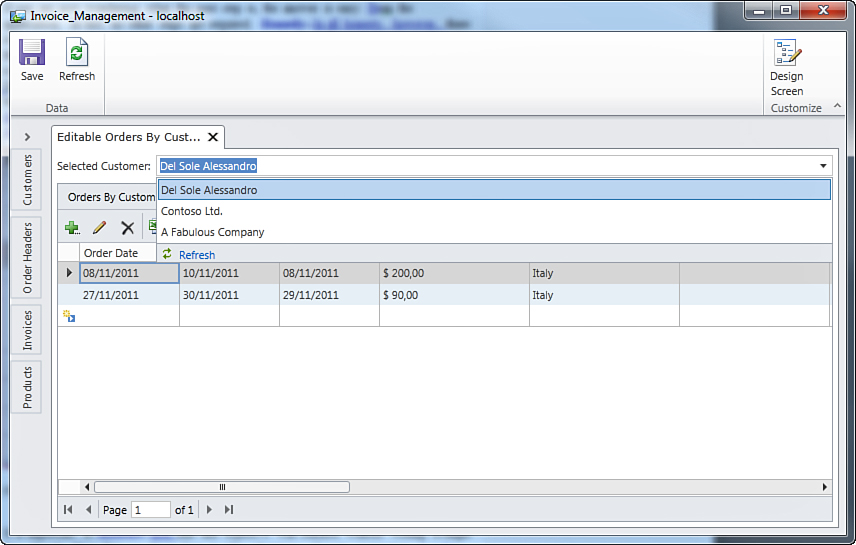
Figure 6.27. The new screen allows working with lookup tables via query parameters.
It is important to note that this objective was reached without writing a single line of code. Now that you know how to take advantage of query parameters to make more-complex things in your business applications, you have a full vision of queries and filters in Visual Studio LightSwitch. Now it is time for you to learn to customize queries by writing some lines of code.
Customizing Queries in Code
So far, you have built queries with filters in LightSwitch without writing a single line of code. But, sometimes the Query Designer will not completely satisfy your needs. For example, you might want to retrieve only the first 20 orders from a specified customer, and this cannot be accomplished by using only the designer. This makes sense because it is a general-purpose tool and cannot predict every possible scenario. Fortunately, however, you are still allowed to customize your queries by writing code. You usually extend queries in code when you need filters that are not supported by the designer, as in the following situations:
• Operations with numeric values and LINQ aggregation operators, such as Sum, Count, and Aggregate
• Partitioning operations, which you accomplish via the Skip and Take clauses
• If you need to reference the many side of a one-to-many relationship
These are the most common reasons why you might want to write custom code for queries, but this is not a requirement. In fact, you might simply want to customize the behavior of an existing query, or you are experienced with LINQ and you prefer writing queries on your own. The amount of code you will write depends exclusively on how complex the query is that you want to implement.
Customizing queries is basically a task that extends existing queries. For example, suppose you want to extend the previous parameterized query named OrdersByCustomerIdQuery to sort the list of orders by the shipment date and to take only the first 20 items. Actually, you can set the number of items on the screen by selecting the query in the upper-left corner of the Screen Designer and then by setting the Number of Items to Display per Page property, but you might want to know how this can be done in code.
To accomplish this, you need to override the existing query in code. Visual Studio LightSwitch enables you to override an existing query. You just click the Edit Additional Query Code hyperlink in the Properties window when you are in the Query Designer. Figure 6.28 shows this hyperlink in the Properties window when working with the OrdersByCustomerIdQuery query.
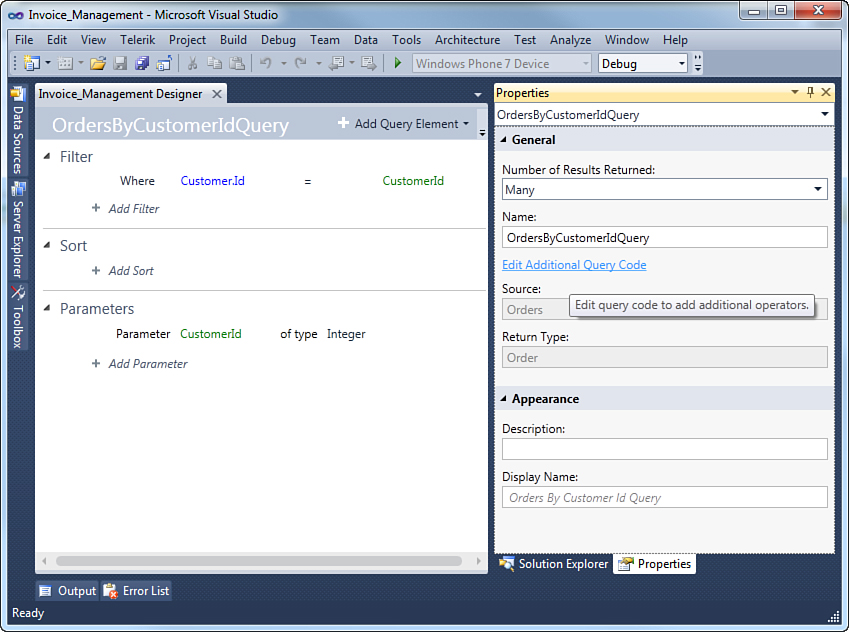
Figure 6.28. The Edit Additional Query Code hyperlink is located in the Properties window.
Because queries run on the middle tier, the code you edit resides in the ApplicationDataService class. Visual Studio LightSwitch therefore generates a method stub in the ApplicationDataService.vb code file that looks like this:
Private Sub OrdersByCustomerIdQuery_PreprocessQuery(ByVal _
CustomerId As System.Nullable(Of Integer),
ByRef query As System.Linq.
IQueryable(Of Invoice_Management.Order))
End Sub
This method has the following features:
• It is invoked when the system raises the PreprocessQuery event.
• It takes two parameters: The first parameter is nothing but the .NET representation of the query parameter that was supplied via the designer, and the second one is a variable representing the query result and it is of type IQueryable(Of Order).
• The second method parameter is passed by reference, so the code that will process the query will simply assign such a variable with the query result, so that it will be returned to the caller.
After you have the method stub, you need to implement the query. To reach the proposed objective (which is taking only the first 20 orders sorted by shipment date), you can write the following LINQ query:
Private Sub OrdersByCustomerIdQuery_PreprocessQuery(ByVal _
CustomerId As System.Nullable(Of Integer),
ByRef query As System.Linq.
IQueryable(Of Invoice_Management.Order))
query = From ord In query
Where ord.Customer.Id = CustomerId
Order By ord.ShippedDate
Select ord
Take 20
End Sub
Notice how the Order By clause in the LINQ query sorts orders by shipment date; then notice how the Take operator picks up the first 20 items. Then the query result is assigned to the query variable, which is returned to the caller (typically the screen). You can easily demonstrate how the revisited query works by simply running the application and opening the Orders By Customer Id Editable Grid screen. You can also navigate relationships when writing code to retrieve more-complex query results. For example, you might want to rewrite this query to retrieve the list of orders only where the given customer purchased products belonging to the category Beverages. This is obtained via the following code, which demonstrates how multiple From clauses can navigate between related entities:
Private Sub OrdersByCustomerIdQuery_PreprocessQuery(ByVal _
CustomerId As System.Nullable(Of Integer),
ByRef query As System.Linq.
IQueryable(Of Invoice_Management.Order))
query = From ord In query
From det In ord.OrderDetails
Where ord.Customer.Id = CustomerId
Where det.Product.Category = 3
Select ord
End Sub
Notice how you browse products for each order detail by first referencing the OrderDetails collection related to each order and then by accessing the single Product instance for each order detail. About the category, the value of 3 was established in the choice list for the Category property in the Product entity definition back in Chapter 4 and represents the Beverages category.
Overriding PreProcessquery for Built-in Queries
Similar to what happens for custom queries, where you customize the PreProcessQuery method, you can override this method for built-in queries. For example, you can override the default behavior for the *All queries (such as Customers_All, OrderHeaders_All, and so on) by writing a custom version of PreProcessQuery for the given entity set, such as Customers_All_PreProcessQuery. Of course, this affects the entire system, so this technique should be never used except when absolutely necessary.
Actually, things can be also easier, because writing a custom query based on a parameterized query is optional. You can, in fact, write a custom query even if you have no filters defined in the designer. This proves useful when you want to filter in code a full collection of entities without parameters but the built-in filters do not satisfy your requirements.
For example, suppose you want to retrieve the top five customers based on the amount they spent to buy your products. The amount must be determined by summing expenses from unit price for each order detail. (This could also be determined by summing expenses from invoice total amounts, but LightSwitch does not support querying computed properties, which is the approach used in Chapter 4.) Although the Query Designer allows filtering customers, it does not allow summing values from a related entity, so you need to write custom code.
For a better understanding, it is a good idea to write a practical example. In Solution Explorer, double-click the Customers collection, and then follow these steps in the Entity Designer:
1. Click Add Query to enable the Query Designer. You can also right-click an entity set in Solution Explorer and then select Add Query directly.
2. Rename the new query to MostActiveCustomers.
3. In the Properties window, click the Edit Additional Query Code hyperlink.
At this point, Visual Studio LightSwitch generates a new method stub, which looks like this:
Private Sub MostActiveCustomers_PreprocessQuery(ByRef _
query As System.Linq.
IQueryable(Of Invoice_Management.Customer))
End Sub
You can immediately notice that the new method this time takes just one parameter of type IQueryable(Of Customer). The difference with the previous example is that now you are not working with a query parameter, but with an entity collection as a whole. The code for the query searches for customers who have related invoices, sorts the price amount by the sum value, and then picks up the top five customers. This is translated into the following LINQ query:
Private Sub MostActiveCustomers_PreprocessQuery(ByRef _
query As System.Linq.
IQueryable(Of Invoice_Management.Customer))
query = From c In query
From o In c.OrderHeader
Let total = Aggregate d In o.OrderDetails
Into Sum(d.Quantity * d.UnitPrice)
Where c.Invoices.Any
Order By total Descending
Select c Take 5
End Sub
As a general rule, the Aggregate clause performs a computation over a set of values. In this particular case, it performs a computation over each item in the OrderDetails entity set and for each item multiplies the order detail quantity by the order detail unit price. The result of this operation is put into Sum, which is an aggregate function that stores the result of the sum of all the elements in the collection. You can find more information about the Aggregate clause and aggregate function in the MSDN Library: http://msdn.microsoft.com/en-us/library/bb531251.aspx. If you want to see how this query works, simply add a new search screen pointing to the MostActiveCustomers query as the data source. When you run the application, you will see the top five customers based on what they paid to buy your products (assuming you have enough customers in your database). Now that you know how to move in the queries world in LightSwitch, you are ready for the next step: sorting data. But first, a complete discussion about queries should include how they are executed, and so we discuss this next.
Understanding the Query Event Model
Query execution follows a standard process, and this is true for both built-in queries and for custom queries, no matter if the query has been simply designed or extended in code. During this process, you can customize the query execution process (which occurs on the server) by adding custom code at each step, except for the one in which the query is actually processed. Each step in this process is represented by a .NET event. Events in the query execution are then divided into two main categories: general and security. General events simply represent a particular step in the query execution, such as PreprocessQuery, which you saw in the previous examples. Table 6.2 summarizes general events, and the order in which items are listed in the table represents the process.
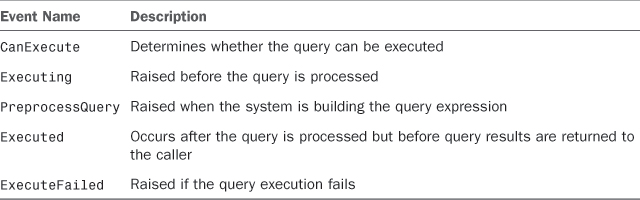
When a query has to be executed, the LightSwitch runtime ensures it can be executed by checking whether the condition established in CanExecute is True. This generally involves security permissions. (For example, the user has permissions to execute the query so CanExecute returns True). Another example is checking that an item is selected within a list so that a query on that element can be executed (in other words, ensuring that the query does not receive a null value). The next step is represented by Executing, which is used to modify the transaction scope semantics, but it is commonly not used because LightSwitch is responsible about this for you. Next, PreprocessQuery is the moment in the process in which you actually inject your custom code to modify the behavior of a query. The final step in the process is constituted by Executed. If an error occurs, however, the ExecuteFailed event is raised, and the error is returned to the caller. You usually interact in code with CanExecute and PreprocessQuery. Other events are automatically handled by LightSwitch, and you do not need to extend them in code in most cases.
Applying Filters at the Screen Level
Visual Studio LightSwitch enables you to apply filters directly against screens, instead of applying them at the data source level. Filters at the screen level run on the client, and therefore you cannot write custom queries in code (which instead run on the server), and so they have limitations from this point of view. Generally, you use filters within screens when you want to apply simple filters that do not need to involve the middle tier. For example, suppose you want a screen to display the list of orders in which the shipment country is the same as the country in which the customer resides. You can create a new screen or edit an existing one, but for the sake of simplicity, add a new screen and select the Orders collection as the data source. Then name the new screen SearchOrdersByCustomerCountry, as shown in Figure 6.29.
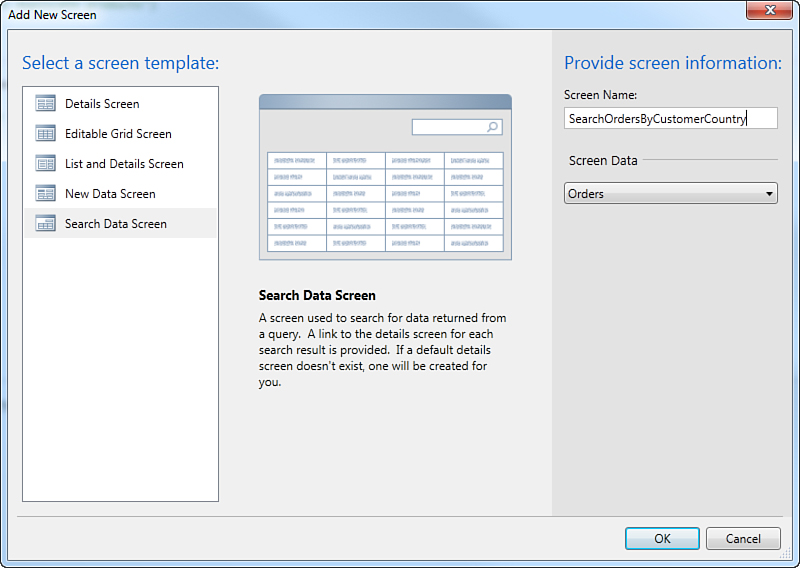
Figure 6.29. Creating a new screen as the base for a custom filter.
On the left of the designer, click the Edit Query hyperlink near the OrderCollection element. Doing so opens the Query Designer, which is actually similar to the design environment you saw in the previous section, except that the Properties window for the query does not offer a button to edit custom code. At this point, add a new filter by following the steps you learned previously. In this case, you can compare two entity properties, which was the only scenario that was not covered before. So, the filter requires the following:
• A Where condition
• The ShipCountry property as the first comparison element
• The equality operator
• The Property element as the comparison type
• The Customer.Country property as the second comparison element
The filter in the Query Designer looks like Figure 6.30.
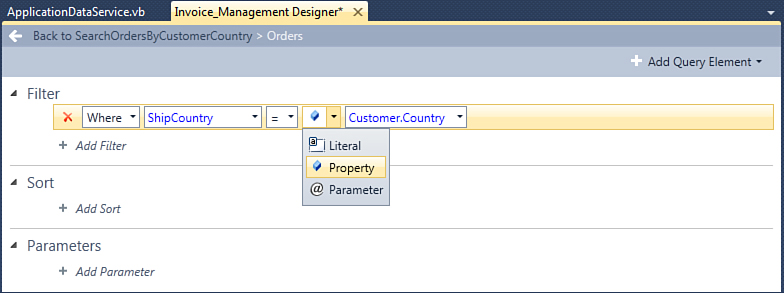
Figure 6.30. The new filter compares two properties.
Now you can just run the application and open the newly created screen and you will be able to restrict the display of orders to only those where the ShipCountry property overlaps the value of the Country property of each Customer instance. Figure 6.31 shows an example of the result you can obtain.
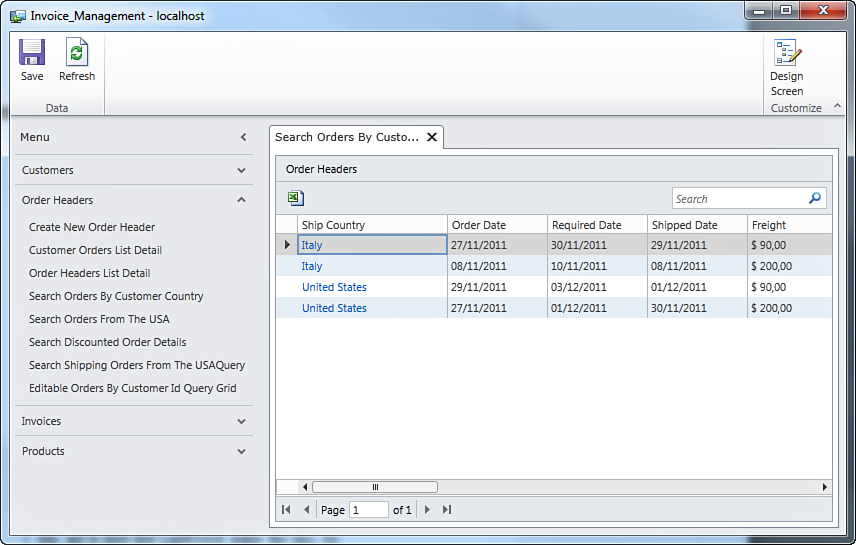
Figure 6.31. The result of the new filter at the screen level.
The discussion about filters at the screen level signals the end of the first part of this chapter, in which you learned how to build and customize filters. Now it is time to discuss another important requirement in business applications, sorting data, and to show how LightSwitch makes this easy, too.
Applying Sorting Logic
Sorting is a technique that allows ordering a list of items by a specified criterion; that is, you can specify the order in which items are displayed. If you are familiar with LINQ or with SQL syntax, this is what an Order By clause does. In LightSwitch, the criterion is represented by an entity property. By default, the LightSwitch infrastructure orders list of entities by their identifier, which is the value of the Id property (or the identity property, if we think in a SQL-oriented fashion). Of course, you can choose a different criterion for sorting data, and you can combine multiple criteria to sort data in a custom logical order.
In the LightSwitch development, the sorting logic is a part of a query, exactly as filters are. As for filters, the sorting logic can be applied both at the data level and at the screen level. The difference is the same as in filters: When you apply your sorting logic at the data level, you are allowed to customize the code, but this is not possible when sorting at the screen level. The following subsections describe both scenarios.
Sorting at the Data Level
To provide your own sorting logic, you still use the Query Designer that you saw in action earlier in this chapter. By implementing your own sorting logic, you replace the default behavior that sorts lists of items by their identity number. For example, suppose you want to show an ordered list of customers by the company name. In Solution Explorer, right-click the Customers collection, and then select Add Query. When the Query Designer is ready, rename the new query to SortedCustomersQuery. In the Sort node of the designer, click Add Sort. Here you just have to specify the entity property you want to sort items by and the order, which is Ascending (from the smallest value to the biggest) or Descending (from the biggest value to the smallest). Select the CompanyName property. Notice that when working with fields of type String, sorting is applied by alphabetic ascending or descending order. Figure 6.32 shows how the new sort appears in the designer.
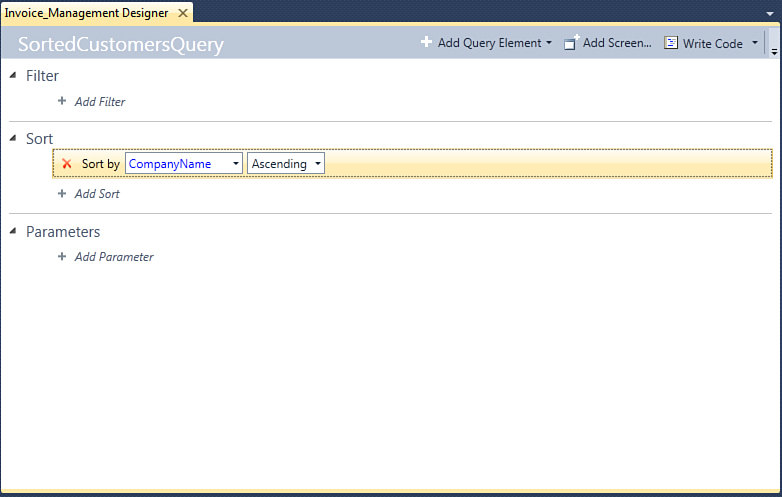
Figure 6.32. Applying custom sorting logic.
Now there is a problem: The new sort item that you provided is not automatically reflected into the customers list, so you need to create a new search screen that points to the current query as the data source, to display sorted items (or you could remove the existing Search Customers screen and add a new one with the same name pointing to the current sorted query). The reason is that you are working at the data level and so the sorting logic affects a data source, not a screen. If you want to avoid this and have changes automatically reflected to the list, you need to apply the sorting logic at the screen level, as described later.
Assuming you created a new search screen that displays the sorted list of customers and that you ensured this works, you can add additional sorting conditions. In LINQ or SQL terminology, you can add some Then By clauses. For example, suppose you want to additionally sort the list of customers by the country where the customer lives, from Z to A. Click Add Sort again and you will see a Then By element appear. Select the Country property and the Descending order. Figure 6.33 shows how the multiple sorting elements appear in the designer.
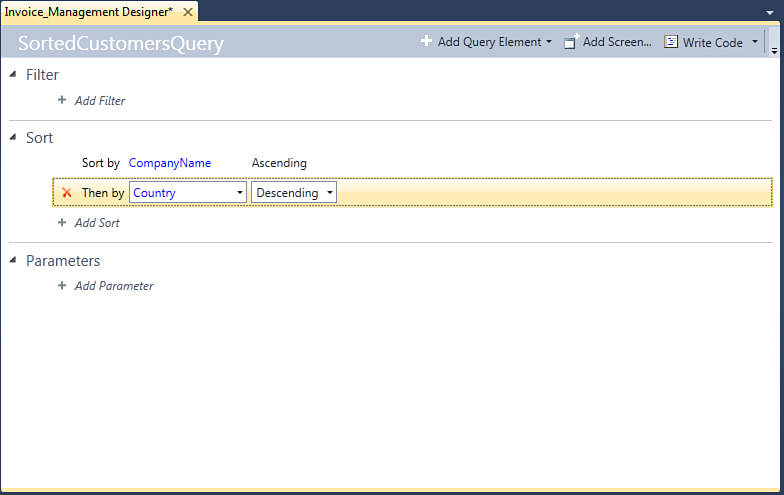
Figure 6.33. Providing multiple sorting items.
If you have a screen associated with the current query, the list of items is first ordered by the CompanyName property and then by the Country one. This is how you apply your own sorting logic at the data level. Before discussing how it happens at the screen level, however, let’s review the intermediate step: writing custom code.
Sorting in Code with LINQ
As mentioned previously, the sorting logic is a component of a query, exactly as with filters. Therefore, the query can be still extended in code and follows the process described earlier with regard to filters. This can be easily demonstrated. In Figure 6.33, you can see that an Edit Additional Query Code hyperlink is still available in the Properties window, although you specified no filters. If you click such a hyperlink, you will be able to customize the query exactly as you did for filters. In fact, Visual Studio LightSwitch generates the following method stub, which is again related to the PreprocessQuery event:
Private Sub SortedCustomersQuery_PreprocessQuery(ByRef _
query As System.Linq.
IQueryable(Of Invoice_Management.Customer))
End Sub
This raises two considerations:
• The sorting logic can be customized in code (for example, by using LINQ and Order By clauses).
• To customize the sorting logic in code, you must write a query that returns the list of items (in this case, the collection of customers).
The following code demonstrates how you would write in code the sorting logic applied at design time:
Private Sub SortedCustomersQuery_PreprocessQuery(ByRef _
query As System.Linq.
IQueryable(Of Invoice_Management.Customer))
query = From cust In query
Select cust
Order By cust.CompanyName
Order By cust.Country
End Sub
Actually, writing custom code only for applying your own sorting logic does not make much sense because you would only write the query and then apply the Order By clauses as required. Instead, writing custom code is useful when you want to combine custom filters with custom sorting logic, as you saw in the previous section with regard to the MostActiveCustomers_PreprocessQuery method, which combined a Where clause (a filter) and an Order By clause (sorting). In a few words, because writing code affects the query as a whole, use the code editor only when you really need to combine both features and not just to sort logic.
Sorting at the Screen Level
In most situations, applying custom sorting logic is something well suited for the screen level because you do not need to write code and you do not need to create new screens because you can just specify how the screen must display the data. For example, suppose you want to specify how the existing SearchCustomers screen should display an ordered list of customers. Double-click the screen in Solution Explorer, and then click the Edit Query hyperlink near the CustomerCollection element, in the upper-right corner of the designer. This will show the Query Designer for the screen. At this point, reproduce the same sorting logic represented in Figure 6.33 and notice how there is no possibility for writing custom code. (You are, in fact, working at the screen level, as you did for filters.) If you now run the application and open the existing SearchCustomer screen, you see how it displays an ordered list of customers according to the specified criteria. Figure 6.34 shows an example.
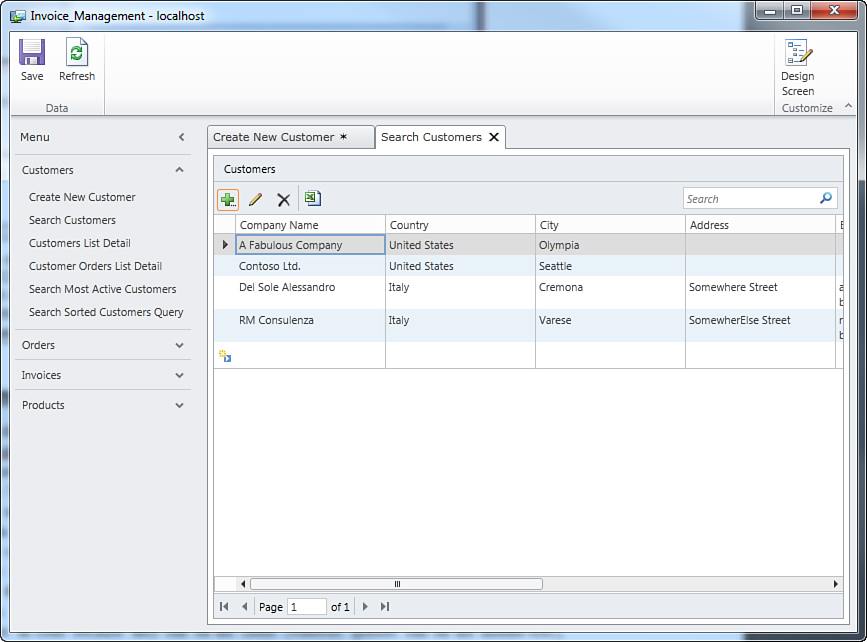
Figure 6.34. An example of data sorted at the screen level.
Sorting at the screen level does not affect the data source or the middle tier, so it can be really convenient.
Basing Queries on Other Queries
A great benefit in LightSwitch is that you can reuse queries by creating new queries built on existing ones, as a kind of inheritance. This should not be surprising. In fact, when you create new queries from scratch, the newly created query is just extending the built-in one that you decided to customize.
For a better understanding, consider the OrdersFromTheUnitedStatesQuery created earlier. This query is built on the built-in OrderHeaders_All query and has been enhanced with specific filters, without losing the behavior of the source query. The same logic applies to custom queries: You can create a new query built on an existing custom query, and the new one will inherit filters and parameters specified in the source query.
Continuing the example of the OrdersFromTheUnitedStatesQuery query, suppose you want to create a new query that still returns orders from customers residing in the United States, but only if such orders are about to ship, meaning that the required date is equal to or greater than (later than) today and the shipped date is not null. To accomplish this, in Solution Explorer, right-click the OrderHeaders entity set and select Add Query. Name the new query ShippingOrdersFromTheUSAQuery, and then from the Source combo box, which you can see at the upper-right corner of the designer, select OrdersFromTheUnitedStatesQuery rather than OrderHeaders, as shown in Figure 6.35.
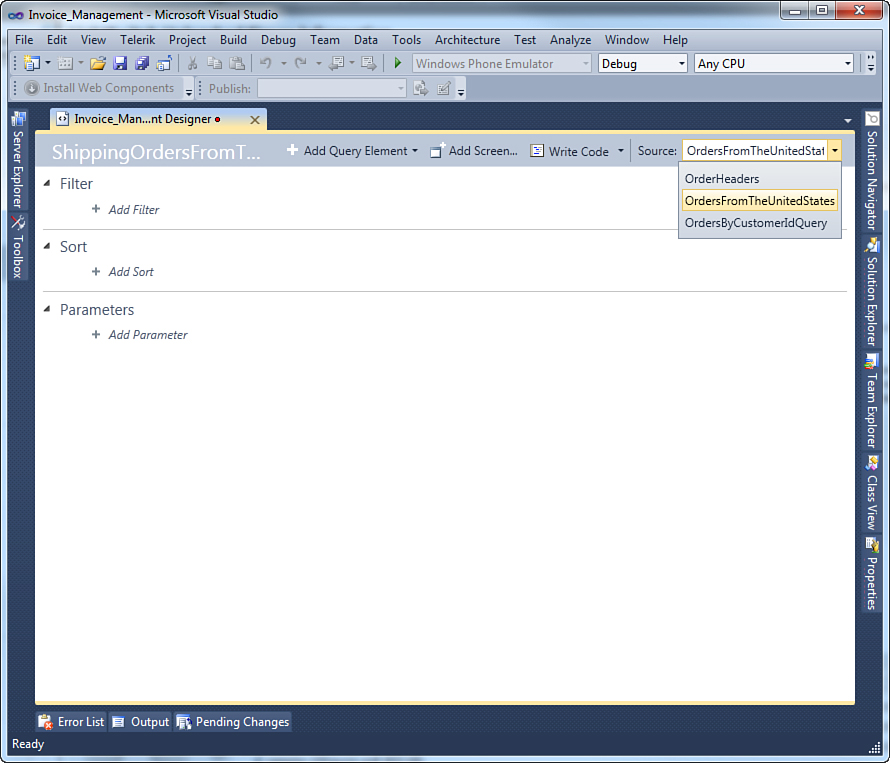
Figure 6.35. Selecting the source for the query.
At this point, the query inherits filters, sorts, and parameters from the source query. Parameters are visible on the designer, whereas filters and sorts are not.
Inheritance from Parameterized Queries
Notice that if you are basing a new query on the inheritance from a parameterized query, the inherited parameters are not editable in the designer, although they are still accessible in PreProcessQuery.
Take a look at Figure 6.9 to understand what the new query is inheriting from the source query. The next step is to add filters specific to the new query. By following the lessons learned at the beginning of this chapter, add a new single filter of type Where, pointing to the ShippedDate property. Then select is null as the comparison operator (which means retrieving orders that have not been shipped yet). Then, add a second filter of type And pointing to the RequiredDate property. Select Is Greater Than Or Equal To as the comparison operator, and then move to the Comparison Type box. When working with dates, LightSwitch offers an additional comparison type, called Global. This special comparison type makes it easy to select dates based on a particular moment in time (for example, Now, Today, End of Day). So, select Global as the comparison type and Today as the comparison value, as shown in Figure 6.36, which also shows the full list of available values.
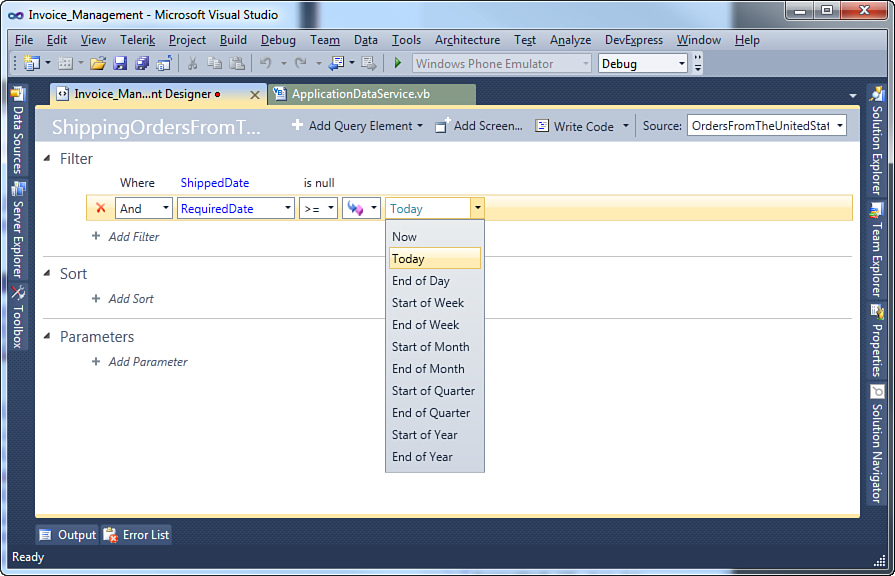
Figure 6.36. The new filter of type Global allows easy date manipulation.
As a summary, the new query will execute the following filters:
• A Where condition, which filters customers whose Country property is equal to United States.
• An And condition that works in conjunction with the previous one, which filters orders whose Freight property is greater than or equal to 100. The previous condition and the current one are inherited from the source query.
• A Where condition that filter orders whose ShippedDate property is null.
• An And condition that works in conjunction with the previous one, which filters orders whose RequiredDate is greater than or equal to Today.
As for previous examples, you need a search screen to display the result of the new query. Based on the orders that you entered into the application, you will see a result filtered according to the query criteria. In addition, you can still edit the query code exactly as you learned previously, which means editing the PreProcessQuery method. With this approach, you learned how to reuse an existing query and thus how to save time by implementing only the new features you need.
Make a Backup Copy of the Application
Make a backup copy of the sample solution because every example in the following chapters will extend the application created so far. For this reason, making a backup copy will make your life easier.
Summary
This chapter covered some important concepts in data-centric applications, as applied to the LightSwitch development environment. Queries are the way in which data-centric applications retrieve collections of items from a data source, and LightSwitch implements built-in queries that return a full list of items or a specific instance of an entity. Via a unified Query Designer, you can filter and sort data according to your custom criteria, and you can combine multiple filters and sorting logic to get complex query results.
Filters and sorting applied to the data source run on the server, and in this case, you can also customize how the query works by extending it in code. This is the ideal place to write custom queries using LINQ. When applying filters and sorting at the screen level, you cannot customize queries in code because they run on the client (whereas queries run on the middle tier).
In this chapter, you also learned how to create queries based on existing ones and thus take advantage of inheritance. Upon completion of this chapter, you now know how to do quite a few things with LightSwitch; but there’s even more. In the next chapter, you learn how to extend applications with buttons, extensions from other developers, and COM automation.