Chapter 17. Implementing Printing and Reporting
In This Chapter
• Using the Office Integration Extension
• Using SQL Server Reporting Services
• Reporting Extensions from Microsoft Partners
• Using Custom Controls for Printing and Reporting
Without a doubt, creating and printing reports are two common requirements that a business application must meet. As you learned back in Chapter 3, “Building Data-Centric Applications,” business applications created with LightSwitch include a built-in feature that enables users to create basic reports by exporting the content of a data source into a Microsoft Excel workbook.
In most cases, this is not enough; and in the first version of LightSwitch, there are no reporting functionalities available out of the box, so you need a way to implement your own reporting features. Actually, you can accomplish this in several ways. For instance, you can take advantage of custom controls to build a “visual” report that can be printed later via leveraging of the new printing APIs from Silverlight 4. In addition, you can export your data to Microsoft Word or to a PDF document.
You are definitely encouraged to utilize the SQL Server Reporting Services (a free edition is available) or third-party reporting extensions from Microsoft partners. Most of the third-party reporting extensions are not available for free, but relatively low prices and the time you can save make them worth the cost because you will not have to “reinvent the wheel,” especially if you are not a Silverlight expert. In summary, these are the quickest ways possible to implement a reporting system, and this chapter examines all these possibilities.
The first part of this chapter is for developers of all skill levels; so, the Office Integration Extension and extensions from other vendors just require Visual Studio LightSwitch Edition. You also need Microsoft Office 2010 installed to use the Office Integration Extension. The last topic of this chapter is about the Silverlight printing APIs, which requires you to create a custom control, so you need Visual Studio 2010 Professional or higher.
Using the Office Integration Extension
Integrating business applications with the Microsoft Office suite is common in real-world scenarios. Back in Chapter 3, you learned that LightSwitch applications include by default a functionality that enables you to export the content of Search Screens and List and Details Screens to Microsoft Excel. This enables you to work on collections of entities inside Excel and print the result of the data processing, if necessary. For more-complex documents such as reports, invoices, or orders, you need something different and more appropriate. The suggested approach is to use third-party extensions, discussed in the next section of this chapter. But, if you have simple reporting requirements or it is enough for you to automate Microsoft Word for exporting documents or Microsoft Outlook to send emails, Grid Logic (www.GridLogic.com) has some good news for you: the Office Integration Extension. This extension brings into your LightSwitch applications some additional functionalities to export data into PDFs, to exchange information with Excel (import and export), and Outlook automation for sending emails and creating appointments. You can download the Office Integration Extension at http://goo.gl/4nKZU or directly from the Extension Manager. In this section, you learn to leverage the best from the extension to provide some basic reporting and Office automation features.
Overview of the Class Library
When you install the Office Integration Extension, it installs onto your machine some new assemblies:
• OfficeIntegration.Client.dll, which is the one exposing the API that you will use in your applications.
• OfficeIntegration.Client.Design.dll, which provides design-time support for LightSwitch when importing data from Excel.
• OfficeIntegration.Common.dll, which provides the runtime support infrastructure for the extension.
• OfficeIntegration.Server.dll, which defines the SMTP and SmtpServer classes that you use to create emails and appointments via server code. This scenario is not discussed in this chapter, but you can find some details in the documentation from Grid Logic.
• OfficeIntegration.Client.dll, which exposes the API that you will use in your applications.
The first assembly exposes a namespace called OfficeIntegration, which offers, among other things, self-explanatory classes such as Excel, Word, Outlook, plus some other helper classes, like ColumnMapping, which is used to establish the form of the exported document. Using these classes is generally simple because the methods they expose are self-explanatory and easy to remember (for example, Import, Export, SaveAsPDF, CreateEmail, CreateAppointment) and require simple parameters to generate the specified documents.
This is just a brief overview because the most important objects and their members are described later in this chapter as they are used. The important thing to emphasize here is that except for the piece of library that works on the server side, all features are available only if the application runs as a desktop client. Now it is time to move on and extend the Invoice Management application example.
The next examples are based on the Invoice Management application as it was completed at the end of Chapter 6, “Querying, Filtering, and Sorting Data.” So, to follow the next steps and code, create a copy of that solution and work on this new copy.
Creating Emails and Appointments with Microsoft Outlook
The simplest way to get started with the Office Integration Extension is to create emails and appointments with Microsoft Outlook 2010. This is an easy task because it requires very few lines of code. The next subsections explain how to send emails to customers and how to create appointments with them.
Sending Emails
Suppose you want to inform customers about their orders. You can do so easily by sending an email to the customer. The email body then consists of the list of orders. Based on your existing LightSwitch skills, do the following:
1. Open the Screen Designer for the Search Customers screen.
2. Locate and expand the Command Bar item inside the Data Grid called Customers.
3. Add a new button called SendEmail to the Command Bar and, when ready, right-click the new button and select Edit Execute Code.
Now it is time for a couple of considerations. To create an email, the Outlook class offers the CreateEmail method. This requires specifying the email address, the subject, and the mail body. The mail body can be not only text but also a table with some data. For this reason, the Outlook class exposes two additional methods: HtmlExport, which exports the content of a screen collection (of type IVisualCollection) to a table suitable to be added to Outlook messages; and HtmlExportEntityCollection, which exports collections of type IEntityCollection. In this current example, suppose you want to send to customers a summary of their orders. You can do so with the following code:
Private Sub SendEmail_Execute()
' Write your code here.
Dim currentCustomer As Customer = Me.Customers.SelectedItem
Dim body As String = OfficeIntegration.Outlook.
HtmlExportEntityCollection(Me.Customers.
SelectedItem.OrderHeader)
OfficeIntegration.Outlook.
CreateEmail(currentCustomer.EmailAddress, "Your orders",
"Dear " & currentCustomer.ContactName & _
", following is the list of your orders:" _
& Environment.NewLine & body)
End Sub
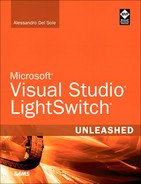
The code first retrieves the instance of the selected customer in the current view. Then it invokes the Outlook.HtmlExportEntityCollection to convert into a string the specified IEntityCollection—in this case, the OrderHeader collection related to the current customer. HtmlExport could not be used because this kind of collection is not of type IVisualCollection, which is instead the one associated with the screen, which is Customers in the current example. Then, with CreateEmail, the code creates a new email message and uses information from the current customer. Notice how the email body includes the result of the HtmlExportEntityCollection. If you run the application and click the Send Email button on the Search Customers screen, Outlook generates an email message containing the specified text and the full list of the customer’s orders, as shown in the window on the left in Figure 17.1.
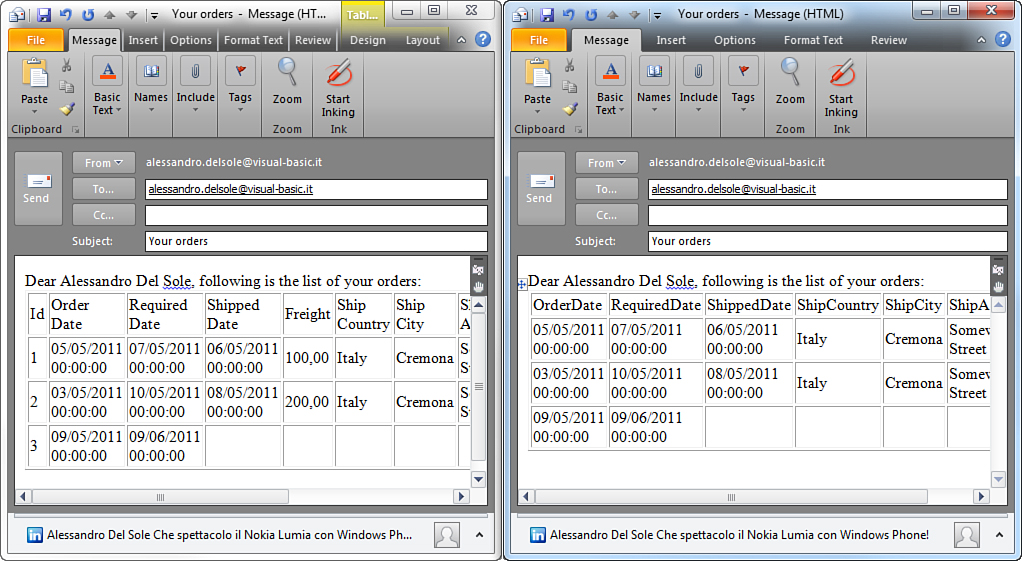
Figure 17.1. Generating email messages with the Outlook class.
With very little effort, you can generate a table inside an email message. In addition, you can further control the table generation by using another overload of HtmlExport and HtmlExportEntityCollection, which allows specifying a group of columns to include in the message, under the form of a generic list of strings. For example, to include in the email message only the specified column names, you can use this code:
Private Sub SendEmail_Execute()
' Write your code here.
Dim currentCustomer As Customer = Me.Customers.SelectedItem
Dim columnNames As New List(Of String)
columnNames.Add("OrderDate")
columnNames.Add("RequiredDate")
columnNames.Add("ShippedDate")
columnNames.Add("ShipCountry")
columnNames.Add("ShipCity")
columnNames.Add("ShipAddress")
Dim body As String = OfficeIntegration.Outlook.
HtmlExportEntityCollection(Me.Customers.
SelectedItem.OrderHeader, columnNames)
OfficeIntegration.Outlook.
CreateEmail(currentCustomer.EmailAddress, "Your orders",
"Dear " & currentCustomer.ContactName & _
", following is the list of your orders:" _
& Environment.NewLine & body)
End Sub
Basically, you pass the list of columns as the second method argument for HtmlExportEntityCollection (HtmlExport behaves the same way). Executing this code produces the result shown in the window on the right in Figure 17.1. As you can see, the table displays only the columns that you specified. Generating emails is not the only task that you can do with the Outlook class; you can generate appointments, as well, as shown in the next subsection.
Creating Appointments
Automating Microsoft Outlook 2010 to create new appointments is an easy task. Suppose you want to send an invitation to a customer to come to your office. In the Search Customers screen, add a new button called CreateAppointment near the SendEmail button created previously. After you have the button, right-click it and select Edit Execute Code. When the code editor appears, you just need to invoke the CreateAppointment method from the OfficeIntegration.Outlook class. The following example demonstrates this:
Private Sub CreateAppointment_Execute()
OfficeIntegration.Outlook.
CreateAppointment(Me.Customers.SelectedItem.EmailAddress,
"New Appointment",
"We would like to discuss our new products line",
"Our Offices",
Now.AddHours(3),
Now.AddHours(4))
End Sub
The first parameter is the email address, which is taken from the EmailAddress property of the selected customer instance. The second parameter is the appointment’s subject. The third parameter is the appointment body. The fourth is the location, and the fifth and sixth arguments are, respectively, the start and end time, both of type Date. When you run the application, you can just select a customer from the list and click the Create Appointment button. Figure 17.2 shows both the button and the generated appointment in Microsoft Outlook.
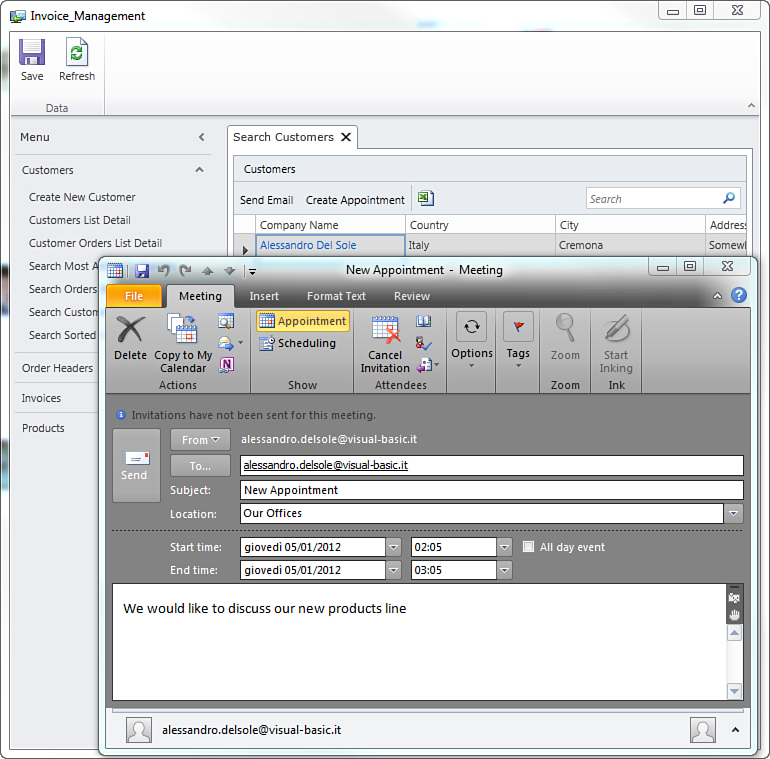
Figure 17.2. Creating new appointments.
As you can see, with a single line of code, you can automate the generation of Outlook appointments. These then have to be sent manually.
Exporting to Microsoft Word and to PDF
Without a doubt, Microsoft Word is the most-used word processing tool in the world, and companies use it to create letters, documents, invoices, and so on. With the Office Integration Extension, you can easily export data from your LightSwitch applications to Word documents so that other users can edit information coming from the application or simply reuse the generated documents. In addition, it is not uncommon to export documents to the PDF format; this is pretty useful when you need read-only, portable documents. With the Office Integration Extension, you can also generate PDF documents. You can interact with Microsoft Word via the OfficeIntegration.Word class. This exposes a number of methods, but the following are the most important:
• Export: Enables exporting the data collection associated with a screen (of type IVisualCollection) into a table in a new or existing Word document
• ExportEntityCollection: Enables exporting collections of type IEntityCollection into a table in a new or existing Word document
• GetWord: Gets an instance of the Word application and is used for custom document generation
• GetDocument: Gets the instance of a Word document
• GenerateDocument: Generates a Word document based on a template containing content controls (Open XML)
• SaveAsPDF: Exports the specified data into a Portable Document Format (PDF) document
By using the Word class, you can export your data to new documents or existing documents. In the case of existing documents, you must create a table to receive the exported data and insert a bookmark on the table so that the Word class knows how to reach it. This section covers both scenarios. The great benefit is that the Word class can generate documents automatically while also enabling you to customize the column generation for tables. Before you start writing code, following well-known steps, add two buttons (Export To Word and Export To PDF) to the Ribbon Bar of the Editable Products Grid screen, as shown in Figure 17.3.
Figure 17.3. Preparing the Ribbon Bar with two export buttons.
Now that you have your buttons, it is time to activate them.
Exporting to Microsoft Word: Simple Export
With a single line of code, you can export data from a collection to a Word document (new or existing) because the Word class can generate tables inside documents for you. For example, suppose you want to export your list of products from the Editable Product Grid screen. In the Screen Designer, right-click the Export To Word button and select to edit the Execute method for the button. When the code editor is ready, write the following:
Private Sub ExportToWord_Execute()
OfficeIntegration.Word.Export(Me.Products, False)
End Sub
The Export method takes as parameters the screen collection to export and a Boolean value indicating whether the data should be exported into a new document (False) or an active one (True). If you run the application and click the Export To Word button in the Editable Products Grid screen, you get a complete table in Microsoft Word, as shown in Figure 17.4.
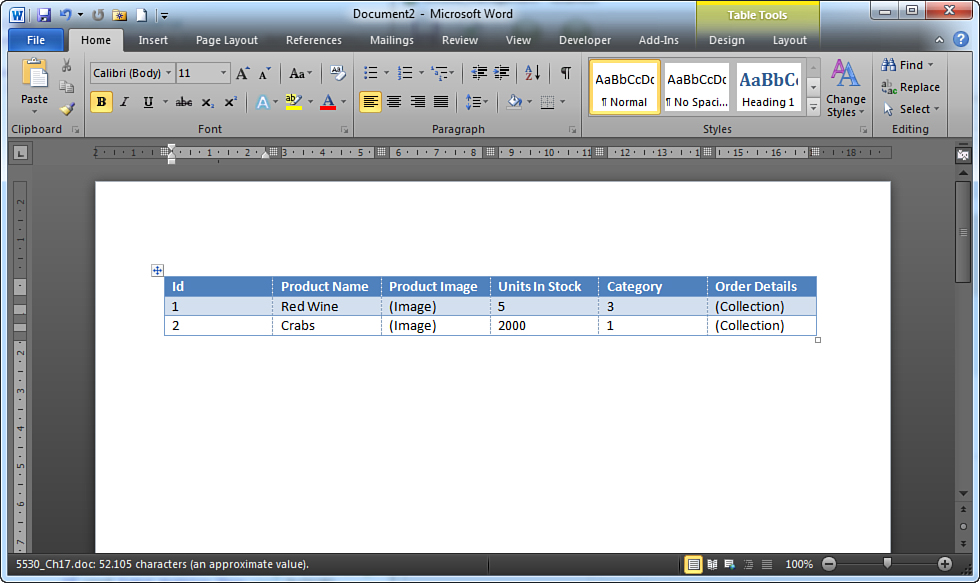
Figure 17.4. Exporting data to Microsoft Word with one line of code.
As you can see, with a single line of code you exported a collection of data to a table in Microsoft Word 2010. This automatic mechanism generated columns from all the items in the data collection, including the Id, related collections, and the name of data types that cannot be represented with strings. Fortunately, you can customize the generated output to take advantage of your existing document templates. The Word class makes this possible by offering specific members, as you see in the next subsection.
Exporting to Microsoft Word: Custom Output Generation and PDF Export
Suppose you want to export your products list to a PDF document. This kind of export is common in business applications, and the Office Integration Extension makes it easy to do. In addition, suppose you want to customize the generated output so that only specific columns are put in the output table of a document template that your company has for printing product lists. This subsection introduces you to a number of features of the Word class that you can then reuse in your applications. Before writing code, however, you need to prepare a Word document template. To do so, follow these steps:
1. Run Microsoft Word 2010 and create a new blank document.
2. Add any text you want in your document, and then add a table with three columns: ProductName, UnitsInStock, and Category.
3. Select the table, and then on the Insert tab of the Ribbon, select Bookmark. At this point, specify the bookmark name (for example, ProductsTable).
Figure 17.5 shows an example. Inserting a bookmark is a fundamental step because the Word.Export method places data based on the bookmarks’ position.
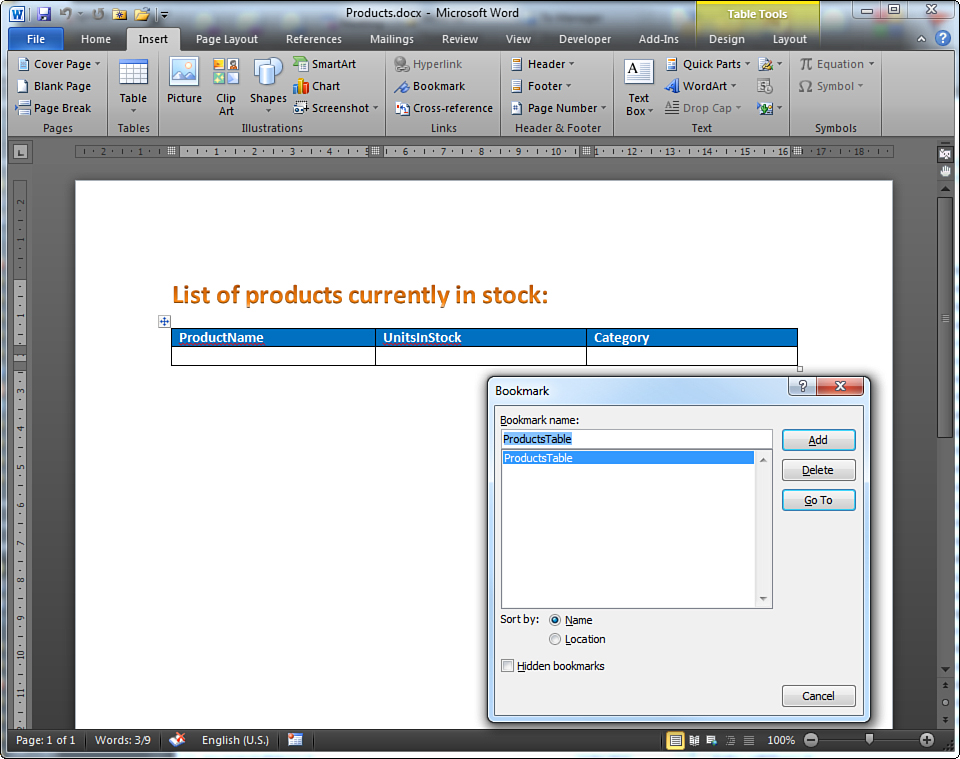
Figure 17.5. Creating a Word template with bookmarks.
The document must be saved into the My Documents folder of the currently logged-in user. The reason is that Silverlight 4, including LightSwitch applications, cannot access anywhere in the file system, but has permission to access the user-level documents folder. For the current example, save the document as Products.docx. Now in Visual Studio LightSwitch, open the Screen Designer for the Editable Product Grid screen and right-click the Export To PDF button, and then select to edit the Execute method.
The following code demonstrates how to export only some columns from the Products collection to a new Word document and then how to save it to PDF. Comments provide in-line explanations:
Private WordFile As String = Environment.
GetFolderPath(Environment.
SpecialFolder.MyDocuments) _
& "Products.docx"
Private Sub ExportToPDF_Execute()
'If the specified template exists
If File.Exists(WordFile) Then
'this handles the instance of Word
Dim word As Object = Nothing
'This handles the instance of the document
Dim doc As Object = Nothing
Try
'Get the instance of Word and make it hidden
word = OfficeIntegration.Word.GetWord()
word.Application.Visible = False
'If the instance of Word is alive
If Not word Is Nothing Then
'Get ths instance of the specified document
doc = OfficeIntegration.Word.
GetDocument(word, WordFile)
End If
'If the document instance is valid
If Not doc Is Nothing Then
'Generate a list of columns
Dim mappings As New List(Of OfficeIntegration.
ColumnMapping)
mappings.Add(New OfficeIntegration.
ColumnMapping("", "ProductName"))
mappings.Add(New OfficeIntegration.
ColumnMapping("", "UnitsInStock"))
mappings.Add(New OfficeIntegration.
ColumnMapping("", "Category"))
'Export some columns from the Products collection
'to the specified bookmark position in the document
OfficeIntegration.Word.Export(doc, "ProductsTable",
1, True,
Me.Products, mappings)
'Save to PDF (optional)
OfficeIntegration.Word.
SaveAsPDF(doc, "C:TempProducts.pdf", True)
End If
Finally
'Quit Word
If word IsNot Nothing Then word.Quit(0)
End Try
Else
Me.ShowMessageBox("Could not find file: " & WordFile)
End If
End Sub
It is worth mentioning that you specify which columns you want to export via a collection of ColumnMapping objects, where each represents a column in the original collection. Here you are using an overload of the Word.Export method that takes the document filename as the first parameter, the bookmark on the table as the second parameter, the row in the table where the export process begins, and a Boolean value indicating whether Export should generate column headers for the table. It takes the data collection and the column definition collection as the last parameters. If you now run the application and click the Export To PDF button in the Editable Product Grid screen, the code generates a PDF document based on the data collection, as shown in Figure 17.6.
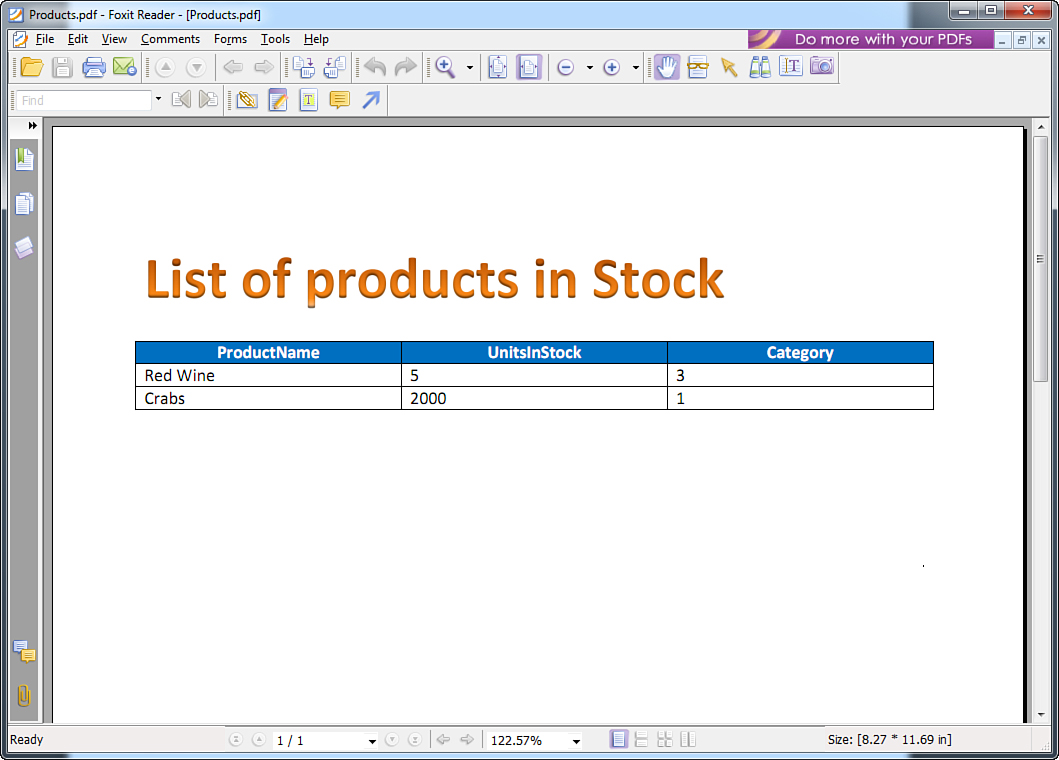
Figure 17.6. Generating a PDF document with specific columns.
In this case, the instance of Word has been closed in code, but if you want to keep it open, you can simply remove the Quit invocation. In addition, the document generation could be easier if you want to add to the table all the columns, which basically only involves removing the mappings argument from the previous invocation to Export. In addition, Export is not limited to exporting tabular data; it can also export the content of a single entity (which will then be represented inside a table with only one row).
More Granularity with Content Controls
As you might know, in Microsoft Word you can use the Developer toolbar and add so-called content controls to your documents. These can be very useful because they support a basic form of data binding, data types, and formatting. You can use content controls in Word documents based on the Open XML standard and you can later interact with documents via code using LINQ to XML. OfficeIntegration.Word.GenerateDocument is the method that you can use to associate a Word template containing content controls with a LightSwitch project and then map entity fields to the content controls.
Beth Massi from the LightSwitch team has a blog post about content controls at http://blogs.msdn.com/b/bethmassi/archive/2011/09/22/fun-with-the-office-integration-pack-extension-for-lightswitch.aspx.
Importing and Exporting Data with Microsoft Excel 2010
You well know that Search Screens and Editable Grid Screens include a button called Export To Excel, which is available when the application is running as a desktop client. This is a useful button and is the first form of interaction with Microsoft Office 2010 in LightSwitch. The default behavior of that button is that it exports all the content of a data collection to an Excel workbook, with no possibility of customizing the export (for example, by excluding some columns). The Office Integration Extension not only provides a more-advanced exporting to Excel functionality, which enables you to generate new workbooks or extend existing ones with an entire collection or just part of it, but it also enables you to import data from an Excel workbook into your LightSwitch data. If you have been testing the first betas of LightSwitch, you might have seen in action an extension from the LightSwitch team called Excel Importer. This has been added to the Office Integration Extension and enhanced with some new features. In this section, you learn how to use both import and export features to interact with Microsoft Excel 2010 from LightSwitch.
Exporting Data to Microsoft Excel 2010
To export data from your LightSwitch application to an Excel workbook, you invoke the OfficeIntegration.Excel.Export method. This can be used in two ways: to export the entire screen collection to a workbook or to export only the selected cells area. In most cases, you will not write code to export the entire screen collection to a workbook because you already have a built-in button in Search Screens that does this for you. In any case, though, this involves writing one line of code, as follows:
OfficeIntegration.Excel.Export(Me.Products)
Continuing the example of the Editable Products Grid screen, this code exports the entire Products collection to a new Excel workbook. Actually, the Export method is more powerful and behaves similarly to the correspondent one from the Word class, meaning that it can export to Excel only the specified number of columns. Before going on with code, follow these two steps:
1. In the user-level documents folder (typically My Documents), create a new, empty Excel workbook file called Products.xlsx. We are creating a document now to demonstrate how to extend an existing document. If the Export method does not find the specified filename, however, it creates one for you.
2. In LightSwitch, in the Screen Designer for the Editable Products Grid screen, create a new button called ExportRangeToExcel.
The goal is to export to Excel the same columns that you exported to Word previously. That said, write the following code to handle the Execute method:
Private excelFile As String = Environment.
GetFolderPath(Environment.SpecialFolder.
MyDocuments) & "Products.xlsx"
Private Sub ExportRangeToExcel_Execute()
' Write your code here.
Dim mappings As New List(Of OfficeIntegration.ColumnMapping)
mappings.Add(New OfficeIntegration.ColumnMapping("",
"ProductName"))
mappings.Add(New OfficeIntegration.ColumnMapping("",
"UnitsInStock"))
mappings.Add(New OfficeIntegration.ColumnMapping("",
"Category"))
OfficeIntegration.Excel.Export(Me.Products, Me.excelFile,
"Sheet1", "A1", mappings)
End Sub
As you can see, the code still creates the column mapping using the ColumnMapping object, as you saw previously with Word. What it is interesting at this point is the Export method. Notice that if you specify the name of an existing file, you can extend a workbook that you worked on previously with another collection, so you are not limited to exporting only to an empty workbook. Next, you have an opportunity to export data to a specific sheet, as shown in the third method parameter; you can also specify the starting cell for the export process. A1, as in the preceding example, means that data will be placed starting from the first cell inside an Excel workbook. However, you might specify A10 if you know that other items are already in your spreadsheet, or you can specify a totally different position (for example, C5). Remember that the first exported row is made up of column headings. If you now run the application and click the Export Range To Excel button in the Editable Products Grid screen, you will see how the code that you wrote before populates an existing Excel workbook with only the selected columns, as shown in Figure 17.7.
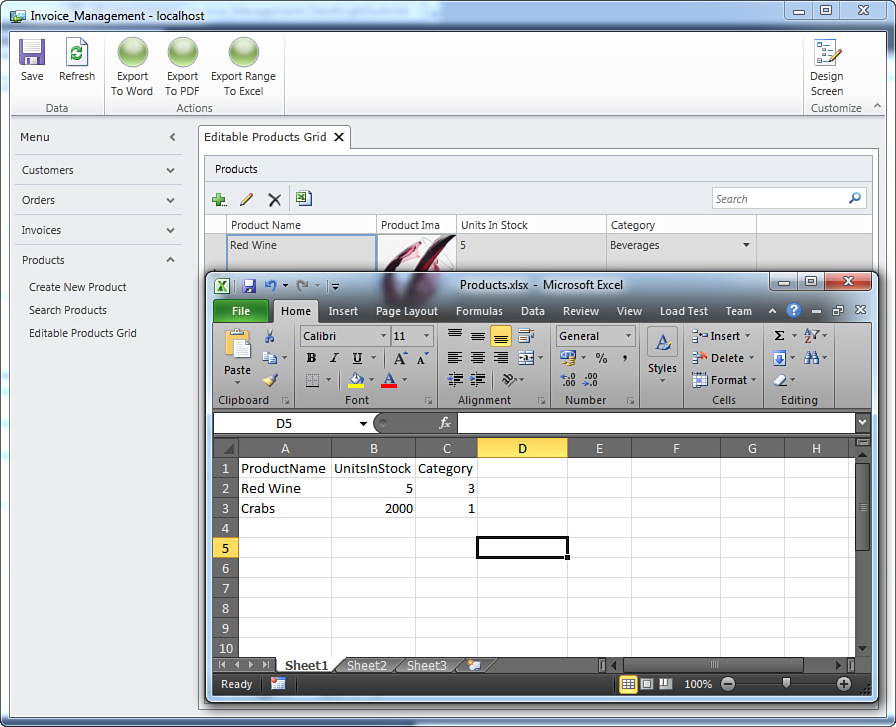
Figure 17.7. Exporting a number of columns to Excel.
There are another couple of things to consider:
• Similar to what was expressed about the Word class, for the Excel class you can use the ExportCollection method, which exports objects of type IEntityCollection instead of IVisualCollection. This is particularly useful if you want to export related collections (for example, Customers.SelectedItem.Orders).
• When invoking the Export method, if you omit the collection of column mappings as an argument, it will export all the available columns to an existing workbook.
Now that you know how easy it is to export specified ranges of columns to Excel, it is time to do the opposite: import data from Excel into LightSwitch.
Importing Data from Microsoft Excel 2010
Importing data from Excel into LightSwitch is not only a common requirement, but it is also the easiest task to accomplish via the Office Integration Extension. Suppose you have an Excel workbook where you store the list of your products, and that a sheet is made of four columns: ProductName, UnitsInStock, Category, and UnitPrice. You might want to import the content of this Excel sheet into the Products collection in the sample Invoice Management application. In the list of columns, one, UnitPrice, is not in the Product entity definition in LightSwitch, but this is to demonstrate some features in a few moments. Add a new button called ImportFromExcel to the Editable Products Grid screen. In the Execute method hook, write the following line:
Private Sub ImportFromExcel_Execute()
OfficeIntegration.Excel.Import(Me.Products)
End Sub
The Import method has, of course, several overloads, but the simplest one takes only one parameter, which is the visual collection that will receive data from Excel. If you are wondering how it might be useful to you, just run the application and open the screen you were working on. Click the Import From Excel button. At this point, you are asked via a classic dialog to select the Excel workbook to import. After the file has been selected, LightSwitch attempts to map columns from the workbook to columns in the table. For example, Figure 17.8 shows how LightSwitch has been able to map columns in the Excel workbook to the current collection; also, if a column from Excel has no corresponding entity properties in LightSwitch, this allows you to choose how to map such a column manually.
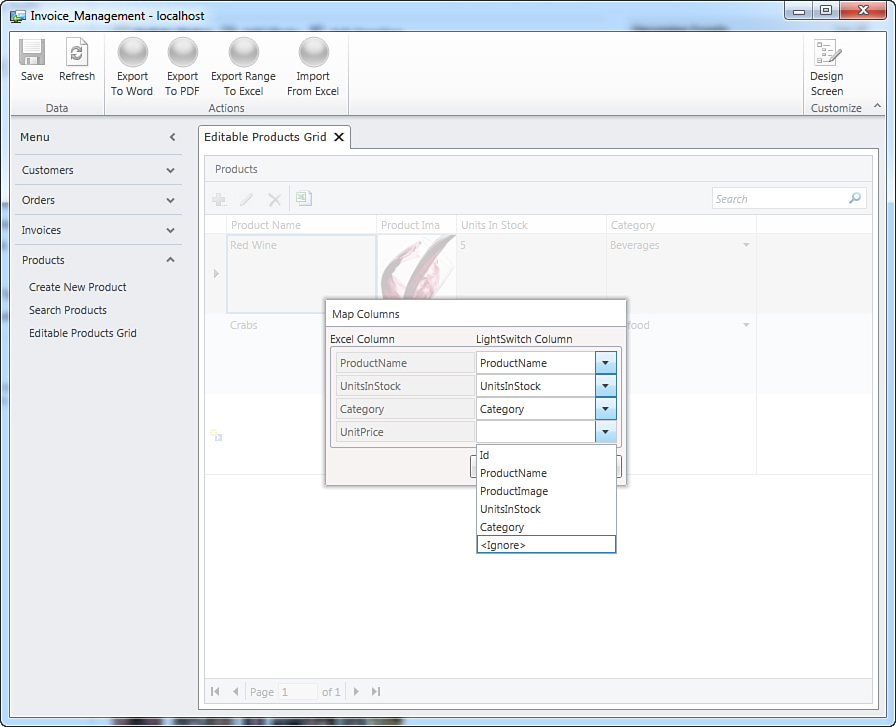
Figure 17.8. The extension automatically maps Excel data to LightSwitch tables.
Click Ignore so that the Excel column will not be imported. When you click Continue, the Excel data is correctly imported into LightSwitch, as shown in Figure 17.9.
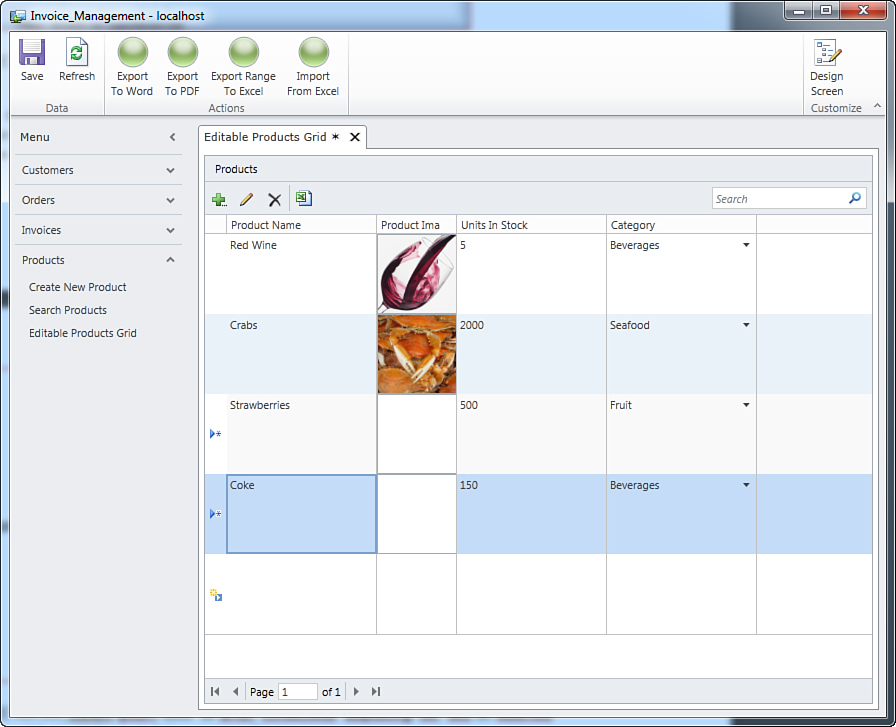
Figure 17.9. Importing data from Excel was successful.
This is a great way to import data from Excel because it requires you to write just one line of code and it allows automatic column mapping; users just need to check whether the mapping is correct before proceeding. Alternatively, you can use a different Import overload so that you specify the range of cells that will be imported into LightSwitch; notice that this overload does not show the previously mentioned mapping dialog and imports data directly. You could use it like this:
Dim excelFile As String = Environment.
GetFolderPath(Environment.SpecialFolder.
MyDocuments) & "Products.xlsx"
OfficeIntegration.Excel.Import(Me.Products, ExcelFile, "Sheet3", "C5:D9")
The final line of code imports the specified cell range from the sheet called Sheet3 in the specified file. Importing from Excel was the very last topic about the Office Integration Extension. This extension is certainly useful and may help you solve a lot of business problems quickly. By the way, if you need to generate complex reports or to implement business analysis features, this extension is not enough. A number of reporting and printing extensions have been developed by the biggest partners of Microsoft that are specific to producing high-quality, professional reports and that are described in the next section.
Using SQL Server Reporting Services
Microsoft SQL Server Reporting Services is a server platform for creating, distributing, and managing high-quality, professional reports. In particular, reports are generated for data contained in SQL Server databases or SharePoint sites. Basically, SQL Server Reporting Services enables you to generate reports on a web server. Such reports can be embedded inside ASP.NET pages and can be displayed by just opening the corresponding web address. Reports can be later exported to different file formats, including portable formats such as PDF. This an important option, because you can use this platform to generate reports that can be used inside a variety of applications and other technologies; it is not expressly dedicated to LightSwitch, and so it is versatile. A free edition of SQL Server Reporting Services is available and ships with the SQL Server 2008 R2 Express Edition with Advanced Services package. You can download it from www.microsoft.com/sqlserver/en/us/editions/express.aspx.
In this chapter, it is not possible to discuss SQL Server Reporting Services in detail because a full discussion would involve configuring the report server, examining the variety of available reports, and showing the use of client tools available to generate report projects (so it is definitely beyond the scope of this chapter).
Here is some useful information about creating reports with SQL Server Reporting Services:
• The MSDN documentation has an entire section dedicated to this platform. Start reading the documentation here: http://msdn.microsoft.com/en-us/library/ms159106.aspx.
• To display reports in an ASP.NET page, you need to install the Report Viewer control on your report server. The Report Viewer is available from www.microsoft.com/download/en/details.aspx?id=6610.
• Microsoft offers for free a client tool called Report Builder 3.0, which you can download from the TechNet website at http://technet.microsoft.com/en-us/ff657833.aspx. Report Builder is a Windows application that enables you to connect to the specified data source and generate reports published to the report web server.
• When you install SQL Server 2008 R2 Express Edition with Advanced Services (or when you just upgrade an existing SQL Express instance), make sure to select a tool called Business Intelligence Development Studio. This tool is nothing but an integrated development environment inside the shell of Microsoft Visual Studio 2008, which provides specific project templates and wizards to generate reports, integration services projects, and analysis services projects. If you are an experienced developer working with Visual Studio, this is probably the simplest choice to start generating reports over the Reporting Services platform.
Generated reports are then published to a web server that runs Internet Information Services, so they can be reached via a web address that points to an ASP.NET page. That said, once you have chosen your favorite tool to build reports, you can create them based on your LightSwitch data sources, including both the intrinsic database and an external source. After you have your reports on a web server, it is easy to launch an instance of the web browser in Visual Studio LightSwitch and show the report. The following code snippet demonstrates how to handle the Execute method hook of a button to open a web page depending on the current client settings (and assumes that you add a reference to the System.Windows.Browser.dll assembly to the Client project):
'Requires to import the System.Runtime.InteropServices.Automation
'and System.Windows.Browser namespaces
'Requires Option Strict Off in VB, the dynamic keyword in C#
Private Sub ViewReport_Execute()
If AutomationFactory.IsAvailable Then
'It is a Desktop client
Dim shell = AutomationFactory.CreateObject("Shell.Application")
shell.Execute("http://webservername/reportpage.aspx")
Else
'It is a Web client
Microsoft.LightSwitch.Threading.Dispatchers.Main.BeginInvoke(Sub()
HtmlPage.Window.
Navigate(New Uri _
("http://webservername/reportpage.aspx"), "_blank")
End Sub)
End If
End Sub
All you need to do is specify the correct web address of your report page. There is much more to say about SQL Server Reporting Services, but the goal of this chapter is just to offer a tour of all the available options that you have in LightSwitch today.
At the time of this writing, Microsoft just released CTP 2 of SQL Azure Reporting Services, a report platform that is integrated in SQL Azure and that enables users to generate reports for cloud-based databases. If you already have a Windows Azure subscription, you can go to the Database area of the Windows Azure Management Portal (www.WindowsAzure.com) and start creating your reports in the cloud.
Reporting Extensions from Microsoft Partners
It is not uncommon for a company that creates software to purchase controls and libraries produced by other software vendors. In fact, developers often need controls or libraries that are ready immediately to solve specific business problems. Sometimes purchasing external components is less expensive than building them yourself. With regard to this, you might be interested in evaluating professional reporting controls created by Microsoft’s partners. The following is a summary of reporting extensions from Microsoft’s partners that will be described in this chapter:
• Developer Express offers a product called XtraReports that includes an extension for LightSwitch that makes it easy to create reports based on your data. You can find further information about the product and the trial download link at http://devexpress.com/Products/NET/Reporting/lightswitch.xml.
• Telerik offers a product called Telerik Reporting that is also available for Silverlight 4 and that is therefore easily embeddable in LightSwitch applications. Product details and the trial download link are available at www.telerik.com/products/reporting.aspx.
• Component One created an extension called OLAP that makes it easy to create screens with business intelligence and data-analysis features. For further information about OLAP and to download a trial, go to www.componentone.com/SuperProducts/OLAPLightSwitch/.
• Infragistics released a special version of their famous NetAdvantage controls suite for LightSwitch, including a free Light Edition. The suite includes controls, themes, and a custom shell. The list of all available controls and features, including the trial download, is available at www.infragistics.com/dotnet/netadvantage/lightswitch.aspx.
You are encouraged to download and install product trials so that you will be able to follow the explanations coming shortly. If you are a professional developer, you should definitely take a look at specific components that can dramatically simplify your life and that can help you reduce costs and time for development, especially when free trial versions are available for evaluating products.
XtraReports from Developer Express
Developer Express created the most specific reporting tool for Visual Studio LightSwitch, which is a special edition of their XtraReports suite. XtraReports Suite for LightSwitch ships with a rich design experience to simplify the report-generation process and to help you create compelling and informational reports with ease. In addition, this suite includes a number of controls to make your reports really effective and the capability to export reports to several file formats. Another benefit is that reports load data on demand, so that data is loaded faster and end users do not have to wait for the generation of complex reports. Technically speaking, XtraReports is accessed as if it were a custom data source that wraps your entities into the report engine via a WCF RIA Service. Using XtraReports for LightSwitch is intuitive. After you have your project and your data source, you can create a very basic report as follows:
1. Add a new data source of type WCF RIA Service.
2. Select the XtraReports service available in the wizard, as shown in Figure 17.10.
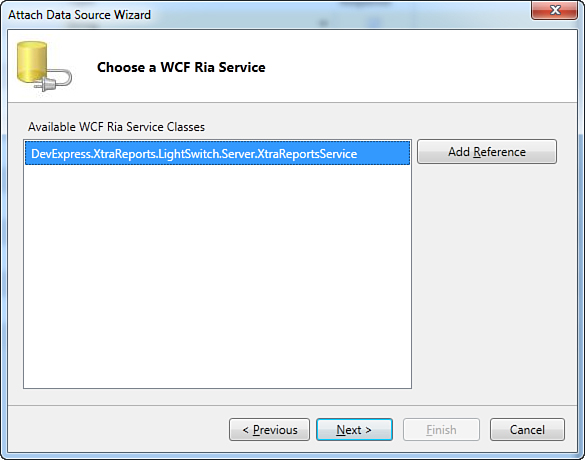
Figure 17.10. Selecting the reporting RIA service.
3. Select the MessageEnvelope entity, as shown in Figure 17.11. This is common to all reports you will build for your applications.
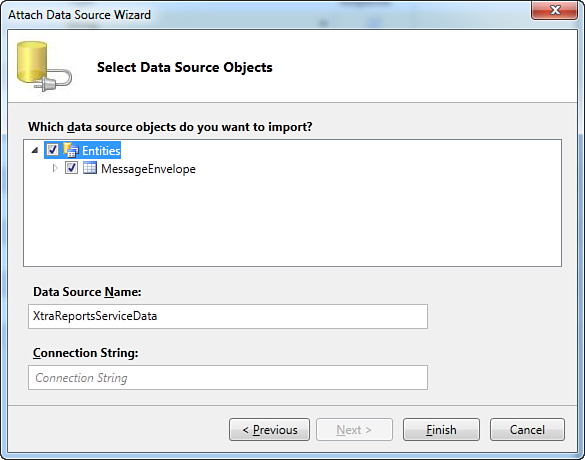
Figure 17.11. Selecting the reporting service’s entity.
4. In Solution Explorer, enable the File View, and then right-click the Server project and select Add New Item. Add a new item of type XtraReport Class v11.1, as shown in Figure 17.12. After you have done this, for your convenience switch back to the Logical View.
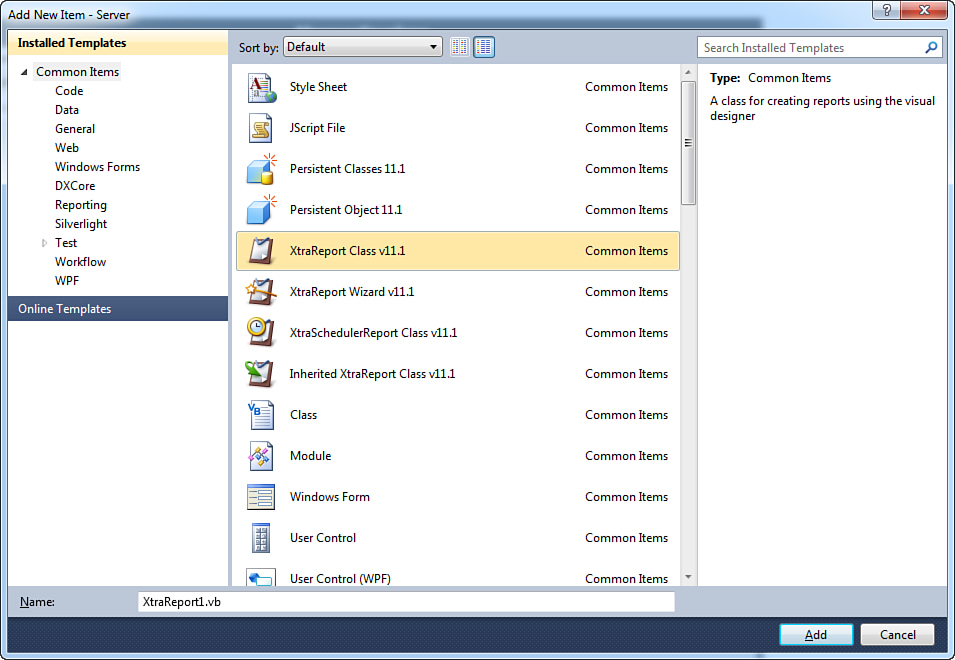
Figure 17.12. Adding a new reporting class.
5. When the Report Designer is read, click the smart tag and select your data source, as shown in Figure 17.13.

Figure 17.13. The Report Designer.
6. From the Field List floating window, drag the fields you want to be part of the report onto the designer, as shown in Figure 17.14, which is using the Orders table from the Northwind database as the data source.
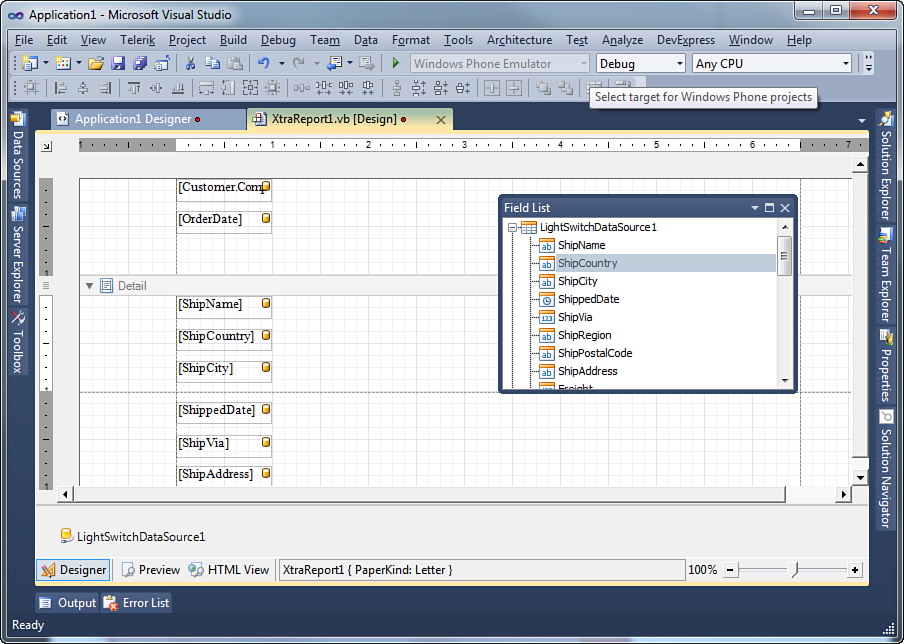
Figure 17.14. Dragging fields from the Field List window onto the designer.
7. Add a new screen of type Report Preview, as shown in Figure 17.15.
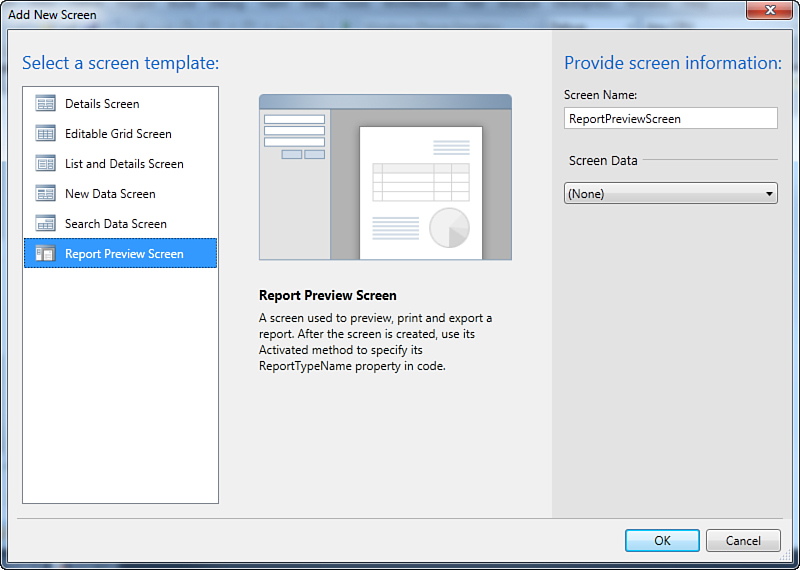
Figure 17.15. Adding a Report Preview screen.
Notice that the screen does not need to be data-bound to any data source, because behind the scenes, it is automatically set to the instance of the XtraReport class added before. You must ensure in the screen’s code that the Activated method hook points to the appropriate instance name, like this:
Private Sub ReportPreviewScreen_Activated()
Me.ReportTypeName = "XtraReport1"
End Sub
This check is important if you have multiple XtraReport classes. In addition, if you are using C#, you must add the application namespace like this:
this.ReportTypeName = "LightSwitchApplication.XtraReport1";
When you run the application, the newly added screen shows the report and allows exporting this to a number of different file formats, as represented in Figure 17.16.
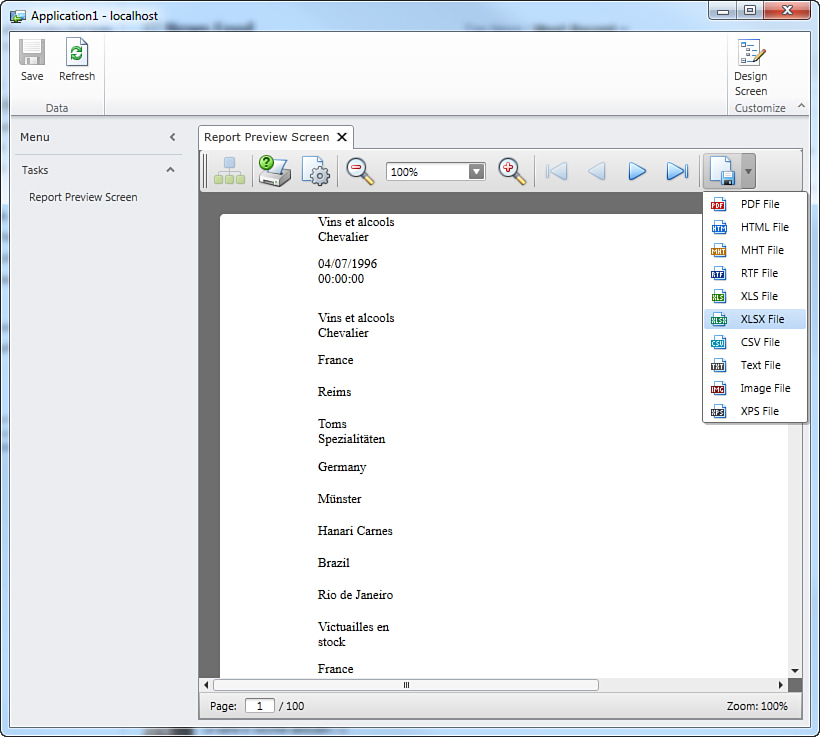
Figure 17.16. A basic report shown inside a LightSwitch application.
In some cases, when you attempt to run the application, an error message might appear saying that a particular assembly cannot be found. If this happens, switch to File View in Solution Explorer and enable the Show All Files view for both the Server and ServerGenerated projects. Expand the references in both projects and select all the DevExpress assemblies, and then right-click Properties. In the Properties window, assign True as the value of Local Copy. This ensures that all the assemblies will be copied into the application’s folder.
Notice that the report tool is fast, because data is loaded asynchronously only when you scroll the document. XtraReports can generate reports that are much more complex than the one described so far. For example, you can take advantage of the Group and Sort window to define complex grouping and sorting options, and you can customize reports with the other available controls in the suite.
In this section, you saw how to easily get started with XtraReports. Online documentation about the product provides detailed information and can be found at http://documentation.devexpress.com/#XtraReports/CustomDocument9832.
NetAdvantage for LightSwitch from Infragistics
Infragistics released a special edition for LightSwitch of their well-known NetAdvantage suite. This includes a number of useful extensions, including the following:
• A custom shell with a nice layout that also supports multiple windows in one tab
• A number of custom controls specific for data input, such as a numeric editor and masked text box
• Four themes
• A number of custom controls based on their Data Visualization suite for Silverlight
Using NetAdvantage extensions is easy. You can apply the shell and themes easily in the Application Designer’s General Properties, and you can add controls to your screens by adding a reference and setting data binding, as you learned in the previous chapter. Figure 17.17 shows an example of gauge controls presenting data in an interesting fashion. Figure 17.18 shows an example of charts. Notice the nice shell and the opportunity of having multiple windows in one tab. It is also worth mentioning that you can obtain this result without writing a single line of code.
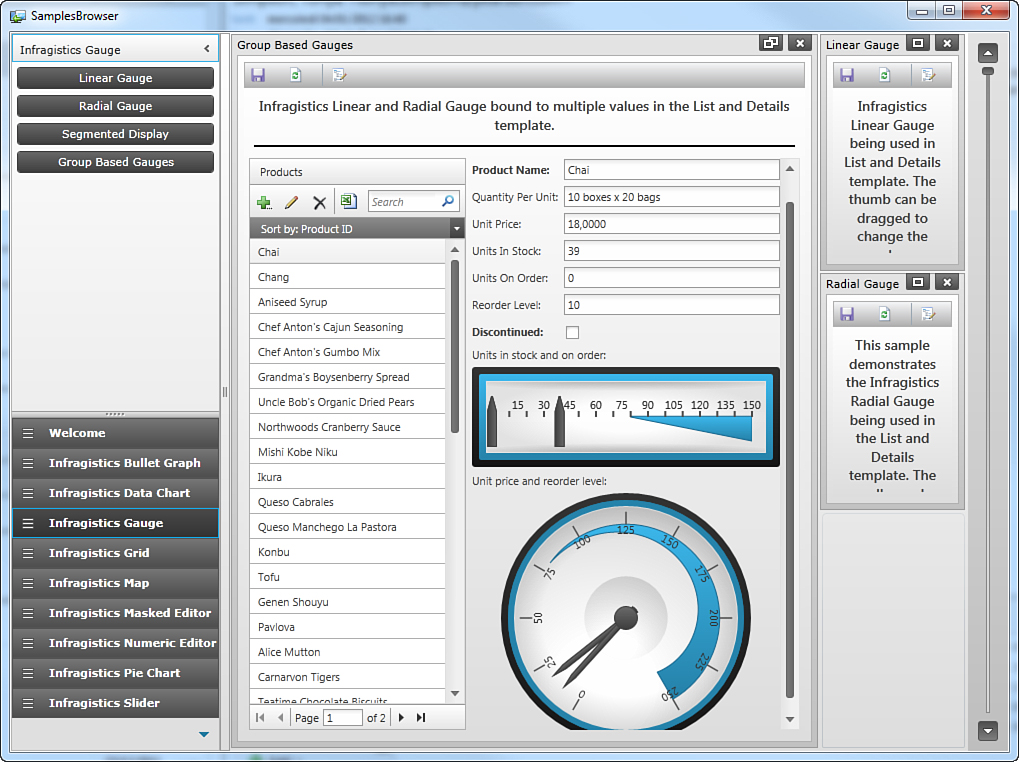
Figure 17.17. Displaying data with a gauge control from Infragistics.
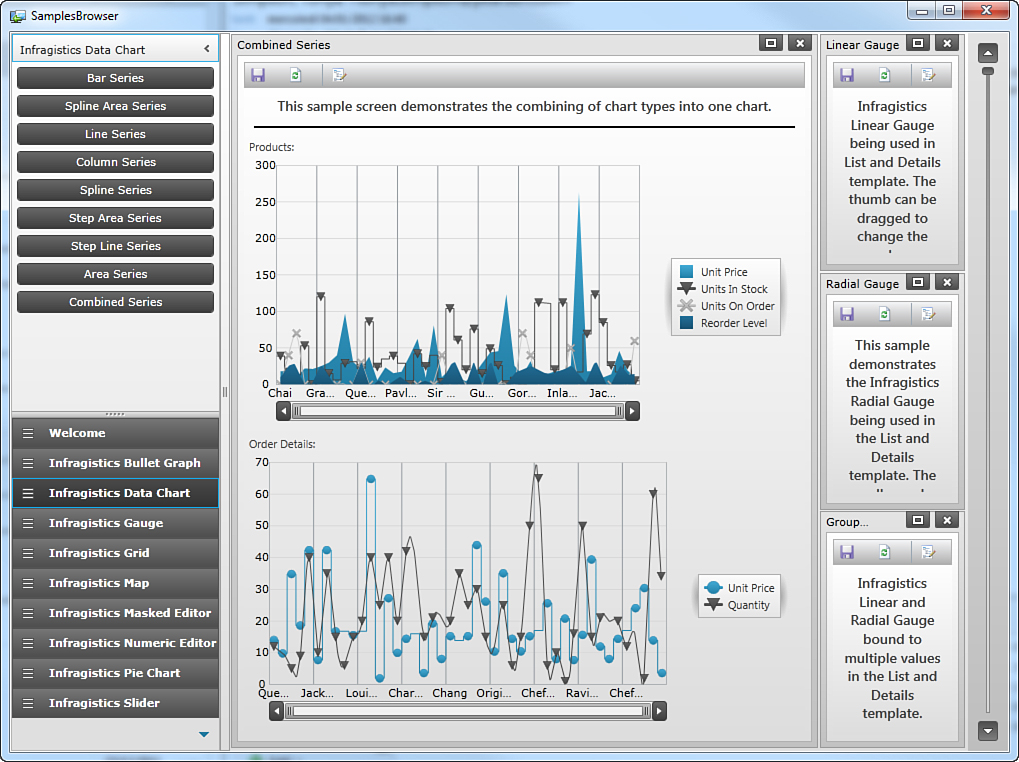
Figure 17.18. Displaying charts bound to the application data.
Infragistics also released a Light (free) edition of the suite, which does not include the shell and most of the data-visualization controls. This is also mentioned in Appendix B, “Useful Resources.”
OLAP Extension from Component One
Component One released the OLAP extension for LightSwitch, which offers a pivoting data screen and instant in-depth business intelligence functionalities. You can create interactive tables, charts, and reports similar to those found in Microsoft Excel pivot tables and charts for full data analysis. You can also use drag-and-drop views for real-time information, insights, and results in seconds. Once enabled, using the OLAP extension is simple. You just have to add a new screen called ComponentOneOLAPScreen and select the data collection that you want to analyze, as shown in Figure 17.19.
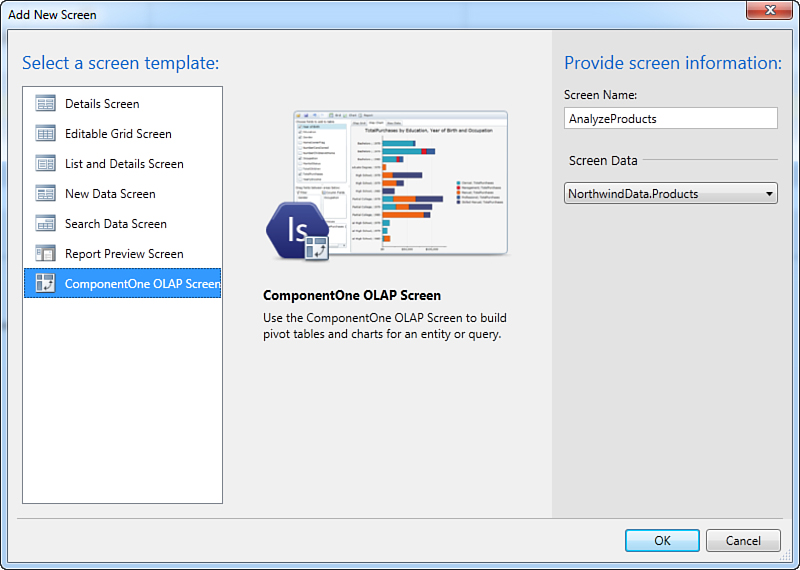
Figure 17.19. Adding a new OLAP screen for business intelligence.
After you have added the screen, you do not need to edit it in the Screen Designer. When you run the application, the OLAP screen shows you a control panel and offers a pivoting grid and a pivoting chart; these are populated with the data of your choice. Figure 17.20 shows a sample chart based on the Products table from the Northwind database. This result has been reached by simply selecting columns; OLAP drew the chart and calculated the values.
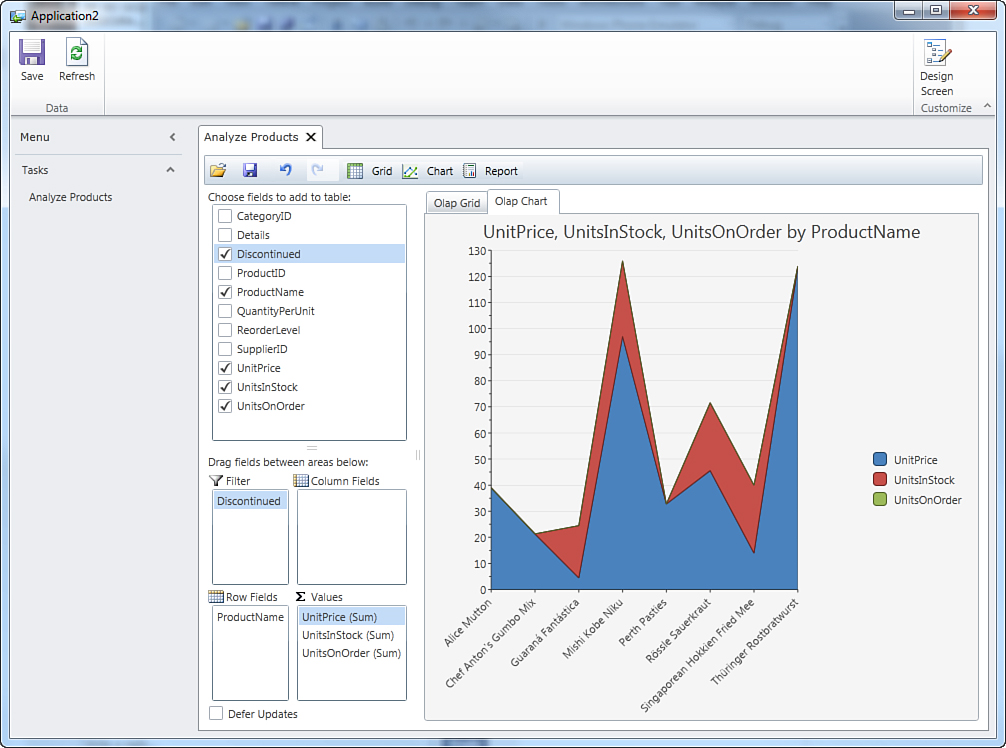
Figure 17.20. Analysis charts are easy to get with OLAP.
The OLAP screen also offers a convenient Report button that generates reports for both the pivoting grid and chart. You can choose among a number of different chart types, of different color palettes, and of different options to make your OLAP reports appealing.
You can also get very complex results without writing a single line of code. Component One has a sample project for LightSwitch with their extension available at http://demo.componentone.com/LightSwitch/OLAP/OlapLightSwitchDemo.zip.
Telerik Reporting for Silverlight
Telerik is another leading vendor of great controls. Even if Telerik is not supporting LightSwitch directly at the moment, you can easily adapt for LightSwitch one of their major products, which is the Telerik Reporting suite for Silverlight 4. This control offers a lot of interesting features and can produce complex reports, in addition to exporting reports to a large number of file formats, including PDF, Word, Excel, and so on. Figure 17.21 shows what you can usually obtain inside a LightSwitch application by embedding the Reporting control.
Figure 17.21. Embedding the Telerik Reporting control in LightSwitch.
Of course, printing is as easy as using the control. Because no extension is offered, you have to do some manual work, which involves creating a Silverlight project, a custom control, and a WCF service. Detailed instructions about how to embed the Reporting control in LightSwitch are provided by Vladimir Enchev from Telerik in his blog post at http://blogs.telerik.com/blogs/posts/11-04-12/how_to_telerik_reporting_in_microsoft_lightswitch_beta_2.aspx. Even though this post was written for LightSwitch Beta 2, it still works with no problems. The great benefit with this control is that it is not specific to LightSwitch, so you can use it with any other Silverlight application.
Using Custom Controls for Printing and Reporting
The techniques described in the previous chapter about customizing screens with custom controls can be extended to offer basic printing and reporting features in a LightSwitch application. If you are wondering how this can happen, think of a control from the point of view of a Silverlight developer. A custom user control’s UI is made of XAML code that aggregates Silverlight controls. So far, you have used data controls, but you could construct your own report by using images, text blocks, and other visual elements that would be useful in building a document such as an invoice. The result can be easily data-bound to an entity and can be visible within screens or not. After you have your visual representation of a document built by using Silverlight controls, you can print it via the new Silverlight APIs. The first part of this section describes how to build a visual report for the Invoice entity and the Invoice List Details screen in the Invoice Management application example.
Creating a Visual Report as a User Control
Suppose you want to enable users to preview and print invoices from the Invoice Management application. An invoice is generally made of one header and of fields that summarize information from order data. So, you can create a control that takes advantage of the Image control to display a logo as the header and of several TextBlock controls that summarize invoice information. By following the lessons learned in Chapter 16, “Customizing Applications with Custom Controls,” add a new Silverlight class library called SilverlightHelperControls to the solution, or add a new user control to the SilverlightHelperControls project if you are extending the sample code as it has been completed in the previous chapter. Finally, name the new control InvoicePreviewControl.xaml. When the new control is available in Visual Studio and the XAML designer with the code editor is visible, you first need to data-bind the control to a single instance of the Invoice entity, which the user will select from the InvoiceCollection on the screen. This is accomplished by adding the DataContext property to the UserControl element, as follows:
DataContext="{Binding Screen.Invoices.SelectedItem}"
Next, you can add visual elements to construct your invoice inside the main Grid container. The following code demonstrates how to use an Image control as a header and several TextBlock controls, each data-bound to a property from the Invoice entity:
<Grid x:Name="LayoutRoot" Background="White">
<Grid.RowDefinitions>
<RowDefinition/>
<RowDefinition Height="40"/>
<RowDefinition Height="40"/>
<RowDefinition/>
<RowDefinition Height="60"/>
</Grid.RowDefinitions>
<!-- A fake invoice header -->
<Image Grid.Row="0"
Source="http://www.lightswitch.it/Portals/5/LightSwitchIT.jpeg" />
<!-- Summary information via data-binding -->
<!-- Notice the usage of StringFormat for string formatting-->
<StackPanel Orientation="Horizontal" Grid.Row="1">
<TextBlock Text="Invoice nr. " Margin="5"
FontSize="18" />
<TextBlock Text="{Binding InvoiceNumber}" Foreground="Blue"
Margin="5" FontSize="18"/>
<TextBlock Text="Date: " Margin="5" FontSize="18"/>
<TextBlock Text="{Binding InvoiceDate, StringFormat=d}"
Margin="5" FontSize="18" Foreground="Blue"/>
</StackPanel>
<StackPanel Grid.Row="2" Orientation="Horizontal">
<TextBlock Text="Dear " Margin="5" FontSize="14"/>
<TextBlock Text="{Binding Customer.CompanyName}" Margin="5"
FontSize="14" Foreground="Blue"/>
</StackPanel>
<StackPanel Grid.Row="3">
<TextBlock Text="Description:" Margin="5" FontSize="14"/>
<TextBlock TextWrapping="Wrap" Foreground="Blue"
Text="{Binding Path=InvoiceDetails}" Margin="5"/>
</StackPanel>
<StackPanel Grid.Row="4" Margin="5" Orientation="Horizontal">
<TextBlock Margin="5" Text="Total Amount:" FontSize="14"/>
<TextBlock Margin="5" FontSize="14" Foreground="Blue"
Text="{Binding Path=TotalAmount,
StringFormat=c}"/>
</StackPanel>
</Grid>
For your convenience, Listing 17.1 shows all the XAML code.
Listing 17.1. Building a Silverlight Reporting Control
<UserControl x:Class="SilverlightHelperControls.InvoicePreviewControl"
xmlns="http://schemas.microsoft.com/winfx/2006/xaml/presentation"
xmlns:x="http://schemas.microsoft.com/winfx/2006/xaml"
xmlns:d="http://schemas.microsoft.com/expression/blend/2008"
xmlns:mc="http://schemas.openxmlformats.org/markup-compatibility/2006" _
DataContext="{Binding Screen.Invoices.SelectedItem}"
mc:Ignorable="d"
d:DesignHeight="300" d:DesignWidth="400">
<Grid x:Name="LayoutRoot" Background="White">
<Grid.RowDefinitions>
<RowDefinition/>
<RowDefinition Height="40"/>
<RowDefinition Height="40"/>
<RowDefinition/>
<RowDefinition Height="60"/>
</Grid.RowDefinitions>
<!-- A fake invoice header -->
<Image Grid.Row="0" Source="http://www.lightswitch.it/Portals/5/LightSwitchIT.jpeg" />
<!-- Summary information via data-binding -->
<!-- Notice the usage StringFormat for better string formatting-->
<StackPanel Orientation="Horizontal" Grid.Row="1">
<TextBlock Text="Invoice nr. " Margin="5"
FontSize="18" />
<TextBlock Text="{Binding InvoiceNumber}" Foreground="Blue"
Margin="5" FontSize="18"/>
<TextBlock Text="Date: " Margin="5" FontSize="18"/>
<TextBlock Text="{Binding InvoiceDate, StringFormat=d}"
Margin="5" FontSize="18" Foreground="Blue"/>
</StackPanel>
<StackPanel Grid.Row="2" Orientation="Horizontal">
<TextBlock Text="Dear " Margin="5" FontSize="14"/>
<TextBlock Text="{Binding Customer.CompanyName}" Margin="5"
FontSize="14" Foreground="Blue"/>
</StackPanel>
<StackPanel Grid.Row="3">
<TextBlock Text="Description:" Margin="5" FontSize="14"/>
<TextBlock TextWrapping="Wrap" Foreground="Blue"
Text="{Binding Path=InvoiceDetails}" Margin="5"/>
</StackPanel>
<StackPanel Grid.Row="4" Margin="5" Orientation="Horizontal">
<TextBlock Margin="5" Text="Total Amount:" FontSize="14"/>
<TextBlock Margin="5" FontSize="14" Foreground="Blue"
Text="{Binding Path=TotalAmount, StringFormat=c}"/>
</StackPanel>
</Grid>
</UserControl>
Notice how the Image control’s Source property can also point to images stored on the Web, instead of just to a local resource. In this case, the source is the official logo of the Italian “LightSwitch Tips & Tricks” community, which the author of this book is the leader of. You can immediately see how the report you have written in code is automatically reflected in the designer, but this is just the first part. The next step is to bind the new control to the user interface, as explained in the next section.
Displaying the Report in the User Interface
The new control can be used as a preview within screens for the invoice that the user wants to print. Open the Invoice List Details screen. Then, when the Screen Designer is ready, follow these steps:
1. Expand the screen architecture and locate the Rows Layout, Invoice Details element. This is the appropriate place to extend the screen because the reporting control is referring to the details of a single invoice.
2. Click Add Layout Item on the toolbar and select Custom Control. When the Add Custom Control dialog appears, select the InvoicePreviewControl control, as shown in Figure 17.22. When you click OK, the new control is added to the screen.
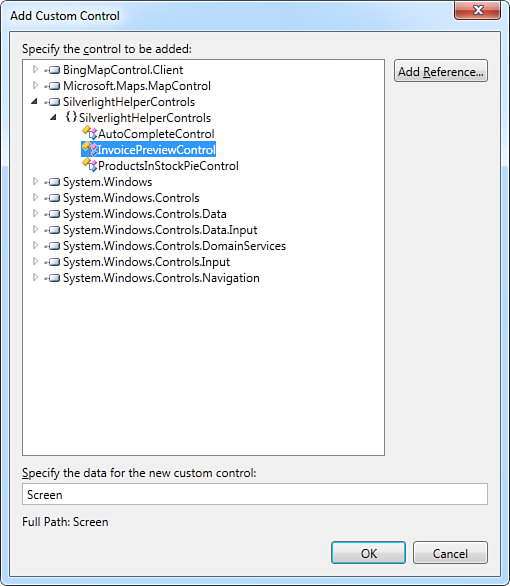
Figure 17.22. Adding a reference to the new control.
3. Run the application and open the screen, ensuring that you have selected an invoice from the list. Figure 17.23 shows how the screen can display the invoice preview each time you select one from the list.
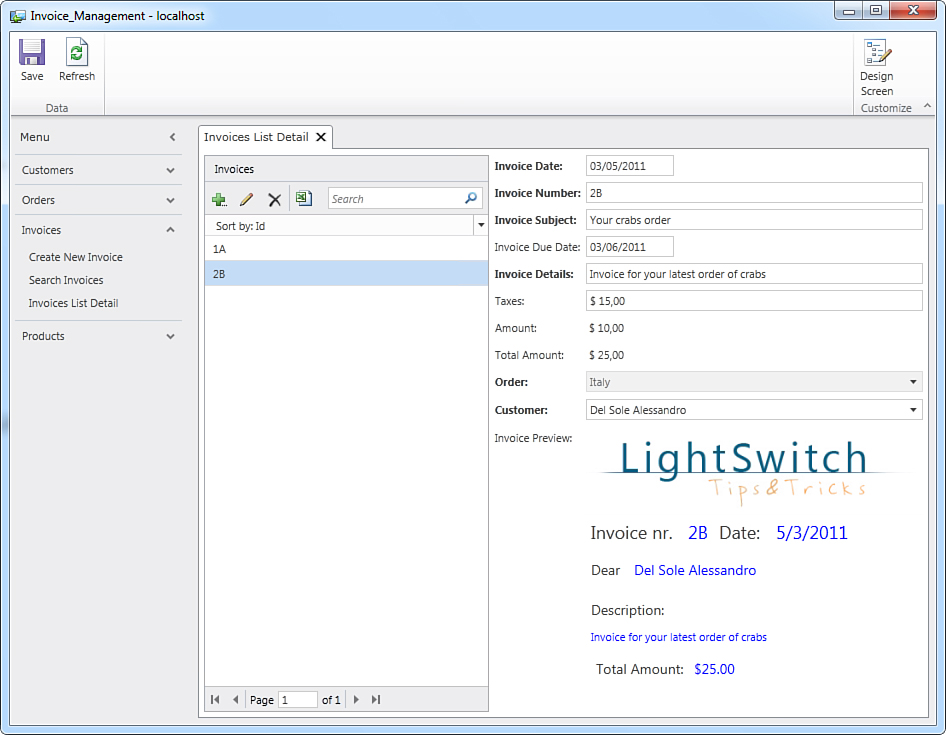
Figure 17.23. Displaying an invoice preview with the custom control.
Displaying the report as a preview can be useful, and you could also show it in different screens. In most cases, your company will need to print the invoice so that it can be sent to the customer. This is explained in the next subsection.
Silverlight’s Printing APIs
One of the most important additions to the Silverlight plug-in in version 4 is a rich set of printing APIs. You can now print documents or visual elements directly from within Silverlight applications, including LightSwitch programs. In this subsection, you add a new button to the Screen Command Bar that launches the print job, using the InvoicePreviewControl as the object to be printed.
Close the application if it is still running and go back to the Screen Designer. Now expand the Screen Command Bar element and add a new button. Then, specify PrintInvoice as the name of a new method. At this point, you need to edit both the PrintInvoce_CanExecute and PrintInvoice_Execute event handlers. Right-click the new button and select one of the event handlers to enable the code editor. First, you can write the code for CanExecute, as follows:
Private Sub PrintInvoice_CanExecute(ByRef result As Boolean)
result = (Me.Invoices.SelectedItem IsNot Nothing)
End Sub
Now it is time for Execute. Before writing code, it is important to understand what the code will do:
1. By invoking the Screen.FindControl method, it gets the instance of the InvoicePreviewControl. The return type is an IContentItemProxy that represents a visual element in the LightSwitch application’s infrastructure.
2. It converts such a type into an object of type InvoicePreviewControl, which is assigned to the IContentItemProxy.Control property and which represents the actual visual element to be printed.
3. It creates an instance of the PrintDocument class and then invokes the PrintDocument.Print method, which receives the InvoicePreviewControl as the element to be sent to the printer.
These points are translated into the following code:
Private Sub PrintInvoice_Execute()
' Write your code here.
Dim proxy As IContentItemProxy = Me.FindControl("ScreenContent")
AddHandler proxy.ControlAvailable,
AddressOf proxy_ControlAvailable
End Sub
Private Sub proxy_ControlAvailable(sender As Object,
e As ControlAvailableEventArgs)
Dim objInvoiceTemplate = CType(e.Control,
SilverlightHelperControls.
InvoicePreviewControl)
Dim document As New PrintDocument
AddHandler document.PrintPage, Sub(newSender As Object,
newE As PrintPageEventArgs)
newE.PageVisual = CType(objInvoiceTemplate,
UIElement)
End Sub
document.Print(String.Format("{0}",
Me.Invoices.
SelectedItem.InvoiceNumber))
End Sub
The print job is launched with a delegate that uses the PrintDocument class, new in Silverlight 4. When the PrintPage event is raised, the visual element to be printed is assigned to the print job (e.PageVisual). This assignment can be done only against items of type UIElement; this is the reason for the explicit conversion from objInvoiceTemplate of type InvoicePreviewControl to UIElement. The document.Print method starts printing, and the argument of the method is a string that identifies the print job in the print queue (in this case, the invoice number). Now run the application again and open the Invoice List Details screen. Figure 17.24 shows that the new button is visible in the Screen Command Bar and that the preview control is no longer visible.
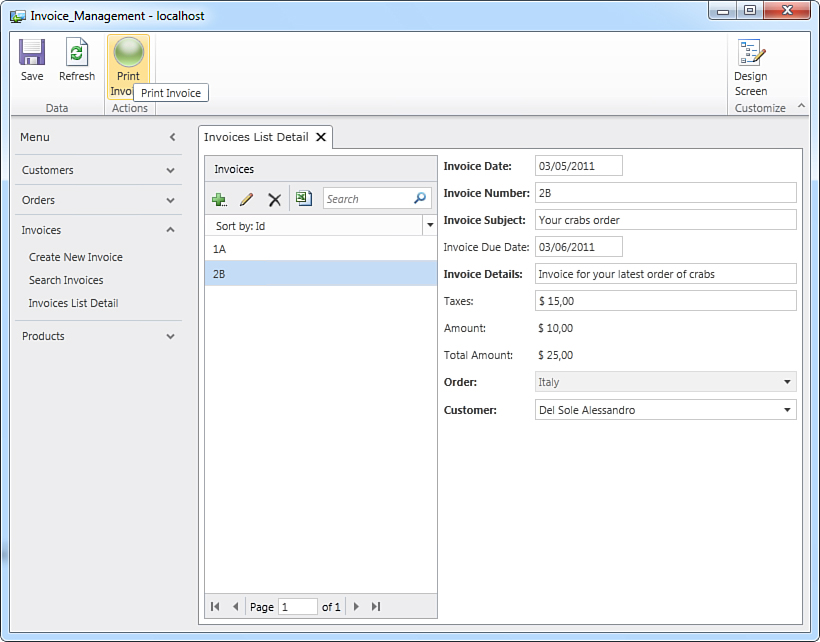
Figure 17.24. The new Print Invoice button available in the Screen Command Bar.
Now select an invoice and click Print Invoice. At this point, the usual printer dialog asks you to specify a printer from the available devices (see Figure 17.25).
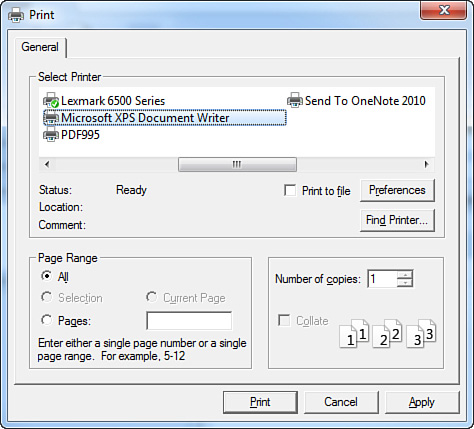
Figure 17.25. Selecting a physical or virtual printer.
You can select a physical or virtual printer, such as the Microsoft XPS Document Writer, if you want to print your document to a portable file. Finally, click Print. Figure 17.26 shows how the printed element appears inside an XPS portable document, instead of on paper.
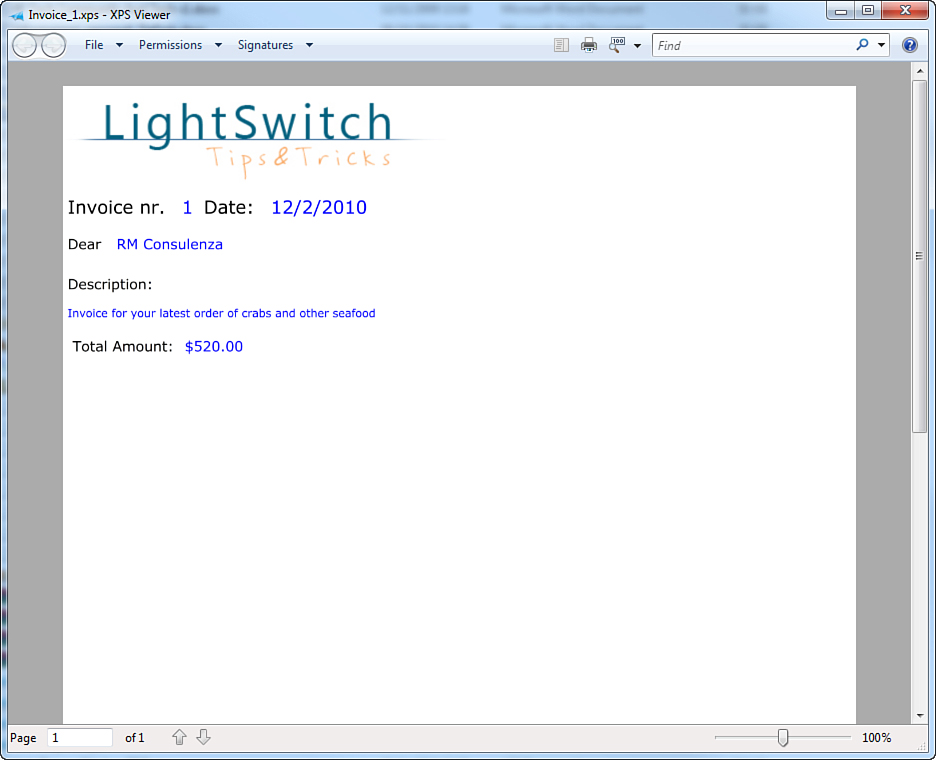
Figure 17.26. The printed document.
So, the application printed the invoice in a convenient way. The only limitation of this approach is that it is platform dependent and that it is not suitable for multipage reports. If you usually work with one-page documents, however, this can be a good choice. There are some better alternatives, such as the Office Integration Extension described earlier.
Summary
Visual Studio LightSwitch does not offer built-in functionalities for printing and reporting, except for the feature that enables exporting collections of entities to Microsoft Excel. GridLogic released the Office Integration Extension, which enables you to export data to Microsoft Word and PDF documents, to create email messages and appointments with Microsoft Outlook, and to export and import data with Microsoft Excel. When you need complex reporting features, you can use the Microsoft SQL Server Reporting Services platform or try to purchase extensions from Microsoft partners. These were discussed briefly, just showing the most important benefits. Finally, you saw how to use the printing APIs of Silverlight 4 to print a visual report created via a custom control. You should now have a good understanding of LightSwitch, but you are still missing one piece. So, in the next chapters, we cover a bit more of LightSwitch’s magic: how to build custom extensions.