In this chapter you will learn to:
Create sites.
Manage site users and permissions.
Manage sites and child sites.
Change a site's theme.
Save and use a site template.
Delete a site.
Microsoft Windows SharePoint Services sites and workspaces are containers for Web Part Pages, Web Parts, lists, and document libraries. You can use any site as a single container for your data or you can create as many child sites as you need to make your data easier to find and manage. You might find yourself frequently creating sites to secure a place for a given group of people to collaborate on its contents. For example, you might create a site to manage a new team or project, collaborate on a document, or prepare for and follow up on a meeting. As containers, sites can be used to secure their contents.
Site templates are used in Windows SharePoint Services as a blueprint to jump start a new site's usefulness by auto-generating the Web Part Pages, Web Parts, lists, and document libraries that will likely be most useful in a given situation. In this chapter, you will learn how to create a site using one of the site templates that are available from a default installation and the steps necessary to manage and administrate this site. You might want to differentiate a site by the way it is presented to the user, so you will also learn how to apply a theme to your site.
See Also
Do you need a quick refresher on the topics in this chapter? See the Quick Reference entries in Quick Reference.
Important
Remember to use your SharePoint site location in place of http://gardenco in the exercises.
The catalyst for organizing your data into different site containers will often be the same catalyst for creating multiple subdirectories on the file system. Perhaps you just have too much information to use a single container and still easily find what you are looking for. Imagine if all your files were kept in the root of the hard drive along with the operating system files and the files for all your other programs. The list of files would be difficult to sort through, work with, and manage. Just as you would create subdirectories to organize your file system data, you will likely create child sites to help organize your SharePoint data in logical ways.
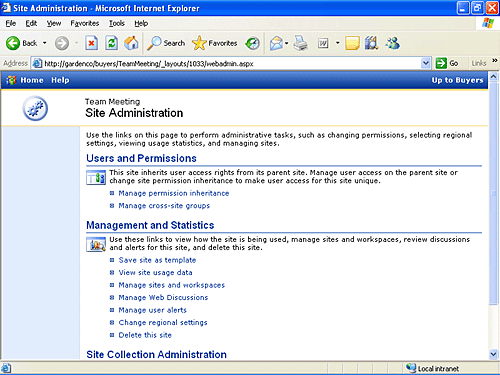
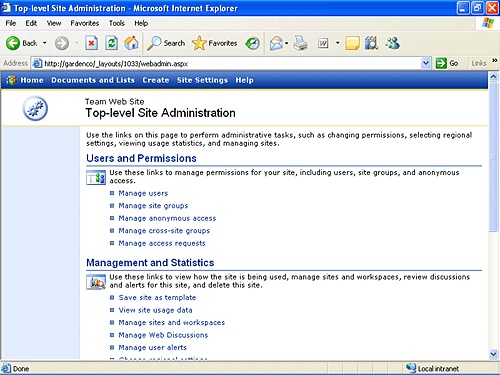
The initial site created in a SharePoint site collection is called the top-level site. Although the top-level site is functionally the same as its child sites, it is created from within SharePoint Central Administration. This is because it doesn't have a parent site. The top- level site in a site collection exclusively contains administrative links on the Site Administration page to manage site collection functionality.
To create a child site you must navigate to the New SharePoint Site page of the would-be parent site. See the following sidebar, "http://[site]/_layouts/1033/Directory," for details about how to gain direct access to the destination directly from the browser's address bar:
http://[site]/_layouts/1033/Directory
Most SharePoint administration pages are kept in a common folder called _layouts. Using http://[site]/_layouts/1033/ in the address bar of your browser, you can quickly navigate to administrative pages that may be buried relatively deep in a site's administrative links.
1033 is the Locale Culture ID (LCID) for the English language. Contents like date, time, and currency are displayed according to the location or region that the LCID identifies. If you use a language other than English, your LCID will be different than 1033.
The following table shows examples typically found in the top link bar of every SharePoint site.
Web site address (URL) | Administrative Page |
|---|---|
http://[site]/_layouts/1033/viewlsts.aspx | Documents and Lists |
http://[site]/_layouts/1033/create.aspx | Create Page |
http://[site]/_layouts/1033/settings.aspx | Site Settings |
The following table shows the same examples for a child site.
Web site address (URL) | Administrative Page |
|---|---|
http://[site]/[childsite]/_layouts/1033/viewlsts.aspx | Documents and Lists |
http://[site]/[childsite]/_layouts/1033/create.aspx | Create Page |
http://[site]/[childsite]/_layouts/1033/settings.aspx | Site Settings |
Note how the suffix for each Web site address is the same regardless of how deep into the site hierarchy you go. So, you can directly access the New SharePoint Site page by typing the following Web site address directly into your browser's address bar:
http://gardenco/_layouts/1033/newsbweb.aspx
When you are initially creating anything in Windows SharePoint Services, you are establishing two name values: the display name, usually labeled Name or Title, and the URL name, also known as the internal name. Occasionally, as is the case with sites, there is an option to provide the URL name separately. In any case, only the display name can be changed after an item is created.
Best practices to follow when initially naming anything in Windows SharePoint Services include the following:
The initial name should be descriptive, intuitive, and easy to remember.
The initial name should be kept short. There is a limit of 260 total characters available for the entire Web site address, so if you consistently use long names you will eventually have problems.
The initial name should not contain spaces. Spaces in the address bar are replaced with %20 so they take up three characters each. Spaces also make the Web site address difficult to use in an e-mail and difficult for others to read.
The initial name should be consistently used throughout the site.
Tip
When the URL name is not prompted for on a SharePoint create page, the display name, usually labeled Title, is used to populate both the display name and the URL name. There are certainly other best practices that could be established for a specific organization. It would be wise to establish your own naming conventions early on.
With Microsoft Office FrontPage 2003 both the display name and the URL name can be changed after an item is created.
When creating a new site there are two permission options available. The default option, "Use same permissions as parent site," checks the parent site's permission every time the user visits the child site to determine what the user is allowed to do on that site. As the permissions on the parent site change over time, the permissions on the child site reflect those changes. If you select the "Use unique permissions" option instead, you, as the site's creator, initially will be the only user with access to the site and you will be associated with the Administrator site group.
Tip
If you select "Use same permissions as parent site," it is possible to have the right to create a new site but not have the right to delete it. However, if you select "Use unique permissions," you will be the site's administrator and, as such, will always have the right to delete the new site.
From the Template Selection page, you can populate your site using one of the eight built- in templates. Each template provisions Web Part Pages, Web Parts, lists, and document libraries using the navigation best suited for the purpose of the template.
The first three templates listed—Team Site, Blank Site, and Document Workspace—all have the same latent capabilities and Quick Launch bar navigation. The Team Site provisions a Shared Documents library and five lists: Announcements, Contacts, Events, Links, and Tasks. The Blank Site, as you might surmise, has no lists or document libraries and only the Site Image Web Part. The Document Workspace provisions the same document libraries and lists as the Team Site, but makes the Shared Documents library more prominent by placing a Web Part for it on the default home page for the site. It also places a Members Web Part on the default home page.
The five meeting workspace templates are named Basic Meeting Workspace, Blank Meeting Workspace, Decision Meeting Workspace, Social Meeting Workspace, and Multipage Meeting Workspace. These sites are variations on a single theme. They show Page tabs across the top of each page rather than a Quick Launch bar on the left. In addition to some of the traditional list types, such as Tasks, Meeting Workspaces can also provision unique lists, such as Agenda, Attendees, Decisions, Objectives, and Things To Bring.
Tip
The eight built-in templates are actually configurations of the two underlying site definitions.
Additional configurations and even alternate site definitions can be created in the underlying files by the people that manage your Web servers. The eight built-in configurations can also be removed or altered.
You will likely focus, at least initially, on utilizing these built-in site templates. However, it is possible to save sites that you create as templates that you and others can select from the Template Selection page.
In the following exercise, you will create a child site that the buyers at The Garden Company will use to collaborate. As a team, the buyers need a centralized place to consolidate their announcements, links, and general discussions as well as track the status of their purchases and the list of current suppliers. You will use the Team Site template to initially populate the new child site.
OPEN the SharePoint site that you'd like to create a new child site within, for example: http://gardenco. If prompted, type your user name and password, and then click OK. BE SURE TO verify that you have sufficient rights to create a site. If in doubt, see the Appendix .
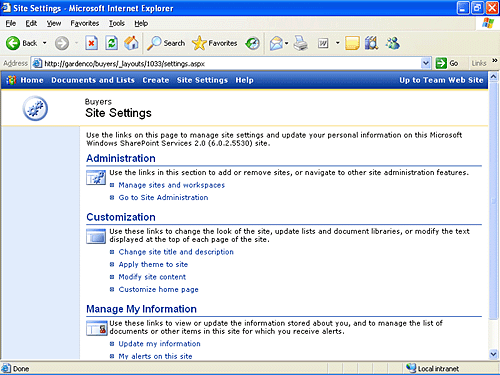
On the top link bar, click Site Settings.
In the Administration section, click Manage sites and workspaces.
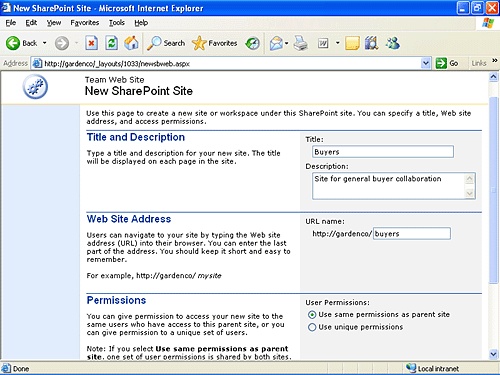
In the Title text box, type Buyers, to establish a display name for the new site.
In the Description textbox, type a description, such as Site for general buyer collaboration, to help users understand the purpose for the new site.
In the URL name textbox, type buyers for the Web Site Address.
This will determine the value in the browser's address bar that people will see when they visit the site. See the tip on naming conventions earlier in this section for best practices regarding naming.
Click the option button that defines the type of permissions you want to initially use on the site. For the Buyers site, use the default option Use same permissions as parent site.
Click the Create button.
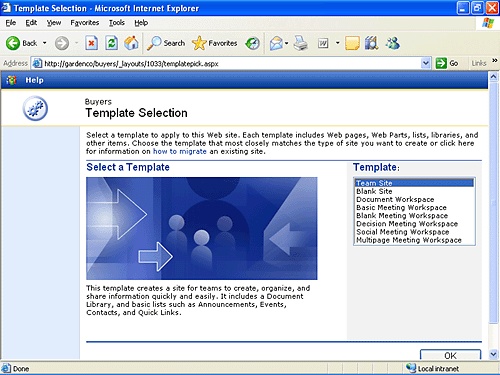
The Template Selection page appears.
In the Template list, click Team Site.
Click OK to create the new site with a default set of Web Part Pages, Web Parts, lists, and document libraries for the buyers to use on the new site.
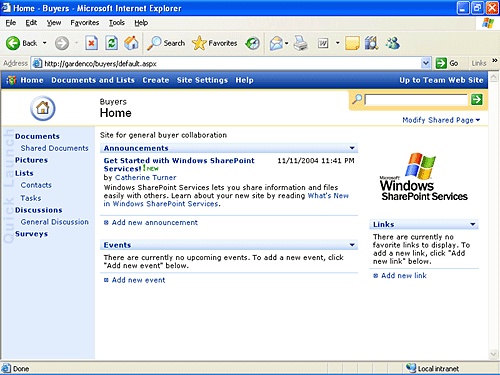
The Buyers Home page appears.
In the upper-right corner, click Up to Team Web Site, to return to the parent site.
CLOSE the browser.
Information in Windows SharePoint Services is either secured at the site level or at the list level. By default, all lists inherit the permissions of the site that contains them. You can delve deeper into list security in Chapter 4.
There are two obvious permission options available for a child site. The default option, "Use same permissions as parent site," checks the parent site's permission every time the user visits the child site, while the other option, "Use unique permissions initially," provides the site's creator sole access to the new site as its administrator.
Because permissions can be changed after the site is created, there are really two additional permission options that may not be evident. The third option is to use the same permissions, but then after the site is provisioned, change the new site to use unique permissions. This effectively copies the permissions of the parent site to the child site. Future changes to the parent site then would not be reflected on the child site. And finally, if you do use unique permissions, you will have complete control over the site as its sole administrator while you set it up, and then later you can change it back to use the same permissions as the parent site.
Tip
You can switch indefinitely between these options by using the "Manage permission inheritance" link on the Site Administration page.
Once a site uses unique permissions, you can use the "Manage users" link on the Site Settings page. Because there is no tie to the parent site, you can add and remove users from the site regardless of whether they have permissions on any other site. When users are added to a site, they must be associated with at least one site group.
Think of site groups as a named collection of rights. There are five site groups that Windows SharePoint Services makes available on every site, as described in the following table.
Site Group | Description of rights | Actual rights |
|---|---|---|
Guest | Rights given on lists or document libraries by way of per-list permissions are automatically added to the Guest site group. The Guest site group cannot be customized or deleted. Changes to list permissions define this site group. | Varies |
Reader | Has read-only access to the site. | View Items |
Contributor | Can add content to existing document libraries and lists. | All Reader rights plus: Add Items Edit Items Delete Items Browse Directories Manage Personal Views Add/Remove Private Web Parts Update Personal Web Parts Create Cross-site Groups |
Web Designer | Can create lists and document libraries and customize pages in the site. | All Contributor rights plus: Manage Lists Cancel Check-Out Add and Customize Pages Apply Themes and Borders Apply Style Sheets |
Administrator | Has full control of the Web site. This cannot be changed. | All Web Designer rights plus: Manage List Permissions Manage Site Groups View Usage Data Create Subsites Manage Web Site |
Tip
Although you can create your own site groups and you can even alter all site groups except for the Administrator site group, you likely will find these groups to be adequate.
Not only can you associate individual users with site groups but you can also associate Windows groups ( Windows NT groups, Active Directory groups or local machine groups ) with site groups. This is a very practical approach to providing tight security with minimum maintenance. However, you may not have control over the Windows groups created in the operating system. If that is the case, cross-site groups may be your ideal solution. Cross-site groups are a named collection of users, similar to Windows groups. Cross-site groups are maintained in each SharePoint site collection and can also be associated with site groups in any site in that site collection.
Rather than restrict people from collaborating on your new site, you may want to provide everyone some level of access. Anonymous users can be granted up to Contributor level access to the lists and document libraries in a site. Anonymous Access must be enabled on the SharePoint server before it can be enabled for individual sites.
Tip
You will also find an option to provide all authenticated users a default level of access on the Anonymous Access page.
After all the people and groups are assigned to various site groups, it is possible, and even likely, that someone will be associated at various levels with more than one site group. Rather than enforcing the most restrictive site group, all associated rights are aggregated and the cumulative list of unique rights applied.
In this exercise, you will change the permissions for a child site from inheriting permissions from its parent site to using unique permissions. Then you will add users that represent The Garden Company buyers to the child site as Contributors.
OPEN the buyer child site created in the previous exercise from the address bar of your browser: http://gardenco/buyers. If prompted, type your user name and password, and then click OK. BE SURE TO verify that you have sufficient rights to alter the site's permissions. If in doubt, see the Appendix .
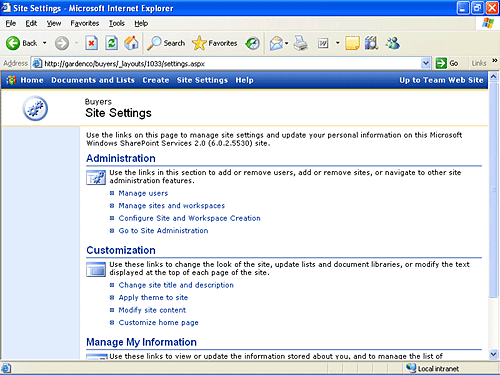
On the top link bar, click Site Settings.
There is no "Manage users" link anywhere on the page because users are being managed at the parent site.
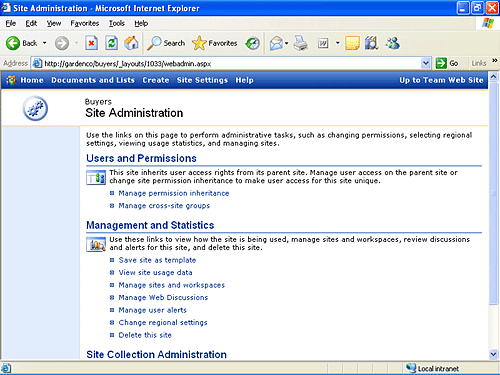
In the Administration section, click Go to Site Administration.
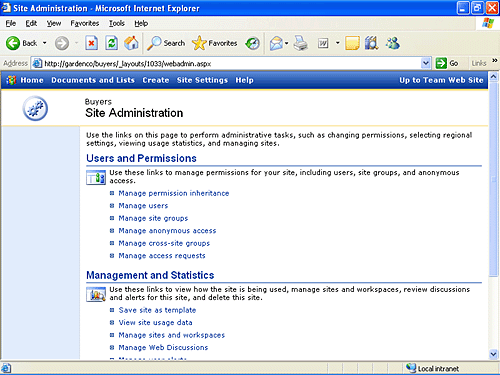
Again, there is no "Manage users" link anywhere on the page; only the "Manage permission inheritance" link.
In the Users and Permissions section, click Manage permission inheritance.
Click Use unique permissions, and then click OK to apply the change and redisplay the Site Settings page.
Notice how this page has changed. You now have a copy of the users and permissions that the parent previously managed.
In the Administration section, click Go to Site Administration, to redisplay the Site Administration page.
Notice the plethora of new options, including a "Manage users" link, available to you in the Users and Permissions section. Of course, you could change the permission inheritance back to inherit user permissions for the site from the parent site. But now you can manage the users of this site from here instead.
Tip
The "Manage users" link here and the "Manage users" link on the Site Settings page both link to the same administration page.
Also note that the links to "Manage site groups," "Manage anonymous access," and "Manage cross-site groups" previously discussed in this section are now available.
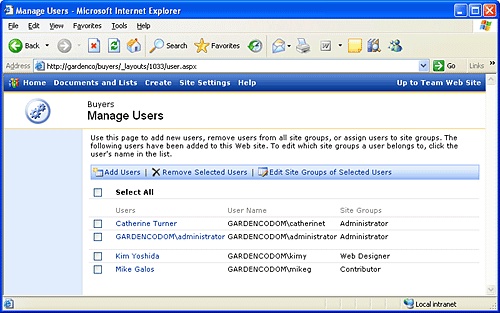
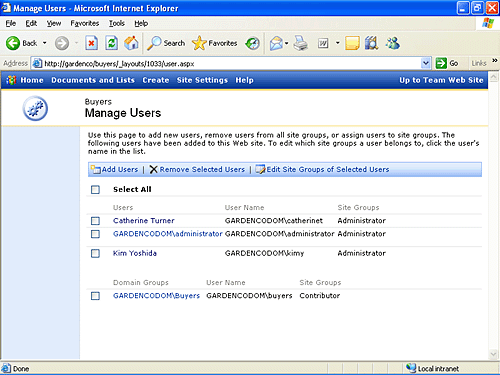
In the Users and Permissions section, click Manage users.
The Manage Users page appears.
Kim Yoshida is The Garden Company's Head Buyer, so she will need to be associated with the Administrator site group. Mike Galos does not need to collaborate with the buyers, so he can be removed. And finally, you need to add the Buyers Windows group and associate it with the Contributors site group.
Important
Your site will not have Catherine Turner, Kim Yoshida, and Mike Galos as users. If you want to modify the permissions for your list of users, you can continue to follow along with these steps, replacing the names as appropriate. The permission changes you make in the Buyers site will not affect the permissions in the parent site. Also, you will not have the Buyers Windows group. If your domain has a Windows group that you can use, you can use that group instead.
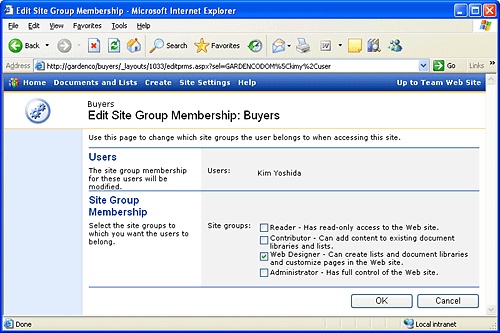
Click Kim Yoshida.
The Edit Site Group Membership: Buyers page appears.
Select the Administrator check box, deselect the Web Designer check box, and then click OK to apply the change.
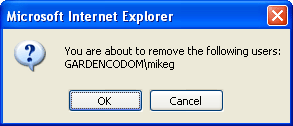
Select the Mike Galos check box, and then click Remove Selected Users.
Click OK to remove the user.
Clicking the Cancel button would discard the removal request.
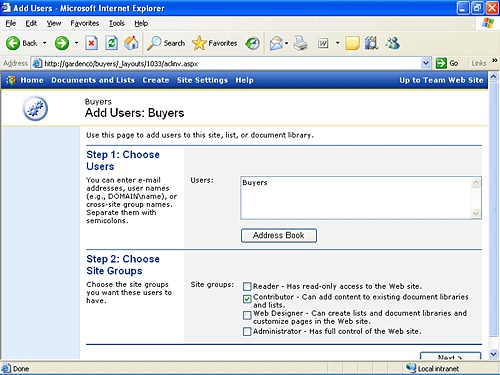
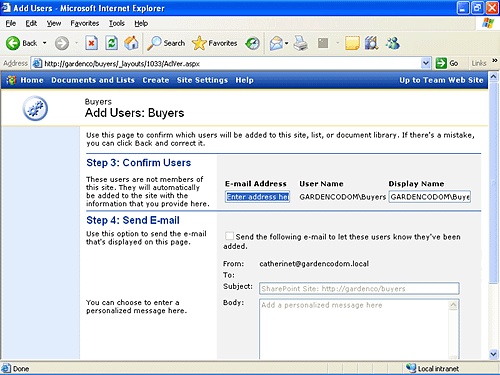
 On the Manage Users page, click Add Users.
The Add Users: Buyers page appears.
Type Buyers as the Windows group that you want to associate with the Contributor site group, click the Contributor site group, and then click Next.
Note
Typically you will add users and Windows groups using a format like domainnameusername or domainnamegroupname. Fortunately, Windows SharePoint Services searches the domain for users and Windows groups that match even if the proper naming convention isn't provided.
Windows SharePoint Services locates the Windows group and determines if there is an e-mail address associated with it. If you provide an e-mail address in the E-mail Address box, the send e-mail option will be enabled and you can notify the new members of your site about their membership.
Click Finish to complete the Add Users wizard.
The Manage Users page appears.
Tip
It is wise to at least associate every user in the various child sites to a site collection with the Reader site group in the top-level site. Users will be unable to use custom site templates and list templates imported into a site collection unless they are associated with one of the four built-in site groups in the top-level site.

CLOSE the browser.
Your child sites have been created, site templates have been applied, and users have been given proper permissions. How do you get back to your child sites? How can you create another child site from your child site? How will you find child sites that others have created?
In this exercise, you will create a meeting workspace child site of the Buyers child site. Since you must be in a site to create a child site, you will first see how to navigate to the Buyers child site. Then you will view the entire site collection's site hierarchy from the top-level site.
OPEN the parent for the Buyers site from the address bar of your browser: http://gardenco. If prompted, type your user name and password, and then click OK. BE SURE TO verify that you have sufficient rights to create a new site. If in doubt, see the Appendix .
On the top link bar, click Site Settings.
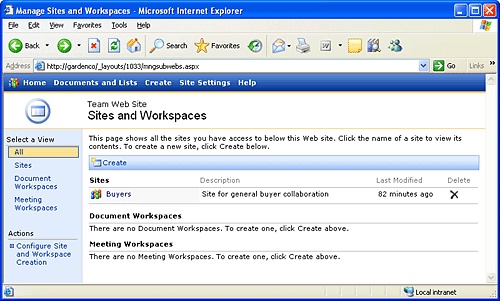
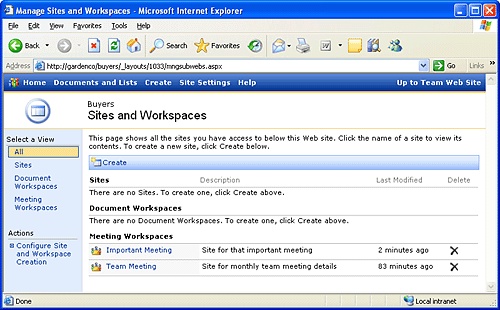
In the Administration section, click Manage sites and workspaces.
A list of all the child sites, grouped by site type, are displayed.
Click Buyers to display the child site.
On the top link bar, click Site Settings.
In the Administration section, click Manage sites and workspaces.
Tip
Alternatively, you could type the entire site hierarchy directly into the browser's address bar. At first this seems a little odd, but Microsoft Internet Explorer will learn the places that you type often and it can be a real time saver rather then clicking through the user interface. To see the child sites of the current site, append /_layouts/1033/mngsubwebs.aspx to the current site's Web site address.
Click Create to display the New SharePoint Site page.
You were at this page earlier in this chapter when we created the Buyers child site. However, this time you are creating a child of the Buyers site rather then a child of the starting site.
In the Title text box, type Team Meeting, to establish a display name for the new site.
In the Description text box, type a description, such as Site for monthly team meeting details, to help users understand the purpose of the new site.
In the URL name text box, type TeamMeeting for the Web Site Address. Remember the naming conventions listed earlier in this chapter.
Keep the default permissions by using the Use same permissions as parent site option.
Click the Create button to display the Template Selection page.
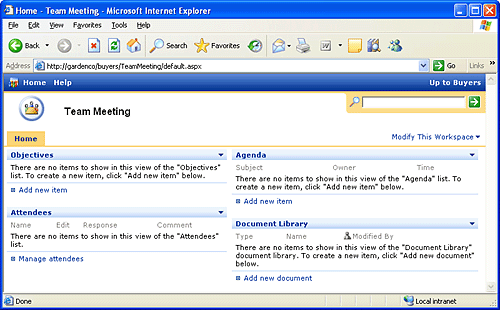
In the Template list, click Basic Meeting Workspace.
Click OK to create and display the new meeting workspace.
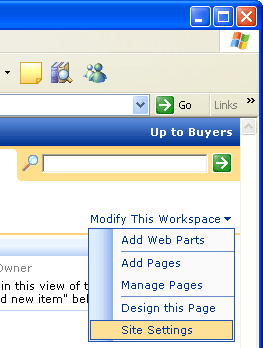
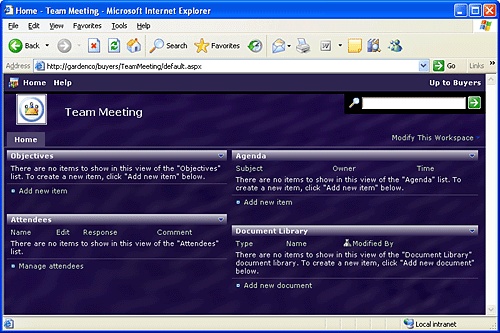
Notice how different Meeting Workspaces look from team sites. Page tabs, such as the Home tab, replace the Quick Launch bar. Documents and Lists, Create, and Site Settings do not show on the top link bar. Site Settings now is on the bottom of the Modify This Workspace menu, which is just below the search box.
Next we navigate back to the top-level site to see the entire hierarchy of child sites.
Note
To navigate to the top-level site, you could click Up to Buyers located in the upper-right corner to return to the parent site, and then on the Buyers site, click Up to Team Web Site to return to its parent; continue this process until you get to the top-level site. Using the Go to Top-level Site Administration link at the bottom of the Site Administration page for any child site is a quicker way to navigate directly to the top-level administration page.
From the Modify This Workspace menu, click Site Settings.
In the Administration section, click Go to Site Administration.
The Site Administration page appears.
At the bottom of the Team Meeting Site Administration page click, Go to Top-level Site Administration.
The Top-level Site Administration page appears.
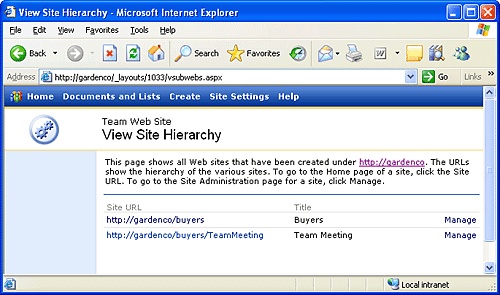
Near the bottom of the page in the Site Collection Administration section, click View site hierarchy, to display the View Site Hierarchy page.
This page shows you all the flattened out, fully qualified child sites in the entire hierarchy. You can click on the site name to display the site or click on the Manage link to display the Site Administration page for the associated child site.
CLOSE the browser.
The blue SharePoint sites initially are fine, but they eventually blur together because they look too similar. With Windows SharePoint Services you can apply a theme to your sites. Themes can radically affect display items, such as colors, graphics, text, banners, and borders. You can choose from nearly 80 built-in themes. Each SharePoint site can have its own theme, or you could set up several sites to all have a common theme so that they visually relate.
Tip
With Microsoft Office FrontPage 2003 you can gain even more control over how themes are applied to your site. You can choose to only apply themes to specific pages or even create your own custom themes.
Perhaps the buyers at The Garden Company want to create a theme for their Team Meeting child site so that it stands out from the other sites. In this exercise, you will navigate to the Team Meeting site and apply a theme.
OPEN the Team Meeting site from the address bar of your browser: http://gardenco/buyers/TeamMeeting. If prompted, type your user name and password, and then click OK. BE SURE TO verify that you have sufficient rights to set up a site's theme and view the site hierarchy. If in doubt, see the Appendix .
On the Team Meeting child site from the Modify This Workspace menu just below the search box, click Site Settings.
In the Customization section, click Apply theme to site to display the Apply Theme to Web site page.
In the Select a Theme list, click Breeze.
Click the Apply button to apply a theme and then redisplay the Site Settings page of the Team Meeting site.
Click Home to display the new home page theme of the Team Meeting site.
The Team Meeting site appears with its new theme.
CLOSE the browser.
After working with a site for a while, you might want to save it just the way it is so that it can be re-created repeatedly. Windows SharePoint Services facilitates this activity by letting the Web Designers and Administrators save a site as a custom template. Custom templates are a way of packaging a set of changes to an existing site definition and making that package available as a template for new sites and lists. Custom templates behave in much the same way that the five built-in templates do in that they provision Web Part Pages, Web Parts, lists, and document libraries best suited for the purpose of the template. In fact, everything in a site except security related information is saved in a custom site template, including its theme and navigation. You can even optionally retain the data in all the site's lists and document libraries.
Note
The STP files on this book's CD-ROM that are used to recreate the solutions for each chapter are actually custom site templates saved to a file.
Every custom template is based on an underlying site definition and saved as a file in the site collection site gallery document library in the root of the site collection. Once saved, a custom site template is made immediately available throughout the entire site collection in which it was saved. When creating a new child site, any user that is associated with one of the default site groups (excluding the Guest site group) in the top-level site will see the saved custom site template as an option on the Template Selection page. To use a custom site template when creating a new top-level site from SharePoint Central Administration, it must be placed into the central template gallery using a command-line tool on the Web server rather than just in the site collection site gallery.
Let's say that the unique look that The Garden Company buyers created for their Team Meetings site has caught on and they want to be able to use the theme repeatedly. In this exercise, you will save the Team Meeting site as a custom site template and then use it to create another meeting site as a child of the Buyers child site.
OPEN the Team Meeting site from the address bar of your browser: http://gardenco/buyers/TeamMeeting. If prompted, type your user name and password, and then click OK. BE SURE TO verify that you have sufficient rights to save a site template and create a new site. If in doubt, see the Appendix .
On the Team Meeting child site, from the Modify This Workspace menu, click Site Settings.
In the Administration section, click Go to Site Administration.
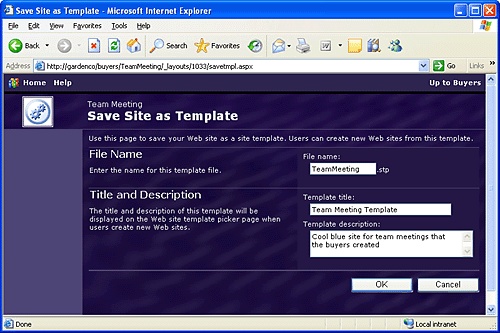
In the Management and Statistics section, click Save site as template to display the Save Site as Template page.
In the File name text box, type TeamMeeting to establish a name for the STP file.
In the Template title text box, type Team Meeting Template to establish the name that will show in the list of templates to choose from on the Template Selection page.
In the Description text box, type a description, such as Cool blue site for team meetings that the buyers created, to help site creators understand the intended purpose of the custom site template.
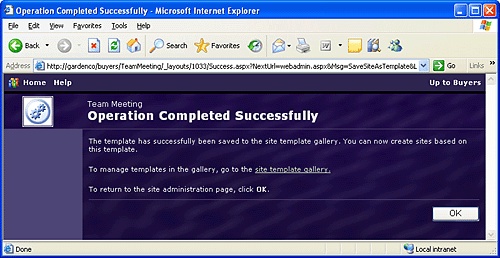
Click OK, to save the custom site template into the site collection site template gallery and to display the Operation Completed Successfully page.
Click OK to acknowledge the page and redisplay the Team Meeting Site Administration page.
In the upper-right corner, click Up to Buyers to display the Buyers child site.
On the top link bar, click Site Settings to display the Site Settings page.
In the Administration section, click Manage sites and workspaces to display the Sites and Workspaces page.
Click Create to display the New SharePoint Site page.
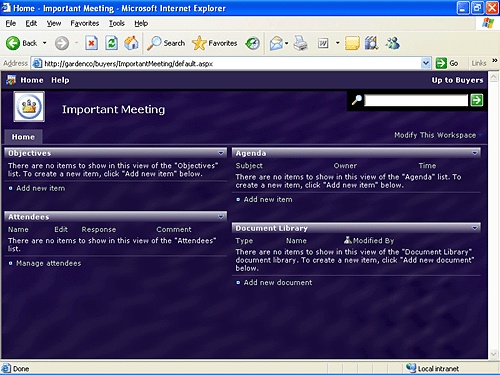
In the Title text box, type Important Meeting to establish a display name for the new site.
In the Description textbox, type a description, such as Site for that important meeting, to help users understand the purpose of the new site.
In the URL name text box, type ImportantMeeting for the Web Site Address. Remember the naming conventions listed earlier in this chapter.
Keep the default permissions by using the Use same permissions as parent site option.
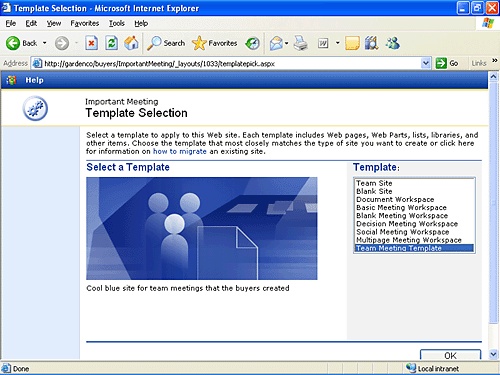
Click the Create button, to display the Template Selection page.
The Team Meeting Template is now available in the Template list. Also note that the description given to the custom site template is displayed below the image when it is selected.
On the Template list, click Team Meeting Template.
Click OK to apply the template and display the new meeting workspace.
The new site Important Meeting site will be identical to the original Team Meeting site.
As always, if you can create something, you also need to be able to uncreate it. Windows SharePoint Services generates all the necessary user interface elements to create, review, update, delete, and manage. However, proceed with some prudence because once something in Windows SharePoint Services is deleted, it cannot be undeleted. You can put very good backup and recovery practices in place, but like a file on your file system, if something is created and deleted before a backup is run, it cannot be restored. There isn't anything like a recycle bin available for Windows SharePoint Services yet.
Tip
It is possible to delete an entire site collection full of sites from SharePoint Central Administration.
Sometimes you will want to remove a site that you either created in error or no longer need. In fact, the creator of the Important Meeting child site at The Garden Company changed priorities and the site is no longer needed. So, in this exercise, you will delete the Important Meeting child site from the Buyers child site.
OPEN the Buyers site from the address bar of your browser: http://gardenco/buyers. If prompted, type your user name and password, and then click OK. BE SURE TO verify that you have sufficient rights to delete a site. If in doubt, see the Appendix .
On the top link bar, click Site Settings.
In the Administration section, click Manage sites and workspaces.
The Sites And Workspaces page appears.
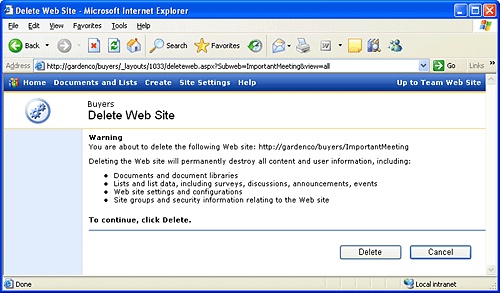
 On the far right of the Important Meeting line, click the Delete icon, to begin the site deletion process.
The Delete Web Site page appears.
Click the Delete button to confirm the deletion request, complete the deletion process, and return to the Sites and Workspaces page.
The Important Meeting site is no longer displayed.
CLOSE the browser.
Sites are containers for Web Part Pages, Web Parts, lists, and document libraries.
The initial site created in a SharePoint site collection is called the top-level site.
To create a child site you must navigate to the New SharePoint Site page.
Don't use spaces in site names and keep them short and intuitive.
Sites are easy to create and secure.
Only after a site is using unique permissions can you manage its users.
Site groups are a named collection of rights.
Cross-site groups are a named collection of users (similar to Windows groups).
All associated rights are aggregated and the cumulative list of unique rights applied.
Clicking Up to [Parent Site] in the upper-right corner of a child site will return the user to the parent site.
Each site can have its own theme.
Sites can be saved as custom templates and immediately used to create other clone sites in a site collection.
Deleting a site is permanent; there is no recycle bin in Windows SharePoint Services.