In this chapter you will learn to:
Discover default lists in a site.
Create a new list.
Add, edit, and delete list items.
Use the Datasheet view.
Attach files to list items.
Add, edit, and delete list columns.
Sort and filter a list.
Add and modify a list view.
Set up alerts.
Delete a list.
You can think of the lists in Microsoft Windows SharePoint Services as editable, Web- based tables that facilitate concurrent, multi-user interactions against a common, centralized, extensible set of columns and rows. SharePoint lists empower users to provision their own repositories of structured information using list items that behave like rows with labeled columns named by you. The Web pages necessary to create, review, update, delete, and manage these lists and their data are automatically and dynamically generated by Windows SharePoint Services.
Tip
Unstructured information is typically stored as a document with associated columns in a document library. Document libraries are discussed at length in Chapter 5 and Chapter 6.
In this chapter, you will discover default lists that are already on your site, create new lists, and alter existing lists. Many lists are provisioned on your behalf and you need only to begin using them. But there will come a time when the lists that are provided do not quite meet a need. So, this chapter will also explore the Web pages that enable you to alter existing lists and create your own lists.
See Also
Do you need only a quick refresher on the topics in this chapter? See the Quick Reference entries in Quick Reference.
Important
![]() Before you can use the practice files provided for this chapter, you need to install them from the book's companion CD to their default locations. See "Using the Book's CD-ROM" for more information.
Before you can use the practice files provided for this chapter, you need to install them from the book's companion CD to their default locations. See "Using the Book's CD-ROM" for more information.
Important
Remember to use your SharePoint site location in place of http://gardenco in the exercises.
Many default lists are provided by Windows SharePoint Services. When you need to create a list, you can use the default list templates to generate a new list with a static set of pre- defined columns. As explained later in this chapter, after a list has been created, additional columns can be added and most of the default columns can be altered or deleted. The list templates built into Microsoft Windows SharePoint Services are described in the following table.
List template | Site Type | Description | |
|---|---|---|---|
Agenda | Meeting Workspaces | Create an agenda list when you want to outline the meeting topics, determine who will cover the topics, and how much time each presenter is allotted. | |
Announcements | All Sites | Create an announcements list when you want a place to share news, status, and other short bits of information. | |
Contacts | All Sites | Create a contacts list when you want to manage information about people that your team works with, such as customers or partners. You can share information between your contacts list and Windows SharePoint Services-compatible contacts programs. | |
Custom List | All Sites | Create a custom list when you want to specify your own columns. The list opens as a Web page, to which you can add or edit items one at a time. | |
Custom List in Datasheet View | All Sites | Create a custom list when you want to specify your own columns. The list opens in a spreadsheet-like environment for convenient data entry, editing, and formatting. It requires a Windows SharePoint Services-compatible list datasheet control and ActiveX control support. | |
Decisions | Meeting Workspaces | Create a decisions list when you want to keep track of all decisions made at the meeting. Attendees and others can then review the results of the meeting. | |
Events | All Sites | Create an events list when you want a calendar-based view of upcoming meetings, deadlines, and other important events. You can share information between your events list and Windows SharePoint Services- compatible events programs. | |
Import Spreadsheet | All Sites | Import a spreadsheet when you want to create a list that has the same columns and contents as an existing spreadsheet. Importing a spreadsheet requires a spreadsheet application compatible with Windows SharePoint Services. | |
Issues | All Sites | Create an issues list when you want to manage a set of issues or problems. You can assign, prioritize, and follow the progress of issues from start to finish. | |
Links | All Sites | Create a links list when you have links to Web pages or other resources that you want to share. | |
Objectives | Meeting Workspaces | Create an objectives list when you want to let your attendees know your goals for the meeting. Every meeting should begin with a purpose in mind. | |
Tasks | All Sites | Create a tasks list when you want to track a group of work items that you or your team needs to complete. | |
Text Box | Meeting Workspaces | Create a text box when you want to insert custom text, such as instructions or motivational quotes, into the meeting. | |
Things To Bring | Meeting Workspaces | Create a list of things that attendees should bring to be prepared for the meeting, such as notebooks, handouts, or something to eat. |
Tip
The Text Box is an odd list, having only a single column and only supporting a single row. It can also be shared across multiple meetings in a repeating group.
As discussed in Chapter 3, Microsoft Windows SharePoint Services provisions some of these lists for you when you create a new site, depending on which site template you use. The Blank Site has no lists or document libraries, whereas the Team Site and Document Workspace provision a Shared Documents library and five lists: Announcements, Contacts, Events, Links, and Tasks. The Meeting Workspace templates provision unique lists, such as Agenda, Attendees, Decisions, Objectives, and Things To Bring.
See Also
For more information about Document Workspaces, refer to Chapter 7. For more information about Meeting Workspaces, refer to Chapter 8.
In the following exercise, you will browse to the lists that have been created for The Garden Company's top-level site. Subsequently, you will browse to the Create page to see the list templates available when you create a new Team Site.
OPEN a newly created SharePoint Team Site to explore, for example http://gardenco. If prompted, type your user name and password, and then click OK. BE SURE TO verify that you have sufficient rights to browse the site. If in doubt, see the Appendix .
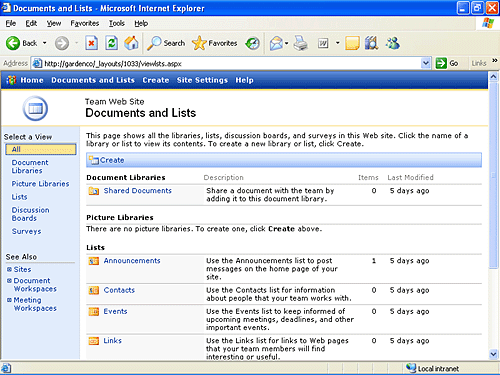
On the top link bar, click Documents and Lists.
This site has one default document library, called Shared Documents, a discussion board called General Discussion, and five default lists: Announcements, Contacts, Events, Links, and Tasks.
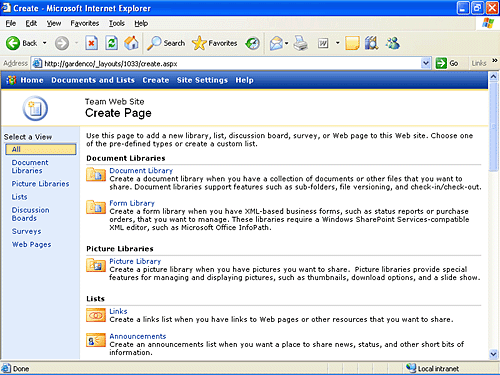
 Click Create to display the Create page.
Tip
Don't be confused by the naming convention. The names for the list templates are identical to the names for the default lists that are generated by Windows SharePoint Services. However, they are radically different from each other. Each list template shown on the Create page could be used to create one of more uniquely named instances in the Documents and Lists page. For instance, if the Announcements list template was used to create the Announcements list, the resulting list could be called something else, such as Sales Notices. The names do not have to be the same.
CLOSE the browser.
The first step in creating a new list is to ask yourself, "What kind of information do I want to gather?" The answer to this question will help you to determine which list template to choose. Perhaps you want to start with a list that is close to your end goal and then add, delete, and alter columns to give you just the solution you are trying to achieve. For example, if you plan to collect information like names and addresses, you might choose the Contact list template to create your initial list, and then modify it. Or perhaps you will want to start with a bare-bones list and build it entirely from scratch. In that case, you would choose the Custom List list template.
Tip
If the list items in the list you want to create always begin with a document, consider using a document library instead of a list. Document libraries are discussed at length in Chapter 5 and Chapter 6.
In the following exercise, you will create a list for the buyers at The Garden Company to track the status of tasks in the buying process. This task list will be based on the Tasks list template. After the list is created, you will alter the display name so that it displays Common Buyer Tasks.
OPEN the SharePoint site from which you'd like to create the new list, for example, http://gardenco. If prompted, type your user name and password, and then click OK. BE SURE TO verify that you have sufficient rights to create lists. If in doubt, see the Appendix .
On the top link bar, click Create.
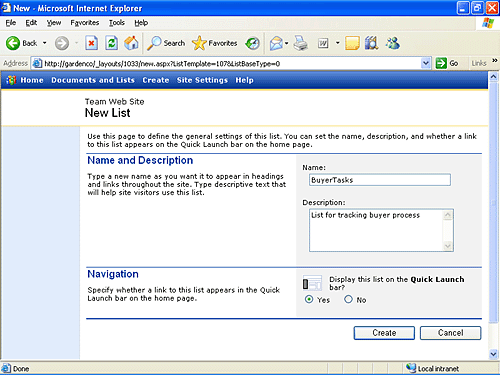
In the Lists section, click Tasks to display the New List page.
You will use this page to create a task list based upon the Tasks list template. You can name your new task list anything you want.
In the Name text box, type BuyerTasks to establish a display name for the new list.
Because no text box is provided for the URL name, the Name text box also supplies the value that Windows SharePoint Services uses for internal names.
Note
When you initially create a list in Windows SharePoint Services, you establish two name values: the display name, usually labeled Name or Title, and the URL name, also known as the internal name. However, you can only change the display name after the item is created. When the URL name is not prompted for separately on a SharePoint create page, the display name, usually labeled Title, is used to populate both names.
The initial name should be descriptive, intuitive, and easy to remember.
The initial name should be kept short. A limit of 260 total characters is available for the entire Web site address, so if you consistently use long names you will eventually have problems.
The initial name should not contain spaces. Spaces in the address bar are replaced with "%20," which takes up three characters for each space. Spaces also make the Web site address difficult to use in an e-mail message and difficult for others to read.
The initial name should be consistently used throughout the site.
Your organization might have specific naming conventions that you want to follow.
In the Description text box, type a description, such as List for tracking buyer process to help users understand the purpose for the new list.
In the Navigation section, Verify that the Yes option is selected indicating that you want this new list to appear on the Quick Launch bar.
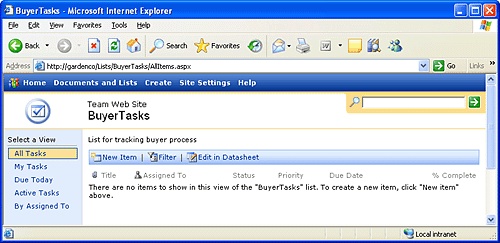
Click the Create button to complete the list creation.
The BuyerTasks page is displayed in All Tasks view.
 On the top link bar, click Home to display the Home page for the site.
The new BuyerTasks list now appears in the Quick Launch bar.
Because this list was named without a space, it would be useful to change the display name so that it has a space in it.
On the Quick Launch bar, click BuyerTasks to redisplay the BuyerTasks page.
On the left side of the page in the Actions section, click Modify settings and columns.
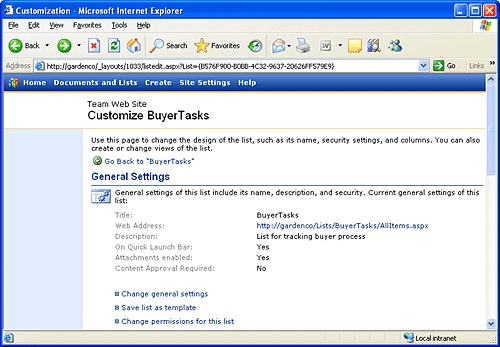
The Customize Buyer Tasks page appears.
In the General Settings section, click Change general settings.
The List Settings: BuyerTasks page appears.
In the Name text box, replace BuyerTasks with Common Buyer Tasks (including spaces).
Scroll to bottom of the page and click the OK button to save the change.
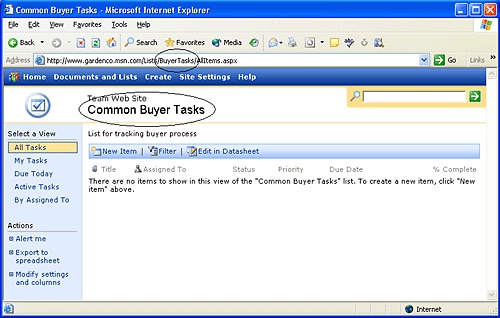
The Customize Common Buyer Tasks page is displayed.
At the top of the page, click Go Back to "Common Buyer Tasks" to redisplay the Common Buyer Tasks page.
The bold title at the top of this page and all other pages associated with this list now reflects the modified display name. However, you can see that the browser's address bar still reflects the initial name (internal name) given to this list.
On the top link bar, click Home to display the Home page for the site.
The Quick Launch bar displays the new Common Buyer Tasks display name.
CLOSE the browser.
Creating a SharePoint list generates the pages needed to view the list, view a list item, add a new list item, and edit an existing list item. The interface also provides options to delete a list item, subscribe to an alert for the list or a list item, and other options, such as the import and export of list items.
See Also
For more information about subscribing to alerts, see the section "Setting Up Alerts" later in this chapter. For more information about importing and exporting list items, refer to Chapter 11.
Tip
Frequently, multiple list views are generated when a new list is created. The Common Buyer Tasks list, created using the Tasks list template, has the following five list views: All Tasks, My Tasks, Due Today, Active Tasks, and By Assigned To.
You can navigate to a list's default list view page by clicking on its name in the Quick Launch bar or by clicking on the link at the top of any List View Web Part for that list.
In this exercise, you will add several task list items for the buyers at The Garden Company to use in their buying process, modify one of the list items, and delete another. Mike would also like to get their Public Workshops onto the calendar. So, you will add one recurring event to the Events list.
OPEN the SharePoint site where you previously created the Common Buyer Tasks list, for example: http://gardenco. If prompted, type your user name and password, and then click OK. BE SURE TO verify that you have sufficient rights to alter list items. If in doubt, see the Appendix .
On the Quick Launch bar, click Common Buyer Tasks.
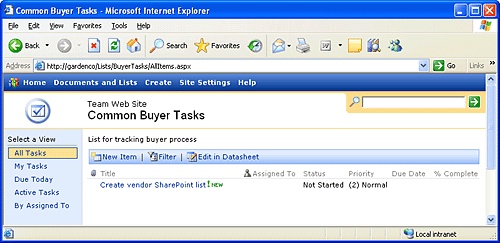
 Click New Item to display the Common Buyer Tasks: New Item page.
In the Title text box, type Create vendor SharePoint list.
Leave the default values for Priority, Status, % Complete, and Assigned To fields.
In the Description text box, type List for vendor to submit seedlings offered this year.
Delete today's date from the Start Date text box.
Leave the Due Date text box empty.
Click Save and Close to save the list item and redisplay the Common Buyer Tasks page.
 The newly created list item appears in the body of the page. A small image with an exclamation mark and the word NEW is displayed to the right of the Title text indicating that this list item was recently created.
Using steps 2 through 8 as a guide, create list items using the values in the following table:
Title
Description
Ensure vendor access
Ensure vendor has access to add a list item for each seedling offered.
Identify seedlings to purchase
Identify which vendor seedlings to purchase.
Generate purchase order
Use Microsoft Word mail merge to generate a purchase order from the filtered list.
Notify Receiving about purchase
Notify Receiving about the anticipated arrival of vendor seedlings.
Tip
When you need to create several items for a list, creating one item at a time can get tedious. Instead, you can create multiple list items using a Datasheet view. This option is covered briefly in the following section and covered in detail in Chapter 11.

Mike suggests that generating the purchase should be changed to a high priority task.
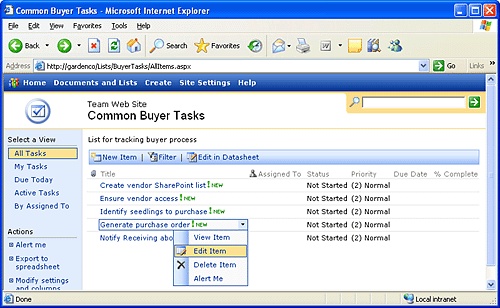
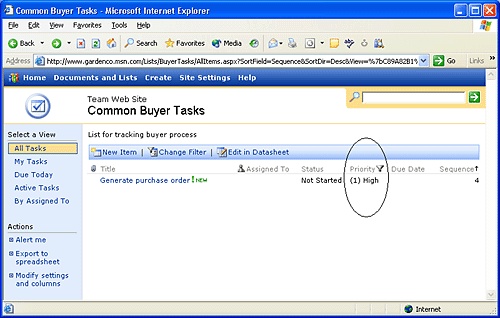
To implement Mike's suggestion, move your mouse over the Generate purchase order list item, and then click the down arrow that appears.
In the menu, click Edit Item to display the Common Buyer Tasks: Generate purchase order page.
Change the Priority drop-down list from (2) Normal to (1) High, and then click Save and Close.
Mike also suggests that creating the vendor SharePoint list is done only when a new vendor is established rather than for each buying cycle. So, he wants it removed.
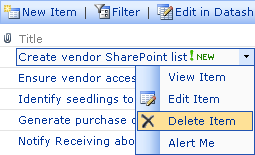
To implement Mike's suggestion and remove the list item, move your mouse over the Create vendor SharePoint list list item, click the down arrow that appears, and then click Delete Item.
You will be prompted to confirm the deletion.
Click OK to confirm the deletion.

To add a recurring Public Workshop to the Events list, you need to navigate to the Events list.
On the top link bar, click Document and Lists.
In the Lists section, click Events to display the Events list.
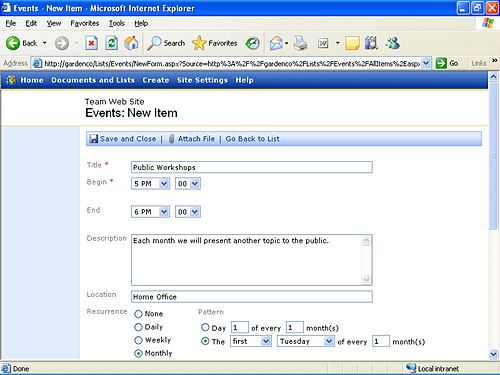
In the Title text box, type Public Workshops.
Leave the default value for the Begin date but change the time to 5 PM.
Leave the End date blank but change the time to 6 PM.
The monthly meeting is set to last one hour.
In the Description text box, type Each month we will present another topic to the public.
In the Location text box, type Home Office.
In the Recurrence section, select the Monthly option.
Many user interface changes occur when Recurrence is changed from the default of None to Monthly. Note that the dates for Begin and End are removed leaving just the time fields. The Begin date is also moved to the Start Date of the Date Range section.
In the Pattern section, select The first Tuesday of every 1 month(s).
Click Save and Close to save the list item and redisplay the Events page.
CLOSE the browser.
If you have Microsoft Office 2003 installed, you can use an optional Datasheet view of the list that can be a huge productivity boost. Creating one item at a time requires several clicks and can get tedious. The Datasheet view presents all the list items of a list in a grid and facilitates editing across the entire table. Yet, drop-down lists, checkboxes, and column edits are all still maintained. Using the Datasheet view is a lot like editing a table in Microsoft Access. You can use your cursor keys or your mouse to move from cell to cell to make changes to any row in the list. When you move off of a row, changes are saved automatically. The last row in the datasheet view is used to add additional list items to the list.
An entire task pane on the right edge of the Datasheet view enables powerful integration between Microsoft Windows SharePoint Services, Microsoft Excel 2003, and Microsoft Access 2003.
See Also
For more information about the Datasheet view, refer to Chapter 11. For more information about SharePoint integration with Microsoft Office, refer to both Chapter 10 and Chapter 11.
Sometimes, you might have one or more documents that you want to attach to a list item. By default, all SharePoint lists allow attachments. However, if every list item has one and only one document, reconsider the use of a list and opt for a document library.
Tip
It is possible to disable attachments to list items. To do this, on the "Change general settings" page for your list, click "Modify settings and columns," click Change general settings, and then click the Disabled option in the Attachments section.
In the following exercise, you will create a simple Microsoft Word document to simulate a purchase order and attach it to an existing list item in the Common Buyer Tasks list.
OPEN the SharePoint site where you previously created the Common Buyer Tasks list, for example http://gardenco. If prompted, type your user name and password, and then click OK. BE SURE TO verify that you have sufficient rights to alter list items. If in doubt, see the Appendix .
Open Microsoft Word, and then in the blank document, type Purchase Order.
On the File menu, click Save As. Save the document in the My Documents folder on your hard drive and name it GardenCoPurchaseOrder.doc.
Close Microsoft Word.
In the browser on the Quick Launch bar, click Common Buyer Tasks.
The Common Buyer Tasks default list view page is displayed.
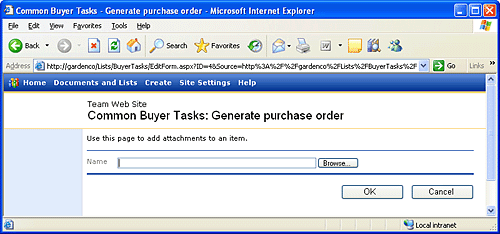
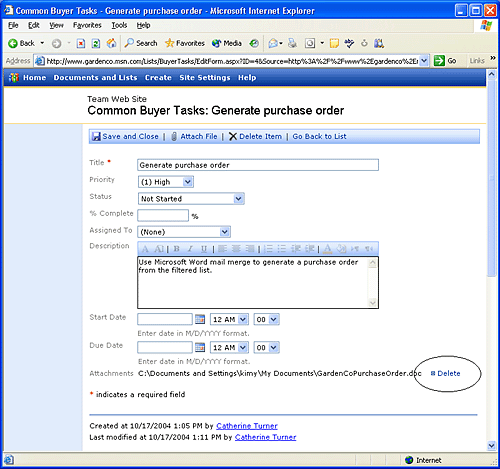
Move your mouse over the Generate purchase order list item, click the down arrow that appears, and then click Edit Item to display the Common Buyer Tasks: Generate purchase order page.
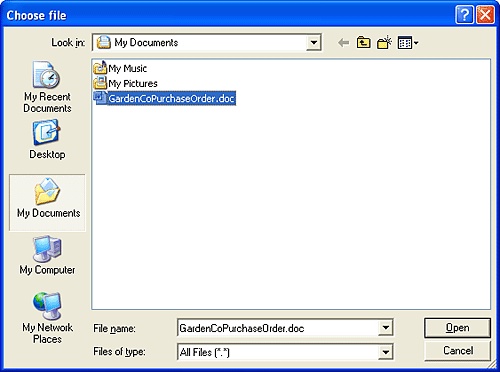
Click Browse to display the Choose File dialog box.
Select GardenCoPurchaseOrder.doc, and then click the Open button, or double- click the document to open it.
Once selected, the location of the selected document is displayed in the Name text box.
Click OK to attach the document to the list item.
The Common Buyer Tasks: Generate purchase order edit page is displayed. The attachment is listed at the bottom of the page. A Delete link also appears that can be used to remove the attachment anytime this page is displayed.
Click Save and Close to complete the process of attaching the document to the list item.
The Common Buyer Tasks page is displayed.
 Each list item in the list that has one or more attachments will be displayed with an attachment icon in the leftmost column.
CLOSE the browser.
The list templates provided by Windows SharePoint Services are a great start to generate a list with very little effort. However, should you need to customize them, Windows SharePoint Services enables you to add, edit, and delete the columns in any list.
A plethora of column types exist when you want to extend a list with an additional column. Once you name your new column, you need to select one of the column types displayed in the following table.
Tip
Most, but not all, column types have both Required and Default value options. If Required is set to true, the user must enter a value into the column when creating or editing a list item. If the user doesn't enter a value, the Default value will be used.
Note
Because every column type has a Description option and an Add to default view option, these options are not explicitly listed in the table.
Column Type | Used To | Options | Edit Using |
|---|---|---|---|
Single line of text | Enter a few words | Required Maximum number of characters Default value | Single-line text box |
Multiple lines of text | Enter one or more sentences | Required Number of lines to display Allow rich HTML text | Multiple-line text box with a toolbar to edit text |
Choice | Select one or more choices from a static list | Required List of choices Display options Allow ‘fill-in’ choices Default value | Drop-down list, option buttons, or a group of checkboxes |
Number | Enter a number | Required Minimum and Maximum values Number of decimal places Default value Show as percentage | Single-line text box |
Currency | Enter a monetary value | Required Minimum and Maximum values Number of decimal places Default value Currency format | |
Date and Time | Enter date and/or time-of-day | Required Date format Default value | Date text box with a pop-up calendar and drop-down lists for hours and minutes |
Lookup | Select one member of the site or list item from a list in the site | Required Get information from In this column Include presence information | Drop-down list |
Yes/No | Enter true or false | Default value | A single check box |
Hyperlink or Picture | Enter a link to a page or picture | Required Format URL as | Single-line text box |
Calculated | Calculate information from columns on this list, columns on another list, dates, or numbers using standard mathematical operators | Formula The data type returned from this formula is | Single-line text box |
After you've added a column, you can make some changes to it. You can change the display name but the internal name cannot be changed. Most other column options can be changed even after data has already been entered into the list. If changing an option will potentially result in the loss of information, Windows SharePoint Services will prompt you to confirm the change before proceeding.
Tip
You can also change a field from not required to required after data has already been entered. The underlying data is not affected unless someone attempts to edit an existing record. The new required rule is enforced and the list item cannot be saved without providing a value in the required column.
Most columns in the list can be deleted. However, all lists have at least one column that cannot be removed, typically the Title column. Certain lists also prevent the deletion of columns so that the list can display properly or so that they integrate with the Microsoft Office System properly. For example, the Assigned To, Status, and Category columns of any list based on the Issues list template cannot be deleted, and all of the default columns in any list based on the Event list template cannot be deleted.
Five columns are automatically created and cannot be changed: ID, Created, Created By, Modified, and Modified By. The ID column ensures that the list item is unique in the list. It contains a sequential number beginning with 1 and increments by 1 for each new list item. Windows SharePoint Services automatically captures when the list item was created, who it was created by, when it was modified, and who it was modified by. Initially, the Created and the Modified columns are equal, as are the Created By and Modified By columns.
In the following exercise, you will enhance the Common Buyer Tasks list by adding a Sequence column, by editing the Priority column to include an additional option, and by deleting the % Complete column. Finally, you will change the order of the columns on the New, Display, and Edit pages to show the Description column immediately after the Title column.
OPEN the SharePoint site where you previously created the Common Buyer Tasks list, for example, http://gardenco. If prompted, type your user name and password, and then click OK. BE SURE TO verify that you have sufficient rights to manage the list. If in doubt, see the Appendix .
On the Quick Launch bar, click Common Buyer Tasks.
On the left side of the page in the Actions section, click Modify settings and columns.
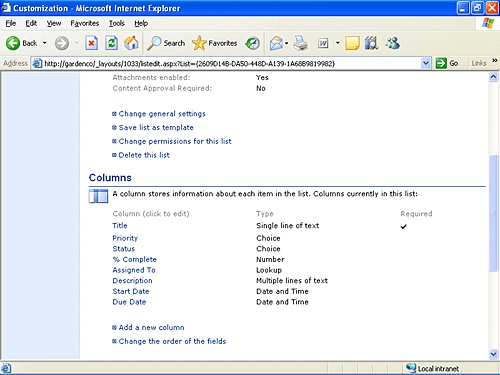
The Customize Common Buyer Tasks page appears.
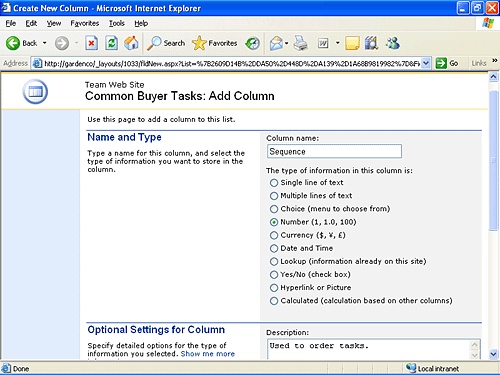
In the Columns section, click Add a new column to display the Common Buyer Tasks: Add Column page.
In the Column name text box, type Sequence.
In the list of column types, click Number.
In the Description text box, type Used to order tasks..
Leave the default values for the rest of the column's settings.
Scroll to the bottom of the page, and click OK to finish adding the Sequence column to the list.
The Customize Common Buyer Tasks page is displayed.
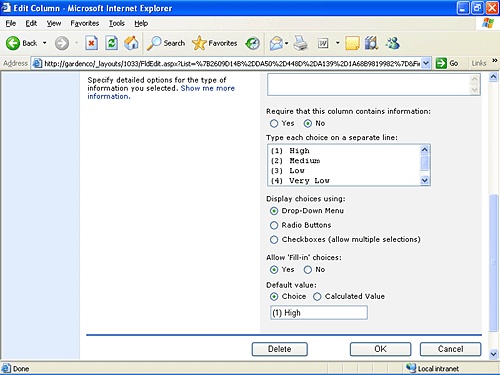
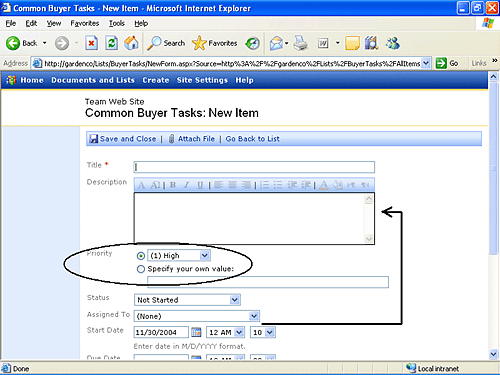
The buyers commonly have some tasks that are very low on the task list and would like to add an option to the Priority column to reflect this. They typically use Medium rather than Normal to rank their tasks and they would like to allow people to enter priorities other than High, Medium, Low, or Very Low.
To edit the settings for the existing column, in the Columns section, click Priority.
In the Type each choice on a separate line text box, type (4) Very Low as the last line to add an additional option to the drop-down list.
In the Type each choice on a separate line text box, replace (2) Normal with (2) Medium in the second line to alter the existing option in the drop-down list.
Tip
Any list items that previously had the option (2) Normal chosen will need to be manually changed to the new option, (2) Medium. Also, if you don't change the Type each choice on a separate line text box, the Default value will change to the first choice on the list, (1) High in this case. If you want the Default value to remain as the second option, you need to type (2) Medium into the Default value text box. For this exercise, you can use the default (1) High.
In the Allow ‘Fill-in’ choices column, click Yes to allow values that are not included in the column's list of choices to be entered.
Click OK to save changes to the Priority column.
The Customize Common Buyer Tasks page is displayed.
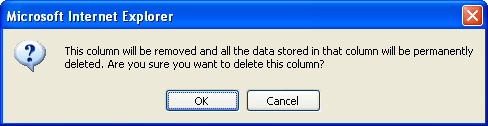
The buyers don't plan on using the % Complete column, so it can be deleted. In the next part of the exercise, you will delete this column from the list.
In the Columns section, click % Complete to delete the existing column.
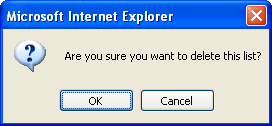
At the bottom of the page, click Delete to initiate deletion of the % Complete column from the list and display the deletion confirmation dialog.
A dialog box appears, asking you if you're sure you want to delete the column.
Click OK to delete the % Complete column.
The Customize Common Buyer Tasks page is displayed.
When creating or editing list items, the buyers would like to show the Description column immediately after the Title column. In the next part of the exercise, you will change the order of the columns displayed on the New, Display, and Edit pages.
In the Columns section, click Change the order of the fields.
To the right of the Description column, select 2 from the drop-down list to change the sequence of the fields so that the Description column comes immediately after the Title column.
Click OK to save the sequence change.
The Customize Common Buyer Tasks page is displayed.
At the top of the page, click Go Back to "Common Buyer Tasks" to return to the default list view page.
Click New Item to display the Common Buyer Tasks: New Item page.
On the modified Common Buyer Tasks: New Item page, verify that the order of the columns has changed and the Description column comes immediately after the Title column.
CLOSE the browser.
As the list grows, it eventually becomes difficult to see the entire list on a single page. To this end, Windows SharePoint Services provides built-in sorting and filtering capabilities. On any standard list view page, individual column headers can be used to alphabetically sort the entire list, first ascending and then descending.
Filtering on the list view page works similar to the way Microsoft Excel auto-filter works. Once the filter is enabled, a unique list of the values for each column is generated and presented as a drop-down list above each column. The filters are cumulative.
Tip
In the Datasheet view, sorting and filtering are available from the drop-down arrow on the top right corner of every column.
In this exercise, you will sort and filter the Common Buyer Tasks list.
OPEN the SharePoint site where you previously created the Common Buyer Tasks list, for example, http://gardenco. If prompted, type your user name and password, and then click OK. BE SURE TO verify that you have sufficient rights to view the list. If in doubt, see the Appendix .
On the Quick Launch bar, click Common Buyer Tasks.
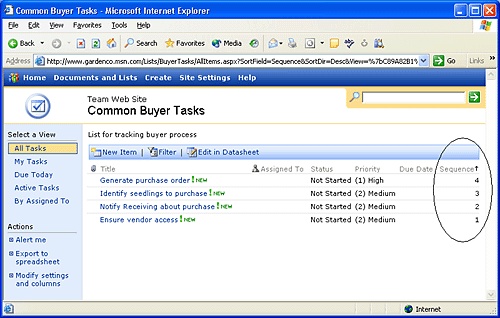
Edit each list item as indicated in the following table:
Title
Sequence
Ensure vendor access
1
Notify Receiving about purchase
2
Identify seedlings to purchase
3
Generate purchase order
4
Move the mouse over the Sequence column and wait for about a second.
The column will be immediately underlined and a ToolTip will appear that reads Sort by Sequence.
Click on the Sequence column.
 A down arrow icon is displayed to the right of the column name, and the list items are displayed in ascending numerical order.
Click on the Sequence column again.
 An up arrow icon appears to the right of the column name, and the list items are displayed in descending numerical order.
Click Filter.
In the drop-down above Priority, click (1) High.
The page immediately redisplays the filtered list with only those list items that are set to a high priority.
 The Filtered icon appears to the right of each column that has an auto-filter applied.
Click Change Filter.
The list is redisplayed with drop-down menus above each column so that additional columns can be filtered.
CLOSE the browser.
Sorting and filtering directly on a list view page's columns is only temporal. However, you can use the list views to provide permanent definition of how the information in the list is displayed. List views define which columns to show in a list and in what sequence these columns are displayed. The sequence is defined from left to right. They may also define the order of rows to be presented, which rows to reveal, and how the list items will be grouped, totaled, styled, and paginated. List views can be created using one of the three starter views defined in the following table.
Starter View | Description |
|---|---|
Standard View | View data in a standard table and easily switch to Datasheet View. |
Datasheet View | View data in an editable spreadsheet and easily switch to Standard View. |
Calendar View | View data in a calendar format and easily switch from day view, to week view, and to month view. |
Every time a new list view is created for a specific list, it begins as one of these starter views. Once created, it is placed to the left of the page with the other list views.
There are two kinds of list views: Public and Personal. Public list views can be seen by everyone that can view the list, whereas, Personal list views can be viewed only by the creator. Readers and contributors cannot create Public list views. Everyone can create their own personal list views on a list.
In this exercise, you will create a Public list view called High Priority Tasks for the buyers to see only the tasks that are currently set to a (1) High priority along with their current status. You will use the Datasheet view starter so that all the list items can be easily updated simultaneously.
OPEN the SharePoint site where you previously created the Common Buyer Tasks list, for example, http://gardenco. If prompted, type your user name and password, and then click OK. BE SURE TO verify that you have sufficient rights to manage the list. If in doubt, see the Appendix .
On the Quick Launch bar, click Common Buyer Tasks to display the Common Buyer Tasks page in standard view.
On the left side of the page in the Actions section, click Modify settings and columns to display the Customize Buyer Tasks page.
At the bottom of the page in the Views section, click Create a new view.
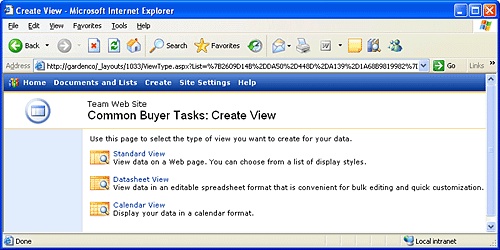
The Common Buyer Tasks: Create View page appears.
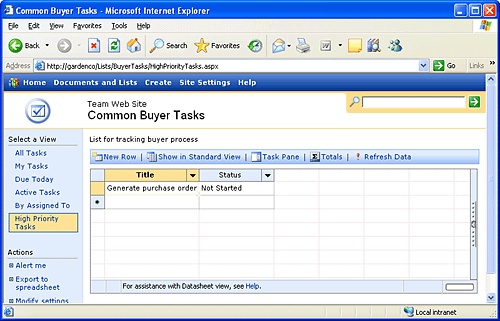
Click Datasheet View so that the new list view has an editable spreadsheet as its default view and displays the Common Buyer Tasks: Create Datasheet View page.
In the View Name text box, type HighPriorityTasks.
In the Audience section, verify that Create a Public View is selected.
Uncheck all check boxes in the Display column except the Title (linked to item with edit menu) column and the Status column.
The Title column is currently set to 2 and the Status column is currently set to 4. Therefore, the Title column will be displayed before the Status column.
Tip
There are three Title columns listed in the Columns section. They all represent the same value, but each one is displayed in a special way. The selected "Title column: Title (linked to item with edit menu)" not only shows the text value of the Title column but also includes a drop-down menu that can be accessed by moving your mouse over the text and clicking on the down arrow. "Title (linked to item)", currently unselected and at the bottom of the Columns section, simply presents the text value in the Title column as a link to the View page for each list item. And finally, the actual Title column, also currently unselected, is just like any other column; it shows only the text captured for the Title column for each list item.
In the Sort section in the First sort by the column drop-down list, click Sequence to order the list using the value in the Sequence column.
By default, it appears in ascending order.
In the Filter section in the Show the items when column drop-down list, click Priority to set up a row filter.
Leave is equal to as the selected option for the filter condition.
In the text box just below the filter condition, type (1) High.
Click OK to save the list view and redisplay the Customize Common Buyer Tasks page.

Now that the list view has been created you can go back and change the display name.
At the bottom of the page in the Views section, click HighPriorityTasks to display the Common Buyer Tasks: Edit Datasheet View page.
In the View Name text box, replace HighPriorityTasks with High Priority Tasks (including spaces) to change the name that is displayed at the left of the list view page.
Scroll to the bottom of the page, and then click OK to redisplay the Customize Common Buyer Tasks page.
Near the top of the page, click Go Back to "Common Buyer Tasks" to return to the default list view page for the list.
On the left side of the page, click on High Priority Tasks to display the list using the rules that we established in this exercise.

CLOSE the browser.
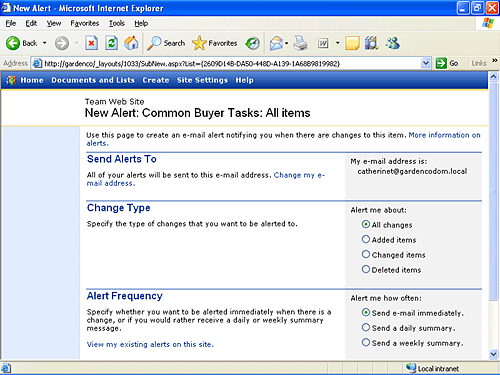
Windows SharePoint Services includes a handy feature that sends an e-mail notification whenever changes are made to site content, including changes made to list items in a list. The setup for an e-mail notification is called an alert. No alerts are set up automatically, so you must sign up for the alerts you want.
Alerts are quite easy to set up. Every list in a SharePoint site displays an Alert Me link in the Actions section at the left of the page. By clicking on this link, you can subscribe to a list level alert. A similar Alert Me option is available when viewing any list item in the list. As you might suspect, with this link you can subscribe to a list item level alert.
Alerts specify to whom the alert is sent and the kind of changes and frequency for which the alert is sent. By default, the alert is sent to the e-mail address of the user setting up the alert. If no e-mail address has been established for the authenticated user, the Send Alerts To section prompts for one. Once provided, the e-mail address will be remembered for subsequent subscriptions. Should the e-mail address provided need to be changed later, a link called "Change my e-mail address" is included in the Send Alerts To section.
You have some choices when setting up alerts as to the type of change that you want to be alerted about. List level alerts allow subscriptions for All Changes to any list item changes or alternatively for Added items only, Changed items only, or Deleted items only. If you want to see added items and changed items but not deleted items, you need to set up two alerts. List item level alerts, on the other hand, allow alerts only for Changed items. This is logical because you can only set up this alert once the list item already exists; a deletion is considered a change to the list item.
Tip
Document libraries support the additional ability to set up alerts when Web discussion updates occur. For more information about document libraries, refer to Chapter 5 and Chapter 6.
You must also specify the alert frequency. You have three choices for any type of alert: Send e-mail immediately, Send a daily summary, or Send a weekly summary. Choosing to receive an alert immediately queues the notice to be sent as soon as the next job runs or whenever the alert is triggered. By default, the alert job runs every five minutes but could be configured by your administrator to wait as long as 59 minutes. The daily and weekly summary stores all changes made to the list or the list item and sends a summary at the end of the period chosen. By default, daily summary alerts are generated at midnight each night and weekly summary alerts are generated at midnight on Sunday night each week.
Lists created using the Issues list template have an additional, special alert that can be enabled at the bottom of the general list settings for the list. When enabled, a supplementary notice is sent to the user in the Assigned To column of the issue whenever the list item is changed.
Tip
Administrators of the SharePoint environment can establish quotas for the total number of alerts that any user can subscribe to. By default, this quota is set to 50. This number can be changed or even set to unlimited. Alerts can also be turned off entirely.
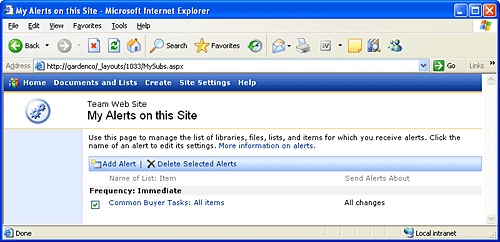
You can view and manage all of the alerts that you have previously set up using the "View my existing alerts on this site" link in the Alert Frequency section instructions. To add or delete alerts, you can use the Add Alerts or Delete Selected Alerts links.
Important
Alerts must be manually deleted when users are removed from a site, otherwise the alerts are orphaned. Also, if a user has set up alerts for themselves, they will continue to receive them even if they are removed from access to the list. It is important to delete these alerts to prevent unauthorized users from having access to site and user information.
In this exercise, you will create a new alert that notifies you of all changes to the Common Buyer Tasks list. After testing the alert, you will delete it.
OPEN the SharePoint site where you previously created the Common Buyer Tasks list, for example, http://gardenco. If prompted, type your user name and password, and then click OK. BE SURE TO verify that you have sufficient rights to manage the list. If in doubt, see the Appendix .
On the Quick Launch bar, click Common Buyer Tasks.
On the left side of the page in the Actions section, click Alert me to display the New Alert: Common Buyer Tasks: All items page.
Leave the default settings of All changes and Send e-mail immediately.
Click OK to create the e-mail alert and return to the Common Buyer Tasks page.
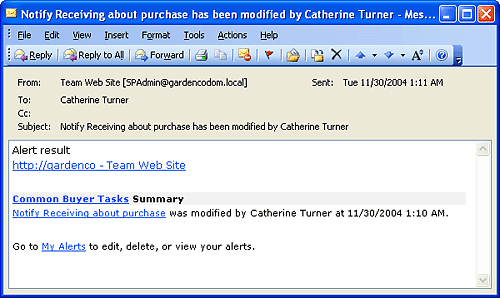
Edit the Notify Receiving about purchase item, and then change the Priority to (1) High. Be sure to click Save and Close after making the change.
After a few minutes, you should receive an e-mail message that looks like the following:
Now you will delete the alert.
On the Common Buyer Tasks page on the left side of the page in the Actions section, click Alert me to display the New Alert: Common Buyer Tasks: All items page.
In the Alert Frequency section, click View my existing alerts on this site to display the My Alerts on this Site page.
Add a check mark next to Common Buyer Tasks: All items.
Click Delete Selected Alerts.
The "Are you sure you want to delete this alert?" dialog box is displayed.
Click OK to confirm the deletion.
CLOSE the browser.
It is important to know how to get rid of an obsolescing list or perhaps one created in error. But be forewarned, deleting a list permanently removes the list and all the list items contained within it. Once it's gone, it's gone. There is no recycle bin.
That said, The Garden Company buyers are happy with their new Common Buyer Tasks task list and no longer need the Tasks task list that was created when the site was originally provisioned. In this exercise, you will delete the surplus list.
OPEN the SharePoint site where you previously created the Common Buyer Tasks list, for example, http://gardenco. If prompted, type your user name and password, and then click OK. BE SURE TO verify that you have sufficient rights to delete the list. If in doubt, see the Appendix .
On the Quick Launch bar, click Tasks.
On the left side of the page in the Actions section, click Modify settings and columns to display the Customize Tasks page.
In the General Settings section, click Delete this list.
The "Are you sure you want to delete this list?" dialog box is displayed.
Click OK to confirm the deletion.
The Documents and Lists page appears. The Tasks list is no longer shown on the Documents and Lists page.
CLOSE the browser.
Lists are like editable, Web-based tables.
List templates can be used to generate a new list with a static set of default columns. There are 14 built-in, default list templates: Agenda, Announcements, Contacts, Custom List, Custom List in a Datasheet, Decisions, Events, Import Spreadsheet, Issues, Links, Objectives, Tasks, Text Box, and Things To Bring.
You can create SharePoint lists using descriptive, easy to remember, consistent names.
One or more documents can be optionally attached to a list item.
With Windows SharePoint Services, you can add, edit, and delete the columns in any list.
List views define how the list items in the list are displayed. Lists can be sorted and filtered manually or through the use of named list views.
Public list views can be seen by everyone, whereas Personal list views can only be seen by their creator.
You can create alerts for a list when you want to know that an item in a list has been changed.
Deleting a list permanently removes the list and all the list items from the site.