In this chapter you will learn to:
Import data from an Excel spreadsheet to a list in SharePoint.
Use the Datasheet view.
Export a SharePoint list to an Excel spreadsheet.
Publish an Excel list to a SharePoint site.
Export data from an Access database to a list in SharePoint.
Import a list to an Access Table.
Link an Access table to a SharePoint list.
Microsoft Windows SharePoint Services provides the collaborative backbone to the Microsoft Office System. In previous chapters, you saw how, within Office 2003, you could share and manage documents stored in a SharePoint Web site. You also created SharePoint sites from your Office programs.
This chapter focuses on the integration of Windows SharePoint Services with Microsoft Office Excel 2003 and Microsoft Office Access 2003. With both these products you can export and import data to and from SharePoint lists. Excel 2003 also provides two-way synchronization between Excel spreadsheets and SharePoint lists, so you can work with lists when you are offline, and then synchronize the changes when you reconnect.
See Also
Do you need only a quick refresher on the topics in this chapter? See the Quick Reference entries in Quick Reference.
Important
![]() Before you can use the practice files in this chapter, be sure you install them from the book's companion CD to their default location. See "Using the Book's CD-ROM" for more information.
Before you can use the practice files in this chapter, be sure you install them from the book's companion CD to their default location. See "Using the Book's CD-ROM" for more information.
In many situations, you might already have data within a spreadsheet, but later find that you need to share the data with other members of your team. SharePoint has the ability to import data from an Excel spreadsheet into a SharePoint list. Users with appropriate permissions may read the SharePoint list, while others may even revise the list or enter additional data. You can choose to import all the spreadsheet data, a range of cells, a named range, or an Excel list.
In this exercise, you will use your browser to create a SharePoint custom list that contains data imported from an Excel spreadsheet.
OPEN the SharePoint site to which you would like to import data from the Excel spreadsheet. Remember to use your SharePoint site location in place of http://gardenco in the exercises. If prompted, type your user name and password, and then click OK.
USE the Plants_Price.xls document in the practice file folder for this topic. This practice file is located in the My Documents Microsoft PressSharePoint Services SBSChapter 11 folder.
BE SURE TO install and activate Microsoft Office 2003 before beginning any of the exercises in this chapter, and that you have sufficient rights to create a new list. If in doubt, see the Appendix .
On the top link bar, click Create.
The Create page is displayed.
In the Custom Lists section, click Import Spreadsheet.
The New List page is displayed.
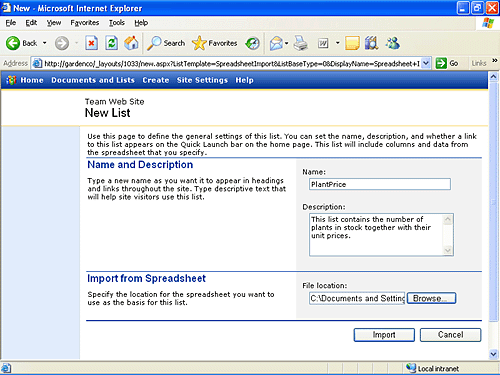
In the Name text box, type PlantPrice.
In the Description text box, type This list contains the number of plants in stock together with their unit prices.
Note
If you import a spreadsheet into a site based on the Meeting Workspace template, an option button appears on the New List page enabling you to share the same items for all meetings. If you choose not to share the same items for all meetings, then each meeting displays the list with just the items added for that date.
Click the Browse button.
The Choose file dialog box appears showing either your My Documents folder or the last folder you accessed.
If the My Documents folder is not displayed in the Choose file dialog box, click the My Documents icon.
Double-click the folder names Microsoft Press, SharePoint Services SBS, and Chapter 11, and then double click the file Plants_Price.xls.
On the New List page, click the Import button.
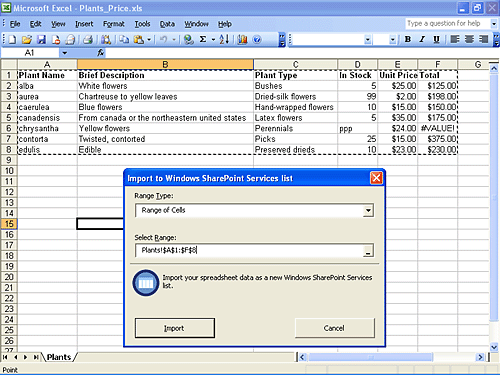
Excel opens Plants_Price.xls and displays the Import to Windows SharePoint Services List dialog box.
From the Range Type drop-down list, select Range of Cells, then press
 .
.In the spreadsheet, select the range of cells A1 to F8, and then on the dialog box, click the Import button.
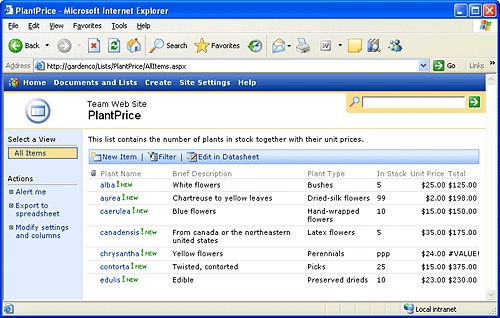
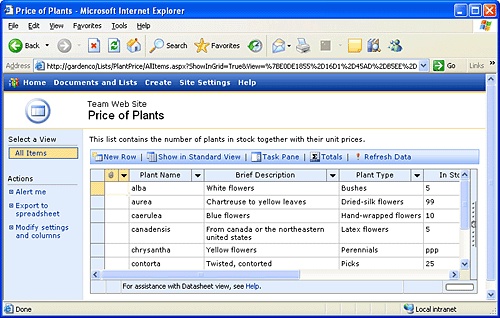
The All Items view of the PlantPrice list is displayed, and the URL in the Address box is http://gardenco/Lists/PlantPrice/AllItems.aspx.
In the left navigation bar under Actions, click Modify settings and columns to change the title of the list.
The Customize PlantPrice page appears.
Under General Settings, click Change general settings.
Under the Name and Description section, in the Name text box, type a user-friendly name, such as Price of Plants.
Under the Navigation section, select the Yes option to display this list on the Quick Launch bar.
Click OK at the bottom of the page.
The Customize: Price of Plants page appears.
Click the Go Back to "Price of Plants" link.
The All Items view of the Price of Plants list appears. The title of the list has changed to Price of Plants, and this name change can be seen on the page, but the URL remains set as http://gardenco/Lists/PlantPrice/AllItems.aspx.
CLOSE Internet Explorer.
If you have created a list by importing an Excel spreadsheet, you might find it convenient to use a spreadsheet-like environment when editing, formatting, or entering data into your newly created list. This spreadsheet-like environment is called the Datasheet view, which was introduced in Chapter 4.
Using the Datasheet view of a list or library can be a huge productivity boost, but to make use of this view you must have Office 2003 installed on your computer and make sure your browser supports Microsoft ActiveX controls. If these requirements are not met, a message indicating that the list will be displayed in Standard view appears. Along with the Explorer view of a document library, the following list types do not support the datasheet view:
Discussion board
Survey
Image gallery
Web template library
Web Part catalog
Data sources
Inbox
The Datasheet view presents all the list items of a list in a grid and facilitates editing across the entire table. A task pane on the right edge of the Datasheet view enables powerful integration between Windows SharePoint Services, Excel 2003, and Access 2003.
In the following exercise, you will add a new list item, edit an existing list item, remove an existing list item, add a list field, and briefly explore the task pane.
OPEN the SharePoint site where you imported data from the Excel spreadsheet. Remember to use your SharePoint site location in place of http://gardenco in the exercises. If prompted, type your user name and password and click OK.
BE SURE TO complete the first exercise in this chapter, "Importing Data from an Excel Spreadsheet to a List in SharePoint" before beginning this exercise.
BE SURE TO verify that you have sufficient rights to contribute to the list. If in doubt, see the Appendix .
On the Quick Launch bar under Lists, click Price of Plants.
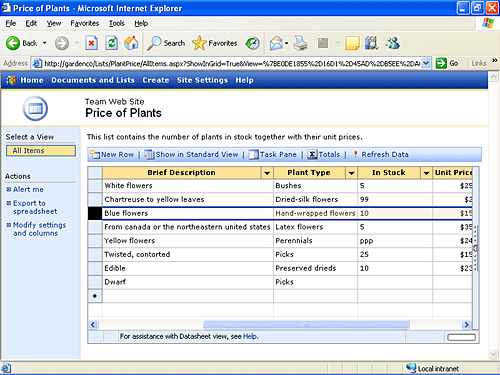
Click Edit in Datasheet to change the display from Standard view.
The Standard view changes to the Datasheet view.
Note


 A Datasheet view consists of rows, each row corresponding to a list item. A column corresponds to a list field. The down arrow in the column headings is used to filter and sort the data. Using the Datasheet view is like editing a table in Access; when you type a value in a cell or choose a value from a drop-down list, an Edit icon appears to the far left indicating that changes have been made to the row. You can use the arrow keys or mouse to move from cell to cell to make changes to any row in the list. When you leave a row that was changed or you navigate away from the Web page, a Saving icon indicates that Windows SharePoint Services is updating the database with your changes. You can continue making changes to different rows, and Windows SharePoint Services saves your changes in the background. If your changes result in a conflict or error, the Datasheet view updates with information necessary to resolve the conflict or error. The last row in the Datasheet view is always empty and the New Item icon is displayed in the left hand column. This empty row can be used to add additional list items to the list. The Datasheet view does not display the star (*) row for a document library.
Tip
All list items in the list are displayed on one page in the Datasheet view regardless of how large the list is. Therefore, it isn't practical to edit extremely large lists using the Datasheet view. To improve performance of a Datasheet view, apply one or more filters to hide unnecessary columns, but do not remove those columns that are marked as Required.
In the last row of the list, in the Plant Name column, type nana, press
, type Dwarf, press , and then type P.Just like in Excel, the IntelliSense feature displays other values that occur in this column.
Press the
 to choose Picks, and then press
  .
.The new item row changes to the currently edited row and another new item row is added to the bottom of the list.
 Position the pointer on the boundary between the column headings Brief Description and Plant type until the horizontal resize pointer appears.
Drag the column boundary to the right until the all the descriptions are on one line.
Click on the far left cell to select the entire Blue flowers list item.
Tip
 It is possible to select and then delete multiple list items. Alternatively, while selected, you can copy and paste the list items into Office programs. You can select the entire list with a single click in the top left corner cell.
 Holding down the
  key while selecting list items selects all rows or columns between the first click and the second click. However, holding down the
  key while selecting does not select and deselect list items regardless of adjacency like you might expect. Instead, it exclusively selects the clicked row, abandoning all other selection in the same way as clicking without holding down the key.
Press the
 key to permanently remove the list item from the list.
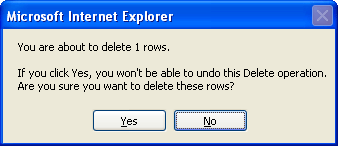
A delete confirmation dialog box appears.
Click Yes to finish deleting the list item and redisplay the Datasheet view of the list.
Click the fourth cell in the In Stock column and replace ppp with 10, and then press
.Replace $24.00 with 25 and then press
.The list item is saved to the database and a dollar sign ($) is placed before the number 25. This is because the Unit Price column is a Currency type.
Replace #VALUE! with 250, and then press
.The list item is saved to the database, but no dollar ($) sign is placed before the number 250. When you imported the spreadsheet in the previous exercise, the In Stock and Total columns were created as a Single line of text type because they did not contain data of one particular type, whereas the Unit Price column contained only currency values. In the Excel spreadsheet, the Total column was a calculated column. To provide the same functionality in the SharePoint list, the column needs to be a calculated data type. You cannot change the data type of an existing column to a calculated data type. You have to create a new column of calculated data type.
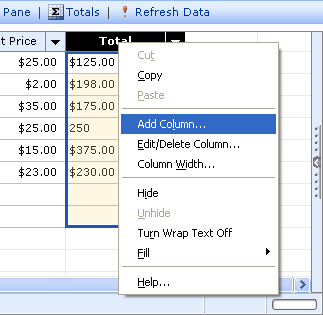
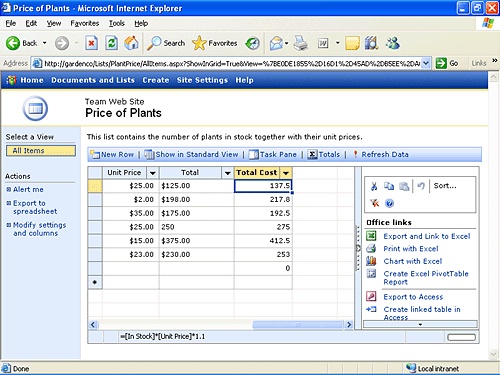
Right-click on the Total column, and then click Add Column in the context menu.
In the Name and Type section, in the Column Name text box, type Total Cost, and then select the Calculated (calculation based on other columns) option.
In the Optional Settings for Column section under the Insert Column, double-click In Stock.
Scroll to the bottom of the page and click OK.
Click the first cell in the Total Cost column, type =[In Stock]*[Unit Price]*1.1, and then press
.A dialog box appears warning you that the results of your calculation change could take some time.
Click Continue.
The Datasheet View status bar displays the formula you typed.
Note
Formulas are equations that perform calculations on values in the list and are very similar to the formulas you would use in Excel, that is, they can contain functions, column references, operators, and constants. For example a formula could be =PI()*[In Stock]^2, where PI() is a function, * and ^ are operators, [In Stock] is a column reference and 2 is a constant.
Click on the vertical bar on the far right side of the Datasheet View page to expose the task pane, which enables you to quickly integrate the SharePoint site with Excel and Access 2003.
At the top of the task pane are a series of buttons for common commands, such as Cut, Copy, Paste, Undo, Custom Sort, Remove Filter/Sort and Help.

See Also
More information on the Datasheet view can be found by clicking the Help icon in the task pane, by clicking the Help link on the Datasheet view status bar, by clicking a cell in the Datasheet view and then pressing F1, or by right-clicking any cell inside the Datasheet view and then clicking Help.
CLOSE Internet Explorer.
You can export the contents of SharePoint lists, results of a survey, or document libraries to an Excel spreadsheet. The exported list or library is a Web Query that stays updated with changes to the original list in your SharePoint site. The Excel spreadsheet maintains a connection to the SharePoint list, that is, the Excel spreadsheet is a linked object.
In this exercise, you will export a list from a SharePoint site to an Excel spreadsheet. You will add data to the spreadsheet and then synchronize the data in the spreadsheet with the contents of the list on the SharePoint site.
OPEN the SharePoint site where you have a list from which you can export data to an Excel spreadsheet. This exercise uses the list you created in the first exercise of this chapter. Remember to use your SharePoint site location and list in place of http://gardenco and Price of Plants in the exercises. If prompted, type your user name and password, and then click OK.
On the Quick Launch bar under the Lists section, click Price of Plants, and then click the All Items view.
Tip
The export process only exports the columns and rows contained in the list's current view, which in this exercise is the All Items view. If none of the views contain the data you want to export, then you will have to create a new view to meet your needs. Alternatively, you can choose one of the existing views, export the list to a spreadsheet, and then delete the unwanted data.
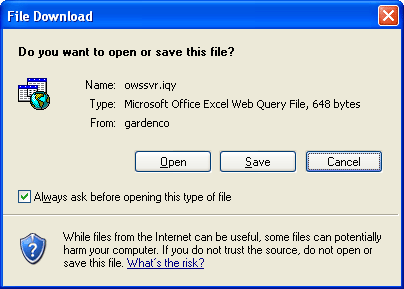
In the left navigation area under Actions, click Export to spreadsheet.
If the File Download box is displayed, click the Open button.
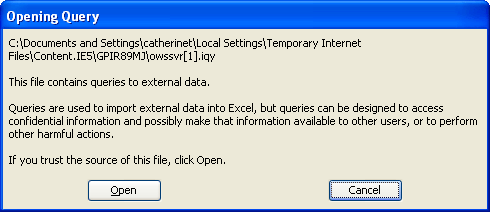
Excel opens a new workbook that contains one worksheet, named owssvr(1) and an Opening Query dialog box is displayed warning you of the risk of opening queries.
Click the Open button.
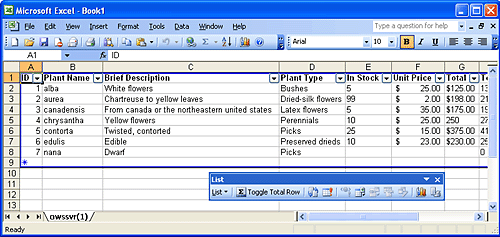
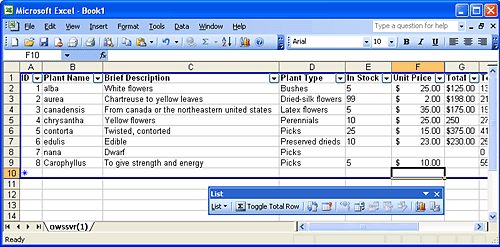
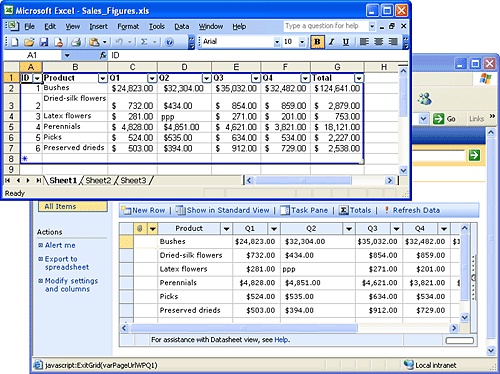
The owssvr(1) worksheet now contains an Excel List; each column in the list has an AutoFilter arrow in the header row and there is a dark blue border around the list. The List toolbar appears.
Click cell B9, type Carophyllus, press
, type To give strength and energy, press type Pi, and then press again.IntelliSense completes the word Picks for you.
Type 5, press
, type 10, and then press .Excel places a dollar ($) sign before the number 10 and the Total Cost column calculates the data in that column. The columns in Excel have retained the data types from the exported SharePoint list.
 On the Lists toolbar, click the Synchronize List button.
 Switch back to the Price of Plants page, click the Internet Explorer Refresh button, and then verify that the Carophyllus item has been added to the bottom of the list.
The Price of Plants: New Item page is displayed.
In the Plant Name text box, type Pumila and then click Save and Close.
The Pumila item is added to the Price of Plants list.
Switch back to Excel, on the List toolbar, click the Synchronize List button and verify that the Pumila item has been added to the bottom of the spreadsheet.

CLOSE Internet Explorer and Excel. You do not have to save the spreadsheet.
Creating a SharePoint list from within Excel 2003 is known as publishing an Excel list. Once the list is on the SharePoint site, users can see the Excel data without opening Excel.
In this exercise, you will publish a spreadsheet to a SharePoint list by using Excel 2003 and a two-step wizard.
BE SURE TO start Excel before beginning this exercise.
USE the Sales_Figures.xls document in the practice file folder for this topic. This practice file is located in the My Documents Microsoft PressSharePoint Services SBSChapter 11 folder. Remember to use your SharePoint site location in place of http://gardenco in the exercises. OPEN the Sales_Figures.xls document.
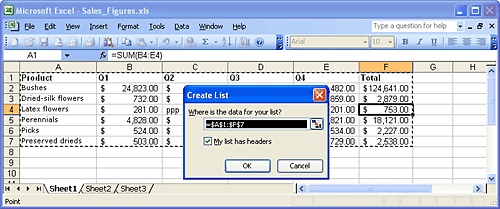
In Excel, click any cell within the data.
On the Data menu, point to List, and then click Create List.
Note
The Create List dialog box appears and the data is automatically selected. By selecting one cell in the data, Excel will automatically selects the range of cells that contain data. You can select a different range of cells to use for creating a list. In addition, if your data does not have headers, Excel creates them for you, and labels them Column1, Column2, and so on. If the data you want to export is already in an Excel list, you do not have to complete the first three tasks of this exercise.
Click OK.
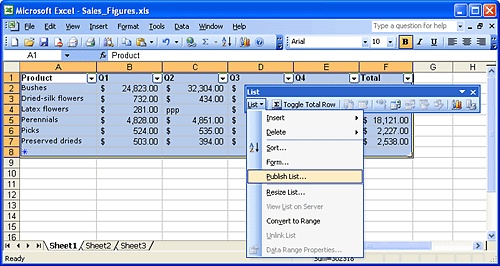
Excel converts the data in the workbook into a list. Each column header has an AutoFilter arrow and a dark blue border surrounds the data, that is, the list is active on the worksheet.
The List toolbar appears.
 On the List toolbar, click the List button and from the menu, click Publish List.
The first step of the two-step Publish List to SharePoint Site Wizard is displayed.
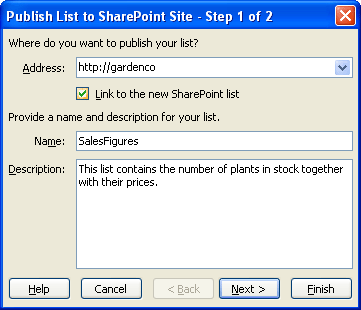
In the Address box, type http://gardenco.
Select the Link to the new SharePoint list check box.
Important
If "Link to the new SharePoint list" check box is selected, the spreadsheet is linked to the SharePoint list and you then can synchronize updates between the spreadsheet and the SharePoint list. However, once the SharePoint list is created, you cannot link the spreadsheet to the SharePoint list. Therefore, if you wish to synchronize updates between the list and the spreadsheet, be sure to select this check box now.
In the Name box, type SalesFigures, and in the Description box type, This list contains the number of plants in stock together with their prices.
Click the Next button.
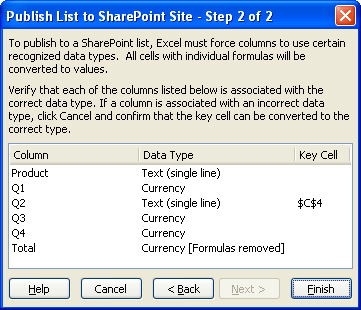
Excel checks the data in each column to ensure that the data belongs to one of the data types supported by Windows SharePoint Services. If it doesn't, Excel usually applies the text data type to each column. Excel also checks whether each column contains only one type of data. If a column contains a mix of data type, for instance, numbers and text, then Excel would choose text as the data type. Once Excel has completed its check, the second step of the Publish List to SharePoint Site Wizard is displayed.
Look at the Key Cell column and notice that in Column Q2, cell $C$4 contains a different data type from the rest of the cells in this column. In addition, the formulas for the Total column are removed.
Tip
You could click the Cancel button, correct the erroneous data, and then restart the publishing process. Also, during the publishing process, because Excel removes formulas, once you have completed the publishing process and the data is on your SharePoint site, you might consider deleting the Total column and creating a calculated column.
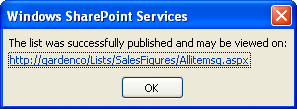
Click the Finish button.
A Windows SharePoint Services dialog box is displayed with the URL of your new SharePoint List.
Click the http://gardenco/Lists/SalesFigures/Allitemsg.aspx link.
A new Internet Explorer window opens displaying the new SharePoint list.
Note
Before you close Excel, notice that the spreadsheet contains an extra column. When you publish a spreadsheet that is linked to a SharePoint list, an ID column is added as column A to your spreadsheet. The ID column contains a unique identifier for each record in the list. This is needed by the SharePoint site for updating purposes. This column is read-only and cannot be removed from the list unless you unlink the list from the SharePoint site. To unlink a spreadsheet from it's SharePoint site, on the Data menu, point to List, and then click Unlink List. To view the SharePoint list to which a spreadsheet is linked, on the Data menu, point to List, and then click "View List on Server."
CLOSE all Internet Explorer windows, close the Windows SharePoint Services dialog box by clicking OK, then close Excel after saving changes to the spreadsheet.
Access enables you to export a table or other database objects to a number of formats such as an external file, Lotus 1-2-3, Paradox, or dBase databases to an Excel workbook, to an XML document, or to an ODBC data source. With Access 2003, you can now export a table to a SharePoint site where a new list is created.
In this exercise, from within an Access database, you will export a table into a SharePoint site by creating a new SharePoint list.
USE the GardenCo.mdb database in the practice folder for the next three sections. This practice file is located in the My Documents Microsoft PressSharePoint Services SBSChapter 11 folder. Remember to use your SharePoint site location in place of http://gardenco in the exercises.
BE SURE TO start Access before beginning this exercise.
OPEN the GardenCo.mdb database. If asked to block unsafe expressions, click Yes. Restart Access, open GardenCo.mdb, and then acknowledge the security warning.
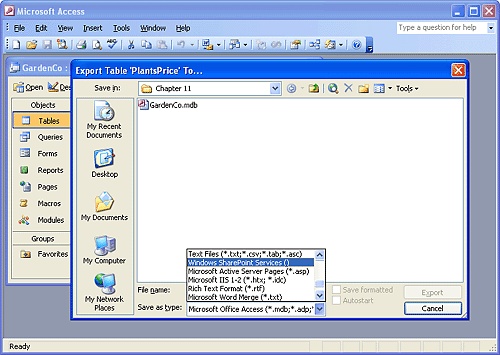
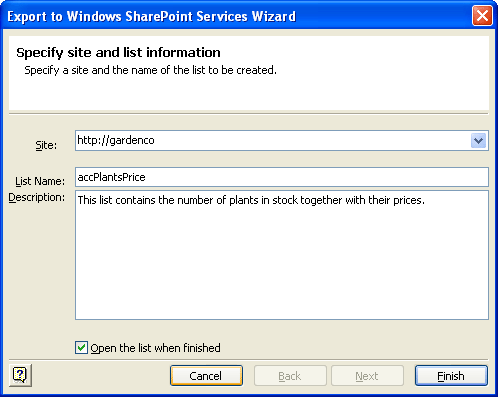
Right-click the PlantsPrice table and from the context menu click Export.
The Export Table ‘PlantsPrice’ To dialog box is displayed.
From the Save as type drop-down list, select Windows SharePoint Services().
The first page of the Export to Windows SharePoint Services Wizard appears.
In the Site drop-down list, select http://gardenco.
In the List Name text box, type accPlantsPrice.
Leave the Open the list when finished check box selected.
Click the Finish button.
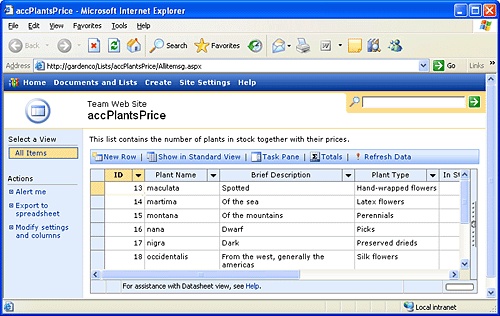
The Microsoft Office Access dialog box is displayed with the message that Access has finished exporting the table to the Web site.
Click OK.
Internet Explorer displays the newly created accPlantsPrice list in Datasheet view.
CLOSE Access and Internet Explorer.
With Access you can create a new table by importing data from an external data source, such as Lotus 1-2-3, Paradox or dBase databases, from an Excel workbook; from a Microsoft Outlook or Microsoft Exchange folder; from an XML document; or to an ODBC data source—and with Access 2003, from a SharePoint Web site. The data in the new table is not updated when subsequent changes are made to the data source after it is imported.
In this exercise, you will import data from a SharePoint list into an Access table.
USE the GardenCo.mdb database in the practice folder. This practice file is located in the My Documents Microsoft PressSharePoint Services SBSChapter folder. Remember to use your SharePoint site location in place of http://gardenco in the exercises. This exercise uses the SharePoint list, Price of Plants, you created in the first exercise of this chapter. You can use your own list if you want.
BE SURE TO start Access before beginning this exercise.
OPEN the GardenCo.mdb database and acknowledge the security warning, if necessary.
On the File menu, point to Get External Data, and then click Import.
From the Files of type drop-down list, select Windows SharePoint Services().
The "Select a site" page of the Import from Windows SharePoint Services Wizard appears.
In the Sites text box, type http://gardenco.
Click the Next button.
The "Select lists" page of the Import from Windows SharePoint Services Wizard appears.
In the Lists text box, select Price of Plants, and then select the Import one or more lists option.
Tip
If you choose to import one or more lists, then on the "Select lists" page you can select more than one list by holding down the
key at the same time as you select the list. If any of the columns in the SharePoint list were lookup columns, you can choose to maintain that relationship by selecting the "Retrieve IDs for lookup columns" check box. If you deselect this check box, the corresponding column in the Access database is not a lookup column, but contains values and not IDs.Click the Next button.
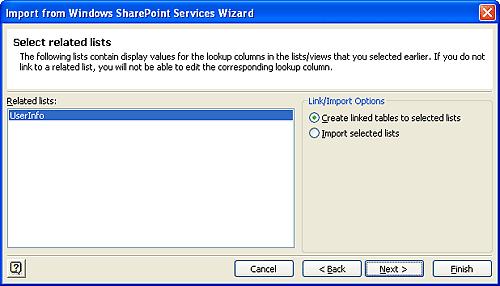
The "Select related lists" page of the Import from Windows SharePoint Services Wizard appears. You will only see this page if the "Retrieve IDs for lookup columns" check box is selected.
Select the Create linked tables to selected lists option.
Note
The Price of Plants list contains a column named Created By and Modified By. These columns are lookup columns pointing to the UserInfo SharePoint list. By selecting this option, Access creates a linked table pointing to the UserInfo SharePoint list. Alternatively, you could choose for Access to import the UserInfo list at the same time as the Plants list.
Click the Next button.
The Finish page of the Import from Windows SharePoint Services Wizard appears, detailing the options you have chosen.
Click the Finish button.
The Microsoft Office Access dialog box is displayed with the message that Access has finished importing from the SharePoint Web site.
Click OK.
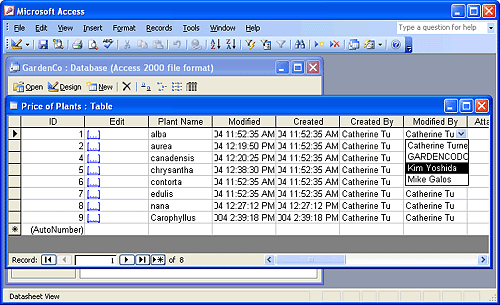
Access now has two additional tables, Price of Plants and a linked table called UserInfo.
Double-click the Price of Plants table.
Access opens the Price of Plants table in Datasheet view.
If the Enter Parameter Value dialog box opens, click Cancel.
Click the first cell in the Modified By column and from the down arrow, select a name from the list. In this example, Kim Yoshida is selected.
Tip
Access obtained the list of users from the SharePoint site through the UserInfo linked table. To see the query used to access UserInfo, open the Price of Plants table in Design view, click on the Modified By field, and then click on the Lookup tab. In the Row Source field property, you will see a SELECT query connecting to the UserInfo linked table.
You could now edit the values in the other cells in the table. Such changes will not be reflected back in the Plants list on the SharePoint site. If you want to change the contents of the SharePoint list, the Access table provides a quick way of opening the SharePoint list in a browser. Click the […] characters in the row you want to edit. Internet Explorer then displays the list item that relates to that row.

CLOSE Access and any Internet Explorer windows that are open.
The previous two sections copied data so that the same data could be stored in both an Access database and in a list on a SharePoint site. However, there was no data synchronization between these two data locations. If you do not want to maintain two copies of that data, but you need to refer to the data within Access, then Access provides methods of accessing external data that is physically located outside an Access database. The easiest way to reference a SharePoint list externally is to use linked tables, which were known as attached tables prior to Access 95. A linked table stores only a connection to the SharePoint list. You should use linking rather than importing if the data is maintained by users or a separate program on the SharePoint Web site.
In this exercise, you will link a table to a SharePoint list.
USE the GardenCo.mdb database in the practice folder. This practice file is located in the My Documents Microsoft PressSharePoint Services SBSChapter 11 folder. Remember to use your SharePoint site location in place of http://gardenco in the exercises. This exercise uses the SharePoint list, SalesFigures, you created in a previous exercise of this chapter. You can use your own list if you want.
BE SURE TO start Access before beginning this exercise.
OPEN the GardenCo.mdb database and acknowledge the security warning if necessary.
On the File menu, point to Get External Data, and then click Link Tables.
The Link dialog box appears.
From the Files of type drop-down list, select Windows SharePoint Services().
The Select a Site page of the Link to Windows SharePoint Services Wizard appears.
In the Sites text box, type http://gardenco, and then click the Next button.
The "Select lists" page of the Link to Windows SharePoint Services Wizard appears.
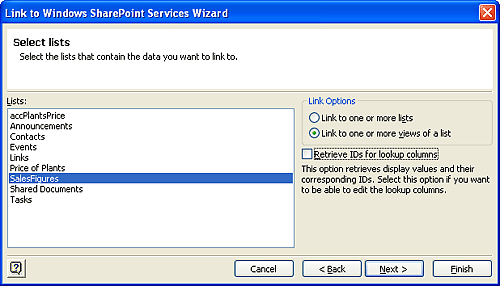
In the Lists text box, select SalesFigures, and then select the Link to one or more views of a list option.
Clear the Retrieve IDs for lookup columns check box.
Click the Next button.
The "Select views" page of the Link to Windows SharePoint Services Wizard appears.
In the Views text box, click All Items.
Click the Next button.
The Finish page of the Import from Windows SharePoint Services Wizard appears detailing the options you have chosen.
Click the Finish button.
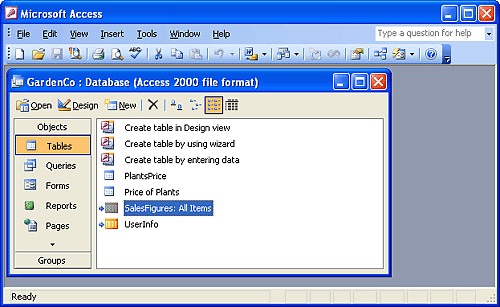
The Microsoft Office Access dialog box is displayed with the message that Access has finished linking to the SharePoint Web site.
Click OK.
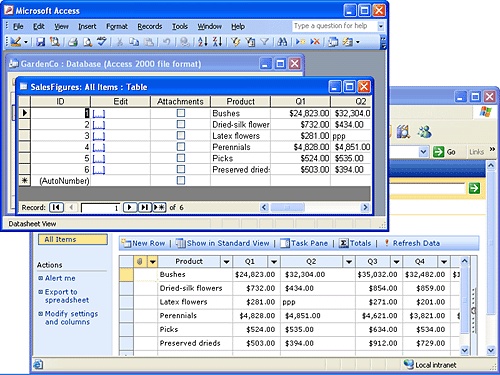
Access now has a linked table named SalesFigures: All Items.
If changes are made to the linked table in Access or the SalesFigures list in SharePoint, the data will be synchronized.
CLOSE Access.
From the browser you can create a Custom list, importing the data from an Excel spreadsheet.
From the browser you can create an Excel spreadsheet and export data from a SharePoint list into it.
From within Excel 2003 you can publish the data held within an Excel List into a newly created SharePoint list.
You can synchronize changes between an Excel spreadsheet and a SharePoint list through a two-way synchronization process.
With Access 2003, you can export and import data to and from SharePoint lists. The data in the Access table is not updated when subsequent changes are made to the SharePoint list, that is, there is no synchronization process between Access and a SharePoint site.
In Access, you should create a new table that is linked to a SharePoint list when the data is maintained by users on the SharePoint Web site and you want Access to use the current data.