
In this section
With Microsoft Windows XP installed, you can customize just about everything on your computer to make it look and work exactly the way you want it to. If the new look of Windows XP doesn’t appeal to you, you can revert to the classic Windows interface, design your own look with elements from both styles, or change the look to that of a Web page. You can customize your Desktop with a color, a picture, or Web content that can be updated on a specific schedule. You can change the size and color of almost everything; set items to open with one click instead of two; and rearrange or hide the taskbar, toolbars, Start menu, and Desktop items. You can even customize your little friend the mouse.
You can use a single window in which to open all your folders, or use a separate window for each folder if you prefer; you can choose the details—date, author, and so on—that you want to be shown in your folder windows; and you can customize your folder windows with colors and pictures. You can change the way you log on for increased security, change the picture that Windows assigns to your user account, and even change the way a CD starts, depending on its content.
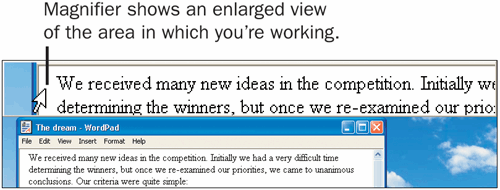
If you have any problems with your vision, hearing, or manual dexterity—or if you simply want to try a different way of working—you can use some innovative tools: press key combinations one key at a time instead of simultaneously, use high-contrast color schemes or the Magnifier tool for better visibility, control mouse movements with the numeric keypad on your keyboard, specify visual cues to replace the computer’s beeps, or type your text on the On-Screen Keyboard.
If Windows XP’s interface doesn’t appeal to you, you can change whatever you don’t like about it—the colors, the fonts, and so on. If you yearn for the familiarity of the old classic Windows look, a few mouse-clicks do away with the new and bring back the old. Can’t decide? How about a combination of the old and the new, or a design of your own?
Tip
Your Theme list might contain a variety of different themes, depending on whether you installed Windows XP as an upgrade, whether you installed one of the Microsoft Plus! For Windows XP packs, or whether you downloaded themes. To download themes, choose More Themes Online from the Theme list.
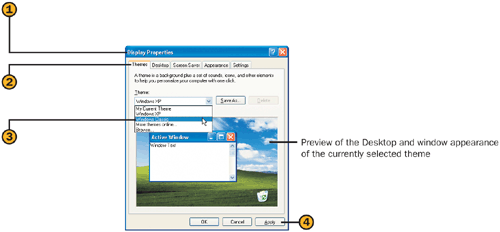
![]() Right-click a blank spot on the Desktop, and choose Properties from the shortcut menu to display the Display Properties dialog box.
Right-click a blank spot on the Desktop, and choose Properties from the shortcut menu to display the Display Properties dialog box.
![]() Click the down arrow in the Theme box, and click Windows Classic in the list.
Click the down arrow in the Theme box, and click Windows Classic in the list.
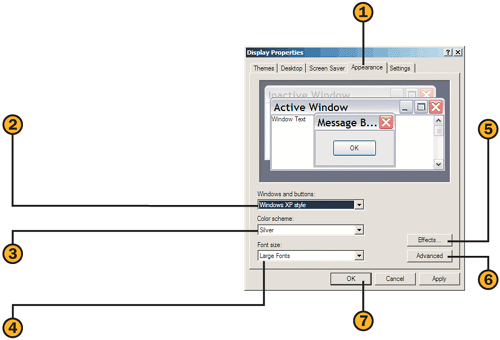
![]() Click the Appearance tab of the Display Properties dialog box.
Click the Appearance tab of the Display Properties dialog box.
![]() Click the down arrow, and then click in the list to specify either the Windows Classic Style or the Windows XP Style for the windows and buttons.
Click the down arrow, and then click in the list to specify either the Windows Classic Style or the Windows XP Style for the windows and buttons.
![]() Click a color scheme in the list to use with the selected style.
Click a color scheme in the list to use with the selected style.
![]() Click a font size in the list to apply to the text.
Click a font size in the list to apply to the text.
![]() Click Effects if you want to do any of the following: change the transition effect for menus, use large icons, show shadows, choose the method for smoothing screen fonts, show window contents while dragging a window, or hide or display the underlines in menus and dialog boxes that indicate keyboard navigation.
Click Effects if you want to do any of the following: change the transition effect for menus, use large icons, show shadows, choose the method for smoothing screen fonts, show window contents while dragging a window, or hide or display the underlines in menus and dialog boxes that indicate keyboard navigation.
![]() Click Advanced if you want to change the color, size, or font of individual items in the scheme you’re using.
Click Advanced if you want to change the color, size, or font of individual items in the scheme you’re using.
Tip
The ClearType option in the Effects dialog box smoothes the edges of screen fonts and can dramatically improve the readability of text on a flat screen, such as that of a portable computer. The ClearType option might not work quite as well on a standard CRT monitor.
See Also
For information about switching the Start menu to the classic Windows layout, see "Customizing the Start Menu".
Your physical desktop—whether it’s oak, glass, or some sort of composite—always looks the same (assuming it’s visible under that pile of paper in your "paperless office"). Your Windows XP Desktop, on the other hand, can change dramatically. You can paint it any color you want, and it can display a picture. You can hide all the standard Desktop icons or display the ones you need. Keep experimenting until you find the look you like.
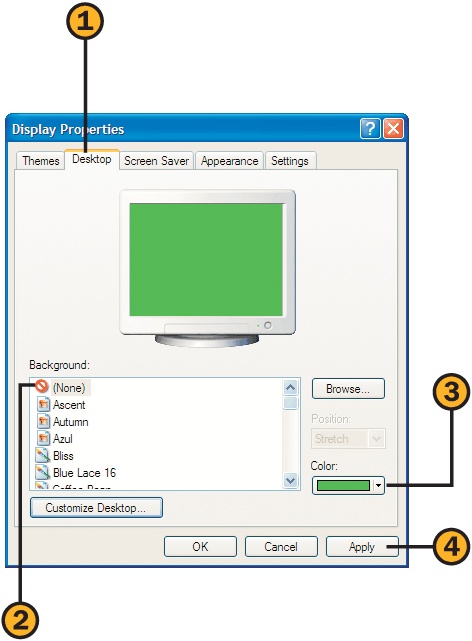
![]() Right-click a blank spot on the Desktop, choose Properties from the shortcut menu, and click the Desktop tab of the Display Properties dialog box.
Right-click a blank spot on the Desktop, choose Properties from the shortcut menu, and click the Desktop tab of the Display Properties dialog box.
![]() Click None in the Background list.
Click None in the Background list.
![]() Specify the color you want for your Desktop.
Specify the color you want for your Desktop.
See Also
For information about adding Web content to your Desktop, see "Creating a Custom Desktop Background".
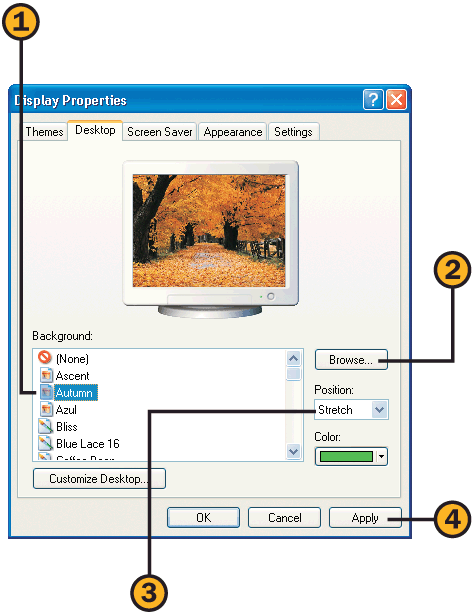
![]() In the Background list, click the name of the picture you want.
In the Background list, click the name of the picture you want.
![]() If the picture you want isn’t listed, click Browse, locate and select a picture, and click Open.
If the picture you want isn’t listed, click Browse, locate and select a picture, and click Open.
Center to place a single copy of the picture in the center of the Desktop.
Tile to repeat the image to fill the Desktop.
Stretch to scale the image to fit the Desktop. (Note that a scaled image might be distorted or its quality deteriorated.)
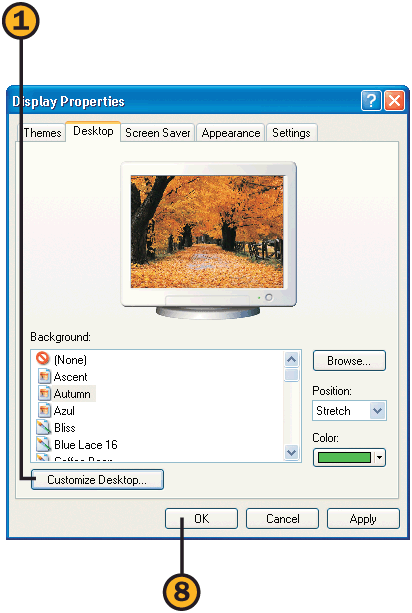
![]() On the Desktop tab of the Display Properties dialog box, click Customize Desktop.
On the Desktop tab of the Display Properties dialog box, click Customize Desktop.
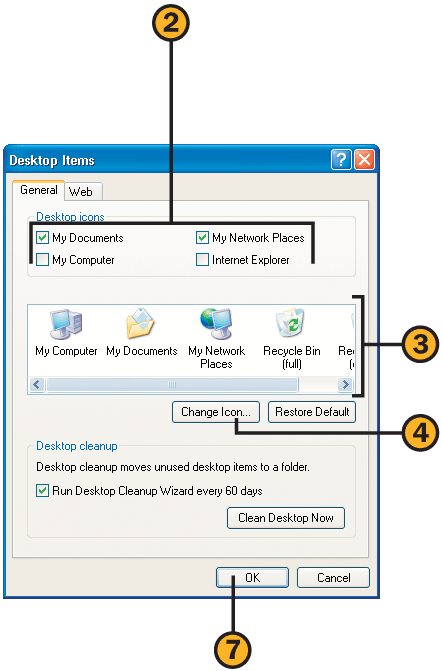
![]() On the General tab of the Desktop Items dialog box, select the check boxes for the icons you want on your Desktop and clear the check boxes for the ones you don’t want.
On the General tab of the Desktop Items dialog box, select the check boxes for the icons you want on your Desktop and clear the check boxes for the ones you don’t want.
![]() To change the appearance of an icon, select the icon.
To change the appearance of an icon, select the icon.

You’re probably on pretty friendly terms with your mouse, but haven’t you sometimes wished that you could build a better mouse? If your mouse’s occasional disobedience is a source of frustration, you can lay down the law and tell that critter how to behave, and then you’ll live together happily ever after.
See Also
For information about changing pointer appearances by applying a theme, see "Changing the Overall Look".
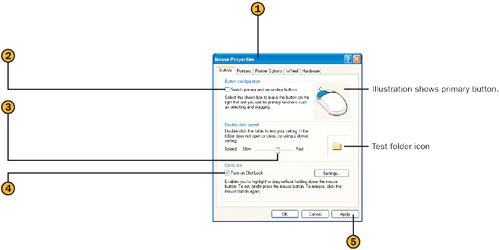
![]() Choose Control Panel from the Start menu, click the Printers And Other Hardware category, and click the Mouse Control Panel icon to display the Mouse Properties dialog box.
Choose Control Panel from the Start menu, click the Printers And Other Hardware category, and click the Mouse Control Panel icon to display the Mouse Properties dialog box.
![]() On the Buttons tab, select this check box to switch the function of the buttons for left-handed or right-handed operation.
On the Buttons tab, select this check box to switch the function of the buttons for left-handed or right-handed operation.
![]() Move the slider to set the speed at which you need to double-click for Windows to recognize your double-click. Double-click the folder icon as a test to see whether the setting is correct for your clicking speed.
Move the slider to set the speed at which you need to double-click for Windows to recognize your double-click. Double-click the folder icon as a test to see whether the setting is correct for your clicking speed.
![]() Select this check box if you want to select content without having to hold down the mouse button. When it’s selected, the ClickLock feature is activated when you hold down the mouse button for a short time and is then deactivated when you click the mouse button. Use the Settings button to set the length of time the mouse button needs to be held down to activate ClickLock.
Select this check box if you want to select content without having to hold down the mouse button. When it’s selected, the ClickLock feature is activated when you hold down the mouse button for a short time and is then deactivated when you click the mouse button. Use the Settings button to set the length of time the mouse button needs to be held down to activate ClickLock.

![]() Click the Pointer Options tab of the Mouse Properties dialog box.
Click the Pointer Options tab of the Mouse Properties dialog box.
![]() Use the slider to set the speed at which you want the pointer to move. Move your mouse to see how the setting affects the speed of the mouse.
Use the slider to set the speed at which you want the pointer to move. Move your mouse to see how the setting affects the speed of the mouse.
![]() Select this check box if you want to increase the precision of the pointer when you move short distances.
Select this check box if you want to increase the precision of the pointer when you move short distances.
![]() Select this check box if you want the mouse to automatically move to the default button in a dialog box to facilitate quick selection of the button.
Select this check box if you want the mouse to automatically move to the default button in a dialog box to facilitate quick selection of the button.
![]() Select this check box, and use the slider to set the length of the trails if you want to increase the mouse pointer’s visibility by temporarily showing its path.
Select this check box, and use the slider to set the length of the trails if you want to increase the mouse pointer’s visibility by temporarily showing its path.
![]() Select this check box if you find the mouse pointer’s visibility annoying or distracting when you’re typing and not using the mouse. The pointer will reappear when you move the mouse.
Select this check box if you find the mouse pointer’s visibility annoying or distracting when you’re typing and not using the mouse. The pointer will reappear when you move the mouse.
![]() Select this check box if you need help locating the mouse pointer on your screen. When you press the Ctrl key, an animated bull’s-eye will appear, indicating the pointer’s location.
Select this check box if you need help locating the mouse pointer on your screen. When you press the Ctrl key, an animated bull’s-eye will appear, indicating the pointer’s location.
![]() Use the following tabs to customize the look and action of the mouse and the mouse pointer:
Use the following tabs to customize the look and action of the mouse and the mouse pointer:
The Pointers tab to change the appearance of the pointers and to include a shadow behind the pointer
The Wheel tab to set the distance the screen content scrolls when you rotate the mouse wheel
The Hardware tab to check your mouse’s type and status
You can place photographs, Web content, and various other items on your Desktop. Although any windows you use will always be on top of this content, they’re still active, so you can move and resize the items, or have Web pages update on a preset schedule.
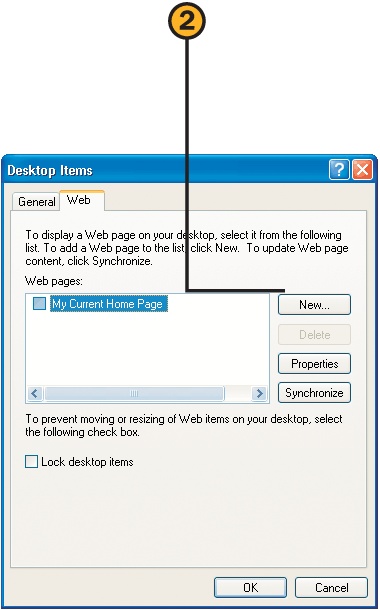
![]() Right-click a blank spot on the Desktop, choose Properties from the shortcut menu, and, on the Desktop tab of the Display Properties dialog box, click the Customize Desktop button.
Right-click a blank spot on the Desktop, choose Properties from the shortcut menu, and, on the Desktop tab of the Display Properties dialog box, click the Customize Desktop button.
![]() On the Web tab of the Desktop Items dialog box, click New.
On the Web tab of the Desktop Items dialog box, click New.
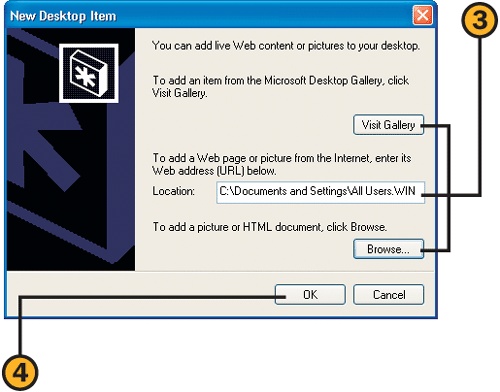
![]() In the list, click the item you want to add, or specify its source:
In the list, click the item you want to add, or specify its source:
Click Visit Gallery to download free Web components.
Type or paste the address of a Web site in the Location box.
Click Browse, and locate pictures, HTML documents, or offline Web pages that you’ve saved on your computer.
![]() Click OK, and then click OK again to close the Display Properties dialog box.
Click OK, and then click OK again to close the Display Properties dialog box.
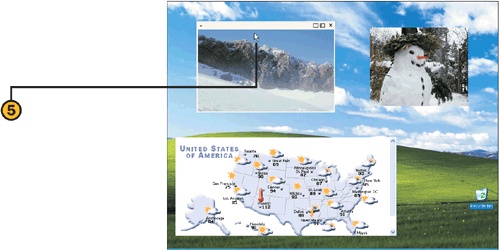
![]() Move the mouse pointer over an item until the title bar appears. Drag the title bar to move the item, or drag an edge to resize it.
Move the mouse pointer over an item until the title bar appears. Drag the title bar to move the item, or drag an edge to resize it.
The taskbar and the toolbars are indispensable tools for working efficiently in Windows XP. If you want, you can rearrange them so that they’re tailored even more closely to your working style. For example, you can change the size of a toolbar or the taskbar, and you can "dock" either of them at any of the four sides of your screen. You can also "float" the toolbars—but not the taskbar—anywhere on your Desktop.
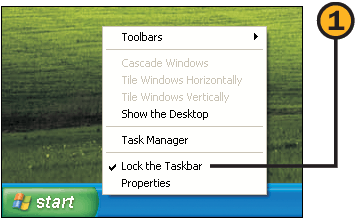
![]() Right-click a blank spot on the taskbar, and, if there’s a check mark next to the Lock The Taskbar command on the shortcut menu, click the command to unlock the taskbar.
Right-click a blank spot on the taskbar, and, if there’s a check mark next to the Lock The Taskbar command on the shortcut menu, click the command to unlock the taskbar.
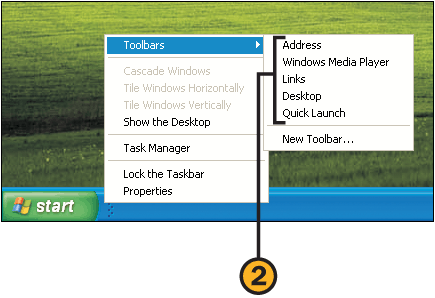
![]() Right-click a blank spot on the taskbar, point to Toolbars on the shortcut menu, and choose the toolbar you want to display.
Right-click a blank spot on the taskbar, point to Toolbars on the shortcut menu, and choose the toolbar you want to display.
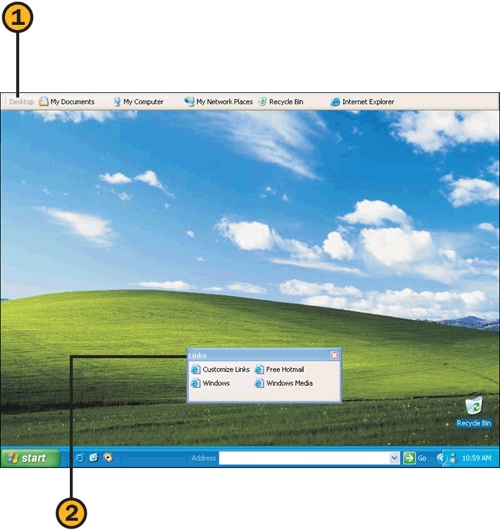
The Start menu is your main resource for organizing your programs, files, and so on, and getting your work done in Windows XP. You can customize the Start menu in several ways: You can change its new Windows XP look so that it looks like the Start menu in previous versions of Windows; you can modify the way items are displayed on the Start menu and its various submenus; and you can add items to or delete items from the main part of the Start menu and from the All Programs submenus.
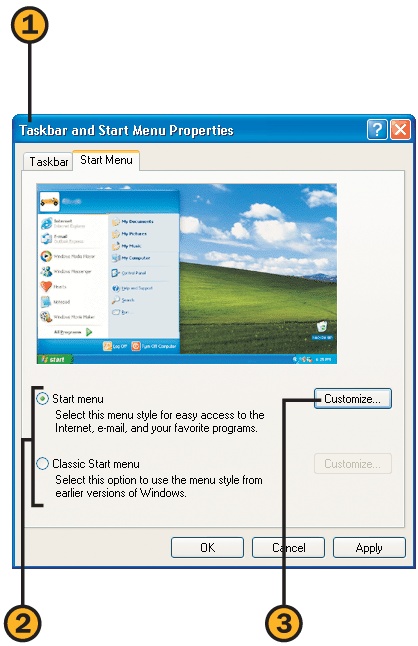
![]() Right-click the Start button, and choose Properties from the shortcut menu to display the Taskbar And Start Menu Properties dialog box.
Right-click the Start button, and choose Properties from the shortcut menu to display the Taskbar And Start Menu Properties dialog box.
![]() Click an option to specify the style you want for the Start menu.
Click an option to specify the style you want for the Start menu.
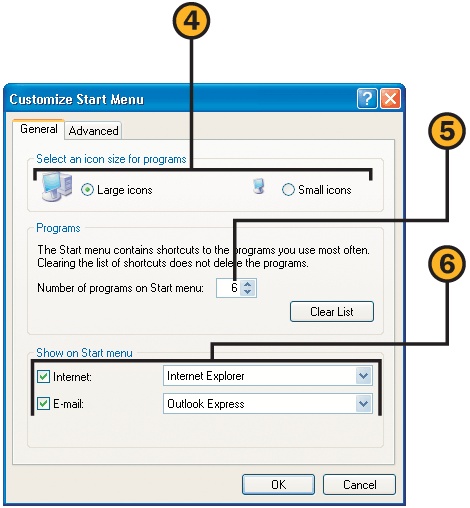
![]() Specify whether you want to see large or small icons on the Start menu.
Specify whether you want to see large or small icons on the Start menu.
![]() Specify how many recently used programs you want listed.
Specify how many recently used programs you want listed.
![]() Select the check boxes if you want your Internet browser and e-mail program listed, and, if so, specify the programs.
Select the check boxes if you want your Internet browser and e-mail program listed, and, if so, specify the programs.
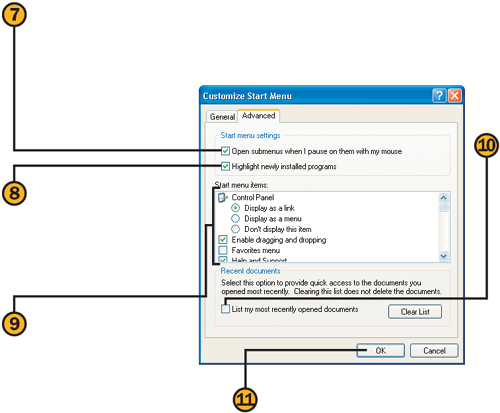
![]() On the Advanced tab, select this check box if you want submenus to open when you point to them (rather than when you click them).
On the Advanced tab, select this check box if you want submenus to open when you point to them (rather than when you click them).
![]() Select this check box if you want newly installed programs to be highlighted on the Start menu.
Select this check box if you want newly installed programs to be highlighted on the Start menu.
![]() Select check boxes and click options to specify whether and how various items are to be included on the Start menu.
Select check boxes and click options to specify whether and how various items are to be included on the Start menu.
![]() Select this check box if you want an item with a submenu that lists your most recently used documents to be displayed.
Select this check box if you want an item with a submenu that lists your most recently used documents to be displayed.
![]() Click OK, and then click OK again to close the Taskbar And Start Menu Properties dialog box.
Click OK, and then click OK again to close the Taskbar And Start Menu Properties dialog box.
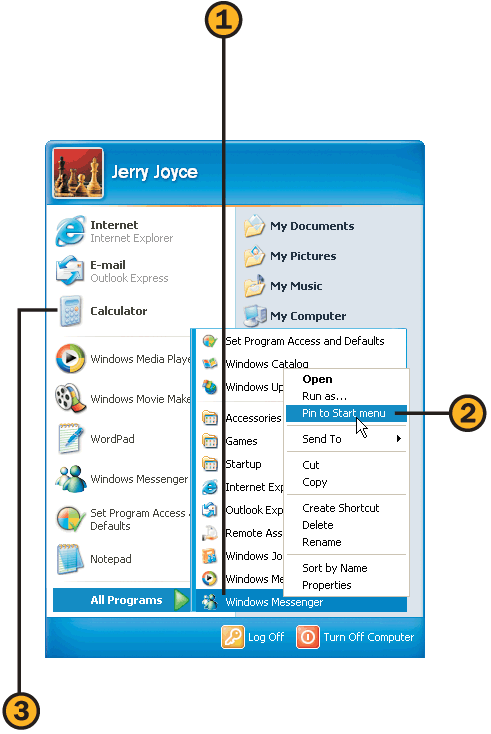
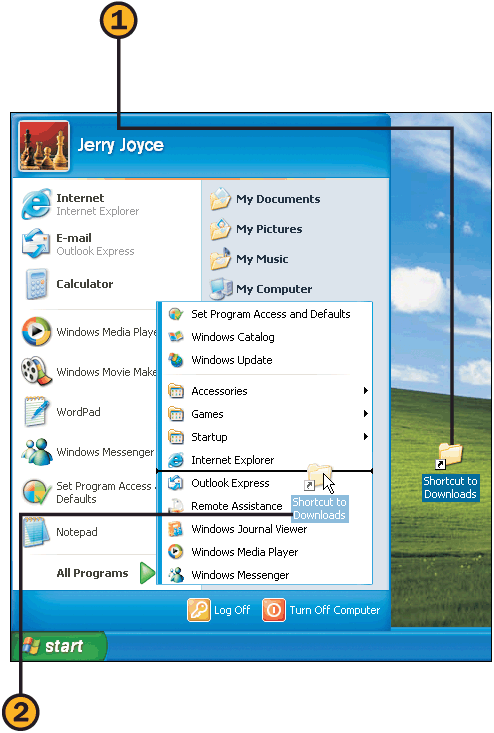
![]() Open the Start menu, locate the program you want to add (from one of the All Programs submenus or from a folder), and right-click it.
Open the Start menu, locate the program you want to add (from one of the All Programs submenus or from a folder), and right-click it.
![]() Choose Pin To Start Menu from the shortcut menu.
Choose Pin To Start Menu from the shortcut menu.
![]() Right-click a program that has been "pinned" to the Start menu, and choose Unpin From Start Menu from the shortcut menu to remove the program.
Right-click a program that has been "pinned" to the Start menu, and choose Unpin From Start Menu from the shortcut menu to remove the program.
The taskbar is a really handy navigation device, and you can make it even more efficient by customizing it to your work habits. You can specify which items are displayed on it and how they’re displayed, and you can even hide the taskbar when you aren’t using it and have it reappear when you need it.
Tip
As more and more programs place icons in the notification area of the taskbar, it’s often difficult to find the ones you need and use. Hiding the inactive icons makes the ones you use easy to find. Anytime you need to access one of the hidden icons, just click the Show Hidden Icons button at the left of the notification area.
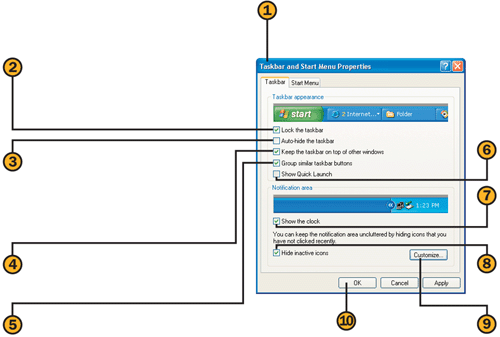
![]() Right-click a blank spot on the taskbar, and choose Properties from the shortcut menu to display the Taskbar And Start Menu Properties dialog box.
Right-click a blank spot on the taskbar, and choose Properties from the shortcut menu to display the Taskbar And Start Menu Properties dialog box.
![]() Select this check box to prevent the taskbar from being moved to a new location or to prevent toolbars from being resized.
Select this check box to prevent the taskbar from being moved to a new location or to prevent toolbars from being resized.
![]() Select this check box to hide the taskbar when you’re not using it. The taskbar will reappear when you move the mouse to whichever edge of the screen contains the taskbar.
Select this check box to hide the taskbar when you’re not using it. The taskbar will reappear when you move the mouse to whichever edge of the screen contains the taskbar.
![]() Select this check box to prevent other windows from obscuring the taskbar.
Select this check box to prevent other windows from obscuring the taskbar.
![]() Select this check box to have similar items grouped on one button when the taskbar is crowded.
Select this check box to have similar items grouped on one button when the taskbar is crowded.
![]() Select this check box to display the Quick Launch toolbar.
Select this check box to display the Quick Launch toolbar.
![]() Select this check box to have the clock appear in the notification area of the taskbar.
Select this check box to have the clock appear in the notification area of the taskbar.
![]() Select this check box to hide seldom-used icons in the notification area of the taskbar.
Select this check box to hide seldom-used icons in the notification area of the taskbar.
![]() Click Customize to specify which icons are always displayed, which are never displayed, and which are hidden when inactive.
Click Customize to specify which icons are always displayed, which are never displayed, and which are hidden when inactive.
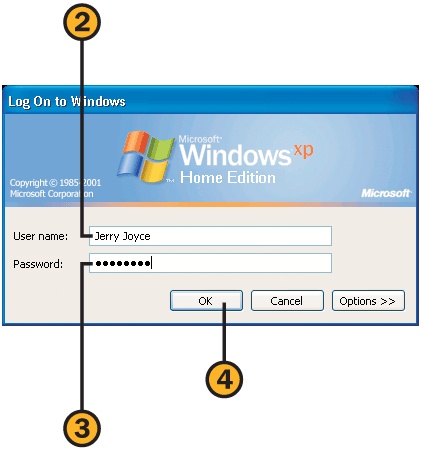
The standard—and the simplest—way to log on to Windows XP is to click your name on the Welcome screen, and, if you’ve set up a password, to type your password. If you’re a traditionalist and/or if you want to boost the security of your system, you can switch to the traditional logon—that is, you type both your user name and your password. When you choose to use the traditional logon, though, you disable Fast User Switching (the ability to allow someone else to log on to your computer without your having to log off).
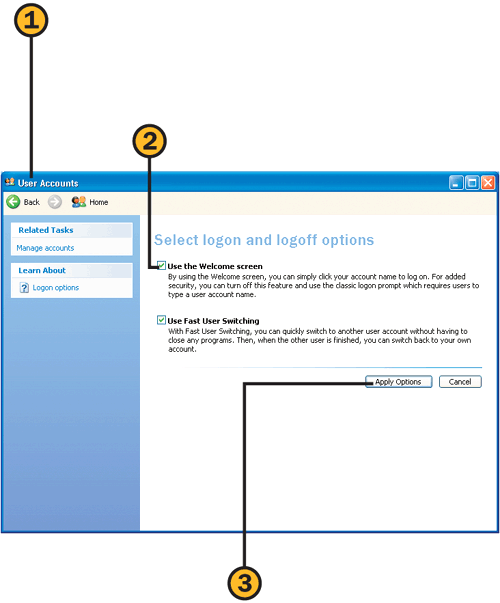
![]() Choose Control Panel from the Start menu, click the User Accounts category, and then click the Change The Way Users Log On Or Off task to display the User Accounts window.
Choose Control Panel from the Start menu, click the User Accounts category, and then click the Change The Way Users Log On Or Off task to display the User Accounts window.
![]() Click Apply Options, and then close the User Accounts window and the Control Panel window.
Click Apply Options, and then close the User Accounts window and the Control Panel window.
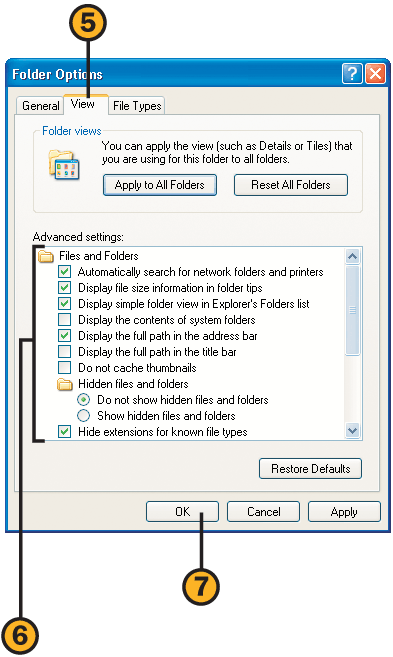
Working in Windows XP means that you work with folders. To adapt the folders to your working style, you can customize them so that they look and work in exactly the way you like. Some of the changes you make apply to all your folders and other changes apply to the single folder that’s open. In some cases, you can first apply the changes to a single folder and then, if you want, apply them to all your folders.
Tip
To learn more about the function of each option on the View tab, click the Help button at the top right of the dialog box, and then click the option.
Try This
To apply the same view to all your folders, select a view from the Views button, choose Folder Options from the Tools menu, and, on the View tab, click the Apply To All Folders button. Click OK.
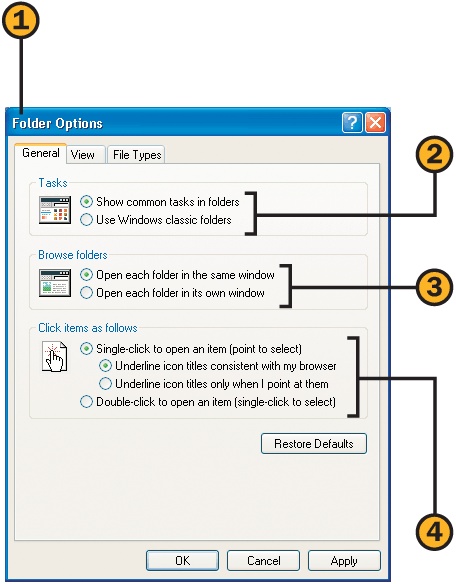
![]() Choose My Computer from the Start menu, and choose Folder Options from the Tools menu to display the Folder Options dialog box.
Choose My Computer from the Start menu, and choose Folder Options from the Tools menu to display the Folder Options dialog box.
![]() Click the first option to have frequently used tasks displayed on the left side of the folder. Click the second option to have only the contents of the folder displayed.
Click the first option to have frequently used tasks displayed on the left side of the folder. Click the second option to have only the contents of the folder displayed.
![]() Click the first option if you want all your folders to open in the same window—that is, when you open one folder from another folder, the second folder’s content replaces that of the first folder in the window. Click the second option if you want to use a separate window for each folder that you open.
Click the first option if you want all your folders to open in the same window—that is, when you open one folder from another folder, the second folder’s content replaces that of the first folder in the window. Click the second option if you want to use a separate window for each folder that you open.
![]() Click the first option if you want to click only once to open an item in a folder. Click the second option if you want to double-click to open an item. If you chose the first option, specify how you want the icon text to be underlined.
Click the first option if you want to click only once to open an item in a folder. Click the second option if you want to double-click to open an item. If you chose the first option, specify how you want the icon text to be underlined.
![]() Select check boxes for the options you want and clear check boxes for the options you don’t want.
Select check boxes for the options you want and clear check boxes for the options you don’t want.
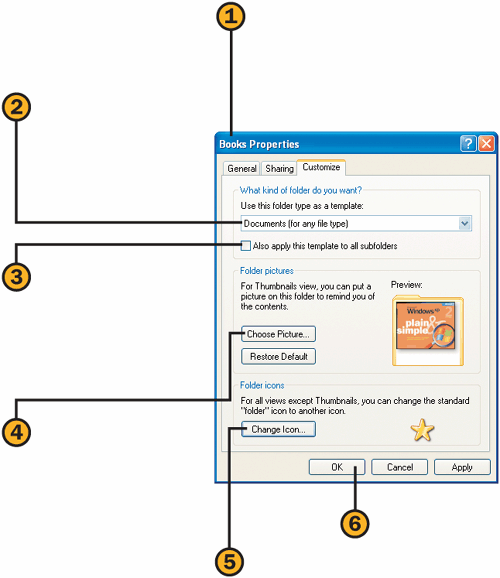
![]() Open the folder you want to customize, and choose Customize This Folder from the View menu to display the folder’s Properties dialog box.
Open the folder you want to customize, and choose Customize This Folder from the View menu to display the folder’s Properties dialog box.
![]() On the Customize tab, specify the predominant type of file this folder contains.
On the Customize tab, specify the predominant type of file this folder contains.
![]() Select this check box if you want any subfolders in this folder to use the same layout.
Select this check box if you want any subfolders in this folder to use the same layout.
![]() Click Choose Picture, and select a picture to be displayed on the folder when you’re viewing the folder in Thumbnails view.
Click Choose Picture, and select a picture to be displayed on the folder when you’re viewing the folder in Thumbnails view.
![]() Click Change Icon to specify a different icon for the folder.
Click Change Icon to specify a different icon for the folder.
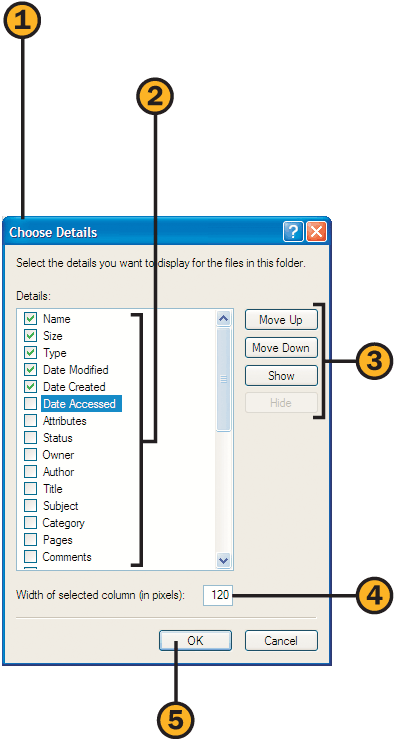
![]() Choose Choose Details from the View menu to display the Choose Details dialog box.
Choose Choose Details from the View menu to display the Choose Details dialog box.
![]() Select check boxes for the details you want to be shown in the folder window and clear check boxes for the details that don’t need to be shown.
Select check boxes for the details you want to be shown in the folder window and clear check boxes for the details that don’t need to be shown.
![]() Use the appropriate button to change the order of the items or to show or hide them.
Use the appropriate button to change the order of the items or to show or hide them.
![]() Specify the width in pixels of the column for the selected item.
Specify the width in pixels of the column for the selected item.
When you insert a CD into your computer’s CD drive, Windows detects the type of content on the CD—music or pictures, for example. Then Windows either asks you what you want to do with the CD or starts doing something without asking you, such as playing the music. If you want to make the decisions, you can let Windows know just how you want it to handle the various types of content on your CDs.

![]() Choose My Computer from the Start menu, right-click the CD drive, and choose Properties from the shortcut menu to display the CD Properties dialog box.
Choose My Computer from the Start menu, right-click the CD drive, and choose Properties from the shortcut menu to display the CD Properties dialog box.
![]() Click one of the following options:
Click one of the following options:
Select An Action To Perform to specify an action that Windows will perform automatically
Prompt Me Each Time To Choose An Action to see a dialog box listing the possible actions you can choose
![]() If you selected the option to perform a specific action, select the action you want for the type of content you specified.
If you selected the option to perform a specific action, select the action you want for the type of content you specified.
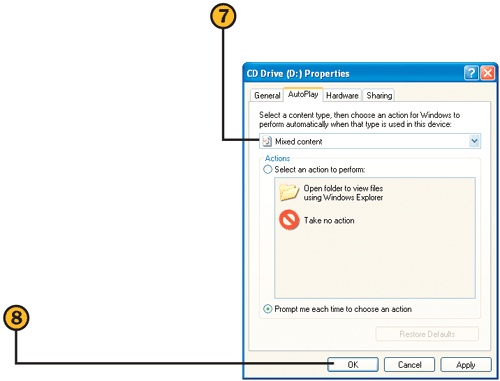
![]() Select a different type of content, and repeat steps 4 through 6.
Select a different type of content, and repeat steps 4 through 6.
Windows XP arbitrarily assigns your user account a picture, which seems to show up all the time. When your computer is set to use the Welcome screen, you see the picture when you log on or switch users, and there it is again every time you open the Start menu. If you don’t like the picture or if you feel that it has no relevance to you, and if you have a picture that’s just right, you can change the picture.
Tip
The space where the user account picture goes is designed for a square picture, so, if your picture isn’t square, you might want to crop it in Paint or in another photo-editing program to eliminate any blank space.
![]() Click the Start button to open the Start menu, and click your account picture.
Click the Start button to open the Start menu, and click your account picture.
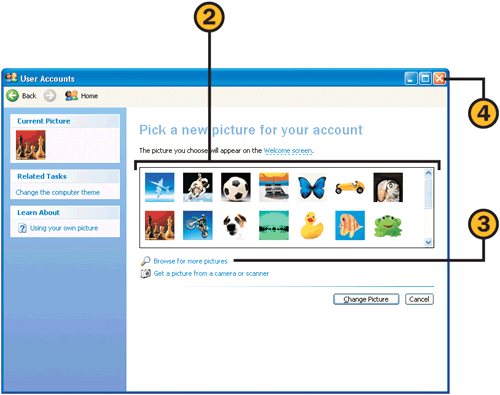
![]() In the User Accounts window that appears, click the picture you want to use.
In the User Accounts window that appears, click the picture you want to use.
![]() If you don’t like any of the pictures, click Browse For More Pictures, locate and select the picture you want, and click Open.
If you don’t like any of the pictures, click Browse For More Pictures, locate and select the picture you want, and click Open.
![]() Close the User Accounts window when you’ve finished.
Close the User Accounts window when you’ve finished.
![]() Open the Start menu, and verify that the picture is the one you want.
Open the Start menu, and verify that the picture is the one you want.
See Also
For information about switching between the traditional logon and the Welcome screen, see "Changing the Logon".
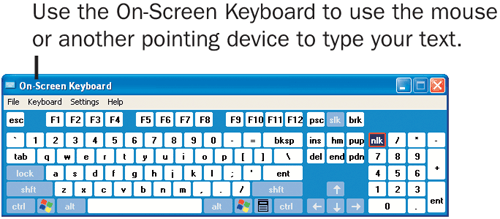
Windows XP provides several tools that let you change the way you enter information into, or receive information from, the computer. These tools—although designed primarily for people who experience difficulty when typing, using the mouse, seeing details on the screen, or hearing sounds—can be used by anyone who’d like to try some different ways of working on the computer. For example, you can use the keyboard to execute mouse actions, or use the mouse or another pointing device for keyboard input. Some other tools that can help you customize keyboard input are described in the table below.
 Choose Control Panel from the Start menu, click the Accessibility Options category, and click Accessibility Options to display the Accessibility Properties dialog box.
 On the various tabs of the dialog box, select the check boxes for the options you want to use, as described in the table. Click the Settings button for each option you selected, and specify how you want the option to function. Click OK.
 On the General tab, specify whether you want the features you selected to be turned off after the computer has been idle for a set period of time, whether you want a warning message or a sound to be used when a feature is turned on or off, and whether you want the settings to be available when you log on and whenever any new users of the computer log on.
Tip
You can use the Accessibility Wizard on the Accessibility submenu of the Start menu to provide a quick way to set up several tools at one time and to help you identify which tools you might want to use.
Alternative Input Options | |
|---|---|
Feature | What it does |
StickyKeys | Sets key combinations with the Alt, Ctrl, and Shift keys to be pressable one key at a time. |
FilterKeys | Ignores repeated characters or too-rapid key presses. |
ToggleKeys | Makes different sounds when you turn the Caps Lock, Num Lock, or Scroll Lock key on or off. |
SoundSentry | Flashes a specified screen component when the system beeps. |
ShowSounds | Displays text instead of sounds for programs that support this feature. |
High Contrast | Sets the color scheme for Windows XP to High Contrast to improve the visibility of components. |
Cursor Blink Rate | Sets the speed at which the cursor (the insertion point in WordPad, for example) blinks. |
Cursor Width | Sets the width of the cursor in programs. |
MouseKeys | Sets the numeric keypad to control mouse movements. |
SerialKey devices | Provides support for alternative input devices. |
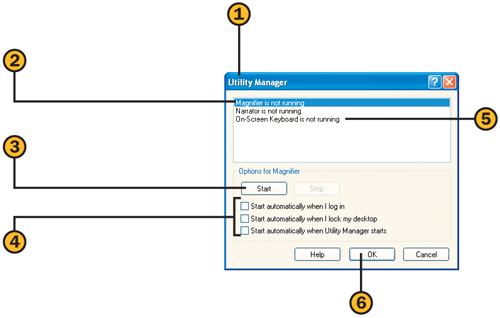
![]() On your keyboard, press the Windows key + U (or point to Accessories on the Start menu, point to the Accessibility submenu, and then choose Utilities Manager) to display the Utility Manager and to start Narrator.
On your keyboard, press the Windows key + U (or point to Accessories on the Start menu, point to the Accessibility submenu, and then choose Utilities Manager) to display the Utility Manager and to start Narrator.
![]() Click the program you want to run.
Click the program you want to run.
![]() Click Start to start the program.
Click Start to start the program.
![]() Select or clear the check boxes to specify how you want the program to start.
Select or clear the check boxes to specify how you want the program to start.
If you’re working in, or producing documents for use in, a region or country other than the one for which your computer was configured, you can change the default region and have Windows XP adjust the numbering, currency, time, and date schemes used by your programs. If you’re working in a different language, you can switch the layout of your keyboard to conform to that language.
Tip
If you want to use more than one regional setting on your computer, you can add additional languages as shown on the facing page. When you switch the input language using the Language bar or a key combination, the regional settings also change.
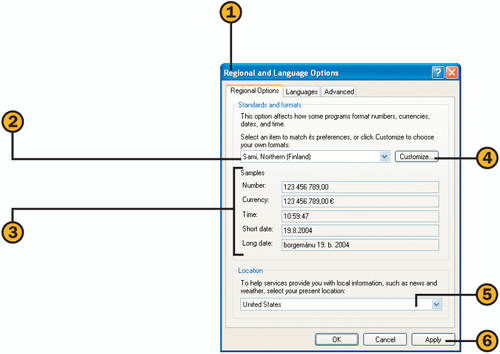
![]() Choose Control Panel from the Start menu, click the Date, Time, Language, And Regional Options category, and click the Change The Format Of Numbers, Dates, And Times task to display the Regional And Language Options dialog box.
Choose Control Panel from the Start menu, click the Date, Time, Language, And Regional Options category, and click the Change The Format Of Numbers, Dates, And Times task to display the Regional And Language Options dialog box.
![]() Select the regional language you want to use.
Select the regional language you want to use.
![]() Inspect the sample formats to make sure they’re displayed as you want them.
Inspect the sample formats to make sure they’re displayed as you want them.
![]() If you want to change any of the formats, click Customize, make any changes on the Numbers, Currency, Time, or Date tabs of the Customize Regional Options dialog box, and click OK.
If you want to change any of the formats, click Customize, make any changes on the Numbers, Currency, Time, or Date tabs of the Customize Regional Options dialog box, and click OK.
![]() Select the country or region in which you’ll actually be doing your work.
Select the country or region in which you’ll actually be doing your work.
See Also
For information about using the On-Screen Keyboard, see "Using Alternative Ways of Working".

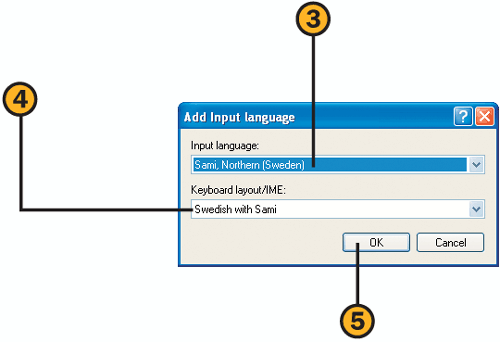
![]() On the Languages tab of the Regional And Language Options dialog box, click the Details button to display the Text Services And Input Languages dialog box.
On the Languages tab of the Regional And Language Options dialog box, click the Details button to display the Text Services And Input Languages dialog box.
![]() Click the Add button to display the Add Input Language dialog box.
Click the Add button to display the Add Input Language dialog box.
![]() Click to set the way you want the Language bar to be displayed.
Click to set the way you want the Language bar to be displayed.
![]() Click to configure key combinations to switch between languages.
Click to configure key combinations to switch between languages.
![]() Select the language you want as the default input language.
Select the language you want as the default input language.
![]() Click OK, and then click OK again in the Regional And Language Options dialog box.
Click OK, and then click OK again in the Regional And Language Options dialog box.
When you work at a computer, it’s good for your eyes—and for your mental health—to take a break and look at something different once in a while. If you work with other people, you might not want them to be able to read your screen—albeit unintentionally—any time your computer is unattended. A screen saver can provide a nice little respite from your work as well as some privacy. To prevent anyone from using your computer—but still allow network access to it—when you’re away from your desk, you can use the password option. You’ll need to enter the password to end the screen saver when you’re ready to get back to work.
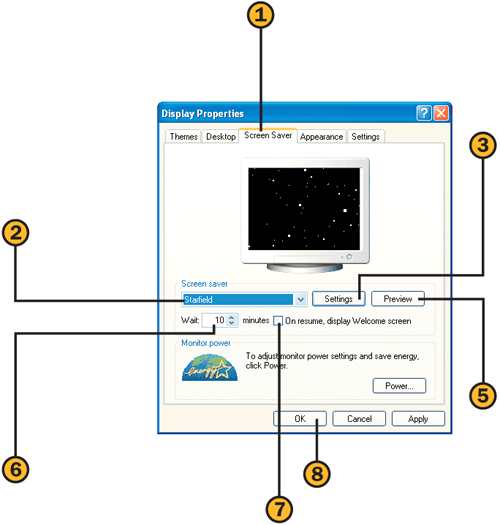
![]() Right-click a blank spot on the Desktop, choose Properties from the shortcut menu, and click the Screen Saver tab of the Display Properties dialog box.
Right-click a blank spot on the Desktop, choose Properties from the shortcut menu, and click the Screen Saver tab of the Display Properties dialog box.
![]() Click a screen saver in the list.
Click a screen saver in the list.
![]() Click Preview to see the screen saver in full-screen view. Move your mouse to end the preview.
Click Preview to see the screen saver in full-screen view. Move your mouse to end the preview.
![]() Specify the length of time you want your computer to be inactive before the screen saver starts.
Specify the length of time you want your computer to be inactive before the screen saver starts.
![]() Select this check box to require your logon password to terminate the screen saver so that you can get back to work.
Select this check box to require your logon password to terminate the screen saver so that you can get back to work.
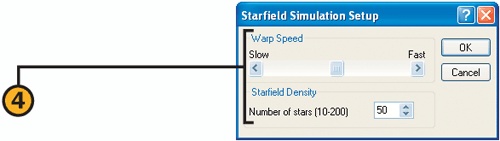
![]() Specify the options you want for the screen saver. (The settings are different for each screen saver.) Click OK when you’ve finished.
Specify the options you want for the screen saver. (The settings are different for each screen saver.) Click OK when you’ve finished.
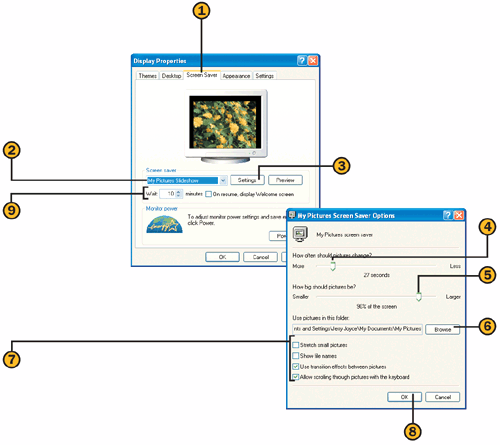
![]() If the Display Properties dialog box isn’t already displayed, click a blank spot on the Desktop, and choose Properties from the shortcut menu. Click the Screen Saver tab.
If the Display Properties dialog box isn’t already displayed, click a blank spot on the Desktop, and choose Properties from the shortcut menu. Click the Screen Saver tab.
![]() Use the slider to specify the length of time you want each picture to be displayed.
Use the slider to specify the length of time you want each picture to be displayed.
![]() Use the slider to specify how much of the screen the picture should occupy.
Use the slider to specify how much of the screen the picture should occupy.
![]() If you don’t want to use the default My Pictures folder, click Browse, and specify the folder that contains the pictures you want.
If you don’t want to use the default My Pictures folder, click Browse, and specify the folder that contains the pictures you want.
Small pictures to be stretched, and possibly distorted, to conform to the size you’ve specified.
The name of the picture file to be displayed at the top of the picture.
To use random transitions between the pictures.
To be able to advance to the next or the previous picture by using the left or right arrow key.
![]() Make any additional settings for the screen saver, and then click OK.
Make any additional settings for the screen saver, and then click OK.
If you have the Microsoft Plus! Digital Media Edition pack installed on your computer, you can create a screen saver that not only displays your pictures in a variety of ways but whose pictures are accompanied by the music of your choice.
See Also
For information about Microsoft Plus!, see "The Microsoft Plus! Packs".
For information about creating playlists, see "Arranging Your Media with Playlists".
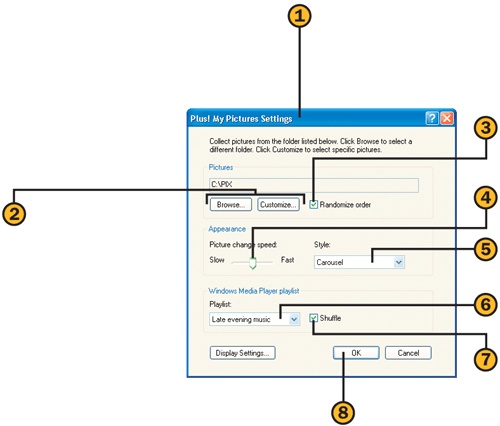
![]() Click a blank spot on the Desktop, choose Properties from the shortcut menu, and click the Screen Saver tab of the Display Properties dialog box. Choose Plus! My Pictures from the Screen Saver drop-down list, and then click the Settings button to display the Plus! My Pictures Settings dialog box.
Click a blank spot on the Desktop, choose Properties from the shortcut menu, and click the Screen Saver tab of the Display Properties dialog box. Choose Plus! My Pictures from the Screen Saver drop-down list, and then click the Settings button to display the Plus! My Pictures Settings dialog box.
![]() Use the Browse button to select the folder containing the pictures you want, or use the Customize button to create a collection of pictures from different locations.
Use the Browse button to select the folder containing the pictures you want, or use the Customize button to create a collection of pictures from different locations.
![]() Select this check box if you want the pictures to appear in random order rather than in their current order in the folder or collection you’re using.
Select this check box if you want the pictures to appear in random order rather than in their current order in the folder or collection you’re using.
![]() Use the slider to set the interval at which the pictures change.
Use the slider to set the interval at which the pictures change.
![]() Select the style in which the pictures will be displayed.
Select the style in which the pictures will be displayed.
![]() Select the playlist for the music you want to accompany your screen-saver slide show.
Select the playlist for the music you want to accompany your screen-saver slide show.
![]() Select this check box if you want the music tracks to be played in random order.
Select this check box if you want the music tracks to be played in random order.
![]() Click OK, make any other settings you want in the Display Properties dialog box, and click OK.
Click OK, make any other settings you want in the Display Properties dialog box, and click OK.