
In this section
Microsoft Windows XP is designed to work for you, not you for it. Don’t be afraid to jump right in and try out some features. You’ll find that there are often several ways to accomplish one task. Why? Because people work differently. Because different tasks have different requirements. And because you want to find the way that works best for you, get your work done quickly with a minimum of hassle, and then get away from the computer and live your life!
You’ll find that the procedures described in this book are simple and straightforward and that you can often use automated methods to get some of the more complex tasks done easily. This doesn’t mean that you can’t get stuck or get into trouble, but there are so many safeguards built into Windows XP and so many places where you can get help that you’ll have to work pretty hard to get into any real trouble.
This section of the book covers the basics: starting Windows XP and shutting it down, starting programs, using Fast User Switching to switch users without having to shut down all your running programs, accessing your documents, arranging your open windows, using the mouse, getting online help, and so on. There’s also a handy visual glossary on the following two pages that will help you become familiar with the various components of the Windows XP environment.
Don’t change or delete anything just yet—you’ll want to feel comfortable with the basics before you do any customizing. The best way to learn about running programs, managing windows, and getting help if you do get into trouble is to jump right in and try things out.
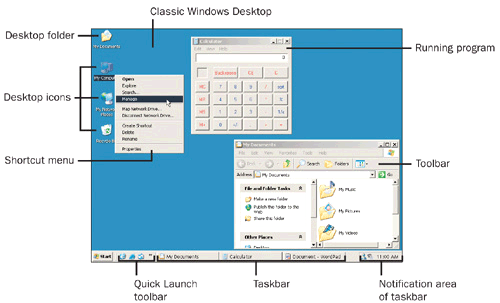
What’s Where in Windows XP?
Microsoft Windows XP is your working headquarters—the operating system that lets you run different programs simultaneously and share information among programs if you need to. Most of the programs you’ll use have common characteristics that were designed to work together in the Windows XP environment so that once you learn how to do something in one program, you know how to do it in other programs.
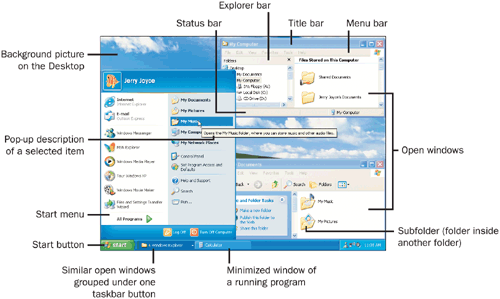
Take a look at the different parts of the Windows XP environment displayed on these two pages—what they do and what they’re called—and you’ll be on the road to complete mastery. The way Windows XP was set up on your computer, as well as the many ways in which you can customize Windows XP, can make drastic changes to the look of your Desktop, but the basic concepts are the same. And if you need to, you can always come back to this visual glossary for a quick refresher on Windows XP terminology.
When you turn on your computer, you’re also starting Windows XP. Startup time depends on your computer’s speed, configuration, and connections, and on the programs that are set up to start automatically. When you’ve finished your work, don’t just turn off the computer! Windows XP needs a little time to close any open programs or connections and to save your current settings.
See Also
For information about logging off and about fast switching of users, see "Switching Users".
For information about what to do if you’re having problems when you try to quit Windows XP, see "Quitting When You’re Stuck".
For information about changing the way you log on, see "Changing the Logon".

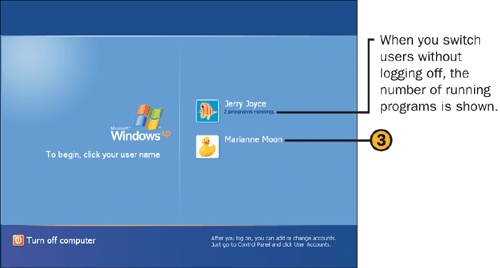
![]() Turn on your computer, your monitor, and any peripheral devices—your printer, for example.
Turn on your computer, your monitor, and any peripheral devices—your printer, for example.
![]() If a box for a password appears, type your password.
If a box for a password appears, type your password.
![]() Click here or press Enter to log on to Windows XP.
Click here or press Enter to log on to Windows XP.
Tip
Your computer can have several states of resting other than simply being turned off. Before you touch the On/Off switch, try pressing a key to see whether the computer comes back to life.
Caution
Personal accounts are very powerful in scope. Each user of the computer has his or her own folders for storing documents, and each user has individual and specific settings. You should never use someone else’s account! If you do, everything from files to e-mail messages could be misplaced or lost.
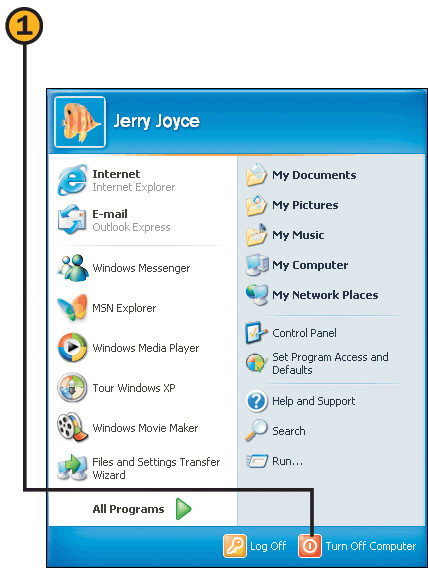
![]() Click the Start button, and then click Turn Off Computer.
Click the Start button, and then click Turn Off Computer.
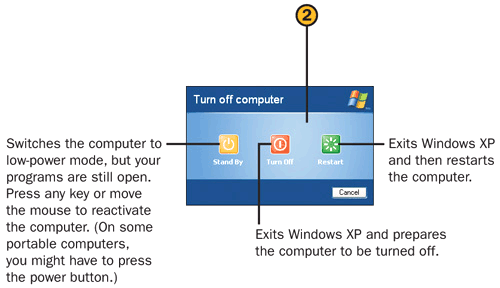
![]() Click the appropriate option. The options available depend on the configuration of your computer.
Click the appropriate option. The options available depend on the configuration of your computer.
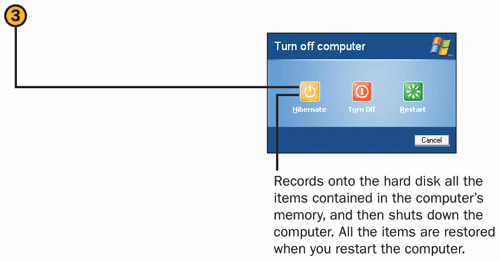
![]() To place the computer in Hibernate mode, hold down the Shift key, and click the Hibernate button when it appears.
To place the computer in Hibernate mode, hold down the Shift key, and click the Hibernate button when it appears.
If someone else wants to log on to your computer and use his or her own settings, you have two choices: You can log off and thereby close all the programs and network connections you were using, or you can simply switch users. Switching users is obviously a great idea! You can leave all your programs running, and as soon as the other person has finished with the computer, you can get back to work and find everything just as it was before you switched users.
Caution
Leaving your programs running uses some of the computer’s resources, so the other person who’s using the computer might find that it’s running slowly. If you notice that the computer’s performance has degraded when you use fast switching, log off to free up those resources.
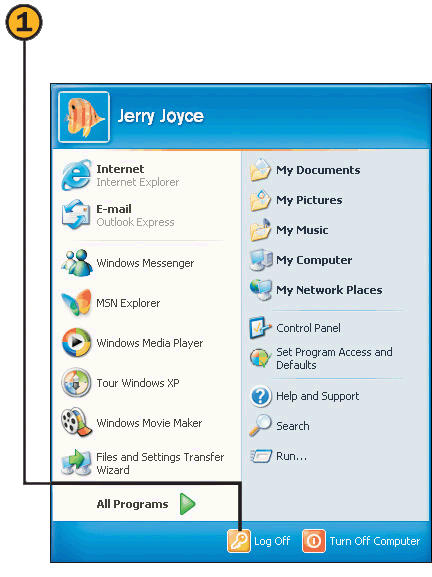
![]() Click the Start button, and click Log Off to display the Log Off Windows dialog box.
Click the Start button, and click Log Off to display the Log Off Windows dialog box.
Switch User to suspend your use of the computer and allow someone else to log on to the computer and immediately be able to use his or her own Desktop configurations and other settings
Log Off to close all your running programs, save your settings, and sign yourself off the computer
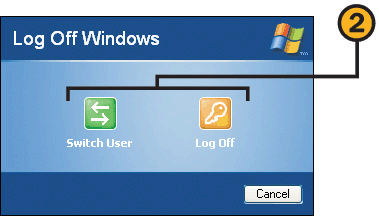
![]() Turn the computer over to the other user so that he or she can log on to the computer and get right to work.
Turn the computer over to the other user so that he or she can log on to the computer and get right to work.
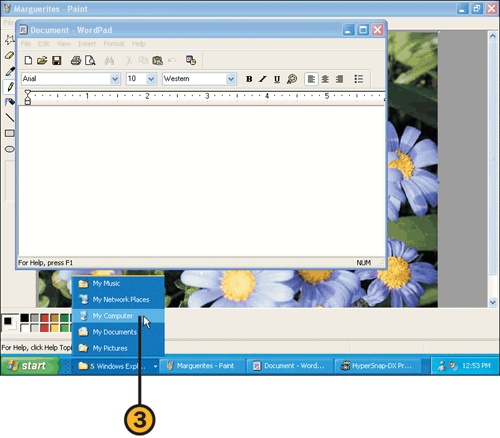
The real work of an operating system is to run software programs. Windows XP comes with a wide variety of programs, and you can install additional (and often more powerful) ones. Most programs are listed on the Start menu, but Windows XP gives you several ways to start your programs, so you can choose the way that’s easiest for you or the one you like best.
Click the Start button, and choose a program from the Start menu.
Click the Start button, point to All Programs, point to any relevant program groups to display additional submenus, and choose the program you want.
Point to and then double-click the program icon on the Desktop.
Open the My Computer folder, navigate to the folder that contains the program you want, and double-click the program.
Open the My Computer folder, navigate to the folder that contains a file associated with the program, and double-click the file.
Insert the CD that contains a program that’s designed to run from the CD, and choose to run the program.
Click the Start button, choose Run, type the full path and file name of the program, and click OK.
Tip
The programs listed in the table at the right are only some of the programs that come with Windows XP. You’ll find descriptions of some of the other programs elsewhere in this book.
Frequently Used Windows XP Programs | |
|---|---|
Program | Purpose |
Address Book | Stores names, addresses, and other contact information. |
Calculator | Does arithmetic calculations and complex mathematical calculations. |
Character Map | Inserts special characters from installed fonts. |
Internet Explorer | Functions as a Web browser and an HTML document viewer. |
Magnifier | Magnifies sections of the screen. |
MSN Explorer | Provides a customized Web browser that works easily with MSN Web sites. |
Narrator | Describes and reads aloud the screen contents. |
Notepad | Creates, edits, and displays text documents. |
On-Screen Keyboard | Allows keyboard input using the mouse or other pointing device. |
Outlook Express | Provides e-mail, newsgroup, and directory services. |
Paint | Creates and edits bitmap pictures; imports and edits scanned images and digital pictures. |
Sound Recorder | Creates and plays digital sound files. |
Windows Media Player | Plays sound, music, and video. |
Windows Movie Maker | Converts, edits, organizes, and distributes video files. |
WordPad | Creates, edits, and displays text, Rich Text Format, and Word documents. |
The My Documents folder is a personal storage area where you can keep and access your documents. The My Computer folder is the gateway to your computer’s contents, and it displays the icons that represent all your local storage areas: removable disk drives, hard disks, CD drives, and so on. From here you can venture as deep into the folder structure of your computer as you dare.
See Also
For information about displaying or hiding the My Documents folder, the My Computer icon, and a few other familiar icons that appeared on the Desktop in earlier versions of Windows, see "Customizing the Desktop".
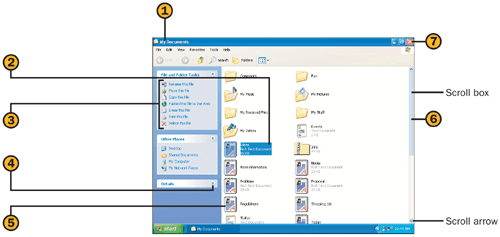
![]() Click the Start button, and choose My Documents from the Start menu to open the My Documents window.
Click the Start button, and choose My Documents from the Start menu to open the My Documents window.
![]() Read about the tasks you can do with this file.
Read about the tasks you can do with this file.
![]() Click to see the details about the file.
Click to see the details about the file.
![]() Double-click a file to open it.
Double-click a file to open it.
![]() Use the scroll bars, if necessary, to view all the documents. Click the scroll arrows to scroll a small increment at a time, or drag the scroll box to scroll a greater distance.
Use the scroll bars, if necessary, to view all the documents. Click the scroll arrows to scroll a small increment at a time, or drag the scroll box to scroll a greater distance.

![]() Click the Start button, and choose My Computer from the Start menu to open the My Computer window.
Click the Start button, and choose My Computer from the Start menu to open the My Computer window.
![]() Click a drive icon to select it.
Click a drive icon to select it.
![]() Read the information about the drive and the actions you can take.
Read the information about the drive and the actions you can take.
![]() Double-click a drive icon to open a window for that drive.
Double-click a drive icon to open a window for that drive.
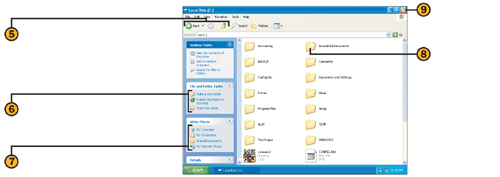
![]() Click the Back button to return to the previous window, the Forward button to move to a previously visited subfolder, or the Up button to move from a subfolder back to its parent folder.
Click the Back button to return to the previous window, the Forward button to move to a previously visited subfolder, or the Up button to move from a subfolder back to its parent folder.
![]() Select a folder or a file, and read about the tasks you can do with this folder or file.
Select a folder or a file, and read about the tasks you can do with this folder or file.
![]() Click a new destination if you want to work in a different folder.
Click a new destination if you want to work in a different folder.
![]() To open a folder, double-click it.
To open a folder, double-click it.
![]() Click the Close button when you’ve finished.
Click the Close button when you’ve finished.
See Also
For information about changing the way folders are displayed, see "Changing the Window View" and "Windows Views".
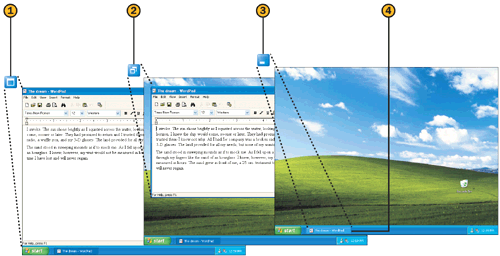
Whatever your working style, it’s inevitable that you’ll end up with more than one window open on your computer—your My Documents window and your My Network Places window, perhaps, or a couple of program windows. Instead of closing one window to get to another, you can simply switch windows.
Tip
If there isn’t enough room on the taskbar to display a button for each open window, Windows XP groups similar types of windows under one button. To arrange all the windows in the group, right-click the button, and choose the arrangement you want from the shortcut menu that appears.
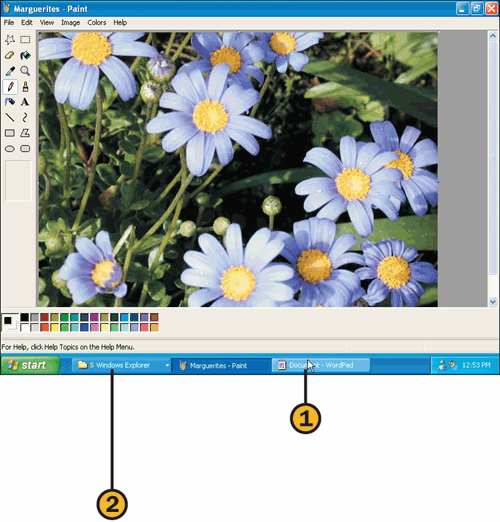
![]() On the taskbar, click to switch to the window you want.
On the taskbar, click to switch to the window you want.
![]() If Windows XP has grouped similar types of windows, click the button for the grouping, and then click the window you want.
If Windows XP has grouped similar types of windows, click the button for the grouping, and then click the window you want.
![]() Click the name of the window to open the window.
Click the name of the window to open the window.
Try This
Hold down the Alt key and press the Tab key. Still holding down the Alt key, press the Tab key several times. Note that the selection cycles through all the open windows. When you release the Alt key, you switch to the window that was selected.
Mouse Maneuvers
Navigating with a mouse is like traveling in a helicopter: You can lift off from any spot and set down wherever you want. Using the keyboard is like taking the scenic route—you get to explore the road less traveled, and you might even come across features and techniques that are new to you. But to finish your tasks as quickly as possible—and to take advantage of some of the best features of Windows XP—give your mouse the job!
Before you fly off on your mouse wings, you might need some Mouse Basics. Here at Mouse School you’ll learn to point, click, double-click, right-click, select, multiple-select, and drag with your mouse. Don’t be too surprised if the mouse acts a bit differently from the way you expect it to. Windows XP gives you numerous options for customizing the way your mouse works, so be patient and experiment a bit. And read "Customizing Your Folders" for information about setting up Windows XP so that your mouse works the way you want it to.
Point: Move the mouse until the mouse pointer (either a small arrow-shaped pointer or a tiny hand) is pointing to the item you want.


Click: Point to the item you want, and then quickly press down and release the left mouse button.
Double-click: Point to the item you want, and then quickly press down and release the left mouse button twice, being careful not to move the mouse between clicks.
Right-click: Point to the item you want, and then quickly press down and release the right mouse button.
Select: Point to an item, and click to select it. To select an icon when the system is set to open an item with a single click, point to the icon but don’t click. A selected item is usually a different color from other similar items or is surrounded by a frame.
Multiple-select: To select a list of adjacent or sequential items, click the first item, hold down the Shift key, and click the last item. To select or deselect nonadjacent items, hold down the Ctrl key and click each item you want. (Not all windows and dialog boxes permit multiple selection.)
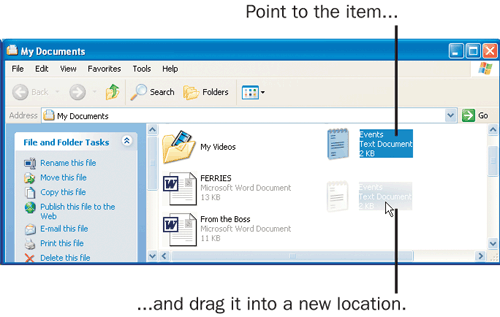
Drag: Select the item you want. Keeping the mouse pointer on the selected item, hold down the left mouse button and move the mouse until you’ve "dragged" the item to the desired location; then release the left mouse button.
"Managing" a window means bossing it around: You can move it, change its size, and open and close it. Most programs are contained in windows. Although these windows might have some different features, most program windows have more similarities than differences.
Tip
To automatically arrange all the windows on your Desktop, right-click a blank spot on the taskbar, and choose the arrangement you want from the shortcut menu.

![]() Click the Maximize button, and the window enlarges and fills the screen. (If the window is already maximized, you won’t see the Maximize button.)
Click the Maximize button, and the window enlarges and fills the screen. (If the window is already maximized, you won’t see the Maximize button.)
![]() Click the Restore Down button, and the window gets smaller. (If the window is already restored, you won’t see the Restore Down button.)
Click the Restore Down button, and the window gets smaller. (If the window is already restored, you won’t see the Restore Down button.)
![]() Click the Minimize button, and the window disappears but you can see its name on a button on the taskbar.
Click the Minimize button, and the window disappears but you can see its name on a button on the taskbar.
![]() Click the window’s name on the taskbar button, and the window zooms back to the size it was before you minimized it.
Click the window’s name on the taskbar button, and the window zooms back to the size it was before you minimized it.
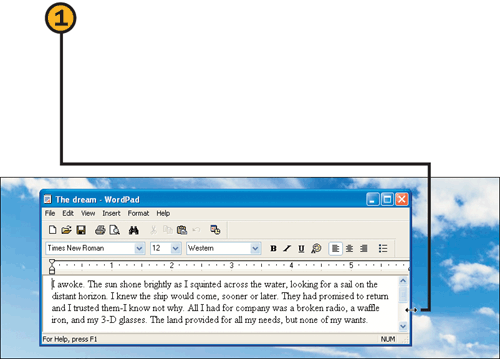
![]() Move the mouse over one of the borders of the window until the mouse pointer changes into a two-headed arrow. Drag the window border until the window is the size you want. The directions of the arrowheads show you the directions in which you can move the window border.
Move the mouse over one of the borders of the window until the mouse pointer changes into a two-headed arrow. Drag the window border until the window is the size you want. The directions of the arrowheads show you the directions in which you can move the window border.
Try This
Move your mouse over a side border, and drag the border to change the window’s width. Now move your mouse over the bottom border, and drag the border to change the window’s height. Finally, move your mouse over one of the window’s corners to change the window’s height and width.
Tip
To see the contents of a window when you move it rather than seeing a blank placeholder rectangle, right-click the Desktop, choose Properties from the shortcut menu, and, on the Appearances tab, click the Effects button. In the Effects dialog box, select the Show Window Contents While Dragging check box, and then click OK.

What are big and colorful; packed with information, procedures, shortcuts, and links to online information; and sadly underutilized? The Help programs! Of course, they couldn’t possibly replace this book, but you can use them to find concise step-by-step procedures for diagnosing and overcoming problems, and to explore many aspects of managing Windows XP. There are three basic types of help: the Help And Support Center, Program Help, and dialog box Help.
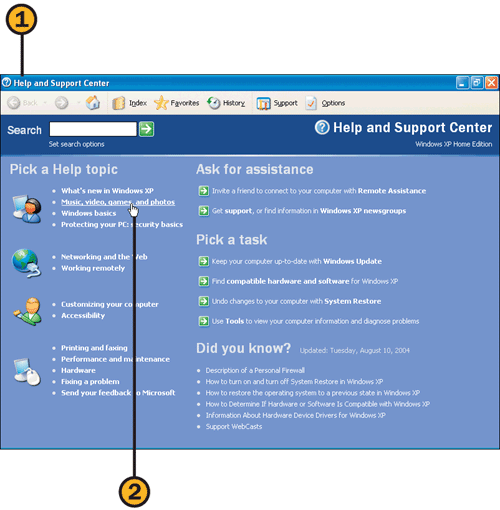
![]() Click the Start button, and choose Help And Support to open the Help And Support Center.
Click the Start button, and choose Help And Support to open the Help And Support Center.
![]() Click a link to the main topic of interest. If the item has subtopics, click the subtopic you want.
Click a link to the main topic of interest. If the item has subtopics, click the subtopic you want.
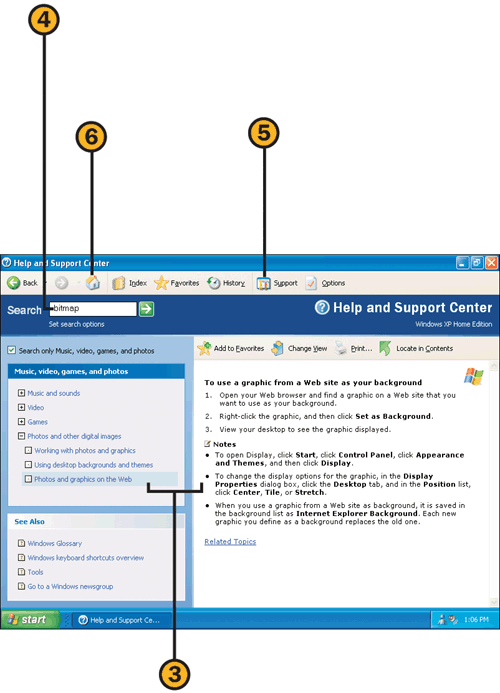
![]() If additional links are displayed, click the link that best suits your needs, and then read the information.
If additional links are displayed, click the link that best suits your needs, and then read the information.
![]() If you can’t find the information you need, type a word or phrase, and press Enter. If your search is unproductive, click Set Search Options, change what’s to be searched for, and try again.
If you can’t find the information you need, type a word or phrase, and press Enter. If your search is unproductive, click Set Search Options, change what’s to be searched for, and try again.
![]() If you still can’t find the information, connect to the Internet, and click Support to use resources on the Internet.
If you still can’t find the information, connect to the Internet, and click Support to use resources on the Internet.
![]() To look up another topic, click Home to return to the main page.
To look up another topic, click Home to return to the main page.
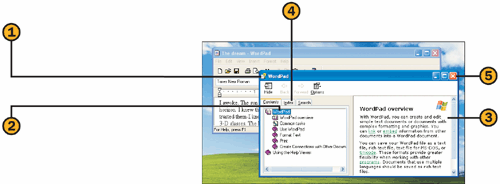
![]() Choose Help Topics from the program’s Help menu to open the Help program.
Choose Help Topics from the program’s Help menu to open the Help program.
![]() On the Contents tab, click the main topic of interest. Click a subtopic if necessary.
On the Contents tab, click the main topic of interest. Click a subtopic if necessary.
![]() If you can’t find the information you need, click the Index tab, and search for help using keywords.
If you can’t find the information you need, click the Index tab, and search for help using keywords.
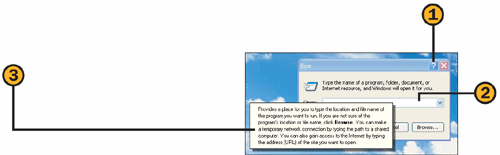
![]() In any Windows XP dialog box that contains a Help button, click the Help button.
In any Windows XP dialog box that contains a Help button, click the Help button.
![]() Click the item you want information about.
Click the item you want information about.
![]() Read the Help information, and then click anywhere to close Help.
Read the Help information, and then click anywhere to close Help.
See Also
For information about getting online help from someone you hope will be knowledgeable about computers and programs, see "Helping Each Other".
Windows XP and the programs that work with it were designed to be intuitive—that is, they anticipate what you’re likely to want to do when you’re working on a particular task, and they place the appropriate commands on a shortcut menu that you open by clicking the right mouse button. These shortcut menus are dynamic, which means they change depending on the task in progress.
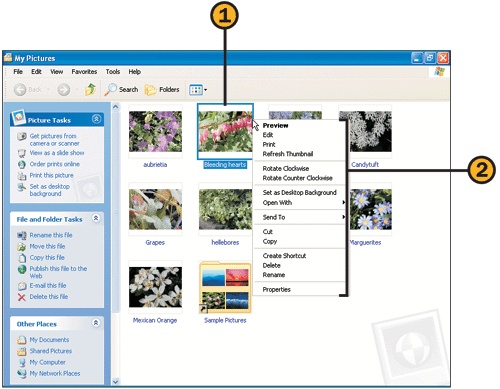
![]() Choose a command from the shortcut menu to accomplish the task at hand. If the item or action you want isn’t listed on the shortcut menu, do any of the following:
Choose a command from the shortcut menu to accomplish the task at hand. If the item or action you want isn’t listed on the shortcut menu, do any of the following:
From the shortcut menu, choose any items whose names have arrows next to them to see whether the item or action you want is on one of the shortcut menu’s submenus.
Check to be sure that you right-clicked the proper item.
Check the program’s documentation or Help files to verify that what you want to do can be accomplished from the item you right-clicked.
Tip
The tasks listed in a folder window are also dynamic, depending on the types of files in the folder, but they usually provide actions that are less specific than those listed on a shortcut menu.
Try This
See what’s on the shortcut menus. Right-click the Start button, and note the commands on the shortcut menu that appears. Now right-click a button on the taskbar, and then right-click a blank spot on the taskbar. Open the Start menu and right-click an item. Continue experimenting by right-clicking the Recycle Bin icon on the Desktop, other items on the Desktop, and various files and folders in folder windows. Amazing, isn’t it?