
In this section
In days of old, only the administrators of large corporate networks had to worry about computer security. These days, with the proliferation of computer viruses, constant connections to the Internet, home networks, and sophisticated hacking techniques used by an ever-growing cadre of snoops and pranksters, everyone should be vigilant. In this section you’ll find valuable information about the ways you can protect your files, your privacy on the Internet, and so on. If other people use your computer, you can protect your sensitive files from prying eyes by restricting user rights, by creating a password that protects the computer from unauthorized access, or by placing sensitive material in a compressed and encrypted folder. You can even lock your computer.
When you visit an Internet site that requests personal information, you can restrict the amount of information you provide by creating a special profile for that purpose. You can also control "cookies," those little files that Web sites use to keep track of your visits and preferences and that compile a lot of personal information about you. We’ll also show you how to configure the Windows Firewall to create a high level of security. If several people use your computer (especially if any are children), you can use Content Advisor to restrict access to Internet sites that contain material you consider inappropriate. If you’re setting up a wireless network, you can add security to prevent unauthorized access to the network. To monitor your overall security, check in periodically with the new Security Center, to verify that your firewall, virus protection, and software updates are working hard to protect you.
If other people use your computer, they can normally gain access to any of your files, including those in your My Documents folder. If your computer uses NTFS (the NT file system), however, you can keep your files private so that only you can access them when you log on to the computer.

![]() Choose My Computer from the Start menu to open the My Computer window.
Choose My Computer from the Start menu to open the My Computer window.
![]() Right-click your Documents folder (it shows your logon name), and choose Sharing And Security from the shortcut menu.
Right-click your Documents folder (it shows your logon name), and choose Sharing And Security from the shortcut menu.

![]() On the Sharing tab, select this check box to keep the folder private.
On the Sharing tab, select this check box to keep the folder private.

![]() If you’re notified that you don’t have a password, click Yes, and create a password.
If you’re notified that you don’t have a password, click Yes, and create a password.
See Also
For information about NTFS, see "Know Your Rights, Know Your Format".
For information about creating a password, see "Setting Your Password".
Unless you create a password that allows you to gain entry to your user account, anyone can log on to your computer and access your files. If you want to protect the computer from unauthorized access, create a password that’s easy for you to remember and difficult for others to guess.

![]() Choose Control Panel from the Start menu, click the User Accounts category, and click your account to display the User Accounts window.
Choose Control Panel from the Start menu, click the User Accounts category, and click your account to display the User Accounts window.
![]() In the User Accounts window, click Create A Password.
In the User Accounts window, click Create A Password.
![]() Type your password, and then type it again to confirm that you didn’t make a typing error.
Type your password, and then type it again to confirm that you didn’t make a typing error.
![]() Type a hint that will remind you, but no one else, of your password.
Type a hint that will remind you, but no one else, of your password.

![]() If Windows asks you whether you want to make your files private, click Yes, Make Private if you want to prevent access by anyone other than yourself to all the files in the My Documents folder and its subfolders.
If Windows asks you whether you want to make your files private, click Yes, Make Private if you want to prevent access by anyone other than yourself to all the files in the My Documents folder and its subfolders.
Caution
Passwords are case-sensitive—that is, MyPASSWORD and mypassword are two different passwords. Make sure that you remember and use the correct capitalization. If you have a problem logging on with your password, make sure the Caps Lock feature isn’t turned on.
Tip
Windows will ask you whether you want to make your files private only if your computer uses NTFS and if you haven’t already made the files private.
See Also
For information about changing a password, see "Changing Your Password" and "Resetting Your Password".
One of the best ways to prevent others from using your account is to change your password occasionally—especially if you’ve given it to someone or you suspect that someone might have guessed it or watched you type it. When you do change your password, create one that can’t be easily guessed (don’t use "password" or your well-known nickname, for example), and try to incorporate both uppercase and lowercase letters as well as one or two numbers. Of course, don’t make the password so complicated that you can’t remember it!

Few things are more maddening than trying repeatedly to log on, only to realize that you’ve forgotten your password! If this happens, you have two choices: You can reset the password (or, if you’re a member of the Limited group, you can ask an Administrator to reset it for you), which means that you’ll lose all your settings and any security credentials and certificates; or you can use your Password Reset disk to log on and reset your password and save all your settings and credentials. The latter is obviously the better choice, so you should create a Password Reset disk while you still remember your password.
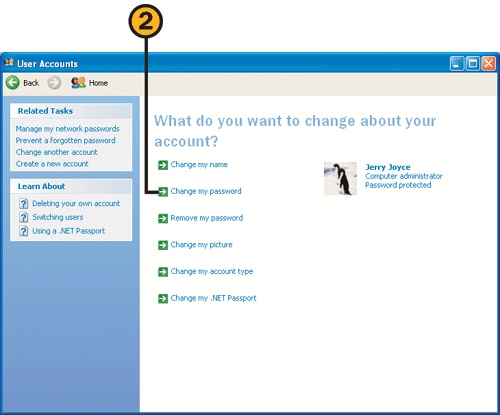
![]() Choose Control Panel from the Start menu, click the User Accounts category, and click your account.
Choose Control Panel from the Start menu, click the User Accounts category, and click your account.
![]() Click Prevent A Forgotten Password in the Related Tasks list in the User Accounts window to start the Forgotten Password Wizard.
Click Prevent A Forgotten Password in the Related Tasks list in the User Accounts window to start the Forgotten Password Wizard.
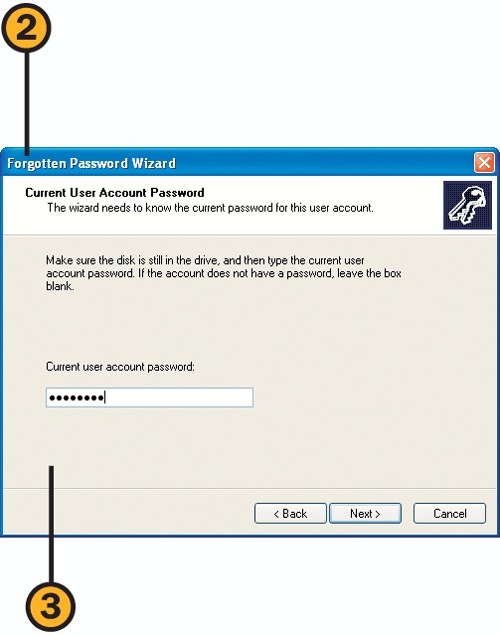
![]() Step through the wizard, inserting a blank floppy disk in the drive and entering your current password when prompted. When you’ve completed the wizard, remove the disk, label it as your Password Reset disk, and store it in a secure location.
Step through the wizard, inserting a blank floppy disk in the drive and entering your current password when prompted. When you’ve completed the wizard, remove the disk, label it as your Password Reset disk, and store it in a secure location.

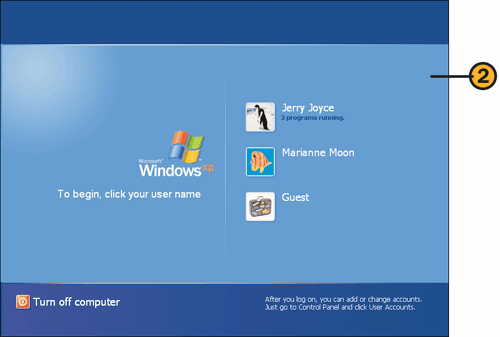
![]() Click here to see your password hint. Enter the password if the hint did its job.
Click here to see your password hint. Enter the password if the hint did its job.
![]() If you still don’t remember the password, click here, and, in the pop-up box that appears, click Use Your Password Reset Disk.
If you still don’t remember the password, click here, and, in the pop-up box that appears, click Use Your Password Reset Disk.

![]() Step through the Password Reset Wizard, inserting your Password Reset disk into the drive. When prompted, type a new password and a new (and better!) password hint.
Step through the Password Reset Wizard, inserting your Password Reset disk into the drive. When prompted, type a new password and a new (and better!) password hint.

![]() After completing the wizard, type your new password, and press Enter.
After completing the wizard, type your new password, and press Enter.
If your files contain sensitive information that you want to protect from prying eyes, place the files in a compressed folder, and create a password. Then, regardless of where those files are located—on your computer, in a shared folder on a network, or on a floppy disk that you lost somewhere—they can be opened and viewed only by you or by someone who knows that password.

![]() Create and open a new compressed folder. Copy your sensitive files into the folder.
Create and open a new compressed folder. Copy your sensitive files into the folder.
![]() Choose Add A Password from the File menu to display the Add Password dialog box.
Choose Add A Password from the File menu to display the Add Password dialog box.
![]() Enter a password. (The password is case-sensitive, so remember your combination of uppercase and lowercase letters.)
Enter a password. (The password is case-sensitive, so remember your combination of uppercase and lowercase letters.)

![]() When you want to access the files, double-click the compressed folder to open it, double-click a file, and enter the password when prompted.
When you want to access the files, double-click the compressed folder to open it, double-click a file, and enter the password when prompted.
One of the surest ways to protect your computer from either malicious or accidental damage is to be extremely cautious when you’re deciding on the select few who are responsible enough to be allowed full access to the computer. If you’re the least bit uncertain, you can always assign people to the Limited group or ask them to log on as Guest users.

![]() Choose Control Panel from the Start menu, click the User Accounts category, and click the account you want to change to display the User Accounts window.
Choose Control Panel from the Start menu, click the User Accounts category, and click the account you want to change to display the User Accounts window.
![]() In the User Accounts window, click the Change The Account Type task.
In the User Accounts window, click the Change The Account Type task.

![]() If the Guest account isn’t listed on the Welcome screen when you first log on (or when you choose Switch Users from the Start menu), click the User Accounts category in the Control Panel, and click the Guest account.
If the Guest account isn’t listed on the Welcome screen when you first log on (or when you choose Switch Users from the Start menu), click the User Accounts category in the Control Panel, and click the Guest account.
![]() Click Turn On The Guest Account.
Click Turn On The Guest Account.
![]() Close the User Accounts window.
Close the User Accounts window.
![]() To use the Guest account, click Guest when you log on. (You can’t have a password with the Guest account.)
To use the Guest account, click Guest when you log on. (You can’t have a password with the Guest account.)
If you leave your computer unattended for a while, you can lock it so that even though the programs that were running will continue to run, no one can access the computer using your name. Exactly what happens depends on whether or not you have Fast User Switching enabled.
![]() On your keyboard, press the Windows key + L.
On your keyboard, press the Windows key + L.
![]() If Fast User Switching is enabled, you’ll see the same window that appears when you choose to switch users, and you or another user can log on or resume working.
If Fast User Switching is enabled, you’ll see the same window that appears when you choose to switch users, and you or another user can log on or resume working.

![]() If Fast User Switching isn’t enabled, the Unlock Computer dialog box appears, and you can log on using your name, or a member of the Administrators group can log on, causing your account to be logged off.
If Fast User Switching isn’t enabled, the Unlock Computer dialog box appears, and you can log on using your name, or a member of the Administrators group can log on, causing your account to be logged off.
See Also
For information about securing the computer using a screen saver, see "Using a Screen Saver".
Some Web sites that you visit ask you to provide information, such as your name and e-mail address. Others are less direct; they use cookies—little text files that are written by the Web site and stored on your computer—to track your activities. Despite their friendly name, cookies can be insidious invasions of your privacy, often using the material they gather for advertising, demographic data, and so on. You can set up Internet Explorer to limit the amount of information you reveal when you’re on the Internet.

![]() Start Internet Explorer if it isn’t already running, choose Internet Options from the Tools menu, and then click the Content tab of the Internet Options dialog box.
Start Internet Explorer if it isn’t already running, choose Internet Options from the Tools menu, and then click the Content tab of the Internet Options dialog box.

![]() In the Address Book dialog box that appears, select the option to create a new entry, and click OK to display the Properties dialog box. Use the different tabs to enter only the information you’re willing to reveal to the Web sites you visit.
In the Address Book dialog box that appears, select the option to create a new entry, and click OK to display the Properties dialog box. Use the different tabs to enter only the information you’re willing to reveal to the Web sites you visit.
Tip
Many Web sites permit access only when you allow cookies; others might not work properly when cookies are disabled.
See Also
For information about blocking pop-up windows, see "Controlling Pop-Up Windows".
For information about adjusting general security settings, see "Restricting Internet Access".

![]() Click the Privacy tab of the Internet Options dialog box.
Click the Privacy tab of the Internet Options dialog box.
![]() Drag the slider to specify the level of privacy you want. Read the description of the restrictions for that level. If the slider isn’t visible, click the Default button, and then use the slider to set the level you want.
Drag the slider to specify the level of privacy you want. Read the description of the restrictions for that level. If the slider isn’t visible, click the Default button, and then use the slider to set the level you want.
![]() If there are specific sites for which you want to either allow or block cookies, click Sites.
If there are specific sites for which you want to either allow or block cookies, click Sites.
![]() Click Advanced if you want to customize the way cookies are handled, and then click OK in the Advanced Privacy Settings dialog box.
Click Advanced if you want to customize the way cookies are handled, and then click OK in the Advanced Privacy Settings dialog box.
![]() Try connecting to your Web sites. If you’re unable to connect, or if the Web pages don’t open fully, you can then allow cookies for these sites by using the Sites button.
Try connecting to your Web sites. If you’re unable to connect, or if the Web pages don’t open fully, you can then allow cookies for these sites by using the Sites button.

![]() Type or paste the Web site’s address.
Type or paste the Web site’s address.
![]() Specify whether you want to always allow cookies for this site or always prohibit cookies for this site.
Specify whether you want to always allow cookies for this site or always prohibit cookies for this site.
Although most Web sites pose little security threat to your computer, some sites are designed with malicious intentions. To protect yourself from these sites, as well as to allow access to additional features for sites you know aren’t going cause any harm, in Internet Explorer you can set and customize your own security levels and can add sites to your list of trusted—or restricted—Web sites.
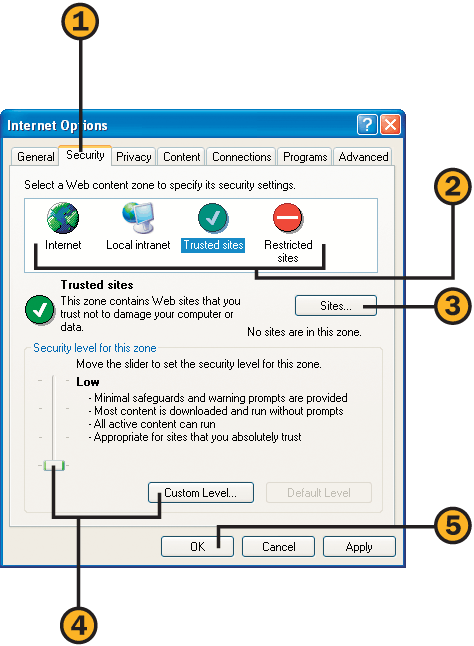
![]() In Internet Explorer, choose Internet Options from the Tools menu, and click the Security tab of the Internet Options dialog box.
In Internet Explorer, choose Internet Options from the Tools menu, and click the Security tab of the Internet Options dialog box.
![]() Click the Sites button, type or paste an address for a Web site you want to include in that zone, and click Add. Continue adding any other sites you want in that zone, and click OK when you’ve finished. (Note that you can’t add any Web sites to the Internet zone.)
Click the Sites button, type or paste an address for a Web site you want to include in that zone, and click Add. Continue adding any other sites you want in that zone, and click OK when you’ve finished. (Note that you can’t add any Web sites to the Internet zone.)
Use the slider to adjust the level of security. If the slider isn’t visible, click the Default Level button, and then use the slider.
Click Custom Level, and select the options you want in the Security Settings dialog box. Click OK.
![]() Repeat steps 2 through 4 for the other zones, and then click OK.
Repeat steps 2 through 4 for the other zones, and then click OK.
Tip
The Internet Explorer security settings aren’t the only means by which content can be restricted. The Windows Firewall also restricts the downloading of potentially dangerous material and restricts access to your computer from the Internet.
See Also
For information about using parental controls for limiting access to certain types of sites, see "Restricting Internet Access" on the facing page.
For information about security settings using the Windows Firewall, see "Configuring the Windows Firewall".
The Internet provides access to many things—some weird, some wonderful, and some that might not be appropriate for everyone who uses your computer. To restrict access to certain types of sites—those that contain sexually explicit or violent material, for example—you can use Content Advisor.

![]() Start Internet Explorer if it isn’t already running, choose Internet Options from the Tools menu, and click the Content tab of the Internet Options dialog box.
Start Internet Explorer if it isn’t already running, choose Internet Options from the Tools menu, and click the Content tab of the Internet Options dialog box.

![]() In Content Advisor, click a category.
In Content Advisor, click a category.
![]() Move the slider to adjust the acceptable level of material that can be accessed. Repeat to set levels for the other categories.
Move the slider to adjust the acceptable level of material that can be accessed. Repeat to set levels for the other categories.

![]() On the General tab, select or clear check boxes to specify whether unrated sites may be accessed and whether a password may be used to allow access to restricted sites.
On the General tab, select or clear check boxes to specify whether unrated sites may be accessed and whether a password may be used to allow access to restricted sites.
![]() Click Create Password, enter and confirm your password, provide a hint for the password, and click OK.
Click Create Password, enter and confirm your password, provide a hint for the password, and click OK.
Maintaining High Security with Service Pack 2
Microsoft Windows XP itself provides your computer with many built-in security features, but, after you’ve enhanced it with Service Pack 2 (or later), your computer’s security will be greatly improved. We’ve discussed some of these security features in other parts of the book, but now we’ll take a look at the big picture to see how Windows with Service Pack 2 enhancements increases your security—and, unfortunately, sometimes complicates your normal computer use.
Closing the Doors to Your Computer
You know that hackers, viruses, worms, spyware, and other evils are lurking out there, making dastardly plans to attack your computer! Fortunately, Windows has come up with several ways of confounding these villains. One such deterrent is the Windows Firewall, which provides superior control of the avenues through which a hacker can access your computer. The hacker’s favored avenue of access to your computer is through a gateway, or port, that’s left open by a program. The firewall closes any ports that aren’t in use and restricts access to others, unless a port has been specifically opened by an authorized program or directly by you. This port patrol adds substantial security, but it can also interfere with the normal operations of certain programs, such as Microsoft NetMeeting. You might need to get specific directions about configuring a particular program, opening ports, or updates for software that doesn’t work properly with the firewall.
The firewall also blocks outgoing connections and messages from programs that you haven’t authorized to communicate with the outside world. You’ve probably seen messages that pop up, telling you this or that program is trying to access your network or the Internet and asking you if you want to allow this. Annoying as these seemingly continuous interruptions and questions can be, imagine how much more up-setting it would be to discover that a program was running on your computer without your knowledge, spying on everything you do! When such a program tries to send information to its evil overlords, the firewall detects the attempted outgoing message and tells you about it. Caught in the act!
Avoiding the Troublemakers
Sneaking in via an open port is only one method among many through which nasty programs can invade your computer. Some of these interlopers, particularly viruses and worms, come to you in e-mail messages or attachments, are downloaded from a Web site, or are transferred to you using Windows Messenger. Windows works hard to keep these programs from gate-crashing your computer. Outlook Express checks your attachments, and Windows Messenger and Internet Explorer look for malicious code in any files you transfer. Windows Messenger will block any invalidly signed programs unless they originate from someone in your Contacts list. Internet Explorer also blocks the downloading of ActiveX controls that don’t have valid signatures, and it blocks the running of any controls that have previously been disabled. Other security enhancements are extremely technical, including added protection for using Remote Procedure Calls and Distributed Component Object Model items.
Preventing Evil Programs from Running
Windows now provides several ways to protect you from a malicious program that has already made its way onto your computer. For example, whenever you open an attachment or run a downloaded file, Windows checks to see whether the file is a program (that is, an executable file), and, if so, whether the program has been signed by a legitimate publisher. If the program appears not to be legitimate, Windows prevents it from running. There are also several very technical improvements: preventing memory buffer overflows, for example, and, with hardware makers, the development of techniques to prevent executable code from running in parts of the computer’s memory designed to store data only.
Doing Your Part
By themselves, these security features can’t protect you from every type of mischief. Some of it’s up to you. You need to be active in protecting your computer, your data, and your personal information. Here are several things you can do to help improve your security:
Make sure you have a good, up-to-date anti-virus program installed. This will add protection against viruses and worms that have figured ways around some of the security features.
In Outlook Express (or in Outlook if you’re using Microsoft Office), read your e-mail messages in Plain Text instead of using HTML format. This will prevent any malicious code that’s hidden in the HTML code from being executed when you open the messaeg.
In Outlook Express (or in Outlook if you’re using Microsoft Office), don’t download pictures and other external HTML content contained on a server. Doing so verifies your e-mail address to any potential authors of spam and can introduce malicious code.
Make sure that your Web content zones in Internet Explorer are properly set and that you’re not using custom settings that provide less protection than the recommended default level.
In Internet Explorer, make sure you have the pop-up blocker turned on to prevent code from being loaded, to prevent a hacker from stealing information by making the pop-up look like a dialog box or other content that asks for information, and to keep those annoying pop-up ads from showing up.
In Internet Explorer, use the Add-Ons Manager to disable any add-on programs that might be causing problems. If Internet Explorer crashes because an add-on program has caused a problem, use the Internet Explorer Add-On Crash Detection window to determine the culprit, and then use the Add-Ons Manager to disable that add-on.
Keep Windows up to date with automatic updates. Yes, we ask the same question—will that endless stream of annoying updates never cease?! Remember, however, that each critical update is an urgent fix to outmaneuver a newly detected software vulnerability or to thwart a new method of attacking your computer.
Use the new Security Center to verify that your basic security settings—Windows Firewall, Virus Protection, and Automatic Updates—are properly configured and up to date.
Stop and think before you do something you might regret: open an attachment, download a file, install a program, or even answer an e-mail.
Keep all your important data backed up so that if something nasty sneaks past all your security, you can recover all your data.
Complicated and complex? Absolutely! But don’t be intimidated: Windows will take care of most of these issues. You don’t need to worry about buffer overflows or spoofed files or any of the other computerspeak techniques of hackers because Windows deals with them swiftly and invisibly. Are you worried because you’re not sure how to turn on the Windows Firewall? Don’t be: Windows turns it on for you, and you can always check its status in the Security Center. Windows also adjusts many of your default settings to maintain the optimum balance between security and functionality.
Although there are many different high-security settings in Windows, there are three big ones: Windows Firewall, Virus Protection, and Automatic Updates. With the new Security Center, you can easily monitor your settings and can adjust them as needed.

![]() Choose Control Panel from the Start menu, and click the Security Center category to display the Security Center window.
Choose Control Panel from the Start menu, and click the Security Center category to display the Security Center window.
![]() Check the status of the Windows Firewall, Automatic Updates, and Virus Protection features.
Check the status of the Windows Firewall, Automatic Updates, and Virus Protection features.
![]() Click the down arrow next to an active feature to see detailed information.
Click the down arrow next to an active feature to see detailed information.
![]() If an item is turned off or is not configured, click the appropriate button, and follow any instructions.
If an item is turned off or is not configured, click the appropriate button, and follow any instructions.
Tip
The Windows Firewall and the Automatic Updates features are part of Windows XP, but the Virus Protection software is provided by third-party software companies. Make sure you’ve set the anti-virus software to automatically download updated files and to conduct real-time scanning.
See Also
For information about customizing the Windows Firewall settings, see "Configuring the Windows Firewall".
For information about configuring the way automatic updates are downloaded and installed, see "Installing Critical Fixes".
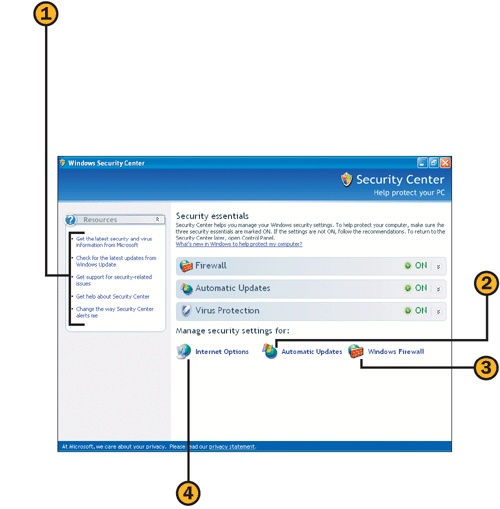
![]() Click an item in the Resources section to
Click an item in the Resources section to
Go to the Microsoft Security Web page for the latest security information and downloads.
Go to Windows Update to manually download critical updates and check for noncritical updates.
Go to the Security Support Center Web page for additional information about security.
Open the Help And Support Center window for information about using the Security Center.
Open the Alert Settings dialog box to specify which security conditions will trigger an alert.
![]() Click the Automatic Updates icon to display the Automatic Updates dialog box, from which you can configure your download settings.
Click the Automatic Updates icon to display the Automatic Updates dialog box, from which you can configure your download settings.
![]() Click the Windows Firewall icon to display the Windows Firewall dialog box, from which you can configure your settings for the Windows Firewall.
Click the Windows Firewall icon to display the Windows Firewall dialog box, from which you can configure your settings for the Windows Firewall.
![]() Click the Internet Options icon to display the Internet Properties dialog box. Set the security for each Web content zone, set your use of cookies, prevent pop-up windows from appearing, restrict access to certain types of Web sites, and specify the personal data you’ll permit to be shared with Web sites.
Click the Internet Options icon to display the Internet Properties dialog box. Set the security for each Web content zone, set your use of cookies, prevent pop-up windows from appearing, restrict access to certain types of Web sites, and specify the personal data you’ll permit to be shared with Web sites.
A firewall is a program that’s designed to prevent unauthorized and malicious access to your computer over the Internet. In other words, a firewall is your defense against hackers, viruses, Trojan horses, worms, and all the other horrors out there in cyberspace. Unfortunately, a firewall can also block legitimate traffic, so you might need to tweak your settings a bit.
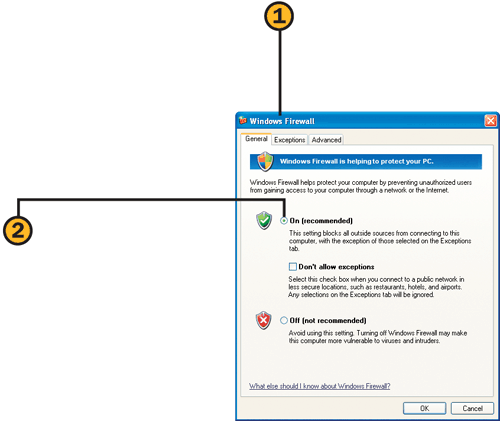
![]() Choose Control Panel from the Start menu, click the Security Center category, and click the Windows Firewall icon in the Security Center window to display the Windows Firewall dialog box.
Choose Control Panel from the Start menu, click the Security Center category, and click the Windows Firewall icon in the Security Center window to display the Windows Firewall dialog box.
![]() On the General tab, verify that the Firewall option is set to On (Recommended). If you’re using a public network (such as a Wi-Fi connection in your favorite coffee shop), select the Don’t Allow Exceptions check box to increase your security.
On the General tab, verify that the Firewall option is set to On (Recommended). If you’re using a public network (such as a Wi-Fi connection in your favorite coffee shop), select the Don’t Allow Exceptions check box to increase your security.

![]() On the Exceptions tab, select the programs that you want to have full access to your network or to the Internet through the firewall, and clear the check boxes for any programs whose access you want to prevent through the firewall.
On the Exceptions tab, select the programs that you want to have full access to your network or to the Internet through the firewall, and clear the check boxes for any programs whose access you want to prevent through the firewall.
![]() If the check box for displaying a notice when a program is blocked isn’t checked, check it.
If the check box for displaying a notice when a program is blocked isn’t checked, check it.

![]() In the Network Connection Settings section of the Advanced tab, select your network connection, and click Settings to carefully make any changes that a reliable source—a software manufacturer or a Microsoft article, for example—has instructed you to make. Click OK.
In the Network Connection Settings section of the Advanced tab, select your network connection, and click Settings to carefully make any changes that a reliable source—a software manufacturer or a Microsoft article, for example—has instructed you to make. Click OK.

![]() Start the program you want to use. If the program is stopped by the firewall, the Windows Security Alert dialog box will appear.
Start the program you want to use. If the program is stopped by the firewall, the Windows Security Alert dialog box will appear.
![]() Review the name of the program and its publisher, and decide whether you trust the program and its source.
Review the name of the program and its publisher, and decide whether you trust the program and its source.
![]() Click the button for the action you want to take:
Click the button for the action you want to take:
Keep Blocking to deny the program access through the firewall. The Security Alert dialog box won’t appear again for this program.
Unblock to always allow this program access through the firewall. The program will be added to the Exceptions list for the firewall configuration.
Ask Me Later to deny the program access through the firewall this time. The next time the program attempts access through the firewall, the Security Alert dialog box will appear again.
Caution
If you’ve changed the default security settings for the Windows Firewall, the Windows Security Alert dialog box might not be displayed when a program is blocked. Select the Display A Notification When Windows Firewall Blocks A Program check box on the Exceptions tab of the Windows Firewall dialog box if you always want the Windows Security Alert dialog box to be displayed.
See Also
For information about manually configuring the firewall to permit certain programs or services access through the firewall, see "Creating Custom Access Across the Firewall" and "Using Windows Services Across the Firewall".
In most cases, when you specify that a program is allowed access to your network or to the Internet through the firewall, the program works perfectly. However, there might be times when a program you’re using doesn’t work well with the firewall. In that case, you’ll need to make some special settings to get the program to work properly, either by manually adding the program to the Exceptions list for the firewall or by adding the port number the program will use.
Tip
A port is an avenue that the computer uses to connect with the world outside the computer. Many programs don’t have fixed port numbers, so you’ll need to specify the program and let it communicate its port number to the firewall. In some cases, when this communication doesn’t work and the program uses a fixed port, you can specify the port number so that the program can use the port to access the network or the Internet.

![]() Choose Control Panel from the Start menu, click the Security Center category, and click the Windows Firewall icon in the Security Center window to display the Windows Firewall dialog box.
Choose Control Panel from the Start menu, click the Security Center category, and click the Windows Firewall icon in the Security Center window to display the Windows Firewall dialog box.
![]() On the Exceptions tab, click Add Program to display the Add A Program dialog box.
On the Exceptions tab, click Add Program to display the Add A Program dialog box.
![]() Select the program that you want to have access to the network or to the Internet.
Select the program that you want to have access to the network or to the Internet.
![]() If the program isn’t listed, click Browse, and, in the Browse dialog box, locate and select the program. Click Open.
If the program isn’t listed, click Browse, and, in the Browse dialog box, locate and select the program. Click Open.
![]() Click OK in the Add a Program dialog box, and then click OK in the Windows Firewall dialog box. Close the Security Center, and then use the program to verify that your settings work.
Click OK in the Add a Program dialog box, and then click OK in the Windows Firewall dialog box. Close the Security Center, and then use the program to verify that your settings work.

![]() In the Change Scope dialog box, select the location of the computers that you’ll allow this program to communicate with, or create a custom list of computers by specifying their IP addresses.
In the Change Scope dialog box, select the location of the computers that you’ll allow this program to communicate with, or create a custom list of computers by specifying their IP addresses.

![]() Obtain the port number or numbers and the protocol to be used for the program from the program’s documentation, the manufacturer’s Web site, or a Microsoft article.
Obtain the port number or numbers and the protocol to be used for the program from the program’s documentation, the manufacturer’s Web site, or a Microsoft article.
![]() In the Control Panel, click the Security Center category, and click the Windows Firewall icon in the Security Center window to display the Windows Firewall dialog box.
In the Control Panel, click the Security Center category, and click the Windows Firewall icon in the Security Center window to display the Windows Firewall dialog box.
![]() On the Exceptions tab, click Add Port.
On the Exceptions tab, click Add Port.
![]() Check the port you added, and then click OK. Close the Security Center, and test the program to see whether you now have access.
Check the port you added, and then click OK. Close the Security Center, and test the program to see whether you now have access.

![]() In the Add A Port dialog box, type a common name for the port that will help you identify it later.
In the Add A Port dialog box, type a common name for the port that will help you identify it later.
![]() Enter the port number you want to open.
Enter the port number you want to open.
![]() Select the protocol to be used. In most cases, it will be the TCP protocol.
Select the protocol to be used. In most cases, it will be the TCP protocol.
![]() Click Change Scope if you want to restrict which computers can communicate through this port.
Click Change Scope if you want to restrict which computers can communicate through this port.
![]() Click OK. Add any additional ports you need for the program.
Click OK. Add any additional ports you need for the program.
Your computer can run a variety of services—for example, it can be an FTP server or a mail server. You’ll need to tell the Windows Firewall which services you’re running so that the firewall will allow the information to pass through. Some services—such as the ICMP (Internet Control Messaging Protocol) services that are usually used to diagnose connection problems—are disabled by default because they have been misused in various ways over the Internet. However, you can enable these if you need them.

![]() Choose Control Panel from the Start menu, click the Security Center category, and click the Windows Firewall icon in the Security Center window to display the Windows Firewall dialog box.
Choose Control Panel from the Start menu, click the Security Center category, and click the Windows Firewall icon in the Security Center window to display the Windows Firewall dialog box.
![]() On the Advanced tab, select a network connection if you have more than one connection.
On the Advanced tab, select a network connection if you have more than one connection.
![]() Click OK, close the Security Center, and try the service to see whether it works.
Click OK, close the Security Center, and try the service to see whether it works.

![]() On the Services tab, select the check box for each service on your computer that needs to bypass the restrictions of the firewall.
On the Services tab, select the check box for each service on your computer that needs to bypass the restrictions of the firewall.


![]() In the Control Panel, click the Security Center category, and click the Windows Firewall icon in the Security Center window to display the Windows Firewall dialog box.
In the Control Panel, click the Security Center category, and click the Windows Firewall icon in the Security Center window to display the Windows Firewall dialog box.
![]() On the Advanced tab, click Settings in the ICMP section.
On the Advanced tab, click Settings in the ICMP section.
![]() Click OK, close the Security Center, and have someone on another computer make a request to see whether that person receives a response from your computer.
Click OK, close the Security Center, and have someone on another computer make a request to see whether that person receives a response from your computer.

![]() Select a request that you think might be one you want to enable.
Select a request that you think might be one you want to enable.
![]() Read the description of the request and its purpose.
Read the description of the request and its purpose.
![]() If this is a request you want, select the check box for the request.
If this is a request you want, select the check box for the request.
![]() Repeat steps 3 through 5 for any other requests you want your computer to respond to.
Repeat steps 3 through 5 for any other requests you want your computer to respond to.
Caution
ICMP requests have been used by those with evil intentions to locate and spy on computers, and are therefore disabled by default. Enable only those requests that you must have open for troubleshooting or for making improved connections, and be sure to disable any that you’re not currently using.
Microsoft continues to issue updates to Windows, fixing problems and vulnerabilities as they’re discovered. To keep your computer running smoothly and to avoid new types of attacks, it’s important that you install any critical updates that Microsoft issues as soon as they’re available. Fortunately, the Automatic Updates feature in Windows can do most of the work for you. You can choose either to have the updates automatically downloaded and installed or to have them downloaded and/or installed only after you’ve given Windows permission to do so.

![]() Choose Control Panel from the Start menu, and click the Security Center category to open the Security Center window.
Choose Control Panel from the Start menu, and click the Security Center category to open the Security Center window.
![]() If the Automatic Updates section shows that automatic updating is turned off or that updates aren’t configured to be installed automatically, click Turn On Automatic Updates to enable automatic downloading and installation.
If the Automatic Updates section shows that automatic updating is turned off or that updates aren’t configured to be installed automatically, click Turn On Automatic Updates to enable automatic downloading and installation.
![]() If you want to customize the way updates are downloaded and/or installed, click the Automatic Updates icon, and, in the Automatic Updates dialog box, select one of the following:
If you want to customize the way updates are downloaded and/or installed, click the Automatic Updates icon, and, in the Automatic Updates dialog box, select one of the following:
Automatic (Recommended) to have Windows take care of all the updating automatically. Specify when you want the downloaded files to be installed.
Download Updates... to have Windows check for and download any updates, but to wait for your confirmation before installing any files.
Notify Me... to have Windows check for updates and to notify you that they’re available for download. When they’re downloaded, Windows will ask your permission to install the updates.
Turn Off Automatic Updates to prevent Windows from checking for updates.
![]() Click OK when you’ve finished.
Click OK when you’ve finished.
See Also
For information about manually checking for updates, both critical and noncritical, see "Updating Your System".
For information about determining which service packs are installed, the Windows version and build number you’re using, and which updates you’ve installed, see "Checking the Status of Windows".

![]() If you chose to be notified by Windows to download updates, click the Windows Update icon in the notification area of the Windows taskbar to display the Automatic Updates dialog box.
If you chose to be notified by Windows to download updates, click the Windows Update icon in the notification area of the Windows taskbar to display the Automatic Updates dialog box.
![]() Click an update if there’s more than one, and read the description of the update.
Click an update if there’s more than one, and read the description of the update.
![]() If you don’t want to download the update, clear its check box.
If you don’t want to download the update, clear its check box.
![]() To download the update, click Download, and wait for the Windows Update icon to reappear.
To download the update, click Download, and wait for the Windows Update icon to reappear.

![]() Click the Windows Update icon in the notification area of the Windows taskbar to display the Automatic Updates dialog box.
Click the Windows Update icon in the notification area of the Windows taskbar to display the Automatic Updates dialog box.
Express Install (Recommended) to have Windows install all the updates.
Custom Install (Advanced) to select only the downloads you want to install.
![]() Click Install, and wait for the updates to be installed. If you’re told that you need to restart the computer, click Restart in the dialog box that appears, or click Close if you have any unsaved information in running programs and you want to save the information before restarting. If you clicked Close, restart your computer after you’ve closed all your programs.
Click Install, and wait for the updates to be installed. If you’re told that you need to restart the computer, click Restart in the dialog box that appears, or click Close if you have any unsaved information in running programs and you want to save the information before restarting. If you clicked Close, restart your computer after you’ve closed all your programs.
If you’re worried about prying eyes on the Internet, you can protect your e-mail messages by encrypting them so that only people with the correct digital ID can read them. You can also digitally sign your messages to authenticate their origin. You obtain your digital ID from a security provider, and then you exchange digital IDs with your intended recipients. You can’t send an encrypted message without knowing your recipient’s digital ID.

![]() In Outlook Express, choose Options from the Tools menu, and, if you don’t already have a digital ID (also called a certificate), click Get Digital ID on the Security tab of the Options dialog box. Follow the instructions provided to install your digital ID.
In Outlook Express, choose Options from the Tools menu, and, if you don’t already have a digital ID (also called a certificate), click Get Digital ID on the Security tab of the Options dialog box. Follow the instructions provided to install your digital ID.

![]() Choose Accounts from the Tools menu, and, on the Mail tab, select your mail service, and click Properties to display the Properties dialog box.
Choose Accounts from the Tools menu, and, on the Mail tab, select your mail service, and click Properties to display the Properties dialog box.
![]() On the Security tab, under Signing Certificate, click Select, select the certificate for signing, and click OK.
On the Security tab, under Signing Certificate, click Select, select the certificate for signing, and click OK.
![]() Under Encrypting Preferences, click Select, select the same or a different certificate for encryption, and click OK.
Under Encrypting Preferences, click Select, select the same or a different certificate for encryption, and click OK.
![]() Click OK to close the Properties dialog box, and click Close to close the Accounts dialog box.
Click OK to close the Properties dialog box, and click Close to close the Accounts dialog box.

![]() Create a message, click the Sign button, and send the message. Have someone send you a digitally signed message.
Create a message, click the Sign button, and send the message. Have someone send you a digitally signed message.
![]() Double-click the digitally signed message you’ve received to open it, and, in the header of the message window, click the Digital Signature button.
Double-click the digitally signed message you’ve received to open it, and, in the header of the message window, click the Digital Signature button.

![]() On the Security tab of the message’s Properties dialog box that appears, click View Certificates.
On the Security tab of the message’s Properties dialog box that appears, click View Certificates.

![]() In the View Certificates dialog box, click Signing Certificate to see the information about the certificate. Click OK when you’ve finished.
In the View Certificates dialog box, click Signing Certificate to see the information about the certificate. Click OK when you’ve finished.
![]() Click Add To Address Book, and click OK. Click OK again to close the message’s Properties dialog box.
Click Add To Address Book, and click OK. Click OK again to close the message’s Properties dialog box.
![]() Create a message addressed to the person with whom you exchanged digital IDs, click both the Sign and the Encrypt buttons on the Standard Buttons toolbar, and send the message to make sure the transfer of IDs was successful.
Create a message addressed to the person with whom you exchanged digital IDs, click both the Sign and the Encrypt buttons on the Standard Buttons toolbar, and send the message to make sure the transfer of IDs was successful.
Try This
After you’ve set up your digital ID, choose Options from the Tools menu, and, on the Security tab of the Options dialog box, select the check boxes for encrypting and signing your outgoing messages. Click the Advanced button, and, in the Advanced Security Settings dialog box, select the check boxes for encrypting mail to yourself, for including your ID, and for adding certificates to your address book. Then select the option to check for revoked IDs, and click OK.
Unless your wireless network is properly protected, it can be used by anyone within range of the network. This means that an unscrupulous person could tap into your network to gain access not only to the Internet but to all your personal files! Fortunately, the enhanced security provided by Windows XP with Service Pack 2 can defeat such intrusions by requiring a security key in order to gain access to the network from a wireless computer. You can configure your network security in one of two ways: You can use a USB storage device to transfer the required code to the wireless base station and to each wireless computer and network printer, or you can enter the information manually yourself.
Tip
In case you were wondering, SSID is Service Set Identifier, WEP is Wired Equivalent Privacy security services, and WPA is Wi-Fi Protected Access security protocol. These features are all part of the IEEE 802.11 standard that’s used in most wireless networks.
Tip
In the Wireless Network Setup Wizard, select the Use WPA Encryption check box if you need to use the less powerful WPA encription instead of WEP encryption for compatibility with network components.

![]() With your wireless network already set up and working, choose Wireless Network Setup Wizard from the Communications submenu of the Start menu, and click Next to start the wizard.
With your wireless network already set up and working, choose Wireless Network Setup Wizard from the Communications submenu of the Start menu, and click Next to start the wizard.
![]() Enter a name for your network.
Enter a name for your network.
![]() Specify which way you want to set up your network security key:
Specify which way you want to set up your network security key:
Automatically Assign A Network Key (Recommended) to automatically create and assign a key
Manually Assign A Network Key to create your own key or to use a key that has already been assigned to components on this network

![]() Click Next. If you chose to manually assign a network key, enter the key, and then click Next.
Click Next. If you chose to manually assign a network key, enter the key, and then click Next.
![]() Specify whether you want to save the network settings on a USB storage device for automatic configuration, or whether you want to print out the settings and manually configure each device.
Specify whether you want to save the network settings on a USB storage device for automatic configuration, or whether you want to print out the settings and manually configure each device.
![]() Click Next, follow the directions to configure your network security, and complete the wizard.
Click Next, follow the directions to configure your network security, and complete the wizard.

![]() If you previously completed the Wireless Network Setup Wizard but you don’t have the security settings printed out or saved on your USB storage device, start the wizard again from the Communications submenu of the Start menu. Step through the wizard, and choose to add new computers to your network. Click Next, and choose either to use a USB storage device or to configure each item manually.
If you previously completed the Wireless Network Setup Wizard but you don’t have the security settings printed out or saved on your USB storage device, start the wizard again from the Communications submenu of the Start menu. Step through the wizard, and choose to add new computers to your network. Click Next, and choose either to use a USB storage device or to configure each item manually.
![]() If you’re using a USB storage device, complete the following steps:
If you’re using a USB storage device, complete the following steps:
Insert the USB device into the computer, and download the settings from the wizard to the device.
Insert the USB device into the wireless base station, and wait for the network key to be downloaded.
Insert the USB device into each computer that will be on the wireless network, and choose to run the Wireless Network Setup Wizard. When prompted, choose Yes to add the computer to the network.
Reinsert the USB device into the first computer on which you ran the wizard, click Next, and review the computers that you’ve added to the network. Print your network settings for safekeeping, and then click Finish.
![]() If you chose to manually configure the network, complete the following steps:
If you chose to manually configure the network, complete the following steps:
Choose to print the settings, and, from the Notepad window that appears, print the Wireless Network Settings document.
Run the wireless base-station management software from the computer that’s connected to the base station. In the wireless security part of the software, enter—and if necessary reenter—the network key, as shown in the Wireless Network Settings document you printed.
On each computer, run the Wireless Network Setup Wizard, choose to set up a new wireless network, enter the name of the network, choose to manually assign the network key, and enter and then reenter the network key.
Caution
If your wireless network has already been configured, it might currently have a network key in use for security. Use the base-station management software to check the security settings. If a key is already in use, any modifications you make to the security could disable access to the network for some computers.
Tip
The network key is used for security only for the wireless connections on a network that uses a mix of wireless and wired connections.
See Also
For information about accessing public wireless networks, see "Connecting to a Wireless Network".
E-mail is your computer’s gateway to the rest of the world, and this gateway is what makes your e-mail one of the prime vectors for the distribution of computer viruses and many other evils. Fortunately, Outlook Express now comes with options that can help you detect and prevent the introduction of viruses onto your computer.

![]() In Outlook Express, choose Options from the Tools menu, and click the Security tab of the Options dialog box.
In Outlook Express, choose Options from the Tools menu, and click the Security tab of the Options dialog box.
![]() Select the Restricted Sites Zone (More Secure) option if it isn’t already selected.
Select the Restricted Sites Zone (More Secure) option if it isn’t already selected.
![]() Select this check box, if it isn’t already selected, to enable protection from programs already on your computer that want to use your e-mail to infect other computers.
Select this check box, if it isn’t already selected, to enable protection from programs already on your computer that want to use your e-mail to infect other computers.
![]() Select this check box, if it isn’t already selected, to enable inspection of the file type of an attachment and to block any attachment that could be a potential virus.
Select this check box, if it isn’t already selected, to enable inspection of the file type of an attachment and to block any attachment that could be a potential virus.
![]() Select this check box, if it isn’t already selected, to stop your message from requesting additional material from an external server.
Select this check box, if it isn’t already selected, to stop your message from requesting additional material from an external server.

![]() On the Read tab, select this check box if you want to prevent any hidden code in HTML-formatted messages from gaining access to your computer, provided you don’t mind losing the formatting of any HTML-formatted message.
On the Read tab, select this check box if you want to prevent any hidden code in HTML-formatted messages from gaining access to your computer, provided you don’t mind losing the formatting of any HTML-formatted message.
Tip
If you choose to read your messages in plain text, you might lose more than just formatting—you could lose some of the message’s content. To view a trusted message in HTML format, with the message open, choose Message In HTML from the View menu.
See Also
For information about displaying pictures that have been blocked, see "Limiting E-Mail Snooping".