
In this section
If, as many people do, you feel a bit daunted by the printing process because of previous unpleasant experiences with uncooperative printers, the first part of this section of the book will guide you painlessly through the printing maze.
If you have more than one printer, we’ll show you how to designate one printer as your default printer, and how to target another printer when you don’t want to—or can’t—use the default printer. We’ll also show you how to check the progress of your print jobs in the print queue. We know you’ll welcome a great feature in Microsoft Windows XP—a wizard that makes it really easy to print your photographs. With just a few clicks, you can choose the sizes, the number of copies, and the orientation you want for your pictures, and then you can just sit back and let Windows do the work. And if you’ve ever printed a Web page and been unhappily surprised by the chaotic result, you’ll appreciate the ability Microsoft Internet Explorer gives you to easily print readable Web pages.
The second part of this section of the book is all about faxes and faxing. Provided you have a fax modem, you can use Fax Service to send and receive faxes using your computer rather than a separate fax machine. You can set up your computer to receive faxes automatically, or—if you have a single phone line that you use for both fax and voice—you can specify which calls you want to receive as faxes and which you want to answer yourself. And you can either set up your computer to automatically print incoming faxes, or you can help save the environment by reading your faxes on line.
In most programs, you can print a document on any printer that’s installed on your computer or shared over a network. By using the Print dialog box, you can specify which printer to use and can customize the way your document is printed.
See Also
For information about setting a printer as the default printer, see "Specifying a Default Printer".

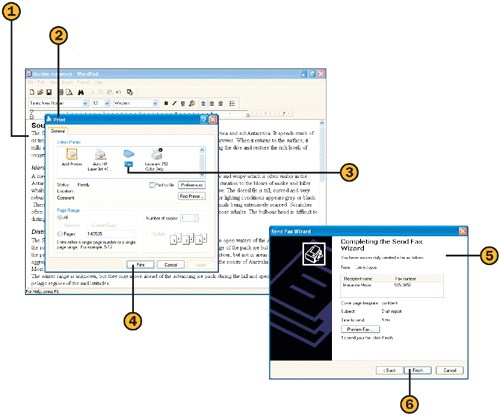
![]() With the document open in its program, choose Print from the File menu to display the Print dialog box.
With the document open in its program, choose Print from the File menu to display the Print dialog box.
![]() Specify the printer you want to use.
Specify the printer you want to use.
![]() Click Preferences if you need to change the printer settings—for example, the size of the paper being used, whether the document is to be printed in color or in black and white, and so on. (Note, however, that sometimes the program’s settings will override your own settings.)
Click Preferences if you need to change the printer settings—for example, the size of the paper being used, whether the document is to be printed in color or in black and white, and so on. (Note, however, that sometimes the program’s settings will override your own settings.)
![]() Click to use a network printer that isn’t listed in the Select Printer section.
Click to use a network printer that isn’t listed in the Select Printer section.
![]() Specify the pages you want to print.
Specify the pages you want to print.
![]() Specify how many copies of each page you want.
Specify how many copies of each page you want.
![]() Specify whether multiple copies are to be printed with the pages in order (collated) or whether each page is to be printed multiple times before the next page is printed. (Collated printing is usually slower than uncollated printing.)
Specify whether multiple copies are to be printed with the pages in order (collated) or whether each page is to be printed multiple times before the next page is printed. (Collated printing is usually slower than uncollated printing.)
When you want to print a document or a group of documents, you can print directly from Windows XP without having to start the program in which the document was created; that program, however, must be installed on your computer. It’s a great convenience to be able to quickly send several documents to your printer and then walk away while Windows XP does all the work.

![]() Open the folder that contains the items you want to print, and select the document or documents.
Open the folder that contains the items you want to print, and select the document or documents.
![]() Right-click a selected document, and choose Print from the shortcut menu.
Right-click a selected document, and choose Print from the shortcut menu.
Tip
Some programs require the use of the system default printer. To print documents that were created in any of those programs, you’ll either have to use the default printer or have Windows XP switch the default-printer designation to the printer you want to use.
See Also
For information about setting a printer as the default printer, see "Specifying a Default Printer".

![]() Choose Control Panel from the Start menu, click the Printers And Other Hardware category, and then click the View Installed Printers Or Fax Printers task to open the Printers And Faxes folder.
Choose Control Panel from the Start menu, click the Printers And Other Hardware category, and then click the View Installed Printers Or Fax Printers task to open the Printers And Faxes folder.
![]() Select the document or documents you want to print.
Select the document or documents you want to print.
![]() Drag the selected document or documents into the Printers And Faxes folder and onto the printer you want to use.
Drag the selected document or documents into the Printers And Faxes folder and onto the printer you want to use.
Some programs are set up to print only on the system default printer. Other programs are set up to print on the system default printer but allow you to target, or change to, a different printer. If several printers are available, you can designate any one of them as your default printer.
Tip
If there’s a check mark next to the printer icon, the printer you’ve chosen has already been designated as the default printer.

![]() Choose Control Panel from the Start menu, click the Printers And Other Hardware category, and then click the View Installed Printers Or Fax Printers task to open the Printers And Faxes folder.
Choose Control Panel from the Start menu, click the Printers And Other Hardware category, and then click the View Installed Printers Or Fax Printers task to open the Printers And Faxes folder.
![]() Right-click the printer you want to use as the default printer.
Right-click the printer you want to use as the default printer.
![]() Choose Set As Default Printer from the shortcut menu.
Choose Set As Default Printer from the shortcut menu.
![]() Close the Printers folder when you’ve finished.
Close the Printers folder when you’ve finished.
See Also
For information about printing on different printers, see "Printing from a Program" and "Printing a Document".
For information about adding access to the Printer And Faxes folder from the Start menu, see "Customizing the Start Menu".
Caution
If you have both a printer and Fax Service installed on your computer, make sure that the Fax printer isn’t designated as your default printer. If it is, documents that you want to print might seem to have disappeared. (It’s easy to accidentally set the Fax printer as the default when you delete an existing printer before you install a new one.)
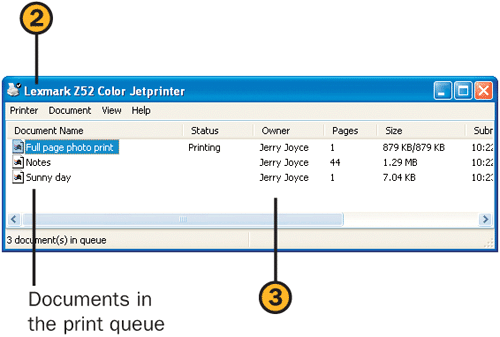
When you send your documents to be printed, each print job is queued, or lined up, in the order in which it’s received by the print server. You can see the progress of your print job in the queue, and you can temporarily suspend the printing of your document or even remove it from the queue if you want.
![]() Choose Control Panel from the Start menu, click the Printers And Other Hardware category, and then click the View Installed Printers Or Fax Printers task to open the Printers And Faxes folder.
Choose Control Panel from the Start menu, click the Printers And Other Hardware category, and then click the View Installed Printers Or Fax Printers task to open the Printers And Faxes folder.
![]() Double-click the printer you’re using to open the print queue for that printer.
Double-click the printer you’re using to open the print queue for that printer.

![]() Right-click the name of your document.
Right-click the name of your document.
![]() Choose the action you want from the shortcut menu:
Choose the action you want from the shortcut menu:
Pause to temporarily stop your document from printing
Resume to resume printing after the document printing has been paused (note that Resume appears on the menu after you’ve chosen Pause)
Restart to restart printing the document from the beginning after the document printing has been paused
Cancel to delete the document from the print queue
Printing your photographs used to be quite a challenge—depending on their format and resolution, your pictures might be printed in different sizes or in different orientations on the page. Windows XP now makes your life a lot easier by providing a wizard that lets you lay out the pictures just as you want them so that you get exactly the desired results every time.

![]() Select the photograph you want to print. If you want to print multiple photos, make sure they’re all in the same folder. However, you don’t need to select them at this point.
Select the photograph you want to print. If you want to print multiple photos, make sure they’re all in the same folder. However, you don’t need to select them at this point.
![]() Click Print This Picture to display the Photo Printing Wizard, and then click Next to start the wizard.
Click Print This Picture to display the Photo Printing Wizard, and then click Next to start the wizard.
![]() Select the check boxes for the photos you want to print and clear any check boxes that are already selected for the photos you don’t want to print.
Select the check boxes for the photos you want to print and clear any check boxes that are already selected for the photos you don’t want to print.
![]() Click Next. On the Printing Options page of the wizard, specify the printer and printing preferences you want to use, and click Next again.
Click Next. On the Printing Options page of the wizard, specify the printer and printing preferences you want to use, and click Next again.

![]() Specify the number of copies of each photo to be printed.
Specify the number of copies of each photo to be printed.
![]() Look at the preview to make sure it’s the way you want the pictures to be printed.
Look at the preview to make sure it’s the way you want the pictures to be printed.
![]() Click Next to print the photos, and then click Finish to complete the wizard.
Click Next to print the photos, and then click Finish to complete the wizard.
If you’ve ever visited a Web page whose content you found so interesting or informative that you wanted to print it out for yourself or for someone else to read, the printed result might have been less than satisfactory—odd-looking pages filled with cut-off text, for example, and an indecipherable hodgepodge of disconnected graphics, tables, frames, and text. However, using Internet Explorer, you can now convert Web pages into a printable form. All you need to do is specify how you want the pages to be set up, take a quick look at the layout to make sure it includes the items you want to print, and then print the pages.

![]() With the Web page you want to print displayed in Internet Explorer, choose Print Preview from the File menu. Examine the page to make sure the layout is suitable for printing and that the information in the header and footer is what you want displayed.
With the Web page you want to print displayed in Internet Explorer, choose Print Preview from the File menu. Examine the page to make sure the layout is suitable for printing and that the information in the header and footer is what you want displayed.
![]() To print more than one page, click the Next Page button to see the additional page or pages.
To print more than one page, click the Next Page button to see the additional page or pages.
![]() If there’s any truncated text, or if you want to change what’s displayed in the header or footer, click the Page Setup button.
If there’s any truncated text, or if you want to change what’s displayed in the header or footer, click the Page Setup button.
![]() In the Page Setup dialog box that appears, specify the page size.
In the Page Setup dialog box that appears, specify the page size.
![]() To change the contents of the header or footer, use the codes in the table on this page.
To change the contents of the header or footer, use the codes in the table on this page.
![]() Specify whether you want the page to be printed in portrait (longer than wide) or landscape (wider than long) orientation.
Specify whether you want the page to be printed in portrait (longer than wide) or landscape (wider than long) orientation.
![]() Specify different margins if necessary.
Specify different margins if necessary.
![]() Examine the layout based on your changes, and then click Print to print the Web page.
Examine the layout based on your changes, and then click Print to print the Web page.
Header and Footer Codes | |
|---|---|
Code | Result |
&b any text | Right-aligns text. |
&b any text &b | Centers text. |
&d or &D | Inserts short date or long date. |
&p | Inserts page number. |
&P | Inserts total number of pages. |
&t or &T | Inserts time in 12-hour or 24-hour format. |
&u | Inserts Web page address. |
&w | Inserts window title. |
With Fax Service installed, you can send a fax directly from your computer, whether it’s a single-page fax with notes or a fax with several pages. To send only a few quick notes, simply enter them on a cover page. If you’re sending a multiple-page document, you can decide whether or not to include a cover page.
See Also
For information about reviewing faxes you’ve sent and faxes that you’ve scheduled for later transmission, see "Reviewing a Fax You’ve Received".
For information about setting up your fax, see "Setting Up for Faxing".

![]() Click the Start button, point your way through All Programs, Accessories, Communications, and Fax, and choose Send A Fax from the submenu. Click Next in the Send Fax Wizard to start the wizard.
Click the Start button, point your way through All Programs, Accessories, Communications, and Fax, and choose Send A Fax from the submenu. Click Next in the Send Fax Wizard to start the wizard.
![]() Specify the recipient by either typing his or her name and fax number or clicking a name in the Address Book.
Specify the recipient by either typing his or her name and fax number or clicking a name in the Address Book.
![]() To specify a different country or to include an area code, select this check box.
To specify a different country or to include an area code, select this check box.
![]() If you typed the recipient’s information, click the Add button to add that person to the list of recipients. Repeat the process to add other recipients.
If you typed the recipient’s information, click the Add button to add that person to the list of recipients. Repeat the process to add other recipients.
![]() Click Next when you’ve finished.
Click Next when you’ve finished.

![]() Specify a cover-page template, and enter the subject and any text you want on the cover page.
Specify a cover-page template, and enter the subject and any text you want on the cover page.
![]() Click Next when you’ve finished.
Click Next when you’ve finished.
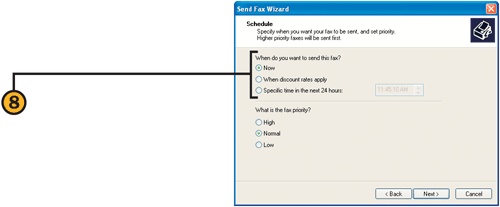
![]() Specify when you want the fax to be sent, and click Next. Preview the fax if you want, and then click Finish to send the fax to the fax queue.
Specify when you want the fax to be sent, and click Next. Preview the fax if you want, and then click Finish to send the fax to the fax queue.
Caution
If the program you’re using doesn’t display a Print dialog box, designate the Fax printer as the default printer before you choose the Print command.
![]() Open or create the document in its program.
Open or create the document in its program.
![]() Choose Print from the File menu to display the Print dialog box.
Choose Print from the File menu to display the Print dialog box.
![]() Specify the Fax printer as your printer.
Specify the Fax printer as your printer.
![]() Step through the Send Fax Wizard, specifying the following:
Step through the Send Fax Wizard, specifying the following:
The recipient or recipients
Whether a cover page is included, with a subject line and any notes
When the fax is to be sent
![]() After verifying the information and previewing the fax, click Finish to send the fax.
After verifying the information and previewing the fax, click Finish to send the fax.
If you have a phone line dedicated to your computer and you set it to automatically receive faxes, all you have to do is review your received faxes. However, if you use your phone line for both voice and fax calls, you’ll probably have your computer set up to receive faxes only when you tell it to do so.
See Also
For information about setting your computer to receive faxes either manually or automatically, see "Setting Up for Faxing".

![]() When you receive the phone call and the notification that the line is ringing, click to receive the call.
When you receive the phone call and the notification that the line is ringing, click to receive the call.

![]() In the Fax Monitor dialog box that appears, click the More button to see the details of the call. (After you’ve used the More button, it changes into the Less button.)
In the Fax Monitor dialog box that appears, click the More button to see the details of the call. (After you’ve used the More button, it changes into the Less button.)
![]() If there’s any problem with the fax, or if it’s a junk fax and you want to terminate the fax reception before you’ve received the entire fax, click Disconnect.
If there’s any problem with the fax, or if it’s a junk fax and you want to terminate the fax reception before you’ve received the entire fax, click Disconnect.
![]() Click Hide after you’ve received the fax if you don’t want the Fax Monitor dialog box on your Desktop.
Click Hide after you’ve received the fax if you don’t want the Fax Monitor dialog box on your Desktop.
After you receive a fax, you might want to review it, print it, save it, or send it to someone else. To review a fax, you use the Fax Console. You can also use the Fax Console to review faxes that you’ve sent, faxes that have yet to be sent, or a fax that you’re currently receiving.
Tip
You can also open the Fax Console by choosing Fax Console from the Fax submenu of the Start menu.

![]() Click the New Fax Received icon.
Click the New Fax Received icon.

![]() Click Inbox if it isn’t already selected.
Click Inbox if it isn’t already selected.
![]() Review the details of the received faxes.
Review the details of the received faxes.
![]() Click a fax to select it, and then click the appropriate button:
Click a fax to select it, and then click the appropriate button:
View to see the fax on the screen
Print to send the fax to your printer
Save As to save the fax to a folder as a TIF-format fax
Mail To to include the fax as an attachment in an e-mail message
![]() Click Incoming to review the status of a fax that’s currently being received.
Click Incoming to review the status of a fax that’s currently being received.
![]() Click Outbox to review any faxes scheduled to be sent at a later time. To suspend or cancel the transmission of a fax, click the fax, and then click either the Pause button or the Delete button.
Click Outbox to review any faxes scheduled to be sent at a later time. To suspend or cancel the transmission of a fax, click the fax, and then click either the Pause button or the Delete button.
![]() Click Sent Items to see the faxes you’ve sent. Click a fax in the list, and use the appropriate button to view, print, save, or e-mail the fax.
Click Sent Items to see the faxes you’ve sent. Click a fax in the list, and use the appropriate button to view, print, save, or e-mail the fax.
Save a tree—read your faxes on line! To do so, use the Windows Picture And Fax Viewer to read the fax, and even to annotate it with your comments, doodles, or whatever else you want to add.
Tip
If you have a mouse with a wheel, rotating the wheel when you’re using the Windows Picture And Fax Viewer changes the magnification of the image instead of scrolling the page as it does in many other programs.

![]() If the Fax Console isn’t already open, display it by choosing Fax Console from the Fax submenu of the Start menu.
If the Fax Console isn’t already open, display it by choosing Fax Console from the Fax submenu of the Start menu.
![]() Double-click the fax to be viewed.
Double-click the fax to be viewed.

![]() Use the buttons in the Windows Picture And Fax Viewer to view the fax.
Use the buttons in the Windows Picture And Fax Viewer to view the fax.
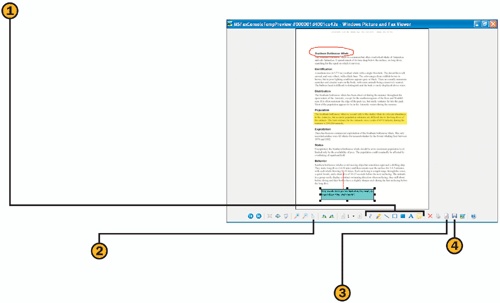
![]() Use the appropriate annotation tool to mark up the fax:
Use the appropriate annotation tool to mark up the fax:
Freehand to draw a line in any shape
Highlight to create a rectangular highlight
Straight Line to draw a straight line
Frame to draw a rectangular border around an area
Solid Rectangle to draw a filled rectangle that obscures anything under it
Attached Note to create a text box in which to enter a comment
![]() Use the Annotation Selection tool to select, move, or resize an annotation. To delete an annotation, select it, and press Delete.
Use the Annotation Selection tool to select, move, or resize an annotation. To delete an annotation, select it, and press Delete.
![]() To change the properties of the selected annotation, such as its line width, font, color, and color transparency, click the Edit Info button.
To change the properties of the selected annotation, such as its line width, font, color, and color transparency, click the Edit Info button.
![]() When you’ve finished, click Copy To, and save the annotated fax.
When you’ve finished, click Copy To, and save the annotated fax.
Caution
After you’ve saved a fax, you can no longer edit the annotations you’ve added, but you can still add new annotations.
Whenever you send a fax, it’s good practice to include a cover page that contains information about the recipient and the sender, as well as the number of pages being sent. You can use the standard cover pages that Fax Service provides, or you can create your own cover page that contains the information you want in the design of your choice. The easiest way to create your own cover page is to start with one of the existing cover pages that Fax Service supplies, and then modify the page to your own use.
Tip
To modify an existing personal cover page, select it in the Personal Cover Pages dialog box, and click Open.

![]() If the Fax Console isn’t already open, choose Fax Console from the Fax submenu of the Start menu. Choose Personal Cover Pages from the Tools menu to open the Personal Cover Pages dialog box.
If the Fax Console isn’t already open, choose Fax Console from the Fax submenu of the Start menu. Choose Personal Cover Pages from the Tools menu to open the Personal Cover Pages dialog box.
![]() Click Copy, select the cover page you want to use as the basis for your own cover page, and click Open.
Click Copy, select the cover page you want to use as the basis for your own cover page, and click Open.
![]() Click the cover page to select it, click Rename, type a name for your new cover page, and press Enter.
Click the cover page to select it, click Rename, type a name for your new cover page, and press Enter.
![]() With the cover page selected, click Open.
With the cover page selected, click Open.

![]() For items that will be the same in all your faxes, use the Selection tool to select items, press Delete to remove unnecessary elements, and use the Text tool to insert text boxes and add formatted text.
For items that will be the same in all your faxes, use the Selection tool to select items, press Delete to remove unnecessary elements, and use the Text tool to insert text boxes and add formatted text.
![]() For data that changes (supplied by the Sender Information or supplied by you when you complete the Send Fax Wizard), use the Insert menu to add data fields that insert information about the recipient, the sender, or the message.
For data that changes (supplied by the Sender Information or supplied by you when you complete the Send Fax Wizard), use the Insert menu to add data fields that insert information about the recipient, the sender, or the message.
![]() Use the Selection tool to select multiple items, and then use the Alignment tools to arrange the elements.
Use the Selection tool to select multiple items, and then use the Alignment tools to arrange the elements.
![]() Save the cover page when you’ve finished, close the Fax Cover Page Editor, and then close the Personal Cover Pages dialog box.
Save the cover page when you’ve finished, close the Fax Cover Page Editor, and then close the Personal Cover Pages dialog box.