
In this section
If you like music, you’ll love Microsoft Windows Media Player. You can use Media Player to download from the Internet all sorts of information about your favorite albums or performers, to play music tracks, and to copy individual pieces of music or entire CDs to your computer. You can arrange the media you want to play, regardless of format—songs, video clips, and so on—in the order you want in a customized playlist. If your computer is equipped with a CD recorder, you can record individual tracks to create your own CD, and if you’ve installed one of the Microsoft Plus! packs on your computer, you’ll be able to create CD labels, inserts, and booklets. If you like to take your music with you, just transfer it from Media Player to your MP3 or other portable player. Having a party? Set up Media Player with music, visualizations, and running text. If you have old LPs or cassette tapes that you want to convert into digital format, you can easily do so provided you’ve installed the Plus! Digital Media Edition on your computer. You can even use your own voice commands to control Media Player, and you can choose among dozens of cool designs to outfit Media Player with a new skin to transform its appearance.
Microsoft Windows XP also provides a program called Narrator that actually reads aloud to you. Provided your computer has a sound system, Narrator can describe items on your screen and can read blocks of text to you. You can adjust the speed, volume, and pitch of Narrator’s voice for your individual listening pleasure. Last but not least, would you like to have people dancing all over your computer screen? Read on....
What Is Media Player?
Windows Media Player is a multifaceted tool that you can have fun with in a variety of ways: You can use it to play music CDs, to copy music from CDs onto your computer, to download music from the Internet, to create your own music CDs, to watch streaming video that’s being sent from the Internet or over a network, to organize your digital music collection, and to listen to a radio program that’s being broadcast over the Internet. Depending on the types of media you play, you have numerous options for enhancing or modifying the way those media are played. You can, for example, change the stereo balance, add special effects, tweak the color of a video, and much more.
Note that Windows Media Player is frequently updated and improved, so the player you have might look a bit different from the one shown here. The basic way in which Media Player works, however, remains the same, so you should find all the features we discuss here in any updated version of Media Player.

Playing a CD is as simple as putting the CD into the drive and waiting for Windows Media Player to start playing the music. However, Media Player can also provide additional information from the Internet about the music and the performer. With or without this additional information, you can control and customize the way the music is played.
See Also
For information about choosing which media files to play if Media Player is already running, see "Playing Any Media File".
For information about making Media Player the default player for CDs and other media, see "Setting Your Default Programs".
![]() Insert the CD into your computer’s CD drive, and wait for Media Player to start. If the CD is already in the drive, choose My Computer from the Windows Start menu, and double-click the CD drive.
Insert the CD into your computer’s CD drive, and wait for Media Player to start. If the CD is already in the drive, choose My Computer from the Windows Start menu, and double-click the CD drive.
![]() Click to display the menu bar if it isn’t already displayed.
Click to display the menu bar if it isn’t already displayed.
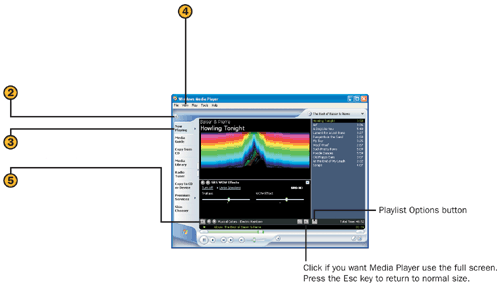
![]() Click the Now Playing tab if it isn’t already displayed.
Click the Now Playing tab if it isn’t already displayed.
![]() If the information you want to see about the album isn’t displayed, point to Now Playing Options on the View menu, and choose one of the following from the submenu:
If the information you want to see about the album isn’t displayed, point to Now Playing Options on the View menu, and choose one of the following from the submenu:
Show Title to display the title information above any visualization you’ve displayed
Show Media Information to display available information about the CD
Show Playlist to display a list of the songs in their playing order and with their playing times
![]() Click the Now Playing Options button, point to a category on the menu that appears, and choose the item you want to display:
Click the Now Playing Options button, point to a category on the menu that appears, and choose the item you want to display:
Visualizations to choose the image displayed
Info Center View to connect to Web content about the CD
Plug-Ins to use features that have been added to Media Player
Enhancements to set color, sound, and video, and to access hyperlinks to the music for e-mailing
To get the names of all the tracks on a CD, as well as lots of additional data about the album, and/or to get information about the music files that you’ve stored on your computer, you can let Media Player connect to the Internet, search for a Web page about the album or music file, and then download the information. Once you’ve downloaded it, the information is stored on your computer and is always available.
Caution
Seeking information comes with a price, and that price can be a loss of some privacy. Even if you don’t send any personal information, your computer’s IP address—a unique number that identifies you for this session only—and possibly the make of your computer are usually sent automatically. If you select the option in the Options dialog box to send a unique player ID to content providers, a static number that specifically identifies you to your enhanced-content service provider is sent for billing and tracking data.

![]() In Media Player, choose Options from the Tools menu to display the Options dialog box, and click the Privacy tab.
In Media Player, choose Options from the Tools menu to display the Options dialog box, and click the Privacy tab.
![]() Select this check box to retrieve data about the album.
Select this check box to retrieve data about the album.
![]() Select this check box to retrieve data about the music files on your computer.
Select this check box to retrieve data about the music files on your computer.
![]() Select this check box to download licenses you need in order to download or copy any protected music files.
Select this check box to download licenses you need in order to download or copy any protected music files.
![]() If you aren’t connected to the Internet, connect, play your music, and wait for the information to be downloaded.
If you aren’t connected to the Internet, connect, play your music, and wait for the information to be downloaded.
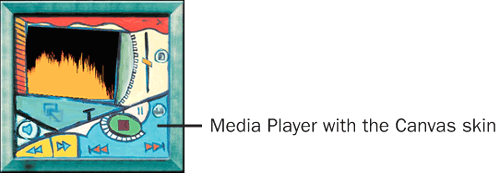
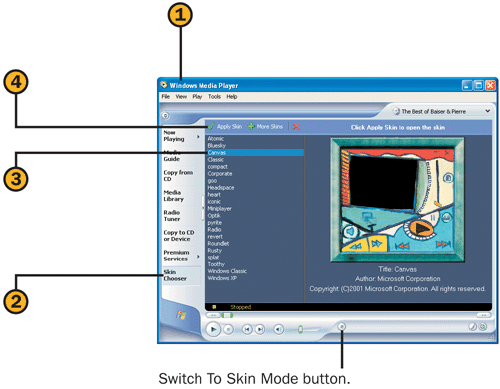
You can change Media Player’s appearance by viewing it in Full Mode or Skin Mode, and by changing its skin. Skins are designs that alter the appearance—but not the functionality—of Media Player. You use skins only when Media Player is in Skin Mode, but it’s quick and easy to switch between the two modes whenever you want.
See Also
For information about displaying Media Player’s controls as a toolbar on the Windows taskbar when Media Player is minimized, see "Displaying and Arranging the Toolbars".
![]() If Media Player isn’t already running, start it from the All Programs submenu of the Start menu.
If Media Player isn’t already running, start it from the All Programs submenu of the Start menu.

![]() Use the controls to play the media.
Use the controls to play the media.
![]() To return to the normal display, click the Return To Full Mode button. If you click the Switch To Skin Mode button while Media Player is in Full Mode, you’ll be switched back to Skin Mode and the previously selected skin.
To return to the normal display, click the Return To Full Mode button. If you click the Switch To Skin Mode button while Media Player is in Full Mode, you’ll be switched back to Skin Mode and the previously selected skin.
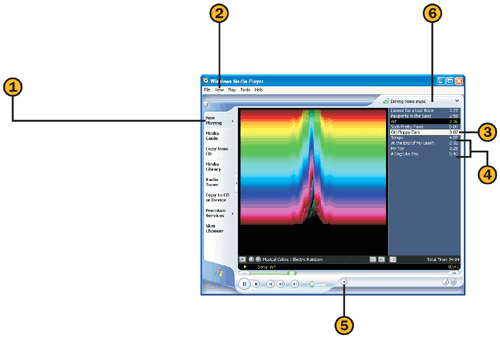
Media Player makes it easy to play your music or videos, and gives you several ways to do it. The basis for most organization in Media Player is the playlist, which is a selection of your media that you can organize any way you want. You can also access your music based on categories such as artist, album title, or genre. If you want to play a specific file or a selection of files that isn’t included in your playlist, you can either start a playlist from a specific file or add files to a temporary playlist to play a series of the music you want.
Tip
To add to the Media Library every track that you play, regardless of its location, choose Options from the Tools menu, and, on the Player tab, select the check boxes for adding items that you’ve played. Click OK. To manually add an item, click the Add To Library button on the Media Library tab, and choose what you want to add from the menu.

![]() If Media Player isn’t already running, start it from the All Programs submenu of the Start menu.
If Media Player isn’t already running, start it from the All Programs submenu of the Start menu.
![]() Under a category, select the album, artist or actor, genre, playlist, or other category you want to access. If the track isn’t in the list, you can locate it by pressing the F3 key and searching your computer for all media files.
Under a category, select the album, artist or actor, genre, playlist, or other category you want to access. If the track isn’t in the list, you can locate it by pressing the F3 key and searching your computer for all media files.
![]() To play the entire contents of the selection, double-click the category.
To play the entire contents of the selection, double-click the category.
![]() To play the entire category starting with a specific file, double-click the file.
To play the entire category starting with a specific file, double-click the file.
![]() To create a temporary playlist with a selection of files from one or more locations, select the files you want, and click the Queue-It-Up button. Locate other files you want to play, and click the Queue-It-Up button each time to add the files to the temporary playlist.
To create a temporary playlist with a selection of files from one or more locations, select the files you want, and click the Queue-It-Up button. Locate other files you want to play, and click the Queue-It-Up button each time to add the files to the temporary playlist.
See Also
For information about creating a personal playlist that programs the items to be played, see "Arranging Your Media with Playlists".
![]() Click the Now Playing tab if it isn’t already displayed.
Click the Now Playing tab if it isn’t already displayed.
![]() If the Playlist isn’t displayed, point to Now Playing Options on the View menu, and choose Show Playlist from the submenu.
If the Playlist isn’t displayed, point to Now Playing Options on the View menu, and choose Show Playlist from the submenu.
![]() To jump to a specific file, double-click the file name in the playlist.
To jump to a specific file, double-click the file name in the playlist.
![]() To change the order of the files in a playlist, click a file, and drag it to a new location.
To change the order of the files in a playlist, click a file, and drag it to a new location.
![]() To play the files in the playlist in a random order, click the Turn Shuffle On button. Click the button again to turn off the shuffle mode.
To play the files in the playlist in a random order, click the Turn Shuffle On button. Click the button again to turn off the shuffle mode.
![]() To select a different playlist or another category, click the down arrow at the left of the Now Playing box, and choose a category form the drop-down list.
To select a different playlist or another category, click the down arrow at the left of the Now Playing box, and choose a category form the drop-down list.
Tip
Windows Media Player can play music and video files that are stored in various formats; however, it doesn’t play every format. Media Player must have the proper decoder to be able to play a specific format. To see a current list of the types of files that Media Player can play without needing an additional decoder, choose Options from the Tools menu, and, on the File Types tab of the Options dialog box, click the relevant categories to display a list of the file extensions, which indicate the types of files Media Player can play.
When you’ve amassed a large number of media files, it can be difficult to keep track of them and even more difficult to figure out how to organize them. Media Player comes to your rescue with two tools that can relieve your frustration: Playlists to help you go through your files and decide which items you want to group together; and Auto Playlists, with which Media Player assembles various playlists depending on the criteria you specify.
Try This
Choose My Music from the Windows Start menu, locate a track you want to add to your playlist, right-click the track, and choose Add To Playlist from the shortcut menu. Click the playlist, and then click OK.

![]() If Media Player isn’t already running, start it from the All Programs submenu of the Start menu, and click the Media Library tab.
If Media Player isn’t already running, start it from the All Programs submenu of the Start menu, and click the Media Library tab.
![]() Click Playlists, and choose New Playlist from the drop-down menu.
Click Playlists, and choose New Playlist from the drop-down menu.
![]() Click in the box, and type a descriptive name for the playlist.
Click in the box, and type a descriptive name for the playlist.
![]() In the New Playlist dialog box, specify how you want to view the Media Library.
In the New Playlist dialog box, specify how you want to view the Media Library.
![]() Click a category to expand it. If there are subcategories, click one to expand it.
Click a category to expand it. If there are subcategories, click one to expand it.
![]() Click each item you want to include in the new playlist.
Click each item you want to include in the new playlist.
![]() Click a file whose play order you want to move, and use the Move Up or Move Down arrow to change the play order.
Click a file whose play order you want to move, and use the Move Up or Move Down arrow to change the play order.
![]() Repeat steps 4 through 7 to add other files to your playlist.
Repeat steps 4 through 7 to add other files to your playlist.

![]() Click Playlists, and choose New Auto Playlist from the drop-down menu.
Click Playlists, and choose New Auto Playlist from the drop-down menu.
![]() Click to specify the criteria you want to use to assemble the playlist.
Click to specify the criteria you want to use to assemble the playlist.
![]() Click each underlined item to specify conditions for the criterion.
Click each underlined item to specify conditions for the criterion.
![]() Click to add limitations to the criteria you’ve added to the list.
Click to add limitations to the criteria you’ve added to the list.
![]() If you added an item that you’ve now decided you don’t want to use, click the item, and then click Remove.
If you added an item that you’ve now decided you don’t want to use, click the item, and then click Remove.
Tip
If you have a Microsoft Plus! pack installed on your computer, you can use Plus! Personal DJ to easily create custom playlists.
Tip
Windows Media Player also creates Auto Playlists all by itself, based on the way you listen to the music in your Media Library, on whether you have rated the music, and on various other features of the music.
Try This
With the Media Library displayed, double-click the Auto Playlists category to expand the list of Auto Playlists. Click the 4 And 5 Star Rated Auto Playlist to see which music is rated so highly. Click the Fresh Tracks—Yet To Be Rated Auto Playlist to see which items you’ve downloaded but haven’t played yet.
Instead of playing a different CD every time you want to hear a particular song or piece of music, you can copy individual tunes or entire CDs onto your computer’s hard disk; then you can play the saved music in any order you like. When you copy the music, it’s saved in Windows Media Format, which takes about half as much space as the original CD format and which allows you to transfer the music to another device—a portable player or a hand-held computer, for example. You can also record the saved music onto a CD if your computer is equipped with a CD recorder.
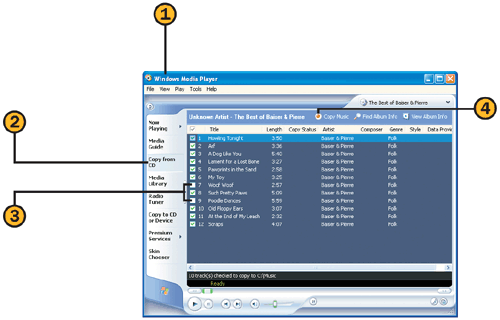
![]() If Media Player isn’t already running, start it from the All Programs submenu of the Start menu. Make sure the CD you want to copy is in the CD drive.
If Media Player isn’t already running, start it from the All Programs submenu of the Start menu. Make sure the CD you want to copy is in the CD drive.
![]() Clear the check boxes for any tracks you don’t want to copy.
Clear the check boxes for any tracks you don’t want to copy.

![]() In the Copy Options Wizard that appears, specify whether you want to add copy protection to the music, and verify that you understand the CD protection laws.
In the Copy Options Wizard that appears, specify whether you want to add copy protection to the music, and verify that you understand the CD protection laws.
![]() Click Next, specify whether you want to change the format of the file, and then click Finish. Wait for the selected tracks to be copied.
Click Next, specify whether you want to change the format of the file, and then click Finish. Wait for the selected tracks to be copied.
Tip
If you didn’t download the names of the tracks before getting ready to copy them, make sure that you’re connected to the Internet, and then click the Find Album Info button to search the Internet for all the details.
See Also
For information about setting Media Player to download album information, see "Downloading Music Information".
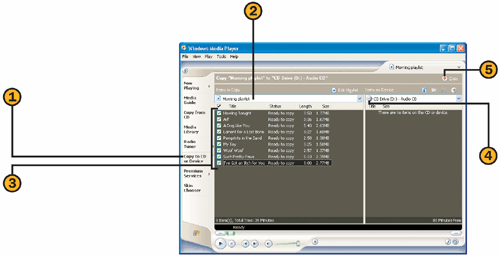
![]() Click the Copy To CD Or Device tab. Make sure you have a blank CD in your CD recorder.
Click the Copy To CD Or Device tab. Make sure you have a blank CD in your CD recorder.
![]() Select the music genre, album, playlist, or track that contains the music to be copied.
Select the music genre, album, playlist, or track that contains the music to be copied.
![]() Select the check boxes for the tracks you want to copy, and clear the check boxes for the tracks you don’t want to copy.
Select the check boxes for the tracks you want to copy, and clear the check boxes for the tracks you don’t want to copy.
![]() Select the format for the recording. If you have more than one recording device, select the device and the format.
Select the format for the recording. If you have more than one recording device, select the device and the format.
![]() Click the Copy Music button (the button changes to Cancel as soon as you start copying), and wait for the files to be converted and copied.
Click the Copy Music button (the button changes to Cancel as soon as you start copying), and wait for the files to be converted and copied.
See Also
For information about creating playlists so that you can record CDs from a variety of sources, see "Arranging Your Media with Playlists".
For information about copying music to a portable device, see "Transferring Music to a Portable Device".
Tip
Media Player copies the files in Windows Media format, but be aware that some stereo systems and car CD players don’t support this format. However, the CD should be playable on another computer that has Media Player installed. Additionally, the HIGHMAT (High Performance Media Access Technology) format can be read by many of the newer CD players. HIGHMAT is a new standard designed to enable the playing of CDs on any playback system that incorporates the HIGHMAT standard.
If you’ve installed either Microsoft Plus! or Microsoft Plus! Digital Media Edition on your computer, you have a program for creating great-looking CD labels, inserts, and booklets. (You’ll need to buy the labels before you can print them, of course, and you can either buy special blank inserts and booklets or use standard paper and trim it to size.) You’ll be amazed at the ease with which you can create artistic labels that make your recorded CDs look spectacular. And, best of all, the program takes the information from your playlist and automatically includes it on your label, insert, or booklet.

![]() Start the Plus! CD Label Maker program, and step through the first three parts of the wizard, specifying
Start the Plus! CD Label Maker program, and step through the first three parts of the wizard, specifying
The playlist on your computer or on an existing CD.
The template you want to use. Be sure to select the correct template for the type of item you want to create and for the type of labels you’re using. If there’s more than one label per page, specify which label you want to print.
![]() Specify what you want on the label. The fields will be different depending on what you’re creating and what part of the item you’re designing.
Specify what you want on the label. The fields will be different depending on what you’re creating and what part of the item you’re designing.
![]() If you’re creating an insert or a booklet, click the appropriate tabs for designing each element.
If you’re creating an insert or a booklet, click the appropriate tabs for designing each element.
![]() Click Preview to view your creation. Close the Preview window when you’ve finished.
Click Preview to view your creation. Close the Preview window when you’ve finished.

You don’t need to lug those bulky CDs or tapes with you to listen to your favorite music when you’re on the go. If you have a portable digital music player (often called an MP3 player), you can simply transfer the music you want from Windows Media Player to your handy little portable device, and you’re all set!
Tip
Different players have different capabilities. Some players can use only MP3-formats; others can use both MP3 and Windows Media Format (WMA). Check the player’s documentation before you download all your files.

![]() With the portable device properly installed on your computer, turned on, and attached to your computer, start Windows Media Player if it isn’t already running, and click the Copy To CD Or Device tab.
With the portable device properly installed on your computer, turned on, and attached to your computer, start Windows Media Player if it isn’t already running, and click the Copy To CD Or Device tab.
![]() Click the down arrow to open the Item To Copy drop-down list, and select the playlist or other source of the music you want to copy.
Click the down arrow to open the Item To Copy drop-down list, and select the playlist or other source of the music you want to copy.
![]() Click the down arrow in the Items On Device drop-down list, and choose your audio device.
Click the down arrow in the Items On Device drop-down list, and choose your audio device.
![]() Select the items you want to copy and clear the items you don’t want to copy.
Select the items you want to copy and clear the items you don’t want to copy.

![]() Select any tracks you want to delete from the portable device.
Select any tracks you want to delete from the portable device.
If you have Microsoft Plus! Digital Media Edition installed on your computer, you can prevent your guests from accessing or changing any files on your computer while Media Player is providing entertainment at your party. All you need to do is set up your music, turn on your security, and let the party begin. Whenever you need full access to the computer, simply quit Party Mode and log back on to your computer.
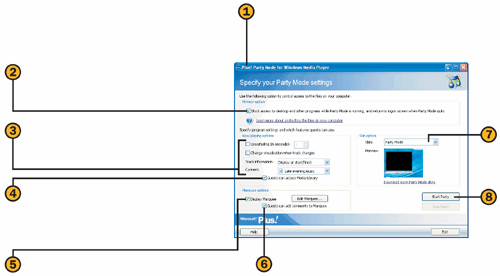
![]() Choose Plus! Party Mode For Windows Media Player from the Microsoft Plus! Digital Media Edition submenu of the Start menu to display the Plus! Party Mode Wizard. If a welcome screen appears, click Next to start the wizard.
Choose Plus! Party Mode For Windows Media Player from the Microsoft Plus! Digital Media Edition submenu of the Start menu to display the Plus! Party Mode Wizard. If a welcome screen appears, click Next to start the wizard.
![]() Select this check box to deny all access to your computer with the exception of Media Player. If a dialog box appears, click OK.
Select this check box to deny all access to your computer with the exception of Media Player. If a dialog box appears, click OK.
![]() Select the options for the way you want the media to be played and the type of information you want to be displayed.
Select the options for the way you want the media to be played and the type of information you want to be displayed.
![]() Clear this check box if you don’t want anyone to be able to access your Media Library, or select the check box if you want others to have full access to the library.
Clear this check box if you don’t want anyone to be able to access your Media Library, or select the check box if you want others to have full access to the library.
![]() Specify whether you want running text (a marquee) to appear on the screen during the party. If you want a marquee, click the Edit Marquee button, type your desired text in the dialog box that appears, and click OK.
Specify whether you want running text (a marquee) to appear on the screen during the party. If you want a marquee, click the Edit Marquee button, type your desired text in the dialog box that appears, and click OK.
![]() Clear this check box if you don’t want anyone to be able to add to or change the marquee text while the computer is in Party Mode, or select the check box it if you want to give your guests access.
Clear this check box if you don’t want anyone to be able to add to or change the marquee text while the computer is in Party Mode, or select the check box it if you want to give your guests access.

![]() Click the Play button to play the media, or click the Pause button to temporarily stop the play.
Click the Play button to play the media, or click the Pause button to temporarily stop the play.
![]() Use the Visualization buttons to change the visualizations if you specified this option.
Use the Visualization buttons to change the visualizations if you specified this option.
![]() Click to display the playlist.
Click to display the playlist.
![]() Click to open the editor to add a comment to the marquee text or to edit the existing marquee text.
Click to open the editor to add a comment to the marquee text or to edit the existing marquee text.
![]() Click to stop Party Mode and show the Windows Log On screen. Log on to the computer, take care of whatever you have to do, and then use the Party Mode Wizard to resume the party or to end it.
Click to stop Party Mode and show the Windows Log On screen. Log on to the computer, take care of whatever you have to do, and then use the Party Mode Wizard to resume the party or to end it.
Tip
When you select a skin in Party Mode, you’ll notice that the skins listed are not the same as those available in the normal Media Player mode. The Party Mode skins are designed to be displayed only in full screen to protect your computer from intrusion. Click the Download More Party Mode Skins link to get additional skins from Microsoft to enhance your party.
With either Microsoft Plus! or Microsoft Plus! Digital Media Edition installed on your computer, you can easily convert MP3 and wave (WAV) music and sound files to Windows Media Format (WMA). Why would you do this? The answer is that the WMA format is far more efficient than the other formats in storing your music, and it creates a much smaller file without compromising the quality of the sound. You can also use the Audio Converter program to change the file size of existing WMA files.

![]() Start the Microsoft Plus! Audio Converter from the Microsoft Plus! Digital Media Edition submenu of the Start menu, or start the Plus! MP3 Audio Converter from the Microsoft Plus! window.
Start the Microsoft Plus! Audio Converter from the Microsoft Plus! Digital Media Edition submenu of the Start menu, or start the Plus! MP3 Audio Converter from the Microsoft Plus! window.
![]() Specify whether you want to convert all the files in a single folder, or discrete files that you select from different folders, and then click Next.
Specify whether you want to convert all the files in a single folder, or discrete files that you select from different folders, and then click Next.

![]() If you chose to convert all the files in a folder, specify the following, and then click Next:
If you chose to convert all the files in a folder, specify the following, and then click Next:
The location of the folder containing all the files
The types of files to be searched for
Whether you want to exclude certain small files from conversion, and, if so, the minimum file size to be converted
![]() If you selected specific files for conversion, click Add File to specify which files you want to add.
If you selected specific files for conversion, click Add File to specify which files you want to add.
![]() If you chose to convert an entire folder, select any files you want to remove, and click Remove File.
If you chose to convert an entire folder, select any files you want to remove, and click Remove File.

![]() Select the Windows Media format to be used (available only in the Plus! Digital Media Edition version of the Plus! Audio Converter):
Select the Windows Media format to be used (available only in the Plus! Digital Media Edition version of the Plus! Audio Converter):
Windows Media Audio to use a constant bit rate. This might cause variations in the quality of the recording throughout the entire file.
Windows Media Audio (Variable Bit Rate) to allow the converter to vary the bit rate throughout the recording to gain consistent quality throughout the file.
Windows Media Audio Lossless for a file with no compression, which guarantees the highest quality but produces a large file.
MP3 to convert to MP3 format. You must have a third-party CODEC installed for this option to be available.
![]() Specify the quality of the recording by specifying the bit rate or range of bit rates.
Specify the quality of the recording by specifying the bit rate or range of bit rates.
![]() Select this check box if you want the volume of all your converted files to be consistent.
Select this check box if you want the volume of all your converted files to be consistent.
![]() Specify where you want to store your converted files.
Specify where you want to store your converted files.
![]() Specify what you want to do if the file has already been converted.
Specify what you want to do if the file has already been converted.
![]() Select this check box if you want to add the converted file to the Windows Media Player Media Library.
Select this check box if you want to add the converted file to the Windows Media Player Media Library.

Remember LPs and cassette tapes? When you use the Analog Recorder that comes with Microsoft Plus! Digital Media Edition, you can convert your old records and tapes into a digital format that you can play from your computer or other player. It might be a bit tricky to get the wiring just right for what you want to do—you’ll need to use special connectors to get your analog player (tape player, amplifier, and so on) wired to the Line-In connection of your computer’s sound card. Once you’ve got the wiring taken care of, though, recording your music is easy.
Tip
The connector you need depends on your analog player’s output. In most cases, you’ll need a cable with two RCA-type plugs at one end to connect to the analog player, and a mini-plug (3.5 mm or ⅛ inch) to connect to your sound card. Most computer stores can provide you with this cable.
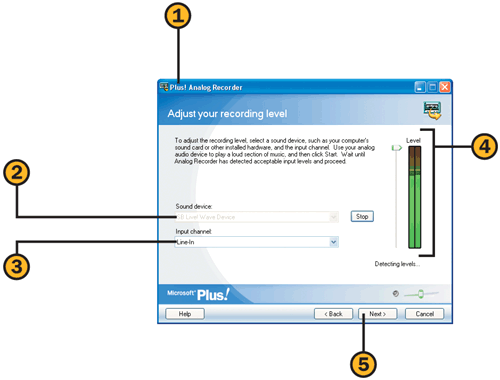
![]() With the analog player attached to your computer, choose Analog Recorder from the Microsoft Plus! Digital Media Edition submenu of the Start menu. Click Next if a welcome screen appears.
With the analog player attached to your computer, choose Analog Recorder from the Microsoft Plus! Digital Media Edition submenu of the Start menu. Click Next if a welcome screen appears.
![]() Select the input line on the sound card to which your analog player is connected.
Select the input line on the sound card to which your analog player is connected.
![]() Play some music from your analog player, and then click Start. Wait for the sound levels to be set.
Play some music from your analog player, and then click Start. Wait for the sound levels to be set.

![]() With your music queued up, start the player, and click the Record button. Use the Pause button if you want to interrupt the recording.
With your music queued up, start the player, and click the Record button. Use the Pause button if you want to interrupt the recording.

![]() Double-click a track to preview it.
Double-click a track to preview it.
![]() Modify the track if necessary, as follows:
Modify the track if necessary, as follows:
If one track contains two or more songs, use the slider to locate the areas between the songs, and click the Split Track button to create separate tracks.
If one song was split into two tracks, select the tracks, and click the Combine Tracks button.
![]() Select a track, and enter the track and album information. Repeat for the other tracks.
Select a track, and enter the track and album information. Repeat for the other tracks.
![]() Click Next, select the filters you want to use to improve the quality of the recording, and click Next again.
Click Next, select the filters you want to use to improve the quality of the recording, and click Next again.

![]() Click the Change button to specify where you want to save your music files. Click the Advanced button if you want to change the way files are named and stored.
Click the Change button to specify where you want to save your music files. Click the Advanced button if you want to change the way files are named and stored.
![]() Select this check box to use Digital Rights Management and require a license for the music to be copied.
Select this check box to use Digital Rights Management and require a license for the music to be copied.
![]() Select the quality, and thus the file size, for the recording.
Select the quality, and thus the file size, for the recording.
![]() Specify whether you want the file to be added to a Windows Media Player playlist, and, if so, which playlist.
Specify whether you want the file to be added to a Windows Media Player playlist, and, if so, which playlist.
![]() Click Next, and step through the remainder of the wizard to save your files.
Click Next, and step through the remainder of the wizard to save your files.
With Microsoft Plus! Voice Command For Windows Media Player, you can use voice commands to control Media Player instead of using your mouse or keyboard. When it’s running, Media Player will recognize specific commands that you use to control the media you play and to change Media Player’s appearance.
Try This
Start and set up Voice Command. Click the Voice Command icon on the taskbar, and choose Plus! Voice Command On from the menu that appears to make sure the feature is turned on. Into your microphone, say, "Media Player, view Skin Mode." Now play some music, and control it using phrases such as "Media Player, next" and "Media Player, repeat." If you’ve selected an alternative call sign, use it instead of saying "Media Player."

![]() Choose Microsoft Plus! from the Start menu, and, in the Digital Media section, click the Start button under Plus! Voice Command For Windows Media Player. If this is the first time you’re using Plus! Voice Command, specify whether you want Plus! Speech Command to be your only speech command tool. Then step through the Plus! Voice Command For Windows Media Player Wizard to set up your microphone, to learn how to use voice recognition, and to teach the program to recognize your speech patterns.
Choose Microsoft Plus! from the Start menu, and, in the Digital Media section, click the Start button under Plus! Voice Command For Windows Media Player. If this is the first time you’re using Plus! Voice Command, specify whether you want Plus! Speech Command to be your only speech command tool. Then step through the Plus! Voice Command For Windows Media Player Wizard to set up your microphone, to learn how to use voice recognition, and to teach the program to recognize your speech patterns.
![]() Click the Plus! Voice Command For Windows Media Player icon in the notification area of the taskbar, and choose Options from the menu that appears to display the Plus! Voice Command For Windows Media Player Options dialog box.
Click the Plus! Voice Command For Windows Media Player icon in the notification area of the taskbar, and choose Options from the menu that appears to display the Plus! Voice Command For Windows Media Player Options dialog box.
![]() Select the type of feedback you want to verify that your commands are interpreted correctly.
Select the type of feedback you want to verify that your commands are interpreted correctly.
![]() Select or enter the word or phrase (the call sign) that tells the voice recognition program you’re giving a command.
Select or enter the word or phrase (the call sign) that tells the voice recognition program you’re giving a command.
![]() Select the level of discrimination you want the voice recognition program to use.
Select the level of discrimination you want the voice recognition program to use.
![]() Use a command to control the player, remembering to preface the command with the call sign.
Use a command to control the player, remembering to preface the command with the call sign.
![]() When you want Voice Command to stop running, click the Plus! Voice Command For Windows Media Player icon on the taskbar, and choose Exit from the menu that appears.
When you want Voice Command to stop running, click the Plus! Voice Command For Windows Media Player icon on the taskbar, and choose Exit from the menu that appears.
Is your computer environment too serious, too boring, too static? If you want to, you can liven it up considerably with some high-energy dancers who’ll entertain you as they whirl and prance around on your screen. With Microsoft Plus! Digital Media Edition, you can choose from an assortment of dancers—human and otherwise—with or without accompanying music.
Tip
If a dancer is in your way, just drag him, her, or it to another location on your screen. You can also right-click the dancer to access the same menu that you open by clicking the Plus! Dancer icon.
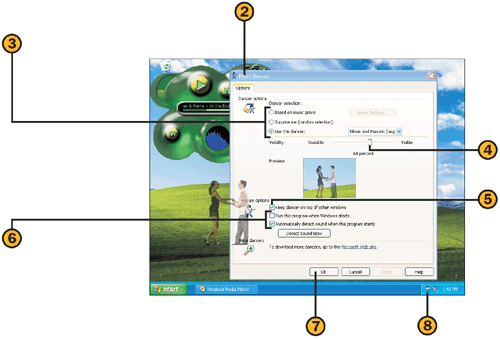
![]() Choose Plus! Dancers from the Microsoft Plus! Digital Media Edition submenu of the Start menu.
Choose Plus! Dancers from the Microsoft Plus! Digital Media Edition submenu of the Start menu.
![]() Click the Dancer icon in the notification area of the taskbar, and choose Options from the menu that appears to display the Plus! Dancer dialog box.
Click the Dancer icon in the notification area of the taskbar, and choose Options from the menu that appears to display the Plus! Dancer dialog box.
![]() Specify how you want the dancers to be selected, or which dancer you want to display.
Specify how you want the dancers to be selected, or which dancer you want to display.
![]() Set the visibility of the dancer on your screen.
Set the visibility of the dancer on your screen.
![]() Select this check box if you always want the dancer to be visible.
Select this check box if you always want the dancer to be visible.
![]() Specify how you want the Plus! Dancer program to start.
Specify how you want the Plus! Dancer program to start.
![]() Click the Dancer icon in the notification area of the taskbar to select and control the dancer, as well as to download additional dancers.
Click the Dancer icon in the notification area of the taskbar to select and control the dancer, as well as to download additional dancers.
Windows XP provides a program called Narrator that actually speaks to you! Narrator can describe aloud the items that are currently displayed on your screen, and it can even read long blocks of text. Narrator has some limitations, but it can be very useful in the right circumstances. Of course, for Narrator to work, your computer must have a sound system.
Tip
Some programs, such as Microsoft Office 2003, have much greater voice capabilities than Narrator, including full voice recognition. If you have installed any such programs, you might find different settings for Narrator from those described here. To view all the settings, open the Control Panel from the Start menu; click the Sounds, Speech, And Audio Devices category; and then click the Speech icon.

![]() Choose Narrator from the Accessibilities submenu of the Start menu to display the Narrator dialog box. If you see an introductory dialog box, click OK.
Choose Narrator from the Accessibilities submenu of the Start menu to display the Narrator dialog box. If you see an introductory dialog box, click OK.
![]() Select this check box to have Narrator describe aloud all the elements in the active window, the items on the Desktop, and so on.
Select this check box to have Narrator describe aloud all the elements in the active window, the items on the Desktop, and so on.
![]() Select this check box to have Narrator read aloud any editable text, such as text in a WordPad document.
Select this check box to have Narrator read aloud any editable text, such as text in a WordPad document.
![]() Select this check box to have the mouse pointer move automatically to the item that’s active or currently selected.
Select this check box to have the mouse pointer move automatically to the item that’s active or currently selected.
![]() Select this check box to have the Narrator dialog box minimized and out of the way when you start Narrator.
Select this check box to have the Narrator dialog box minimized and out of the way when you start Narrator.
![]() Click Voice to open the Voice Settings dialog box.
Click Voice to open the Voice Settings dialog box.
![]() Click the Minimize button when you’ve adjusted all the settings to your satisfaction.
Click the Minimize button when you’ve adjusted all the settings to your satisfaction.
![]() To close Narrator, click its button on the taskbar to restore it if you’ve minimized it, and then click Exit.
To close Narrator, click its button on the taskbar to restore it if you’ve minimized it, and then click Exit.
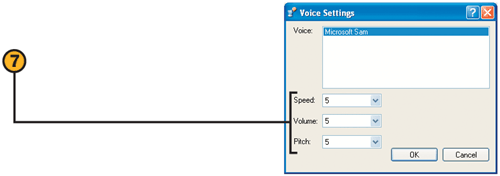
![]() Adjust the reading speed, volume, and pitch of Narrator’s voice. Click OK when you’ve finished.
Adjust the reading speed, volume, and pitch of Narrator’s voice. Click OK when you’ve finished.
You usually use a sound file to record or play a short, simple sound—a beep or a bark, an occasional musical chord or two, or even a short message. Windows XP and many programs use sound files (called WAV files) to mark an event—starting up, for example—or to record a short message, such as an audio comment. Using Sound Recorder and a microphone or some other input device, you can record and play your own sound files, each of which can be up to 60 seconds long.
Tip
To reduce the size of a sound file, save the file, choose Properties from the File menu, and choose a format that will compress the sound file. Different formats are designed for different purposes, so take a look at the Sound Recorder Help file if you need information about the various formats.

![]() Choose Sound Recorder from the Entertainment submenu of the Start menu.
Choose Sound Recorder from the Entertainment submenu of the Start menu.
![]() Click the Record button, and record the sounds you want.
Click the Record button, and record the sounds you want.
![]() Click Stop when you’ve finished.
Click Stop when you’ve finished.
![]() Choose Save from the File menu, and save the file.
Choose Save from the File menu, and save the file.
See Also
For information about setting the recording levels for different input devices, see "Set the Recording Volume".

![]() Move the slider to the location in the sound file where you want to add an existing sound file.
Move the slider to the location in the sound file where you want to add an existing sound file.
![]() From the Edit menu, choose Insert File to add a file and to record over any existing sound, or choose Mix With File to merge a file with any existing sound. Use either the Insert File or the Merge With File dialog box to locate the file you want, and click Open.
From the Edit menu, choose Insert File to add a file and to record over any existing sound, or choose Mix With File to merge a file with any existing sound. Use either the Insert File or the Merge With File dialog box to locate the file you want, and click Open.
![]() From the Effects menu, choose the type of effect you want to add to the entire sound file:
From the Effects menu, choose the type of effect you want to add to the entire sound file:
Increase Volume or Decrease Volume to change the volume of the recorded file
Increase Speed or Decrease Speed to speed up or slow down the recording
Add Echo to add an echo to the recording
Reverse to have the recording play backward
If the sound your computer emits to signal an event—the logon or logoff sound, for example—is an earsplitting assault, relief in the form of adjusting the volume is just a click away. You can also use the volume control to keep your music and other sounds muted so that you don’t disturb other people, or, when you’re the only person around, you can crank up the sound level and blast away! You can also control the volume levels when you’re using a microphone or any input line and can select the best settings for your speakers. Although many programs have individual controls, you can use the volume control to set all your sound levels.
Tip
If the Volume icon doesn’t appear on the taskbar, choose Control Panel from the Start menu, and click the Sounds, Speech, And Audio Devices category. Click the Adjust The System Volume task, and, on the Volume tab, select the Place Volume Icon In The Taskbar check box. Click OK. If the icon still doesn’t appear on the taskbar, your sound system might not work with this control. Instead, use the controls on the Volume tab of the Sounds And Audio Devices Properties dialog box.

![]() Click the Volume icon in the notification area of the taskbar. If Windows has hidden infrequently used icons in the notification area so that the Volume icon isn’t visible, click the Show Hidden Icons button.
Click the Volume icon in the notification area of the taskbar. If Windows has hidden infrequently used icons in the notification area so that the Volume icon isn’t visible, click the Show Hidden Icons button.
![]() Drag the slider to adjust the volume.
Drag the slider to adjust the volume.
![]() Click outside the Volume icon to close it.
Click outside the Volume icon to close it.
Tip
If you’re using a device that isn’t listed in the volume control, choose Properties from the Options menu, and select the check box for the device. To see any available advanced settings, including tone settings, and using only digital sound output, choose Advanced Options from the Options menu, and then click any Advanced button that you see in the volume control.

![]() Double-click the Volume icon on the taskbar.
Double-click the Volume icon on the taskbar.
![]() Adjust the settings for the device or devices whose volume you want to adjust, and then use the device or devices to check the sound level.
Adjust the settings for the device or devices whose volume you want to adjust, and then use the device or devices to check the sound level.

![]() Double-click the Volume icon on the taskbar.
Double-click the Volume icon on the taskbar.
![]() Choose Properties from the Options menu to display the Properties dialog box, and click the Recording option.
Choose Properties from the Options menu to display the Properties dialog box, and click the Recording option.
![]() Select the check boxes for the devices to be displayed in the recording control, and clear the check boxes for the devices you don’t want displayed. Click OK.
Select the check boxes for the devices to be displayed in the recording control, and clear the check boxes for the devices you don’t want displayed. Click OK.

![]() Adjust the settings for the device or devices whose recording volume you want to adjust, and then use the device or devices to check the sound level.
Adjust the settings for the device or devices whose recording volume you want to adjust, and then use the device or devices to check the sound level.
![]() When the adjustments are correct, close the recording control.
When the adjustments are correct, close the recording control.
Tip
The items listed in the Show The Following Volume Controls list in the Properties dialog box depend on your computer’s sound system and on the equipment installed on the computer.
Caution
Before you spend a lot of time trying to tweak your volume settings, make sure that you have the correct settings for your speakers. To see whether the speakers have been set up with the correct configuration, choose Control Panel from the Start menu, and click the Sounds, Speech, And Audio Devices category. Click the Change The Speaker Settings task. Under Speaker Settings, click Advanced, and then specify the correct speaker configuration in the list. Click OK, click the Speaker Volume button, adjust the speakers, and then click OK in the Speaker Volume dialog box and again in the Sound And Audio Devices Properties dialog box.
If you want to hear audio cues for events in Windows XP—the closing of a program or the arrival of new mail, for example—you can assign sounds to these events. Windows XP comes with a variety of predesigned sound schemes that you can use, or you can create your own customized audio cues.
Tip
Put any WAV audio files that you want to use for events into the Media folder (you’ll find it in the Windows folder), and the files will appear in the Sounds list, so you won’t need to use the Browse button to locate them.
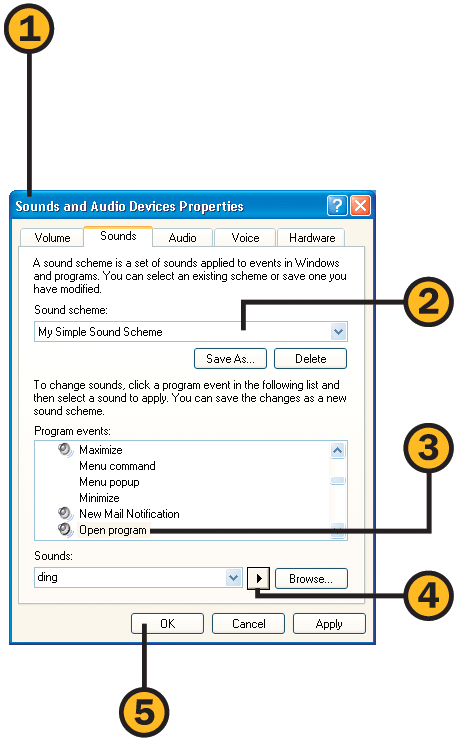
![]() Open the Control Panel, click the Sounds, Speech, And Audio Devices category, and then click the Change The Sound Scheme task to display the Sounds And Audio Devices Properties dialog box.
Open the Control Panel, click the Sounds, Speech, And Audio Devices category, and then click the Change The Sound Scheme task to display the Sounds And Audio Devices Properties dialog box.
![]() On the Sounds tab, click a sound scheme in the list.
On the Sounds tab, click a sound scheme in the list.
![]() Click any event that’s marked with a sound icon.
Click any event that’s marked with a sound icon.
![]() Click the Play Sound button to preview the sound scheme.
Click the Play Sound button to preview the sound scheme.
![]() If you like the sound scheme, click OK.
If you like the sound scheme, click OK.
Tip
You might or might not have numerous sound schemes available, depending on what other software you’ve installed, whether the computer was upgraded from a previous version of Windows, or whether someone else has created sound schemes. If you have only the one default Windows scheme, why not create a sound scheme of your own?

![]() If the Sounds And Audio Devices Properties dialog box isn’t displayed, open it from the Control Panel.
If the Sounds And Audio Devices Properties dialog box isn’t displayed, open it from the Control Panel.
![]() On the Sounds tab, click an event to which you want to assign a sound.
On the Sounds tab, click an event to which you want to assign a sound.
![]() Click a sound in the Sounds list, or use the Browse button to find a sound in another folder. Click None in the Sounds list to remove a sound from an event.
Click a sound in the Sounds list, or use the Browse button to find a sound in another folder. Click None in the Sounds list to remove a sound from an event.
![]() Use the Play Sound button to preview the sound. Continue to select events and assign the sounds you want.
Use the Play Sound button to preview the sound. Continue to select events and assign the sounds you want.
![]() Click Save As, enter a name for the sound scheme you’ve created, and click OK.
Click Save As, enter a name for the sound scheme you’ve created, and click OK.