
Chapter at a Glance
With Microsoft Office PowerPoint 2007, you can save a presentation in a format that can be viewed in a Web browser. PowerPoint provides all the tools you need to convert and display the presentation over an intranet or the Internet. The converted presentation is viewed as a single Web page with a navigation bar that provides easy access to each slide.
To maximize the usefulness of any presentation, you can create hyperlinks that viewers can click to move to specific slides, to other presentations, to Web sites, or to the message window of an e-mail program. After you create a hyperlink, you can modify its action to run programs, such as Microsoft Office Excel 2007, or play sounds. You can also create action buttons and attach links or other actions to them.
In this chapter, you will create hyperlinks that open an e-mail message window, open a document, and jump to a specific Web page. You will attach actions to existing slide contents to display hidden slides and play sounds, and you will create action buttons to jump to a slide and back again. Finally, you will save a presentation in a Web format, view the presentation in your Web browser, make a change to the HTML file in PowerPoint, and then view the change.
Warning
Important You need a connection to the Internet and to have a Web browser and e-mail program installed on your computer to be able to see the results of some of the exercises in this chapter.
Note
See Also Do you need only a quick refresher on the topics in this chapter? See the Quick Reference section at the beginning of this book.
Warning
Important Before you can use the practice files in this chapter, you need to install them from the book’s companion CD to their default location. See Using the Book’s CD at the beginning of this book for more information.
Note
Troubleshooting Graphics and operating system–related instructions in this book reflect the Windows Vista user interface. If your computer is running Windows XP and you experience trouble following the instructions as written, please refer to the Information for Readers Running Windows XP section at the beginning of this book.
Presentations that are intended to be viewed on the Web often include hyperlinks to provide access to supporting information. That information might be a hidden slide, another presentation, a file on your computer or your organization’s network, or a Web address.
You can attach a hyperlink to any selected object, such as text, a graphic, a shape, or a table. Clicking the hyperlinked object then takes you directly to the linked location. Editing the object does not disrupt the hyperlink; however, deleting the object also deletes the hyperlink.
In this exercise, you will create one hyperlink that opens an e-mail message window and another that opens a document. You will also create a hyperlink with an informative ScreenTip that starts the default Web browser and jumps to a specific Web page.
Note
USE the Hyperlink presentation and the Procedures document. These practice files are located in the DocumentsMicrosoft PressPowerPoint2007SBSWeb folder.
BE SURE TO configure an e-mail program on your computer, connect to the Internet, and start PowerPoint before beginning this exercise.
OPEN the Hyperlink presentation.
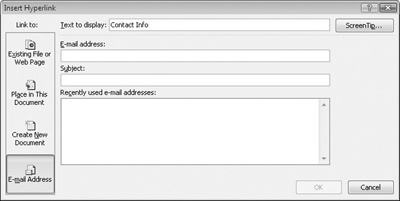
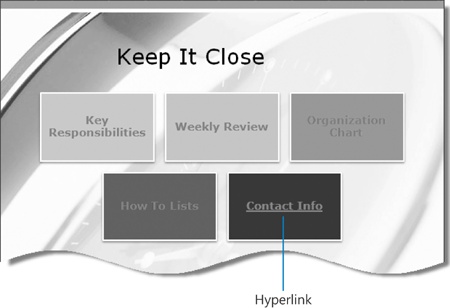
Display Slide 6, and in the lower-right shape, select Contact Info.
On the Insert tab, in the Links group, click the Hyperlink button.
Under Link to, click E-mail Address.
In the E-mail address box, type [email protected], and then in the Subject box, type Organization presentation.
Notice that PowerPoint changes the entry in the E-mail Address box to mailto:[email protected].
Click OK, and then click away from the subtitle placeholder.
The text is underlined to indicate that it is a hyperlink, and it takes on the hyperlink color in the presentation’s color scheme, which is teal.
Move the mouse to display the pointer, and then click Contact Info.
Your default e-mail program displays a message window with the specified e-mail address entered in the To box and the specified subject entered in the Subject box.
Close the message window, and then press the
 key to end the slide show.
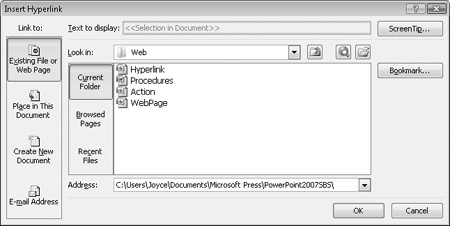
Display Slide 4, and then click the graphic.
On the Insert tab, in the Links group, click the Hyperlink button, and then in the Insert Hyperlink dialog box, under Link to, click Existing File or Web Page.
You can use the Look In box to find a file on your computer, or you can click the Browse The Web button to locate a Web site.
With the contents of the Web folder displayed, double-click the Procedures document.
Switch to Slide Show view, point to the graphic to see the path of the hyperlinked file displayed as a ScreenTip, and then click the graphic.
Tip
The pointer changes to a pointing hand when you move it over a hyperlinked object. Any time the pointer has this shape, you can click to follow a hyperlink.
Microsoft Office Word 2007 opens and displays a document about office procedures.
Display Slide 5, and then click the clock to the left of the table.
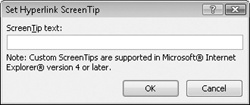
In the Links group, click the Hyperlink button, and then in the upper-right corner of the Insert Hyperlink dialog box, click ScreenTip.
The Set Hyperlink ScreenTip dialog box opens so that you can specify the text that will appear when someone points to the question mark graphic.
In the ScreenTip text box, type Check out this book, and then click OK.
Back in the Insert Hyperlink dialog box, select the entry in the Address box, type http://www.microsoft.com/learning/en/us/Books/9602, and then click OK.
Display the slide in Slide Show view, and point to the animated clock graphic.
PowerPoint displays the ScreenTip you entered.
Click the graphic.
Your Web browser starts, and if you are connected to the Internet, you are taken to the Web page for our book Microsoft Office Outlook 2007 Step by Step.
Close the browser window, and then press
to end the slide show.

In addition to attaching hyperlinks to text or objects by clicking the Hyperlink button, you can attach them by clicking the Action button, which is also in the Links group on the Insert tab. In the dialog box that opens, you can specify whether the action should take place when you click the linked text or object or when you point to it. You can designate a target to which PowerPoint should jump if the link is clicked or pointed to, or an action such as starting a program or playing a sound.
If attaching an action to existing text or an object on a slide is not appropriate, you can insert an action button. PowerPoint includes standard navigation action buttons (Back, Forward, Beginning, End, Home, and Return) and display action buttons (Document, Help, Information, Movie, and Sound) as well as a generic action button that you can customize.
In this exercise, you will select a word in a bulleted list and attach an action that displays a hidden slide when the word is clicked. You will also attach a sound that plays when you point to a slide title. Finally, you will create action buttons that you can click to move between presentation slides and an overview slide.
Note
USE the Action presentation. This practice file is located in the DocumentsMicrosoft PressPowerPoint2007SBSWeb folder.
OPEN the Action presentation.
Display Slide 11, and select the word Champion.
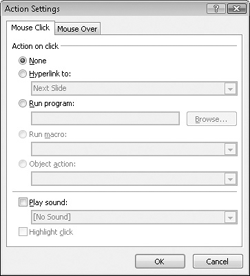
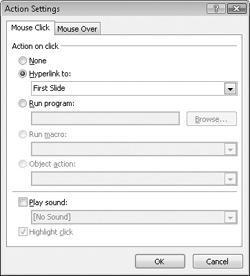
On the Insert tab, in the Links group, click the Action button.
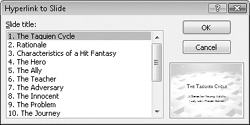
On the Mouse Click tab, under Action on click, click the Hyperlink to option, click the arrow at the right end of the box below, and then in the list, click Slide.
Scroll the Slide title list, and then click (12) The Battle.
The number 12 is enclosed in parentheses because this slide is hidden. You want to be able to click the word Champion to go to the slide about the possible types of battles, if appropriate.
Click OK to close the Hyperlink to Slide dialog box, and then click OK again to close the Action Settings dialog box.
The word Champion is now underlined and displayed in the hyperlink color assigned by the color scheme.
Display Slide 4, and select The Hero.
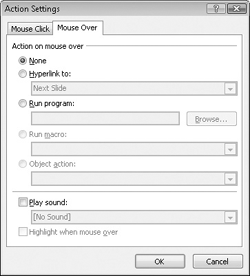
In the Links group, click the Action button, and then in the Action Settings dialog box, click the Mouse Over tab.
Under Action on mouse over, click the Play sound option, click the arrow at the right end of the box below, click Applause in the list, and then click OK.
The title is now underlined and displayed in the hyperlink color.
Switch to Slide Show view, and then point to The Hero.
The Applause sound plays.
Right-click the screen, point to Go to Slide, and then click 11 The Skill or Power.
In the bulleted list, click Champion.
PowerPoint displays the hidden slide about types of battles.
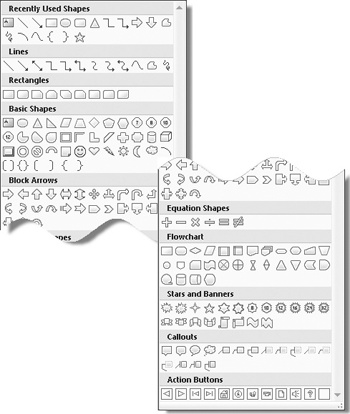
On the Insert tab, in the Illustrations group, click the Shapes button.
Under Action Buttons at the bottom of the gallery, click the Action Button: Home icon.
The pointer changes to a cross.
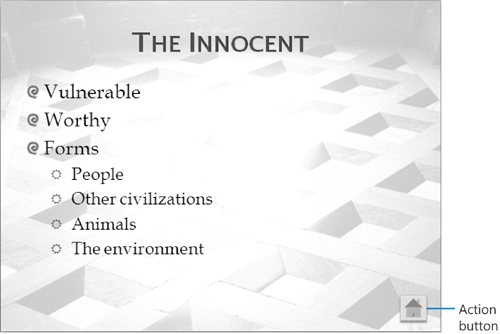
In the lower-right corner of the slide, drag to create a Home action button about half an inch square.
When you release the mouse button, the Action Settings dialog box opens with the Hyperlink To option selected and First Slide in the box below. At the bottom of the dialog box, the Highlight Click check box is selected, but dimmed to indicate that you cannot change this setting.
Click the Hyperlink to arrow, and then in the list, click Slide.
The Hyperlink To Slide dialog box opens.
In the Slide title list, click 3. Characteristics of a Hit Fantasy, and then click OK twice.
With the action button still selected on the slide, on the Format contextual tab, in the Shape Styles group, click the blue thumbnail in the fourth row (Subtle Effect - Accent 3).
The color of the Home action button is now compatible with the background.
When you click the action button, you will jump to Slide 3, which is an overview of Slides 4 through 14. Referring back to this slide after showing half of the listed topics is a good idea, but suppose you need a quick way of jumping back to Slide 8 so that you can resume the discussion.
Display Slide 3, and then on the Insert tab, in the Illustrations group, click the Shapes button to display the Shapes gallery.
Under Action Buttons at the bottom of the gallery, click the Action Button: Return icon, and then in the lower-right corner of the slide, drag to create a Return action button about half an inch square.
When you release the mouse button, the Action Settings dialog box opens with the Hyperlink To option selected and Last Slide Viewed selected in the box below.
Click OK to close the Action Settings dialog box.
Change the color of the action button to one that is compatible with the background.
Display Slide 8, switch to Slide Show view, and then click the Home action button to jump to Slide 3.
On Slide 3, click the Return action button to jump back to Slide 8, and then click the mouse button to display Slide 9.
A presentation doesn’t have to be delivered in front of a live audience. Instead, you can save it in a Web format and store it on a Web site so that people can view it when they have the time. Presentations suitable for Web delivery are usually accompanied by the speaker’s narration, and might be accompanied by video clips of a live delivery session.
To make a presentation available via the Web, you need to convert it to Hypertext Markup Language (HTML) format. HTML consists of codes called tags that control how the page appears in a Web browser such as Windows Internet Explorer. You convert the presentation for Web viewing by saving it in one of two formats:
Web Page. If you select this file type in the Save As dialog box, PowerPoint converts the presentation file into an HTML file, creates a folder with the same name as the Web presentation, and stores in the folder all the files necessary to display the pressentation in a Web browser.
Single File Web Page. If you select this file type, PowerPoint saves everything that is necessary to display the presentation in a single file with the extension .mhtml.
Tip
While saving a presentation in a Web format, you can specify in the Save As dialog box that it should be saved on a Web server or an FTP (File Transfer Protocol) site by typing the URL of the server or FTP site in the Address bar. (FTP is a technology used for moving files around on the Internet.)
From within PowerPoint, you can start your default Web browser and display a presentation that has been saved in either Web Page or Single File Web Page format. If PowerPoint is not open, you can display the presentation in your default Web browser by double-clicking the file.
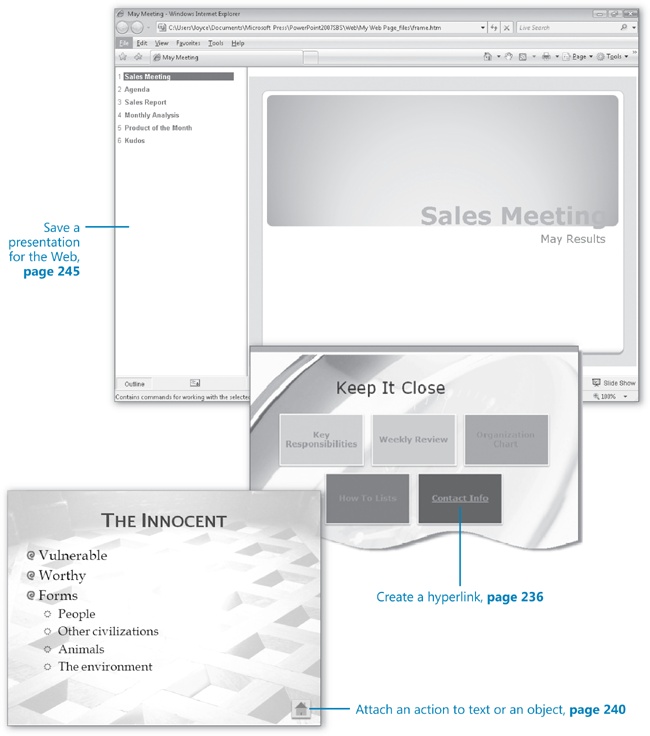
By default, PowerPoint designates the title specified in the presentation’s properties as the one that will appear in the Web browser’s title bar. You can change this title while you are saving the presentation. Also by default, PowerPoint creates a navigation frame containing the slide titles. Clicking a title in the navigation frame on the left side of the window displays that slide in the content frame to the right.
Note
See Also For information about presentation properties, see Finalizing a Presentation in Chapter 8.
After a Web presentation is converted to HTML, it is not cast in stone. You can make changes to the HTML version of a presentation by opening it in PowerPoint and making changes just as you would in a regular presentation (.pptx) file. Saving the file saves the changes to the HTML version; if you also want an updated PPTX version, you can save a copy with the PowerPoint Presentation file type (or overwrite the original).
In this exercise, you will convert a presentation to a Web page, view the presentation in your Web browser, make a change to the HTML file in PowerPoint, and then view the change.
Note
USE the WebPage presentation. This practice file is located in the DocumentsMicrosoft PressPowerPoint2007SBSWeb folder.
OPEN the WebPage presentation.
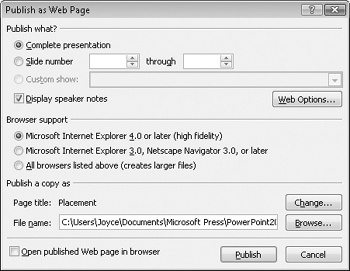
In the File Name box, type My Web Page.
Click the Save as type arrow, and then in the list, click Web Page.
The Save As dialog box expands to include additional information saved with a Web page.
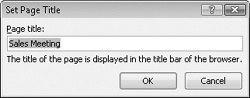
Click Change Title.
In the Page title box, change the title to May Meeting, and then click OK.
Under Publish what?, verify that Complete presentation is selected, and then click Web Options.
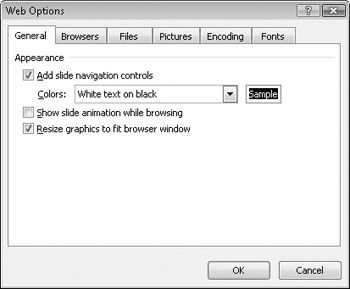
On the General tab, verify that the Add slide navigation controls check box is selected. Then click the Colors arrow, and in the list, click Presentation colors (accent color).
Select the Show slide animation while browsing check box, and then click OK.
In the Publish as Web Page dialog box, under Browser support, click All browsers listed above (creates larger files).
This option makes the Web presentation compatible with most common browsers.
At the bottom of the dialog box, verify that the Open published Web page in browser check box is cleared, and then click Publish.
PowerPoint saves the presentation as a Web page.
Close the presentation without saving your changes (but don’t exit PowerPoint).
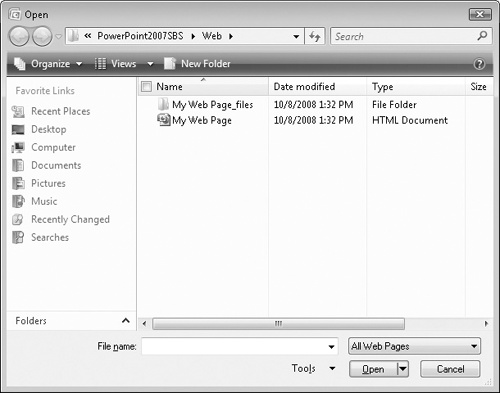
Click the Microsoft Office Button, and then click Open.
With the Web folder displayed in the Open dialog box, change the All PowerPoint Presentations setting to All Web Pages if necessary.
The Web folder contains a new folder and a new file with the same name as the Web page that you just created.
In the list of folders and files, click the My Web Page file.
Click the Open arrow, and then in the list, click Open in Browser.
If a message warns you to click only hyperlinks from trusted sources, click Yes.
If your Web browser displays a message requesting that you approve the display of the file content, follow your browser-specific instructions to do so.
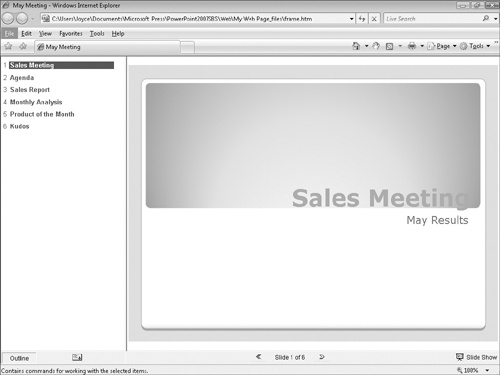
The May Meeting presentation home page opens in your default Web browser, displaying Slide 1. The slide titles appear in the navigation bar on the left.
Click a few slide titles to move around the presentation, and then exit the Web browser.
You return to PowerPoint.
Click the Microsoft Office Button, click Open, and in the Open dialog box, change the All PowerPoint Presentations setting to All Web Pages if necessary.
With the contents of the Web folder displayed, double-click My Web Page.
The Web presentation opens in PowerPoint. The HTML version might look a little different from the original, but all the basic components are intact.
On the Insert tab, in the Illustrations group, click the Shapes button. Then in the Shapes gallery, under Stars and Banners, click the first Explosion icon.
Drag to create the shape in the lower-left corner of Slide 1.
Save and then close the file.
Click the Microsoft Office Button, click Open, and with All Web Pages selected as the file type, click (don’t double-click) My Web Page. Then click the Open arrow, and in the list, click Open in Browser. Follow any browser-specific instructions necessary to display the Web page.
Your Web browser opens and displays Slide 1 with the shape you just added.

You can add a hyperlink to any text or object to directly link it to another slide, presentation, file, or Web address.
You can create action buttons that jump to other locations, play sounds, or run programs when you click or point to them.
You can save a fully functional presentation as a self-contained Web page or as a Web presentation.
You can edit a Web presentation in PowerPoint just as you would a regular presentation file.