
Now that we have created and exposed our custom services, they can be consumed by other applications. To demonstrate this, we will use Visual Studio and write two code samples.
The first example of consuming a service deals with the retrieval of a title list. We want to be able to write a list of titles to the console window.
To add the service reference, perform the following steps:
- In Visual Studio, create a console application just like we did in the previous chapter when testing the document service.
- Right-click on the project node and select Add Service Reference…. The Add Service Reference window opens.
- In the Address drop-down box, specify
http://DYNAX01:8101/DynamicsAx/Services/CVRCustomServicesas the address for the service and then click on Go. Of course, replaceDYNAX:8101with the server and WSDL port of your installation. The address is queried and the services and operations that are available are listed. - In the Namespace box, specify the namespace that you want to use:
AxCustomServicesRef.
After performing these steps, the Add Service Reference window should look similar to the one shown in the following screenshot. On the left-hand side of the window, the services that were found are listed. In our case, we see that CVRCustomServices, along with three other services, are contained in the service group. On the right-hand side of the window, we see the operations that are available for the selected service:

When you click on OK, ServiceModel Metadata Utility (SvcUtil.exe) creates a client proxy and types according to the metadata found in the service WSDL. You can view the types by opening the Object Browser menu.
To consume the service in the console application and retrieve a list of titles, you can use the following code:
static void Main(string[] args)
{
    // Create an instance of the proxy client
    CVRTitleServiceClient theClient = new CVRTitleServiceClient();

    // Create the call context
    CallContext theContext = new CallContext();
    theContext.Company = "CEU";
    theContext.Language = "EN-US";
    theContext.LogonAsUser = "UserName";

    // Invoke the getAllTitles service operation
    CVRTitleListDataContract theListContract = theClient.getAllTitles(theContext);

    // Loop all of the returned titles
    foreach (Title title in theListContract.parmTitleList)
    {
        Console.WriteLine(String.Format("{0} - {1} - {2}", title.Id, title.Name, title.Description));
    }

    // Wait for the user to press a key
    Console.Read();
}
The output should be a title list shown as follows:
T000000001 - Memento - Memento weird movie
T000000002 - Lord of the rings - Lord of the rings long movie
In this second example, we will consume a service that enables us to register a rental. We will again take a look at creating the service reference but focus a little more on some advanced options available to us when creating the service reference.
We added a service reference in the previous example, so first delete it. This allows us to recreate the service reference for this example and look at it in more detail.
To create the service reference again, perform the following steps:
- In the Solution Explorer panel in Visual Studio, right-click on the project node and click on Add Service Reference…. The Add Service Reference window opens.
- In the Address drop-down box, specify
http://DYNAX01:8101/DynamicsAx/Services/CVRCustomServicesas the address for the service and then click on Go. The address is queried and the services and operations that are available are listed. - In the Namespace box, specify the namespace that you want to use:
AxCustomServicesRef. - Click on the Advanced button available on this screen. The Service Reference Settings window opens.
Let's pause here and look at two options (as shown in the following screenshot) that are of particular interest to us: Always generate message contracts and Collection type:
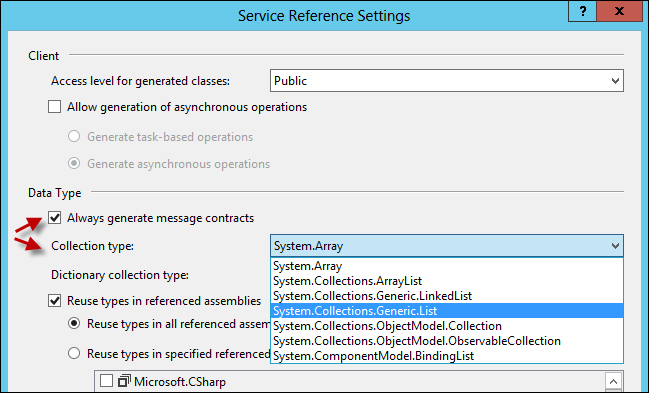
The Always generate message contracts option determines if the message contracts will be generated for the client. When you do not use this, the client has service operations that contain the same number of parameters as provided on the service operation. When this option is checked, the message contracts are used on the service operations instead of the parameter list. The parameters that would normally be passed to the service operation are then wrapped in a message contract. This can be useful when you want to make sure that all of the service operations take only one parameter.
If we look back at the previous sample code, it could also be modified to work with the message contracts that were generated, as demonstrated in the following code:
// Create the request message contract
CVRTitleServiceGetAllTitlesRequest theRequest = new CVRTitleServiceGetAllTitlesRequest(theContext);

// Invoke the getAllTitles service operation
CVRTitleServiceGetAllTitlesResponse theResponse = theClient.getAllTitles(theRequest);

// Retrieve the list of titles
CVRTitleListDataContract theListContract = theResponse.response;
Instead of just passing the context to the service operation, we need to create a request message contract. This contract is then passed to the service operation as the only parameter. All of the other parameters that you would use are contained in the message contract so that you can set them in the request message contract.
The service operation itself does not return the list in this case, but returns a response message contract. This response message contract itself contains the list.
The Collection type option specifies the type of collections that are used by the proxy client when dealing with collections. Though the service implementation uses List as the collection type, you can choose to use arrays on the client side. This is the default option when creating a service reference. If we look back at the code that retrieves the list of titles (as shown in the following screenshot), we can see that the resulting collection type is an array of Title objects:

If we choose a different type, for example, System.Collections.Generic.List, we can see that the return type is now a generic list of Title objects instead of an array, as shown in the following screenshot:

The following code uses the rental service and creates a rental with two titles. First, start by adding the using statement so that the types in the service reference are available to you. Use the following code to do this:
using DynamicsAxServices.Chapter4.Rentals.AxCustomServiceRef;
Then, you can add the following code to consume the rental service:
CVRRentalCustomServiceClient client = new CVRRentalCustomServiceClient();

// Create the rental header information
RentalHeader header = new RentalHeader();
header.MemberId = "M00001";
header.RentalId = "R00001";
header.ShopId = "S00002";
header.TransDate = DateTime.UtcNow;

// Create a rental line
RentalLine line = new RentalLine();
line.RentalId = "R00001";
line.Title = "T00001";
line.ReturnDate = DateTime.UtcNow;

// Create a second rental line
RentalLine secondLine = new RentalLine();
secondLine.RentalId = "R00001";
secondLine.Title = "T00003";
secondLine.ReturnDate = DateTime.UtcNow;

// Add it to the lines for the Rental
RentalLines lines = new RentalLines();
lines.LinesList = new List<RentalLine>();
lines.LinesList.Add(line);
lines.LinesList.Add(secondLine);

// Compose the Rental document
Rental Rental = new Rental();
Rental.RentalHeader = header;
Rental.RentalLines = lines;

// Invoke the creation of the Rental
long rentalRecId = client.createRental(null, Rental);

Console.WriteLine(String.Format("Rental created with record id {0}", Convert.ToString(rentalRecId)));
Console.ReadLine();
To explain how this works, we will go through the code one block at a time. The following is the first line of code:
CVRRentalCustomServiceClient client = new CVRRentalCustomServiceClient();
Just as in the previous samples, the first thing to do is to create an instance of the proxy client. When we have instantiated the client, we can start building the document that is required by the service operation that we are going to call. First up is the rental header, shown as follows:
RentalHeader header = new RentalHeader();
header.MemberId = "M00001 ";
header.RentalId = "R00001";
header.ShopId = "S00002";
header.TransDate = DateTime.UtcNow;
The header is created by creating an instance of the RentalHeader contract. Note that this is a data contract that is generated by the SvcUtil tool and corresponds with CVRRentalHeaderDataContract. The name RentalHeader comes from the DataMemberAttribute attribute that we defined in X++. The following block of code creates a rental line:
RentalLine line = new RentalLine();
line.RentalId = "R00001";
line.Title = "T00001";
line.ReturnDate = DateTime.UtcNow;
In this sample, we are adding two of those lines. As with RentalHeader, the same remark applies for the RentalLine type. This is the CVRRentalLineDataContract contract that has been generated at the client side with the name that was specified in the DataMemberAttribute attribute:
RentalLines lines = new RentalLines();
lines.LinesList = new List<RentalLine>();
lines.LinesList.Add(line);
lines.LinesList.Add(secondLine);
Next, the lines that we previously created need to be added to a list data contract. We do this by creating an instance of the CVRRentalLineListDataContract contract. In this contract, we add a list that contains the two lines that we have created:
Rental Rental = new Rental();
Rental.RentalHeader = header;
Rental.RentalLines = lines;
We have created the header, two lines, and a list that contains these lines. At this point, we can glue these together and obtain a rental document object to pass to the service operation. The Rental type matches the CVRRentalDocumentDataContract contract and gets its name from the DataMemberAttribute attribute in X++.
Last but not least, we invoke the createRental service operation and pass the document to it. The result is RecId of the created CVRRentalHeader record.
long rentalRecId = client.createRental(null, Rental);

Console.WriteLine(String.Format("Rental created with record id {0}", Convert.ToString(rentalRecId)));