
In the next sections, we will begin with the simplest architecture and point out the flaws in the design. Gradually, we'll solve them until we have a robust high availability design.
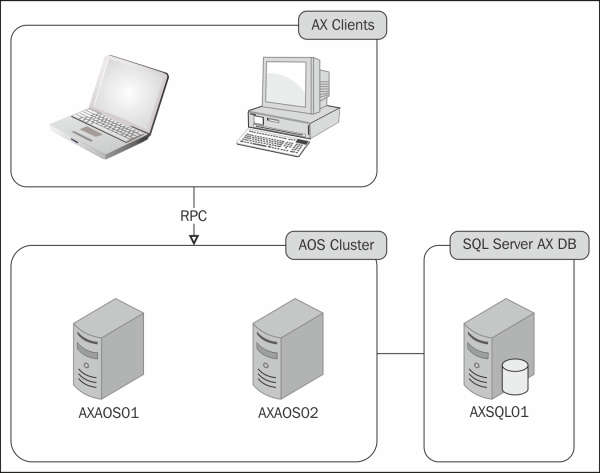
First, let's take a look at the following diagram, which represents the most basic Microsoft Dynamics AX 2012 design. There is a single AOS instance and the AOS connects to a single SQL Server instance, as shown in the following figure:

It goes without saying that this is not a good design when it comes to HA. When either the AOS or SQL Server instance has a failure, the whole environment will be out of order.
We will not discuss the SQL Server issues here because we want to focus on the architecture of the AOS instances. These are the most important when it comes to services.
We should begin by adding redundancy for the AOS instance. We will do this by configuring the application level load balancing.
This type of load balancing is configurable from within Microsoft Dynamics AX and has been around for quite some time. It is intended for load balancing Remote Procedure Call (RPC) communication between the client and AOS.
The following figure shows us that in order to configure application level load balancing, we have to add multiple AOS instances to a cluster. A new AOS instance (AXAOS02) is placed within a cluster with the existing AOS (AXAOS01):
To achieve application level load balancing, perform the following steps:
- Navigate to System administration | Setup | System | Cluster configuration.
- By default, a non-load-balanced AOS cluster should be available. Create a new record by pressing Ctrl + N and add a cluster named
Clustered AOS Instances. This is a cluster that will support the addition of a load balancer later. - Go to the fast tab Map AOS instances to cluster.
- Add the following entries to the grid:
AOS Instance Name
Load balancer
Max Concurrent Sessions
Cluster name
AXAOS01No
2000
Clustered AOS Instances
AXAOS02No
2000
Clustered AOS Instances
- Restart both the AOS instances.
With both the AOS instances now becoming part of the cluster, we need to make a modification in the client configuration. The clients should be configured to connect to both the AOS instances. To do this, add the second AOS instance to your configuration by performing the given steps:
- Open Microsoft Dynamics AX Configuration Utility.
- Go to the Connection tab.
- Click on the Add… button and enter the AOS details.
- Click on the OK button and verify that both the AOS instances are present.
- Click on the Apply button at the bottom of the utility.
The output looks like the following screenshot:
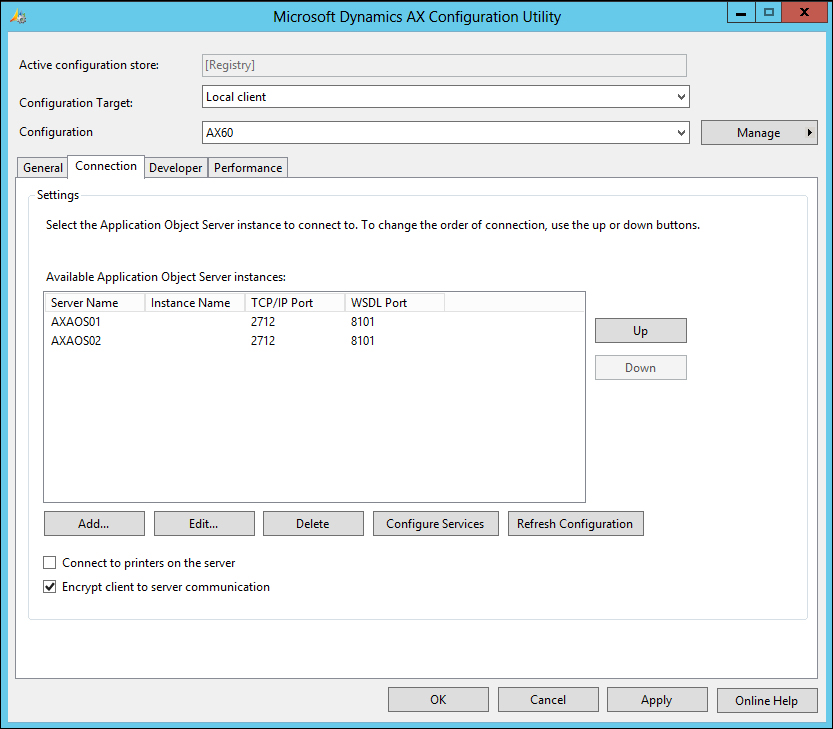
When a client starts using this configuration, the client will send a request to the first AOS in the list. This AOS will respond with a list of active AOS instances in the cluster, sorted by workload. The workload is determined by the number of connected clients divided by the maximum number of allowed clients on that AOS. Then, the client will try to connect to the AOS instances in order, starting with the AOS that has the lowest workload.
This provides us with the following advantages:
Although we have successfully added a second AOS instance to the cluster, there are still some pitfalls to this approach:
- Maintenance: Removing or adding AOS instances to the cluster requires the client configuration to be updated.
- Startup performance: On startup, the client will go through the list of AOS instances sorted by workload. When the first AOS instance does not respond, the next in the list will be tried, and so on. Because there is a timeout before moving to the next instance, this may result in slower startup times for the client. This is especially inconvenient for services because they tend to log in and log off from Microsoft Dynamics AX more frequently.
- Overhead: Each individual AOS acts like a load balancer, which causes overhead for the server.
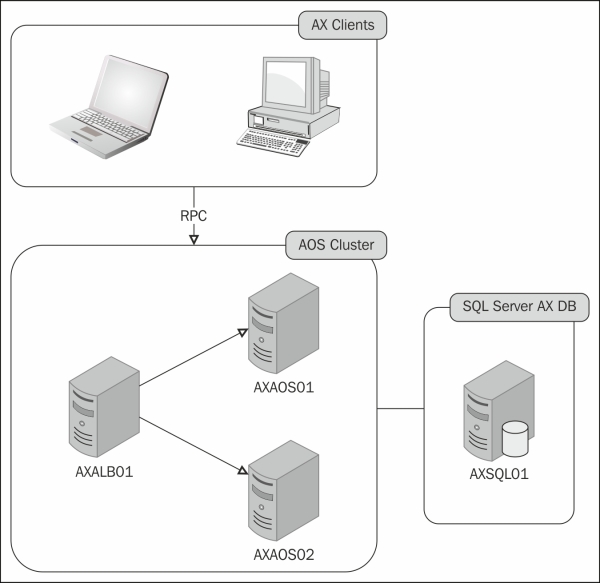
To solve the maintenance and startup performance issues, a dedicated load balancer can be used within the cluster. When using a dedicated load balancer, clients connect to that instance. The dedicated load balancer will then point the clients to one of the AOS instances that are not designated as load balancers.
The process to divide the load is as follows. The load balancer maintains a list of all the available AOS instances. To view this list in the Microsoft Dynamics AX client, perform the following steps:
- Navigate to System administration | Common | Users | Online users.
- Click on the Server Instances tab.
It's important to notice the AOS Status and Number of clients columns here. These fields are used to create a list of AOS instances sorted by workload. When a client makes a request, the load balancer will sort the list by workload in ascending order and use the first AOS to redirect the client.
Using a cluster with a load balancer, AOS has the following benefits:
- Maintenance: You can add new instances to the cluster without having to modify the client configuration
- Performance: Using a dedicated load balancer frees the other AOS instances from their task of performing load balancing themselves
The following diagram shows us a design using a dedicated load balancing AOS instance:
To add a dedicated load balancer, follow the same steps that we used earlier to add AXAOS02 to the cluster. Add the following to the list:
|
AOS Instance Name |
Load balancer |
Max Concurrent Sessions |
Cluster name |
|---|---|---|---|
|
|
Yes |
0 |
Clustered AOS Instances |
As you can see, the Max concurrent sessions parameter is automatically set to 0 for dedicated load balancers. This is because dedicated load balancers do not accept client connections but only serve the purpose of load balancing. It is also important to note that the dedicated load balancer instance will not consume an AOS license.
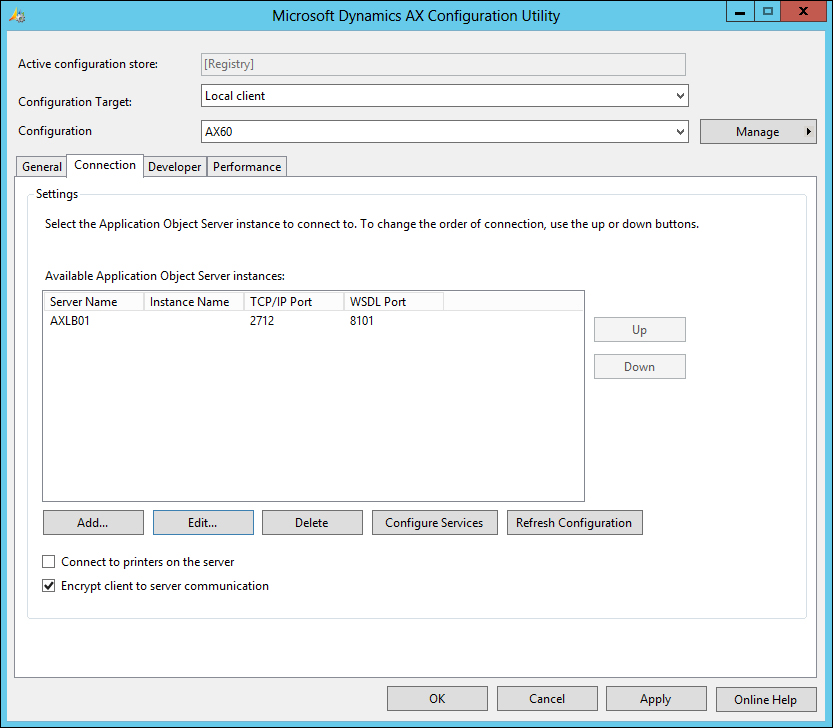
Once the load balancer is in place, we need to make an adjustment to the client configuration so that it connects to the dedicated load balancer.
We have now solved the downsides of not using a dedicated load balancer, but we are not out of the woods yet. We have created two new problems:
- WCF communication: When using dedicated load balancers, the WCF communication between the client and AOS fails. This is because the WCF client connects directly to a dedicated load balancer that does not accept clients and because the mechanism of application level load balancing only applies to RPC communication.
- Single point of failure: Adding only one dedicated load balancer introduces a new single point of failure. If the load balancer fails, none of the other AOS instances will receive clients. Therefore, we should at least add one extra dedicated load balancing AOS instance to the cluster.
To deal with these issues, we will need some kind of load balancing that is external to Microsoft Dynamics AX. This is what we will discuss next.
Microsoft Network Load Balancing (NLB) is a feature that you can add in the server versions of Windows. It also allows you to create load balancing clusters, but here, it is on the network level.
NLB enables you to create a cluster and, among many other things, specify the following key components:
- The full name of the cluster, so you are able to refer to the cluster later on
- A dedicated IP address for the cluster
- A list of hostnames and IP addresses that are taking part in the cluster
Note
For more information on how to install and configure NLB clusters, please refer to the following MSDN page: http://technet.microsoft.com/en-us/library/cc770558.aspx.
To further optimize our design for HA, we will need NLB for the following two reasons:
- Load balancing the Microsoft Dynamics AX dedicated load balancer to avoid a single point of failure
- Load balancing services (WCF communication)
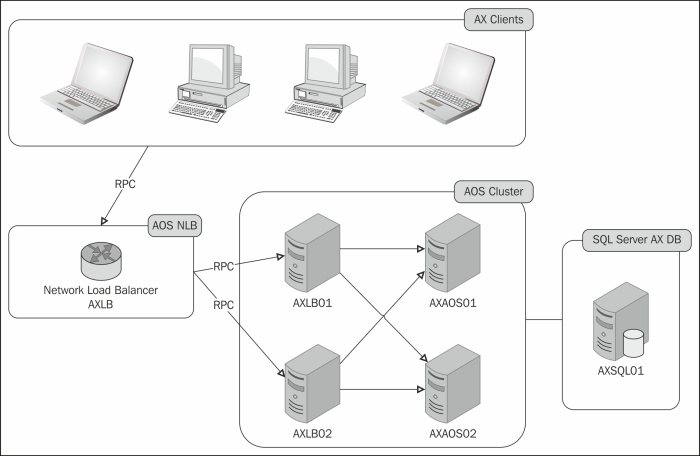
Let's take a look at the design that we have now. One of the remaining problems is that although the AXLB01 AOS balances load over the AOS instances, it is the single point of failure itself now. If the dedicated load balancer fails, none of the clients can connect to the AOS instances anymore.
So, the first thing to do here is to add at least one extra dedicated load balancer to the cluster. By doing so, you will avoid the system going down when the dedicated load balancer is unavailable. Add the following load balancer to the cluster:
|
AOS Instance Name |
Load balancer |
Max Concurrent Sessions |
Cluster name |
|---|---|---|---|
|
|
Yes |
0 |
Clustered AOS Instances |
Now that both the dedicated load balancers are in place, two options are available to enable clients to connect to the dedicated load balancers:
- Modify client configuration: We could add
AXLB02to the list of AOS instances within the Connection tab of the Microsoft Dynamics AX Configuration Utility. - Use an NLB cluster on the network level: The better option is to configure an NLB cluster. To do that, add a cluster named
AXLBin the NLB manager and give the cluster its own dedicated IP address. Then, you can also add two hosts within the cluster by using the names and ports of the Microsoft Dynamics AX load balancers.
We will go with the option of creating an NLB cluster. We will assume that an NLB cluster has been configured as follows:
|
Cluster Name |
Cluster IP |
Host Name |
Host IP / Port |
|---|---|---|---|
|
|
192.168.2.100 |
|
192.168.2.101 / TCP 2712 |
|
|
192.168.2.102 / TCP 2712 |
The last thing that we need to do is point the clients to the network load balancer instead of the dedicated load balancer.

By doing so, all client requests will be made using the AXLB name. The NLB cluster continuously monitors the hosts within the cluster to see if they still respond on their IP address and port. When a client tries to connect to an AOS, the network load balancer chooses a suitable host and forwards the client's request. In our case, this means that AXLB01 or AXLB02 will receive the request.
Once either one of the dedicated load balancers receive the client's request, they will fall back to the application level load balancing to decide which of the client AOS instances will handle the client session.
At this point, our design should look like the following diagram:
Since the release of Microsoft Dynamics AX 2012, every AOS instance now has two extra ports that are used for WCF services: A WSDL port (8101) and a service endpoint port (8201).
We have gone through several pitfalls so far, but there is actually one pitfall still remaining in our current design. All of the clients connect to AXLB, which is fine for RPC. Requests will be forwarded to one of the dedicated load balancers from which point the application level load balancing takes over to redirect them to the client AOS instance. This, however, does not apply to WCF communication.
When the WCF service clients communicate with the AOS, the request is also made to the AXLB cluster, and it will be rerouted to either AXLB01 or AXLB02. The problem here is that the application level load balancing does not support the load balancing of WCF communication, which causes the service client to try to log on to the dedicated load balancers themselves. When refreshing the service in the Microsoft Dynamics AX Configuration Utility, for example, this will result in the following error message:
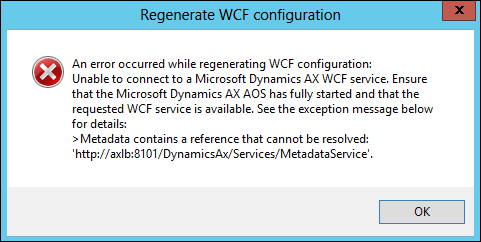
The Microsoft Dynamics AX Configuration Utility stores the WCF configuration within the AXC file. If you open it, you will see that the endpoints contain the name of the NLB cluster that points to the dedicated load balancers. This needs to be prevented so that the client does all the WCF communication with the AOS instances directly. To do this, we need to make one last addition to our design, which is shown in the following diagram:
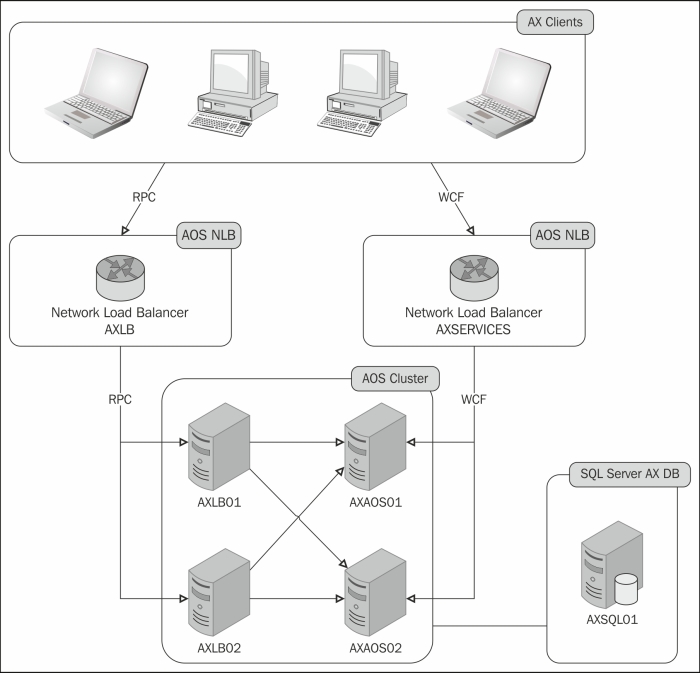
We have added one NLB cluster named AXSERVICES and configured it, as shown in the following table:
|
Cluster Name |
Cluster IP |
Host Name |
Host IP / Port |
|---|---|---|---|
|
|
192.168.2.200 |
|
192.168.2.201 / NetTcp 8201 |
|
|
192.168.2.202 / NetTcp 8201 |
This NLB cluster serves two purposes:
- It routes the service clients directly to the AOS instances (
AXAOS01andAXAOS02) instead of routing them to the dedicated load balancers - It allows the service communication to be load balanced over the AOS instances
Now we just need a way to make the client connect to AXLB for RPC communication and to AXSERVICES for WCF communication. Unfortunately, only one name can be specified when adding AOS instances in the Microsoft Dynamics AX Configuration
Utility. To work our way around this, we need to edit the configuration in the registry by performing the following steps:
- Open up the registry by opening RegEdit.
- Locate the following key for both HKEY_CURRENT_USER and HKEY_LOCAL_MACHINE:
SoftwareMicrosoftDynamics6.0Configuration<Configuration name>. - Add two new string values:
Name
Host IP / Port
WcflbservernameAXSERVICESWcflbwsdlport8101
- Start the Microsoft AX Configuration Utility. If the utility is already open, close and reopen it.
- On the Connection tab, click on the Refresh Configuration button to refresh the WCF configuration.
Now you should not get the error message anymore. If you click on the Configure button, the configuration opens and you see that the server name within the endpoint addresses is now replaced with the AXSERVICES NLB instead of AXLB.
<endpoint address="net.tcp://AXSERVICES:8201/DynamicsAx/Services/MetadataService" binding="netTcpBinding" bindingConfiguration="MetadataServiceEndpoint" contract="Microsoft.Dynamics.AX.Framework.Services.Metadata.Service.IAxMetadataService" name="MetadataServiceEndpoint">
  <identity>
    <userPrincipalName value="[email protected]" />
  </identity>
</endpoint>