
These days, business relies on the Internet as much as cellphones and fax machines. Although Project isn’t a web browser or email program, it doesn’t leave you stranded offline. Far from it. Just as hyperlinks help you navigate websites, you can access web pages by following hyperlinks in Project files. You can even access other files the same way.
Like any self-respecting Microsoft program, Project also has a strong working relationship with Outlook. For example, you can share tasks and contacts between Project and Outlook (so you can take advantage of Outlook’s reminder feature, for example). You can even send email messages and attachments right from Project—ideal for things like circulating reports among project stakeholders.
Managing projects means keeping track of information stored in different places and different types of files. As a project manager, your nose is usually buried in a Project file, so why not access the information you need directly from Project? For example, you can add hyperlinks to tasks to access the corresponding work package Word documents, an Excel spreadsheet with financial figures, or the web page with your customer’s mission statement. Project hyperlinks can also jump to tasks or resources within the Project file.
Hyperlinks can connect to any kind of file—a Word document, an Excel spreadsheet, a web page, and so on. Although the destination file can reside anywhere (anywhere that’s accessible to the people who need it), the file must remain in the same place. If the file moves to another location, the hyperlink can’t find the file and becomes what’s known as a broken link.
To create a hyperlink in a Project file, do the following:
Display the view that shows the task, resource, or assignment to which you want to add a hyperlink.
You can insert hyperlinks in any view.
Right-click the task, resource, or assignment, and then choose Hyperlink. (Or select the task, resource, or assignment, and then press Ctrl+K.)
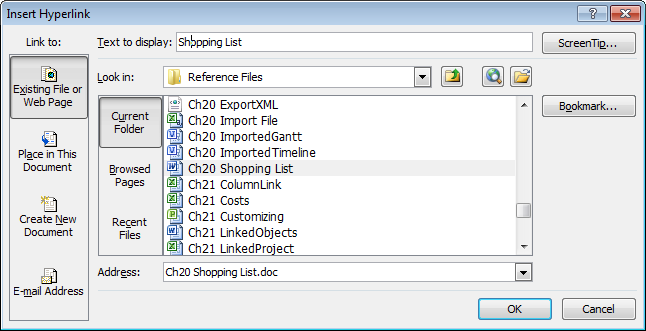
In the “Text to display” box, type a brief description of what you’re hyperlinking to.
The “Text to display” box is initially empty. If you type a description, as shown in Figure 22-1, Project leaves it in place when you select a destination file.
Figure 22-1. If you don’t type a description in the “Text to display” box, Project fills in the path and file name of the destination file or the URL of a Web page. When you position the mouse over a hyperlink indicator, a pop-up box containing the description appears.
The Insert Hyperlink dialog box also has a ScreenTip button. When you position the pointer over a hyperlink indicator without clicking, a ScreenTip appears immediately below the description. If you type a meaningful description in the “Text to display” box, you may not need a ScreenTip, but it’s handy if you want to see more information about a hyperlink before you click it.
In the “Link to” section, select the type of destination to which you want to hyperlink, like “Existing File or Web Page”.
The left side of the Insert Hyperlink dialog box has two navigation bars for choosing what you want to hyperlink to: “Link to” and “Look in”. In the “Link to” navigation bar, the aptly named “Existing File or Web Page” and “Place in This Document” are the most popular types of hyperlinks. (The next section describes the steps for linking to a location in your Project file.)
Although you can create a new document and hyperlink to it at the same time, creating the document outside Project is more expedient. Outside Project, you can create the document based on a template. Moreover, you keep your multitasking to a minimum. You can also create a hyperlink to an email address, so you can easily email the person assigned to a task.
In the “Look in” section, navigate to the folder that contains the destination file, and then select the file name.
The “Look in” drop-down list includes all the locations you can reach through the My Computer window: drives on your computer, network drives, and removable drives. To look for the file you want, click the “Browse for File” button (which looks like an open file folder) to the right of the “Look in” box. The “Link to File” dialog box opens.
The “Look in” area’s navigation bar has three choices for finding files or web pages. Current Folder shows the files in the folder you’ve selected. To hyperlink to files or web pages that you’ve used recently, select Browsed Pages or Recent Files.
The “Browse the Web” button to the left of the “Browse for File” button opens an Internet Explorer browser window. Surf to the web page you want. When you click the Address box in the Insert Hyperlink dialog box, Project copies the URL into the box.
Click OK.
A hyperlink indicator (which looks like a globe with links of chain) appears in the Indicators column. Double-click the indicator to open the hyperlinked file with its associated program.
If the Indicators column isn’t visible, then you can’t tell which elements have hyperlinks. However, if you know a hyperlink exists, you can follow it by right-clicking the task, resource, or assignment, and then, from the shortcut menu, choosing Hyperlink→Open. To insert the Indicators column in the table, right-click the table heading, and then choose Insert Column. In the drop-down menu, choose Indicators, and then click OK.
You can edit or remove hyperlinks. For example, if a destination file moves to a new location or a web page address changes, edit the hyperlink to point to the new location:
Modify a hyperlink. Right-click the task, resource, or assignment, and then, on the shortcut menu, choose Hyperlink→Edit Hyperlink. The Edit Hyperlink dialog box has all the same components as the Insert Hyperlink dialog box. Change the values you want, and then click OK to update the link.
Remove a hyperlink. Right-click the task, resource, or assignment, and then, on the shortcut menu, choose Clear Hyperlinks. Project deletes the hyperlink, and the hyperlink indicator disappears.
Hyperlinking from one place in your Project file to another is a great way to find related tasks or resources. A hyperlink can take you from a design task to the corresponding development task or the resource assigned to the task. Although you can add hyperlinks to tasks, resources, or assignments, hyperlinks can point only to tasks or resources in your Project file. Moreover, you must know the task ID or resource ID that you want to link to before you open the Insert Hyperlink dialog box.
To create a hyperlink to another location in the same Project file, do the following:
Right-click the task, resource, or assignment to which you want to add a hyperlink, and then choose Hyperlink.
The Insert Hyperlink dialog box opens.
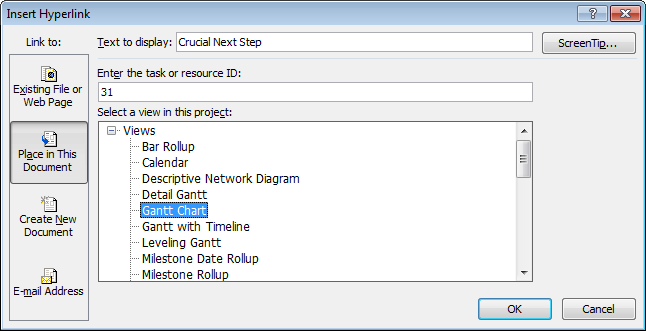
In the “Text to display” box, type a brief description of the hyperlink destination.
Project keeps your description when you select a destination task or resource. If you don’t fill in the “Text to display” box, then Project fills it in with the view name and ID that you select, which isn’t particularly informative—for instance, “Gantt Chart!20 for task ID 20 in the Gantt Chart view.”
In the “Link to” section, select “Place in This Document”.
Project replaces the “Look in” area with a box for task or resource ID and a list of views to select, as shown in Figure 22-2.
In the “Enter the task or resource ID” box, type the number for the task or ID (the number in the first column of the task or resource table).
Project determines whether the number is a task ID or resource ID based on the view you select. ID represents a task ID when you select a task-oriented view like the Gantt Chart; selecting the Resource Sheet changes the box to a resource ID.
In the “Select a view in this project” box, select the view you want Project to display when you follow the hyperlink.
If you haven’t filled in the “Text to display” box, then Project inserts the view name in the box in front of the ID.
Click OK.
A hyperlink indicator appears in the Indicators column. Clicking the hyperlink indicator switches to the hyperlinked view and opens the Task Information dialog box (or Resource Information dialog box) for the hyperlinked task or resource.
If you right-click the task, resource, or assignment and then choose Hyperlink→Open, Project opens the hyperlinked view, and then selects the first cell in the row for the hyperlinked task or resource.
Outlook is Microsoft’s email workhorse, but email is only one of the ways that Outlook and Project work as a team. When you’re in Project, you can email Project files without jumping over to Outlook to do so. But because both programs can store lists of tasks and names, you can export Project tasks to Outlook and vice versa. You can even use your Outlook address book to build your resource list in Project. This section explains how to use these features.
If the old saying “out of sight, out of mind” is all too true in your case, you can keep important Project tasks in sight by adding them (one at a time) to your Outlook Task List. By adding a reminder to these Outlook tasks, you can really stay on top of things. All you need is copy and paste. Here are the steps:
In a task-oriented view like the Gantt Chart, select the Task Name cell for the task you want to copy to Outlook and press Ctrl+C. (Or right-click the cell and choose Copy Cell.)
You can select only one task at a time. Project copies the task name to the Clipboard.
In Outlook, display the Tasks list.
In the navigation bar, click Tasks.
Right-click the Tasks list and choose New. (Or choose Home→New Task.)
The Task entry window appears with the heading Untitled–Task.
Click the Subject box, and then press Ctrl+V.
In the Subject box, the name of the task appears. If you want Outlook to remind you about the task due date, turn on the Reminder checkbox and then choose the date and time when you want to be reminded.
On the ribbon, click Save & Close.
Repeat steps 1 through 4 for other tasks you want to add to Outlook.
Every once in a while, you quickly create tasks in Outlook that you later realize belong in one of your projects. You can import these tasks into a Project file as a head start. When you import tasks from Outlook, you just create tasks with the task names from Outlook and any notes that you added. Although these imported tasks come in with the standard duration of 1 day? (the question mark indicates estimated duration), they have no task dependencies, resources, or dates. To import Outlook tasks, follow these steps:
Open the Project file, display a task-oriented view like the Gantt Chart, and then choose Task→Insert→Task→Import Outlook Tasks.
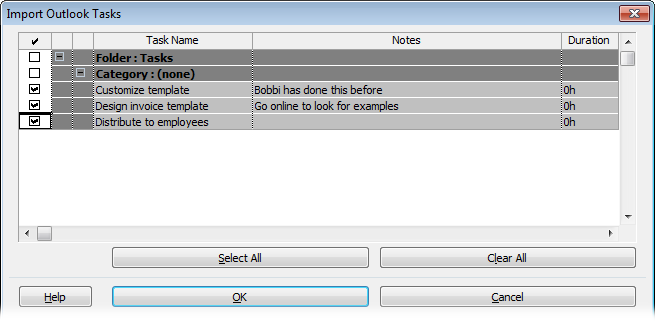
The Import Outlook Tasks dialog box opens. Outlook doesn’t have to be running, but you must have at least one incomplete task in your Outlook Task list. If you have no tasks in Outlook or they’re all complete, a message appears telling you there are no tasks to import.
Select the checkbox for each task you want to import, as shown in Figure 22-3.
Any notes you typed in the Notes box in Outlook appear in the Notes cell in the table.
Click OK.
The tasks appear at the end of the list of tasks in your Project file.
When it comes to copying and pasting, Project 2010 has gotten a lot chummier with its Office 2010 counterparts. If you copy an indented list of tasks from an Outlook email or a Word document, Project 2010 is smart enough to turn them into summary tasks and subtasks in your Project Task list. Figure 22-4 shows the tasks in Outlook and the same tasks after pasting them into Project.
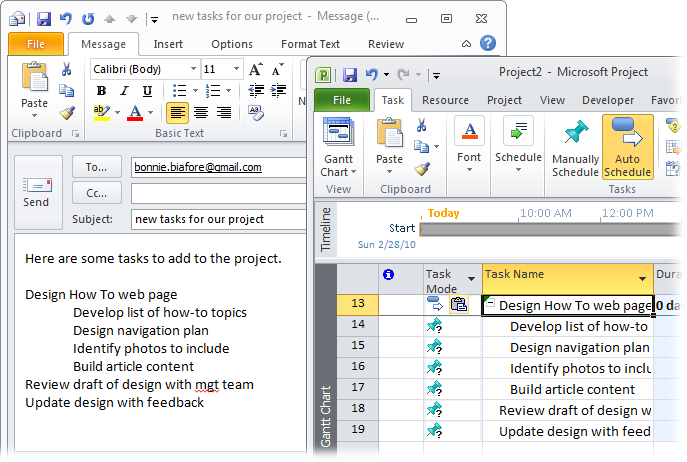
Figure 22-4. In an Outlook email, select the tasks you want to copy to Project and press Ctrl+C. Switch to Project and select the first blank Task Name cell where you want to copy the tasks. Press Ctrl+V. When you paste the tasks into Project, it uses indents in the email to set the outline levels for the tasks.
If you use Outlook at work, you probably already have information about team members in your Outlook address book or Contacts folder. Rather than retyping all this information in Project, you can import resource names from Outlook into Project. Here are the steps:
In Project, open the file into which you want to import resources.
If you use a resource pool (Sharing Resources Among Projects), import the resources into the pool rather than into individual projects. Similarly, if you use Project Server, don’t import resources directly into Project but into the enterprise resource pool instead.
Choose Task→View→Resource Sheet.
Select the row where you want to insert the new resources.
Choose Resource→Insert→Add Resources→Address Book.
The Select Resources dialog box appears.
Select the names of people you want to add to the Resource Sheet.
You can select several resources at a time by Shift-clicking the first name in the group and the last name in the group. Select nonadjacent names by Ctrl-clicking each name.
Click Add.
The names appear in the Add box.
Click OK.
Project adds new rows in the Resource Sheet for the selected resources.
You’ve probably emailed thousands of messages with attachments, so the concept of attaching a Project file to an email is nothing new. However, with Project, you can choose to send the whole project or only a few tasks and resources. If your audience doesn’t have Project installed on their computers, you can create a picture of the Project information and mail that instead. Project can send files using any MAPI-compliant (Messaging Application Programming Interface) email program.
Tip
If your organization uses SharePoint, that’s a far easier way to share Project information. See Publishing Project tasks to SharePoint to learn how.
When you need approval for a schedule, the routing mechanism in Outlook can send the file to reviewers in sequence, so you can get their comments and approvals. While sending attachments tends to choke email servers with multiple copies of the same file, publishing a Project file to a Microsoft Exchange folder or to a Microsoft SharePoint site (Updating the Tasks list) lets everyone look at a single copy (which requires that you use Microsoft Exchange or Microsoft SharePoint).
Sending Project files via email is easy, whether you send the message from your email program or directly from Project. In your email program, simply create a new message, and then, in Outlook 2010, choose Insert→Include→Attach File (or your email program’s equivalent command) to attach the Project file. If you tend to forget attachments, like most people do, you can create the email message in Project, which automatically attaches the file.
Here are the steps for sending a Project file from within Project:
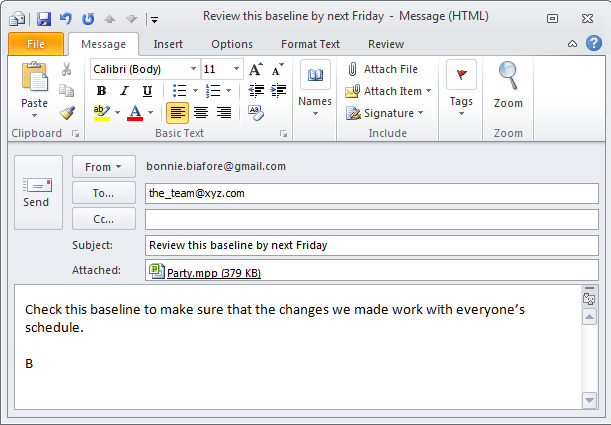
In Project, open the Project file you want to send, and then choose File→Share→“Send as Attachment”.
Your email program starts (if it isn’t running already) and opens a new email message form with the current Project file already attached. The Subject line contains the filename.
Click the To: box, and then, in the Select Names dialog box, select the names of the recipients.
You can also type email addresses directly in the To: box.
Edit the Subject box to tell your recipients why you’re emailing the Project file.
In the message area, tell the recipients what you want them to do with the Project file, as shown in Figure 22-5.
Click Send or the equivalent command.
The recipients receive an email message with the Project file attached.
When several people are in line to contribute to, review, or approve a Project file, routing an email with the file attached to each recipient is easier than trying to remember whom to email next. You can route the drawing to one recipient after another or blast the email to all recipients at once. When the recipients are done, the file comes back to you.
Routing a Project file to several people is similar to sending one to just one recipient. However, the Routing Recipient command is not on the ribbon out of the box, so you have to add it to a custom group that you create (Creating Custom Groups). Then, with the command in a group on the ribbon, do the following:
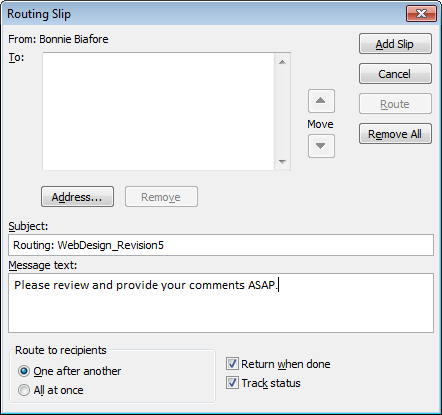
Open the Project file you want to route, and then choose the ribbon tab to which you added the custom group and choose Routing Recipient.
Click Address.
Your email program’s address book opens.
Select the email addresses for the recipients, click To, and then click OK.
The email program adds the names to the To: box.
Modify the Subject line to tell the recipients why you’re sending the file. In the “Message text” box, type a message.
Remember to begin your email message with what you want people to do. You can add less important information after the opening paragraph.
Select either the “One after another” or “All at once” option, as shown in Figure 22-6.
The Routing Slip automatically selects “One after another”. Routing a file sequentially takes a lot of time, but each person sees the comments from the person before. Then, each recipient can add his two cents to the routing message. Although the email message shows up in recipients’ inboxes, routing the message to the next person on the list occurs in Project. Choose the Routing Recipient command again to pass on the message and its attached file.
On the other hand, to see what people think without being influenced by others, select the “All at once” option. With this option, recipients email you individually when they’re done.
To receive the routing email after every recipient has seen it, turn on the “Return when done” checkbox.
If you select the “One after another” option, then the “Track status” checkbox automatically turns on and tells your email program to notify you as the message makes its way through the list.
Click Route.
Project sends an email with the file attached to your routing recipients.
If your organization uses Microsoft Exchange, you can publish a Project file to an Exchange folder instead of sending the same file to multiple recipients. You must first add the Send To Exchange Folder command to a custom group on the ribbon (Creating Custom Groups). With the Send To Exchange Folder command on the ribbon, publish a file to a Microsoft Exchange folder by following these steps:
In Project, open the file you want to publish to an Exchange folder, choose the tab that contains the custom group, and then choose Exchange Folder.
The “Send to Exchange Folder” dialog box appears and lists the available folders.
Select the folder, and then click OK.
Project saves the file in the Exchange folder. You can also create a new folder by clicking New Folder, typing a name, and then pressing Enter.