
Learning how to manage projects while learning to use Project at the same time is too much for most mortals. So this chapter lets you take Project out for a test drive, with a simple map to guide you on your trip. Because Project 2010 has switched from the menu bar to the ribbon, the journey begins with an exploration of Project’s ribbon tabs. Then you’ll wander through the panes that appear in the Project window. At that point, you’re ready to start working on a project.
If this were a real project, you’d start by defining project objectives, listing assumptions, choosing strategies, identifying risks, building project teams, carving out budgets, and so on, as described in the first two chapters. This chapter uses a fictitious project, called the “It’s About Time Graduation Party” for the 40-year-old college graduate in your family, to take you through Project’s main features and give you the satisfaction of creating a working schedule.
The Project ribbon is like a cyber-border collie, herding related features onto tabs to make them easier to find. As you plan and manage a project, you shift your focus from tasks to the resources who work on them to the big picture of the entire project, so the Task tab, Resource tab, and Project tab make perfect sense. As it turns out, a few other tabs come in handy for working with your Project files and looking at your project in different ways. This section steps through the six tabs that appear when you launch Project 2010 for the first time. (See Creating Custom Tabs to learn how to add other tabs to the ribbon or to create your own custom tabs.)
The File menu from earlier Project versions is now the File tab on the ribbon. You can call it the File tab, but Microsoft refers to the page that the File tab opens as the Backstage view. When you click a command on the left side of the Backstage view, it takes over the entire Project window, as you can see in Figure 3-1. For example, when you click New, the Backstage view presents a plethora of ways to create a new file (Creating a New Project File).
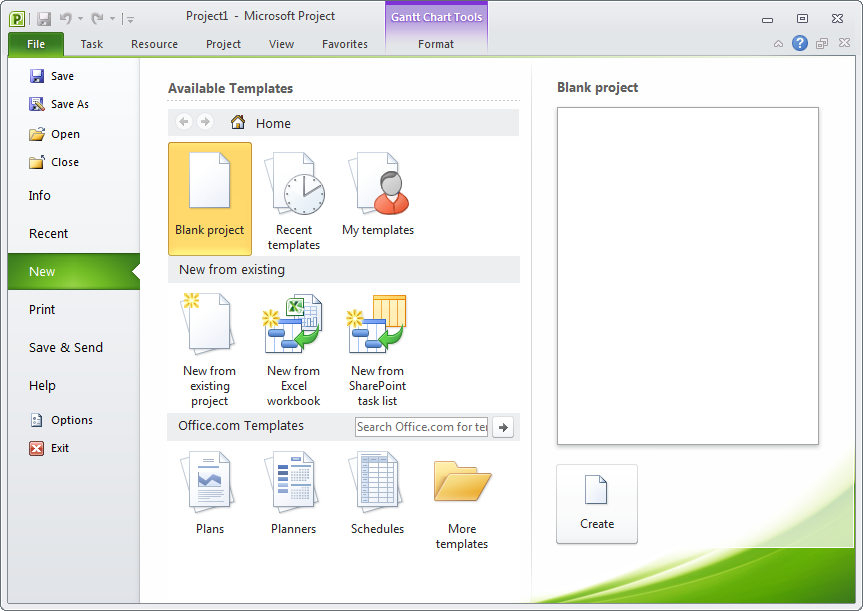
Figure 3-1. The ribbon tabs appear near the top of the Project window. Select the File tab and the Backstage view takes over. Select any other tab and you see the ribbon across the top of the window while a Project view fills in the rest. If you want to see only the ribbon tabs until you need a command, right-click the ribbon and then choose “Minimize the Ribbon”. The tabs remain visible at all times. When you select a tab, the ribbon reappears until you choose a command.
A few commands in the Backstage view need no explanation: Save, Save As, Open, Close, and Exit. Their familiar icons tell you they do what they’ve always done. When you click Save, Project saves the active Project file. Click Save As, and the Save As dialog box appears. You get the idea.
The other entries on the Backstage menu do more. You’ll learn about them in other chapters of the book, but here’s a quick intro:
Info. Information about the active Project file, such as its start and finish date, appears on the right side of this page. Click Project Information and choose Project Statistics to see scheduled, baseline, and actual values. This page also includes an Organizer button, so you can copy project elements between files (Sharing Custom Elements). If you use Project Server, you can access Project Server accounts from this page.
Recent. The Recent page is a list of all the projects you’ve opened recently. If you open a lot of Project files—say, as you write a book about Project—this is the quickest way to reopen a file. On the other hand, if you work on one or two projects for months at a time, you can pin a project to the top of the Recent Projects list by clicking the pushpin icon to the right of the filename.
Tip
For even easier access, you can display one or more projects on the Backstage menu itself. At the bottom of the Recent Projects list, turn on the “Quickly access this number of Recent Projects” checkbox and type the number you want. Project displays that number of recent projects above the Info command, starting with any projects pinned to the Recent Projects list. Click the filename to open the Project file.
New. This page offers several ways to create a new file (Creating a Blank Project File), including starting from scratch with a blank project, using a template, or creating a file from an existing project, an Excel workbook, or a SharePoint task list.
Print. The Print page looks like a spiffed-up version of the familiar Print dialog box. This one page lets you select a printer, specify print settings like paper orientation, and choose page setup settings like margins (Printing Views to Report Project Information). If you rarely touch any of those settings, you can simply choose the number of copies and click the big Print button at the top of the page. If you don’t have one of those widescreen monitors, the Print page leaves little room for a preview of what you’re printing (Generating Text-Based Reports) and you can’t shrink the print options area. See Generating Text-Based Reports to learn how to work around this limitation.
Save & Send. As its name implies, this page offers features for saving and sending Project files. The Save & Send section helps you send your Project file as an email attachment (Sending Project files via email), synchronize your file with a SharePoint Task List (Sharing Projects with SharePoint), or save the Project file to a SharePoint site (Updating the Tasks list). If you subscribe to Project Online (an online service that works with Project Server and SharePoint), you can also share your file to Project Online.
Help. It’s no surprise that the first command on this page opens Project’s Help window, but you can also find other help resources, contact information for Microsoft, and other links.
Options. Choose Options to open the Project Options dialog box and specify options to tell the program how you’d like it to behave.
Tip
The Quick Access toolbar sits above the File and Task tabs and looks like one of the toolbars from earlier versions of Project. Out of the box, it has icons for all-time favorite commands: Save, Undo, and Redo. But you can customize the Quick Access toolbar with your favorites. (See Removing Custom Ribbon Elements to learn how.)
Project management’s focus on projects, tasks, and resources is a natural fit for tabs on the ribbon. This section introduces you to the rest of the tabs on the Project ribbon. You’ll learn about each one in detail throughout this book.
The Task tab is home to commands for creating tasks (subtasks, summary tasks, and milestones), rearranging them in the outline, and linking tasks to one another. The first section on this tab lets you choose popular task-oriented views like the Gantt Chart. You can also use this tab to format tasks, copy and paste them, or look at their details. This tab also has the incredibly useful Scroll to Task command, which scrolls the view timescale (The Project Window) until the selected task’s task bar is visible. During project execution, you can use commands on this tab to move tasks to new dates, update task progress, or investigate scheduling issues.
The Resource tab has a section for choosing popular resource-oriented views, like the Resource Sheet or the Team Planner (Quickly Assigning Resources with Team Planner). Whether you’re adding resources to a project, assigning them to tasks, or leveling them to remove overallocations, this is the tab you want. This tab also contains commands for setting up, refreshing, and updating a resource pool (Sharing Resources Among Projects). If you use Project Server, this tab has the commands for accessing the Enterprise Resource Pool and substituting resources.
The Project tab is a catch-all for project-oriented commands. It contains commands for viewing project information, defining work calendars, setting project baselines, inserting subprojects, creating links between projects, running reports, and so on. This is also the tab to select if you want to work on custom fields or your WBS code. In addition, you can also find commands to recalculate your project schedule, update project-wide status, or compare two Project files.
The View tab starts with buttons for the most popular task and resource views, but you can also access the More Views dialog box to choose any view you want. This tab has commands for controlling what information you see in a view: how many levels in the outline; the table applied; highlighting; how the list is filtered, grouped, or sorted; and the time periods used in the timescale. You can turn the Timeline view and the Details pane on and off and choose the view that appears in the Details pane (Creating a Project Schedule). You can also switch between windows and arrange windows from this tab. The only command that doesn’t seem to fit is in the last section: You choose Macros to run macros.
The Format tab is a chameleon that offers different formatting commands depending on the view that’s active. For example, when the Gantt Chart view is applied, the Format tab lets you insert columns in the table, format task bars and text styles, display elements like summary tasks or critical tasks, and so on. When you switch to the Timeline view, the Format tab lets you add tasks to the timeline and format them. For the Resource Usage view, the Format tab has checkboxes for which fields you want to see in the time-phased data grid.
Below the ribbon, most of the Project window is taken up with a view like the Gantt Chart, the Timeline, or the Resource Sheet. Some views, like the Resource Sheet, are like a giant table, but most views have a left and right side. For views like the Gantt Chart and Task Usage, the left side of the view is a table with field values in the columns, as shown in Figure 3-2. The rows show tasks, resources, or assignments. The right side is called the timescale and shows values by time period. In a Gantt Chart view, task bars in the timescale show when tasks begin and end. The Task Usage view uses a time-phased table instead, in which the columns represent time periods.
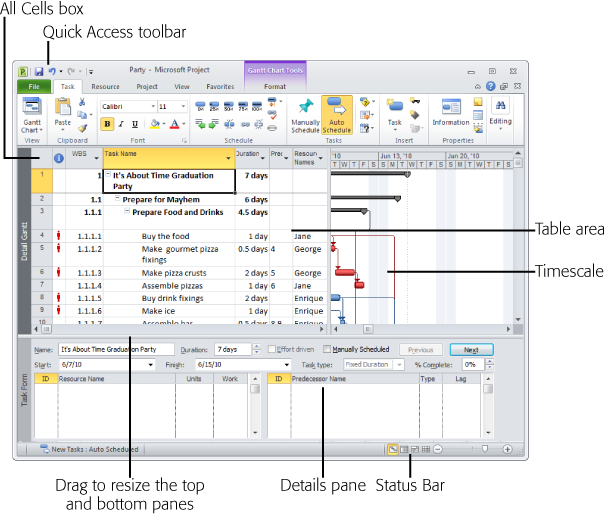
Figure 3-2. The Quick Access toolbar is always visible, so it’s a handy place for your favorite commands. The Status Bar at bottom-right shows information about your project, like the task mode (page 116) you’ve selected. On the right side of the Status Bar, you can click icons for Project views or drag the Zoom Slider to change the timescale in the current view.
If you look closely at Figure 3-2, you’ll notice another pane at the bottom of the window, which is called the Details pane. In Project, combination views actually contain two single-pane views: one on top and one in the Details pane. For example, the Task Entry view displays the Tracking Gantt view on top and the Task Form on the bottom. The box on One Pane or Two? explains how to apply views and switch between one and two panes.
In many cases, the view is fine, but you want to see a different table. You can quickly apply another table using the All Cells box (to the left of the table’s column headings and immediately above the first ID cell). If you click the All Cells box, Project selects all the cells in the table (hence the cell’s name). However, if you right-click it, you can choose a table from the shortcut menu that appears. If the table you want isn’t on the menu, choose More Tables. Then, in the More Tables dialog box, double-click the table.
Building a project schedule might seem as intimidating and interminable as constructing the Great Wall of China. But if you build your schedule stone by stone (or task by task), you’ll be done before you know it.
Tip
If you’re already a Project maven, you may have a favorite approach to building a schedule. In that case, consider following this test drive anyway—you may just learn some new Project tips and tricks.
For just about any kind of project, you can start constructing a schedule by asking yourself the following questions:
What work must be done to achieve the project’s objectives?
What tangible results must your project produce—and when?
How does each task depend upon the completion of other tasks?
Who’s going to do the work?
How long do they have to get it done?
The first two chapters of this book talk about how to ask and answer these questions as you build a plan for your project. You’ll use the answers to these questions as you wend your way through the process of creating a schedule in Project.
The foundation for any schedule is the work that will achieve the project’s objectives and deliver the desired results. Before you can do anything else, you need a list of the tasks to perform, from beginning the project to sweeping up the confetti at the end. This section describes how to build a list of individual tasks.
Note
If you’re not ready to jump in and create a schedule on your own, you can download the sample project (GraduationParty_CompleteProject.mpp) from www.missingmanuals.com/cds. As you follow along in the chapter, you can add new tasks to this schedule and modify its tasks and resources.
In this test drive, you’ll create the steps for part of the project schedule—preparing the food and drinks for the party. For extra practice, you can try filling out the rest of the schedule on your own.
Start Project by choosing Start→All Programs→Microsoft Office→Microsoft Project 2010.
Project opens a blank project, called something like Project1.
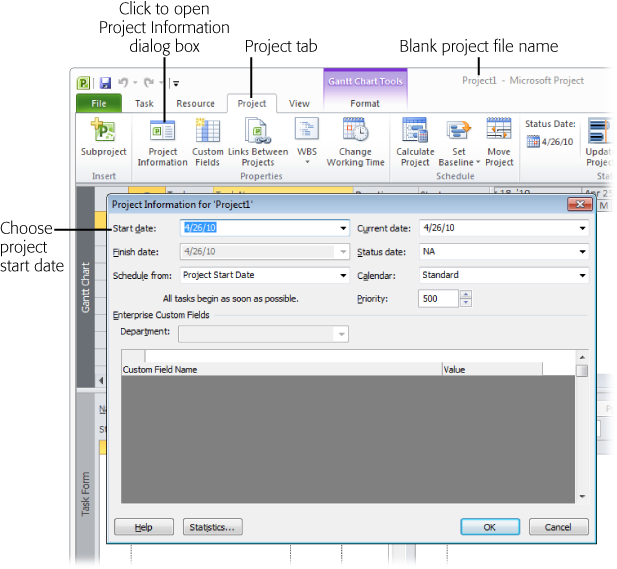
To change your project’s start date, choose Project→Properties→Project Information.
Remember, the shorthand in the instructions means you select the Project tab, go to the Properties section on that tab, and then click the Project Information button.
In the Start Date box, select the starting date, and then click OK to close the dialog box.
Chances are your project doesn’t start the same day you build your project schedule, so change the project’s start date to when you expect work to begin. Setting an accurate start date is important, since Project schedules new tasks to start as soon as possible—initially, the project start date.
The Project Information dialog box, shown in Figure 3-3 also provides opportunities for specifying your project calendar, working time, and so on. For this test project, as for many other projects, the settings are fine as is. (You’ll learn all about the Project Information dialog box in Chapter 6.)
Figure 3-3. As you can see, you don’t step through the ribbon tabs in sequence. When Project launches, it opens to the Task tab. If you’re ready to start a new project, you select the Project tab so you can specify the project start date before you create any tasks. However, if you want to open an existing project, choose the File tab.
Add your project’s first task: In the first row of the Task Name column, type Buy the food and then press Enter.
For the moment, the task name is the only cell you must fill in. Because Project initially creates new tasks as manually scheduled, it leaves the duration for your first task blank. The icon in the Task Mode cell (a pushpin with a question mark) indicates that more information is needed. (You’ll fill in that information later.)
Repeat step 4 to add the following tasks:
Make gourmet pizza fixings
Make pizza crusts
Assemble pizzas
Figure 3-4 shows what the task list looks like when you’re done.
Figure 3-4. Project leaves the duration blank because the tasks are created in manually scheduled mode. The pushpin with a question mark icon in the Task Mode cell tells you that information is missing. When you’re ready to commit to how long a task should take, simply type the duration in the Duration cell (as described on page 74).
Tip
In Project 2010, squiggly red lines indicate scheduling issues, as discussed on Task Inspector: Help with Schedule Problems, not spelling errors.
As your task list grows, so does the urge to group tasks. People have a hard time focusing on more than half a dozen things at a time, so gathering related tasks into groups makes the project schedule easier to grasp. Chapter 4 provides a detailed description of how to break work down and group it into related chunks. The next step shows how to group a few related tasks under one summary task.
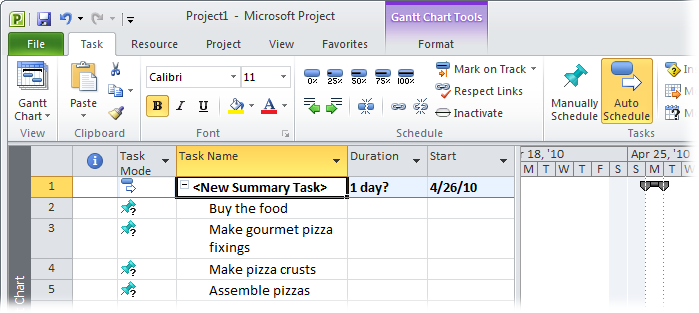
Drag over the task rows to select all the tasks. Then choose Task→Insert→Insert Summary Task.
Project inserts a new summary task above the selected tasks, named <New Summary Task>. The program indents the selected tasks to make them subtasks, as shown in Figure 3-5. You can see that the summary task is set to Auto Scheduled, which means Project calculates the values for the task. For example, the program sets the Duration to “1 day?” The question mark indicates that the duration is an estimate. It also sets the start date to the project start date.
Type the name for the summary task, Prepare food and drinks, and press Enter.
When Project inserts the new summary task, it selects the Task Name cell, so you can immediately type the name of the summary task.
To create a summary task and subtasks at the same time, select a blank row in the task list and then choose Task→Insert→Summary.
Project inserts a new summary task and one subtask, named <New Summary Task> and <New Task>.
Figure 3-5. Summary tasks help group your work into logical chunks and make the big-picture view emerge from the details. What’s more, Project calculates the dates, duration, and other values for summary tasks from the totals of their subordinate tasks (although you can’t see that helpful feature this early in the process).
Type Prepare drinks in the new summary Task Name cell and press Enter. In the Task Name cell that contains <New Task>, type Buy drink fixings and press Enter.
Project selects the next cell in the Task Name column. As you’ll see in the next step, the next tasks you add are subtasks to the summary task you just created.
Repeat step 4 to add the following tasks:
Make ice
Assemble bar

Tip
To move tasks inward or outward at any time, select the tasks and then choose Task→Schedule→ Indent Task or Task→Schedule→Outdent Task. Indent Task is a green arrow pointing to the right. The green arrow for Outdent Task points to the left. (Outdent is Microsoftese for the opposite of indent. That is, outdenting moves a task out to the next higher level in the outline.) You can also move selected tasks inward or outward by positioning the pointer at the magic spot in a Task Name cell (over the text of the task name) where the mouse pointer turns into a double arrow. When you see the double arrow, drag the tasks to the left or right.
If you wish, experiment with adding additional tasks and summary tasks to your schedule. (Use the completed schedule in Figure 3-11 at the end of this chapter as a guide.)
Waiting until the end to see whether a project meets its deadline isn’t just stressful; it also doesn’t give you enough time to go back and fix what went wrong. What’s more, managers, clients, or other stakeholders expect regular status updates, so you need up-to-date information to keep them happy. Setting up regular checkpoints, appropriately called milestones, gives you a chance to gauge your progress frequently. The earlier you discover that the project is falling behind, the more easily you can take corrective action before it’s too late—or too costly.
Milestones are perfect for identifying deliverables—the tangible products or results required to complete a project—and when they’re due. Every project has a major deliverable at the end: a building ready to occupy, a book ready to read, or a design ready to construct. But most projects include additional deliverables along the way, like an approved blueprint or proof copy.
A milestone typically appears at the end of the tasks that produce the deliverable or achieve a key point in progress. Completing a milestone is like crossing off an item on your To Do list. Project makes it easy to add milestones to your schedule:
Click anywhere in the blank row below the last task (“Assemble bar” in the current example) and then choose Task→Insert→Milestone.
The Task Name cell is set to <New Milestone> and the Duration is 0 days. Project switches the Gantt Chart task bar symbol to a diamond. (Don’t worry about the date on the milestone just yet.) If you select a row containing a task, Project would automatically insert a new row above the selected row.
In the Task Name cell, type Food and drinks ready.
Task naming is an art in itself, which you’ll learn more about in Chapter 4. One way to differentiate milestones from work tasks is to name the milestone based on what was accomplished: “Documentation printed” or “Design complete,” for example.
To move the milestone to the same level as its summary task, make sure the milestone task is selected, and choose Task→Schedule→Outdent Task (the green arrow pointing to the left). (Keyboard mavens can press Alt+Shift+left arrow.)
Project places the milestone at the same level in the outline as the summary task, as shown in Figure 3-6.
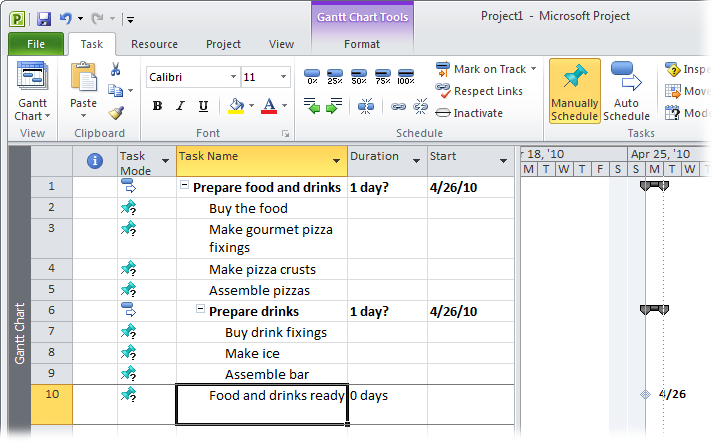
Figure 3-6. Milestones, like “Food and drinks ready” in this example, punctuate the completion of a group of related tasks. Applying them to your schedule gives you checkpoints to gauge progress.
There are actually two schools of thought regarding where milestones sit in an outline. One is to place milestones at the same level as the summary tasks that produce them (as in this example), so you can collapse an outline to hide subordinate tasks, but still see summary tasks and their corresponding deliverables or milestones. Other folks prefer to keep milestones as subtasks, so that the higher-level views show only summary tasks. Try it both ways to see which works for you.
Now’s a good time to practice by adding milestones for other checkpoints in your schedule.
Most likely, the people who work on your project would revolt if you asked them to do all the tasks at the same time. More importantly, some work simply has to be completed before other work can start. Trying to mix a drink before the ice is frozen is a messy and diluted affair. In Project, a relationship between two tasks is known as a task dependency or task link. Defining the dependencies between tasks helps you determine which tasks start when, as well as when the project might finish.
To link the tasks in the graduation party example, do the following:
Select the tasks related to making the pizzas (from “Buy the food” to “Assemble pizzas”).
You can select tasks in any number of ways. You can drag your mouse over the ID cells in several rows to select the tasks. To select individual tasks, Ctrl-click each individual task’s ID cell. To select adjacent tasks, click the first task, and then Shift-click the last task.
Project highlights the selected tasks.
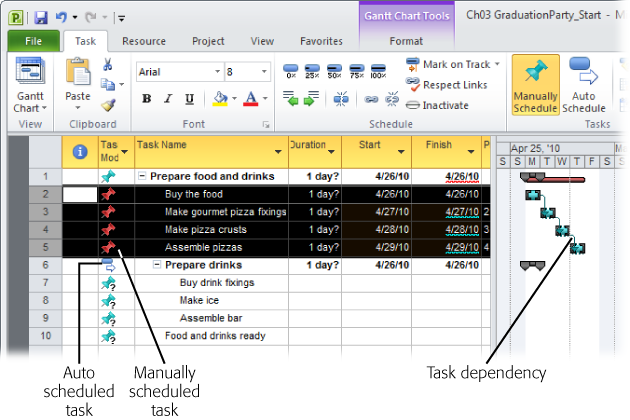
To create links between the selected tasks, choose Task→Schedule→Link Tasks, which looks like links of chain (shown in Figure 3-7).
The tasks automatically cascade with Finish-to-Start dependencies (How Tasks Affect One Another) so one occurs after the other. If you want to remove the dependencies, simply click Unlink Tasks, which looks like a broken link.
Note
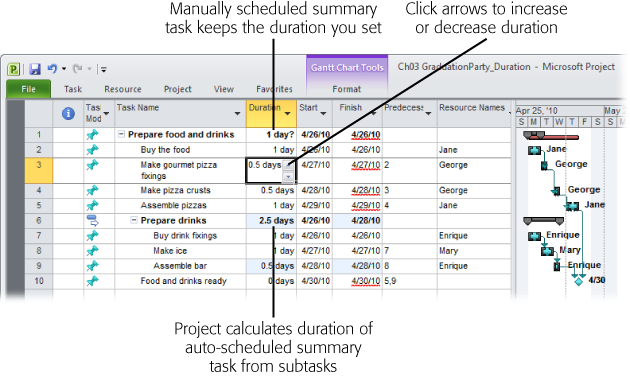
When you link the tasks, you might notice that the summary task has two bars. If a summary task is manually scheduled, Project keeps track of the duration you specify for the summary task, as well as the duration of all the subtasks (Planning from the Top Down). That way, you can see whether your estimate for the summary task duration is long enough for all the subtasks.
Figure 3-7. Task dependencies define the sequence of work. Moreover, as you establish dependencies, Project takes care of changing start dates, finish dates, and summary task duration as long as you create tasks in Auto Scheduled mode. Keep an eye on these values to make sure the project meets its deadline. (See page 327 for ideas on how to shorten a schedule.)
Repeat steps 1 and 2 to link the tasks for preparing the drinks.
The two workflows for food and drinks can occur at the same time, so in the next step, you’ll show that you’ve reached the food and drinks milestone when the pizzas and the bar are assembled.
Click “Assemble pizzas,” Ctrl-click the “Food and drinks ready” milestone, and then choose Task→Schedule→Link Tasks.
A task link appears between the two task bars in the Gantt Chart timescale.
To link the last drink task to the milestone, click “Assemble bar,” Ctrl-click “Food and drinks ready,” and then choose Task→Schedule→Link Tasks once more.
Tasks 5 and 9 are the last steps for assembling the food and drinks, respectively, so linking these two tasks to the milestone moves the milestone to occur after both tasks are complete.
Note
Relationships between tasks come in several flavors, with the most common being Finish to Start, as illustrated in the previous steps. See How Tasks Affect One Another to learn about the other types of task dependencies.
People are any project’s greatest resource. It’s the people and their availability (when folks are assigned to work, and when they’re scheduled to take vacation) that ultimately controls when tasks get done and how long the project takes. In Project, resources are any people, equipment, or materials needed to complete tasks in your project. Chapter 8 and Chapter 9 provide the full scoop on how to create and manage all types of project resources. In this section, you’ll see how to add people as resources to your project, and hook them up with tasks.
Work could still be up for grabs when you create your schedule. Even if you don’t know resource names, you probably know what skills are required to do the work. You can use a person’s name if you have a lucky team member lined up, or fill in generic names when all you know is the type of work or skill required.
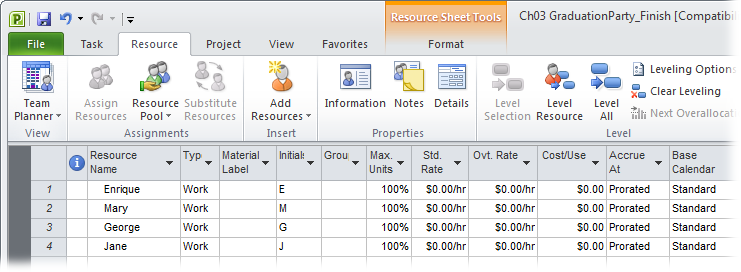
Project provides a view—the Resource Sheet—specifically for listing your resources. Here’s how to fill it in:
Choose Resource→View→Resource Sheet.
A new spreadsheet-like view appears with fields for recording information about your resources, as shown in Figure 3-8.
To create the first resource in Project for the best friend you’ve corralled into helping, in the first Resource Name cell, type Enrique, and then press Enter.
Repeat this step for your other friends.
At this point, you have a list of all of the people who are pitching in. If you handed them your schedule now and told them to get to work, you’d have a free-for-all. To get the work done on time with a minimum of chaos, all team members need to know which tasks are theirs to do.
Here’s how to connect your project’s resources to tasks:
Choose Task→View→Gantt Chart.
The left side of the Gantt Chart view lists project tasks with fields for details, such as Duration, Start, Finish, Predecessors, and Resource Names. The right side is the Gantt Chart timescale.
Make sure you see the Resource Names column. If necessary, adjust the Gantt Chart’s two panes to display it. Position the mouse pointer over the vertical bar between the panes. When the pointer changes to double arrows, drag the divider bar to the right until the Resource Names column is visible.
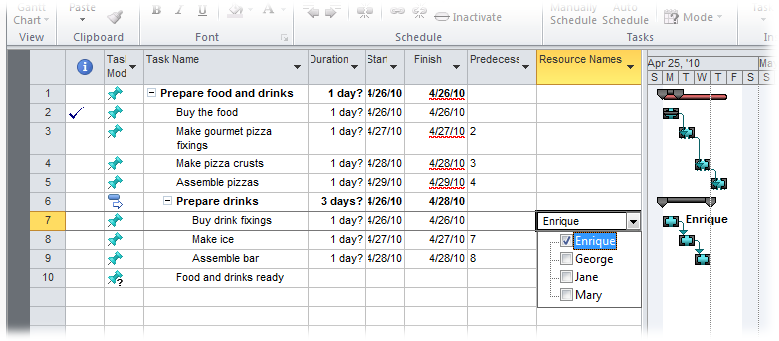
To assign Enrique to a task, click the Resource Names field for the “Buy drink fixings” task.
Project displays a box around the cell and displays a down arrow for the resource drop-down list.
To select a name, click the down arrow, turn on the checkbox for a name in the list, and then press Enter.
Your selected victim appears in the Resource Names cell next to the task. It also shows up in the Gantt Chart above the task’s task bar (Figure 3-9). For other ways to assign resources to tasks, see Assigning Work Resources to Tasks.
Repeat steps 2 and 3 until your friends are all appointed to tasks.
Or not. If you don’t know who to assign and can’t determine a generic resource, then leave the resource name blank. You can come back and assign resources later.
You’re ready to proceed to the last step of the test drive.
The next step can be the most difficult part of scheduling. You need to look into your crystal ball and give your best guess—er, informed estimate—of how long each project step should take. You can find entire books on this subject alone, but Chapter 5 provides a brief introduction to estimating. For now, you’ll revise the task durations in the sample project to see how the schedule changes accordingly.
Here are the steps for defining the duration of tasks:
Click the Duration cell for the first pizza work task (“Buy the food”).
You can enter durations for summary tasks only if you’ve set their task mode to Manually Scheduled (Planning with Manually Scheduled Tasks). For auto-scheduled summary tasks, Project calculates the duration for you from the duration of the subtasks. Milestones, by definition, have zero duration.
Enter the length of time (duration) you or your buddies think it will take to do that step (Figure 3-10).
You can enter durations in minutes (m), hours (h), days (d), weeks (w), or months (mo). Type the number followed by the abbreviation for the unit you want to use. For example, type 3d for 3 days or 6h for 6 hours.
Repeat step 2 for each task in the project.
When you’re done, the schedule shows how long it should take to prepare for your party, as Figure 3-11 illustrates.
For most projects, you have to tweak your schedule to meet project objectives, such as finish date, budget, or scope. Chapter 10 explains different methods for evaluating whether a project schedule is accurate. Chapter 12 discusses ways to fine-tune schedules, for instance, to shorten them, to reduce costs, or simply to bring them more in touch with reality.
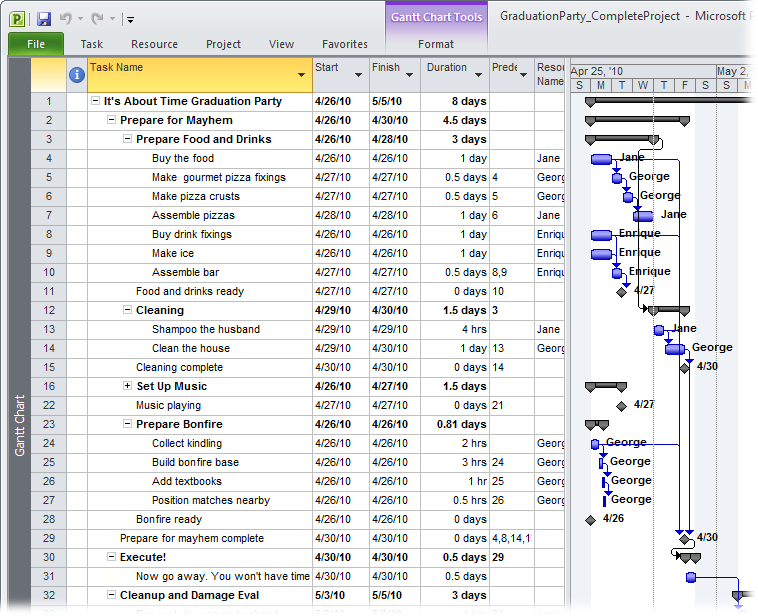
Figure 3-11. A complete schedule has many tasks with resources assigned to them, and links between the tasks. There’s no guarantee that your first pass at a schedule will meet your objectives, but you have to reach this point to find out. (To compare your schedule to this example, you can download a completed version, as described in the tip on page 65.)
Now, save your hard work so you can come back to it later. You must save Project files, just like any document or spreadsheet.
Choose File→Save.
The Save As dialog box appears. If you’ve saved the project file before, then the Save dialog box appears.
In the “File name” field, type a name, and then click Save.
Project saves the file in the location you specified.
As you work on your project, remember to save early and save often. Pressing Ctrl+S to save a Project file is so fast that you can make it a habit in no time. Chapter 6 explains other ways to save projects (Saving Your Project).
Congratulations! You’ve created your first project.