
Keyboard shortcuts are tremendous timesavers, because your fingers can press a key combination in a fraction of a second compared to the seconds it takes to grasp the mouse and move the pointer to the correct location. Those seconds saved add up when you stick to the keyboard for your most frequent tasks—like saving a file regularly to make sure you don’t lose any work or adjusting the position of tasks in the outline.
The only apparent disadvantage to keyboard shortcuts is learning their obscure keystroke combinations. If it takes you 10 seconds to remember that Alt+Shift+* displays all tasks in the project, then you really haven’t saved any time. Mercifully, Project shares many keyboard shortcuts with other Microsoft programs, so you may not have to memorize as much as you think. On the other hand, a few minutes spent memorizing vital keyboard shortcuts can add up to hours saved down the line.
Now that Project 2010 uses the ribbon, you have two ways to use keyboard shortcuts. You can press tried-and-true keyboard combinations like Ctrl+S to save a file just as you could in previous versions of Project. Or you can display KeyTips and press letters to move around the ribbon and choose the command you want. This chapter tells you how to use both methods.
Keyboard shortcuts can be a single key, like F3 to show all tasks or resources. But usually you have to press a combination of Ctrl, Shift, or Alt along with other keys.
If you don’t know the keyboard shortcut, you can navigate through the ribbon, drop-down menus, and commands with KeyTips (the letters you press to choose a feature). Here’s what you do:
To display KeyTips, press Alt.
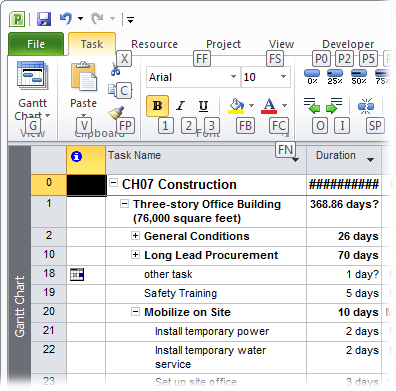
KeyTips appear over each feature in the current tab or menu. For example, on the Task tab, the Gantt Chart command has the letter G next to it, as shown in Figure C-1.
Figure C-1. If KeyTips are visible, continue to press letters until you press the letter for the specific feature you want to use. For example, after you press Alt to display KeyTips, press R to display the Project tab, then press B to display the Baseline drop-down menu, and finally press S to set a baseline. Pressing KeyTip letters to choose features works only when KeyTips are visible. If you turn KeyTips off, pressing R does not display the Project tab, although it does enter an R if the cursor is in a field that accepts letters.
To choose a feature, press the letter in the feature’s KeyTip.
As you use KeyTips to switch between tabs and menus, additional KeyTips may show up. For example, if the View tab is visible and you press H, Project switches to the Task tab, which displays the KeyTips shown in Figure C-1.
Repeat step 2 until you press the letter for the command or feature you want.
For example, if the Task tab is visible, press G to display the drop-down menu of Project views. Then press M to open the More Views dialog box.
To hide KeyTips, press Alt.
When KeyTips are hidden, pressing KeyTip letters doesn’t issue commands.
Note
The keyboard shortcuts in Microsoft Help refer specifically to the U.S. keyboard layout. If you use a keyboard layout for another language, your keyboard shortcuts vary depending on how characters map to the keys on your keyboard. For example, Ctrl+Z is the U.S. keyboard shortcut to undo the previous action. However, the French keyboard layout has W located where Z resides on the U.S. keyboard, so the French keyboard shortcut for Undo is Ctrl+W.
Some of the keyboard shortcuts in this section apply not only to Project but to every Microsoft Office program, so you can learn them once and then put them to work in all your favorite programs. Project doesn’t come with flip cards to help you memorize these esoteric keyboard combinations, but if you memorize the ones for the tasks you perform most, then you can often save time without overtaxing your brain.
Tip
If you memorize the shortcuts in this appendix and are still hungry for more, in Project, choose File→Help→Microsoft Office Help. At the top of the Project Help window, in the search box, type keyboard shortcuts, and then click Search. The first help topic link should be “Keyboard shortcuts for Project 2010”. Click the link to view a complete list of keyboard shortcuts specific to Project, and many that apply to all Microsoft Office programs.
These favorites apply to all Microsoft Office programs, and they’re commands you use all the time. The keyboard shortcuts in Table C-1 should be at the top of your memorization list.
Table C-1. Keyboard shortcuts you’re sure to use all the time
Task | Keyboard shortcut |
|---|---|
Open a new file (Project file, Word document, and so on). | Ctrl+N |
Open an existing file. | Ctrl+O |
Save the active file. | Ctrl+S |
Print the current view (such as the Gantt Chart). | Ctrl+P |
Close the active file. | Ctrl+F4 |
Undo the last action you performed. | Ctrl+Z |
Redo the action you just undid. | Ctrl+Y |
Copy a picture of the entire screen to the Clipboard (which you can then paste into a document or file). | Print Screen (might appear as Prnt Scrn or Prt Scr on some keyboards) |
Copy a picture of the active window to the Clipboard (for pasting into another file). | Alt+Print Screen |
Note
In Project 2003, Ctrl+Z toggled between undoing the one last action you performed and redoing that action; Ctrl+Y wasn’t a keyboard shortcut. Project 2007 introduced the ability to undo as many previous actions as you want, either by frenetically pressing Ctrl+Z or, on the Project title bar, using Undo (Undoing Changes). Ctrl+Y behaves differently in Project than in any other Office program. In Word, Excel, and so on, Ctrl+Y repeats the previous action. In Project, Ctrl+Y redoes only the last actions you undid.
So much of working with a project schedule is adding tasks and placing them at the proper level in the Project outline. The shortcuts in Table C-2 help you view the outline and indent or outdent tasks.
Table C-2. Outlining without touching the mouse
Task | Keyboard shortcut |
|---|---|
Insert a new task above the selected task. | Insert |
Indent the selected tasks. | Alt+Shift+right arrow |
Outdent the selected tasks. | Alt+Shift+left arrow |
Hide subtasks of the selected summary task. | Alt+Shift+hyphen (or Alt+Shift+minus sign on the numeric keypad) |
Show next level of subtasks. Repeat this keyboard shortcut until you can see all the levels you want. | Alt+Shift+= (or Alt+Shift+plus sign on the numeric keypad) |
Show all tasks. | Alt+Shift+* (or Alt+Shift+* on the numeric keypad) |
Whether you work on one Project file or several, the shortcuts in Table C-3 make it easy to see the information you want.
Table C-3. Displaying Project windows and key dialog boxes
Task | Keyboard shortcut |
|---|---|
Make the next Project file window active (when more than one file is open or when you use View→Window→Switch Windows). | Ctrl+F6 |
Make the previous Project file window active. | Ctrl+Shift+F6 |
Maximize all Project file windows within the main Project window. | Ctrl+F10 |
Open the Task Information dialog box with data for the selected task. | Shift+F2 |
Open the Resource Information dialog box with data for the selected resource. | Shift+F2 |
Open the Assignment Information dialog box with data for the selected assignment. | Shift+F2 |
Open the Field Settings dialog box to add or modify a column. | Alt+F3 |
Reapply the current filter. | Ctrl+Shift+F3 |
Display all tasks or resources. | F3 |
Display smaller time units in the timescale, for example, switching from weeks to days. | Ctrl+/ (use / on the numeric keypad) |
Display larger time units in the timescale, for example, from weeks to months. | Ctrl+* (use * on the numeric keypad) |
Whether you’re setting up, modifying, or monitoring a schedule in Project, you’re likely to move around within the table area or timescale of the Gantt Chart and other Project views. The keyboard shortcuts for moving around in views, shown in Table C-4, are a little easier to remember because they use arrow keys as well as Home and End. For example, to move to the first field in a row, you press Ctrl+left arrow, whereas you press Ctrl+right arrow to move to the last field. The Ctrl key identifies shortcuts for moving within the rows and columns of the table area, and the Alt key applies to the shortcuts for the timescale.
Tip
In Project 2010, the timeline pane is an easy, mouse-driven way to scroll the timescale (Changing Manually Scheduled Tasks to Auto Scheduled).
Table C-4. Moving within views
Task | Keyboard shortcut |
|---|---|
Move to the first row. | Ctrl+up arrow |
Move to the last row. | Ctrl+down arrow |
Move to the first field in the current row. | Ctrl+left arrow (or Home) |
Move to the last field in the current row. | Ctrl+right row (or End) |
Move to the first field in the first row. | Ctrl+Home |
Move to the last field in the last row. | Ctrl+End |
Scroll the timescale to the left. | Alt+left arrow |
Scroll the timescale to the right. | Alt+right arrow |
Scroll the timescale to display the task selected in the table area. | Ctrl+Shift+F5 |
After you display the part of the schedule you want, your next step is often to select a field, task, or resource to perform some editing. Selection shortcuts use the arrow, Home, and End keys in similar ways to the shortcuts for moving within a view. The main difference is that selection shortcuts use the Ctrl+Shift combination. For example, moving to the first row is Ctrl+up arrow. Selecting from the current selection to the first row is Ctrl+Shift+up arrow. Table C-5 lists the keyboard shortcuts for selecting elements in a Project view.
Table C-5. Selecting within views
Task | Keyboard shortcut |
|---|---|
Expand the current selection to the first row. | Ctrl+Shift+up arrow |
Expand the current selection to the last row. | Ctrl+Shift+down arrow |
Expand the current selection to the first field in the current row. | Shift+Home |
Expand the current selection to the last field in the current row. | Shift+End |
Expand the current selection one field to the left. | Shift+left arrow |
Expand the current selection one field to the right. | Shift+right arrow |
Expand the current selection to the first field in the first row. | Ctrl+Shift+Home |
Expand to the last field in the last row. | Ctrl+Shift+End |
Expand the selection up one row. | Shift+up arrow |
Expand the selection down one row. | Shift+down arrow |
Note
These selection shortcuts expand the selection based on the fields or rows that are already selected. For example, if a Task Name cell is selected, then expanding to the first row selects all the Task Name cells up to the first row. If the entire row is selected, then expanding the selection to the first row selects all the tasks up to the first row.
You’re probably familiar with keyboard shortcuts for editing. Ctrl+X, Ctrl+C, and Ctrl+V still cut, copy, and paste selected elements, as they do in Microsoft Word and other programs. But Project includes a few additional keyboard shortcuts for specialized editing, listed in Table C-6.
Of course, Project has dialog boxes like every other program, and the same keyboard shortcuts for navigating within them. The forms that appear in Project view, such as the Task Entry form, use some additional keyboard shortcuts to navigate within form fields and tables. Table C-7 lists these shortcuts.
Table C-7. Navigating dialog boxes and forms
Task | Keyboard shortcut |
|---|---|
Display the next tab in a dialog box. | Ctrl+Tab |
Display the previous tab in a dialog box. | Ctrl+Shift+Tab |
Select an option in a dialog box or toggle between turning a checkbox on and off. | Alt+ the underlined letter in the option or checkbox |
Move to a field in a table within a form (such as the Resources and Predecessors tables in the Task Form). | Up arrow, down arrow, left arrow, and right arrow |
Switch to the left or right table within a form, like between the Predecessors and Successors table in the Task Form. | Alt+1 for the left table, Alt+2 for the right table |
You need just a few keyboard shortcuts, listed in Table C-8, to open the Help window and browse help topics.