
To manage projects, you usually need several types of information all at the same time. That’s why so many project managers have a corkboard plastered with layers of printed pages or a computer screen with a dozen windows open at once. To see information without opening every program you own, you take information created in one program and display an editable copy of it in another program. This visual exchange goes in either direction: Project data can appear in other programs like Excel and PowerPoint, or information from other programs can appear in Project.
You have three ways to make this happen: copying, linking, and embedding. You can copy data from one program and paste it into another (see Copying Information for copying and pasting). In a way, copying is a lot like embedding, because you create a copy of the data in the destination program, but embedding does more, as you’ll learn shortly. Linking means connecting directly to information in one program from another program. For instance, a PowerPoint slide can display a high-level schedule from Project. When you update the schedule in Project, that latest, greatest version automatically appears in PowerPoint. On the other hand, embedding places a copy of an object (like a spreadsheet or Visio diagram) from one program into another. The embedded object and the original file aren’t linked, so you don’t automatically see changes made in the original. But embedded objects are ideal when you want to send self-contained files to colleagues.
Here are the differences between linking and embedding:
Linking means the data remains in the source file, and the destination file merely displays the source file data. With linked objects, updating takes care of itself, because the data in the destination file and the source data are one and the same, so the data in the destination file changes when the source data does.
When you double-click a linked object, the source program starts and you edit the source file. For example, suppose you link your Project schedule to a PowerPoint slide, and you spot a schedule change you want to make. Double-click the linked object, and Project opens the source Project file. The changes you make are saved in the source Project file and also appear automatically in the PowerPoint slide.
Embedding means that a separate copy (called an embedded object) of the source file becomes a part of the destination file. The source file still exists, but the embedded object is independent and doesn’t change when the source data changes.
In most cases, when you double-click an embedded object, the source program doesn’t start. Instead, you see its menus in place of the destination program menus (Editing Embedded Objects). For example, double-clicking an embedded Excel spreadsheet in the Project timescale pane replaces Project’s menus with Excel’s and you see a hatched border around the object. The menus revert when you deselect the embedded object. Editing the embedded object doesn’t affect the source file. In Project, embedded objects can also behave in another way, which Editing Embedded Objects explains.
Tip
Linking and embedding work with any program that supports Object Linking and Embedding (OLE), which Microsoft developed specifically so that files can contain components created in different programs.
Whether linking or embedding is the better choice depends on what you’re trying to do. Bottom line, linking is better if the source data is going to change. Embedding is better when you need to widely distribute the destination file, particularly to recipients who can’t access your computers. Table 21-1 shows the pros and cons of each approach.
Table 21-1. Whether you use linking or embedding depends on what you’re trying to do.
Feature | Linking | Embedding |
|---|---|---|
Updating | Linking keeps data up to date in both source and destination files. You can edit the source file from either program and see the updated information in both places. | The destination file doesn’t update along with the source. If you want to update an embedded object, then you must either make the same changes to the embedded object or re-embed the object after the changes are made. |
Copies of data | Linking means there’s only one copy of the data, so you don’t have to make the same changes multiple times. The link breaks if you move the source file, but you can repair it (Managing Linked Objects). | An embedded object is a second copy of the data. To show the most recent data in an embedded object, you must edit the embedded object or delete and re-embed it. |
Distributing data | When you distribute a file with links, the recipients see the data only if they can access the linked files. If they can’t, then the links break, and they see an error message instead. | You can distribute the destination file with the source data in it. The destination file contains everything the recipients need to view and edit the data. |
File size | Destination files don’t increase in size, because the data remains in the source file. | The size of a destination file increases because it contains the embedded object and all of its data. |
Performance | When a file contains multiple links, it takes time to open the links (especially over a network). The file has to examine each source file for updates to the linked objects. | The additional data in embedded objects can make the destination file slower to open and respond. |
The procedures for linking and embedding are usually almost identical—except for turning a Link checkbox on or off. However, a few linking and embedding techniques stray further from the typical path, depending on the type of data, and whether you’re displaying Project data in other programs, or vice versa. This chapter describes the steps for each approach.
Project data comes in handy in lots of other programs. For example, a Project schedule shows project status whether it appears in a PowerPoint slide, a Word-based status report, or an Excel spreadsheet. Similarly, you might embed a Resource Graph into a memo requesting resources. This section describes how to link and embed Project data into other programs.
Sometimes, pictures of Project views aren’t enough. You might want the Gantt Chart in your status report to show the up-to-date project schedule. When you link a Project file to another program, the linked object initially displays the portion of the view that you copied in Project. Once the linked object is in place, you can edit it to change the view, filter the tasks, and so on (as described on Editing Linked Objects).
Note
Office programs can be fussy about linking objects, but the box on When Programs Won’t Link provides a workaround.
Here’s how you link a Project file to another program:
Open the Project file and the destination file.
You can link to a Project view in any program that supports OLE, including Excel, Word, and PowerPoint.
In Project, set up the view the way you want it.
Select the view and the table you want. If necessary, insert or hide columns in the table. Filter the view to show only the tasks, resources, or assignments you want.
Select the data you want to link, and then, on the Task tab, click Copy (or press Ctrl+C).
Whether you select cells in a table or entire rows by dragging over their ID numbers, the Copy command places what you’ve selected on the Clipboard.
In the destination file, click where you want to place the linked view.
Unlike pasting table cells, a view comes in as one object with its top-left corner at the location you click.
Choose the Paste Special command.
For Office 2010 programs, choose Home→Clipboard→Paste→Paste Special. In Office 2003 (and many non-Microsoft programs), choose Edit→Paste Special.
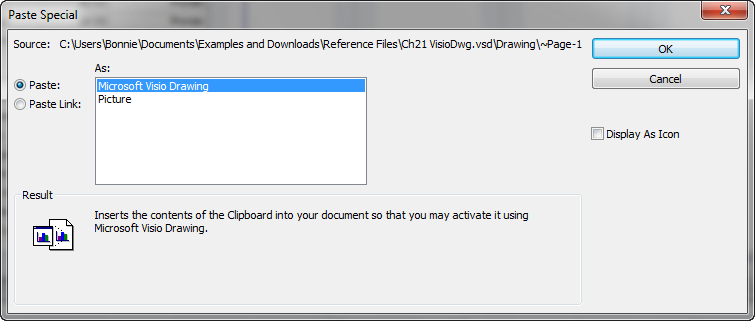
In the Paste Special dialog box, select the “Paste link” option, as illustrated in Figure 21-1.
Be sure to select Paste Link, since the Paste option embeds the object instead of linking it. If the Paste Link option is grayed out, be sure to save the Project file, and then recopy and try Paste Link again.
In the As list, select Microsoft Project Document Object, and then click OK.
The Project view appears as a single object in the destination file. You can move the linked object around by dragging from the center of the object. To resize the object, select it, and then drag the boxes at the corners and the middle of each side.

Embedding Project data into another program creates a copy of your project in the destination file. Embedding data creates a self-contained file—for example, for the subcontractors who can’t access your computer systems. If you send them status reports with linked objects, they would see broken links, not data.
You can create objects to embed as you go, as the box on Creating Objects from Scratch describes. However, creating a Project file on the fly is a bad idea, because that file is available only within the destination file. By creating the file in Project, you can embed the file and keep the original to work with.
To embed a Project file in another program, follow these steps:
Open the destination file, and then select the location where you want to embed your Project object.
Project doesn’t have to be running to embed a Project file.
In an Office program, choose Insert→Text→Insert Object (the icon looks like a picture with a cactus).
For Office 2003 and many non-Microsoft programs, choose Insert→Object.
Select the “Create from File” tab, and then select the file you want to embed.
To locate the file, click Browse. In the Browse window, navigate to the folder that contains your Project file, and then double-click the filename. The path and filename appear in the “File name” box, as shown in Figure 21-2.
To show an icon until you want to see the Project file, turn on the “Display as icon” checkbox.
Turning on the “Display as icon” checkbox displays a Change Icon button. In the Change Icon dialog box, you can select the icon you want to show, and the label.
Click OK.
The embedded file appears at the selected location in the destination file. If you display an icon for an embedded file, then you can open the file by double-clicking its icon.

You can create links from selected Project table cells directly to cells in another file, like an Excel spreadsheet. When the Project values change, the linked cells in the other program display the updated values. For example, by linking Project cost cells to Excel, a return on investment spreadsheet could show the rate of return at any time—perfect for surprise executive visits.
Linking and copying both work with Project table cells, but linked cells get their values directly from source Project cells. Copying pastes the text or numbers from the source Project cells into destination cells; copied data is the same as values you enter directly.
Note
You can’t embed a portion of a Project table into another file. If you try, the program embeds the entire Project file instead.
To link Project table cells to cells in a program like Excel, follow these steps:
Open both the Project file and the destination file.
For example, open an Excel spreadsheet.
In Project, display the table you want to link to Excel.
If necessary, display the view you want. To change the table, right-click the Select All cell (the gray cell at the intersection of the column heading row and the ID column), and then choose the table from the drop-down list. If the table doesn’t appear on the drop-down list, choose More Tables. In the More Tables dialog box, select the table and click Apply.
Select the data you want to link, and then choose Task→Copy (or right-click and choose Copy Cell).
Use any of the usual techniques for selecting data: dragging over column headings to select entire columns, dragging from the top-left to the bottom-right cell of a range, or Ctrl-clicking or Shift-clicking cells.
In the destination file, click the top-left cell for the linked data.
The data starts at the cell you click, and then fills in cells to the right and below that cell.
In Excel, choose Home→Clipboard→Paste→Paste Special. In the Paste Special dialog box, select the Paste link option, as shown in Figure 21-3. Select HTML or Text, and then click OK.
The linked data appears in the selected cells. If you can’t see the full values, adjust the column widths in the destination file.

Figure 21-3. The command you use to create links depends on the program. For example, in Excel 2010, choose Home→Paste→Paste Special. In Excel 2003, choose Edit→Paste Special. Then, in the Paste Special dialog box, select the Paste Link option, and then, in the As box, select Text. Click OK to add the linked data into the cells.
Linking and embedding data goes in either direction. Just as a Project schedule can provide information for a status report or presentation, other files can provide background information for the tasks in your Project schedule. For example, you might link information in a risk log spreadsheet to an at-risk task, so the most recent actions and results appear in the Task Information dialog box. Likewise, you could embed a Visio workflow diagram in the Gantt Chart timescale.
You can link or embed entire files into Project, or link cells from an Excel spreadsheet to Project table cells. In addition, you can link or embed portions of other files, like Excel charts or Visio drawing pages. This section explains how to link and embed data into Project.
Inserting an entire file into Project is perfect for easy access to additional information—for example, a specifications Word document or a change request tracking database. To see more of the file, simply drag the boundaries of the inserted object. To see a different part of the file, select the object and then edit it, as described on Editing Linked Objects. When you work with entire files, the linking and embedding steps are almost identical:
Open your Project file, and then select the location where you want to insert the other file.
Only some areas of a Project file accept inserted objects: the Gantt Chart timescale, the Notes or Objects boxes in the Task Form or Resource Form, and the Notes tab in the Task Information, Resource Information, or Assignment Information dialog box.
On the Notes tab in any of the Information dialog boxes, simply click the Insert Object button immediately above the Notes area.
The Insert Object dialog box opens.
If you want to insert objects in the Gantt Chart timescale, you must customize the ribbon (see Chapter 25) to add the Object command to a custom group (in the “Choose commands from” list, choose All Commands, and scroll until you see the Object command).
Select the “Create from File” option, and then choose the file you want to link or embed.
Click Browse to navigate to the folder that contains the file you want. Double-click the filename, and the path and filename appear in the “File name” box.
To link to the file, be sure to turn on the Link checkbox.
Initially, the Link checkbox is turned off, which means that Project will embed the file.
To display the file as an icon until you want to see it, turn on the “Display as icon” checkbox.
After you insert the link in Project, you will be able to open it by double-clicking it.
Click OK.
The object appears at the location you selected in your Project file.
With some programs, you can extract portions of a file to link or embed. A chart from an Excel spreadsheet, a slide from a PowerPoint presentation, or a drawing page from a Visio document are all candidates for inserting into a Project file. The advantage is that the inserted object represents only that portion of the file, so linked objects have less data to update, and embedded objects don’t take up as much room.
To link or embed a part of a file into your Project file, follow these steps:
In the source program, open the file and select what you want to show in your Project schedule.
For example, in Visio, drag across the shapes you want to link or embed in Project. To select an entire Visio drawing page, make sure no shapes are selected. For an Excel chart, select the chart.
Press Ctrl+C to copy the selection to the Clipboard.
In Office 2010 programs, click Home→Clipboard→Copy. For Office 2003 and non-Microsoft programs, choose Edit→Copy or, on the Standard toolbar, click Copy.
In your Microsoft Project file, select the location where you want to place the object, and then choose Task→Clipboard→Paste→Paste Special.
Because you must choose Paste Special from the ribbon, you can’t insert these partial objects in the Notes tab of the Information dialog boxes. You can insert them in the Gantt Chart timescale and the Objects box in the Task Form or Resource Form. (To display the Objects box in a form, right-click the top part of the form, and then, in the shortcut menu, choose Objects).
In the Paste Special dialog box, select the Paste Link option to create a link to the source data.
Initially, Project selects the Paste option, which embeds the object. The Paste Link option can be stubborn and appear grayed out. Make sure you’ve saved the Project file at least once, so the program knows where the file is stored and can define the link. If saving the file doesn’t help, try copying and paste-linking the information again.
In the As box, select the type of object, as shown in Figure 21-4.
The choices vary depending on what you copied to the Clipboard.
Figure 21-4. If the object you’re linking or embedding is an Excel chart, for example, select Microsoft Office Excel Chart. Select Microsoft Visio Drawing to insert a Visio drawing page.
Note
The Picture type appears in the As list whether you select Paste or Paste Link. If you select the Paste option and the Picture type, then Project inserts a picture as you’d expect. If you select Paste Link and Picture, then Project acts as if you selected a type like Microsoft Visio Drawing. Linking a picture of a Visio drawing actually inserts a linked Microsoft Visio Drawing object. Double-clicking the object opens the Visio file to the drawing page.
The object appears in Project at the location you selected.
Just as you can link Project table cells into other programs, you can bring data from other programs into Project’s table cells. When you link data to Project cells, the values look as if you typed them directly into Project, but they’re actually linked to the source file, and change when the source data changes. Project demands the right types of data in its fields, so you have to make sure the data types are the same in both places. The easiest way to keep data types in sync is to link column by column:
In Excel or another table-based program, select the first column you want to link (click the column heading), and then press Ctrl+C.
Another advantage to linking column by column is that the links don’t break if you rearrange the columns. For example, if you link several Excel columns at once, then the Project link expects those columns to stay in the same order. If you move one of the columns in the Excel spreadsheet, then the entire Project link breaks. However, if you link each column separately, then you can move the columns, and the links continue to work.
In Project, display the view and table in which you want to link the data. Then select the first cell for the linked data.
Select the top-left cell for the linked data. Project fills in the other cells to the right and below.
Choose Task→Clipboard→Paste→Paste Special, and then select the Paste Link option.
If you choose the Paste option, Project simply copies the values into the Project cell as text, numbers, dates, and so on.
In the As box, select Text Data.
As you learned on Linking and Embedding Parts of Files in Project, selecting an object type like Microsoft Office Excel Worksheet inserts a linked object that you double-click to open and edit. By selecting Text Data, Project fills in individual cells with linked values. Each linked cell gets its value from the corresponding cell in the source file.
Click OK.
The cells display values from the source file. To link other columns in the source file, repeat steps 1 through 5 for each additional column.
Linking or embedding information into another file is just the beginning. Linked and embedded objects are incredibly versatile, and this section shows you all the things you can do with them. Most of the time, you want the information in linked and embedded objects to be visible at all times, but these objects can just as easily keep a low profile as icons until you want to see what they have to show. Like other elements in files, you can move or resize objects—for instance, to get them out of the way of task bars in a Gantt Chart or graphics on a Visio diagram. And the whole point of inserting a linked or embedded object instead of a picture is to edit it at some point. For linked and embedded objects to work, you need to know how to manage links between files, and this section explains that as well.
Linked and embedded objects work like many other elements in your files. You can select them, move them around, change their size, and delete them. Here’s how:
Resize an object. When you select an object by clicking it, resize handles appear at each corner and at the middle of each side. You can drag these handles to change the size of the object. To change the object dimensions while maintaining its proportion, drag a handle at one of the corners. The pointer changes to an angled two-headed arrow. To change the size in only one dimension, drag a handle at the middle of a side. The pointer changes to either a horizontal or vertical two-headed arrow.
Move an object. You can move an object whether or not it’s selected by dragging the middle of the object to the new location. The pointer changes to a four-headed arrow to indicate that you’re about to move the object. If you drag too close to an edge, then the object resizes instead.
Delete an object. Select the object, and then press Delete.
Display the object behind an icon. When you choose to display an object as an icon, double-click the icon to bring the full object into view. Dragging an icon moves the object, just as dragging the actual object does.
Whether you’re working in the source program or container program when you edit a linked object, you always edit the same source file. Suppose you link an Excel spreadsheet to your Gantt Chart timescale. If you edit the spreadsheet in Excel, then the changes you make show up automatically the next time you open or update your Project file. On the other hand, you can double-click the linked object in Project to start Excel and open the source file for editing.
Editing linked objects works differently from editing embedded objects in that you always do your editing in the source file. Here’s how it works:
To edit a linked object, double-click it.
The source file opens in the source program. For example, double-clicking a linked Excel spreadsheet starts Excel and opens the spreadsheet—as if you’d started Excel yourself and opened the file. You must have read-write privileges for the file in order to edit it, just as you would if you opened the file directly. The box on Opening Reluctant Links explains your options if an error message appears when you try to edit a linked object.
When you see the message box telling you that you’re opening an OLE object that could contain viruses and other malicious code, if you’re sure it’s safe, click Yes to open the file.
If you have any doubts about the file, click No.
When you finish editing, save the file as you would normally, and then close the object’s program (Excel in this example).
Back in the container file, the linked object displays the changes. If the linked object isn’t up to date, you can tell the container program to immediately check for updates, as described in the next section.
Linked objects require ongoing care and feeding. For example, you must make sure that links can find the files they represent. If links are broken, then you can redirect them to the correct location for the source file. Conversely, you can intentionally break the link between an object and the source file to transform the object into an embedded object or picture. Finally, you can update a link immediately and tell the container program whether you want it to update links automatically or wait for you to say when.
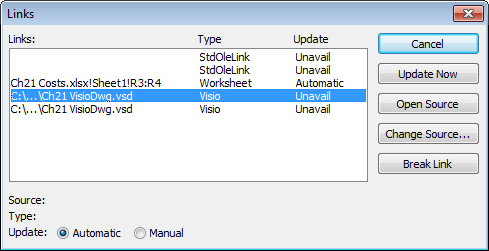
The Links dialog box, shown in Figure 21-5, is where you begin link management tasks. The Edit Links command isn’t on the ribbon, so you must add it to a custom group (Creating Custom Groups) before you can use it.
Here’s how to keep links in tip-top condition:
Review links. The Edit Links dialog box lists the links in your file whether they connect to other places in the same file or different files altogether. When you select a link in the list, the Source line shows the path and filename at the bottom of the dialog box. The Type line indicates the type of file.
Update a link. To immediately update a link with changes from the source file, select the link, and then click Update Now.
Note
When you open a file with links, a message box asks whether you want to update the links. Click Yes to display the most recent data from the linked file.
Figure 21-5. In Project, you can use a keyboard shortcut to open the Links dialog box. Press Alt+E as if you were opening the Edit menu in Project 2007 and then press “.” (the period key). Or customize the ribbon to add the Edit Links command to a custom group (page 662). For Office 2010 programs like Excel, open the Edit Links dialog box by selecting the ribbon’s Data tab, and then, in the Connections group, choosing Edit Links.
Repair a broken link. You can fix broken links by changing the folder or file that a link looks for. Click Change Source. In the Change Source dialog box, click Browse to find the file. Double-click the filename to update the path and name in the Source box. Click OK to save the link.
Change a linked object into an embedded object. Suppose you linked to a document during its development so you always saw the most recent version. Now that the document is approved, you want to embed it so you can see the document without the baggage of maintaining the link. You can convert a linked object into an embedded object in the Edit Links dialog box by selecting the link and then clicking Break Link. The link disappears from the list in the Links dialog box, but the object remains, and now acts like the embedded object it is.
Specify when to update the link. Initially, Project and other programs create links so they update automatically, which means that the container program checks source files for changes and updates the objects with any changes it finds. All that checking and updating can slow your program to a crawl, especially if the source files change frequently or are located on large or complex networks. In this situation, you can control when updates occur by selecting a link, and then selecting the Manual option.
You double-click embedded objects to edit them, just like you do linked objects. The result, in most cases, is that the menus for the container program change to the menus for the embedded object’s program. For example, when you double-click an Excel spreadsheet embedded in your Gantt Chart, Excel menus appear where the Project menus just were, as illustrated in Figure 21-6. You can work on the Excel object as if you were working directly in Excel. When you’re done, click away from the embedded object, and the Project menus reappear. It’s like having two programs at your fingertips.

Figure 21-6. When you’re done editing, click away from the embedded object. The resize handles on the embedded object and the Project menus reappear.
If you embed an object in a Project task’s note (select the task and choose Task→Properties→Information, click the Notes tab, and then click the Insert Object icon), then double-clicking the embedded object opens the object in the source program. However, if you click the File tab in that program, the heading on the Info screen says “Information about Embedded Object”—which is your clue that you aren’t editing a source file.