When you first start using Project 2010, you pick commands from the ribbon. After using the program for a while, you may discover that some commands get a lot of exercise, that some starve for attention, and that a few you want are nowhere to be found. For example, you may never choose any of the Gantt Chart Style buttons to change the color theme for your task bars. At the same time, you might rather see the Format Painter command on the Format tab. And you need the Edit Links command to update the connections to files you link to your Project schedule.
Fortunately, in Project 2010, you can customize the ribbon to suit your needs. You can turn tabs on or off, create your own tabs and groups, add commands to groups, and rearrange the order of elements (tabs, groups, and commands). This chapter shows you how to do all these things. The Quick Access toolbar sits above the left side of the ribbon. Adding commands to it is even easier than customizing the ribbon. Making changes to the ribbon and the Quick Access toolbar takes only a few minutes, but it might save hours in the long run.
As you’ve seen throughout this book, the ribbon is made up of several tabs, like Task Resource, Project, View, and Format. Within each tab, groups keep related commands close to one another, like the Split View group on the View tab, which contains commands for working with the Timeline view and Details pane. Commands reside in a group, even if it’s a group of one, like the lonely Subproject command in the Project tab’s Insert group. You can create your own tabs and groups or add groups you create to the built-in tabs. Either way, the techniques you use to customize the ribbon are refreshingly easy.
Tip
If you want to use your customized ribbon or Quick Access toolbar on other computers, read the box below.
Customizing the ribbon takes place on the Customize the Ribbon page in the Project Options dialog box. The fastest way to reach this page is to right-click the ribbon and then choose Customize the Ribbon. (The long way around is to choose File→Options and then, in the Project Options dialog box, choose Customize the Ribbon.)
The ribbon comes with several ready-made tabs, most of which are visible when you first launch Project (Using the Ribbon). Whether you use the built-in tabs or build your own, you can turn tabs on when you need them and then turn them off to keep the ribbon tidy the rest of the time. For example, if a rousing session of macro development sounds like fun, you can turn on the built-in Developer tab, which is turned off initially. Then when your macros are ready for prime time, you can turn off the Developer tab and run your macros from the Format tab (Using Keyboard Shortcuts to Run Macros). Here’s how to turn tabs on and off:
Right-click the ribbon, and then choose Customize the Ribbon.
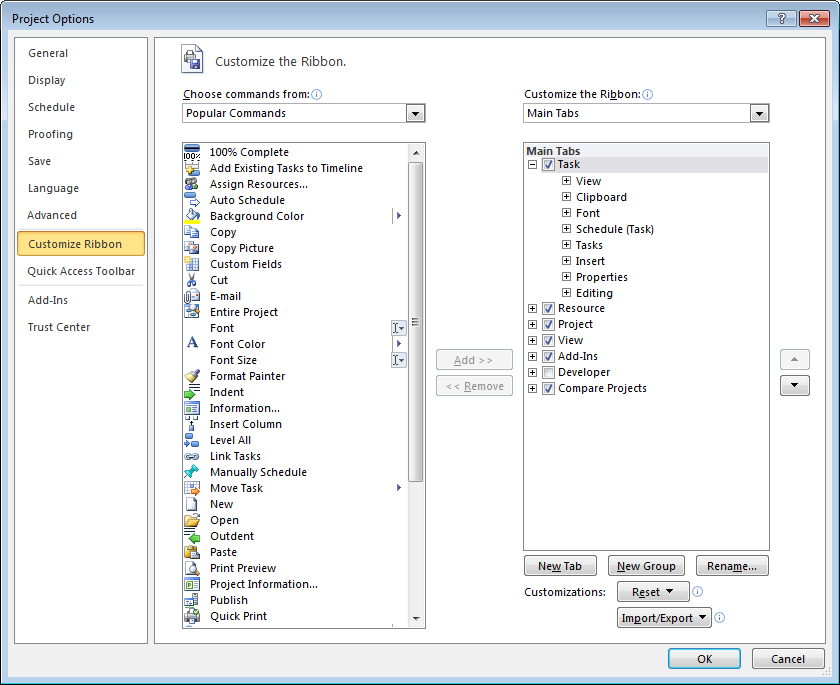
The Customize the Ribbon page opens in the Project Options dialog box, as shown in Figure 25-1.
Figure 25-1. When the Project Options dialog box is open, you can choose to customize the ribbon or the Quick Access toolbar. Choose Customize Ribbon to open the “Customize the Ribbon” page. If you choose Quick Access Toolbar instead, a simplified version of the “Customize the Ribbon” page appears, because the Quick Access Toolbar doesn’t have tabs or groups.
Below the “Customize the Ribbon” heading on the right side of the page, turn on a tab’s checkbox to make it visible on the ribbon (turn it off to hide it). Click OK to close the Project Options dialog box.
The drop-down list below the Customize the Ribbon heading is initially set to Main Tabs, which are the built-in tabs (Task, Resource, Project, View, and so on) and custom tabs you create. If you choose Tool Tabs in the drop-down list, you see the context-sensitive Format tabs for each type of view, such as the Gantt Chart Tools Format tab (Displaying the critical path in Project) or the Team Planner Tools Format tab (Customizing the Timeline).
When existing tabs won’t do, you can blaze a new trail by creating a tab from scratch. Completely new tabs are great when you constantly turn to the same set of commands. Once the Customize the Ribbon page is open (Customizing the Ribbon), here are the steps:
In the tab list on the right side of the page, select the tab below which you want to add your custom tab.
If you forget to select a position in the list before you create the tab, you can move the custom tab to another location later (Adding a Command to the Ribbon).
Below the tab list, click New Tab.
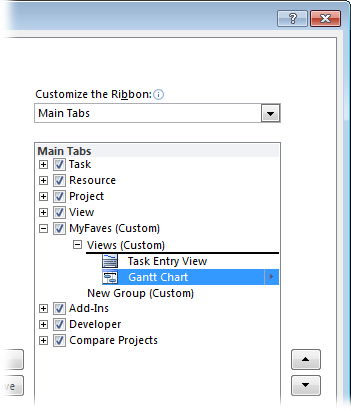
Project inserts a new custom tab named New Tab (Custom) containing one custom group named New Group (Custom), as shown in Figure 25-2.
Select the new custom tab and click Rename. In the Rename dialog box, type a short but meaningful name, like “MyFaves,” and then click OK.
The new name appears in the tab list.
Select the new custom group and click Rename. To display an icon for the group, choose the one you want in the Symbol list. In the Rename dialog box, in the “Display name” box, type a short but meaningful name, like “MyViews.” Click OK.
Your custom tab and group are ready for you to add commands (Adding a Command to the Ribbon). See Creating Custom Groups to learn how to add more groups to a tab. Rearranging Ribbon Elements explains how to rearrange tabs, groups, and commands.

Figure 25-2. By automatically adding a custom group, the program saves you a step. You can add commands only to custom groups, so a custom tab must have at least one custom group. It’s a good idea to immediately rename the custom tab and the custom group to indicate what they do. Select the tab and then click Rename. Then, select the group, and click Rename.
Visual separators (like the groups on built-in tabs) make it easier to find the commands you want. Project doesn’t give you a choice, because you can add commands only to custom groups. Whether you want to add commands to a built-in tab or a custom tab, you must first add a custom group. Here are the steps:
In the tab list on the right side of the page, select the tab to which you want to add a new group.
You can add a custom group to a built-in tab or a custom one.
Select the group below which you want to add the new group.
If you forget to select a position before you create the group, you can move the custom tab to another location later (Rearranging Ribbon Elements).
Below the tab list, click New Group.
Project inserts a new custom group named New Group (Custom).
Select the new custom group and click Rename. To display an icon for the group, choose one in the Symbol list. In the Rename dialog box, in the “Display name” box, type a short but meaningful name, like “Tasks.” Click OK.
Your custom group takes its place in the tab.
All of Project’s commands, as well as the macros you develop (What You Can Do with Macros), are fair game for the Project ribbon. The “Customize the Ribbon” page in the Project Options dialog box includes categories of commands to help you find the ones you want to add. You can choose a category like Macros to add a macro or Commands Not in the Ribbon to add a command that isn’t available on Project’s built-in tabs.
Tip
If you can’t find the command you want on the ribbon, you may be looking in the wrong place—or the command simply might not be on the ribbon. To see where a command resides on the ribbon, open the Customize the Ribbon page and chose All Commands. Scroll to the command name in the list and hover the pointer over the command. A ToolTip appears to tell you the ribbon tab, group, and name for the command. To see if you can’t find a command because it isn’t on the ribbon, in the “Choose commands from” drop-down list, choose Commands Not in the Ribbon. If you find the command you’re looking for in the list, you must add it to a custom group to use it.
The steps for adding commands to the ribbon are easy:
Right-click the ribbon and choose Customize the Ribbon.
The Customize the Ribbon page opens in the Project Options dialog box.
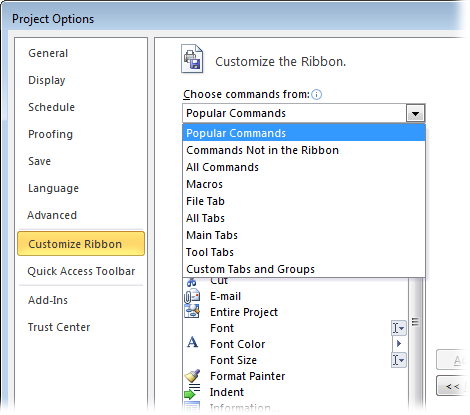
In the “Choose commands from” drop-down list, select one of the command categories.
The command categories, shown in Figure 25-3, represent different collections of commands. For example, the “Choose commands from” drop-down list is set initially to Popular Commands, but you can also choose from the commands on all the main tabs or all tabs. When you select a category, the command list shows the choices within that category. If you don’t know which category to choose, select All Commands.
Figure 25-3. Unless you know the built-in tabs inside and out, your best bets are the first three categories in the list. Popular Commands is a list of the most frequently used commands. To add a command that isn’t on the ribbon, choose “Commands Not in the Ribbon”. To make sure you find the command you want, choose All Commands and scroll through the list.
In the command list on the left side of the page, select the command you want to add to the ribbon.
When you select a command in the list, the Add button becomes active, indicating that you can add it to the ribbon. But don’t click Add just yet.
On the right side of the page, expand the tab you want and select the custom group to which you want to add the command. If other commands are in the group already, select the command below which you want to add the new command.
Although you can select a built-in group, you might notice that they’re grayed out. If you try to add a command to a built-in group, a message warns you that you can add commands only to custom groups.
Click Add.
The command takes its place in the custom group.
Repeat steps 3–5 to add other commands to the group.
When you’re done, click OK to close the Project Options dialog box.
Project is fussy about where you put commands. It lets you add, move, or rearrange the commands only in custom groups you create. (You can add custom groups to built-in tabs.) The program is happy to let you rearrange tabs and groups in any way you want, whether the tabs and groups are built-in or custom. For example, if you prefer the View tab to appear before the Task tab, drag it to the top of the Main Tabs list. With the Customize the Ribbon page open, you can drag elements (or click the up and down arrows) to move them to another location. Here’s how:
Right-click the ribbon and choose Customize the Ribbon.
The Customize the Ribbon page opens in the Project Options dialog box.
On the right side of the page, select the tab, group, or command you want to relocate.
You can move only one element at a time.
Drag the element to its new location. Or click the up or down arrows to move the element higher or lower in the list.
If you drag the element, position the horizontal bar where you want the element to go, as shown in Figure 25-4, and then release the mouse button.
Figure 25-4. A horizontal bar shows you where the element goes. If you click the up or down arrow, the element moves up or down one position. Because you can add commands only to custom groups, you might see the up or down arrow grayed out or an icon (a circle with a diagonal bar through it) indicating you can’t relocate the element to the current location (for example, to a built-in group).
You can’t delete the built-in tabs that come with Project. Nor can you remove commands from built-in groups, like Cut, Copy, and Paste in the Clipboard group on the Task tab. However, you can remove custom tabs, custom groups, and commands you add to custom groups. In a surprising twist, the program also lets you remove built-in groups from a built-in tab. For example, you can select the Clipboard group on the Task tab and remove it from the tab. The secret to removing elements is the Remove button on the Customize the Ribbon page. On the Customize the Ribbon page, select the element you want to remove: a custom tab, a custom group, a command in a custom group, or a built-in group. If the Remove button in the middle of the page becomes active, clicking it removes the selection from the ribbon.
After you tweak the ribbon, you may decide you want some or all of the tabs back to the way they came off the Project CD. Rather than finding each change you made and changing it back, it’s easier to reset them. You can reset the customizations on a single tab or remove all the customizations you’ve made. Here are the steps:
Right-click the ribbon and choose Customize the Ribbon.
The Customize the Ribbon page opens in the Project Options dialog box.
If you want to reset a single tab, on the right side of the page, select the tab.
You can reset only built-in tabs. The only way to “reset” a custom tab is to remove it or edit it.
Click Reset and choose either “Reset only selected Ribbon tab” or “Reset all customizations”.
The “Reset only selected Ribbon tab” is active only if you select a built-in tab in the list or on the ribbon itself. It removes any customizations you made to that built-in tab. If you select “Reset all customizations”, Project removes customizations you made to built-tabs and the Quick Access toolbar, and also removes all custom tabs.
Tip
Before you remove all customizations, export your customizations to a file (see Customizing the Ribbon). That way, it you want the customizations back, you can import the file.
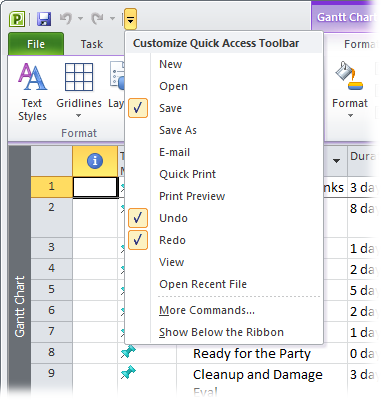
The Quick Access toolbar sits above the File and Task tabs. Initially, this toolbar contains Save, Undo, and Redo, but you can add any commands you want to it. The Quick Access toolbar doesn’t have tabs or groups, so customizing the toolbar is even easier than customizing the ribbon. Here’s what you can do:
Add a command to the toolbar. Click the down arrow to the right of the Quick Access toolbar and then choose the command you want to add, as shown in Figure 25-5. A checkmark appears to the left of the commands on the toolbar. The drop-down menu includes several popular commands, like New, Open, and Print Preview.
Figure 25-5. Unlike the ribbon, you can specify whether the customizations you make to the Quick Access toolbar apply to all files you open in Project or just the active one. In the Project Options dialog box, in the Customize Quick Access Toolbar box, Project automatically chooses “For all documents (default)”. With that setting, the changes you make to the toolbar appear for every file you open. To customize the Quick Access toolbar for the active file, choose “For <filename>” where <filename> is the name of the active Project file.
Add any Project command to the toolbar. Click the down arrow to the right of the Quick Access toolbar and choose More Commands. The Project Options dialog box opens to the Customize the Quick Access Toolbar page. You can add or remove commands from the toolbar using the same steps as for the ribbon (Adding a Command to the Ribbon and Removing Custom Ribbon Elements).
Show the Quick Access toolbar below the ribbon. If you put your top commands on the Quick Access Toolbar, you can reduce the distance you have to move your mouse by locating the toolbar below the ribbon. Click the down arrow to the right of the Quick Access toolbar and then choose Show Below the Ribbon. The toolbar appears in between the ribbon and your Project view. To replace it at the top of the Project window, click the down arrow to the right of the Quick Access toolbar and then choose Show Above the Ribbon.