
If you’re like most project managers, you juggle several projects at the same time. You may have several smaller projects that are part of a larger effort—like the subprojects for building the different parts of a new airplane. Other times, you simply must manage several separate projects at once. In almost every case, you have to share resources with others. For organizations with oodles of projects, Microsoft’s enterprise project management software (Project Server) provides tools for managing entire portfolios of projects (Where Microsoft Project Fits In). However, both Microsoft Project Standard and Professional have features for managing smaller numbers of projects.
In Project, a master project is the easiest way to work with several projects at the same time. You create a new Project file and then insert separate Project files into that one consolidated file. A master project is great for assembling multiple subprojects into one place, but it works equally well if you’re just dealing with a bunch of unrelated projects. This chapter describes how to build a master project of related subprojects, and how to consolidate several unrelated projects into one Project file.
Master projects aren’t your only alternative, though. Sometimes all you need is a link between one task in one project and one task in another project. Suppose one project in your company has magnanimously funded a new database management system. One of your projects can use the system, but you don’t want to start your database work until the stakeholders have approved the other project’s database design. You can create what’s called an external task dependency between the database design milestone and the start of your project’s database design. In this chapter, you’ll learn how to create external task dependencies.
Whether you fight over resources with yourself or with other project managers, you eventually have to share the resources you use. Project Server has the niftiest tools for finding and sharing resources, but plain-Jane Project can share resources, too. In Project, you can create a Project file called a resource pool to hold the information about the resources that are available. In this chapter, you’ll learn how to create a resource pool and apply it to your projects. You’ll also learn different ways of opening a resource pool and when to use each one.
In Project Standard or Professional, inserting subprojects is the key to managing multiple projects, no matter how much or how little the projects have in common. Inserting subprojects usually falls into one of the following situations:
A large project with subprojects. Suppose you’re managing a project so large that it requires several project managers to handle different parts. For example, a project to build a new airplane may have subprojects for the fuselage, engines, electronics, wiring, and so on. The separate systems progress individually, but they must come together before the rubber can hit the tarmac. When you set up a master project that contains the separate subprojects, the project managers for the subprojects (whether they’re subcontractors or part of your organization) each work on their own Project files. However, you can see the big picture of all the subprojects simply by opening the master project.
Tip
Master projects and subprojects are in way over their heads trying to manage humongous projects with casts of thousands, budgets in the millions, hordes of risks and issues, and project interdependencies galore. For a stable of big projects, Project Server is what you need to stay on top of everything.
Several unrelated projects. If you spend each day juggling several small projects, you’d probably like to juggle those projects within Project as well. By creating a master project and inserting all your Project files into it, you can open all your projects by opening the master Project file. Even better, you can work on the projects without switching Project windows and create links between tasks in different projects. Similarly, you can produce consolidated views or reports for all your projects.
Tip
If you don’t require Project’s help calculating the schedule for small projects, the new Team Planner view (Quickly Assigning Resources with Team Planner) is an easy way to assign resources to tasks, move assignments around, and see where things stand.
Reporting on overall progress. You can insert projects into another Project file temporarily to produce consolidated views or reports for several projects.
Although you can insert a Project file into any other Project file, the most common approach is to create a master project—a Project file that contains other projects inserted into it. Here’s how a master project works when you insert Project files:
All the inserted subprojects assemble cheerfully in one Project window, so you can work on and save them all as if they were a single file.
The inserted projects look like summary tasks, which you can expand to show all the subtasks, or collapse to see the big picture.
You can work on subproject tasks as if they belong to the master project—modifying, sorting, filtering, and grouping the aggregated tasks.
Because a master project is a regular Project file, you can add tasks to it—for example, for the work you do supervising the other project managers.
A master project maintains continuous contact with its inserted projects. If someone modifies information in a subproject, those changes are immediately visible in the master file. Conversely, if you make a change to a project from the master project, those changes are immediately visible to anyone looking at the original Project file for that inserted project.
Setting up a master project is usually just a matter of creating the master Project file and then inserting the subproject Project files into it, as in the aircraft-building example at the beginning of this chapter. (The less-common alternative is to create a master project when you already have a single large project that you want to break into subprojects. The box on Creating a Master Project from One Large Project tells you how.)
Here’s how you create a master project from several individual projects:
Choose File→New, and then, in the Available Templates screen, double-click “Blank project”. (Or click “Blank project” and then click Create.)
Project creates a new blank Project file, ready to accept your subprojects.
Select the first blank row.
If you create a master project to track several levels of subprojects, then you can insert projects anywhere in the task hierarchy. For example, if a subproject is large enough to have its own subprojects, then you can insert Project files underneath the higher-level subproject. When you insert the project, it pushes the task you selected down one row and inserts itself at the same level as the task immediately above it.
Choose Project→Insert→Subproject.
The Insert Project dialog appears. Navigate to the folder that contains the first project you want to insert.
Select the project you want to insert, make sure the “Link to project” checkbox is turned on, and then click Insert.
Project adds a summary task for the inserted project, as shown in Figure 19-1.
Figure 19-1. The summary task for an inserted project behaves like a regular summary task. You can click the + before the task name to show all the tasks within the inserted project. Click the – before a task name to collapse the inserted project to only the project summary. A master project can have inserted projects as well as regular tasks.
Project automatically turns on the “Link to project” checkbox, which tells Project to update the master project whenever the inserted project changes. You almost always want immediate updates. In some cases, you want subprojects inserted into a master project as read-only entries, as the box on Preventing Changes to Subprojects explains. One time you might turn off the “Link to project” checkbox is when you decide to turn your master project back into one large project. You can unlink all the projects so that their tasks now belong to the master Project file. Of course, when you do this, you should be sure that no one makes changes to the original subproject files.
Repeat steps 2–4 to insert additional projects.
Remember, you specify where to insert projects by selecting the row below which you want to insert the project. The project in the row you select shifts down, so the inserted projects don’t overwrite what’s already there. You can also reorder inserted projects by dragging an inserted project summary task to another position in the task table.
Note
When you insert projects into a master project, the ID cells for tasks seem to go crazy, as you can see in Figure 19-1. Project assigns sequential ID numbers to each subproject, beginning with 1. However, the tasks that belong to inserted projects have ID numbers, which also begin with 1. So you’re likely to see several tasks with the same ID number. When you work with subprojects, ignore the ID numbers. Instead, refer to the WBS code with a project prefix (Setting Up Custom WBS Codes) to uniquely identify every task.
Work on the inserted projects as you would regular tasks.
Choose Task→Schedule→Indent Task or Outdent Task (Deleting Tasks) to move the inserted project to the correct level of the task hierarchy—for example, to include several sub-subprojects underneath a top-level inserted project. You can link tasks within inserted projects to one another, or to regular tasks in the master project, or you can link one inserted project summary task to another.
If you need help identifying tasks and resources from different subprojects, you can insert the Subproject File column into your Gantt Chart table.
Right-click the Gantt Chart table heading area, and then choose Insert Column. In the drop-down list, choose Subproject File. Figure 19-2 shows the Subproject File cells with the file paths and names for each inserted project.
The Subproject Read Only field shows whether or not an inserted project is read-only. To keep track of subproject editability, insert this column in the Gantt Chart table as well. If an inserted project is read-only, the field value is Yes. Otherwise, it’s No.


Figure 19-2. The Subproject File column contains the full path to the subproject Project file, which means the value seems endless. Don’t widen the column to show the entire path. Instead, you can read the full path by hovering the pointer over a cell in the Subproject File column.
Tip
If your master project and subprojects contain some of the same resources, the Resource Sheet in the master project also contains duplicate entries for those resources, one for each project Resource Sheet containing that resource. The problem is you have to select the correct resource entry (the one for the subproject) when you assign resources within that subproject. You can tell the resource entries apart by inserting the Project column into the Resource Sheet view. But the best way to solve the duplicate problem is to set up a resource pool for all the projects to share, as described on Sharing Resources Among Projects.
If you no longer need an inserted project in your master project, then you can delete the inserted project task while keeping the original subproject file. Suppose another project manager takes over one of your several projects, so you no longer need to see that project. Simply delete it from your master project. The new project manager works on the original Project file. That’s it.
To remove an inserted project, do the following:
In the Gantt Chart view, select the ID cell for the inserted project summary task.
Project selects the entire task, not just the task name.
Press Delete. Or you can right-click the task and choose Delete Task on the shortcut menu.
The Planning Wizard dialog box appears and asks you to confirm that you want to delete a summary task and all its subtasks.
Make sure the Continue option is selected, and then click OK.
Project removes the inserted project from the master project but leaves the original subproject file where it is. If you change your mind, click Cancel instead.
Maybe only a few tasks in one project link to tasks in another project. For example, your advertising firm has an office move planned, but the partners are adamant that packing won’t start until the “Who Needs Pants?” ad campaign is complete. You don’t have to insert these two projects into a master project to link their tasks. The easiest way to link tasks in different projects is to open both projects and then create an external task dependency.
To create an external task dependency, follow these steps:
In Project, open the projects that contain the predecessor task and the successor task.
Project opens each Project file in its own window, but these windows are initially on top of each other.
To view both projects at the same time so you can see the tasks you want to link, choose View→Window→Arrange All.
Project positions the windows for the two projects one above the other, as you can see in Figure 19-3.
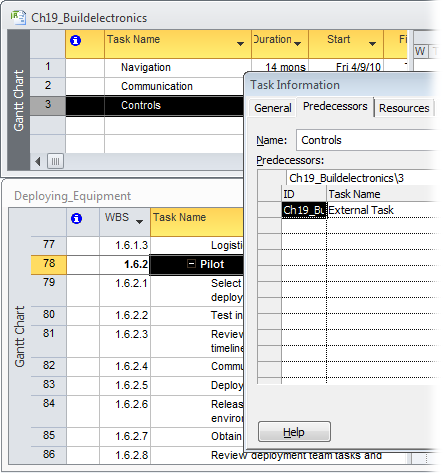
Select the task that’s the successor in this external task dependency.
Because the Task Information dialog box includes a Predecessors tab, you must begin the external link from the successor task.
To open the Task Information dialog box, press Shift+F2 (or choose Task→Properties→Information), and then select the Predecessors tab.
The Name box shows the successor task.
Click the first blank ID cell, and then type the name of the project that contains the predecessor task, followed by a backslash and the task ID.
To see the name of the project, look at the title bar of the project’s window. In Figure 19-3, the predecessor task’s project is Ch19_Buildelectronics. The full ID is Ch19_Buildelectronics3, which appears in the text entry box above the Predecessors table.
Press Enter to save the external task dependency.
Project fills in the Task Name, Type, and Lag cells with “External Task,” and you can’t change any of these values. Don’t panic. After you click OK to complete the link, you can edit the dependency to change the task dependency type and lag value.
Click OK to complete the link.
In the project that contains the successor, the external predecessor appears formatted in gray and immediately above the successor task in the Gantt Chart table area, as shown in Figure 19-4.
To change the type of task dependency or to set lead or lag time, select the successor task once more, and then press Shift+F2.
The Task Information dialog box opens. This time around, the name of the predecessor task appears. The Type is set to Finish-to-Start and the Lag is set to 0d. To change the type or lag, click the corresponding cell in the row for the external task, and then type the new value. For example, if the predecessor and the successor start at the same time, you can choose Start-to-Start.

Note
When you open a Project file that contains external task dependencies, the Links Between Projects dialog box opens, which shows all the external predecessors and external successors to the file. You can see the effects to your schedule and choose which changes you want to accept. To see the links between projects at any time, choose Project→Properties→Links Between Projects. You can also set options to control the appearance of cross-project links. Choose File→Options. In the Project Options dialog box, choose Advanced. In the “Cross project linking options for this project” section, you can turn off the “Show external successors” and “Show external predecessors” checkboxes (they’re on by default) to hide external tasks. If you don’t want the Links Between Project dialog box to open automatically, then turn off the “Show ‘Links Between Project’ dialog box on open” checkbox.
People usually work on more than one project for more than one project manager. If each project manager creates a resource to represent the same worker in each Project file, then overallocated resources and resource squabbles are soon to follow. The solution in Project Standard and Professional is a resource pool, which is a Project file dedicated to resource information—the pool of resources who work on projects, their cost, availability, and most important, how much time they’re already allocated to tasks. (A resource pool in Project follows the same idea as the enterprise resource pool in Project Server, although Project Server includes a few more tools for finding the right resources.)
The beauty of a resource pool is that resource information is in one place. Project managers who use those resources simply link their projects to the resource pool. Assigning resources works exactly as it does when resources are contained in the project file. The only difference is that you can see how much of the resources’ time is allocated to tasks from all linked projects.
The simplest way to set up a resource pool is to create a new Project file, which does nothing but act as a resource pool. Although you can use a Project file with tasks in it as the resource pool, you may run into problems if you want to work on the tasks and someone else wants to work on resource information.
Tip
If an existing project contains all the shared resources in your organization, you don’t have to build a resource pool from scratch. Open the existing project, and then choose File→Save As to save a copy of the project. Open the copy, delete all the tasks, and then save the Project file. (To quickly delete all tasks, display the Gantt Chart view. Click the Select All cell immediately above the first ID cell, which selects all tasks. Then press Delete.) Voilà—you have a Project file suitable for a resource pool.
To create a standalone resource pool, do the following:
Choose File→New. Under Available Templates, double-click “Blank project”.
A blank project opens.
Choose View→Resource Views→Resource Sheet.
The Resource Sheet is home to all the data about your resources (Adding Resources Manually).
Fill in information about your shared resources.
Typically, you fill in resource names, their standard charge rates or cost, and the maximum availability for work resources. If you want to include other information like work group, overtime rate, or cost per use, fill in those fields, too.
Choose File→Save, and then name the project something meaningful (like “Resource Pool”).
Be sure to save the resource pool in a location that all project managers can access. Saving the resource pool to your laptop, for example, won’t help other project managers who need to link to the file. Save the resource pool to a network drive or shared folder.
Tip
If you have resource information in Microsoft Outlook or a human resources database, then you can import that information into Project, as described on Importing Resources from Other Programs.
Before you can assign resources from a resource pool to project tasks, you must link the file to the resource pool. Any Project file that uses a resource pool is known as a sharer file. With the project–resource pool connection in place, the resource pool resources act as if they’re part of your project file.
To connect a project to the resource pool, do the following:
In Project, open the resource pool.
Since many project managers may share the resource pool, open the resource pool Project file as read-only so you don’t lock anyone out of the file. To do that, when you choose File→Open, select the resource pool filename. On the Open button, click the down arrow, and then choose Open Read-Only.
Open the Project file that you want to access the resource pool.
If you have several projects to share with the resource pool, you can open them all at the same time and then cycle through to connect each one to the resource pool.
With the Project file active, choose Resource→Assignments→Resource Pool→Share Resources.
The Share Resources dialog box shown in Figure 19-5 opens.
Select the “Use resources” option and then, in the From drop-down list, choose the resource pool.
If you have several projects open, the From drop-down list shows open projects except those that aren’t already sharer files.
Under “On conflict with calendar or resource information”, select an option to tell Project how you want to resolve resource information discrepancies.
The best choice is to let the resource pool take precedence (select “Pool takes precedence”), because the resource pool then has the final say about resource information. When the resource pool takes precedence, changes made in the resource pool overwrite resource information in the sharer file. For example, suppose someone else opens the resource pool and updates everyone’s standard and overtime rates. When you open a sharer file, the project automatically uses the new updated rates. In turn, if you change resource information in your project file, the resource pool is immune to those changes.
If you select “Sharer takes precedence”, then resource information you change in your project overwrites information in the resource pool. This approach is fine if you use a resource pool for resources dedicated to only your projects. With this option selected, you can change resource information in a project and update the resource pool when you save the project. If you share the resource pool with several other project managers, though, the “Sharer takes precedence” option usually leads to unwanted resource changes, as each project manager tries to modify resources.
Click OK.
The project now obtains its resource information from the resource pool.

When you open a sharer file, Project asks whether you want to open the resource pool (if it’s not open), as shown in Figure 19-6. In almost every case, you want to open the resource pool, because you’ll see all the resources from the resource pool in your project’s Resource Sheet. All resource assignments (from all sharer files) appear in the Resource Usage view, so you can see all the tasks on which a resource works. To open the resource pool, select the “Open resource pool to see assignments across all sharer files” option (see Figure 19-6).
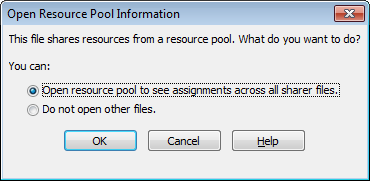
Figure 19-6. If you level resources to remove overallocations (page 277), be sure to open the resource pool. When you level resources in one sharer file, the resource pool hears about the modified assignments and passes them on to all sharer files.
Tip
Because an open resource pool shows all assignments for a resource, your Resource Usage view is likely to have a lot more tasks than you remember. The problem is you can’t tell which assignments are from your project and which come from other projects. To identify the project an assignment belongs to, right-click the heading row in the Resource Usage table area, and then choose Insert Column. In the drop-down list, choose Project. The Project cell for an assignment shows the sharer file that made the resource assignment.
Opening the resource pool also means that the resource assignments you make in your project affect the resource’s availability in the resource pool. When you save a sharer file with the resource pool open, Project asks if you want to update the resource pool. To save the resource changes to the resource pool, click OK. (Click Cancel to save the sharer file without saving the resource pool, for example when you’re testing what-if scenarios and haven’t decided which one you’re going to use.)
Note
If other sharer projects are open, updating the resource pool saves the resource changes from all open sharer projects. Before you update the resource pool, be sure to close any sharer files that contain resource changes you don’t want in the resource pool just yet. When those sharer files are ready for prime time, open them with the resource pool, and then save the project and update the resource pool.
If you select the “Do not open other files” option, then only the resources already assigned to tasks in your project appear in the Resource Sheet. Likewise, you see only the assignments from your project. When you save the sharer file, the resource pool doesn’t receive the resource assignments you make.
Tip
To make sure you’re up to date with the most recent changes in the resource pool, choose Resource→Assignments→Resource Pool→Refresh Resource Pool. Project immediately shows the most current information from the resource pool. Similarly, if you’ve made scads of resource assignments, then you can update the resource pool immediately by choosing Resource→Assignments→Resource Pool→Update Resource Pool.
You can disconnect a sharer file from the resource pool, which is perfect if your project gets canned before it gets started. On the other hand, if a project contains a lot of assignment information, keeping the sharer file and the resource pool connected helps you report on all resource assignments at once. For example, if you want to evaluate resource usage for the past year, you want to keep all projects—active, completed, and discontinued—connected to the resource pool.
To remove a project from the resource pool:
Choose Resource→Assignments→Resource Pool→Share Resources.
The Share Resources dialog box opens.
Select the “Use own resources” option, and then click OK.
Any resources assigned to tasks remain in the project and appear in the Resource Sheet. Other resource pool resources disappear from the Resource Sheet. In addition, the assignments from the detached sharer file (now back to a regular Project file) no longer appear in the resource pool.
When you open a resource pool after it’s connected to at least one sharer file, you have three choices for opening the pool. Sometimes you just want to see what’s in the resource pool. Sometimes you need full read-write access—for example, when you’re updating everyone’s cost rates or work calendars.
When you open a resource pool file, the Open Resource Pool dialog box appears with options that win the prize for longest option labels. Here’s what your choices are, and when to use each one:
Read-only. The “Open resource pool read-only allowing others to work on projects connected to the pool” option opens the resource pool as read-only. Although the resource pool is opened as read-only, saving your sharer files updates the resource pool with assignments you’ve made. The benefit of opening a resource pool as read-only is that everyone else who uses the resource pool can continue to work on their projects at the same time.
Read-write. If you must make changes to resources in the resource pool, select the “Open resource pool read-write so that you can makes changes to resource information (like pay rates, etc.), although this will lock others out of updating the pool with new information” option. By selecting this option, you can modify fields like costs and resource calendars. Of course, you want to use read-write mode for as short a time as possible, because no one else can access the resource pool while you’re using it. That means other project managers can’t see resource assignments and availability across all sharer files. If they open their Project files, they have to do so without opening the resource pool.
Create master project. The “Open resource pool read-write and all other sharer files into a new master project file. You can access this new master project file from the View tab, Switch Windows command” option combines the resource pool and all sharer files into a brand-new master project. If you work on several projects of your own, this is an easy way to build a master project. However, this master project is also useful when you want to produce reports that span all the projects your organization performs. Remember that the resource pool is read-write, so other project managers can’t open their sharer files connected to the resource pool while you have it open.