Blender is a 3D content creation suite that offers a broad range of essential tools, including modeling, rendering, animation, video editing, VFX, compositing, texturing, rigging, and many simulation types. It is cross-platform with an OpenGL GUI that is uniform across all major platforms. It can customize with Python scripts. If you have heard of or tried 3DS Max, Maya, Cinema4D, SketchUp, Wings3D, or Adobe Dimension, and if you’ve used Windows 10, 3D Viewer, and ArtistGL, then you have a basic idea of what Blender 3D is.
Why Blender?
There are a lot of 3D software packages around the globe. There’s 3Ds Max, Maya, Cinema4D, Wings3D, Modo, Daz3D, SketchUp, and a lot more. I have personal reasons for preferring Blender over the others, but I gathered reviews from across the Internet.
Hidden Tools
There are a lot of built-in add-ons in Blender that you can explore to make your project a lot easier. Add-ons need to be activated. There are also free add-ons that you can download that are made by developers in the community.
Blender has a lot to offer its users. There are a lot of tools to learn that you will enjoy. You will discover a lot of things that you will find helpful, such as shaders. Creating outstanding materials or shaders in Blender can’t be discussed in one go. There are a lot of things involved, but learning the style and techniques can help you make something like Pixar shades.
Launches Quickly
Personally, speed is what brings me to Blender. A lot of software takes time to launch, especially if another application is running. But with Blender, this isn’t a problem. It only takes seconds to launch and start your project.
Customizable Interface
The ability to customize the Blender interface based on your preferences is one of the features that attracts many of its users.
Significant Upgrades
If you read the Blender version milestones, you will notice how the team upgrades Blender. In every version, there are major upgrades, fixes, and new developments by its developers. That makes you always look forward to the new version.
Workflow Speed
At first, as with other software, you are slow in making your project; but after you learn all the shortcut keys in Blender, you will notice how quickly you are making your project. The fact that everything in Blender has a shortcut key makes sense. You don’t need to memorize it all. Most of the artists in the Blender community use a cheat sheet for the Blender hotkeys. I provide it in this book.
Blender Cycles Built-in Renderer
Blender offers an unbiased, physically based, pathtracing engine that simulates the way a camera works in the real world. It is optimized for GPU animation and rendering.
The Community
There’s a large community that supports Blender. A lot of volunteers, both developers and artists, are there to assist Blender users around the globe. You not only gain support as a user, you also gain connections and friends, which are more important.
https://blender.stackexchange.com: Question-and-answer site for people who use Blender to create 3D graphics, animations, or games.
https://blenderartists.org: One of the most active independent user sites.
https://blender.community/c/today: User-submitted stories, chat, and weekly live streams.
www.blendernation.com: An overview of everything Blender—development updates, new tutorials, artwork, and community information.
https://blender.chat/home: Independent chat server created to help Blender users to communicate in real time. Part of the blender.community network.
https://discordapp.com/invite/blender: Community-managed discord server.
https://blender.community/c/rightclickselect/: Ideas for Blender.
https://blender.community/c/graphicall/: Custom Blender builds by users and developers from the community.
www.reddit.com/r/blender/: A very active subreddit devoted to Blender; news, critics, and a monthly contest.
www.facebook.com/groups/BNPRandFreestyle/: Facebook group for sharing Blender-based non-photorealistic rendering (NPR) techniques and styles.
www.blendswap.com: A community of passionate Blender artists who share their work under Creative Common licenses.
www.blendercn.org: A Chinese Blender community.
www.bgteach.com: A Chinese Blender community.
dbc-3d.nl/: A Dutch Blender community.
https://blender.community/c/actu/: A French Blender community.
http://blenderlounge.fr/: A French Blender community.
http://blenderclan.tuxfamily.org/html/modules/news/: A French Blender community.
www.nurembug.org: A German Blender community.
www.meetup.com/Blender-3D-Meetup-Munchen/: A German Blender community.
https://blendpolis.de/: A German Blender Community.
www.facebook.com/groups/BlenderGreece/: A Greek Blender community.
http://forum.blender.org.il/: A Hebrew Blender community.
https://blender.community/c/oggi/: An Italian Blender community.
www.blender.it/; An Italian Blender community.
https://blender.jp/: A Japanese Blender Community.
www.facebook.com/groups/blender3d.msia: A Malaysian Blender community.
https://polskikursblendera.pl/: A Polish Blender community.
www.facebook.com/groups/blenderpolska/: A Polish Blender community.
www.blender.pl/index.php?action=portal: A Polish Blender community.
https://blender.community/c/hoje/: A Portuguese Blender community.
http://forum.blender-pt.com/: A Portuguese Blender community.
https://vk.com/blender_3d: A Russian Blender community.
http://blender3d.org.ua/: A Russian Blender community.
https://blender.community/c/hoy/: A Spanish Blender community.
www.facebook.com/groups/HubLa/: A Spanish Blender community.
www.facebook.com/groups/blenderpo/: A Spanish Blender community.
www.facebook.com/groups/blendeame/: A Spanish Blender community.
https://discordapp.com/invite/ebpM5nE: A Spanish Blender community.
Open Source Software
Aside from being “free,” open source software gives you the right to modify your copy and make a version that suits your needs. This is important, mostly for large companies, because not everything you want can be available in one software program. Usually, you need two or three software licenses to create an outstanding CGI film, but sometimes, that’s hard. If your company has an IT department, and you know that they can build add-ons that provide features similar to what you want in licensed software, then you need open source software to freely insert these features. Since open source software can be freely modified, you will not have a problem configuring its code.
Note
There is free software, open source software, and freeware. Their differences are in licensing. Since Blender is GNU GPL, it is considered both free software and open source software. Being free doesn’t mean the price; it means freedom. It’s the freedom to choose the way you distribute, the freedom to change the program, the freedom to redistribute copies, and the freedom to distribute your modified version of the program under the GNU GPL license.
Blender’s Future Is Bright
Blender’s future is bright because of the upgrade the team did for Blender 2.80, or what they call Eevee. They added a new built-in renderer, and changed the layout of its interface, which makes it user-friendly and easy for both beginners and advanced users of Blender.
Blender 2.80 is a version to look forward to, and that’s the topic that I discuss next.
What’s with Blender 2.80?
What should we look forward to in Blender version 2.80? There’s a lot, but the following are the top five reasons.
User Interface
Blender 2.80 has a revamped user interface. Tools, gizmos, and consistent layouts make it easier to discover and use Blender’s many features.
Workspaces let you quickly get started with tasks like sculpting, texture painting, or motion tracking. They can be customized to create your own work environment.
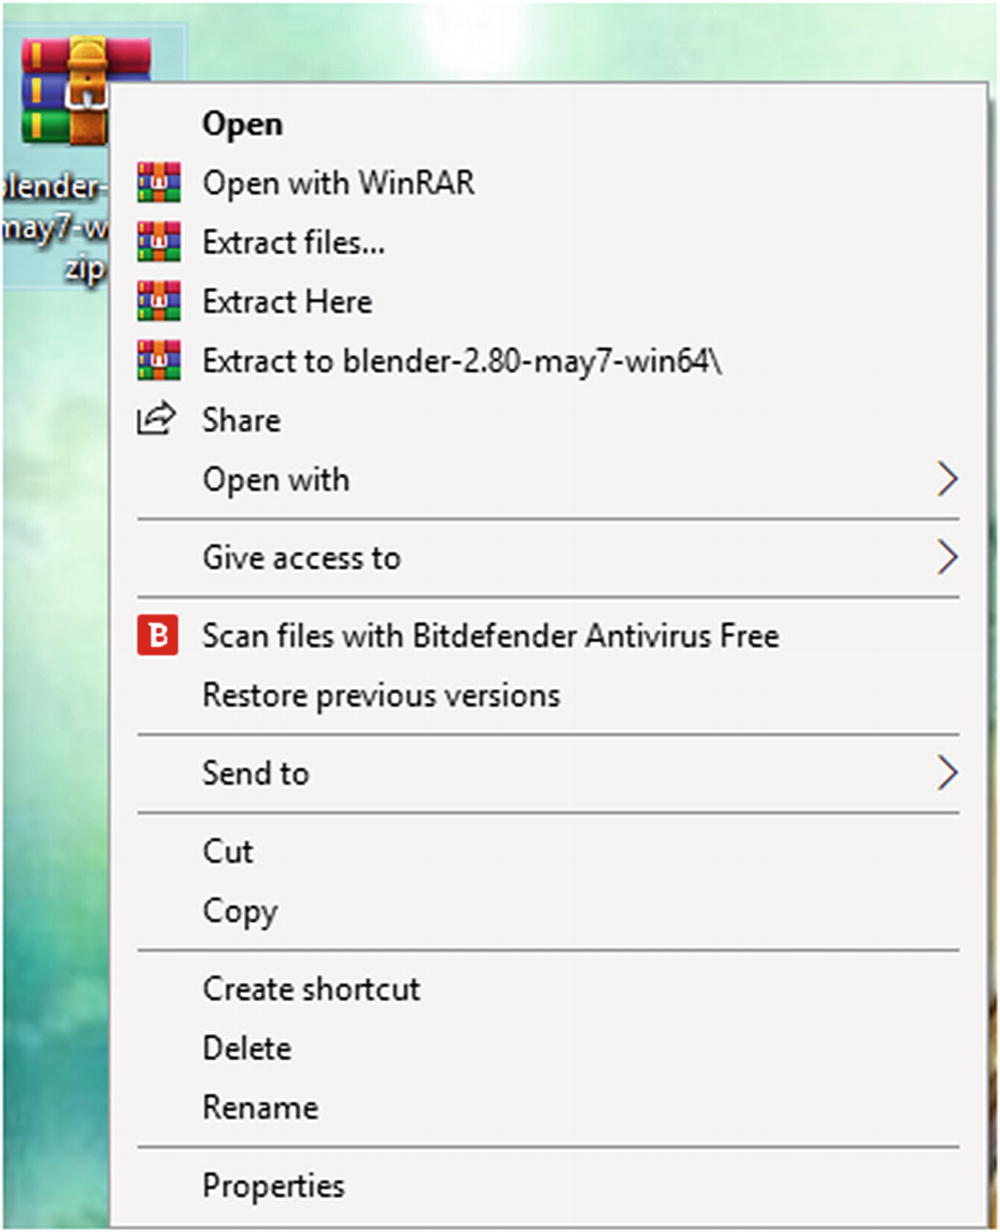
Blender 2.80 user interface
In Figure 1-1, you see the menus for layout, modeling, sculpting, UV editing, texture painting, shading, animation, rendering, compositing, and scripting. These menus let you quickly switch to the workspace you want for your project. Each workspace can be customized according to your own preferences.
Eevee
Eevee is a new physically based real-time renderer. It works as a renderer for final frames and as the engine driving Blender’s real-time viewport for creating assets.
It has advanced features, such as volumetrics, screen-space reflections and refractions, subsurface scattering, soft, and contact shadows, depth of field, and camera motion blur and bloom.
Viewport
There is a new, modern 3D viewport. The workbench engine can visualize your scene in flexible ways. Eevee powers the viewport for interactive modeling and painting with PBR materials.
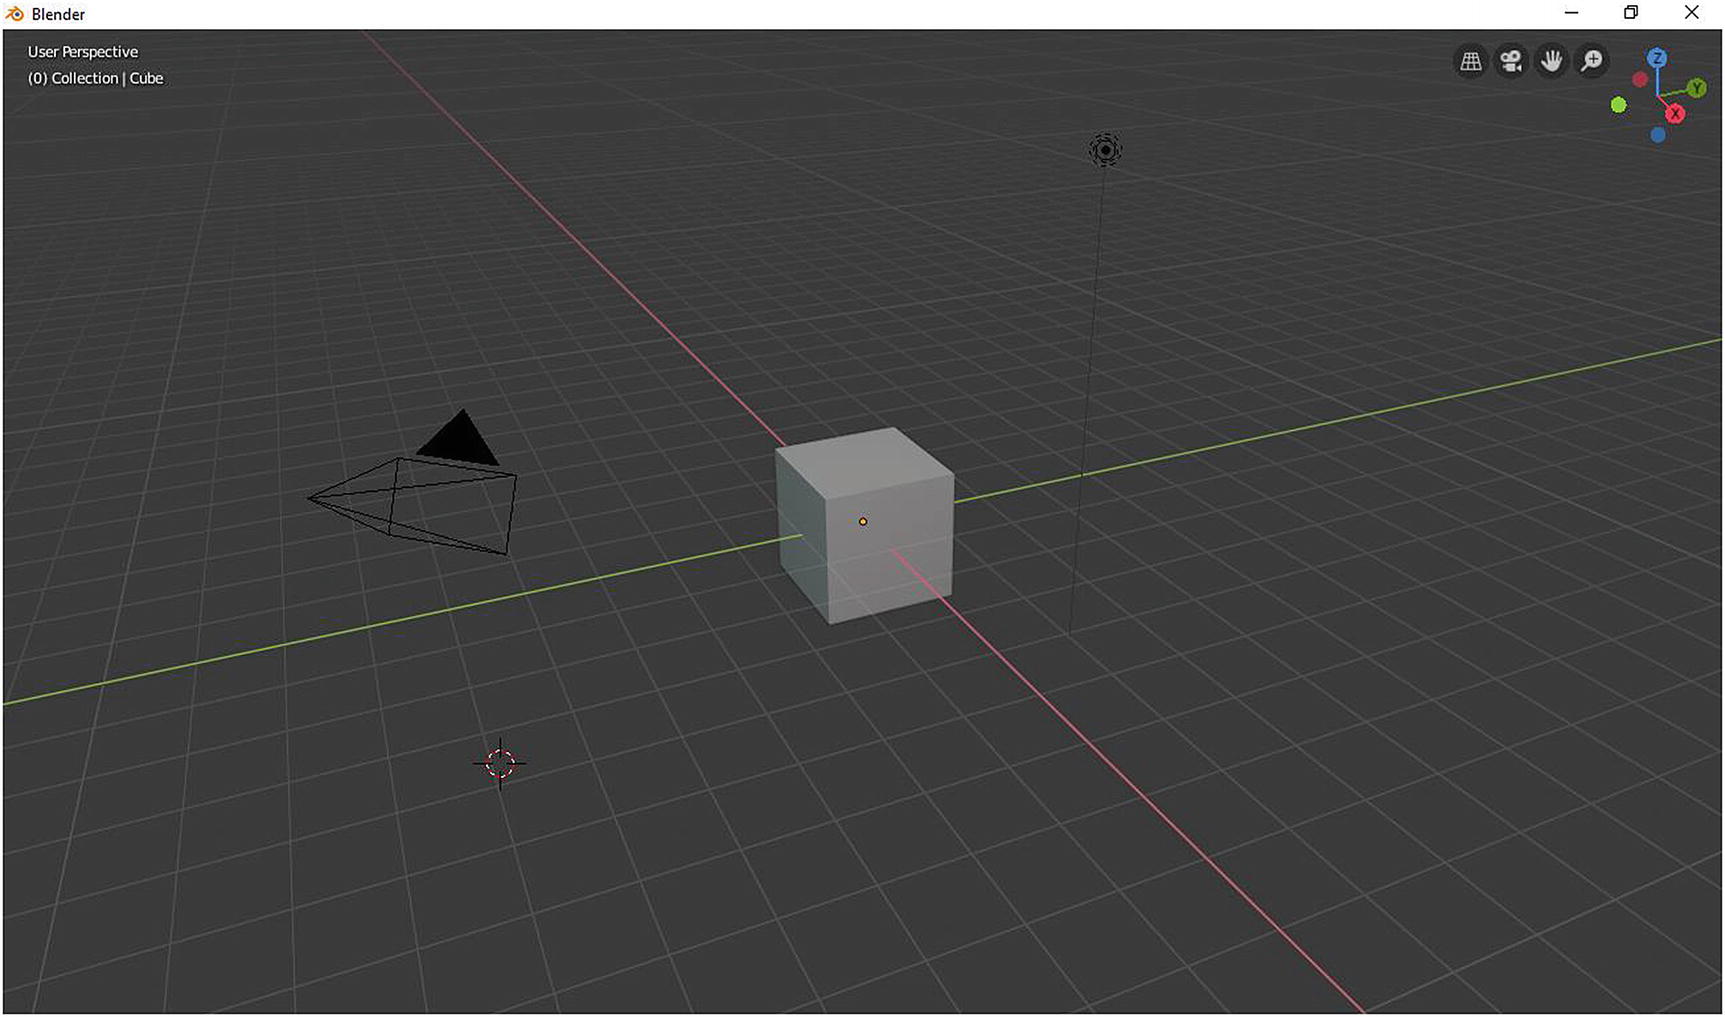
If you’re wondering about the viewport, it allows you to see your objects and manipulate them. This area is called the viewport.
The minimum graphics card requirement for Blender has increased to OpenGL 3.3.
2D Animation
Blender’s 2D drawing capabilities have greatly improved in 2.80. The new Grease Pencil focus creates a friendlier interface for the 2D artist, while keeping the advantages of a full 3D suite.
Grease Pencil is no longer just a stroke; it’s now a real Blender object with huge improvements to brushes and tools.
Cycles
Cycles is a renderer that has been built into Blender since version 2.61. It is very efficient at rendering photorealistic images.
There are new principled volume shaders, hair shaders, and bevel and ambient occlusion shaders. The industry-standard Cryptomatte is now fully supported, combining your CPU and GPU for rendering, random-walk subsurface scattering and many other improvements.
Note
Random Walk Subsurface Scattering is a shader for subsurface scattering mode, which is used in texturing skins. Subsurface scattering is when light passes an object, which is normally opaque, like our skin and plastics.

Witch by Mohamad from blenderartist.org
Installation
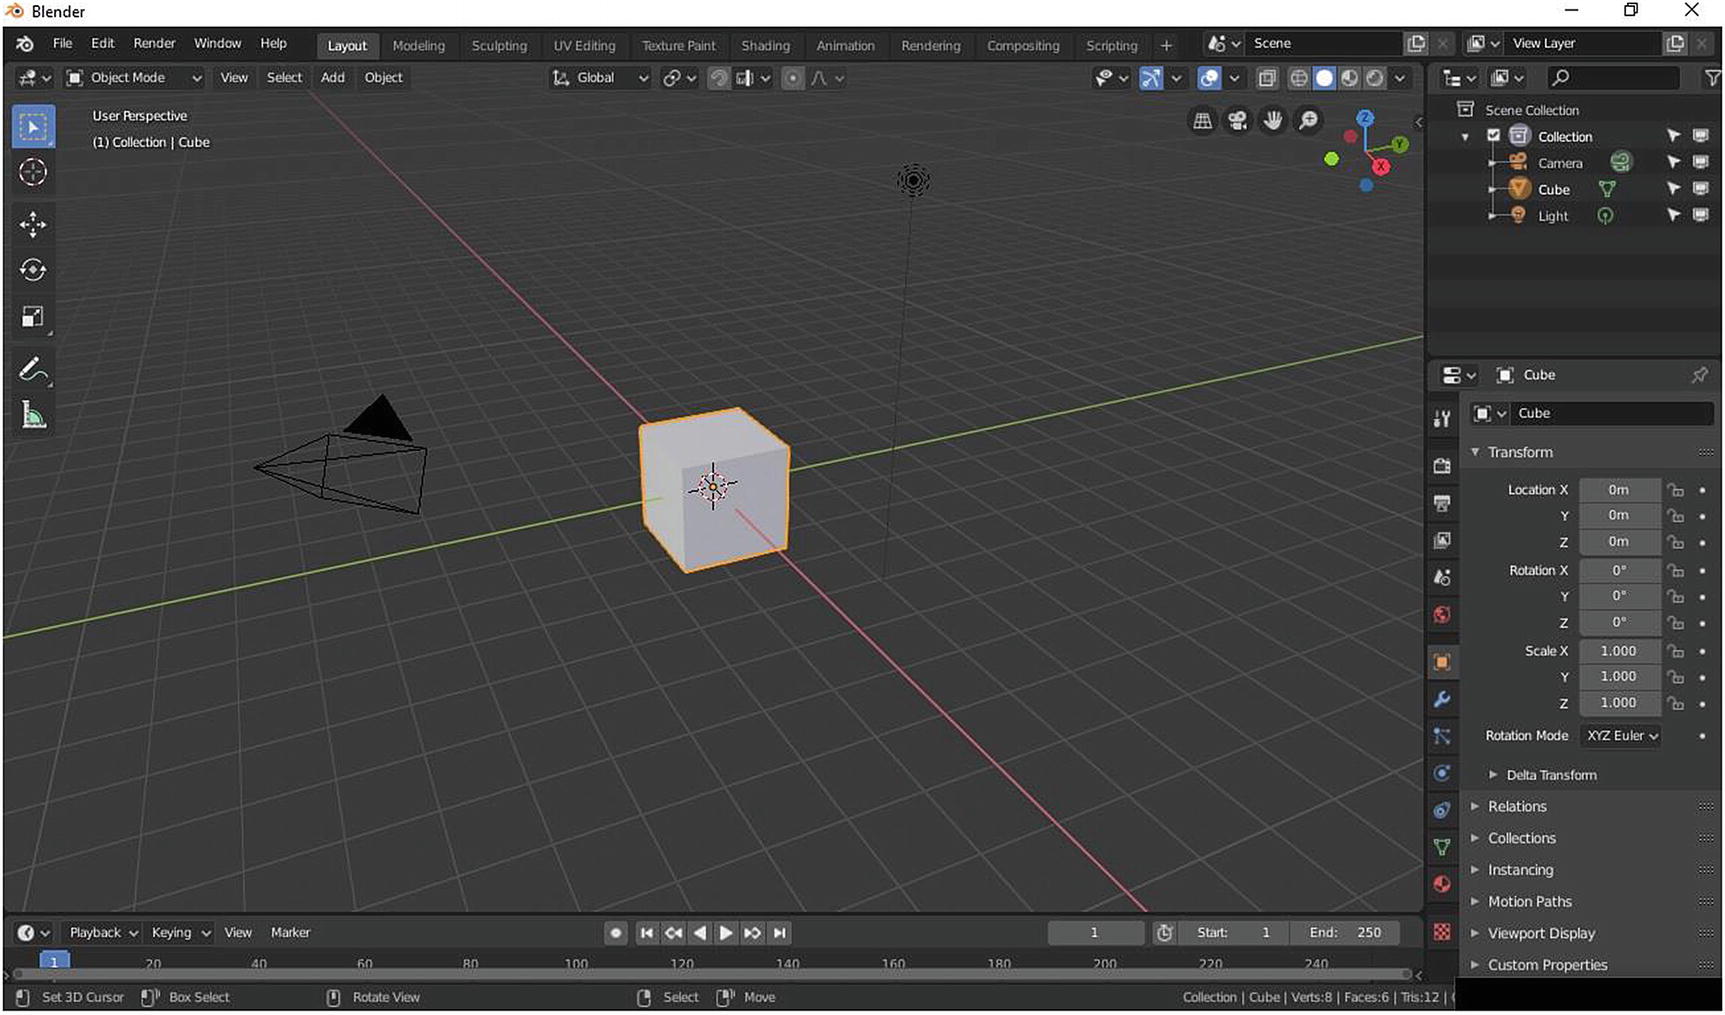
System Requirements
If you are using Blender to create 3D models and assets only, the minimum requirements will do. But if you will use Blender for bigger projects, you need to invest in hardware.
Installation Process
There are two ways to install Blender: using the .exe file or using the .zip file.
Figure 1-4 shows you where to download.
At www.blender.org, click the Download Blender 2.80 button to automatically download the .exe file of Blender’s current release.
If you go to www.blender.org/download, you see all the links to install current and past versions.
Note
The difference between the .exe installer and the .zip installer is that when you use .exe installer, all of its components—the registry and every detail regarding the software—are installed on your PC or laptop. The software creates a directory in the C drive, with backup files, so if ever you accidentally uninstall the program, and install it again, whatever you did before (e.g., any configuration) is remembered by the software. With a .zip file, that doesn’t apply. After you extract the .zip file, the program is there. Portable software. It can be transferred to a flash drive and run on any PC. Save the file on the flash drive too. You can choose either according to your preference.

Download from Blender.org

Installation with .exe
Note
It is always recommended to install software in C:Program Files, but you also have the option to install it on the D: drive to free your C: drive. Click the Browse button. Make sure to create a folder of the software on the D: drive before installing it there. Another thing to note is if you have a previous version of Blender on your machine, you are offered the chance to change, repair, or remove Blender at the start of installation. The correct choice is to Change it.
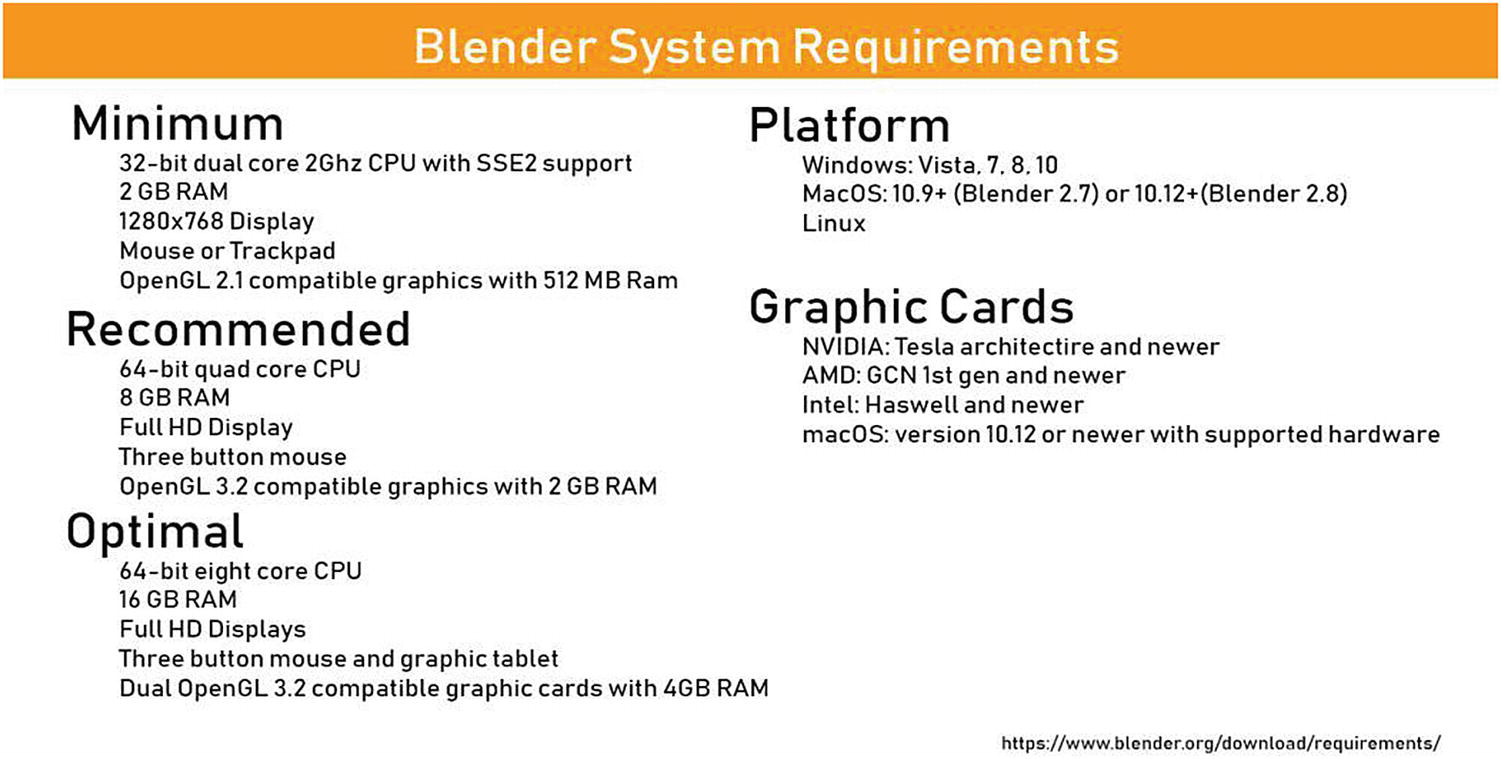
Blender gives you an option to use either the .exe file or the .zip file. You can download and use WinRAR to extract the .zip file or to use the default zip extractor on Windows.
Installation with .zip part 1
In Figure 1-6, you can choose Extract Here, Extract files..., or Extract to <folder name>. When you choose Extract here, whatever files are inside it are extracted in the place where it is. For example, in Figure 1-7, all the Blender files are extracted to the desktop. It is extracted the way it was compressed as a zip. What this mean is that if the files were not in a folder, they are extracted unorganized in the place you extracted them to. Extract Files gives you the option to choose where you will extract the files, and there are other options in Settings that might help. Extract to <folder name> makes the program create a folder before it extracts the files inside. This tip is applicable, not only in Blender but also in other software. I always choose Extract to <folder name> since it is organized and fast.
Note
In vanilla Windows 10, the same function is achieved with the only extract option in the right-click menu: Extract All….
Installation with .zip part 2
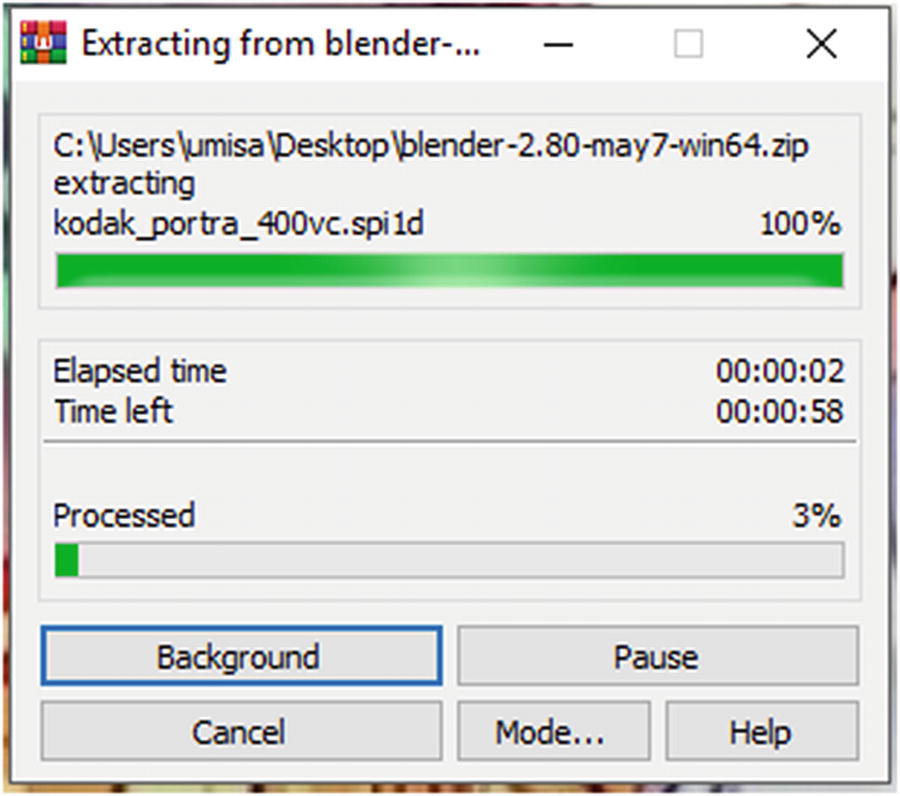
In Figure 1-7, while WinRAR is extracting the file, it is creating a folder on my desktop.
When it comes to .zip files, the way to know that this was done is after the window that processes the extraction is closed, you see that your folder already has all of its contents.
Let’s run Blender 2.80 and take a look at its user interface.
The Face of Blender 2.80
Let’s discuss the new look of Blender’s user interface.
Blender’s user interface is designed to be non-overlapping, which means that you can view all relevant options and tools at a glance without pushing and dragging editors around. It is also designed to be non-blocking. Tools and interface options do not block the users from any other parts of Blender. It is designed with non-modal tools, which means that the tools can be accessed efficiently without taking time to select between other tools.
The Topbar is at the top
The editor is in the middle area
The Status Bar is at the bottom
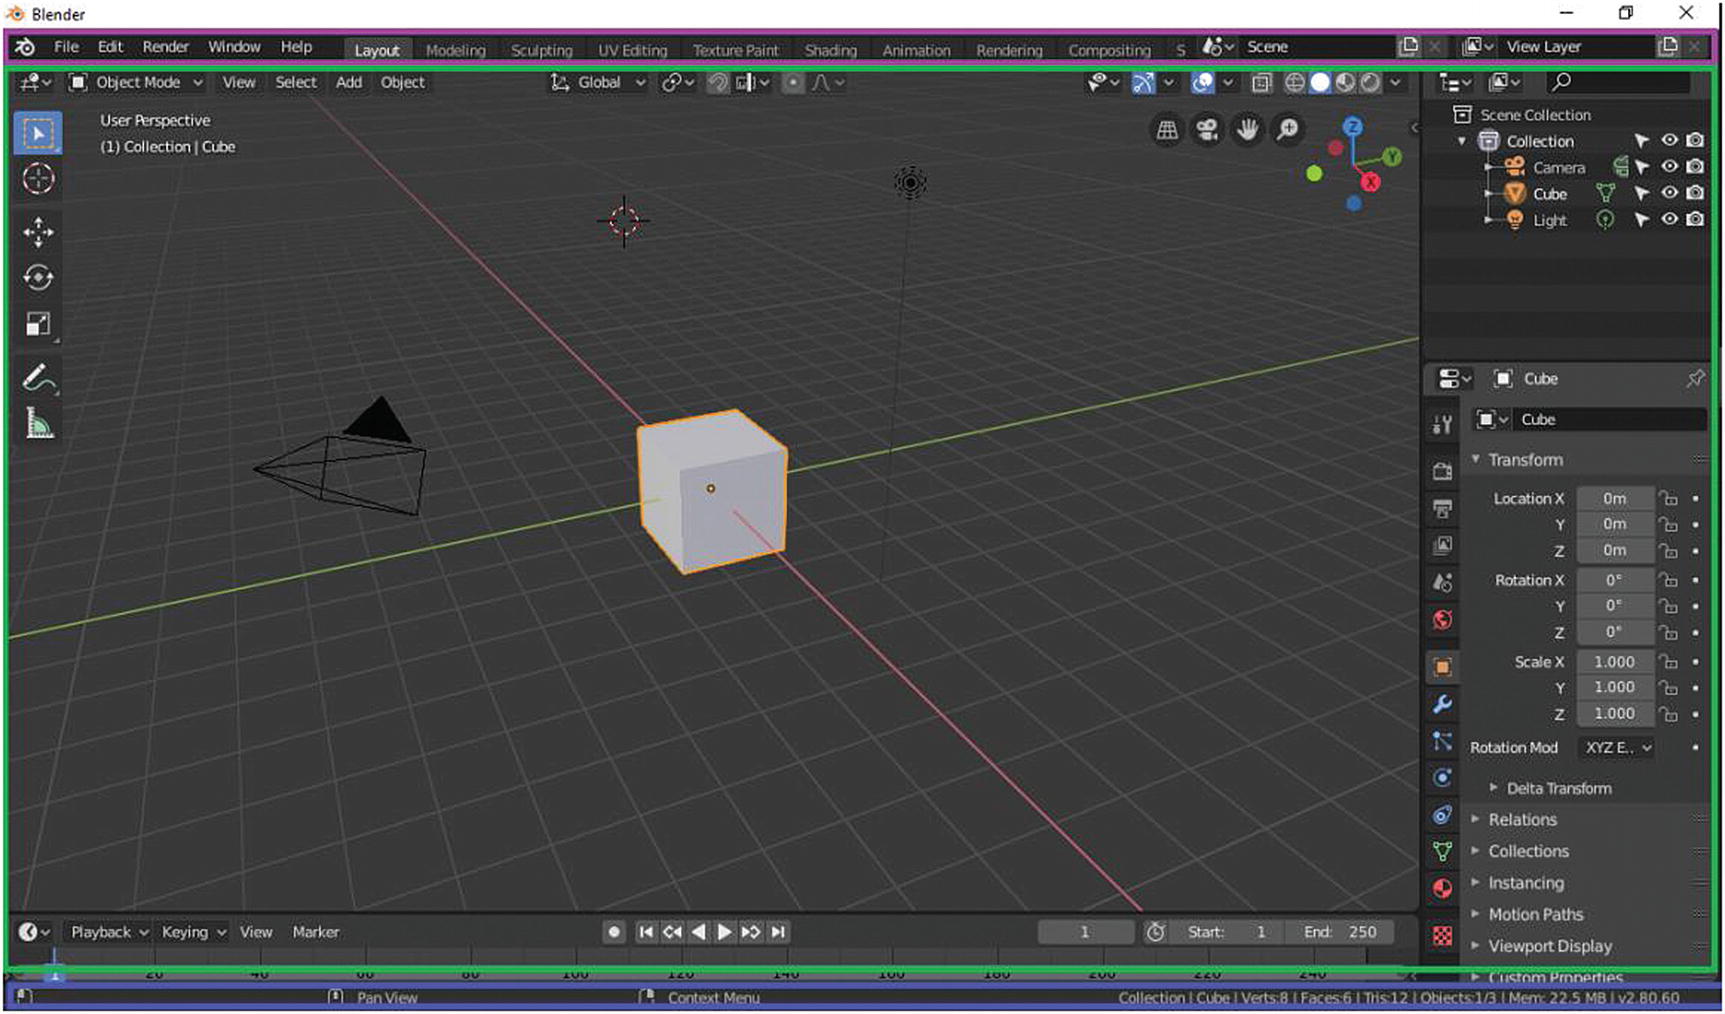
After splash screen: Topbar (violet), editor area (green), Status Bar(blue)
3D view in the top left
Timeline in the bottom left
Outliner in the top right
Properties in the bottom right
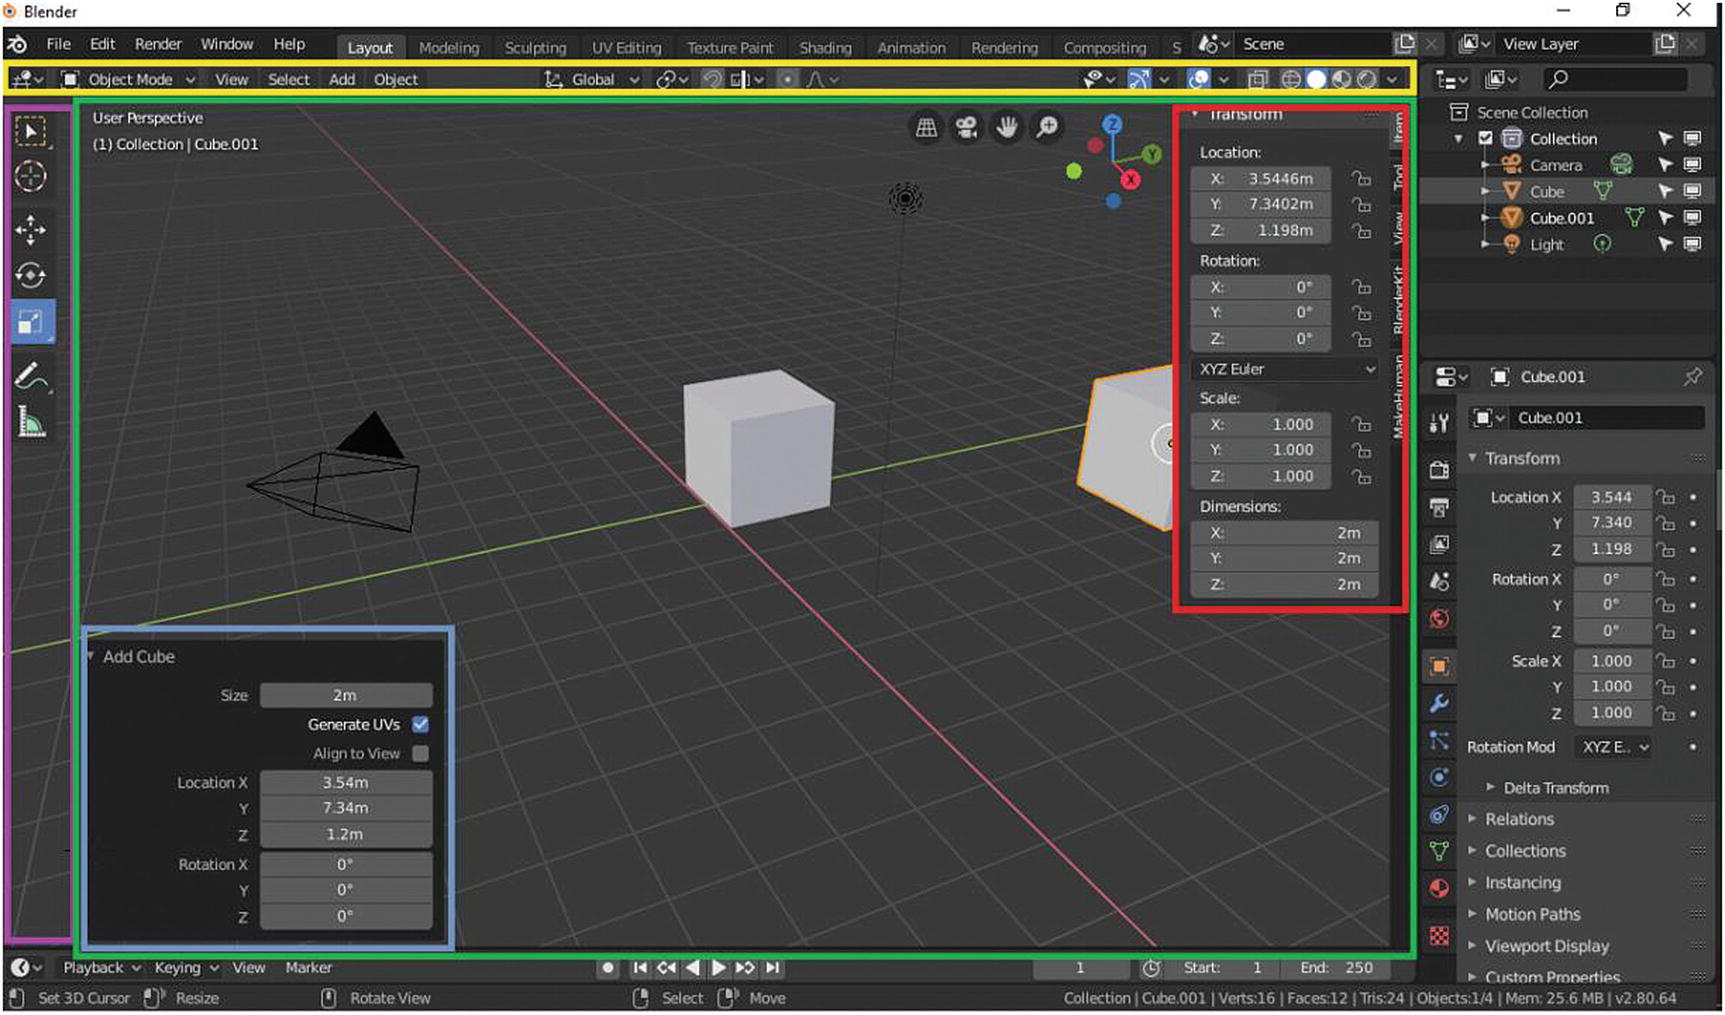
3D view editor: the header (yellow), main region (green), toolbar (violet), sidebar (red), and operator panel (blue)
The header in the 3D view editor is mainly used to switch the editing mode—from object mode to edit mode or to sculpting mode. I discuss these modes in Chapter 2. In this header, you can also add meshes by clicking Add ➤ Mesh ➤ the object you want to add. An easier way to do this is to hold Shift and press A.
The main region is where you see all the editing you’ve done.
The toolbar guides you with basic functions, like moving an object, measuring the object’s size, scaling, rotating, and making annotations.
The sidebar is where you see the exact measurements, such as the current location of the object, the scale size, the rotation value, and dimensions.
Customization
Another great thing about Blender is that it allows you to customize everything—including the themes and the shortcut keys for your own convenience.
To customize your themes or shortcut keys, go to Edit ➤ Preferences.
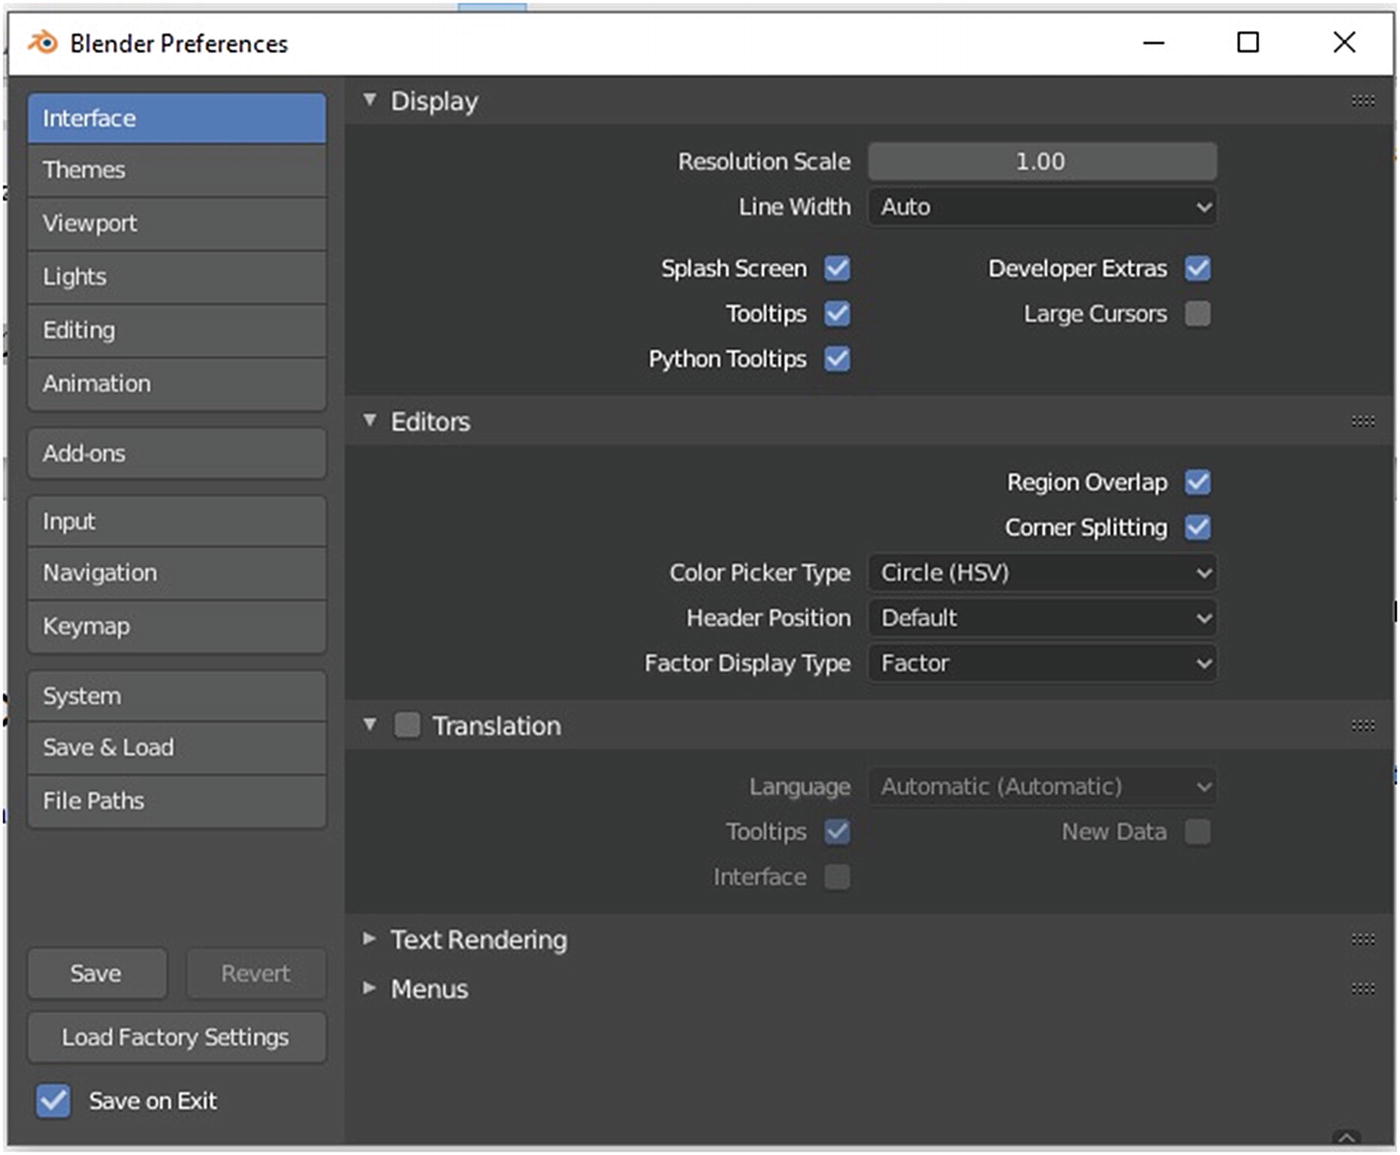
User preferences
Blender opens a new window in which you can edit your preferences. You have the option to minimize the window.
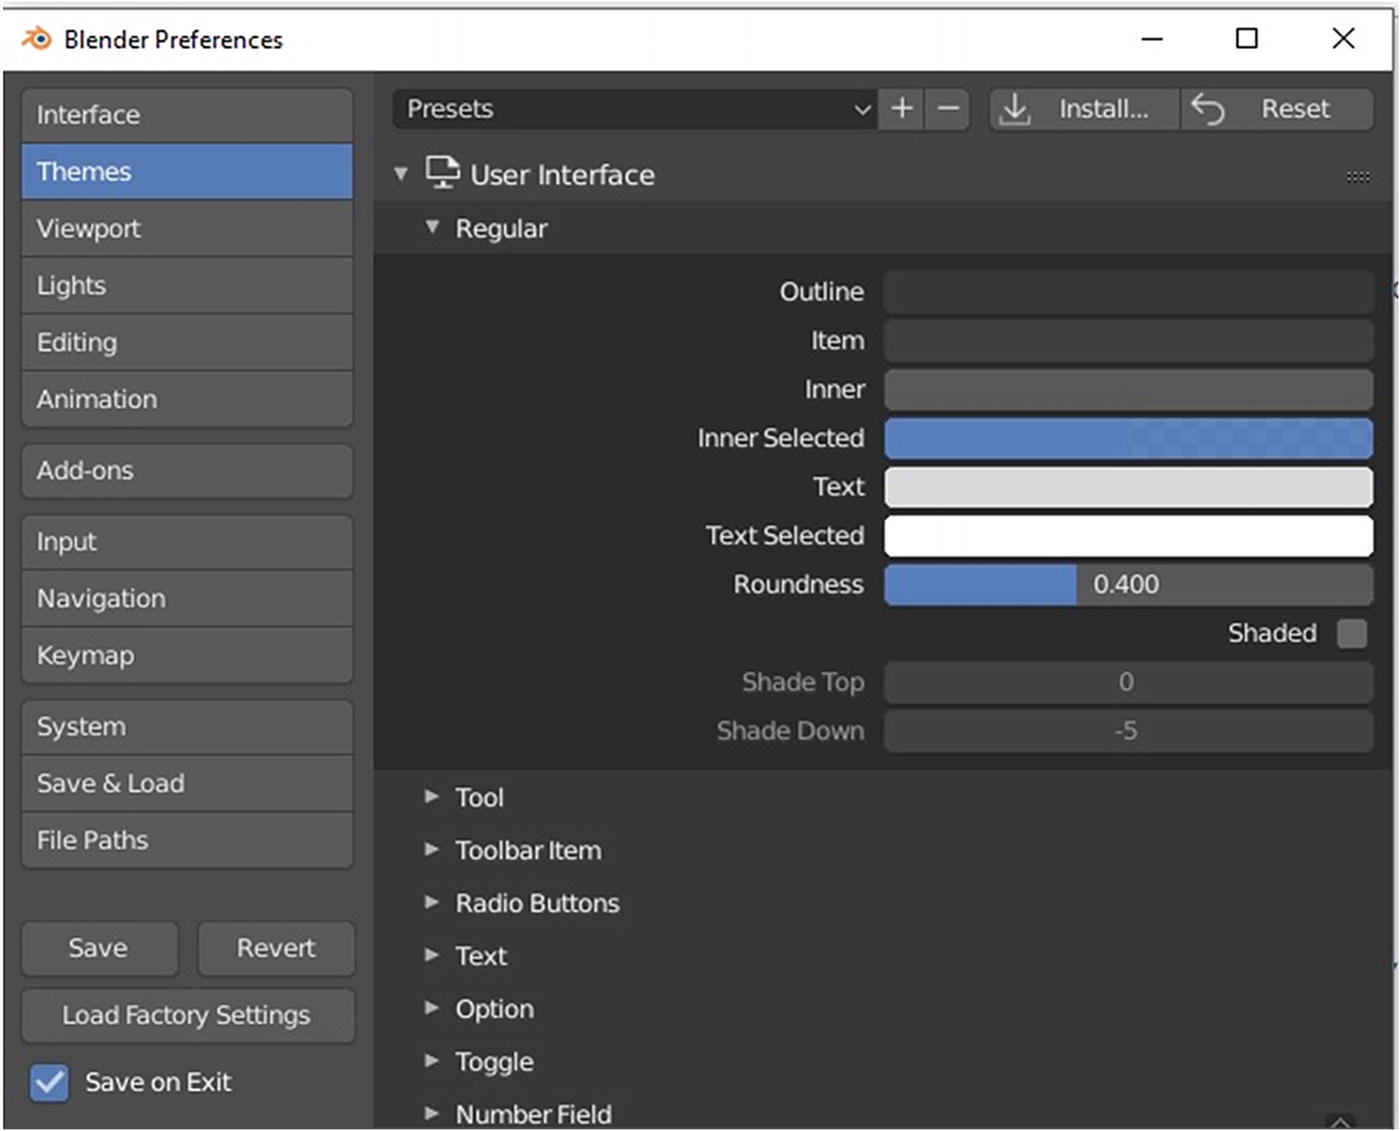
User preference: Themes
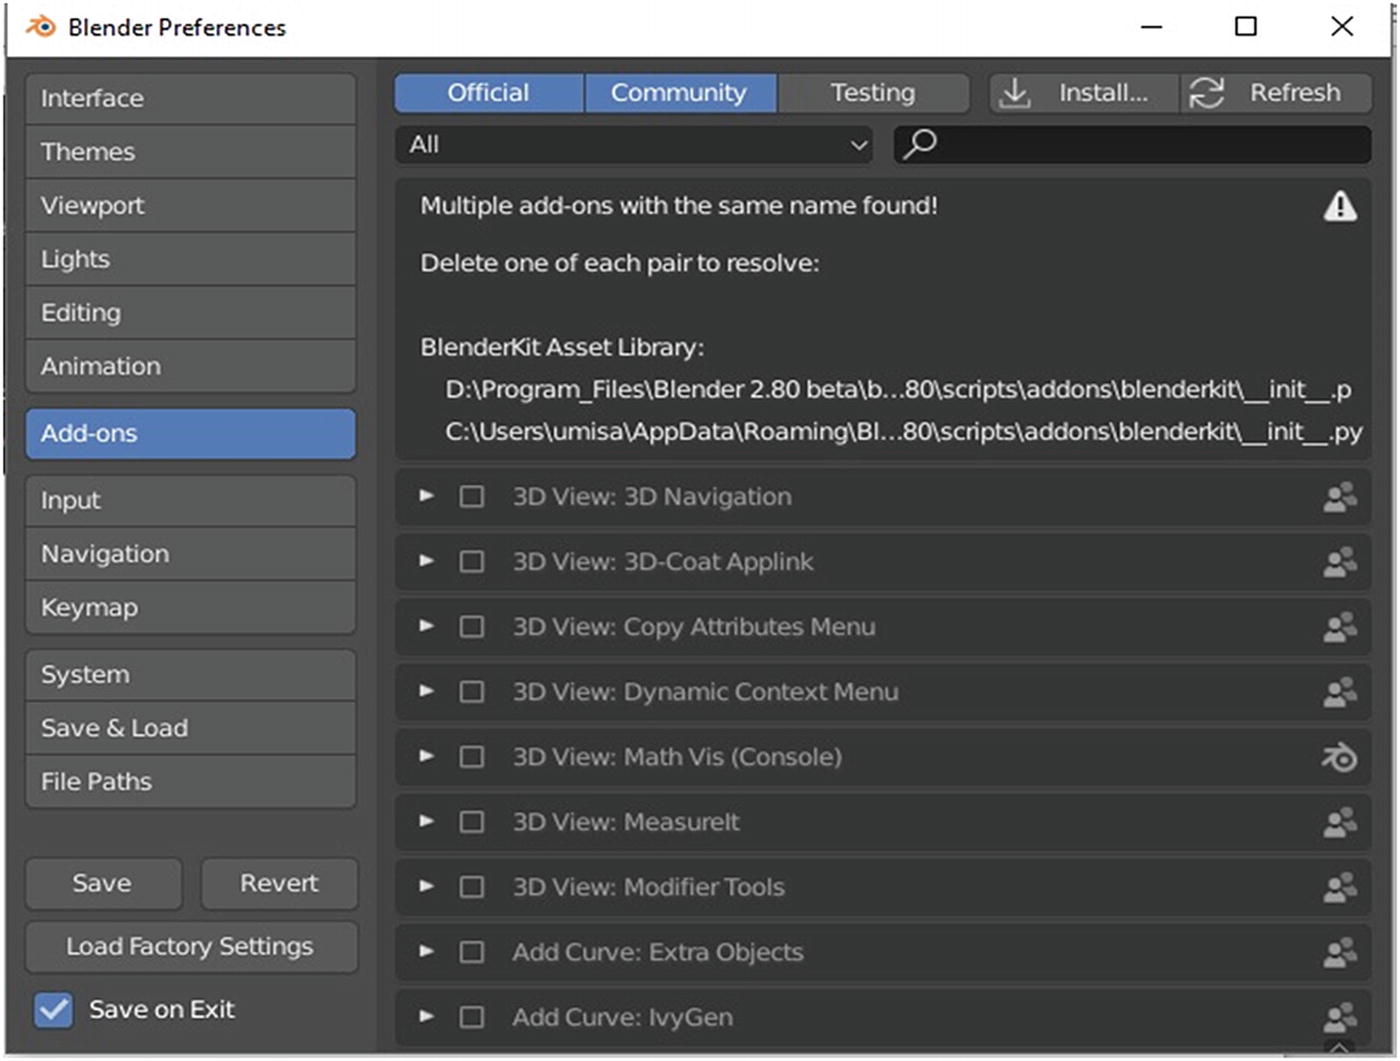
User preference: Add-ons

User preference: Keymap
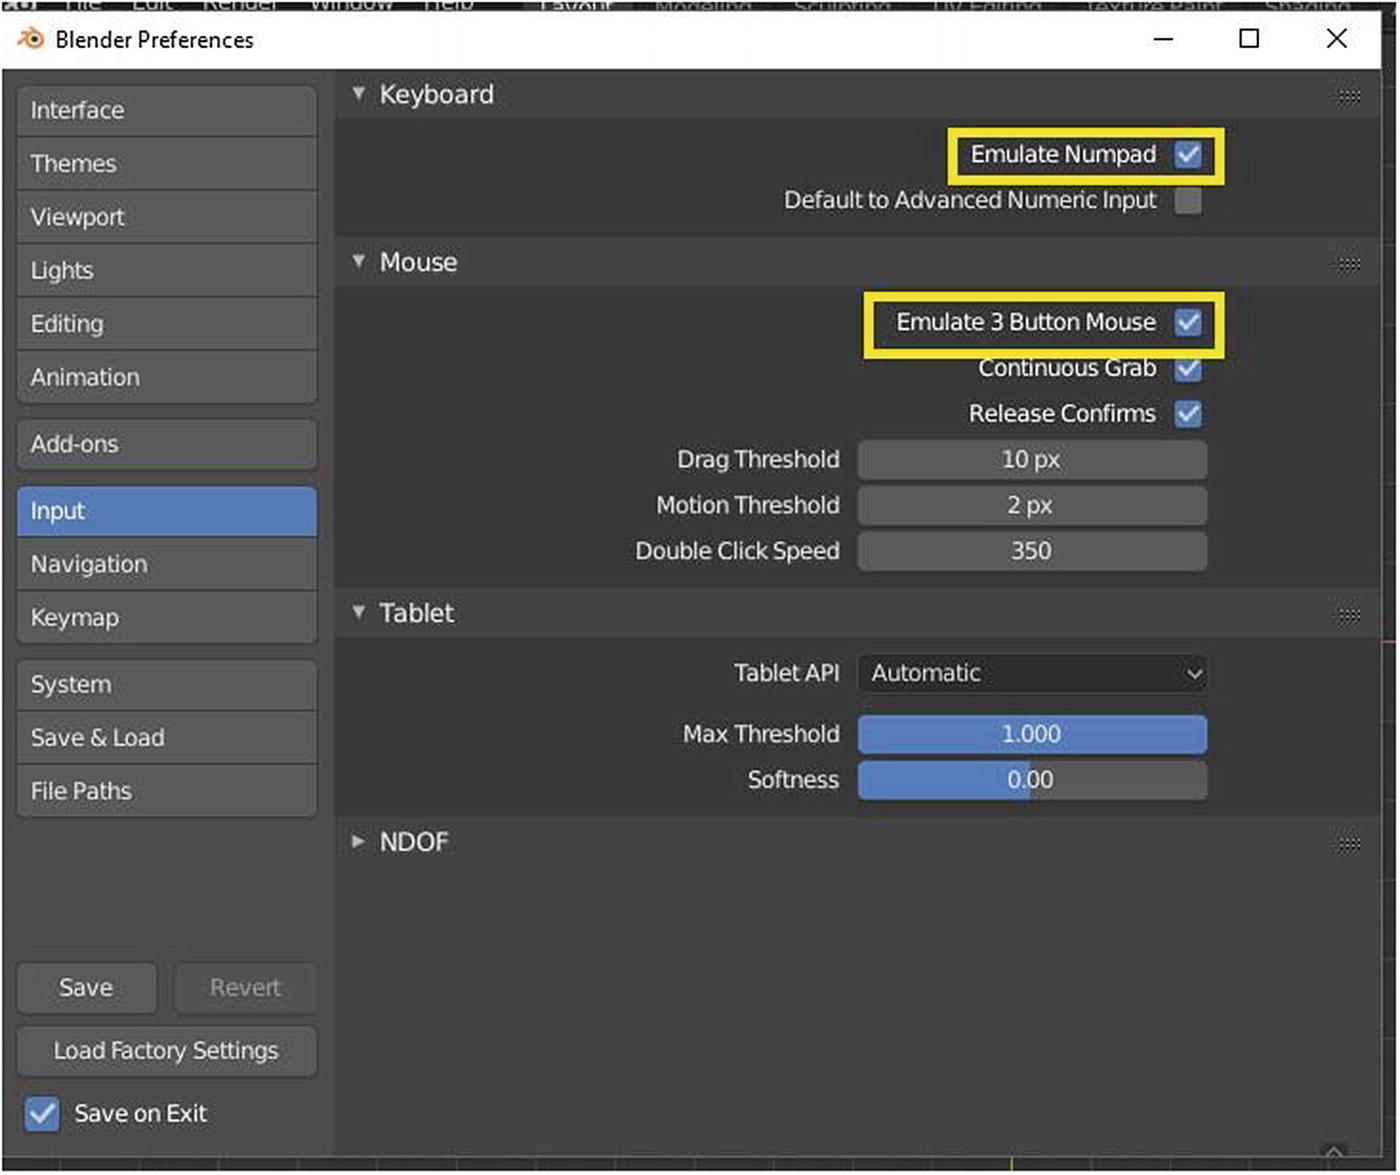
User preference: Input
When you activate Emulate 3 Button Mouse, you can use Alt+Left mouse button and drag to rotate the view. Use Shift+Alt+left mouse button and drag to pan the view. You can change the Selection button in the mouse from left mouse to right mouse in Keymap section, under Preferences ➤ Select with.
If you’re using a Mac with a single-button mouse, Option+mouse button is the equivalent of a middle button mouse. To rotate the view, press Option+mouse button and drag. To pan the view, press Shift+Option+mouse button and drag. To select an object, press the Command button+mouse button. You can create loop cuts without a scroll wheel by using the PageUp/PageDown or Up/Down keys, or by entering a numeric key after pressing Ctrl+R.
Workspaces

Blender has ten workspaces to play around in. Workspaces are essentially predefined window layouts. You can create your own customized workspaces by clicking the plus icon beside the Scripting tab.
Layout: The general workspace to preview and work on your project.
Modeling: The workspace for modifying geometry with modeling tools.
Sculpting: The workspace for modifying geometry with sculpting tools.
UV Editing: The workspace for mapping image textures in 3D objects.
Texture Painting: The workspace for coloring image textures in 3D.
Shading: The workspace for applying color/nodes and shades in 3D.
Animation: The workspace for applying animation effects.
Rendering: The workspace for rendering the final image.
Compositing: The workspace for post processing.
Scripting: The workspace for editing and adding Python script or code.
Note
Workspaces are automatically saved in a .blend file. When opening the file, if you check the Loud-UI option in the Blender file browser, Blender will override the current layout and use the layout saved in the .blend file.

Workspaces: Layout
Areas

The application window is divided into a number of areas that reserve screen space for editors, such as 3D view, outliner, timeline, properties, and more. The boundaries of an area are indicated by rounded corners, as shown in Figure 1-17.
By dragging a rounded corner, which is highlighted in yellow, you can duplicate the existing editor. For example, if you drag the rounded corner of a 3D view editor, it opens another 3D view editor.
You can resize areas by dragging with the left mouse button. Move your mouse cursor over the border between two areas, so that the cursor changes to a double-headed arrow, and then click and drag.
Splitting an area creates a new area. Joining two areas closes one area. To do this, place the mouse cursor in an area corner; the cursor will change to a cross or plus sign. Press the left mouse button to activate a splitting or a joining command. Dragging the area inward makes the areas split, whereas dragging the area outward makes two areas in a similar size and the editors join.
Toggle Maximize Window/Fullscreen
To maximize the area, go to View ➤ Area ➤ Toggle Maximize Area or press Ctrl+spacebar. To return to normal size, you can use the Ctrl+spacebar shortcut or click the Back to Previous button on the Topbar.

To use the fullscreen mode, go to View ➤ Area ➤ Toggle Fullscreen Area or press Ctrl+Alt+spacebar. To return to normal size, use the keyboard shortcut.
Editors
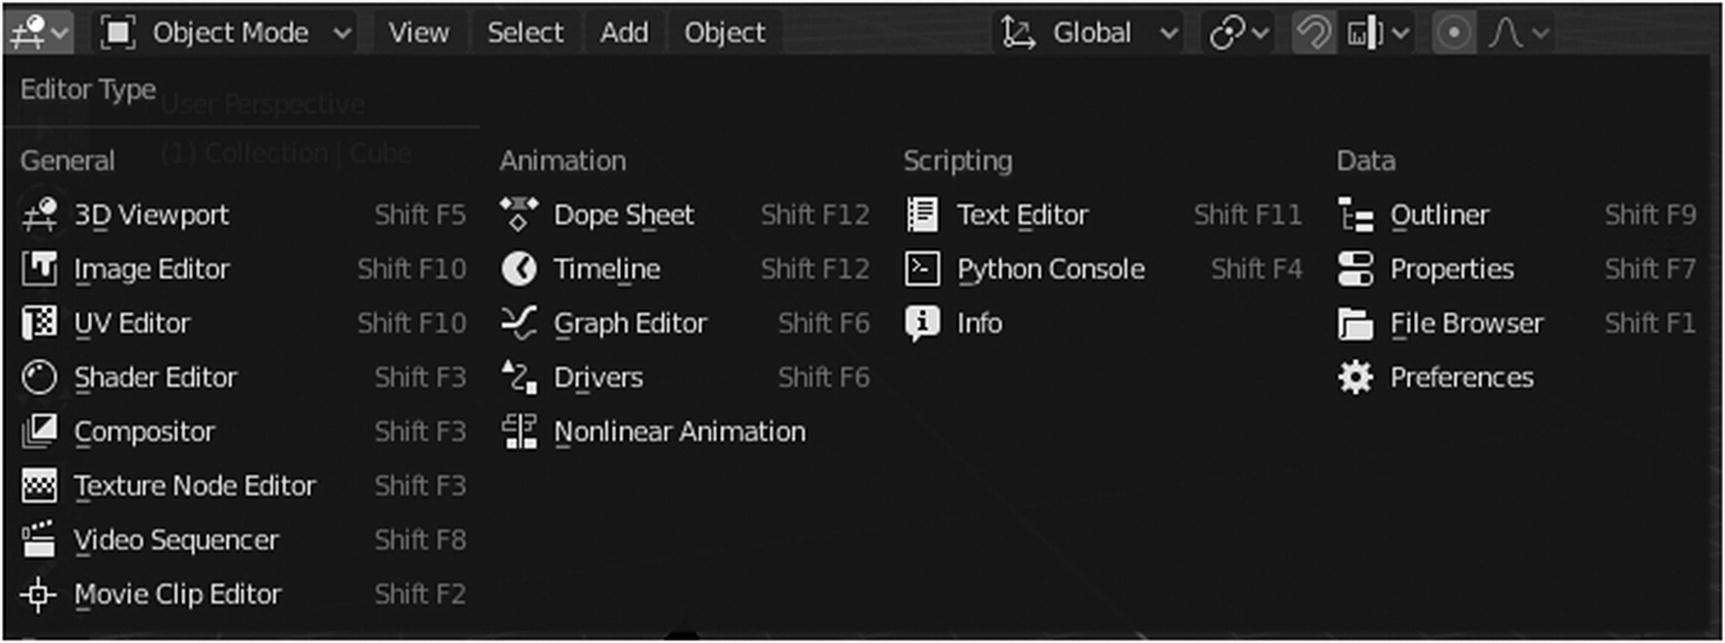
Blender provides editors for displaying and modifying different aspects of data. The Editor Type selector (the first button on the left side of a header) allows you to change the editor in that area. This helps you to create an ideal workspace for your project. Every area may contain any type of editor; it is also possible to open the same type multiple times.

In The Wind by Cheryl Chen