
15. Chronicle and Share Your Experiences

In this chapter, you’ll discover tips for taking professional-quality photos using the camera that’s built in to your smartphone or tablet and then learn about some of the ways you can edit, organize, and share them. You’ll learn
![]() Five tips for taking better vacation photos using the cameras that are built in to your smartphone or tablet
Five tips for taking better vacation photos using the cameras that are built in to your smartphone or tablet
![]() Easy ways to view, organize, edit, and enhance your digital images from your mobile device
Easy ways to view, organize, edit, and enhance your digital images from your mobile device
![]() Ways to share your digital images by creating prints or sharing them online
Ways to share your digital images by creating prints or sharing them online
In addition to using the technology that’s at your disposal to help you in planning, researching, booking, and enjoying your trips, you can use your same smartphone or tablet to take, edit, enhance, organize, print, and share impressive vacation photos.
Every smartphone and tablet has a front- and rear-facing camera built in that’s able to capture high-resolution digital images. Using the Camera app that comes preinstalled on your mobile device, it’s possible to take professional-quality images. Then, using the photos app that also comes preinstalled in your iOS or Android smartphone or tablet, you can edit, enhance, print, and share those images.
In addition, you can get optional mobile apps for taking, editing, and enhancing photos and then share your images on social media (Facebook, Instagram, or Twitter, for example) using a cloud-based file sharing service (such as Apple iCloud, Microsoft OneDrive, or Dropbox), or by taking advantage of the features offered by online photo-sharing services, like Flickr.com, PhotoBucket.com, Smugmug.com, Shutterfly.com, or SnapFish.com.
Letting Your Pictures Tell a Story
Each photo you take should tell a story. Based on the subject(s) you choose, what’s seen behind, in front of, and to the sides of your subject, your use of lighting, the shooting perspective, and how you frame your shots, you determine what information or emotion you convey.
With each photograph, the goal of any photographer is to elicit some type of emotion or thought from the people looking at their photos, and/or to tell some type of story.
When you group a collection of images taken during a trip, and then display them in chronological order in a photo album, photo book, digital slide show, or online gallery, the people viewing those images should be able to easily determine where you were, what you experienced, and the emotions that were felt by the people featured in the photos. In other words, without the photographer needing to verbally explain each image, or the viewer needing to read long captions, your digital images should speak for themselves and tell some type of story.
So, as you go about taking pictures, think about what story you want to tell, and exactly what you want to convey in each image. Then, use your creativity and the shooting strategies outlined in the next section to make your photos as visually interesting and appealing as possible.
Five Tips for Taking Better Photos with Your Mobile Device
The camera app that’s preinstalled on your smartphone or tablet allows you to shoot photos virtually anywhere using the cameras that are built in to your mobile device. The front-facing camera is ideal for taking “selfies,” which are photos of yourself (with whatever is behind you as the background). You can take a selfie while holding the camera in front of your face, or while using an optional selfie stick, which you can purchase for between $15.00 and $30.00.
The rear-facing camera that’s built in to your mobile device is a much higher resolution camera than the front-facing camera, and should therefore be used for all other types of photos to get the best results in terms of clarity, detail, and color vibrancy, for example.
Learn How to Use the Camera App Like a Pro
For comprehensive information about how to use the camera app on your smartphone or tablet and get more detailed instruction on how to edit and share your photos using a mobile device, pick up a copy of My Digital Photography for Seniors (Que) by Jason R. Rich. It’s available from bookstores, your favorite eBook store, or www.QuePublishing.com.
When you understand the basics of how to use the camera app that comes on your mobile device, the following five tips will help you consistently take more visually interesting photos in your everyday life, including while you’re on vacation.
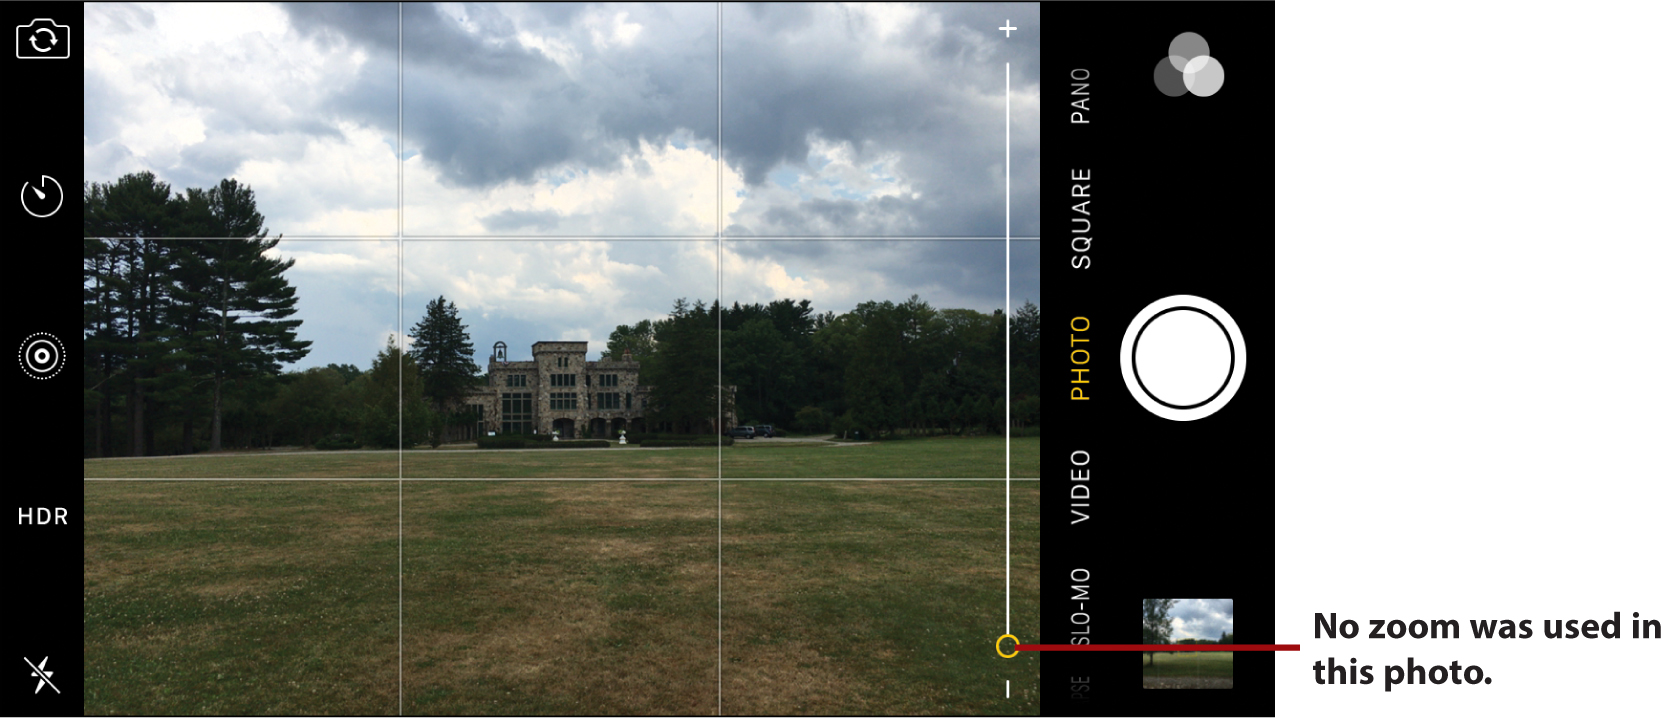
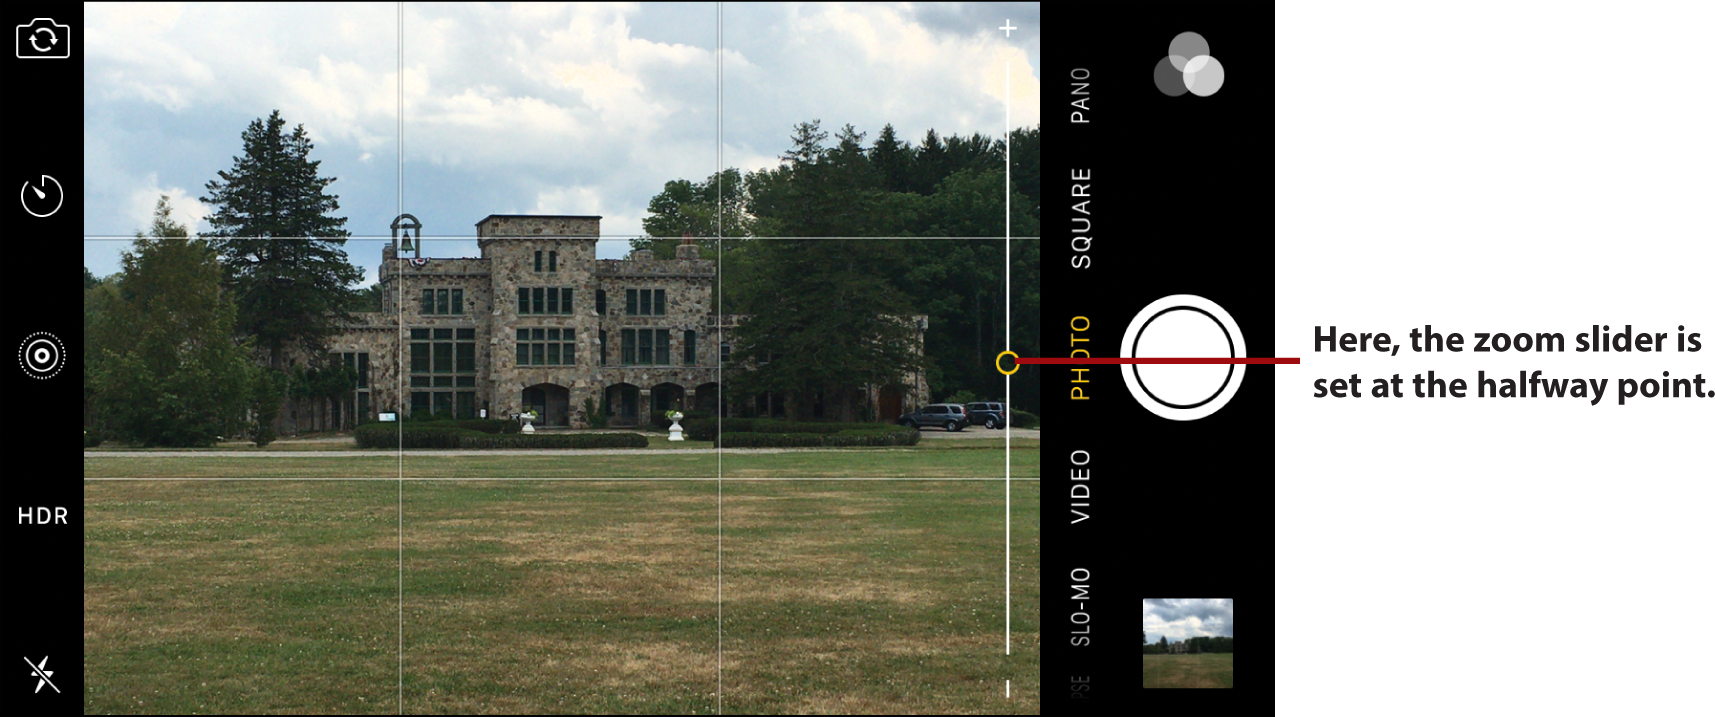
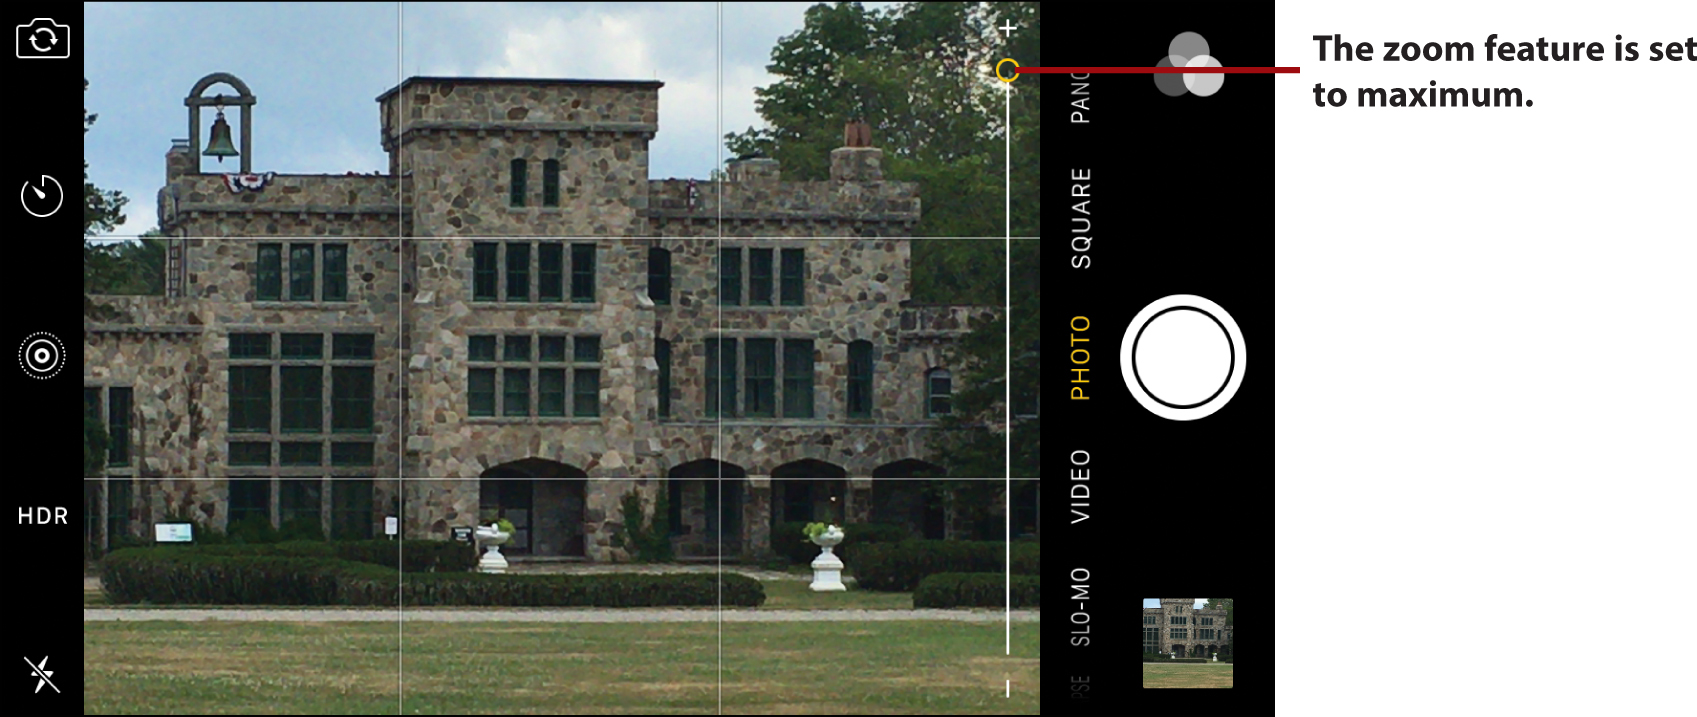
Remember to always hold the camera (your smartphone or tablet) still when you’re actually taking a photo. This becomes even more important when taking pictures in low-light situations, or when you’re using the camera’s built-in zoom feature. Shown here is a demonstration of the zoom feature offered by the iPhone edition of the Camera app (running iOS 9.3.2). In each of the following photos, neither the photographer nor the objects in the photo physically moved. Only the camera’s zoom was used.
Choose Between Landscape and Portrait Mode
One of the initial creative decisions you need to make when taking a photo with your smartphone or tablet is whether to shoot in portrait mode (by holding the mobile device vertically), or using landscape mode (by holding the device horizontally).

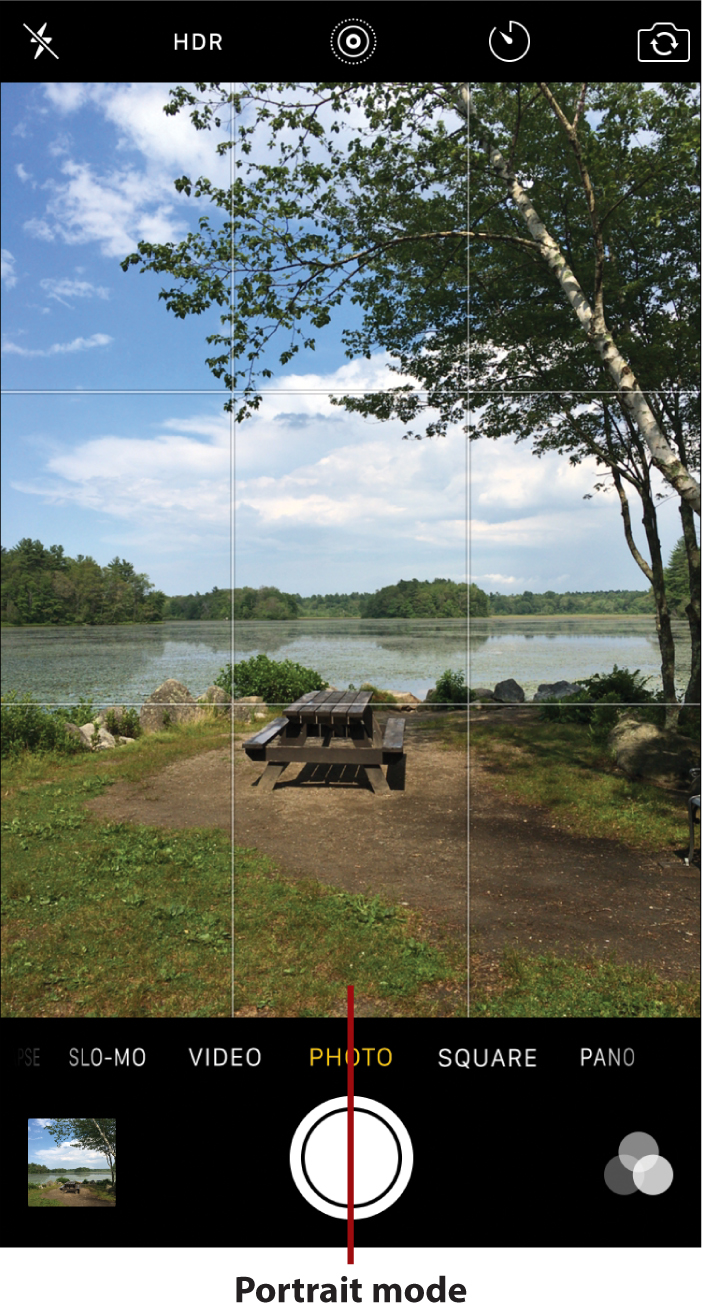
When taking pictures of people or pets, for example, portrait mode allows you easily make your intended subject the main focal point of a shot without displaying too much in the background.
However, there are several instances when using landscape mode allows you to feature more background within your shots. Landscape mode is useful when
• Taking photos of one or more people while on vacation, when they’re standing in front of a popular tourist attraction, for example. In this case, you want to showcase the people in the image, but also make it very clear where the photo was taken by allowing a lot of the background to be seen.
• Taking photos of a large group of people.
• Taking landscape or cityscape shots.
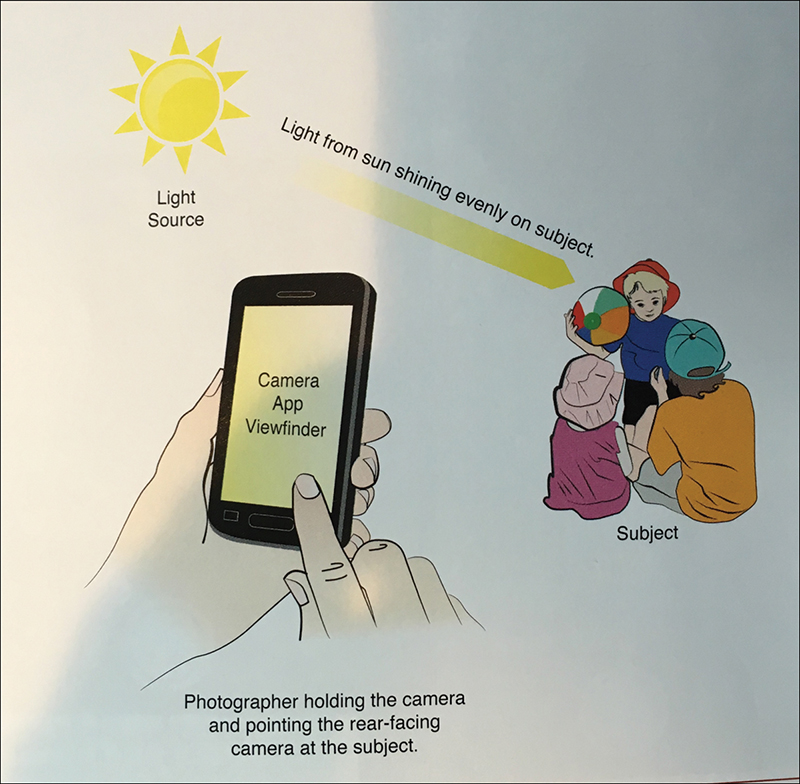
Pay Attention to Your Primary Light Source
Anytime you’re taking pictures outside during the day, your primary light source will most likely be the sun. Indoors, your primary light source could be from a lamp, overhead light, sunrays coming through a window, fire from a fireplace, or candlelight.
As a general rule—except when taking photos of sunrises or sunsets, for example—it’s best to position yourself (the photographer) so that your primary light source is behind you and in front of your subject, so that the light shines as evenly as opposite onto your subject without causing unwanted shadows.
If too much light comes directly into the camera’s lens, you’ll wind up with unwanted glares, silhouettes, or an over exposed image that removes colors and detail from the photo.
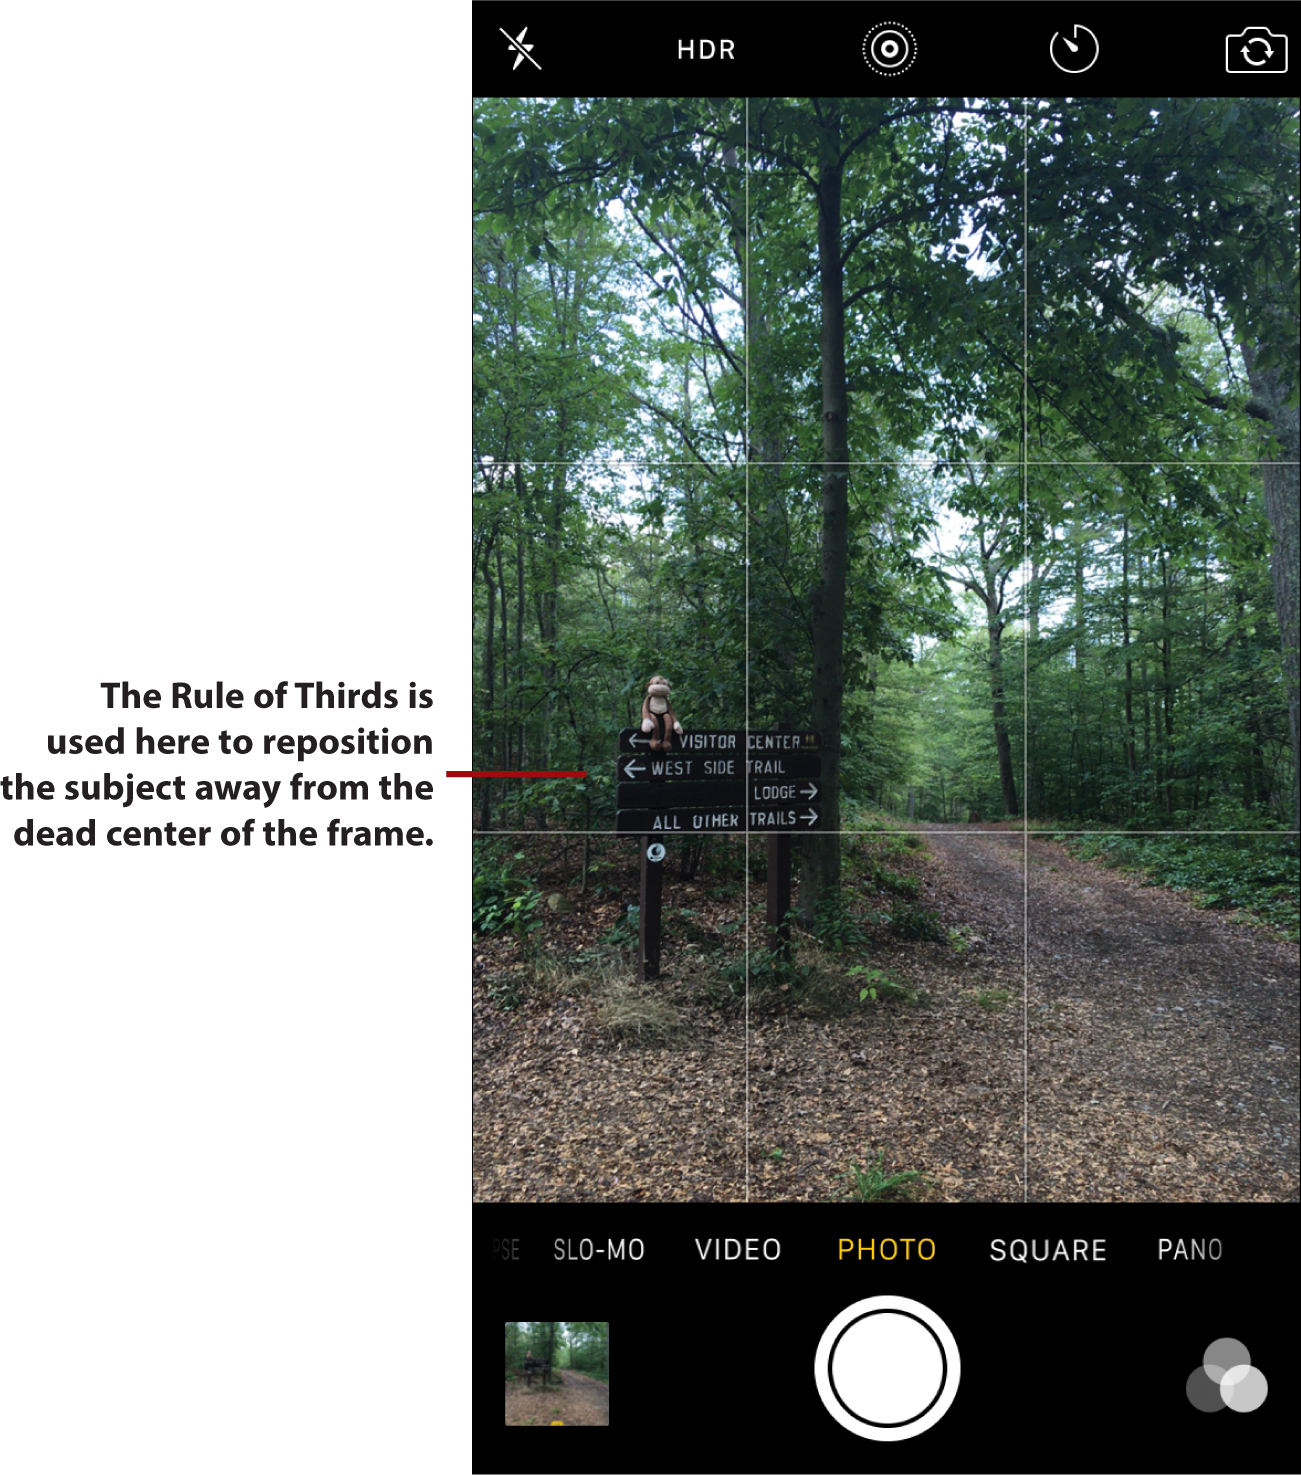
Use the Rule of Thirds to Frame Your Shots
Most amateur photographers point their camera at their intended subject, center their subject in the viewfinder, and then take all of their photos from a head-on perspective. As a result, even if your subjects are different, all of your photos will tend to look the same, and showcase little creativity from a visual perspective. The Rule of Thirds encourages a photographer to move their intended subject away from the dead center of the frame.
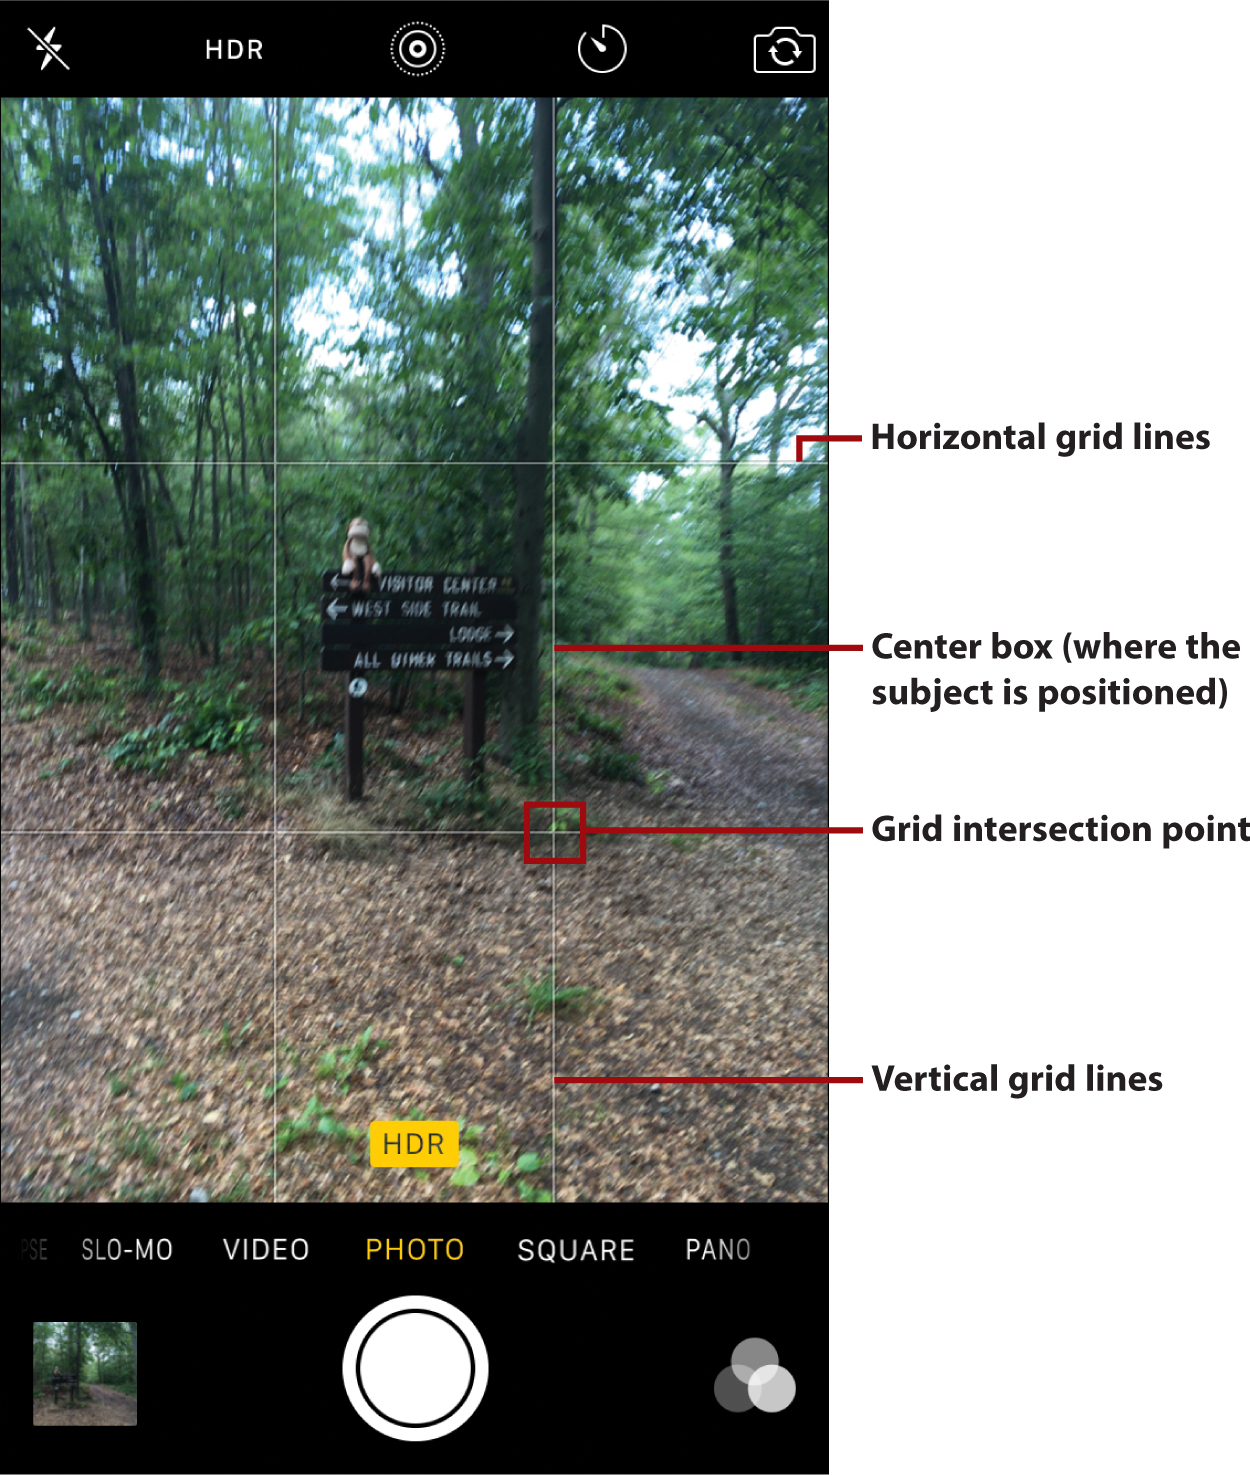
Imagine a grid (or tic-tac-toe board) superimposed over your viewfinder, or turn on the Grid (iOS) or Grid Lines (Android) feature that’s built in to the camera app. The center square of the grid represents the center of the frame.
Add a Grid to the Camera App’s Viewfinder
On the iPhone or iPad, make a virtual grid appear by launching Settings, tapping the Photos & Camera option, and then turning on the virtual switch associated with the Grid option from the Photos & Camera submenu.
On an Android smartphone or tablet, launch the Camera app, tap the gear-shaped Settings icon, tap the More menu icon (which looks like three dots), and then tap the Grid Lines option to turn the feature on.
The grid is superimposed on your viewfinder screen, but it does not appear in your actual photos.
As you’re positioning your intended subject in the viewfinder and framing each shot, instead of lining up that subject in the center frame, position the subject along one of the horizontal or vertical lines of the grid, or make it so the primary focal point of the image (where you want to draw peoples’ attention) is positioned at one of the intersection points of the grid.
Now, each time you’re choosing a subject and framing your shot, determine the best position for your subject that’s outside of the center box. Tap into your creativity, so each of your shots begins to look different based on how you position your subject.
Use the Crop Tool
If you forget to use the Rule of Thirds to frame your shots while taking pictures, it’s also possible to apply this photography principal when reframing your shots using the Crop tool that’s built in to your device’s photo-editing app.
Don’t Always Shoot from a Head-On Perspective
In addition to using the Rule of Thirds, instead of shooting from a straight, head-on perspective, where your camera is even with the intended subject, try shooting from a slight angle. Try one of these strategies:
• Move your camera above the intended subject and shoot from a slight downward angle. In this case, what is below your subject will appear in your photo’s background.
• Move the camera below your intended subject and shoot from a slight upward angle. In this case, what is above your subject will appear in your photo’s background.
• Move your camera slightly to the side of your intended subject and shoot from an angle.
• Try shooting from a diagonal. For example, shoot from the side of your subject while crouching down.
Even shooting from a slight angle will dramatically alter the appearance of a shot, so use your creativity and try experimenting, based on how you’re using the Rule of Thirds, and how you’re taking advantage of the available lighting.
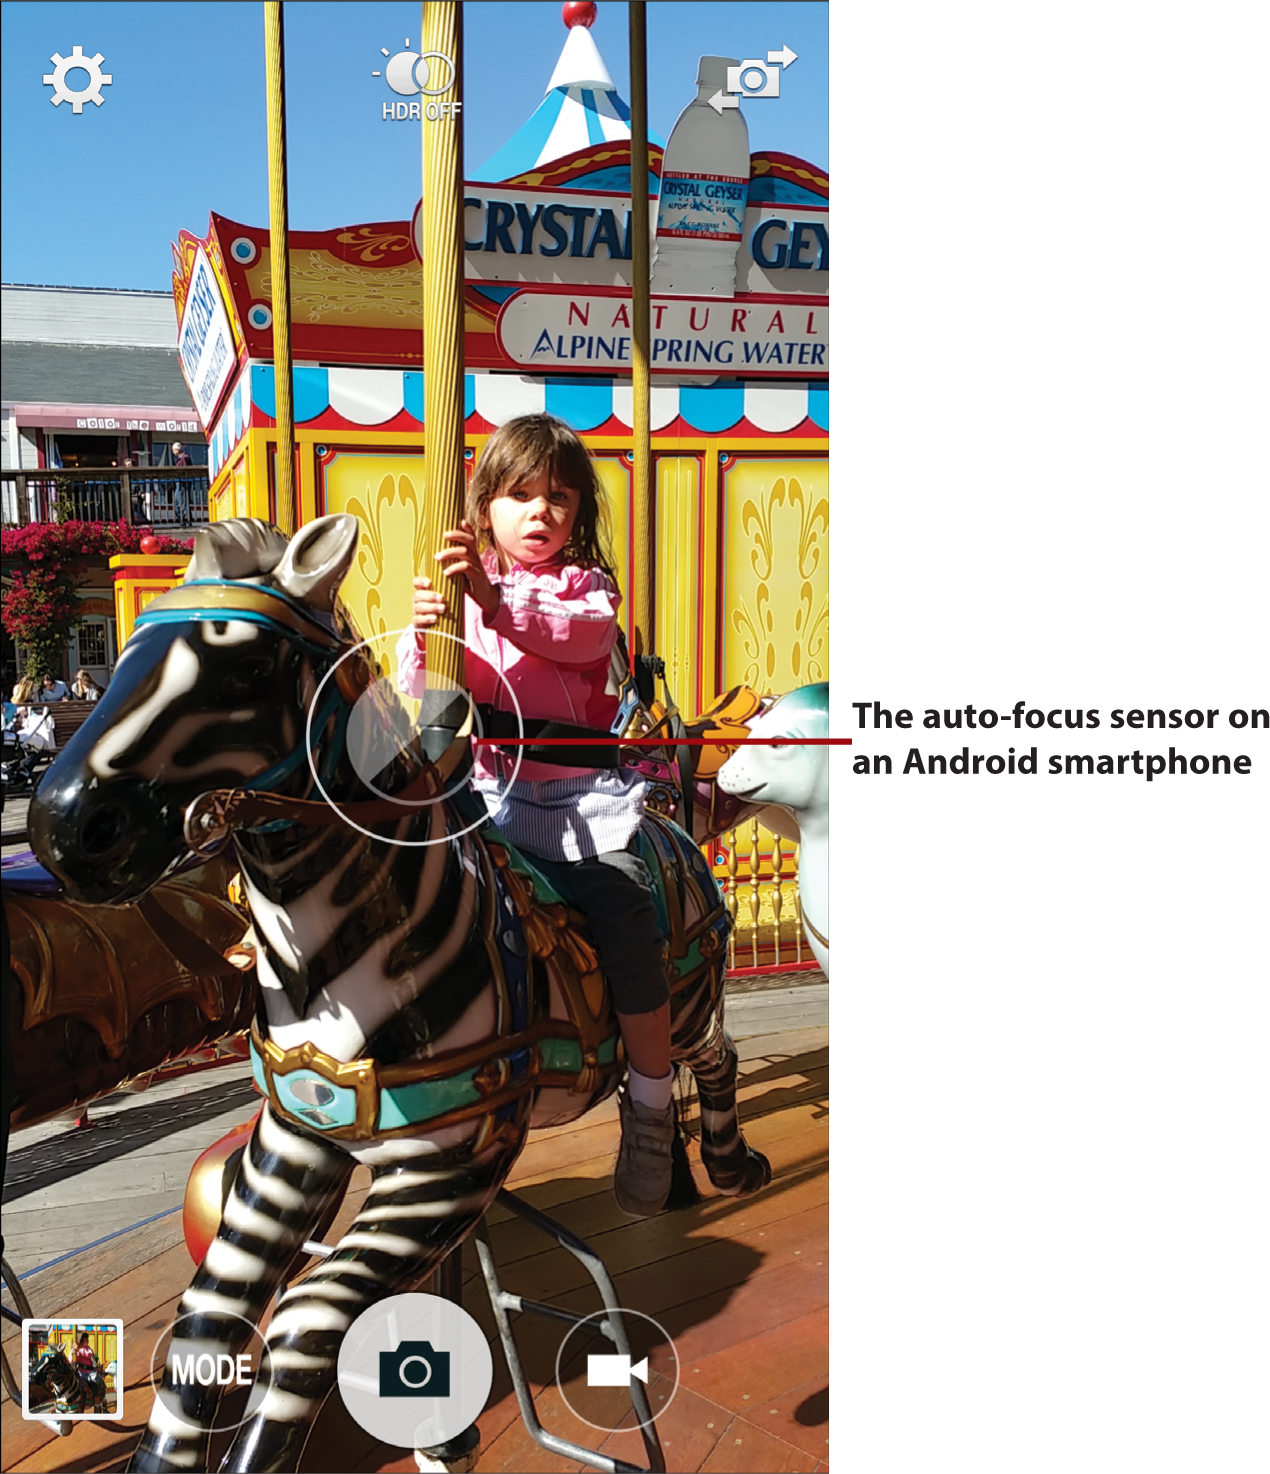
Use the Camera’s Auto-Focus Sensors
Anytime you take pictures of people using the Camera app that’s built in to your smartphone or tablet, the app’s built-in auto-focus sensors should focus on the human subject’s face automatically. When this happens, a visual representation of the auto-focus sensor is displayed on the viewfinder screen.
When an auto-focus sensor activates, this forces the camera app to ensure that whatever the sensor is focused on will, in fact, be what appears in focus in the image. What’s in front of, behind, or to the sides of your intended subject may become slightly blurred, which draws someone’s attention to the main subject of your photo.
In situations when you’re not taking pictures of people, it’s important that you manually activate the camera app’s auto-focus sensors. Position your subject as desired in the viewfinder and then tap the screen directly over your intended subject. When you do this, the auto-focus sensor activates and positions itself over your subject.

You’ll want to manually activate the auto-focus sensor anytime you’re taking pictures of animals or objects. If you fail to do this, the camera app will try to guess what your intended subject is, but it might wind up focusing in on something above, below, in front of, or behind what you intend to be your subject, which will result in your intended subject looking blurry.
Using the Camera App
Whether you’re using the preinstalled camera app on an iOS or Android mobile device, use the following steps to take awesome photos.
What You See May Vary
Based on whether you’re using a smartphone or tablet, and which version of the mobile device’s operating system you’re using, some of the camera app features discussed may not be available to you or the way the screens look may vary.
![]() Turn on your smartphone or tablet and launch the Camera app.
Turn on your smartphone or tablet and launch the Camera app.
![]() Set the Camera app to Photo mode.
Set the Camera app to Photo mode.
![]() Choose between the front- or rear-facing camera.
Choose between the front- or rear-facing camera.
![]() Select your subject as you’re looking through the viewfinder.
Select your subject as you’re looking through the viewfinder.

![]() Position yourself so that your primary light source is positioned behind you and is shining as evenly as possible on your subject. Try to control or eliminate unwanted shadows, when applicable. (Not shown.)
Position yourself so that your primary light source is positioned behind you and is shining as evenly as possible on your subject. Try to control or eliminate unwanted shadows, when applicable. (Not shown.)
![]() Use the optional zoom feature to zoom in on your subject, as desired.
Use the optional zoom feature to zoom in on your subject, as desired.
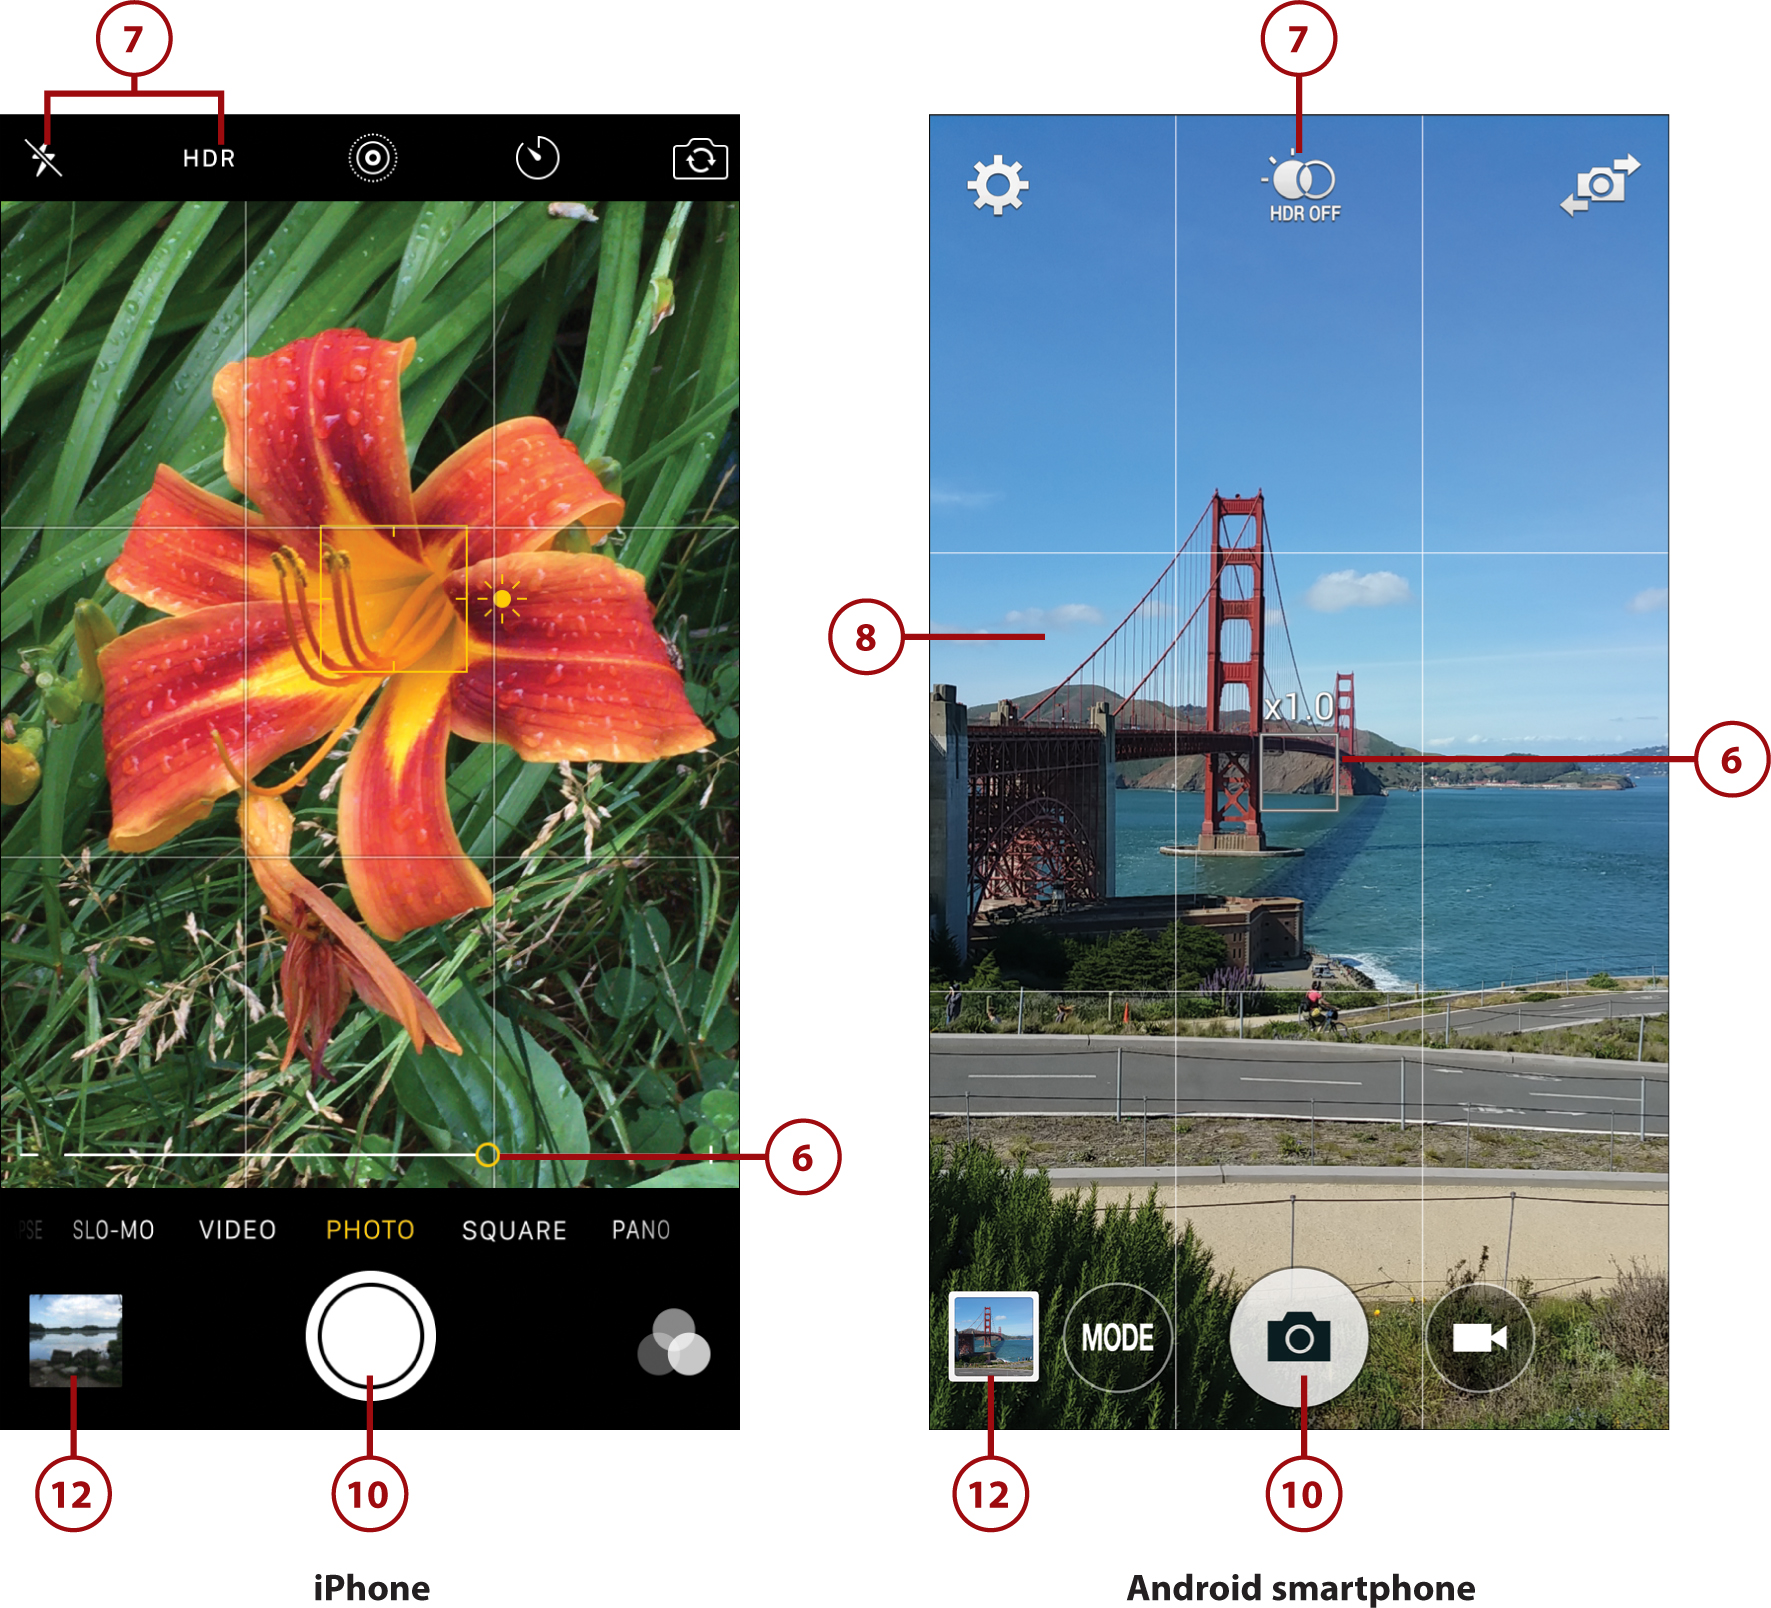
![]() Turn on HDR shooting mode or the Flash (if applicable), based on your lighting situation. If you’re using a newer iPhone, you also have the option of turning on the Live shooting mode.
Turn on HDR shooting mode or the Flash (if applicable), based on your lighting situation. If you’re using a newer iPhone, you also have the option of turning on the Live shooting mode.
HDR Stands for High Dynamic Range
The camera app for both iOS and Android mobile devices offers an HDR (High Dynamic Range) shooting mode. You can use this mode anytime, but it works best in low-light situations.
Basically, when activated, the app takes multiple pictures simultaneously when you tap on the shutter button, but it captures the available light in each shot slightly differently. The mobile device then automatically merges those images to create one image in which the colors will be more vibrant, and the details in the image will be enhanced.
HDR mode overrides the mobile device’s built-in flash. So when you want to use the ambient light in any shooting situation, you’ll typically get the best results if you avoid using the flash and turn on HDR mode.
![]() Position your desired subject in the viewfinder and frame your shot. This also means choosing your shooting perspective.
Position your desired subject in the viewfinder and frame your shot. This also means choosing your shooting perspective.
![]() Tap your finger on the viewfinder, directly over your subject, to activate the auto-focus sensor. Make sure the app is focusing in on your intended subject, and not something in the foreground, background, or to the sides of your intended subject. (Not shown.)
Tap your finger on the viewfinder, directly over your subject, to activate the auto-focus sensor. Make sure the app is focusing in on your intended subject, and not something in the foreground, background, or to the sides of your intended subject. (Not shown.)
![]() Hold your mobile device very still, and when you’re ready to snap a photo tap the shutter button once, quickly. Keep in mind, in addition to the shutter button icon, the Volume Up or Volume Down buttons on the side of your mobile device can also be used as a shutter button.
Hold your mobile device very still, and when you’re ready to snap a photo tap the shutter button once, quickly. Keep in mind, in addition to the shutter button icon, the Volume Up or Volume Down buttons on the side of your mobile device can also be used as a shutter button.
![]() If you want to use the camera’s Burst shooting mode to take several images in quick succession, press and hold down the shutter button instead of just tapping it. (Not shown.)
If you want to use the camera’s Burst shooting mode to take several images in quick succession, press and hold down the shutter button instead of just tapping it. (Not shown.)
![]() Tap the image preview thumbnail to view the photo you just took. Alternatively, continue taking pictures, or exit out of the Camera app altogether.
Tap the image preview thumbnail to view the photo you just took. Alternatively, continue taking pictures, or exit out of the Camera app altogether.
![]() The photo you just took will be stored in your smartphone or tablet. Use the Photos app (iOS or Android), the Gallery app (Android), or a third-party photo-editing app to view, edit, enhance, print, or share the image. (Not shown.)
The photo you just took will be stored in your smartphone or tablet. Use the Photos app (iOS or Android), the Gallery app (Android), or a third-party photo-editing app to view, edit, enhance, print, or share the image. (Not shown.)
Managing Your Digital Images from Your Mobile Device
As soon as you take photos using a camera that’s built in to your smartphone or tablet, those images are stored in your mobile device. To view, edit, enhance, print, organize, or share them, take advantage of the photo-management app that comes preinstalled on your iOS or Android mobile device.
Some Android devices include an app called Gallery, either in addition to or instead of the Photos app. It offers much of the same functionality. If the features and functions built in to the Photos app aren’t sufficient, in the App Store (iOS) or Google Play Store (Android), you can find hundreds of third-party photography apps that offer more advanced tools for editing, enhancing, organizing, printing, and sharing your digital images.
A few of the more popular and powerful third-party apps designed specifically for editing or enhancing digital images directly on your smartphone or tablet include
• Photo Lab PRO Photo Editor (Android)
• Photoshop Express (Android/iOS)
• Photoshop Fix (iOS) and Photoshop Mix (Android/iOS)
• Pixelmator (iOS)
• SnapSeed (Android/iOS)
If you opt to store your photos online using a file-sharing service, the Photos app that comes preinstalled on iOS mobile devices has built in integration with Apple iCloud and iCloud’s Photo Library feature (which is used for creating and storing online albums, syncing them with your computers and mobile devices, and then optionally sharing them with other people). The Photos app that’s built in to Android-based devices includes integration with Google Photos, which is an online service you can use to create online albums, and then share those albums with other people.
If you want to use another file-sharing service, such as Microsoft OneDrive (because you’re already a Windows user that uses the Photos app that comes preinstalled with Windows 10), be sure to install the free OneDrive mobile app on your iOS or Android mobile device.
Likewise, if you use Dropbox to back up, archive, and share your digital images files, be sure to install the Dropbox mobile app onto your iOS or Android mobile device.
Each of the popular online-based photo-sharing services, such as Flickr.com, PhotoBucket.com, Shutterfly.com, Smugmug.com, and Snapfish.com, also has its own proprietary iOS and Android mobile app that you can use to organize, upload, view, and share photos using that service. In some cases, you can also order traditional prints or photo products via the service’s mobile app.
Managing Your Digital Images Using Your Computer
Once you’ve taken photos using the camera built in to your mobile device, or if you used a point-and-shoot or digital SLR camera, you can transfer those images to your Windows-based PC or Mac computer to view, organize, edit, enhance, print, and share them.
Computers running Windows 10 or Mac OS come with their own version of a photos app preinstalled. The Photos app for Windows 10, for example, integrates directly with the Microsoft OneDrive online service, which allows you to back up, sync, and share your photos via the Web. The Mac version of the Photos app offers full integration with iCloud and iCloud’s Photo Library feature.
Depending on how you have your mobile device set up to communicate with your computer, you can make it so that each time you take a photo using your smartphone, for example, as long as the smartphone has access to the Internet, it automatically uploads the photo to an online service, syncs the photo with your other computers and mobile devices (that are linked to the same online account), and then gives you the opportunity to share specific online-based albums with other people.
If your photo viewing, organizing, editing, enhancing, printing, and sharing needs go beyond what the preinstalled app on your computer is capable of, there are many third-party software applications, such as Corel PaintShop Pro, Google Photos, Photoshop Elements, Photoshop Lightroom, Pixelmator, and PortraitPro, that can be installed onto your computer. Visit the Windows Store or Mac App Store to find these and other third-party photography applications.
Showcasing and Sharing Your Digital Images Online
When you start using an online file-sharing or photo-sharing service to back up and archive your photos, you can use these same services to share specific online galleries/albums (or groups of images) with other people while still keeping your other photos private.
Each of the file-sharing services, such as Apple iCloud, Dropbox, and Microsoft OneDrive, give you a set amount of free online storage space for your digital photo collection. However, if your needs exceed that storage capacity, you’ll be charged a monthly or annual fee for additional online storage space. This is also the case with most online photo-sharing services.
Online photo-sharing services are designed exclusively for storing, archiving, and sharing photos online. These services also offer easy-to-use tools for creating visually impressive online galleries or animated slide shows, plus most are linked with photo labs, so you can order traditional prints and photo products from the service. Flickr.com, PhotoBucket.com, Shutterfly.com, and Smugmug.com are among the popular online photo-sharing services.
Pick One Service and Stick to It
To avoid confusion, and make sure your entire digital image library winds up being stored in one place online where all your computers and mobile devices can access it, select one service and use it for all your digital photography–related needs.
As your image library grows to thousands or tens of thousands of images, having them backed up, archived, and accessible from one online service will make them easier to find and share.
Share Digital Images Using Social Media
One of the key reasons why billions of people throughout the world use social media services like Facebook, Instagram, Snap Chat, and Twitter is because these services make it easy to use the Internet connectivity that’s built in to your smartphone, tablet, and/or computer to share one or more of your digital images at a time.
When you use the proprietary Facebook, Instagram, SnapChat, or Twitter mobile app, for example, it’s easy to take photos using your mobile device’s built in cameras, store and edit the images on your mobile device, and then instantly share them with your online friends (or the general public) using a special media service. You can do this from virtually anywhere, including while you are traveling.
After you choose which social media service you want to use, set up a free account and then adjust the privacy settings so you have control over who can access and view your images after they’re posted online. Also, make sure you understand how geotagging and photo tagging work, before using these features, so you don’t wind up compromising your own privacy, or the privacy of the people in your photos. Based on who you choose to share your photos with, you may not want your audience to know the names of the people in your photos or where and when the photos were taken, so use caution when taking advantage of these features.
What Are Geotagging and Photo Tagging?
Geotagging automatically links and displays the exact location where a photo was taken with each digital image file, and this information is available through the social media service. Thus, the people viewing your images online can see exactly where (and when) the photo was taken.
Social media services allow you to tag people in your photos, which means you add the name of each person who appears in each of your photos. The person’s name is displayed to the people viewing your photos online.
Using social media to share your images is free. Depending on the service, it’s possible to share one image at a time, or create and share multi-image albums or galleries. To learn more about the difference social media services or to set up a free account, download and install the service’s free app onto your mobile device, or from your computer, visit the website:
• Facebook (www.facebook.com)
• Instagram (www.instagram.com)
• SnapChat (www.snapchat.com)
• Twitter (www.twitter.com)
Each social media service offers a different collection of tools for editing, organizing, and sharing one or more images online, so choose the service(s) that works best based on your needs and your audience.
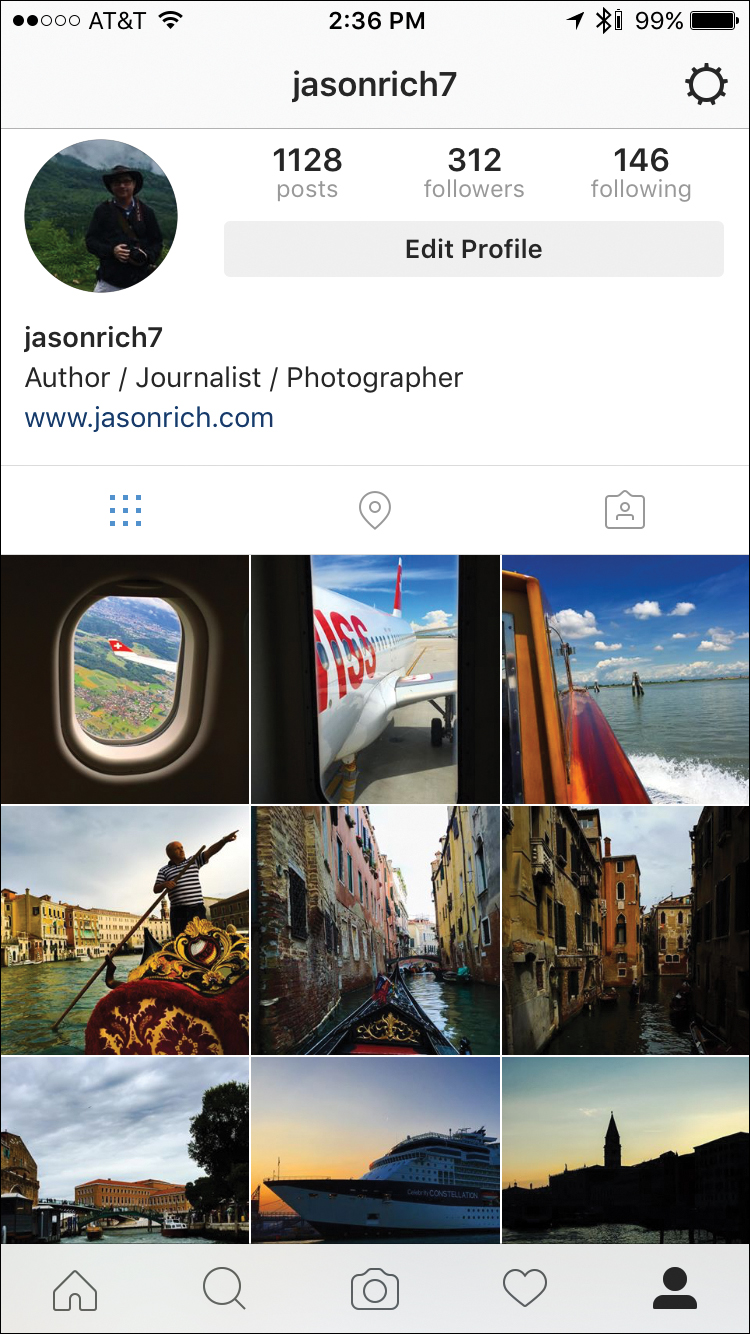
The figure shows a sample Instagram feed (displayed on an iPhone), of a collection of individual travel photos.
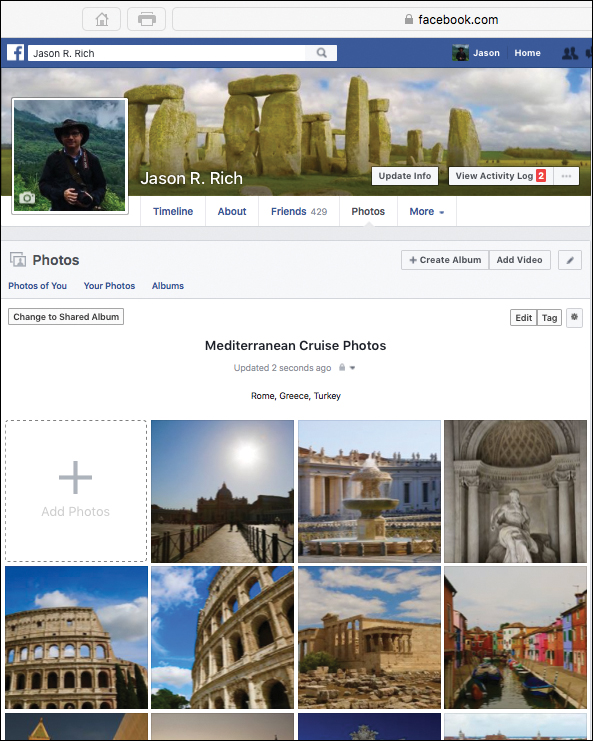
Using Facebook (shown here on a Mac), you can create online albums from your vacation photos and then share specific albums with the online friends you select or with the general public.
Adjust the Service’s Privacy Settings
When you start using any social media service, all of the privacy settings are turned off, which makes everything you post available for anyone to see. To prevent this and control who can see the photos and content you post online, adjust the Privacy Settings associated with each social media service you use. This can be done from the service’s website or using its proprietary mobile app. For example, Facebook users should visit www.facebook.com/settings and click on the Privacy option.
Create Photo Books and Photo Products
From the digital images stored in your smartphone, tablet, and/or computer, one way to showcase them is to create professionally bound hardcover or paperback photo books. You can use a proprietary mobile app from a photo book publisher or by downloading free photo book software onto your computer.
Blurb.com, for example, offers free tools for creating, designing, and publishing one-of-a-kind photo books from your tablet or computer. This company’s mobile app and software offers page templates that you drag-and-drop your photos into to design each page of a photo book. Thus, it’s easy to create a custom-designed and professional-looking photo book, even if you have no graphic arts skill and don’t consider yourself to be too creative. A sample of the free Photo Book page layout software from Blurb.com, called BookSmart (running on a Mac), is shown in the figure. The company also offers free Bookify software, which offers a handful of different features for designing photo books.

You can fully customize each page with graphic elements by altering the page layout or by adding text-based captions to your images. When the photo book is fully designed, you preview it on the screen before uploading the digital file to Blurb and selecting your printing options. The company professionally prints and binds your photo book and then ships it to the address you provide.
Companies like Blurb allow you to choose between hardcover or softcover books, choose between several paper qualities, and select a trim size (the dimensions) for the book. How much it costs to print a photo book depends on the customization options you choose, as well as the number of pages included in your book. For an additional fee, it’s possible to format a Blurb Photo Book as an eBook that can be viewed using the iBooks app that comes preinstalled on the iPad.
Blurb specializes in photo books, whereas other companies, such as Mpix.com, Picaboo.com, Shutterfly.com, SnapFish.com, and many one-hour photos labs, also offer tools for creating photo books and allow you to create photo products using your favorite images.
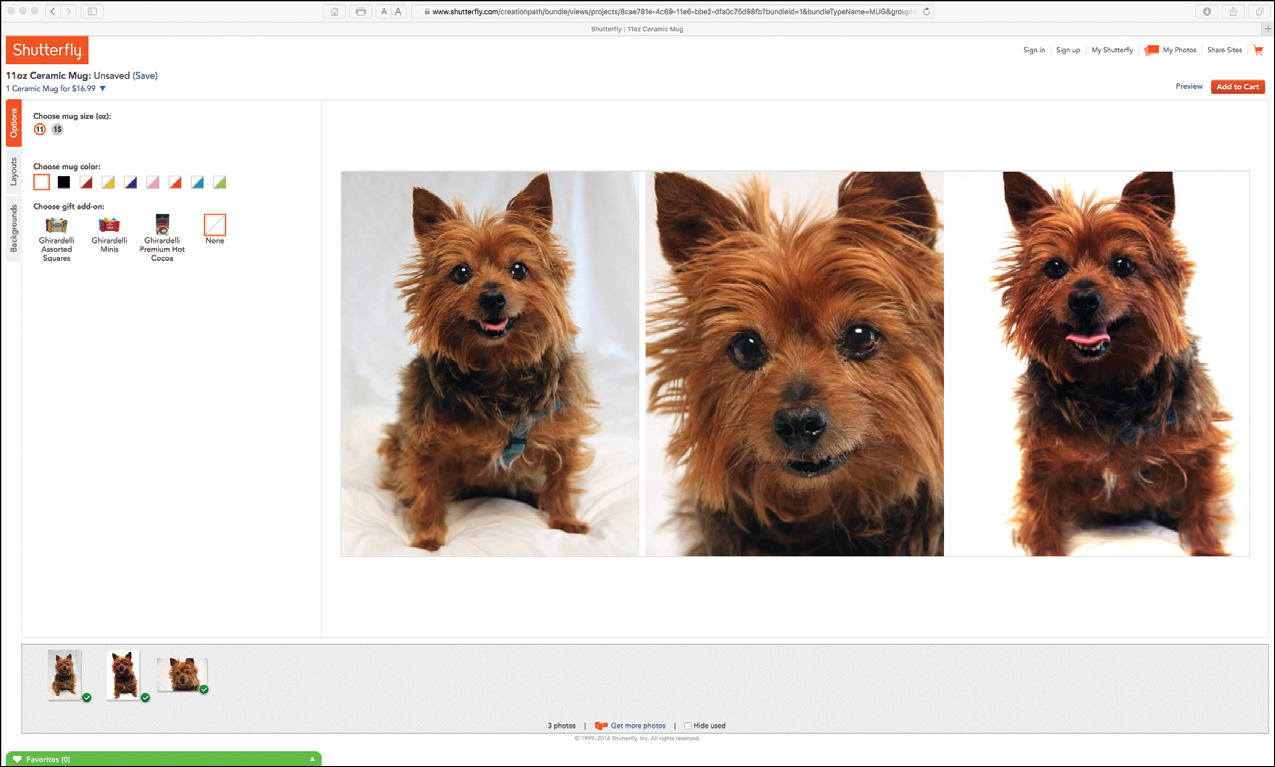
Shutterfly.com, for example, allows you to create hundreds of different types of photo products from your photos—coffee mugs, T-shirts, mouse pads, greeting cards, holiday ornaments, photo blankets, puzzles, and posters. Use the Shutterfly app from your mobile device, or visit www.shutterfly.com from your computer’s web browser, to design and order these products.
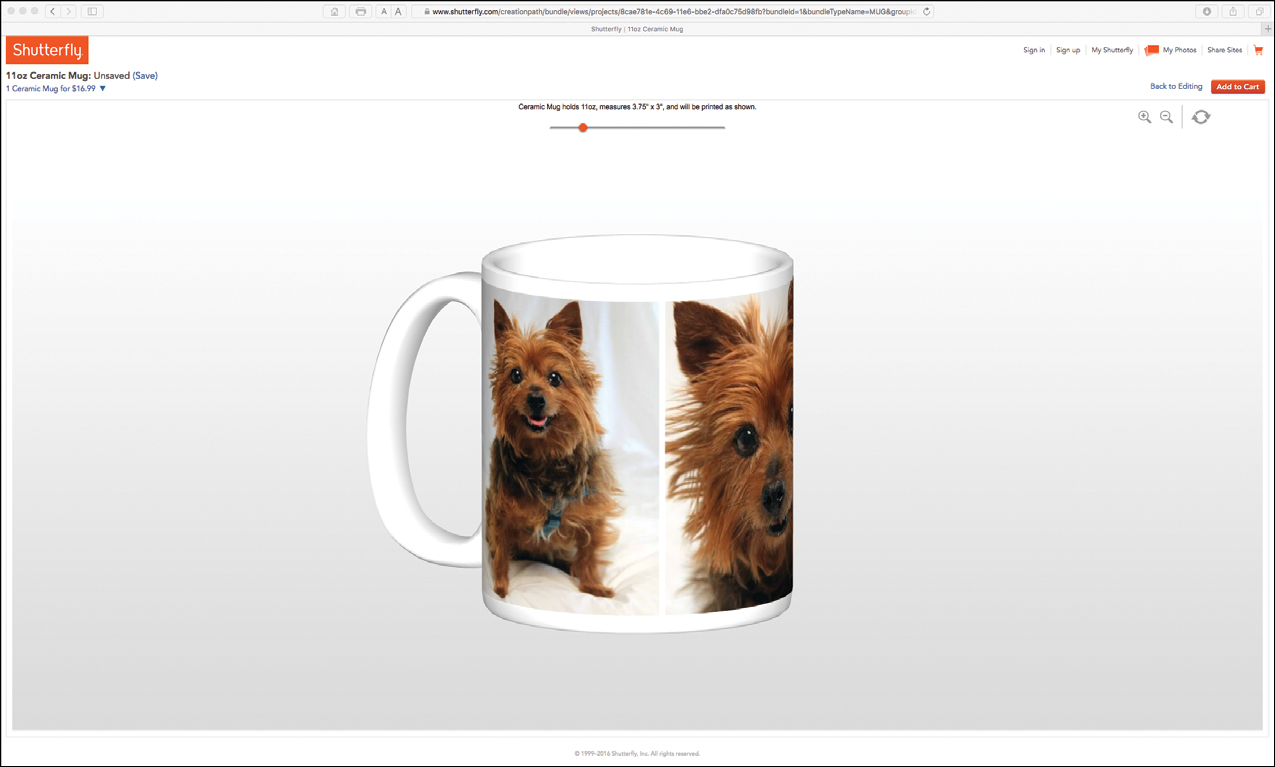
Shown here, a coffee mug featuring three digital photos is being created using the Shutterfly.com website. First you drag-and-drop your photos into the on-screen, product-specific template, and then you see a preview of the product before placing your order.
Create a Vacation Diary with Moleskine Voyageur
Yet another way you can use technology for a popular travel-related task is to use your computer, smartphone, tablet, or the Internet to create a digital journal or diary that chronicles your travels. Whether you use specialized journaling/diary software on your computer or mobile device or choose an online-based service, each entry you create can include text, photos, video clips, and audio clips, so you’re able to document all aspects of your trips.
Find Digital Diary Software, Mobile Apps, and Online Services
From your mobile device, visit the App Store (iOS) or Google Play Store (Android) to find specialized mobile apps that allow you to create a digital diary or journal. From your Windows-based computer, visit the Windows Store, or, from your Mac, visit the Mac App Store. Alternatively, access the Internet search engine of your choice.
Whichever option you choose, in the Search field type, Travel Journal or Diary to find applicable software, apps, or online-based services designed specifically for this task.
One innovative travel diary option, called Moleskine Voyageur, is available from Moleskine (www.moleskine.com/voyageur), a company that manufactures high-quality, hardcover notebooks. The $22.95 Moleskine Voyager is a 4.5″ × 7.25″ hardcover notebook that works with any Internet-connected computer to create a one-of-a-kind travel diary that focuses specifically on where you travel.
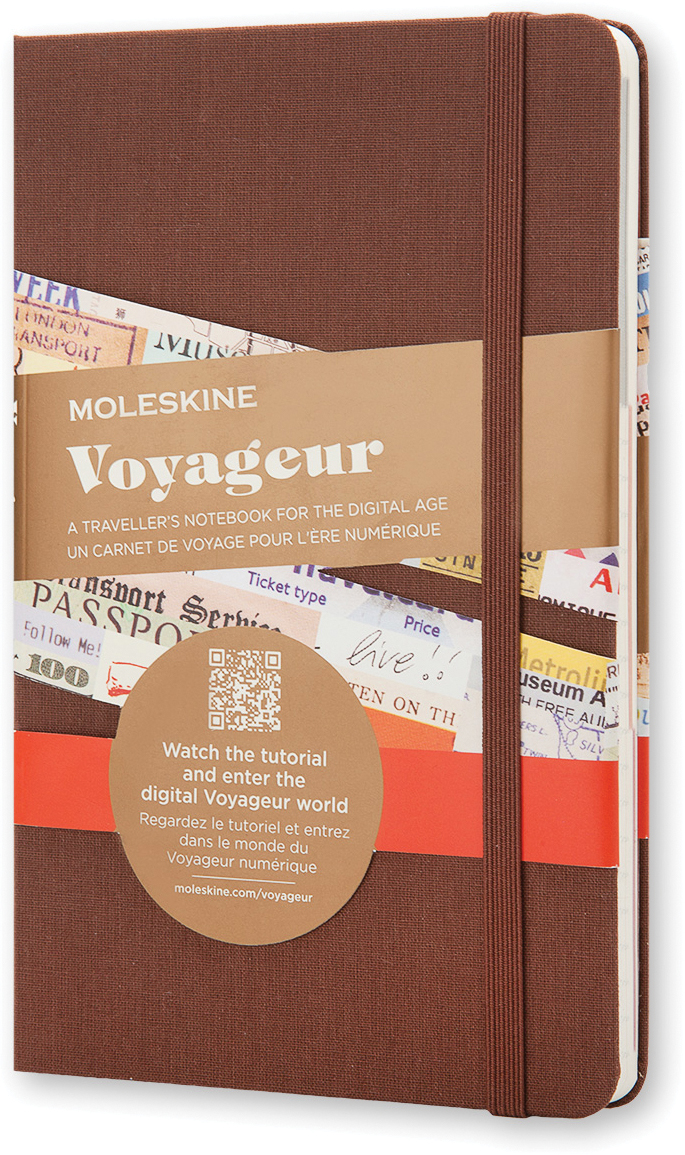
For example, using your computer, it’s possible to download travel-related web pages and content, as well as preformatted checklists and packing lists, that relate to your travel destinations, and then print that content in a special format that fits directly into the Moleskine Voyageur journal. The journal notebook includes blank (lined) pages for handwriting journal entries as well as dotted paper that can be used for doodling, drawing, or attaching prints of your travel photos.
Add 2″ × 3″ Prints to Your Journal or Scrapbook
Prints of travel photos taken using your mobile device that are created using the pocket printer from Polaroid or Life Prints can easily be glued or taped into pages of the Moleskine Voyageur notebook.
You’ll quickly discover that the Moleskine Voyageur nicely combines a traditional paper-based journal with the technology at your disposal, and allows you to easily chronicle your travels in a fun and creative way. You can also use the journal to keep track of reservation confirmation numbers, your travel itinerary, and other information that’s pertinent to your trips.
Whether you spend one or two minutes per day while traveling to write down a list of what you did, or you invest much more time documenting every aspect of your trip using text, photos, graphics, and computer-generated content, the Moleskine Voyageur offers a unique way to document your travels and utilize technology in the process.