9. Viewing and Listening to Photos, Videos, and Music

In this chapter, you find out how to view and listen to various types of media files on your Chromebook.
→ Viewing Digital Photos on Your Chromebook
→ Listening to Music on Your Chromebook
→ Watching Videos on Your Chromebook
Many people use their computers and tablets to view and listen to a variety of media files—photos, music, and videos. Not surprisingly, you can use your Chromebook as a photo viewer and media player, as long as you work within Chrome’s storage and file format limitations.
That is, you have to figure out some way to store large media files not on the Chromebook itself—or stream your audio and video over the Internet, in real time. And you have to make sure that all your media files are in a format that is supported by Google Chrome.
Viewing Digital Photos on Your Chromebook
Your Chromebook is the perfect device for viewing your digital photos. Fortunately, Google Chrome is compatible with most major image formats, including the .jpg, .gif, .png, and .bmp file formats.
View Photos from an External Storage Device
Because your Chromebook’s internal storage is limited, the best way to view digital photos is to first store them on an external storage device, such as a memory card or USB memory device. You can then insert the external storage device into your Chromebook to view the photos.
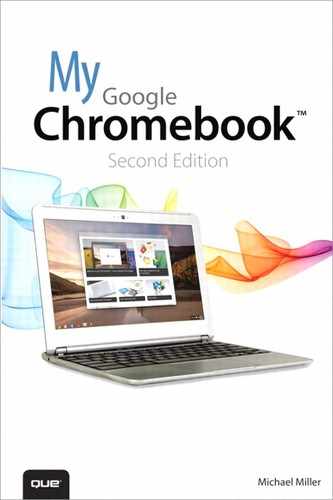
1. Insert the external storage device into your Chromebook.

2. When File Manager opens, open the folder for the external storage device and navigate to the folder where the photos are stored.
3. Click the image file you want to view, or select the item and click the Open button. The selected image opens in Chrome’s photo viewer.
4. Mouse over the viewer to see the navigation controls. Click the right arrow to advance to the next photo, or the left arrow to display the previous photo.
5. Click the Slideshow button to display all the photos in the folder in a full-screen slideshow.
6. Click the Delete button to delete the current picture.
7. Click the X at the top-right corner of the window to close the photo viewer.

Edit a Photo
Chrome’s photo viewer also includes basic photo editing functionality. You can use the photo viewer to crop a picture, adjust brightness, rotate the picture 90° right or left, or apply a general “auto-fix” option that attempts to correct contrast, brightness, and color issues.
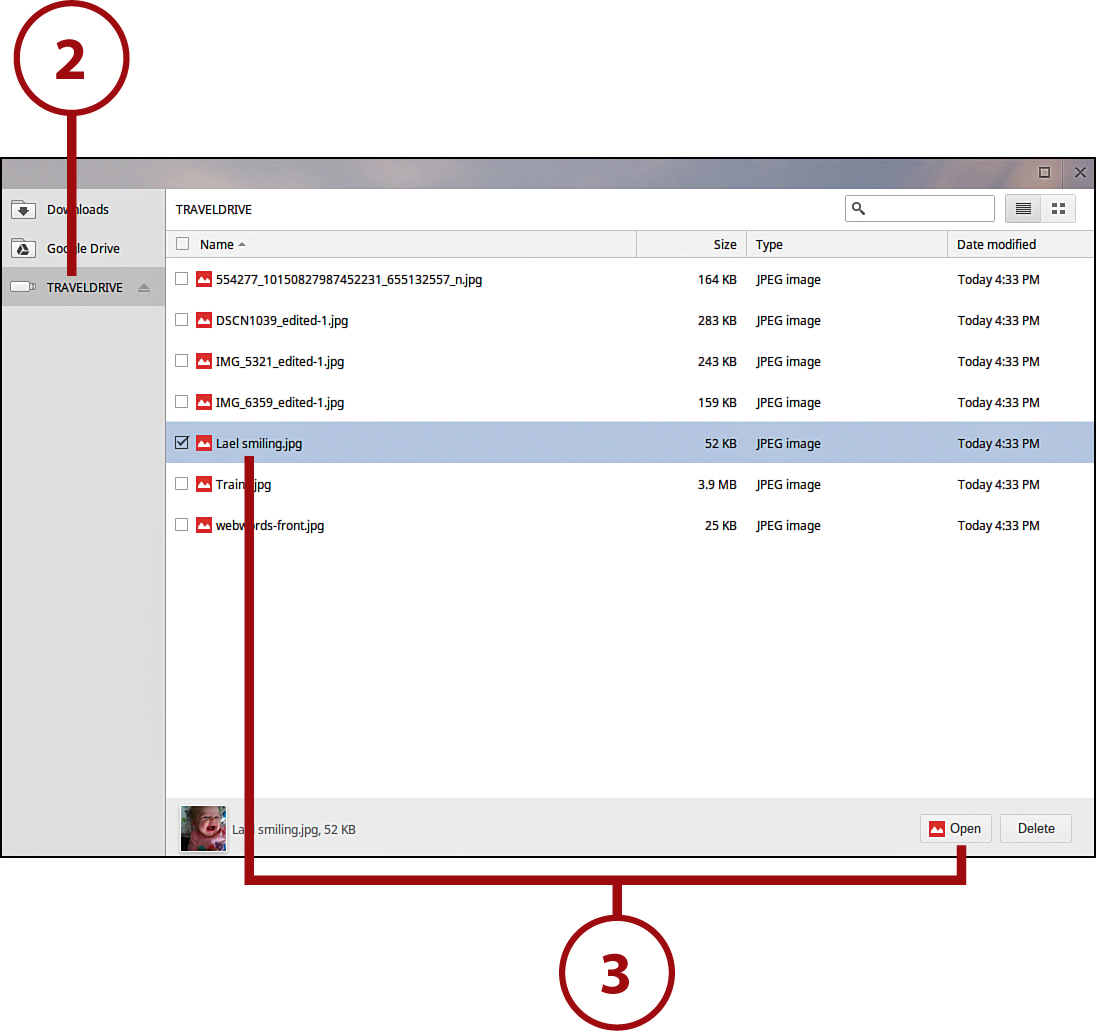
1. Open the picture you want to edit in Chrome’s photo viewer.
2. Mouse over the picture and then click the Edit button to display the editing controls.
3. Click Auto-fix to apply an automatic fix to the picture.
4. Click Left to rotate the picture 90° counterclockwise.
5. Click Right to rotate the picture 90° clockwise.

6. Click Crop and then drag the corners of the crop box as needed. Press Enter when you’re done.
7. Click Brightness and then adjust the Brightness and Contrast sliders. Your changes are saved automatically.
8. Click the Edit button to exit photo editing mode.

Store and Share Photos Online with Picasa Web Albums
If you want to store more photos than you have space for locally, consider using Google’s Picasa Web Albums. This free service, tied into your Google Account, lets you store your photos online and then share them with friends and family.
1. Open the Chrome browser, go to picasaweb.google.com, and log in with your Google account.
2. Click the Upload button to upload new photos.
3. Your photos are organized into albums. Click an album’s thumbnail to view the contents of that album.

4. Click a picture’s thumbnail to view that picture.

5. To share the contents of the current album, click Actions, Album Properties to display the Edit Album Information pane. Click the Visibility button and select either Public on the Web or Limited, Anyone with the Link.
6. Click the Save Changes button.

Listening to Music on Your Chromebook
If you want to listen to music on your Chromebook, you’re in luck. Chrome includes its own Audio Player application, which you can use both to listen to tunes and watch videos.
As with viewing photos, your Chromebook’s storage limitations makes it difficult to store large numbers of music files internally. Your better bet is to transfer the desired music files to a USB memory device and then insert that device into your Chromebook. You can then listen to the files stored on the USB device, using Chrome’s Audio Player.
Note, however, that Chrome’s Audio Player does not support all types of music files. It’s compatible with the popular MP3 audio format, but not with Apple’s .aac or Microsoft’s .wma formats. So if you have your files in an iTunes library, for example, you first need to convert them to MP3 format to listen to on your Chromebook.
Listen to a Single Track
We’ll assume that you’ve already copied your favorite MP3 files to a USB memory device. You use that device to listen to your music on your Chromebook.
1. Insert the external storage device into your Chromebook.

2. When File Manager opens, open the folder for the external storage device and navigate to the folder where the MP3 files are stored.
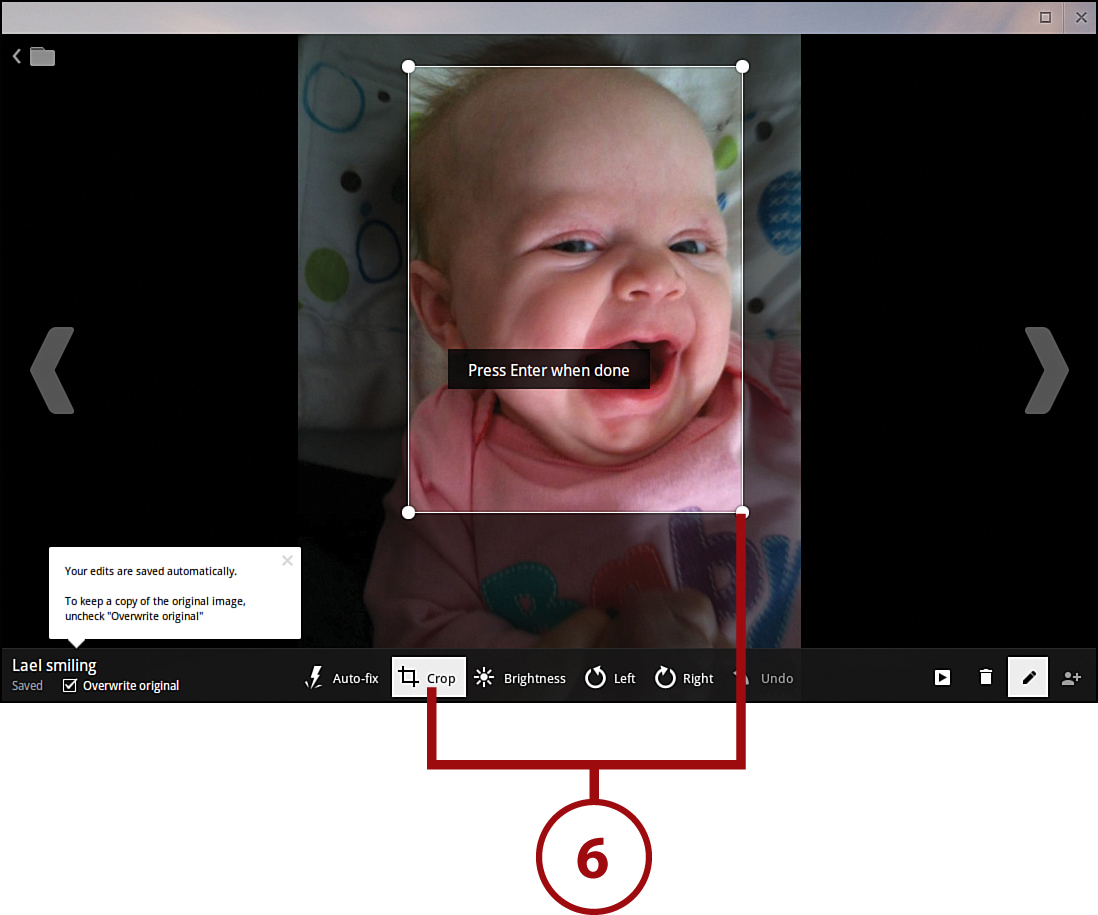
3. Click the music file to which you want to listen. Alternatively, you can select the file and then click the Listen button. The Audio Player opens and starts playback.

4. Click the Pause button to pause playback; to resume playback, click the Play button.
5. Click the X at the upper-right corner to close the Audio Player.
Listen to a Playlist
Chrome’s Audio Player can also play back a playlist of multiple tracks. This lets you program music for an extended sitting.
1. Open File Manager and check those music files you want to include in the playlist.
2. Click the Listen button in the Preview pane to open the Audio Player and start playback of the first song in the playlist.
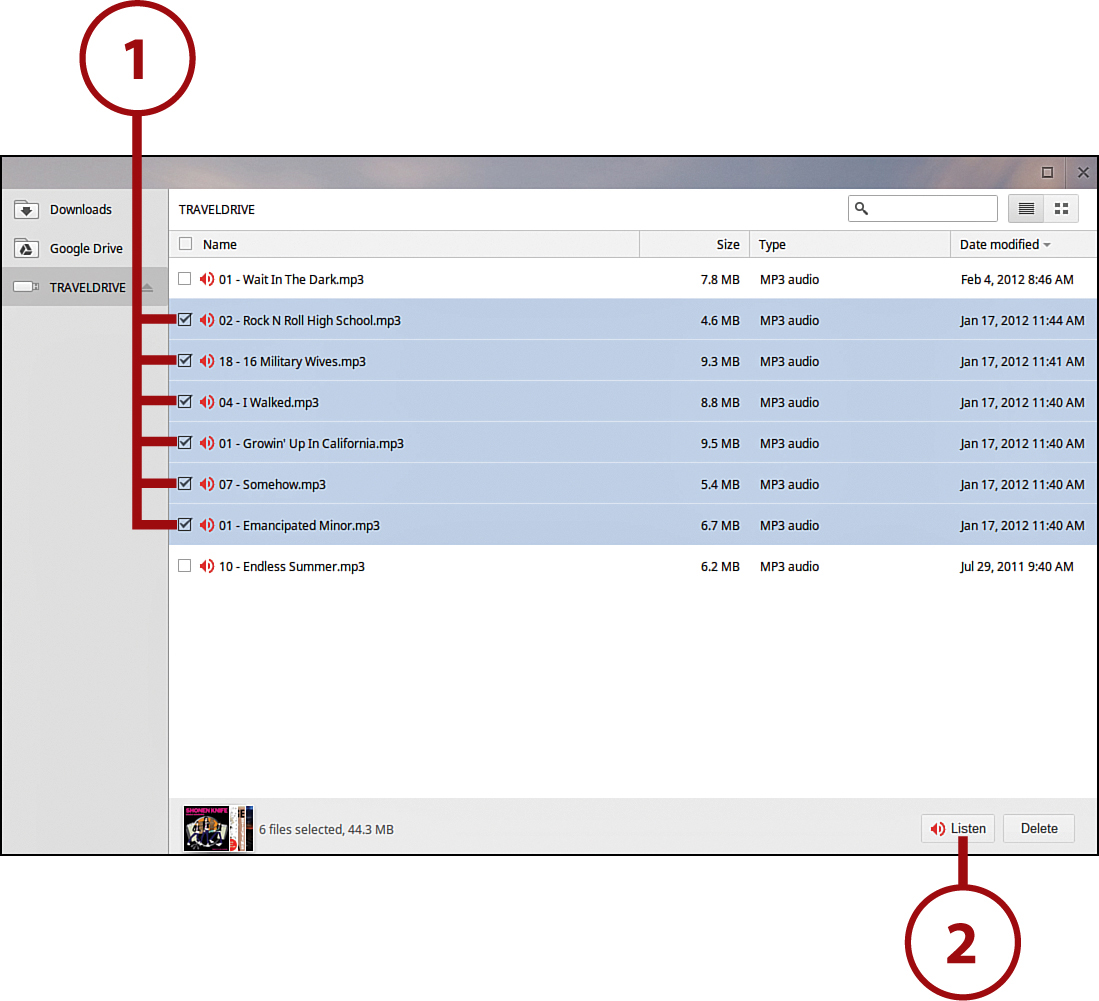
3. Click the Pause button to pause playback; to resume playback, click the Play button.
4. Click the Next Track button to advance to the next song in the playlist.
5. Click the Previous Track button to listen to the previous song.
6. Click the Playlist button to view the entire playlist. The Audio Player pane expands to display all tracks in the playlist.

Uploading Your Music to Google Play
Listening to your own music via an external storage device might not be ideal for all users. Many music lovers prefer to listen to streaming music over the Internet; this provides for a larger selection of music with no local storage limitations.
To this end, Google offers the Google Play music service, which enables you to stream your own music back to you over the Internet. You can upload the favorite tracks from your personal music collection and then play them back from any web browser—including the Chrome browser on your Chromebook. You can upload and listen to up to 20,000 individual tracks, all for free.
Scan and Match
Google Play is actually a “scan and match” music service. That is, it scans the files you want to upload and then matches them against tracks in its own large music library. If the tracks are already there, it doesn’t have to upload your tracks, thus saving you lots of time. If, on the other hand, your tracks are not in Google’s library, it uploads them for your future listening pleasure.
Unfortunately, you can’t upload music directly from your Chromebook to Google Play. Instead, you need to have your digital music stored on a Windows or Mac PC, and then use that machine for uploading. You’ll first need to install Google’s Music Manager application on your PC; go to play.google.com/music/listen and click the Upload Music button. You can then select which files to upload to your Google Play music library.
File Formats
Google’s Music Manager lets you upload audio files in the following audio formats: .mp3, .m4a/AAC, .wma (Windows only), .flac, and .ogg.
1. Launch the Music Manager app from your Windows or Mac PC and select the Upload tab.
2. Click the Add Folder button and then browse to and select the folder where you store your digital music.
3. Click the Upload button to upload all the tracks in this folder.
4. Check the Automatically Upload Songs option if you want to automatically upload new tracks you add to this folder.

Uploading from Your Chromebook
Although music uploading is not possible by default in Chrome OS, the third-party MusicAlpha app adds uploading for MP3 files stored either on your Chromebook or an external storage device. Note, however, that the app is still in its testing phase, and does not appear to work for all users. If you’re interested, go to the Chrome Web Store and search for MusicAlpha.
Playing Music with Google Play
After you’ve uploaded your music to Google Play, you can use your Chromebook’s Chrome browser to play back your favorite tracks.
1. Click Apps in the Launcher and then click Google Play Music. Alternatively, open the Chrome browser and go to play.google.com/music/listen. Google Play opens in the Chrome browser.

2. Use the navigation sidebar to select what you want to listen to—Songs, Artists, Albums, Genres, or specific playlists.
3. Select the playlist, album, or songs you want to listen to. (Hold down the Ctrl button to select multiple tracks.)
4. Click the Play button to begin playback.
5. Click the Shuffle button to play your selections in a random order.

Watching Videos on Your Chromebook
You can use your Chromebook to watch movies, TV shows, and home movies, stored either internally or externally. You can also stream movies and TV shows over the Internet and view them in the Chrome browser.
View a Video
If you have home movies or other videos on some sort of external storage device, you can easily view them on your Chromebook—as long as the individual video is in an approved file format. At present, Chrome supports videos encoded in the .mp4, .mpv,.mov, and .webm file formats, as well as Ogg Vorbis video files.
WebM
WebM is a new video file format promoted by Google. It is likely that Google will adopt WebM as the video file format of choice for all of its video-related websites, including YouTube.
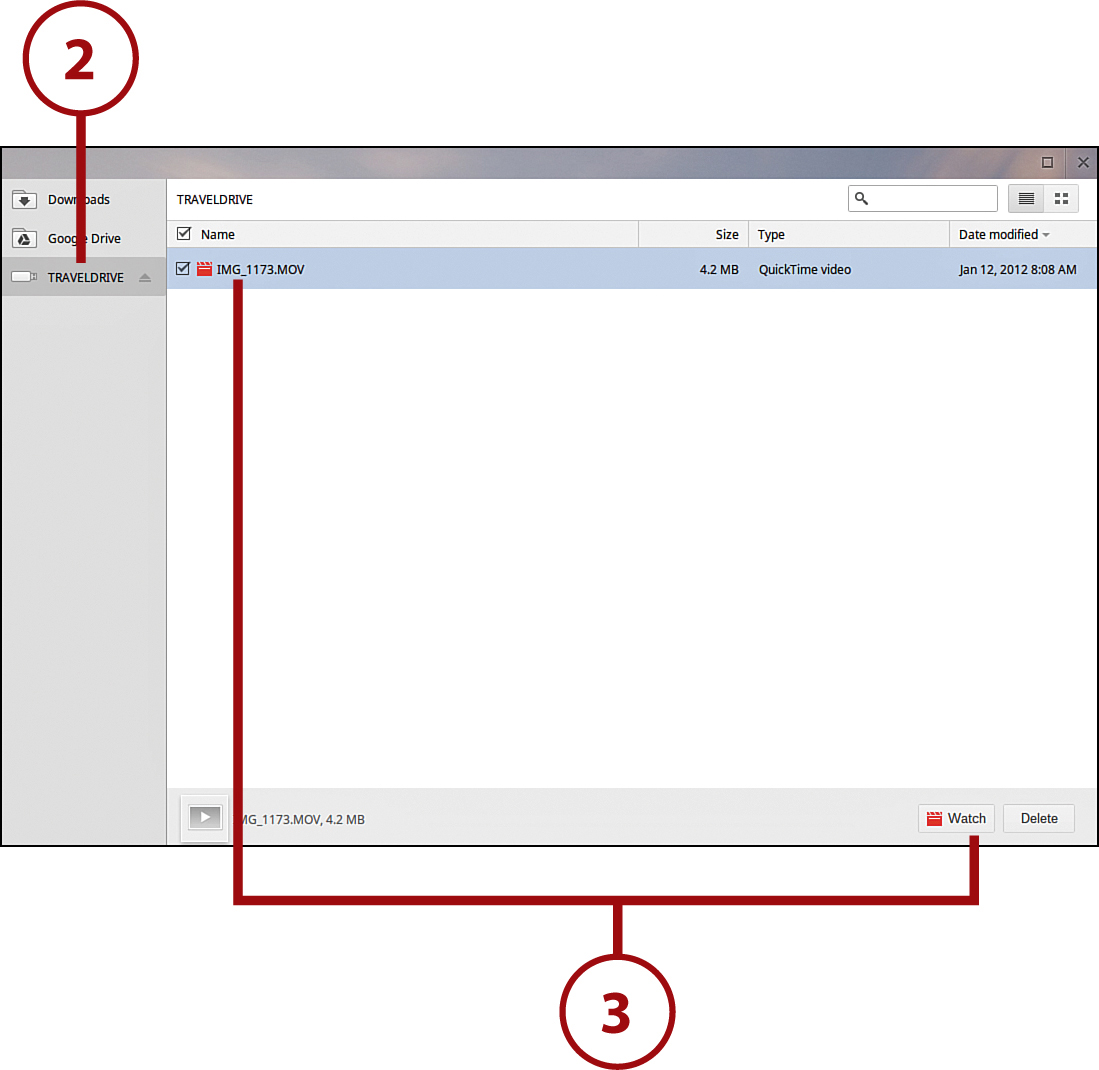
1. Insert the external storage device into your Chromebook.

2. When File Manager opens, open the folder for the external storage device and navigate to the subfolder where the video file is stored.
3. Click the video file you want to view. Alternatively, select the video file and click the Watch button. The video begins playback in the Media Player window.
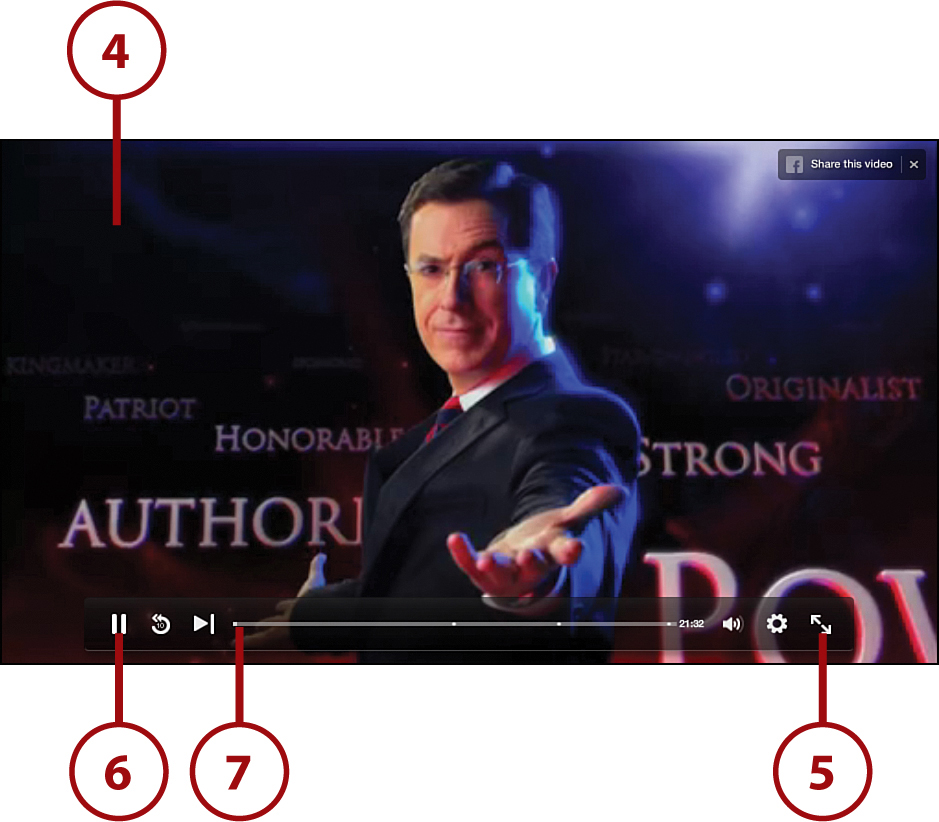
4. Mouse over the video to display the transport controls.
5. Click the Pause button to pause playback; to resume playback, click the Play button.
6. Click the Fullscreen button to view the video full screen on your desktop.
7. Drag the slider to the right (forward) or the left (backward) to advance to another section of the video.
8. Click the X at the top-right corner to close the Media Player window.

Watch TV Shows on Hulu
The most popular site for watching TV shows online is Hulu (www.hulu.com). Hulu offers a good selection of TV shows for free, and an even better selection with its $7.99/month Hulu Plus service. You watch Hulu videos in the Chrome web browser.
1. Open the Chrome browser, go to www.hulu.com, and sign into your account.
2. Search or browse for the program you want to watch. In many instances, you have the option of accessing complete seasons or individual episodes.
3. Click the thumbnail of the program you want to watch. Playback begins.

4. Mouse over the browser window to display the playback controls.
5. Click the Full Screen button to view the program full-screen on your desktop.
6. Click the Pause button to pause playback; click the Play button to resume playback.
7. Use the playback slider to advance through the program.
Watch YouTube Videos
Google also makes it easy to watch videos from its YouTube subsidiary. YouTube (www.youtube.com) contains millions of videos uploaded by both companies and individuals; it’s a great place to find just about anything in video format, and it’s totally free.
1. Click the YouTube button in the Chrome Launcher, or use the Chrome browser to go to www.youtube.com. The YouTube home page displays.

2. Click the Sign In button to sign into your account.
3. Browse or search for a video you want to watch.

4. Click the video’s thumbnail to begin playback on a new page.
5. Click Pause to pause playback; click Play to resume playback.
6. Click anywhere on the red slider to move to a different place in the video.
7. Click the Full Screen button to view the video full screen.

Vimeo
Vimeo (www.vimeo.com) is another popular video-sharing website. There’s a nice Vimeo app in the Chrome Web Store that many Chromebook users seem to like.